appendix A planting and maintenance
Covered in this section are the basics of planning a vegetable garden, preparing the soil, starting seeds, transplanting, fertilizing, composting, using floating row covers, rotating crops, mulching, watering and installing irrigation, and maintaining vegetables.
Planning Your Vegetable Garden
You can interplant a few Italian vegetables and herbs among your ornamentals, or add them to your existing vegetable garden. If you have no vegetable garden, then you need to design one. The first step in planning your vegetable garden is choosing a suitable site. Most chefs recommend locating the edible garden as close to the kitchen as possible, and I heartily agree. Beyond that, the majority of vegetables need at least six hours of sun (eight is better)—except in warm, humid areas, where afternoon or some filtered shade is best—and good drainage. There are only a few Italian edibles that tolerate much shade: Roman mint, arugula, sorrel, and parsley. Annual vegetables need fairly rich soil with lots of added organic matter. They can be planted in rows in a bed by themselves—as part of the classic vegetable garden, say—but some of them, especially eggplants, peppers, radicchios, artichokes, sweet fennel, lettuces, and summer squash, are beautiful and work well interplanted in a flower bed with annual flowers, most of which need the same conditions. In addition, most vegetables can be grown in containers or in large planter boxes.
Once you’ve decided on where you are going to plant, it’s time to choose your vegetables. Your major consideration is, of course, what flavors you enjoy using in the kitchen. With this in mind, look for species and varieties that grow well in your climate. As a rule, gardeners in northern climates and high elevations look for vegetables that tolerate cool and/or short-summer conditions. Many vegetable varieties bred for short seasons and most salad greens are great for these conditions. Gardeners in hot, humid areas require plants that tolerate diseases well, and they need to choose heat-tolerant vegetables.
The USDA Plant Hardiness Zone Map has grouped eleven zones according to winter lows. It is a help in choosing perennial plants, but of only limited use for annual vegetables. The new Sunset National Garden Book, published by Sunset Books, gives much more useful climatic information; it divides the continent into forty-five growing zones. Several regional maps describe the temperature ranges and growing season in much detail. The maps are an integral part of this information-packed resource. Of additional interest to the vegetable gardener is the AHS Plant Heat-Zone Map, published by the American Horticultural Society. The heat map details twelve zones that indicate the average number of days each year when a given area experiences temperatures of 86°F or higher—the temperature at which many plants, including peas and most salad greens, begin to suffer physiological damage. In Italian Garden Encyclopedia (page 21) I indicate which varieties have a low tolerance to high temperatures and those that grow well in hot weather. See Resources (page 103) for information on obtaining the heat map.
In addition to analyzing your climate, knowing what type of soil a particular vegetable needs is equally important. Consider how well your soil drains: is it rich with organic matter and fertility? Poor soil with bad drainage? Is it so sandy that few plants grow well? Find out too what your soil pH is. Nurseries have kits to test your soil’s pH, and University Extension Services can lead you to sources of soil tests and soil experts. As a rule, rainy climates have acidic soil that needs the pH raised, and arid climates have fairly neutral or alkaline soil that needs extra organic matter to lower the pH. Most vegetables grow best in soil with a pH of about 6.5—in other words, slightly acidic. Soil that is below 6 ties up phosphorus, potassium, and calcium, making them unavailable to plants; soil with a pH much over 6.5 ties up iron and zinc. Furthermore, is there hardpan under your garden that prevents roots from penetrating the soil, or water from draining? This is a fairly common problem in areas of heavy clay, especially in many parts of the Southwest with caliche soils—a very alkaline clay. You need answers to these basic questions before you proceed because, to be tender and mild, annual vegetables need to grow fast and with little stress.
Vegetable plants do best with good drainage. Their roots need air, and if the soil stays waterlogged for long, roots suffocate or are prone to root rot. If you are unsure how well a particular area in your garden drains, dig a hole about 10 inches deep and 10 inches across, where you plan to put your garden and fill it with water. The next day fill it again. If it still has water in it eight to ten hours later, you need to find another place in the garden that will drain much faster, amend your soil with much organic matter and mound it up at least 6 to 8 inches above the ground level, or grow your vegetables in containers.
The last consideration is how large a garden you are planning. A few hundred square feet of Italian vegetables like basil, fennel, beans, and eggplant, plus a small bed of Italian lettuces, would give you many classic Italian meals. If you want to get more involved and plant a large garden that might also include Italian tomatoes, broccoli, and zucchini, you need more space (an area of at least 500 square feet would be ideal) and even more still for large winter squashes to provide enough vegetables for a family of four. In any case, the area can be rectangular, square, or freeform.
A garden of a few hundred square feet or more needs a path or two and the soil should be arranged in beds. Paths through any garden should be at least 3 feet across to provide ample room for walking and using a wheelbarrow, and beds should generally be limited to 5 feet across, as that is the average distance a person can reach into the bed to harvest or pull weeds from both sides. Protection too is often needed, so consider putting a fence or wall around the garden to give it a stronger design and to keep out rabbits, woodchucks, and the resident dog. Assuming you have chosen a nice sunny area, selected a design, and determined that your soil drains properly, you are ready to prepare the soil.
Installing Your Vegetable Garden
Preparing the Soil
To prepare the soil for a new vegetable garden, first remove large rocks and weeds. Dig out any perennial weeds, especially perennial grasses like Bermuda and quack grass. You need to sift and closely examine each shovel-full for every little piece of their roots, or they will regrow with a vengeance. If you are taking up part of a lawn, the sod needs to be removed. If it is a small area, this can be done with a flat spade. Removing large sections, though, warrants renting a sod cutter. Next, when the soil is not too wet, spade over the area. Most vegetables are heavy feeders, and few soils support them without being supplemented with much organic matter and nutrients. The big three nutrients are nitrogen (N), phosphorus (P), and potassium (K)—the ones most frequently found in fertilizers. Calcium, magnesium, and sulfur are also important plant nutrients, and plants need a number of trace minerals for healthy growth, among them iron, zinc, boron, copper, and manganese. A soil test is the best way to see what your soil needs. In general, most soils benefit from at least an application of an organic nitrogen fertilizer. While it’s hard to say what your soil needs without a test, the following gives you a rough idea of how much you need per 100 square feet of average soil: for nitrogen apply blood meal at 2 pounds, or fish meal at 2¼ pounds; for phosphorus apply 2 pounds bonemeal; for potassium apply kelp meal according to the package, or in acidic soils 1½ pounds of wood ashes. Kelp meal also provides most trace minerals. (The addition of so many nutrients will not be needed in subsequent years if you practice composting and mulching, especially if you rotate your crops and use cover crops.)

Sprouting broccoli and arugula in the Italian vegetable garden
After the area has been spaded up, cover it with 4 or 5 inches of compost and an inch or two of well-aged manure. Add a few more inches of compost if you live in a hot, humid climate where heat burns the compost at an accelerated rate, or if you have very alkaline, very sandy, or very heavy clay soil. Since most vegetables grow best in neutral soil, add lime at this point if a soil test indicates that your soil is acidic. Follow the directions on the package. Add fertilizers by sprinkling them over the soil. Incorporate all the ingredients thoroughly by turning the soil over with a spade, working the amendments into the top 8 to 12 inches. If your garden is large or the soil is very hard to work, you might use a rototiller. (When you put in a garden for the first time, a rototiller can be very helpful. However, research has shown that continued use of tillers is hard on soil structure and quickly burns up valuable organic matter if used regularly.)
Finally, grade and rake the area. You are now ready to form the beds and paths. Because of all the added materials, the beds will now be elevated above the paths, which further helps drainage. Slope the sides of the beds so that loose soil will not be easily washed or knocked onto the paths. Some gardeners add a brick or wood edging to outline the beds. Some sort of gravel, brick, stone, or mulch is needed on the paths to forestall weed growth and to prevent your feet from getting wet and muddy.
The last task before planting your garden is providing support for vining crops like pole beans and tomatoes. There are many types of supports, from simple stakes to elaborate wire cages; whichever you choose, installing them before you plant is best.
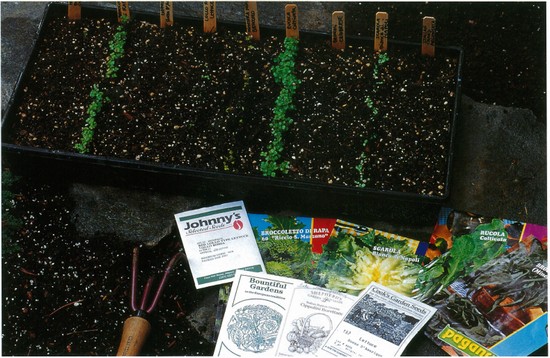
Seed packs for Italian vegetable varieties
Starting from Seeds
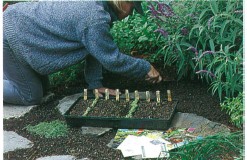
You can grow all annual vegetables from seeds. They can be started indoors in flats or other well-drained containers, outdoors in a cold frame, or, depending on the time of year, directly in the garden. When I start annual vegetables inside, I seed them in either plastic pony packs that I recycle from the nursery or in Styrofoam compartmentalized containers variously called plugs or speedling trays (available from mail-order garden-supply houses). Whatever type of container you use, the soil depth should be 2 to 3 inches. Soil any shallower dries out too fast, and deeper soil is usually a waste of seed-starting soil and water.
Starting seeds inside gives your seedlings a safe start away from slugs and birds. It also allows gardeners in cold or hot climates to get a jump on the season. Many vegetables can be started four to six weeks before the last expected frost date and then transplanted out into the garden as soon as the soil can be worked. Furthermore, some vegetables are sensitive to high temperatures; by starting them inside in mid- or late summer, the seeds will germinate and the seedlings will get a good start and be ready to be transplanted outside in early fall, when the weather has started to cool.
The cultural needs of seeds vary widely among species; still, some basic rules apply to most seeding procedures. First, whether starting seeds in the ground or in a container, make sure you have loose, water-retentive soil that drains well. Good drainage is important because seeds can get waterlogged, and too much water can lead to “damping off,” a fungal disease that kills seedlings at the soil line. Commercial starting mixes are usually best since they have been sterilized to remove weed seeds; however, the quality varies greatly from brand to brand, and I find most lack enough nitrogen, so I water with a weak solution of fish emulsion when I plant the seeds, and again a week or so later.
Smooth the soil surface and plant the seeds at the recommended depth. Information on seed depth is included in the Italian Garden Encyclopedia (page 21) as well as on the back of most seed packages. Pat down the seeds, and water carefully to make the seed bed moist but not soggy. Mark the name of the plant and variety and the date of seeding on a plastic or wooden label and place it at the head of the row. When starting seeds outside, protect the seed bed with either floating row covers or bird netting to keep out critters. If slugs and snails are a problem, circle the area with hardwood ashes or diatomaceous earth to keep them away, and go out at night with a flashlight to catch any that cross the barrier. If you are starting seeds in containers, put the seedling tray in a warm, but not hot, place to help seeds germinate more quickly.
When starting seeds inside, once they have germinated, it’s imperative that they immediately be given a quality source of light; otherwise, the new seedlings will be spindly and pale. A greenhouse, sunporch, or south-facing window with no overhang will suffice, provided it is warm. If one is not available, use fluorescent lights, which are available from home-supply stores or from specialty mail-order houses. Hang the lights just above the plants for maximum light (no farther than 3 or 4 inches away, at most) and move them up as the plants get taller. Another option I use if the weather is above 60°F is to put my seedling trays outside on a table in the sun and protect them with bird netting during the day, bringing them in at night.
Once seedlings are up, keep them moist and, if you have seeded thickly and have crowded plants, thin some out. It’s less damaging to do so with small scissors. Cut the little plants out, leaving the remaining seedlings an inch or so apart. Do not transplant your seedlings until they have their second set of true leaves (the first leaves that sprout from a seed are called seed leaves and usually look different from the later true leaves). If the seedlings are tender, wait until all danger of frost is past before you set them out. In fact, don’t put heat-loving tomatoes, peppers, eggplant, and basil out until the weather has thoroughly warmed up and is stable. Young plants started indoors should be “hardened off’ before they are planted in the garden—that is, they should be put outside in a sheltered place for a few days in their containers to let them get used to the differences in temperature, humidity, and air movement outside. A cold frame is perfect for hardening off plants.
Transplanting
I generally start my annual vegetables from seeds and then transplant them outside. Occasionally I buy transplants from local nurseries. Before setting transplants out in the garden, check to see if a mat of roots has formed at the bottom of the root ball. I remove it or open it up so the roots won’t continue to grow in a tangled mass. I set the plant in the ground at the same height as it was in the container, pat the plant in place gently by hand, and water each plant in well to remove air bubbles. I space plants so that they won’t be crowded once they mature; when vegetables grow too close together, they become prone to rot diseases and mildew. If I’m planting on a very hot day or the transplants have been in a protected greenhouse, I shade them with a shingle or such, placed on the sunny side of the plants. I then install my irrigation ooze tubing (see “Watering and Irrigation Systems,” page 94, for more information) and mulch with a few inches of organic matter. I keep the transplants moist but not soggy for the first few weeks.
Floating Row Covers
Among the most valuable tools for plant protection in the vegetable garden are floating row covers made of lightweight spunbond polyester or polypropylene fabric. They are laid directly over the plants, where they “float” in place. These covers protect plants against cold weather and pests.
If used correctly, row covers are a most effective pest control for cucumber, asparagus, bean, and potato beetles; squash bugs and vine borers; cabbage worms; leafhoppers; onion maggots; aphids; and leaf miners. The most lightweight covers, usually called summer-weight or insect barriers because they have little heat buildup, can be used throughout the season for insect control in all but the hottest climates. They cut down on 10 percent of the sunlight, which is seldom a problem unless your garden is shady. Heavier versions, sometimes called garden covers under trade names like Reemay and Tufbell, variously cut down from 15 percent to 50 percent of the sunlight and guard against pests, but they also raise the temperature underneath from 2 to 7°F, usually enough to protect early and late crops from frost or to add warmth for heat-loving crops in cool-summer areas.
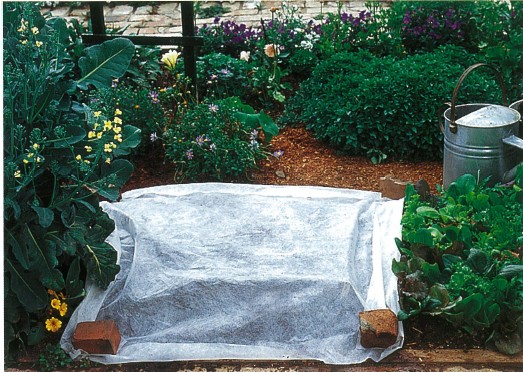
Floating row cover
In addition to effectively protecting plants from cold weather and many pests, there are numerous other advantages to using floating row covers:
• The stronger ones protect plants from most songbirds, though not from crafty squirrels and blue jays.
• They raise the humidity around plants, a bonus in arid climates, but a problem with some crops in humid climates.
• They protect young seedlings from sunburn in summer and in high-altitude gardens.
There are a few limitations to consider:
• These covers keep out pollinating bees and must be removed when squash, melons, and cucumbers are in production.
• They are not attractive enough to use over most flower beds and in decorative settings. In fact, they make the garden look like a sorority slumber party.
• Many of the fabrics last only a year and then start to deteriorate. (I use tattered small pieces to cover containers, in the bottoms of containers to keep out slugs, etc.)
• Row covers use petroleum products and eventually end up in the landfill.
• In very windy areas, the tunnels and floating row covers are apt to be blown away or become shredded.
• The heavyweight versions cut down on much light and are useful only to help raise temperatures when frost threatens.
Rolls of the fabric, from 5 to 10 feet wide and up to 100 feet long, can be purchased from local nurseries or ordered from garden-supply catalogs. As a rule, you have a wider selection of materials and sizes from mail-order sources.
Before you apply your row cover, fully prepare the bed and make sure it’s free of eggs, larvae, and adult pests. (For example, if instead of rotating your crops, you follow onions with onions in the same bed, you are apt to have larvae of the onion root maggot trapped under the cover—with their favorite food and safe from predators!) Then install drip irrigation if you are using it, plant your crop, and mulch (if appropriate). There are two ways to lay a row cover: either directly on the plants or stretched over wire hoops. Laying the cover directly on the plants is the easiest method. However, laying it over hoops has the advantage that it is easier to check under, and some plants are sensitive to abrasion if the wind whips the cover around, causing the tips of the plants to turn brown. When you lay the fiber directly on the plants, leave some slack so plants have room to grow. For both methods, secure the edges completely with bricks, rocks, old pieces of lumber, bent wire hangers or U-shaped metal pins sold for this purpose.
To avoid pitfalls, it’s critical to check under the row covers from time to time. Check soil moisture; the fibers sometimes shed rain and overhead irrigation water. Check as well for weeds; the protective fiber aids their growth too. And most important, check for any insect pests that may have been trapped inside.
Maintaining the Vegetable Garden
The backbone of appropriate maintenance is a knowledge of your soil and weather, an ability to recognize basic water- and nutrient-deficiency symptoms, and a familiarity with the plants you grow.
Annual vegetables are growing machines. As a rule, they need to grow rapidly with few interruptions so they produce well and have few pest problems. Once the plants are in the ground, continually monitoring them for nutrient deficiencies, drought, and pests can head off problems. Keep the beds weeded because weeds compete for moisture and nutrients. In normal soil, most vegetables need supplemental nitrogen fertilizer. Fish emulsion and fish meal, blood meal, and chicken manure all have their virtues. Sandy or problem soils may need more nutrients to provide potassium and trace minerals. Kelp meal or emulsions can be added to the nitrogen sources mentioned above, or apply a packaged balanced organic vegetable fertilizer. For more specific information on fertilizing, see the individual entries in the Italian Garden Encyclopedia (page 21).
Weeding
Weeding is needed to make sure unwanted plants don’t compete with and overpower your vegetables. A good small triangular hoe will help you weed a small garden if you start when the weeds are young and easily hoed. If you allow the weeds to get large, a session of hand pulling is needed. Applying a mulch is a great way to cut down on weeds; however, if you have a big problem with slugs in your garden, the mulch gives them more places to hide. Another means of controlling weeds, namely annual weeds like crabgrass, pigweed, and quack grass, is a new organic preemergence herbicide made from corn gluten called Concern Weed Prevention Plus. This gluten meal inhibits the tiny feeder roots of germinating weed seeds, so they wither and die. It does not kill existing weeds. Obviously, if you use it among new seedlings or in seed beds, it kills them too, so it is only useful in areas away from very young plants.
Mulching
Mulching can save the gardener time, effort, and water. A mulch reduces moisture loss, prevents erosion, controls weeds, minimizes soil compaction, and moderates soil temperature. When the mulch is an organic material, it adds nutrients and organic matter to the soil as it decomposes, making heavy clay more porous and helping sandy soil retain moisture. Mulches are often attractive additions to the garden as well. Applying a few inches of organic matter every spring is necessary in most vegetable gardens to keep them healthy. Mulch with compost from your compost pile, pine needles, composted sawdust, straw, or one of the many agricultural byproducts like rice hulls or apple or grape pomace.
Composting
Compost is the humus-rich result of the decomposition of organic matter, such as leaves and lawn clippings. The objective of maintaining a composting system is to speed up decomposition and centralize the material so you can gather it up and spread it where it will do the most good. Compost’s benefits include providing nutrients to plants in a slow-release, balanced fashion; helping break up clay soil; aiding sandy soil to retain moisture; and correcting pH problems. On top of that, compost is free, it can be made at home, and it is an excellent way to recycle our yard and kitchen “wastes.” Compost can be used as a soil additive or a mulch.

A three-bin composting system
There need be no great mystique about composting. To create the environment needed by the decay-causing microorganisms that do all the work, just include the following four ingredients, mixed well: three or four parts “brown” material high in carbon, such as dry leaves, dry grass, or even shredded black-and-white newspaper; one part “green” material high in nitrogen, such as fresh grass clippings, fresh garden trimmings, barnyard manure, or kitchen trimmings like pea pods and carrot tops; water in moderate amounts, so that the mixture is moist but not soggy; and air to supply oxygen to the microorganisms. Bury the kitchen trimmings within the pile, so as not to attract flies. Cut up any large pieces of material. Exclude weeds that have gone to seed, because you could promote the growth of those weeds in the garden. Do not add meat, fat, diseased plants, woody branches, or cat or dog manure.
I don’t stress myself about the proper proportions of compost materials, as long as I have a fairly good mix of materials from the garden. If the decomposition is too slow, it is usually because the pile has too much brown material, is too dry, or needs air. If the pile smells, there is too much green material or it is too wet. To speed up decomposition, I chop the materials before adding them to the pile and I may turn the pile occasionally to get additional oxygen to all parts. During decomposition, the materials can become quite hot and steamy, which is great; however, it is not mandatory that the compost become extremely hot.
You can make compost in a simple pile, in wire or wood bins, or in rather expensive containers. The size should be about 3 feet high, wide, and tall for the most efficient decomposition and so the pile is easily workable. It can be up to 5 feet by 5 feet, but it then becomes harder to manage. In a rainy climate it’s a good idea to have a cover for the compost. I like to use three bins. I collect the compost materials in one bin, have a working bin, and when that bin is full, I turn the contents into the last bin, where it finishes its decomposition. I sift the finished compost into empty garbage cans so it does not leach its nutrients into the soil. The empty bin is then ready to fill up again.
Crop Rotation
Rotating crops in an edible garden has been practiced for centuries. It’s done for two reasons: to help prevent diseases and pests and to prevent depletion of nutrients from the soil, as some crops add nutrients and others take them away.
To rotate crops, you must know what plants are in which families since plants in the same families are often prone to the same diseases and pests and deplete the same nutrients.
The following is a short list of related vegetables.
Goosefoot family (Chenopodiaceae)—includes beets, chard, orach, spinach
Cucumber family (gourd) (Cucurbitaceae)—includes cucumbers, gourds, melons, summer squash, winter squash, pumpkins
Lily family (onion) (Liliaceae)—includes asparagus, chives, garlic, leeks, onions, Oriental chives, shallots
Mint family (Lamiaceae)—includes basil, mints, oregano, rosemary, sage, summer savory, thymes
Mustard family (cabbage) (Brassicaceae)—includes arugula, broccoli, cabbages, cauliflower, collards, cresses, kale, kohlrabi, komatsuna, mizuna, mustards, radishes, turnips
Nightshade family (Solanaceae)—includes eggplants, peppers, potatoes, tomatillos, tomatoes
Parsley family (carrot) (Apiaceae)—includes carrots, celeriac, celery, chervil, coriander (cilantro), dill, fennel, lovage, parsley, parsnips
Pea family (legumes) (Fabaceae)—includes beans, cowpeas, fava beans, lima beans, peanuts, peas, runner beans, soybeans, sugar peas
Sunflower family (daisy) (Asteraceae)—includes artichokes, calendulas, celtuce, chicories, dandelions, endives, lettuces, marigolds, tarragon
The object is to avoid growing members of the same family in the same spot year after year. For example: cabbage, a member of the mustard family, should not be followed by radishes, a member of the same family, as they are both prone to flea beetles, and the flea beetle’s eggs will be in the soil ready to hatch and attack the radishes. Tomatoes should not follow eggplants, as they are both prone to fusarium wilt.
Crop rotation is also practiced to help keep the soil healthy. One family, namely the pea family (legumes), which includes not only peas and beans but also clovers and alfalfa, adds nitrogen to the soil. In contrast, most members of the mustard (cabbage) family deplete the soil of nitrogen. Other heavy feeders are members of the nightshade and cucumber families. Because most vegetables deplete the soil, knowledgeable gardeners not only rotate their beds with vegetables from different families; they also include an occasional cover crop of clover or alfalfa and other soil benefactors like buckwheat and vetch to add what’s called green manure. After growing for a few months, these crops are turned under and provide extra organic matter and many nutrients, help stop the pest cycle, and attract beneficial insects. Some cover crops (like rye) are grown over the winter to control soil erosion. The seeds of all sorts of cover crops are available from farm suppliers and specialty seed companies. I’ve been able to give only the basics on this subject; for more information, see Shepherd Ogden’s Step by Step Organic Vegetable Gardening and some of the other basic gardening texts recommended in the “Books” section of Resources (page 103).
Garden Watering and Irrigation Systems
Even gardeners who live in rainy climates may need to do supplemental watering at specific times during the growing season. Therefore, most gardeners need some sort of supplemental watering system and a knowledge of water management.
There is no easy formula for determining the correct amount or frequency of watering. Proper watering takes experience and observation. In addition to the specific watering needs of individual plants, the amount of watering needed depends on soil type, wind conditions, and air temperature. To water properly, you must learn how to recognize water-stress symptoms (often a dulling of foliage color as well as the better-known symptoms of drooping leaves and wilting), how much to water (too much is as bad as too little), and how to water. Some general rules are
1. Water deeply. Except for seed beds, most plants need infrequent deep watering rather than frequent light sprinkling.
2. To ensure proper absorption, apply water at a rate slow enough to prevent runoff.
3. Do not use overhead watering systems when the wind is blowing.
4. Try to water early in the morning so that foliage will have time to dry off before nightfall, thus preventing some disease problems. In addition, because of the cooler temperature, less water is lost to evaporation.
5. Test your watering system occasionally to make sure it is covering the area evenly.
6. Use methods and tools that conserve water. When using a hose, a pistol-grip nozzle will shut off the water while you move from one container or planting bed to another. Soaker hoses, made of either canvas or recycled tires, and other ooze and drip irrigation systems apply water slowly and use water more efficiently than do overhead systems.
Drip, or the related ooze/trickle, irrigation systems are advisable wherever feasible, and most gardens are well-suited to them. Drip systems deliver water a drop at a time through spaghetti-like emitter tubes or plastic pipe with emitters that drip water right onto the root zone of each plant. Because of the time and effort involved in installing one or two emitters per plant, these systems work best for permanent plantings such as in rose beds, with rows of daylilies and lavender say, or with trees and shrubs. These lines require continual maintenance to make sure the individual emitters are not clogged.
Other similar systems, called ooze systems, deliver water through either holes made every 6 or 12 inches along solid flexible tubing or ooze along the entire porous hose. Neither system is as prone to clogging as are the emitters. The solid type is made of plastic and is often called laser tubing. It is pressure compensated, which means the flow of water is even throughout the length of the tubing. The high quality brands have a built in mechanism to minimize clogging and are made of tubing that will not expand in hot weather and, consequently, pop off its fittings. (Some of the inexpensive drip irrigation kits can make you crazy!) The porous hose types are made from recycled tires and come in two sizes—a standard hose diameter of 1 inch, great for shrubs and trees planted in a row, and ¼-inch tubing that can be snaked around beds of small plants. Neither are pressure compensated, which means the plants nearest the source of water get more water than those at the end of the line. It also means they will not work well if there is any slope. All types of drip emitter and ooze systems are installed after the plants are in the ground, and are held in place with ground staples. To install any drip or ooze system you must also install an anti-siphon valve at the water sources to prevent dirty garden water from being drawn up into the house’s drinking water. Further, a filter is needed to prevent debris from clogging the emitters. To set up the system, you connect 1-inch distribution tubing to the water source and lay it out around the perimeter of the garden. Then you connect smaller-diameter drip and ooze lines to this. As you can see, installing these systems requires some thought and time. You can order these systems from either a specialty mail-order garden or irrigation source or you can visit your local plumbing store. I find the latter to be the best solution for all my irrigation problems. Over the years I’ve found that plumbing supply stores offer professional-quality supplies, usually for less money than the so-called inexpensive kits available in home-supply stores and some nurseries. In addition to quality materials, there are professionals there to help you lay out an irrigation design that is tailored to your garden. Whether you choose an emitter or an ooze system, when you go to buy your tubing, be prepared by bringing a rough drawing of the area to be irrigated—with dimensions, the location of the water source and any slopes, and, if possible, the water pressure at your water source. Let the professionals walk you through the steps and help pick out supplies that best fit your site.
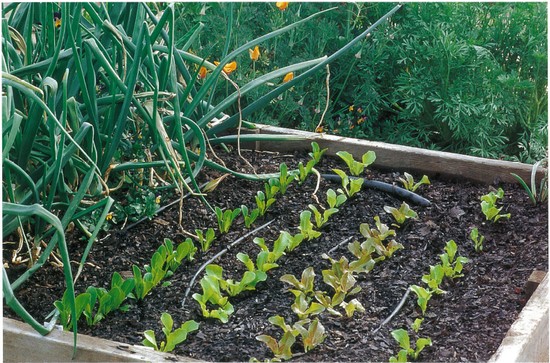
Baby lettuces with laser tubing drip irrigation
Problems aside, all forms of drip irrigation are more efficient than furrow or standard overhead watering in delivering water to its precise destination and are well worth considering. They deliver water slowly, so it doesn’t run off; they also water deeply, which encourages deep rooting. Drip irrigation also eliminates many disease problems, and because so little of the soil surface is moist there are fewer weeds. Finally, they have the potential to waste a lot less water.