
italian
garden
encyclopedia
Listed below are some of the most popular Italian vegetables, along with recommended varieties. I give both the Italian and Latin names in case you want to select seeds from an Italian catalog. Fratelli Ingegnoli of Milan has an extensive catalog written in English. Pagano is a wholesale source of Italian seeds distributed by Lake Valley Seed Company in Italian markets throughout the country. I have included a few varieties of vegetables and herbs available only from Ingegnoli and Pagano; the vast majority, however, are available from the American seed companies listed in Resources (page 103).
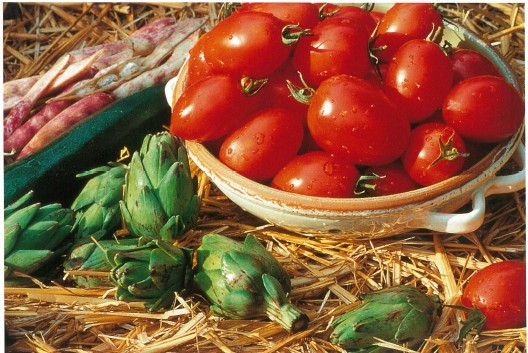
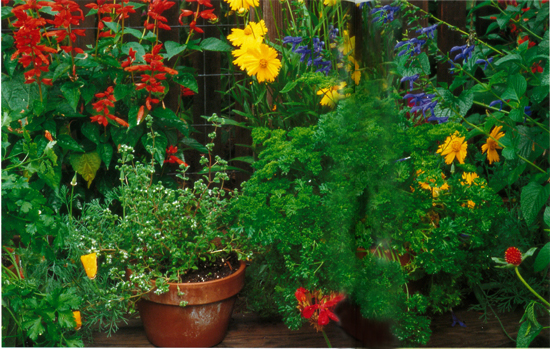
Italian cuisine is unadorned. Food is prepared with a minimum of sauces, soufflés and other multi-layered techniques. Its strengths lie in using the very best ingredients, especially fresh, succulent vegetables picked in their prime, presented in a simple manner. A layout (left) of just-harvested zucchinis, complete with their still-open blossoms; ripe tomatoes; fresh ‘Piccolo Verde Fino’ basil; eggplants; and baby leeks could be the spectacular foundation of just such an Italian meal.
There is much overlap between the gardens and cooking of Italy and France. I have not covered in this book some of the vegetables that are enjoyed in Italy, since they are covered in great detail in my book on the French garden, including mâche, asparagus, melons, sorrel, leeks, and carrots.
ARTICHOKES, GLOBE
(carciofi)
Cynara scolymus
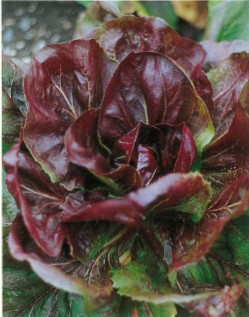
Purple and green artichokes
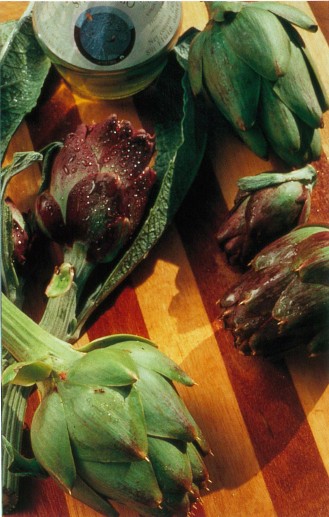
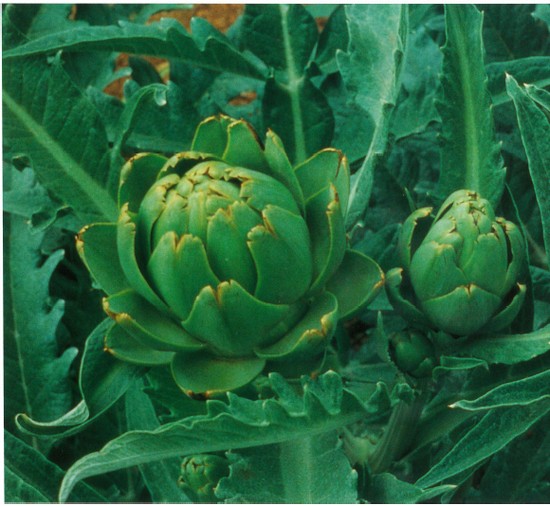
Probably no vegetable is more typically Italian than the artichoke. There are dozens of varieties, and Italians cook these thistle buds in endless ways—far beyond serving them whole and dipping them in butter. Gardeners lucky enough to have many plants can let a few buds develop into massive blue-purple thistles that are extremely showy.
How to grow: Six plants should be ample for the average family. These large 4-foot-tall dramatic plants prefer cool, moist summers and mild winters but grow in summer heat if the soil is kept continually moist. Below 28°F they need winter protection, for example, an overturned basket filled with leaves or straw and placed above the roots. In coldest-winter areas artichokes are usually not successful unless the roots are brought inside during the winter and kept moist and cool. In hot, early summers the artichoke buds open too soon and are tough. Artichokes prefer full sun in cool-summer areas and partial shade in hot-summer climates.
Start plants when they are bare root when possible. Plants are sold in some nurseries when they are dormant, with their roots wrapped in plastic. They are sold in nurseries in mild-winter areas of the West and in mail-order catalogs in the spring. Artichokes can be started by seeds. Sow them indoors eight weeks before your last spring frost date, about ¼ inch deep and ¼ inch apart. The soil temperature should be between 70° and 80°F. Transplant seedlings to 4-inch pots. Grow at cooler temperatures (60° to 70°F during the day, 50° to 60°F at night). Transplant them to the garden when they’re six to eight weeks old. (They need at least 250 hours of temperatures under 50°F to induce budding.) Protect them from frost.
Artichokes require rich, constantly moist but well-drained soil with plenty of organic matter. They respond well to deep mulches, compost, and manure. Extra nitrogen should be added halfway through the growing season and after the harvest. The plants need to be dug up and thinned every three or four years.
Aphids, earwigs, and snails are sometimes a problem. In commercial artichoke-growing areas the plume moth is a problem treated with Bacillus thuringiensis (Bt) applied to the center of the plants when they’re moist.
To harvest artichokes, cut off the young buds about 4 to 6 inches below the bud (the tops of the stems are edible if peeled) before they start to open. The younger the bud, the more tender it is and the more of it is edible. The small lateral buds are also edible and if harvested while young have no choke. An unseasonable frost can brown the outer leaves of artichokes but improves the flavor.
Varieties
Many regions of Italy seem to have their own varieties, but few are available to outsiders. The three described below are the only ones readily available in America.
‘Green Globe’: most common variety grown in the United States, large conical shape, hardy throughout most of the coastal West, most available variety sold as bare root plants
‘Imperial Star’: 90 to 100 days from transplants, thornless, sweet flavor, meaty hearts and almost chokeless, easiest to grow from seed and harvest the first season
‘Violetto’: produces purple medium-size artichokes, cooking more than two minutes turns them green
How to prepare: Artichokes are rich and sweet flavored, with a meaty texture, and the flavors stimulate salivation. Elsewhere, the bud is usually served whole, but in Italy young buds are often cut into pieces or pureed.
Most mature and commercial artichokes must have the choke (fuzzy, inedible center) removed. Homegrown ones, however, similar to those available in Italy, can be harvested while still young and be eaten without removing the choke.
To prepare an artichoke, cut the top inch or so off to remove any thorns and the inedible top part of the “leaves.” You can leave 4 to 6 inches of the stem and peel it to remove the tough outer skin. Then with your fingers peel back the outside layer of leaves to where they break readily, revealing yellowish flesh at the base. Open the artichoke; if there is a fuzzy choke at the bottom, scrape it out with a sharp spoon. Immediately rub all cut edges with lemon juice (or soak them in acidulated water until you are ready to serve or cook the artichoke).
Whole artichokes can be stuffed and baked, steamed, or boiled in water with the juice of two lemons. In Rome they are sometimes braised in olive oil, garlic, and mint and served upside down with 4 to 6 inches of stem sticking up in the air. In all cases artichokes are cooked until a knife inserted into the bottom of the choke comes out clean. They can be presented whole, and can be accompanied with plain or flavored olive oil for dipping. To eat a whole artichoke, pull off the outside leaves and use your teeth to scrape out the flesh. Cut the remaining heart, or bottom, into bite-size pieces and relish it.
In Italy artichokes are also incorporated into many cooked dishes. Very young and tender buds are lightly trimmed and used whole or cut up. If the bud is more mature, the outside leaves and tough outer material is removed, the meaty center is quartered, and the choke is removed. Cutup pieces are then cooked with other vegetables such as asparagus, fava beans, or peas and served as a side dish (as they do in Sicily) or combined with tomatoes and served over pasta (as is popular in many parts of southern Italy). Morsels of artichokes are added to pizza; combined with marjoram, parsley, and garlic in frittatas; incorporated into risotto and pasta sauces; and included in a creamy tart of puff pastry (as they serve it in Genoa); or pureed and made into a spread for bread or folded into soufflés. When fried whole, artichokes can be flattened out to look like a star and then fried again, as is done in the Jewish Quarter of Rome.
Young, tender artichokes are a treat when eaten raw. Pieces are dipped in olive oil as part of an antipasto; in pinzimonio, raw artichokes are sliced paper thin and served in olive oil, salt, and pepper.
Artichoke
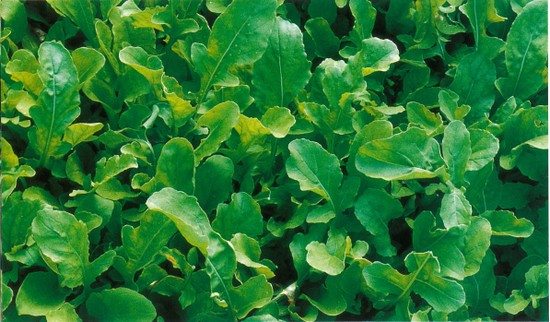
ARUGULA
(rucola) Eruca vesicaria
RUSTIC ARUGULA
(rucola selvatica, wild arugula)
E. selvatica (Diplotaxis tenuifolia)
Arugula
Arugula leaves are lobed, pungent, and nutty and taste a bit like horseradish. The most common arugula is the domesticated milder one; however, there is another, usually called rustic arugula, that is perennial and has a more intense flavor.
How to grow: The standard arugula is grown in cool weather in early spring and again in the fall. The plants are short-lived; they get quite spicy and will go to seed in hot weather. Rustic arugula is a tender perennial, that, if started in spring and kept cut back, grows throughout the summer and fall and even winters over in mild-winter areas. Common arugula is planted in the fall for a winter harvest in these same mild climates. For both types, broadcast seeds over rich soil in a sunny area of the garden and lightly cover them with soil, or plant them in flats for transplanting into the garden. In cold climates, in the fall, plant common arugula in a cold frame or green house for winter salads. For succulent growth keep arugula well watered and fertilize lightly. Both arugulas have few pest and disease problems. Harvest individual leaves or cut back the plant and leave a few inches of growth for a cut-and-come-again crop. Common arugula comes back more quickly than the rustic one. Arugula flowers attract beneficial insects, so I keep them blooming for much of the spring. If allowed to go to seed, both arugulas reseed readily in your garden and behave as “wild greens.”
Varieties
Arugula: 40 days, lobed green leaves, plants grow to 1 foot tall, white flowers
Wild Rustic Arugula (Italian wild arugula, ‘Sylvetta’): 55 days, finely cut leaves, plants grow to 8 inches, yellow flowers
How to prepare: When only 2 or 3 inches tall, and still very mild, arugula leaves can be used in fairly large amounts to add a peppery and nutty flavor to a mixed green salad, misticanza, or a bread salad. Combine them with other assertive greens, especially the fall and winter ones, like chicories and mustards, and complement them with strong cheeses, capers, prosciutto, anchovies, olives, and fruit. Sprinkle young leaves of arugula over a plate of carpaccio or sliced tomatoes and serve with paper-thin fennel drizzled with olive oil, or put them in a sandwich instead of lettuce. Boiled potatoes dressed with olive oil and garlic and sprinkled with arugula and other herbs make a wonderful dish.
Parboiled arugula can be sautéed with anchovies, garlic, and olive oil or combined with cooked white beans and served over pasta. Arugula leaves can be added to pizzas, frittatas, and soups. When the leaves become more pungent, use arugula sparingly as an herb in a mixed salad, sauce, or dressing. Long after the leaves have become too strong to use, the flowers are great in salads or as a garnish.
BASIL
(basilico)
Ocimum basilicum
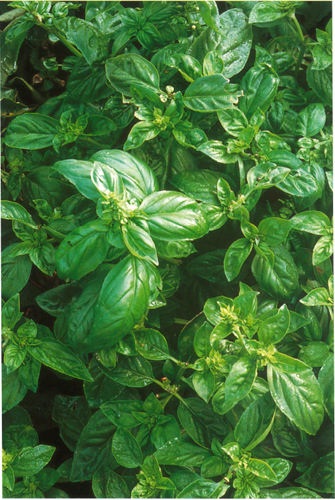
Sweet basil
Basil is an annual herb that glories in hot weather and withers after a light frost.
How to grow: Plant basil in a sunny site in fertile, well-drained soil with a high amount of organic matter. Start basil seeds inside a month before your weather warms up in spring or use transplants from the nursery. Keep the plants fairly moist during the growing season. If your soil is not very fertile, feed every six weeks. Harvest the leaves by hand or with scissors. Keep the flower heads continually cut back, or the plant will go to seed and give you few leaves.
Varieties
‘Fine Green’ (‘Piccolo Verde Fino’): dwarf plants to 1 foot, small leaves, compact shape great for edging beds, flavor great for pesto
‘Genovese’: tall, slow to bolt, large dark green leaves, intense spicy basil fragrance; ‘Genovese Compact’ is about half as tall and good for small gardens or containers
‘Lettuce Leaf’ (O. basilicum var. crispum): 85 days, very productive, large crinkled leaves
‘Mammoth’ (‘Mostruoso’): very large leaves, sweet and spicy, similar to lettuce-leafed basil but not as crinkly and has larger leaves
How to prepare: The aromatic leaves of basil are used fresh in soups, salads (including panzanella, a rustic salad made with slightly stale bread and vegetables), bruschetta, and pesto. It is sometimes tucked in sandwiches instead of lettuce. In Italy basil flavors minestrone, sandwiches, marinara, zucchini frittata, and fresh and marinated mozzarella.
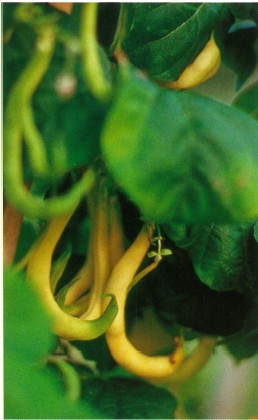
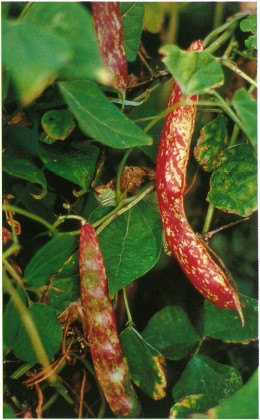
BEANS
(fagioli rampicanti: pole beans; fagioli nani: bush beans; fagiolini: snap beans)
Phaseolus vulgaris
FAVA BEANS
(fave)
Vicia faba

Cannellini
Beans are beloved in italy. Italians use the standard cylindrical green beans, but they also favor broad, flat green and yellow beans called romano beans and the coiled ones called anellino beans. These beans seem to have a richer flavor than most green-bean varieties and are worth seeking out. Shelled beans are also widely grown in Italy, particularly the white kidney-shaped cannelloni and the lovely red-speckled borlotto. Use them fresh or dried.
Ancient Romans relied on the broad fava beans as one of their staples. In Italy the special sweetness of these beens is prized, particularly when they are harvested very young. Favas are still very flavorful when fully mature, but their skins must be peeled off before preparation—and this is a real labor of love.
How to grow: Beans are grown as annuals and do well in most climates. Plant snap and shelling beans after all danger of frost is past; the purple and wax varieties can tolerate colder soil than the green snap bean. All beans need full sun and a good, loose garden loam with plenty of added humus. Sow seeds of bush beans 1 inch deep in rows 18 inches apart. Thin seedlings to 2 inches apart. Pole beans need a fairly strong trellis to climb on. Plant the seeds 1 inch deep, 6 inches apart. If the plants look pale midseason, fertilize them with fish emulsion. They are best watered deeply and infrequently; water at the base of the plants to prevent mildew.
Fava beans need a long, cool growing period of about ninety days and can even take repeated frost. In areas where winters don’t dip below the low teens, plant favas in the fall. In very cold winter areas, plant favas at the same time as peas if you have long springs. Plant the seeds 2 inches deep, about 2 to 3 inches apart, in rows about 1½ feet apart. Support the tall varieties with stakes and strings surrounding the outside of the beds.
In some areas bean beetles can be a serious problem. Other pests include beanloopers, whiteflies, aphids, and cucumber beetles. To help prevent diseases like anthracnose and leaf spots, plant resistant varieties, use drip irrigation rather than overhead watering, and do not work with the plants when they are wet. Black aphids are about the only pest of fava beans, and can be readily controlled by sprays of water.
Harvest snap beans when the seeds inside are still very small and the pods are tender. Harvest fresh shelling beans when the pods fill out noticeably but before they get dry. If the pods get too mature, allow them to dry for winter use. Young fava bean foliage can be harvested and cooked as you would other greens. The pods of the fava bean can be cooked when they’re 3 to 4 inches long. Harvest young, tender fava beans that do not need their skins removed when they first start to fill out the pods. Or let the fava beans mature and use them fresh or dried.
Varieties
Anellino Beans (cornetti)
Green Anellino (‘Gancetto Verde’): 85 days, pole, green Italian heirloom snap bean, stringless, crescent-shaped pod with rich bean flavor
Yellow Anellino (‘Gancetto Burro’): 80 days, pole, yellow Italian heirloom snap bean, small, crescent-shaped pod, rich bean flavor
Yellow Anellino
Borlotto
Fava Beans
‘Sweet Lorane’: 240 days if sown in fall; small-seeded fava, good flavor, cold-hardy
‘Windsor’: 75 to 80 days, bush, grows on an erect 2- to 4-foot stalk, long green pods (up to 10 inches), large, broad, light green beans
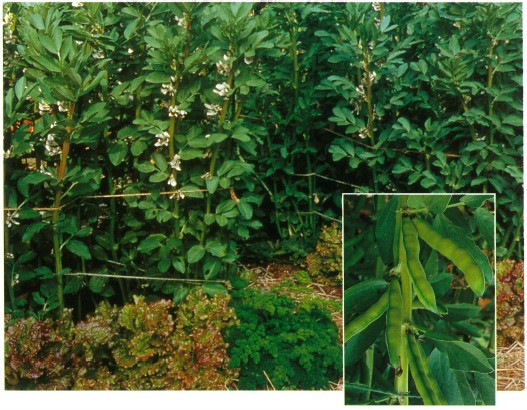
Fava beans
Purple Snap Beans
‘Trionfo Violetto’: 60 days, pole, string-less, purple Italian heirloom, vigorous and attractive vines with deep lavender flowers
Romano Beans
‘Burro d’Ingegnoli’ (‘A cornetto largo giallo Burro d’Ingegnoli’): 78 days, pole, stringless, very broad, deep yellow with large round seeds; very tender and almost buttery in flavor
‘Garafal Oro’: 67 days, pole, large (up to 1 foot) beans with good flavor and delicate texture, very fast growing, vigorous vines, disease-resistant

Romano beans
‘Roma II’: 50 days, bush, stringless, green, wide, thick pods with rich flavor, productive, resistant to bean mosaic virus
‘Wax Romano’: 58 days, bush, light yellow, flavorful pods with meaty texture; vigorous plants
Shelling Beans
Cannellini: 75 to 80 days (for shelling, longer to dry), white, kidney-shaped, classic for Italian minestrone soup, also great for baking
Borlotto: 73 days, bush, Italian heirloom, colorful rose and cream pods, delicious creamy white beans with rosy speckles, sometimes referred to as cranberry beans
How to prepare: In Italy standard green snap beans are usually boiled in a large pot or steamed until just tender. For salads they are left to cool; but most often they are cooked again, usually warmed in a sauté pan with olive oil (occasionally butter). Sometimes Parmesan cheese, anchovies, or garlic is added. Snap beans are served with pasta, sometimes combined with new potatoes or tomatoes. My favorite is snap beans with a pesto sauce served over penne pasta. The romano beans, particularly the yellow ones, must be watched carefully during cooking, as they turn to mush very quickly.
Fresh shelling beans like the borlotto types are usually boiled until just tender, then served with olive oil, Parmesan cheese, and garlic or used cold in a bean salad. They also are combined with leafy cutting types of chicory or broccoli raab and served in a sauce over pasta.
Fava beans in Italy are eaten at different stages. Young pods under 4 inches are boiled whole in salted water and seasoned with olive oil and garlic. When pods start to fill out, the small beans inside are sometimes served raw with salt or pecorino cheese at the end of a meal. Fava beans are most often cooked like lima beans, served with olive oil or butter and Parmesan cheese or cooked with pancetta. Simmer the young ones and add them to chopped tomatoes for a pasta sauce; use the older beans peeled or dried in hearty soups or with meats.
Caution: Some males of Mediterranean descent are allergic to favas and should be wary when trying them for the first time.
Dried beans are most popular in Italy, both the cannellini and the borlotto. Particularly in Tuscany and Florence there are numerous local dishes. White beans baked with olive oil, garlic, and sage is a favorite, as is the “twice boiled” soup ribollita. In ribollita the beans are simmered with aromatic vegetables until the soup is fairly thick; half the beans are then pureed and added back to the soup, which is eaten the next day. The soup is warmed, seasoned, and served over toasted bread. Tuscan black kale (lacinato) is the traditional vegetable added to this soup. Fresh or dried borlotto beans are integral to a mussel soup flavored with basil. Dried beans are important in the soup pasta e fagioli; they are also served with tuna over pasta or combined with rice and vegetables.
BORAGE
(borragine)
Borago officinalis
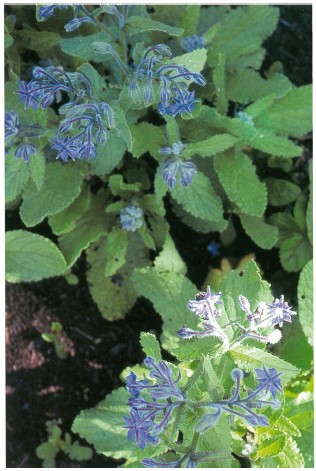
Borage
This potherb is native to Europe and Africa and has a slight cucumber flavor. It’s one of many spring greens gathered from the fields and hillsides of Italy to be used for salads and as a cooked green.
How to grow: Borage is an easily grown summer annual that sometimes acts like a biennial. Borage plants grow to about 2 feet and have hairy gray leaves and deep blue, ½-inch star-shaped flowers. Plants are easily started from seeds. Sow the seeds in spring after all threat of frost is over, in average soil and full sun. You can harvest young leaves once the plants are established, and flowers anytime they appear. Borage often reseeds itself and winters over in mild climates.
How to prepare: In Italy very young leaves are added to salads and soups. The 1-inch borage flowers can be used in salads or to garnish drinks. The, more mature leaves are hairy and are best consumed cooked, since cooking removes the hairy texture. Combine the leaves with other greens, both domestic and wild, in calzone and ravioli, in risotto, and on pizzas, or make them into nests that can be filled with eggs or cheese.
Caution: Pregnant and lactating women should avoid borage flowers, as eating more than eight to ten flowers can cause milk to flow!
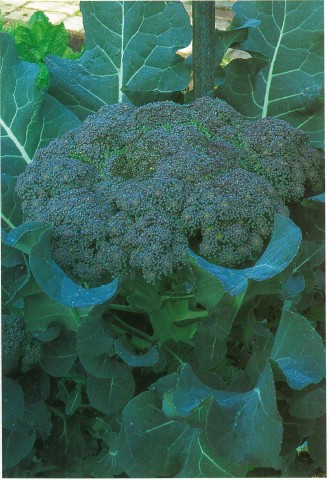
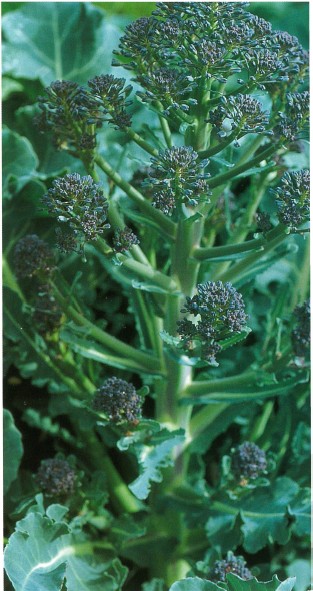
BROCCOLI, HEADING
(cavoli broccoli)
Brassica oleracea var. botrytis
BROCCOLI, SPROUTING
(cavoli broccoli)
B. oleracea var. italica
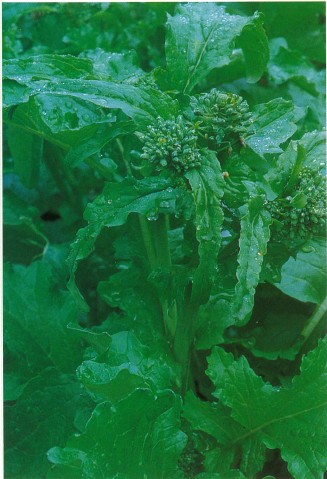
BROCCOLI RAAB
(cime di rapa, broccoletto di rapa, sparachetti)
B. rapa (B. campestris)
CAULIFLOWER
(cavolfiore)
B. oleracea var. botrytis
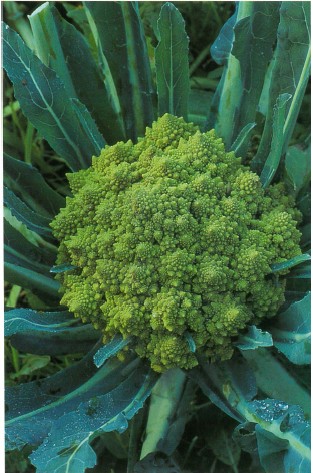
‘Romanesco’ broccoli
Broccoli raab
Broccoli calabrese
In addition to the familiar green heading broccolis, Italians grow sprouting broccolis that produce numerous small heads over a long season. Purple and white varieties of both the heading and sprouting broccolis, and the chartreuse, sculptured romanesco are also popular. While Americans categorize romanesco as broccoli, Italians consider it cauliflower. There are two more Italian “broccolis” to discuss—broccoli raab and broccolo spigariello. Broccoli raab is actually the flower shoot of a type of turnip and has slightly bitter green leaves. Broccolo spigariello is most probably a primitive cabbage and has dark green leaves with a grayish cast and grows as a very open broccoli plant with narrow heads. A broccoli relative, cauliflower, is very popular in Italy, and both white and purple types are grown.
How to grow: Standard broccoli is an annual, while cauliflower is actually a biennial. Both prefer cool weather and bolt (go to flower) in extremely hot weather. They are planted in very early spring for summer bearing, or in summer or fall for winter bearing. In mild climates overwintering varieties can be planted. Both need full sun, with light shade in hot climates. Start broccoli seeds indoors six weeks before your last average frost date. Plant cauliflower a little earlier, as it grows more slowly. Plant seeds ½ inch deep. Or buy transplants and place them in rich soil about two weeks before the last average frost date. Plants should be spaced 1½ feet apart, or 2½ feet for the romanesco varieties. Broccoli and cauliflower are heavy feeders and need a consistent supply of water and nutrients, especially nitrogen. Work compost and blood meal or a balanced organic fertilizer into the soil before planting and again three or four weeks after planting. Mulching helps retain the necessary moisture.
Broccoli and cauliflower tend to be more vigorous and have fewer pest and disease problems than do cabbages. Flea beetles, imported cabbageworm, and cutworms may be problems. The maggot of the cabbage root fly is another possible pest. Use floating row covers to prevent the fly from laying her eggs or the larvae from entering the soil by placing a 12-inch square of tar paper or black plastic directly over the roots of the plant. Cut a slit about 6 inches long from one edge directly to the middle of the square and slip the square around the plant. Good garden hygiene is your best prevention against diseases.
Harvest broccoli when the buds begin to swell but before they open. Once the primary head is harvested, most broccoli varieties produce many smaller heads. Most cauliflower heads need protection from the sun. Modern varieties have leaves that grow over the head, but some heirlooms need to have the leaves tied up around the head (see page 15). Harvest cauliflower heads at the base when they are very full but before the curds have begun to separate.
The less well known broccolis raab and spigariello are both annuals and are grown like sprouting broccolis; their seeds are sown in early spring. Both grow to harvestable size quite quickly. The plants may be fall-planted in mild climates, with the shoots being harvested over the winter. Plant the seeds ¼ to ½ inch deep in rows 1½ to 2 feet apart in full sun. Thin to 4 to 6 inches apart. Both can tolerate light frosts. Harvest the young leaves, stems, and flower buds just as the buds form a small head but before the flowers open.
Varieties
Broccoli
‘Calabrese’: 58 days, Italian green sprouting broccoli with a long season of side shoots after the main head is cut
‘De Cicco’: 48 days, traditional Italian heirloom with 3- to 4-inch main heads and a heavy yield of side shoots after the main head is cut, long cutting season, leaves used like collards after the plant is well established
‘Minaret’: 75 to 85 days; earlier, smaller, and more uniform than ‘Romanesco’
‘Paragon’: 75 days, 8-inch heads, tender and sweet stems
‘Romanesco’: 85 days; conical, chartreuse broccolis; slow grower; attractive conical whorl of mild, sweet florets; large plant; uneven quality heads
Cauliflower
‘Alverda’: 80 to 100 days from fall planting, green-headed, uniform and productive, good for overwintering in mild climates
‘Snow Crown’: 50 days, hybrid white cauliflower, dependable production, good for early spring
‘Violet Queen’: hybrid cauliflower with purple heads, one of the easiest cauliflowers to grow, space 12 inches apart, self-blanching
Unusual Broccoli
Broccolo Spigariello: loose-growing type of broccoli with very small heads, grows to 2½ to 3 feet, white flowers, produces over a long season if flower heads are harvested, available only from Pagano
‘Sessantina Grossa’: 35 days, early, large buds, thick, tender stems
‘Spring Raab’: 45 days, Italian heirloom, slow-bolting, late variety that can be wintered over in mild climates
How to prepare: Broccolis are mostly associated with the southern parts of Italy. Usually the florets are cooked in boiling salted water until just tender and then reheated with olive oil and seasonings. Another presentation is to simmer the broccoli in white wine, olive oil, and garlic. The sprouting and romanesco types of broccoli cook more quickly than do the standard types. Small florets of both types can be marinated and used in antipasto or steamed and flavored with anchovies and garlic and served over fettucine. Broccoli florets are lovely in soup with small potatoes or baked with seasonings, bread crumbs, and cheese.
The slightly bitter flower shoots of broccoli raab are blanched or steamed and then served with olive oil and garlic. They can be seasoned and served over orechiette pasta or added to soups. In southern Italy broccoli raab is cooked with salt pork and garlic. Broccolo spigariello is sometimes called black soup broccoli and is most often used in soup as you would Tuscan black kale.
Cauliflower is very popular in Italy, especially in the north. The basic preparation is to boil it in salted water and then finish it with seasonings like olive oil, butter, garlic, fennel seeds, vinegar, or Parmesan cheese.
‘Purple Sprouting’ broccoli
Cauliflower can be added to a frittata, breaded and fried, or sauced with a béchamel and baked with a little ham and seasonings. It can also be combined with tomatoes, seasonings, and pine nuts and served over pasta.
CABBAGE, SMOOTH
(cavolo cappuccio)
Brassica oleracea var. capitata
CABBAGE, SAVOY
(cavolo verza)
B. oleracea var. bulata
TUSCAN BLACK KALE
(cavolo lacinato nero, black kale, dinosaur kale, lacinato kale)
B. oleracea var. acephala
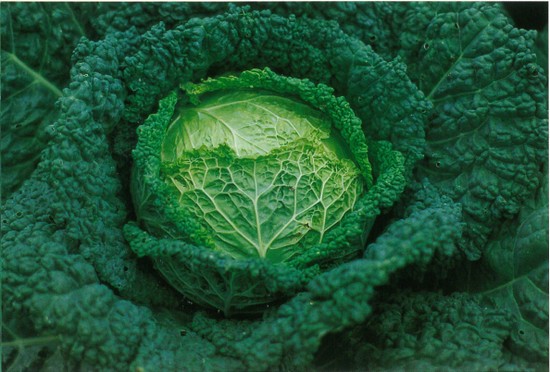
Savoy cabbage
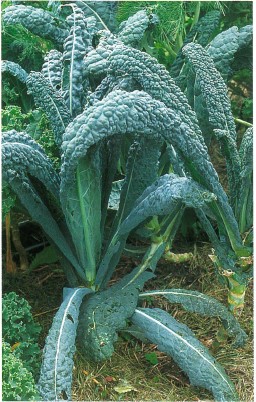
Tuscan black kale
Italians use the puckery Savoy types of cabbage, with their handsome crinkled leaves, as well as the red and green ball-like smooth cabbages. Tuscan black kale is particularly favored in some areas of northern Italy.
How to grow: Cabbages are best grown as cool-season annuals and are usually started in early spring or midsummer, depending on the variety. They bolt and can get quite bitter-tasting in extremely hot weather. Most gardeners start Tuscan black kale in midsummer for a fall harvest. Transplant cabbages and kale into rich soil filled with organic matter. Both need full sun, or light shade in hot climates. Plant cabbage seeds 2 to 3 inches apart, ½ inch deep. Thin or transplant small varieties 12 inches apart and larger ones 24 inches apart. As cabbages tend to be top-heavy, when transplanting, place them lower in the soil than you would most vegetables—up to their first set of true leaves (the first leaves after the seed leaves). Plant kale seeds ½ inch deep, 1 inch apart, and thin to 12 to 18 inches apart. Cabbages and kales are heavy feeders, so add a balanced organic fertilizer: 1 cup worked into the soil around each plant at planting time. They need regular and even watering and a substantial mulch.
Cabbages are susceptible to many pests and diseases; kale has fewer problems. See page 30 for information on cabbage family pests and diseases.
Harvest cabbages anytime after they have started to form a ball, but before they become so large that they split. Mature cabbages can take temperatures as low as 20°F. If a hard freeze is expected, harvest all the cabbages and store them in a cool place. Start harvesting young leaves of Tuscan black kale when the plant has eight to ten leaves. Tuscan black kale is more tender than most kales and will not overwinter where the soil freezes.
Varieties
Cabbages
‘Dynamo’: 70 days, 2½-pound green heads that resist splitting, plant in spring and again in fall, resistant to fusarium yellows
‘Green Glitter’: 80 days, dark green 3½-pound heads, holds up well in the garden for winter harvest
‘Rougette’: 80 days, deep red, 3-pound heads
‘Savoy Ace’: 80 days, Savoy-type, good quality, up to 4½-pounds, highly resistant to fusarium yellows and insect damage
Tuscan Black Kale
‘Lacinato’: 62 days; Italian heirloom; unique, dark blue-green kale with thick crinkly leaves and a sweet flavor
How to prepare: The Savoy cabbages are usually the mildest flavored and most popular in Italy, especially in the Milan area. Salads combining thinly sliced Savoy cabbage and red radicchios are gorgeous. Cabbages are often stuffed with meat or rice; and they are commonly used in minestrone soup.
Tuscan black kale is most often used in soups, especially in ribollita, a twice-cooked soup with white beans served over country-style bread. It is also featured in Tuscan black kale pesto. Other uses include adding it to a stew with pork, and cooking it with potatoes and serving it over penne. Red cabbage is cooked in the same manner as in much of Europe, poached in red wine.
CAPERS
(capperi)
Capparis spinosa
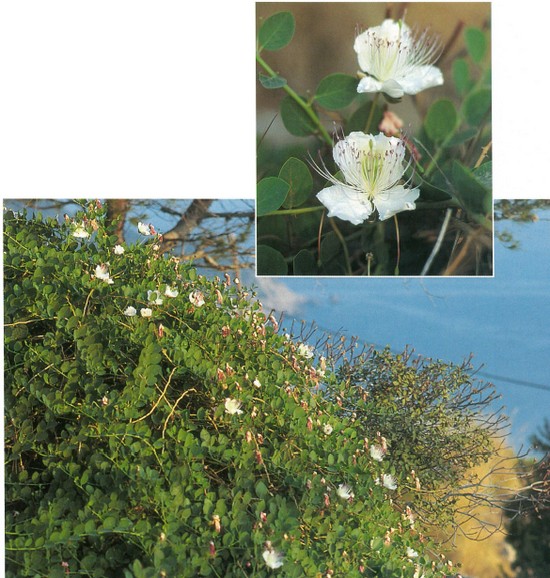
Capers growing on an Italian hillside (right); a closeup of the caper flower (inset)
Capers are shrubby tender perennials with edible flower buds.
How to grow: Capers are very susceptible to frost. They’re grown in a greenhouse or outdoors in USDA Zones 9 through 11. Plant them in fast-draining soil, as they rot readily. The plants are evergreen and spread to about 5 feet if not cut down by frost. Their green, round, fleshy leaves are carried on arching branches. Their lovely flowers have 2- to 3-inch petals and long pink stems. Obtain plants from a specialty mail-order nursery and set them out in a warm, sunny place as soon as there is no danger of frost. Look for a spineless variety. (If you must start plants from seed, freeze the seeds in sand for two weeks prior to germination. Germination rates are very low, so plant lots of extra seeds.) Water transplants in and then keep the watering to a minimum. Fertilizer is not usually needed. Prune the plants occasionally to prevent them from becoming straggly. Capers grow very slowly.
When harvesting for pickling, pick flower buds just before they open. The buds should be left in the dark for a few hours before they are pickled.
How to prepare: The flower buds are salted or pickled and used to add flavor to hors d’oeuvres, stuffings, sauces, vinaigrettes, and vegetable salads. Sprinkle them over pizzas and sliced tomatoes or add them to pasta sauces. To salt capers, first dry them in the sun; then layer them with rock salt. Before using, soak the salted capers for half an hour or so to remove the salt.
CARDOON
(cardoi)
Cynara cardunculus
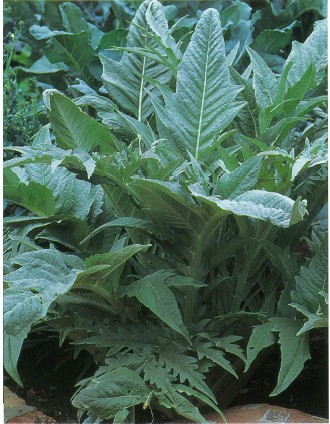
Cardoon plant
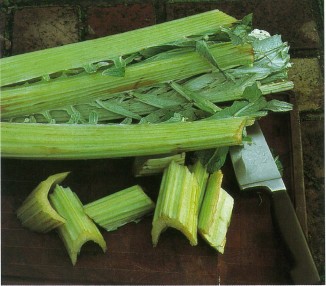
cut stalk
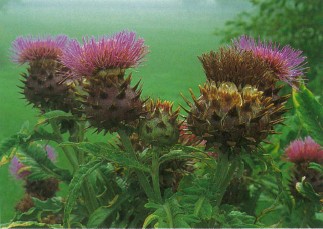
cardoon in bloom
Cardoon is a wild relative of the artichoke, but unlike the artichoke, its stalks, not its flower buds, are eaten.
How to grow: Sow seeds of cardoon in early spring, inside in cold climates and outside in mild-winter ones. Plant the seedlings or seeds in a trench about 1 foot deep in which the soil has been well prepared with organic matter. Keep the plants very well watered and fertilized to produce vigorous growth, or the stalks get bitter and tough. In the fall blanch the stalks to make them sweeter and more tender (see page 15). For more general information on climate considerations and cultural requirements, see “Artichokes, Globe,” page 22.
How to prepare: Remove the tough outside stalks and string as you would with celery stalks. Cut the stalks into 3-inch pieces. To prevent discoloration and to cut some of the bitterness, pre-blanch them for 5 to 7 minutes in water to which a couple of tablespoons of vinegar or lemon juice has been added. Boil the stalks for 45 minutes or steam them until tender. Serve the stalks with olive oil or an herb or anchovy butter, or bake them with butter or a béchamel sauce and serve with Parmesan cheese. Or add them to a fritter, or marinate them for a dramatic part of your antipasto presentation. When very young, cardoons are eaten raw and used to accompany bagna cauda, a hot garlic, anchovy sauce.
CHARD
(bieta, Swiss chard)
Beta vulgaris var. cicla
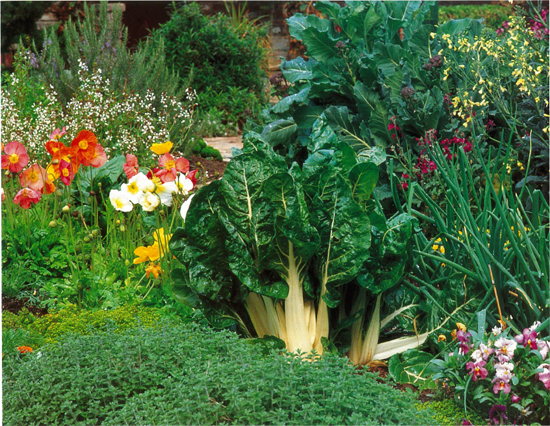
Chard
Chard, a close cousin of the beet, is a mild-flavored green that tolerates a lot more heat than most.
The chard favored by Italians has crunchy, large white midribs and deep green ruffled leaves.
How to grow: Start chard in early spring or late summer. Swiss chard grows upright and straight, even to 4 feet tall when it bolts.
Plant chard seeds ¼ to ½ inch deep, 6 inches apart, and thin to 1 foot apart. Plant in full sun and neutral soil with lots of added organic matter. For tender, succulent leaves, keep plants well watered. Mulch with a few inches of organic matter. When plants are about six weeks old, fertilize them with ½ cup of balanced organic fertilizer for every 5 feet of row.
A few pests and diseases bother chard, namely slugs and snails (especially when the plants are young), and leaf miners, a fly larvae.
To harvest chard, remove the outside leaves at the base; tender new leaves will keep coming throughout the season.
Varieties
‘Argentata’: 55 days, Italian heirloom, large green-and-white chard, plants widely adapted and among the most cold tolerant
‘Paros’: 55 days, a French green-and-white traditional-type chard with milder and more tender stalks than some domestic varieties
How to prepare: Young chard leaves are tender and mild; they are a staple in many Italian recipes, often combined with or substituted for spinach. When chard leaves are large, the long, crisp ribs are removed from the greens. Blanch the leaves in boiling salted water, then drain them and squeeze out the excess water. They can then be warmed in a pan with olive oil and lemon juice, with or without garlic, or used in frittatas, soups, and risottos. Chard leaves are also used in ravioli stuffings, in barley soup with cannellini beans, and even in a dessert tart along with ricotta cheese.
In Italy the stems of Swiss chard are considered its best virtue. The strings in the stems are removed. Then the stems are boiled in salted water, drained, and served with olive oil and seasonings, folded over themselves and stuffed with meat and mushrooms, or sautéed in butter and finished with Parmesan cheese.
CHICORIES
(cicorie)
Cichorium intybus
BELGIAN ENDIVE
(Witloof chicory)
ITALIAN WILD, CUTTING CHICORIES
(cicorie)
RADICCHIOS
(cicorino, radicchio, radicchieto)

Radiccios in the garden (top, middle) and after harvest
Chicories are a cool-weather salad staple throughout most of Italy. They include the rustic cutting chicories sometimes found growing wild in Italy, the burgundy-colored heading radicchios, and the elegant Belgian endive. All chicories share a mildly bitter taste that can be mitigated by blanching them and soaking them in salted water. The variety and growing temperature are also factors in the level of bitterness.
How to grow: Generally chicories are easy to grow, though they prefer cool growing conditions and often perform poorly in very hot summer areas. Plant all chicory seeds ¼ inch deep in good soil filled with organic matter, in full sun. (Or start seeds inside and transplant them when they are a few inches tall.) Thin seedlings to 8 inches apart and keep them fairly moist. Chicories have few pests and disease problems. The challenges to producing most chicories is in the timing and the pre- and post-harvest treatment. And it’s here that there are major differences by type.
Let’s start with the easiest chicories to produce: the non-heading, leaf, cutting chicories. Some are categorized as Catalonian-type chicories in Italian catalogs. They are planted in early spring, or sixty days before the onset of cool fall weather. They can be harvested when young and mild by cutting the leaves with scissors when they are 3 to 4 inches tall. If the weather stays cool, they can be cut again a few weeks later.
The leaves of the cutting chicories are best if harvested when young. Leaf chicories can also be grown over the winter in most climates, with the new, tender growth harvested in the spring. One such chicory is grown for its twisted succulent stems as well as its leaves—‘Puntarella.’ To make it less bitter, garden blanch it by inverting a flowerpot over the plant a week or so before harvesting (see page 15).
In contrast, producing the beautiful ruby red and white radicchios and the silky chicons of Belgian endive is another matter. A little know-how and timing are needed. To produce the chicories Americans call radicchios, choosing the proper variety and planting time is the first step. If you are new to growing radicchios, choose the modern radicchios; they are much easier to grow in most climates, as they pretty reliably head up and self-blanch in the garden. (The heirloom varieties are generally climate-specific to Italy.) In cold climates plant the modern varieties in late spring; if they don’t form round heads on their own, cut back the plants in early fall—usually they will resprout, form a head, and be ready for harvest four to six weeks later. In parts of the country where winters stay above 10°F, plant radicchios in late spring for a fall crop or in the fall for a harvest in the spring. The red radicchios are a bit unnerving, as most young plants start out with loose green leaves in the garden, then round heads form, and the inner hearts turn red at maturity. At harvest time, remove the outer green wrapper-leaves to reveal a center that is a deep, dark wine color with white midribs.
Belgian endive is another story; it is always blanched. In cold climates, start seeds in early spring and dig up the plants after the first frost. In mild-climate areas start plants in summer and dig them up in early fall. The plants are then blanched (see page 15).
Varieties
Cutting, Non-Heading Chicories
‘Catalonian Dentarella’: Catalonian-type chicory, has dandelion-like leaves and thick stems, can be planted in fall and will winter over for a spring harvest in all but the coldest climates
‘Catalogna Frastagliata’: 65 days, a Catalonian-type variety, looks like a large dandelion
‘Catalonian Puntarella’: 120 days from fall planting, another Catalonian type with twisted stems, succulent variety used for spring salads, overwinters in most climates
‘Ceriolo’ (‘Grumulo’): 120 days from fall planting, a green cutting chicory for spring harvest
Radicchios
‘Chioggia Red Precoce No. 1’: 60 days, modern red round radicchio that is widely adapted
‘Firebird’: 74 days in north, modern red round radicchio
‘Giulio’: about 90 days, spring-planting type, modern red round radicchio
‘Medusa’: 65 days, hybrid, modern red round, radicchio for spring or fall planting
‘Red Treviso’: deep burgundy, long, open heads; considered the gold standard of radicchios; heirloom variety acclimatized to Italy; must be cut back and forced
Belgian Endive
‘Flash’: 110 days, hybrid Belgian endive bred for forcing without sand or soil around the shoots
‘Witloof Zoom’: new hybrid Belgian endive for forcing without sand or soil around the shoots
How to prepare: All types of chicories are usually sliced or torn into bite-size pieces and eaten raw in salads, combined with sliced fennel. The red radicchios can be added to a salad raw or after they have been braised, grilled, or roasted. Grilled radicchio can be added to pasta dishes, used as part of an antipasto, or served as a side dish.
To cut the bitterness of raw chicories, shred them fine, soak them in salted water for 1 hour, drain, and use a dressing with balsamic vinegar or add honey. The cutting chicories are used in salad when they’re very young and are served as potherbs when they’re more mature—usually parboiled, drained, and seasoned with olive oil and lemon juice, or sautéed with garlic. They are then used to top pizzas, in frittatas, or in risottos.
Cutting chicory
Belgian endive is most often used as a bed for, or in salads with, other vegetables, seafood, and meats. The individual leaves are removed from the chicon and placed on a platter, with other ingredients arranged on them, or they are braised whole in butter or olive oil and lemon juice.
DANDELION, COMMON
(dente di leone, radichella)
Taraxacum officinale

Dandelion
Dandelion greens are flavorful and add a slightly bitter richness to a salad, as well as lots of nutrition.
Grow your own dandelions or gather them from wild areas early in the spring.
How to grow: Dandelions prefer full sun and slightly acidic soil. Plant these perennials as seeds ½ inch deep directly in the soil in the spring or fall, in rich, fertile loam, and keep them fairly moist. Thin seedlings to 8 inches apart and mulch to control weeds. Dandelions have very few pest and disease problems. Start harvesting after about three months. Harvest only the youngest, tender leaves. For the most delicate flavor, blanch the leaves by tying them up at the top as you would escarole. Do not let dandelions go to seed, or they will become a nuisance.
Varieties
‘Pissenlit’: 92 days, notched leaves usually blanched, French strain popular in Europe
‘Thick-Leaved Improved’: 95 days, large leaves good as a potherb, blanched leaves good in salads
How to prepare: When harvested very young and garden-blanched, dandelions can be used in large amounts; but if strong-flavored, they should be used sparingly or soaked in cold salted water for a few hours. Dandelion greens are eaten raw in salads dressed with olive oil, salt, and vinegar or lemon juice. In Emelia dandelions are dressed with warm bits of pancetta. Dandelions are also served as a pot herb in rissotto, frittatas, and soups.
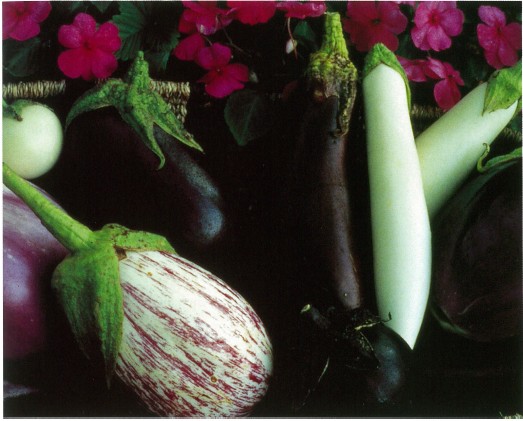
EGGPLANT
(melanzana)
Solanum melongena var. esulentum
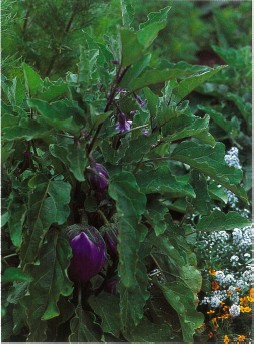
Eggplant
Eggplant, which is very popular in Italy, is a tender, herbaceous perennial that’s usually grown as an annual.
How to grow: Eggplants are so susceptible to freezing that it is best to start seeds indoors six to eight weeks before the average date of your last frost. The seeds germinate best at 80°F. Plant the seeds inch deep, in flats or peat pots. Eggplant takes about a week to germinate in a warm room. When all danger of frost is past and the soil has warmed up, place the plants in the garden 24 inches apart and water them well. Grow eggplant in full sun in rich, well-drained garden loam that is fertilized with blood meal and manure. Mulch with organic matter to retain both heat and moisture. If you are growing eggplant in a cool climate, cover the soil with black plastic to retain heat. To increase the yield and to keep the plants healthy, feed them about three times during the growing season with fish emulsion and liquid kelp. Eggplant needs moderate watering and should never be allowed to dry out.
‘Listada de Gandia.Violetta Lunga,’ ‘Rosa Bianca,’ and ‘White Sword’ eggplants
Flea beetles, spider mites, and white flies can be a problem. Flea beetles often appear early in the season, right after transplanting. Spider mites can be a nuisance in warm, dry weather. Nematodes are sometimes a problem in the South. Verticillium wilt and phomopsis blight are common disease problems in humid climates.
Eggplant is ready to harvest when it is full colored but has not yet begun to lose any of its sheen. Plants produce more fruit when they are harvested regularly.
Varieties
Italian varieties of eggplants vary in size and color. The most common are purple and elongated, but lavender and white varieties and round and cylindrical ones are grown as well.
‘Bambino’: 75 days, hybrid, round, deep purple, small fruit good for pickling and stuffing
‘Italian White’(‘Bianco Ovale’): 75 days, 3- to 4-inch roundish white fruit, milder than purple varieties
‘Listada de Gandia’: 75 days, striking white with purple stripes fruit, thin skins, not recommended for northern gardens
‘Rosa Bianca’: 75 days, spectacular, productive, bright lavender fruits that are creamy, mild-flavored, and of high-quality
‘Violetta di Firenze’: 60 to 80 days, spectacular lavender eggplant from Italy, large fruits sometimes with wide white stripes
‘Violetta Lunga’: 8 inches long, deep purple, just right for slicing
‘Vittoria’: 61 days, hybrid, long slender Italian type for slicing
How to prepare: Italians salt eggplants and let some of the water drain out before using them in some recipes, especially if they are to be fried. Eggplant absorbs flavors well and may be browned by sautéing or grilling. Italians serve it with Parmesan cheese or tomato sauce, in lasagna, and with roasted garlic. Other Italian dishes include eggplant caviar, which is a term used to describe roasted or grilled eggplant that has been combined with garlic and seasonings and mashed. Deep-fried eggplant is served as a side dish, either plain or sauced. Italian dishes call for stuffing eggplants with herbs and anchovies or bread and mushrooms. Grilled eggplant is served with pesto or nepitalla butter, garnished with chopped arugula or basil, or added to a pasta or polenta dish with other vegetables and given a marinara sauce. And then there is the most famous Italian eggplant dish—eggplant parmigiana—in which eggplant is deep-fried and dressed with tomatoes and cheeses.
FENNEL, FLORENCE
(finocchio, bulbing fennel)
Foeniculum vulgare dulce
FENNEL, WILD
(finocchio selvatico, leaf fennel, herb fennel)
F. vulgare

Fennel
Florence bulbing fennel is a favorite Italian vegetable and is often included in antipasto dishes and salads. This ferny-topped plant, about 2 feet tall, looks a little like a swollen white celery. It is easy to grow and generally requires cool weather. Wild fennel is used as an herb for the anise flavor its leaves and seeds impart to salads and cooked dishes.
How to grow: Though a perennial, wild fennel, with its beautiful, ferny foliage, is usually grown as an annual. Start wild fennel in the spring from seeds or transplants after the weather has warmed up. One or two plants are enough for the average family. Plant them in full sun in well-drained, fertile soil. These ferny plants grow to 3 feet (so give them room to spread) and produce flat sprays of yellow flowers. Keep fennel moist until it is well established; after that, be careful not to overwater. Harvest the leaves as soon as the plants get 4 to 5 inches tall. Dry the brown seeds in a paper bag in a warm, dry place. Store the dried seeds in a glass jar. Cut back the plants in spring to keep them looking trim. Keep the seed heads removed, as fennel reseeds and can become a weed.
Florence bulbing fennel grows to perfection only in cool weather. Therefore, in cold climates Florence fennel is started as soon as the soil can be worked in the spring, or planted in summer for a fall harvest. In areas where winters seldom dip below 28°F, it can be grown as either a fall or a spring crop. As a rule, fall-planted crops are the most rewarding. Grow Florence fennel in full sun in fertile, well-drained soil. Thin plants to 6 to 8 inches apart. In short-season areas harvest the plants as baby vegetables, only 2 inches across, instead of trying to grow large bulbs, which require a long, cool season. If you have the needed long season, harvest the bulb when it is 3 to 5 inches across by cutting the bulbing stem off at ground level with a knife. If conditions are suitable, “baby” fennels will sprout from the crown.
Varieties
Fennel, Leaf: 60 days, herb fennel, green feathery leaves, slow-bolting, to about 3 feet
‘Zefa Fino’: 80 days, bulbing, Florence fennel, bolt-resistant, large bulbs
How to prepare: Use the slightly anise-flavored bulbs as you would celery; or braise fennel, drizzle it with olive oil, and sprinkle it with anchovy bits or Parmesan cheese. The most common fennel presentation in Italy is to cut it into wedges and serve it with pinzimonio, a simple dipping sauce made of the best olive oil and salt. Fennel is often served as part of an antipasto, sometimes sliced paper thin, or in a salad with arugula or oranges.
The leaves of the leaf or wild fennel can be used to flavor salads, sauces, fish, soups, stews, salad dressings, and pasta. Throw the dry plant prunings onto the grill when you are preparing fish for a great, rich flavor. Use the seeds in soups and in seafood sauces. In parts of Italy wild fennel pollen is gathered and used to flavor pork and chicken dishes.
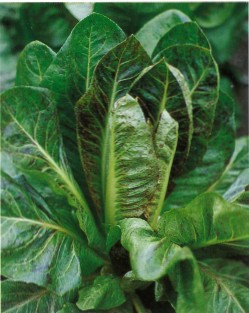
LETTUCE
(lattuga)
Lactuca sativa
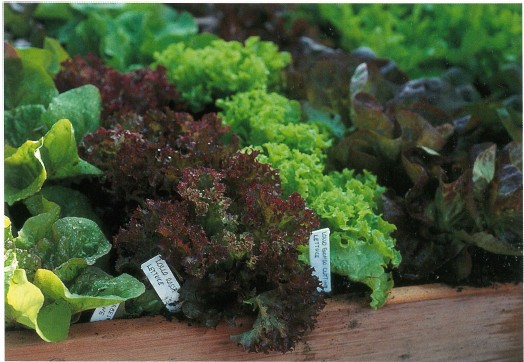
Lettuce
Lettuce is native to the Italian peninsula and the Italians enjoy many varieties.
How to grow: Lettuce is a cool-season annual crop that can be grown in temperate gardens worldwide. Most varieties go to seed or become bitter rapidly once hot weather arrives. In warm weather lettuce grows better with afternoon or filtered shade. In mild-winter areas lettuce grows through the winter.
Lettuce prefers soil high in organic matter. It needs regular moisture and profits from light feedings of fish emulsion or fish meal fertilizer every few weeks. Sow seeds ⅛ inch deep outdoors, start indoors in flats, or buy transplants. You can start lettuce outside as soon as you can work the soil in spring. Plant seeds 2 inches apart and ⅛ inch deep. Keep seed beds uniformly moist until the seedlings appear. Thin seedlings to between 6 and 12 inches apart, depending on the variety. Failure to thin seedlings can result in disease problems.
Protect seedlings from birds, slugs, snails, and aphids until they get fairly good sized by using floating row covers and by hand picking. Botrytis, a gray mold fungus disease, can cause the plants to rot off at the base. Downy mildew, another fungus, causes older leaves to get whitish patches that eventually die.
You can harvest lettuce at any stage. If possible, harvest during the cool of the day. Leaf lettuces can be harvested one leaf at a time or in their entirety. Heading lettuces are generally harvested by cutting off the head at the soil line.
Varieties
‘Biondo Liscio’: tender, small-leafed lettuce perfect for misticanza and cut-and-come-again harvesting
‘Lollo Biondo’: pale green version of ‘Lollo Rossa,’ heat-resistant
‘Lollo Rossa’: 56 days, Italian variety, looseleaf, distinctive, frilly leaves, red margins, pale green heart, good for cut-and-come-again plantings
‘Marvel of Four Seasons’ (Four Seasons): 60 days; known in Italy as ‘Meraviglia di Quattro Stagioni,’ striking, bright red outer leaves, pale pink-and-cream interior, tender yet crisp
‘Red Perella’: (‘Perella Red’): 52 days, beautiful Italian variety of baby lettuce, 6- to 7-inch rosettes of green leaves shading to rich red
‘Resisto’: an Italian crisp-head lettuce that can be sown in summer and is resistant to bolting and to most lettuce diseases
‘Rossa d’America’: Italian looseleaf lettuce, pale green leaves tipped with rosy red, harvest at 4 inches for cut-and-come-again crop
‘Verde d’Inverno’: Italian romaine-type lettuce for fall sowing, resistant to frost, medium green leaves with prominent ribs
How to prepare: Lettuces are used in Italian salads, which are generally a mixture of many different types of greens with complementary flavors—some tangy, some bitter, and some sweet—that change with the seasons. Salads are often dressed simply with olive oil and vinegar or lemon juice. Lettuce is occasionally cooked in soups and is stuffed with meats of all types, fish, and vegetables and herbs.
NEPITELLA
(nepitella)
Calamintha nepeta
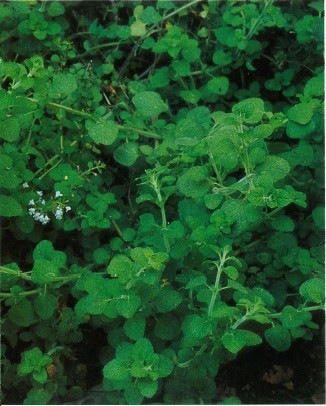
Nepitella
This mellow mint has been used by generations of Italians to flavor mushrooms and many vegetables.
How to grow: Nepitella is a low-growing perennial herb that is easily grown in USDA Zones 5 to 10. It grows to about a foot and has small gray-green leaves and sprays of tiny lavender to white flowers. Obtain plants from specialty herb nurseries and set them out in fast-draining soil. Give them afternoon shade in hot climates and moderate watering in arid areas. Cut back plants after flowering and apply a balanced organic fertilizer. In mild climates a second pruning may be needed to keep the plant trim and in bounds. Nepitella reseeds itself and occasionally becomes a weed. In cold-winter areas mulch nepitella in the fall to protect it against frosts.
How to prepare: Nepitella tastes like a mellow mint with a bit of oregano. Called mentuccia in certain dialects, this herb grows wild in parts of Italy. It is used in stuffed artichokes and with eggplant, potatoes, zucchini, and grilled fish; in some parts of the country it is considered essential in some mushroom dishes.
Caution: Large amounts of certain calamints have been known to cause miscarriages; to be safe, pregnant women should avoid all calamints.
ONIONS BULBING ONIONS
(cipolle)
Allium cepa
GARLIC
(aglio)
A. sativum
ROCAMBOLE
(serpent garlic, Italian garlic)
A. sativum var. ophioscorodon
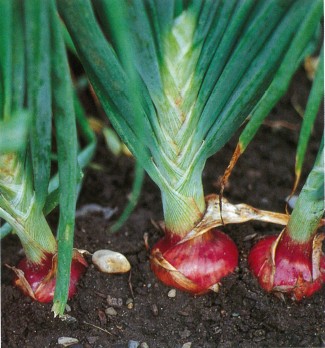
Growing onions
How to grow: Onions, garlic, and rocambole are all members of the genus Allium. Plants in this group prefer cool weather, particularly in their juvenile stages, and soil rich in organic matter and phosphorus. They are heavy feeders and should be fertilized, as well as watered, throughout the growing season.
Bulbing Onions
Bulbing onions are grown from seeds or from young bulbs, called sets. As biennials, onions bulb up the first year when grown from seed and flower the second if they’re replanted. When grown from sets, they usually both bulb and flower the first year.
It is important to select the right variety of onion for your climate and time of year because the bulbs are formed according to length of day. There are short-day, medium-day, and long-day onion varieties. Short-day onions are most successful when spring-planted in southern regions of the country. Long-day onions are ideal for northern areas with their long summer days. Medium-day onions do well in most parts of the country.
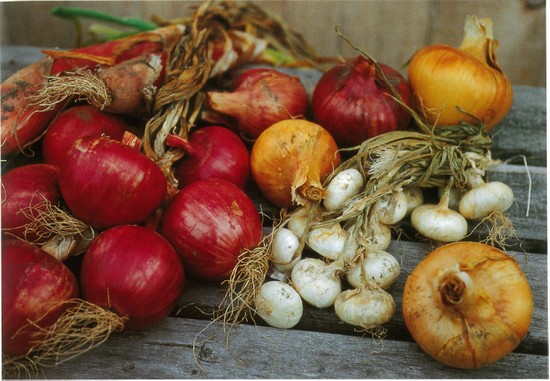
‘Italian Torpedo,’ ‘Rossa di Milano,’ ‘Giallo di Milano,’ and small white onions
The bulbing season can be prolonged by planting seeds indoors six to eight weeks before you can safely plant them outdoors. Outside, sow onion seeds inch deep in the spring or put out sets; seeds or sets may be started in the fall or winter in mild climates. Many gardeners interplant onions among other vegetables and flowers, a practice that deters the onion maggot. Plant onions in rich, well-drained soil, and keep the soil moisture even during the growing season. Fertilize with a balanced organic fertilizer when plants are about 6 inches tall and beginning to bulb. Keep weeds and cultivation to a minimum, as onions are shallow rooted. Onions should be thinned to give each plant adequate room for unhampered development. Use the thinnings as scallions.
The most common pests of onions are the brown fly larvae, known as the onion maggot, and thrips. To cut down on infestations, practice crop rotation. Interplant onions with other plants so the pests can’t easily crawl from onion to onion. With severe infestations, apply row covers and/or saturate the soil with beneficial nematodes at planting time. Thrips are attracted to stressed onion plants, especially those that are moisture-stressed. Place light blue sticky traps to attract adult thrips and treat the plants with insecticidal soap.
Onions may be harvested at any stage of development, though most people wait until the bulbs are fairly large. Onions for storage should not be harvested until their tops die down. You can hasten this process by bending the tops over. Then dig up the onions and let them stay on top of the soil to dry out for at least a day. The bulbs must be protected from sunburn, which you can do easily by covering them with their tops. Place the bulbs on a screen or hang them where there is good air circulation to “cure” (allow the skins to dry) for several additional weeks before their final storage. Storage varieties can be stored for three to four months.

Garlic
Varieties
Most modern onion breeding has been for sweet onions, but the sharp, less sweet varieties are better for sauces, soups, and many long-cooking dishes. Lockhart Seeds and the Cook’s Garden have a large selection of onions.
‘Bianca di Maggio’: 80 days, flat, white, mid-size onion with mild flavor for a summer crop
‘Giallo di Milano’ (‘Gialla Ramata di Milano’): 110 days, long-day, yellow, good storage
‘Italian Torpedo’: 110 days, medium-day, Italian heirloom bottle onion, red, 4 to 6 inches long, 2 to 3 inches wide, does not store well
‘Red Burgermaster’: 110 days, long-day, large red, sweet slicing onion, stores well
‘Rossa di Milano’ (‘Rossa Ramata di Milano’): 110 days, long-day, Italian red, barrel-shaped, stores well, pungent flavor
‘Walla Walla Sweet’: 125 days if spring-seeded, 300 days if sown in late summer and left to overwinter; long-day; large, round onion, known for sweet and juicy flesh; best if seeded in time to overwinter
Garlic
Garlic plants are grown from cloves that can be purchased in heads from nurseries or food markets. Although easily grown, garlic performs best in milder, dry climates. It should be planted in the fall or early spring. Ample and consistent water is needed for the first four or five months of development, as is full sun.
Divide the heads into individual cloves and plant them about 1 inch deep and 4 inches apart. Garlic does best in soil with a good deal of added organic matter. In areas of extremely cold winters, mulch with straw to protect fall-started plants. Garlic is hardy to all but the most severe cold and is virtually free of pests and diseases. Garlic greens may be lightly harvested and used in cooking as you would scallions, in both fall and late spring, as long as the plants are not depleted. Garlic is ready for harvest when the plant tops turn brown and die back. Dig the heads carefully and allow them to dry on a screen in the shade, protected from sunburn. To prevent rotting and so that you can braid them, retain several inches of dried stalk on each head. Store garlic in a cool, dry area with good air circulation.
Varieties
Overall, smaller types are considered to have the best flavor. Filaree Farms specializes in organically grown garlic, and Territorial Seed Company carries a large number of garlic varieties.
‘Early Red Italian’: early maturing, medium to large bulbs splotched with red, cloves milk white
‘German Extra-Hardy’: very winter-hardy, good for northern gardens, good flavor, keeps well
‘Gilroy California Late’: good flavor, long-keeping, juicy cloves, ideal for garlic braiding
‘Italian Late’: late season, softneck, pungent, stores and braids well
Rocambole
Rocambole is a rich-flavored type of garlic with large, easily peeled cloves. Also known as Italian garlic, hardneck garlic, or serpent garlic—the latter for the shape of its stem—it is a top-setting garlic that forms bulbils (small bulbs) at the top of the stem. Either these or the cloves formed underground may be used in any recipe calling for garlic, or they can be planted to continue the crop.
Varieties
‘Hillside’: winter-hardy, hardneck type with small, strong-flavored cloves
‘Spanish Roja’: midseason, hardneck type, a Northwest heirloom with true garlic flavor, does not do well in mild-winter areas
How to prepare: Use strong, “hot” onions for rich onion flavor in dishes calling for long cooking or caramelizing. Use the mild onions for raw dishes.
The onion is the basis for many Italian dishes. It is used in soffritto, a mixture of onion, garlic, carrots, celery, herbs (especially parsley), and sometimes a slice of pancetta that is the starting point for many meat and vegetable dishes. Sweet red onions are used raw in salads. Onions can also stand on their own, baked with olive oil and balsamic vinegar, say, or stewed in butter and a meat stock. Anna Del Conte speaks of northern Italians roasting onions with the skins still on. When they are cooked through, they are peeled, sliced, and eaten with olive oil and salt. Other Italian favorites are onions in a frittata with potatoes and rosemary, ravioli stuffed with a potato dough with onions and peppermint, and tiny onions in a sweet and sour sauce.
Garlic is used as a flavoring in many Italian dishes, from marinated olives to most pasta sauces. Two classic dishes feature garlic: agliata, a sauce made of garlic, bread crumbs, and olive oil and served on mushrooms or grilled vegetables; and bagna cauda, or farmer’s lunch, a sauce made with cream, anchovies, and garlic and served with vegetables and bread for dipping. You can rub garlic on toasted bread and drizzle it with olive oil for an antipasto, put it on pizzas, use it in salad dressings, soups, stews and to flavor sautéed vegetables.
Whole heads can be roasted in the oven. Cut papery tops off the head, place the head on a baking sheet, drizzle with olive oil, and bake it at 400°F for about 20 minutes or until tender. Squeeze flesh out of cloves and spread on bread or use in dressings and vegetable dishes.
OREGANO AND SWEET MARJORAM
(origano)
Origanum spp.
Flat leaf parsley (left), Marjoram (center pot), and curly parsley (right)
‘Greek’ oregano
The European oreganos are scrubby perennials native to the arid mountainsides of the eastern Mediterranean, they have long been associated with Italy.
How to grow: Common (Origanum vulgare) and Greek oregano (O. v. sub. hirtum; synonym: O. v. heracleoticum) are hardy to USDA Zone 5. Oreganos do poorly under hot, humid conditions and are treated as summer annuals in areas where temperatures are regularly in the high eighties and above. Sweet marjoram (O. marjorana) can’t withstand hard frosts and is often grown as a summer annual. Both must be planted in full sun in light, fast-draining soil. To ensure the best flavor, start plants from transplants or cuttings, not seeds. Cut back plants in late spring to encourage new growth, and again in midsummer to prevent them from becoming woody.
Greek oregano is considered by many to be the most flavorful European oregano. Before buying your oregano, taste it and see if it has a pleasant, spicy taste. The same holds true with marjoram.
How to prepare: The oreganos are most associated with southern Italy and can be used in soups, marinara, pizza, salads, cooked vegetables, and most fish and meat dishes. Use them in marinades for olives and tomatoes.
PARSLEY
(prezzemolo)
Petroselinum crispum

Flat-leaf parsley
There are two major types of parsley—the curly one and the tall, flat-leafed type, rightly called Italian parsley.
How to grow: Parsleys are biennials generally treated as annuals. The curly types have dark green, curly, finely divided leaves. They seldom grow more than a foot tall. Flat-leaf or Italian parsley grows to 2 feet and is a somewhat rangy plant. It’s the preferred culinary parsley for flavoring in Italy because of its deep flavor and sweetness. Start seeds in the spring or buy plants from nurseries and set them out. The plants do best in full sun and in rich, organic soil high in organic matter. Fertilize parsley midseason with nitrogen.
Varieties
Curly-leafed Parsley
‘Frisca Curly’: 75 days, vigorous, extra-curly, sweet flavor without metallic overtones, mildew-resistant
Flat-leafed Parsley
‘Catalogno’ (‘Gigante Catalogno’): 75 days, large leaves, good strong flavor
‘Gigante d’Italia’ (‘Giant Italian’): 85 days, 2 to 3 feet, vigorous growth, rich flavor
How to prepare: Parsley is best used fresh, though it retains some flavor when frozen. The Italians most commonly use the flat-leaf parsley, primarily in cooked dishes. Curly parsley is primarily used for garnishing.
Parsley is critical in Italian cooking. Soffritto, a mixture of onions, garlic, carrots, celery, and lots of parsley, is the basis for sauces, soups, stews, and fritattas. Gremolata is another flavoring mixture made with parsley, lemon peel, garlic, and olive oil.
SHELLING PEAS
(piselli garden peas, green peas)
Pisum sativum
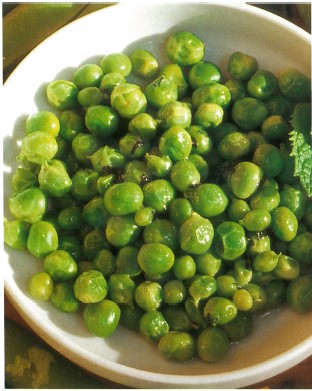
Shelling peas
Peas are most associated with northern Italy.
How to grow: Pea plants are either short bushes or long climbing vines from 6 feet tall. Peas are annuals requiring well-prepared, humus-rich soil, full sun, high humidity, and cool weather. They can tolerate some frost but do poorly in hot weather. The soil should be neutral or slightly alkaline and well drained. Pea seeds should be planted directly into the garden in early spring. Plant seeds 1 inch deep and 4 inches apart in double rows—12-inch spacing between rows is sufficient. Sets of double rows can be planted 24 inches apart. Most pea varieties profit from a trellis. Supports should be placed in the ground at the time of planting. Peas need only a light fertilizing when about 6 inches tall but profit from regular and deep watering—1 inch per week is ideal. They also respond well to organic mulches.
Peas are most attractive to slugs, snails, and birds. Cover the seedlings until they are 6 inches high. Another pest, the pea weevil, is not usually a serious problem, but large numbers should be controlled. To deter them, try lightly dusting wet or dew-covered foliage with lime. Pea moths can be controlled with Bacillus thuringiensis. To prevent mildew, avoid afternoon overhead watering.
Ideally, peas should be harvested every day during the mature-pod stage. If left past maturity, they begin to lose their sweetness and become tough, and production declines. Shelling peas are ripe when the pods are filled out but before they begin to lose their glossy green color and start to harden.
Varieties
‘Lincoln’: great-tasting heirloom pea; not as disease-resistant as some of the new varities
‘Knight’: 56 days, 1½- to 2-foot vines, productive, 3½- to 4½-inch pods with sweet, medium-sized peas
‘Novella’ (‘Novella II’): 57 days, semi-leafless variety, pronounced flowers and pods; neat and uniform bushy plants to 24 inches high.
How to prepare: Standard peas are enjoyed as a side dish after being boiled briefly and then reheated in butter and seasonings. Peas are paired with prosciutto and served in a cream sauce over pasta; combined with rice and pancetta in a soup; or pureed and cooked to make a timballini, a molded creation made with eggs and seasonings. Fresh peas are also used in lovely spring soups in combination with other spring vegetables and herbs like sorrel, mint, and chives.
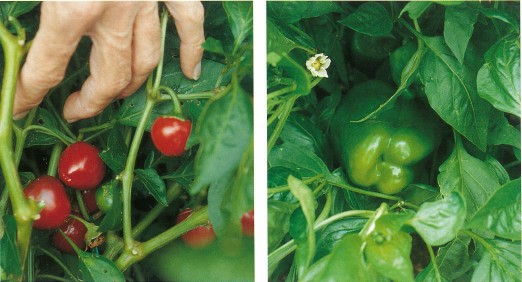
PEPPERS
(peperoni, sweet peppers; peperoncini, hot peppers)
Capsicum spp.

Peppers
Peppers are enjoyed most in southern Italy. Here they enjoy the large bells and the spicy Cayenne types.
How to grow: Peppers are a warm-weather crop. They cannot tolerate frost and won’t set fruit unless the weather is at least 65°F but does not exceed 80°F. Start them in flats eight weeks before the average last frost date. When seedlings are about 4 inches tall and all danger of frost is past, transplant them. Do not move them out too early, as chilling them results in poor growth all season. Wait until night temperatures are above 55°F and the air and soil are warm and settled.
Plants should be placed at least 18 inches apart in full sun, or in partial shade in hot climates. They require deep, rich soil and regular watering and fertilizing. Peppers are heavy feeders and respond well to regular applications of manure, fish emulsion, and kelp. Should they develop paler than normal and curling leaves, try adding calcium in the form of dolomite.
Tender pepper plants can fall victim to snails, slugs, aphids, and cutworms. Otherwise, the plants are relatively pest-free. They are occasionally prone to the same diseases that afflict tomatoes. Keep plants mulched and the weeds under control.
Peppers continue to produce fruit until the weather cools. Sweet peppers come in a wide range of colors. Once sweet peppers get near full size, they can be picked at their green, red, or yellow stages. Hot peppers can also be picked at any color stage, but most are hotter if allowed to ripen fully.
Cherry (above) and bell peppers (right)
Varieties
Sweet Peppers
‘Cherry Sweet’ (‘Sweet Cherry’): 70 days, heirloom, green to red, sweet, cherry-shaped peppers, great for pickling and stuffing
‘Como di Toro Giallo’ (‘Yellow Como di Toro’): 80 to 100 days, Italian pepper named for the shape, which is similar to a bull’s horn; 6 to 12 inches long; sweet yellow flesh at maturity
‘Como di Toro Rosso’ (‘Red Como di Toro’): 80 to 100 days, red version of the one above
‘Figaro’: 68 days, sweet Italian heirloom pimiento, ripens to crimson red, great for roasting
‘Marconi ’: 70 to 80 days, Italian heirloom, large—up to 1 foot long and 3 inches across at the shoulder—red or yellow sweet peppers
‘Peperoncini’: 75 days, long thin sweet peppers for salad, pickled for antipasto, harvested when green and full size, turns red at maturity, shrubby 3-foot plant, high-yielding
‘Quadrato d’Asti Giallo’: 85 days, Italian, green to gold, blocky shape, sweet pepper
Hot Peppers
Cherry: 80 days, bright red hot pepper, round, good for pickling
‘Super Cayenne’: 70 days, early, slim, 3- to 4-inch long red peppers, high-yielding, 2-foot-tall plant
How to prepare: Sweet bell peppers are used raw in salads and antipasto, or roasted and marinated. They are braised with onions and tomatoes and served as a side dish called peperonata, used in sauces for pasta with anchovies or pancetta, and stuffed with bread crumbs, capers, anchovies, and olives or with pasta. In a few parts of southern Italy peppers are dried like tomatoes and used over the winter or made into a paste and spread on bread or used as a condiment. Grilled peppers are marinated with garlic, anchovies, and capers.
The spicier peppers are pickled or used to add a “kick” to soups, seafood, and stews, especially in the south. In Abruzzi hot peppers are used more than anywhere else in Italy, especially in pasta dishes.
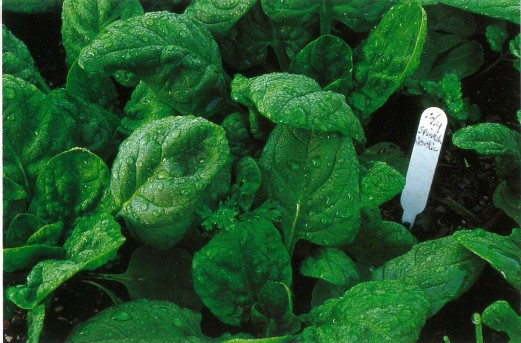
SPINACH
(spinaci)
Spinacia oleracea
Spinach
Spinach is a hearty green much appreciated in Italy. It is also very nutritious, as it is chock full of vitamins (especially vitamins A and B2) and minerals such as iron and calcium.
How to grow: If the weather is cool and the soil is rich and filled with humus, spinach is easy to grow. Since spinach is a cool-season crop, many varieties quickly go to seed if the weather is too warm. Sow seeds in early spring or fall, or in winter in mild-winter areas. Plant seeds ½ inch deep about 1 inch apart, in full sun in rich, well-drained soil. Keep them fairly moist. Thin seedlings to 3 inches apart and use the thinnings in salads. Make successive sowings every two or three weeks to extend the harvest. Spinach has occasional problems with slugs and leaf miners, plus downy mildew under fall and winter conditions. Harvest leaves a few at a time as needed by cutting or pinching them off, or harvest the entire plant.
Varieties
Spinach varieties vary in leaf type—smooth or savoyed—heat tolerance, mildew resistance, and strength of taste. As a rule, smooth-leafed spinaches tolerate heat better than savoyed ones, and savoyed leaves are harder to clean. The Italians grow both types.
‘Bloomsdale’: 48 days, old-time variety, savoyed leaves, heavy-yielding, slow to bolt
‘Italian Summer’: 40 days, bolt-resistant, semi-savoyed leaves are easy to clean, good flavor, high-yielding, resistant to downy mildew
‘Olympia’: 45 days, dark green smooth leaf, slow to bolt, mildew-resistant
‘Tyee’: 45 days, hybrid variety, dark green savoyed wrinkled leaves, upright vigorous growth, slow to bolt, tolerant of mildew, good for most seasons
How to prepare: First some generalities about spinach. When cooking it, avoid aluminum or iron containers, as spinach picks up a metallic taste. Spinach is very nutritious, but is also high in oxalic acid, which in large amounts ties up calcium and can impair kidney function. Therefore, it is best not to eat it in large amounts. Spinach seems to attract more than its share of sand and soil, so to enjoy it, it’s critical to wash spinach well.
Spinach is very popular in Italy. Young tender leaves are used raw in salads, either alone or combined with lettuces and other greens. When cooked spinach is usually boiled in salted water and drained, with the extra water squeezed out. Sometimes Italians combine spinach with chard leaves or many of the so-called “wild greens.” They generally serve it reheated in olive oil, garlic, and seasonings or use the cooked spinach, with or without other greens. It is added to a soup with barley and cannellini beans; combined with pancetta, tomatoes, and herbs for a pasta sauce; chopped and used in a souffle; used in fillings for ravioli; stewed with squid and tomatoes; pureed and incorporated in pastas of many types; enjoyed as a side dish; or incorporated into a gratin.
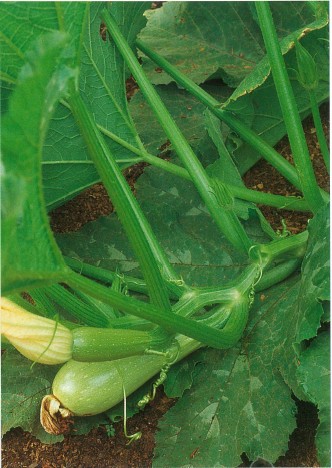
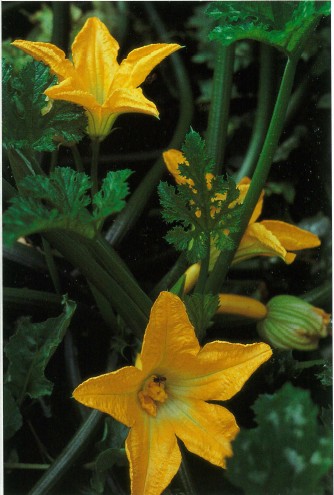
SQUASH, SUMMER
(zucchini, zucchette)
Cucurbita pepo var. melopepo
SQUASH, WINTER AND PUMPKINS
(zucche)
C. maxima, C. moschata, C. pepo
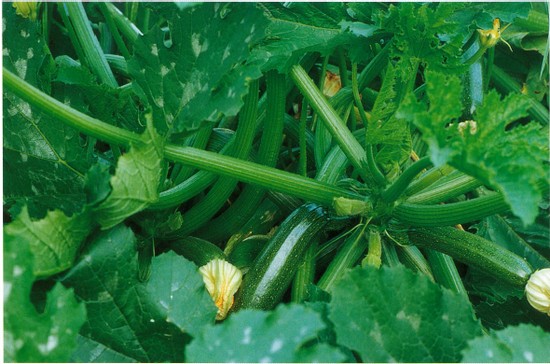
Green zucchini
‘Tromboncino’
The most famous Italian squash is zucchini; even the name is Italian. There are unique Italian zucchinis of different colors and shapes, and some with flowers that are particularly well suited for sautéing or stuffing.
How to grow: All the squashes are warm-season annuals. In short-summer areas seeds must be started indoors. The plants are usually grown in hills measuring about 3 feet across, with two or three plants to a hill. Space hills 5 to 6 feet apart for summer squash, and 7 to 10 feet apart for winter squash and pumpkins. Squash needs rich humus, full sun, and ample water during the growing season. It also benefits from regular applications of fish emulsion or a balanced organic fertilizer that is not too high in nitrogen. Do not let the plants dry out, and keep young plants well weeded.
Squash may be afflicted with squash bugs or spotted and striped cucumber beetles. Squash vine borers can also be a problem east of the Rockies. Mildew is the most common disease of this group and is to be expected by the end of the season.
Pick summer squash when it is quite young and tender; in its “adolescent” stage when the blossoms have just withered, indicating that the squash is still tender but has developed its flavor; or when it is more mature but still tender. Harvest the fruits regularly, or the plant drastically slows its production.
Unlike summer varieties, winter squash is picked when fully mature and is used for its wonderful deep flavor and texture. If not fully mature, it can be tasteless. When winter squash is fully ripe, the rind should be too hard to puncture with your fingernail, and the exterior color should be highly saturated. Leave about 2 inches of stem attached, or the squash is likely to rot. In storage most varieties hold their flavor (some even get sweeter), but if they are kept at too warm a temperature the flavor can deteriorate.
‘Rosalina’ squash
yellow zucchini with flowers
Gather squash blossoms in the early morning before they close; put their bases or stems in water in the refrigerator. The female flowers have an immature little squash at the base; the male flowers end at the stem. Usually, you should gather only male blossoms, making sure to leave a few to pollinate the females. Use the blossoms the same day they are harvested.
Varieties
Summer Squash
‘Costata Romanesco’: 52 days, Italian cocozelle type of zucchini, delicious ribbed light-and-dark-green-striped fruits, produces a good supply of male blossoms for cooking
‘Lagenaria Longissima’ (‘Verde Rampicante’): 65 days, vining, is used like summer squash in Italy when picked half ripe; white flowers, rich, full flavor, serve baked
‘Milano’ (‘Verde di Milano’): 55 days, dark green, rich flavored zucchini, harvest when small, just after the flower opens; ‘Seneca Milano’ is an early version (42 days)
‘Ronde de Nice’ (‘Tonda di Nizza’): 45 days, French heirloom grown in Italy, tender light green skin, fine flavor, creamy texture; its round shape lends itself well to stuffing
‘Tromboncino’ (‘Zucchetta Rampicante’): 55 to 58 days, vining, Italian heirloom, long, curved, pale green fruit that is bell-shaped at one end and can grow to 1 yard long; delicately flavored, resistant to squash vine borers, can be grown on a trellis
Winter Squash
‘Early Butternut’ (‘Noce di Burro Precoce’): 75 to 85 days, extremely early, high yields, rich orange flesh, resistant to squash borers; standard butternut (‘Noce di Burro’) is also grown in Italy
‘Mammouth’: large, round, yellowish tan squash found all over Italy, very sweet creamy yellow flesh
‘Marina di Chioggia’: 5 to 10 pounds, dark gray-green warty very tasty fruits, high-yielding vigorous vines, from the Chioggia region of Italy
How to prepare: Summer squash is popular all over Italy and is cooked in oh-so-many ways. It is simply steamed or boiled and is finished with olive oil and seasonings and served as a side dish or over pasta—sometimes tomatoes are added to the squash, and eggplants too. Basil, thyme, and oregano are favorite herbs to add to the pasta sauces. Diced zucchini is added to risottos or is sliced and sautéed with mushrooms and nepitella. Zucchini is also used in summer vegetable soups, or sautéed and baked with a béchamel sauce and cheese. If you are overwhelmed with zucchini, Marcella Hazan’s books have many recipes (see Resources, page 100).
Zucchini blossoms, called fiori di zucca, are another Italian specialty with a slightly sweet nectar taste. To prepare the flowers, wash and gently dry them first. (Watch out for bees inside of closed blossoms.) If you’re using the blossoms for fritters or stuffing, keep the stems on. Otherwise, remove the stems, stamens, and stigmas. Dip the blossoms in a light batter and fry them until golden. They can be stuffed first with ricotta cheese, bread crumbs, and seasonings. Or you can cut up the blossoms and use them in fritattas; sprinkle them over clear soups or a salad; or make a delicate pasta sauce with butter, garlic, and veal stock and serve it over fresh pasta. A note: Sicilians also cook with the last foot or so of the squash vine, which they boil and dress or use in soups.
Winter squashes and pumpkins are used interchangeably in Italy, and most are rich, dense, and sweet. Serve winter squash pureed as a side dish, by itself or combined with white beans, and use it to accompany game or sausages. Italians use winter squash to flavor gnocchi. They stuff the squash with meat and herbs or use it diced in a soup with rice and in a risotto, as is popular in Lombardy. Other uses include roasting winter squash with potatoes and rosemary for a pasta filling.
TOMATOES
(pomodori)
Lycopersicon esculentum

‘Costoluto Genovese’ tomatoes
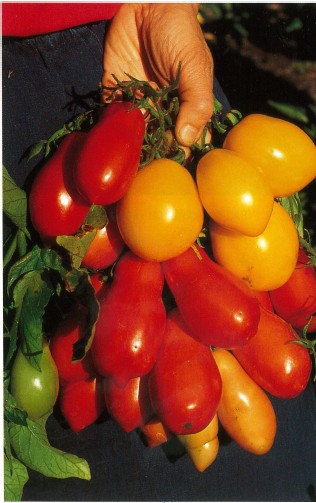
yellow and red paste tomatoes
The tomato is king in Italy. Its meaty red fruit is used in a great number of ways, particularly in the south. Many of the slicing-type tomatoes grown in Italy are similar to ours, though some varieties are fluted rather than round. In the many varieties we call paste tomatoes, Italians have perfected the tomato’s taste and use tomatoes in sauces, either fresh or reconstituted. In Italy both paste and cherry tomatoes are sun-dried and reconstituted for winter use.
How to grow: Tomatoes are heat-loving plants. Though perennials, tomatoes are grown as warm-weather annuals since they can tolerate no frost. Extreme heat can sunburn the fruit, though, so it is necessary to protect your plants in extremely hot climates. Buy tomato seedlings from your local nursery in spring, or to try the recommended Italian varieties, start your own from seed. About six to eight weeks before your last frost, plant tomato seeds ¼ inch deep in good potting soil. Keep the plants in a very sunny place near a window or under grow lights. When all danger of frost is over and the plants are about 6 inches high, transplant them into the garden. They should be planted several feet apart, in full sun and in well-drained soil amended with a good amount of organic matter. Plant the transplants deeper than you would most vegetables—the soil should come up to the first set of new leaves. Most gardeners prefer to stake or trellis tomatoes. These supports help your plants take up less room and keep the fruit from spoiling on the ground. At transplant time and again when the fruits are beginning to set, fertilize plants with fish meal, chicken manure, or a premixed low-nitrogen, high-phosphoru: organic fertilizer formulated for tomatoes. Be careful not to apply excess nitrogen fertilizer, as it favors leaf growth at the expense of the fruit. A form of calcium is often needed to prevent blossom-end rot. Liming may be needed every few years if you live in an area with acidic soil. Tomatoes prefer a soil pH between 6 and 7. Keep your tomato plants evenly watered. Deep, fairly infrequent waterings are best. Mulch with compost after the soil has warmed up thoroughly.

‘San Marzano’ tomatoes
A few major pests afflict tomatoes, including tomato hornworms, cutworms, tobacco budworms, nematodes, and whiteflies. A number of diseases are fairly common to tomatoes, including fusarium and verticillium wilt, alternaria, and tobacco mosaic. Control diseases by rotating crops, planting resistant varieties, and practicing good garden hygiene.
Harvest tomatoes as they ripen. Color and a slight give to the fruit are the best guides to ripeness. Remove fruit from the plant with care not to break stems bearing fruit. Harvest with a slight twist of the wrist or with scissors or shears.
Varieties
In a catalog, the capital-letter abbreviation after the name of the variety indicates the disease resistance. For example, VF or VFF indicates resistance to some strains of verticillium and fusarium wilt. Other initials include N for nematodes; T or TMV for tobacco mosaic virus; and A for alternaria.
Tomato varieties are either “determinate” or “indeterminate.” Determinate plants are those in which the vines grow little or not at all once the fruit is set. They usually need little support, and you can expect the fruit to ripen within a short time. Indeterminate vines continue to grow after the first fruit is set, and they continue to set new fruit throughout the season. They need staking or other support, and their fruit ripens over a long period of time.
Medium to Large Red Tomatoes
‘Bissignano #2’: 78 days, large juicy Italian slicing tomato, good flavor, plum or globe shape; can also be used for cooking; larger, indeterminate, high-yielding plants
‘Costolulto Genovese’: 80 days, Italian heirloom, delicious slightly tart flavor, large—1 pound and up—deep red, lobed fruits from the Piedmont region of Italy, for slicing or cooking, vigorous productive indeterminate vines, resistant to verticillium and fusarium wilt
‘Gigante Liscio’: large red smooth-globed fruits with the green shoulders appreciated in Italy, determinate vigorous plants, good disease resistance
‘Marmande VF’: 67 days, semi-determinate, tolerates cool weather, delicious meaty beefsteak-type fruit
Processing Tomatoes
‘La Rossa VFF’: 75 to 78 days, great-tasting Italian-type sauce and paste tomato, very thick walls, little juice, cooks down very quickly, determinate
‘Milano’: 63 days, early Italian hybrid, plum-type with rich tomato taste for sauce, drying, and canning; compact determinate bushes, high yields, resistant to verticillium and fusarium wilts
‘Principe Borghese’: 75 days, small heirloom determinate plants with numerous small fruits, grown in Italy for drying—in some areas houses are decorated with long bunches drying in the sun, not very disease-resistant
‘Roma VF’: 78 days, determinate, improved cultivar of old ‘Roma’ with considerably more disease resistance, large harvests of thick-walled fruits ideal for sauces, paste, and canning
‘San Marzano’: 75 days, heirloom, indeterminate, oblong great-tasting paste tomato, good for canning or drying, vigorous plants, considered the “gold standard” for flavor in Italy, the Fl hybrid ‘Super Marzano VFNT’ is more pear shaped, determinate, and very productive
‘San Remo’: 76 days, Italian hybrid, very large sauce or drying tomatoes, tall indeterminate vines, high yields, resistant to verticillium and fusarium
‘Viva Italia VFFNA’: 80 days, pearshaped fruit with high sugar content, for fresh eating, canning, or freezing; determinate plants are highly disease- and heat-resistant
How to prepare: In Italy large slicing tomatoes are generally eaten raw, sometimes served with olive oil and fresh basil. The paste (or plum) tomatoes are preferred for cooking. Favorite herbs to use with tomatoes are basil, oregano, marjoram, and parsley. Tomatoes can be stuffed with all sorts of fillings, from risotto to pasta to tuna and black olives, as is popular in southern Italy. Cooked dishes that feature tomatoes include peperonata (tomatoes, peppers, and onions braised in butter and served with meat or a fritatta); a soup with garlic, mushrooms, and basil that’s ladled over bread; bread salad with onions and basil; and a tomato pizza with mozzarella cheese. Tomatoes are also integral to many pasta dishes. A common pasta sauce is one in which a vegetable such as spinach, artichoke pieces, zucchini, or eggplant chunks are combined with pancetta or prosciutto and seasonings and served over compact types of pasta and served with Parmesan cheese. In parts of the south a little hot pepper may be added to the sauce. In the summer the sauce is made with fresh tomatoes, in the winter from canned tomatoes or tomatoes that were pureed and dried in the sun.

Roma tomatoes
In Italy dried tomatoes are not usually found in cooked dishes, as they might be in the United States. Instead, they are marinated in olive oil, sometimes with added seasonings, and used as a snack or condiment or in an antipasto.