What can be more important than a knitter’s choice of yarn? Yarn is the fabric of the sweater. Whether a sweater is simple or elaborate, the choice of yarn does more than influence the look and feel; when knitted, it becomes the fabric. Therefore, it is the look and feel.
Because knitted fabric is built from the seemingly nothingness of two sticks and some string, there is a tendency to think of it as something else. When most of us think of fabric, we think of the woven variety, such as shirting, denim, calico, or satin. But think of the wardrobe-staple T-shirt made from knitted fabric—these stitches may appear too small to be knitted by hand, but they could be.
Even knitters who follow patterns to the letter using the suggested yarn, needles, and stitch pattern are creating their own fabric. They have the additional advantage that they can guide every detail of that fabric and the fit of the garment it produces.
The variety of yarns and patterns currently available is overwhelming. New yarn stores are popping up everywhere—each one a treasure trove of enticing colors, fibers, and designs. Artisan yarns are widely available on the Internet and at fiber fairs nationwide. Everywhere you turn, it seems you’re faced with a beautiful new yarn. But not all yarns are appropriate for all projects. Before you settle on a yarn for your next project, take into account the type of yarn, how it knits up, and how you want the finished garment to look and feel.

Yarns are most commonly classified by weight, which is a measure of the thickness of the yarn. This weight influences how many stitches and rows of stitches constitute an inch of knitted fabric. In order of increasing thickness, the standard yarn weights are lace or fingering, sport, DK, worsted, chunky, and bulky. The table below shows how the Craft Yarn Council of America has classified these yarn weights according to the number of stitches expected per inch of knitting on specific needle sizes.
The Craft Yarn Council of America (CYCA) has devised a standard numbering system for reporting yarn weights. This system is used for the projects in this book.

Yarn can also be classified by grist—the amount of fiber required to make a certain thickness of yarn, reported as wraps per inch (WPI). Wraps per inch is a measure of the width of a particular yarn, based on the number of strands that fit side by side in one inch. The easiest way to determine WPI is to wrap the yarn around a narrow rod or ruler for one inch. The heavier the yarn, the fewer number of wraps in one inch; the finer the yarn, the more wraps. Like yarn weight, WPI relates to the number of stitches expected per inch of knitting, but because it is a measurement of the actual size of the yarn, it provides a more accurate idea of the expected gauge and needle size. Some knitting books and magazines include WPI information along with general weight classifications.

To measure WPI, count the number of wraps in one inch.
When determining WPI, be sure to acknowledge the loft of the yarn by wrapping loosely so that each wrap just touches the last. Depending on the fiber content, the yarn construction, and the tension with which the yarn is wrapped, some yarns may compact when they are wrapped around the needle but fluff up once the stitches slide off the needles—WPI should reflect this quality of the yarn.
Although yarn weight and WPI fundamentally suggest a well-balanced gauge and needle size, don’t be afraid to deviate from these guidelines. By simply changing the needle size, you can make a fabric that’s elegantly drapey or serviceably dense. Use the table on page 9 to help you decide the combination of yarn weight, yardage per pound, WPI, needle size, and gauge needed to create the fabric you want.
Follow the recommendations for “Pliable or Normal Fabric” for a fabric that is flexible without being too dense or too open (see Mary’s Classic Crew on page 15). When held up to the light, the stitches in this type of fabric will touch each other but allow light to shine through. This fabric is reasonably durable and well suited for sweaters, vests, and other indoor garments. For outerwear, it offers only moderate wind resistance.
Follow the recommendations for “Drapey or Openwork Fabric” to create a fabric that’s pleasantly pliable and drapey (see Angel Wing Lace Float on page 104). When held up to the light, the stitches in this fabric will barely touch each other and will allow a lot of light to shine through. This fabric is somewhat sheer, not particularly durable, and easily snagged. But it is very light and comfortable to wear. It is commonly used for shawls, scarves, and lightweight layered garments. This type of fabric offers minimal warmth and no wind resistance.
Follow the recommendations for “Dense or Stiff Fabric” to create a fabric that’s stiff and not particularly flexible (see Alina’s Basketweave Coat, page 53). When held up to the light, the stitches in this fabric are tightly packed together and allow very little light to shine through. This fabric is very durable and great for rugs, purses, and totes. Dense fabrics knitted with finer yarns are ideal for socks, mittens, fitted vests, and coats. They are very warm regardless of the yarn used and as wind resistant as knitted fabrics can be.
Gauge—the number of stitches and rows per inch of knitting—is the key to successful knitting. An understanding of gauge will unlock the door to fit, yarn substitution, and pattern alteration. If you want to knit a piece of cloth to particular dimensions (as in a sweater that fits), you must knit to a specific gauge. The only way to know in advance that you’re knitting to the right gauge is to knit a sample swatch. There is no alternative. Every yarn, every pair of needles, and every knitter has idiosyncrasies that affect gauge. The only way to discover how these variables interact is to knit a sample.
To get an accurate gauge, knit a swatch with the needles and in the stitch pattern you intend to use for your project. Different types of needles and different stitch patterns will produce different gauges. Don’t skimp here—you’ll get the best gauge measurement from a large swatch that allows you to measure at least four inches each horizontally (stitch gauge) and vertically (row gauge) without interference from irregular edge stitches, distortion from cast-on or bind-off rows, or draw-in from the last row of stitches on the needles. Loosely bind off the last row of stitches or slip them off the needle (and onto waste yarn) before measuring the gauge, unless your swatch is so long that there’s plenty of fabric to measure that isn’t anywhere near the needles.
If you’re short on yarn for your swatch, use a provisional cast-on (see Glossary, page 134), knit at least 2½" square, and slip the last row of stitches onto waste yarn. Because the cast-on and bind-off edges are as flexible as the knitting, this allows you to get an accurate measurement on fewer stitches.
It is important to swatch in the round if you intend to knit your garment in the round. (Don’t confuse knitting back and forth on circular needles with knitting in the round. Knitting in the round is when you join your knitting and knit in a circular fashion, with every row being worked in the same direction.) Many knitters knit tighter than they purl, or vice versa. When working stockinette stitch in the round, every stitch is knitted every row. If you knit tighter than you purl, your gauge will be tighter when you work in rounds than when you work in rows with the same yarn and needles. Even if the difference is only a quarter of a stitch every 4", it can add up to several inches over the circumference of a sweater.
To get an accurate gauge for knitting in the round, knit a tube using a set of double-pointed needles or a very short circular needle. Another option is to knit a flat swatch. Using double-pointed or circular needles, knit every row with the same side of the swatch facing you, stranding the yarn across the back so that each row begins with the same stitch. Be careful to carry the strand loosely across the back of the work so that it doesn’t cause the knitting to pucker. Measure the gauge in the center portion of the swatch as far from the edge stitches as possible—the edge stitches will be affected by the loose strand connecting them and will not reflect the true gauge.
Before measuring, lightly block the sample by covering it with a barely damp cloth and gently steaming it with an iron. Note that although this process is recommended for natural fibers, it usually isn’t necessary (or desirable) with synthetic yarns.
Measure the number of stitches in 4", including partial stitches, both vertically and horizontally. Divide this number by four to determine the gauge per inch. Be sure to take partial stitches into account—again, one-fourth of a stitch difference every 4" can add up to several inches in the circumference of a sweater.
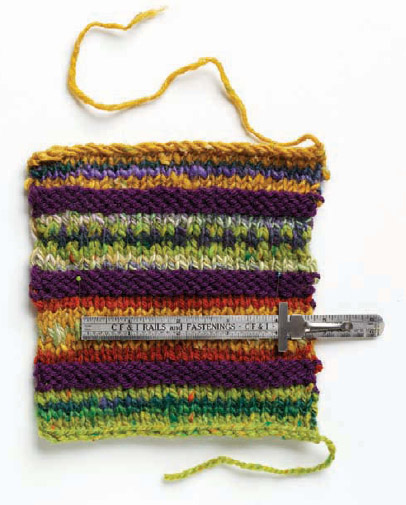
It’s easy to see and count the number of stitches per inch on a white or solid-colored smooth yarn by placing a ruler on top of the sample and counting the stitches along one row. This can become more of a challenge with variegated and textured yarns. When it’s difficult to see the individual stitches, determine the gauge by using simple math. Keep track of the number of stitches cast-on for the sample swatch and the number of rows knitted. To measure the stitch gauge, place a straight pin after the first stitch and before the last stitch of a row. Place your ruler along one row of the swatch and measure the width between the pins. Divide the number of stitches between the pins by the number of inches between the pins. To get the row gauge, place pins horizontally in the swatch just inside the cast-on and bind-off rows. Place your ruler along the vertical stitch line and measure the length of the swatch between the pins. Divide the number of rows between the pins by the number of inches between the pins.

Measure the number of stitches over four inches.
Download the table below as a PDF.

The Twisted Sisters love working with color, and one of our favorite ways to incorporate lots of color is to use handpainted and variegated yarn. Most of us like to dye our own yarns, but if dyeing isn’t for you, you can purchase a wide array of handpainted and variegated yarns from commercial or independent yarn producers (see Resources, page 142, for a few).
Handpainted and variegated handspun yarns form stripes of color when knitted. The length of the color bands will determine how those stripes will appear in the knitted fabric. One inch of knitting, regardless of gauge, will take about 3" to 4" of yarn, depending on the stitch pattern—heavily cabled knitting takes more; slip-stitch and color patterns take a little less. But as a rule of thumb, a 3½" color band will knit up into a 1" width of stitches.

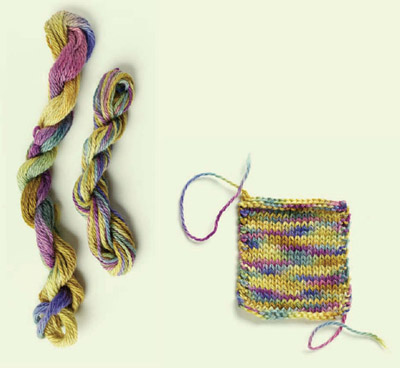
A swatch of handpainted brushed mohair from Dicentra Designs is raveled to show the difference in the length of color bands before and after knitting.
Yarns that have long color bands will produce varying widths of stripes over the standard width of an adult sweater. The same yarn knitted in narrow panels or areas of intarsia or entrelac will produce solid colors and gradations of color depending on the colorway of the yarn and the lengths of the color bands. Color bands an inch or shorter in length will show up as dots when knitted.
No matter the length of the color bands, handpainted yarn usually develops a distinct color pattern repeat when knitted. This repeat isn’t usually exactly the same for each skein of handpainted yarn, so don’t expect every skein to knit up exactly the same. To minimize the difference between different skeins, alternate knitting two rows from one skein with two rows from another, as in the Bouclé Boat Neck on page 48. If the skeins are very different, alternate two rows each from three different skeins.

Left: variegated yarn before and after reskeining. Right: knitted fabric.
Another way to distribute variations is to knit with two strands of yarn held together. Double stranding is a beautiful way to “paint” with yarn, especially finer yarns. Alternate one strand at a time as above while carrying the other strand twice as far. For example, if you have three skeins, A, B and C, knit two rows with A and B held together, followed by two rows with B and C held together, followed by two rows with C and A held together, and so on.
Some skeins may have an obviously longer section of one color than the others. Rather than trying to disperse this difference over the entire sweater, group the accent skeins in a single area as a design element, such as at the collar and cuffs.
Figuring yardage is not an exact science. A conservative ballpark figure plus at least 10 percent usually works. If you are designing as you go, get plenty of yarn or fiber. You may not be able to get more later.
Gauge (the number of stitches and rows per inch of knitting) is probably the most important factor in determining the amount of yarn you’ll need. The smaller the gauge, the more rows you’ll knit, the more yarn you’ll need—it’s that simple.
To get a rough estimate of how much you’ll need, flip through knitting magazines and highlight the gauges and number of yards in each project to get a good idea of the range of yardage necessary. For example, a classic stockinette crew-neck sweater like Mary’s Classic Crew (page 15) knitted at 4½ stitches per inch on size 8 needles can take anywhere from 1,100 to 1,300 yards, depending on the stretchiness of the yarn. Pay attention to the stitch patterns, too. Heavy cable patterns take about half again as much yarn as the same size sweater knitted in stockinette stitch. Sweaters knitted with color stranding take roughly half again as much yardage for each row of stranding.
Most yarn shop workers will usually have a good idea about how much you’ll need of the yarns they carry, even if you don’t have a specific pattern in mind. But be considerate when seeking help from yarn shops—don’t ask for more help than you’re willing to return in the form of purchases.
For a more accurate estimate of yardage needs, you’ll have to do some math. But don’t worry—this is really pretty easy. Measure about 10 yards of yarn and place a small safety pin through the yarn to mark each yard. Use this yarn to knit a swatch that measures exactly 4" square, removing the pins as you come to them. Chances are, you’ll finish your swatch in between a pair of pins. Estimate how much of that yard you used. For example, if 2 feet of yarn remain before the next pin, you’ve used ⅓ of a yard. Count the number of pins you removed as you knitted and add the partial yard measurement at the end to determine how many yards of yarn you use to knit the 4"-square swatch (which translates to 16 square inches of fabric). Next, make a generous determination of how many square inches of fabric are in the sweater you want to make (remember to include collars and edgings).
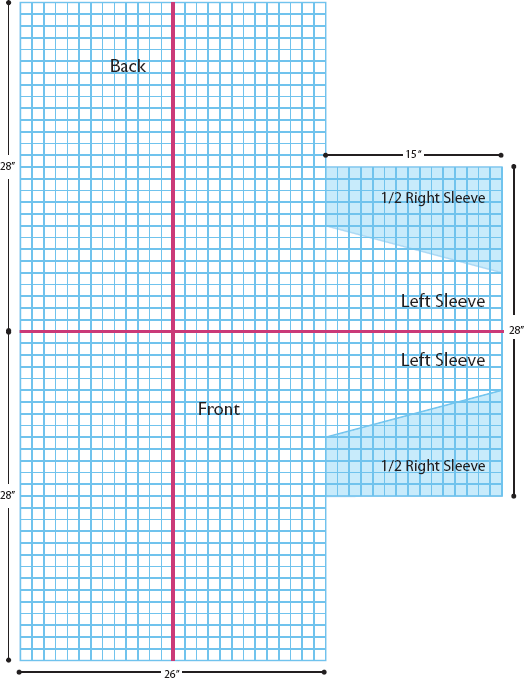
To do this, make a scale drawing of your sweater on graph paper. Draw the bodice back, the bodice front, and one sleeve. Split the other sleeve lengthwise in two halves and draw each half next to the first sleeve to make two rectangles. Multiply the width of each rectangle by its length to get a good approximation of the number of square inches in your sweater. For the example here, the front and back take 56" × 26"=1,456 square inches; the two sleeves take 28" × 15"=420 square inches.
Divide the number of square inches just determined for your sweater by the number of square inches in your swatch (16 square inches in our 4" square example) to determine how many swatches it would take to make your sweater. Multiply that number by the number of yards knitted into your swatch to determine the minimum number of yards you’ll need. For a safety margin, add 10 percent to this number.


Plot your sweater pieces on graph paper to figure out the total area of all the pieces.