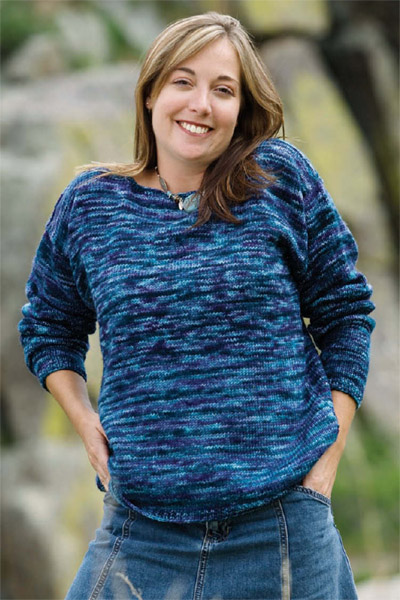
In a sweater that is knitted up and down, the pieces are worked from the hem upward to the neck or from the neck downward to the hem. In either case, the rows of knitting run perpendicular to the center line of the bodice or sleeve. When broken down into individual steps, it’s surprisingly easy to design and knit a drop-shoulder sweater in this orientation. The instructions here are for working the front and back upward from the hem to the neck, and the sleeves either upward from the cuff to the shoulder or downward from the shoulder to the cuff. For our example, we’ll use a classic crew pullover knitted by Mary Priestly.

The Fitter List for Drop-Shoulder Sweater Knitted Up and Down (Mary’s Classic Crew)
Measure your body and allow for the appropriate amount of ease (see page 14) or measure a sweater that fits the way you like and enter the numbers below. Refer to your gauge swatch for your stitch and row gauges, then translate each measurement into numbers of stitches and/or rows as you go along.
Yarn name: Ashland Bay Trader’s Falkland’s Superwash
Fiber content: 100% Superwash Wool
Weight classification: Worsted (#4 Medium)
WPI: 11
Number of yards/pounds used: 1,180 yards; 15½ ounces
Stitches per inch: 4½ Rows per inch: 7 Needle size: US 8 (5 mm)
Cast-on method: Loop
Bind-off method: Chain
Selvedge treatment: Chain stitch
Sleeve increase/decrease method: Paired decreases
Seam technique: Mattress stitch
Mary wanted to make the decreases on right-side rows only, so she used a taper of *6, 4. The first set of paired decreases was made on the 6th row, the next pair of decreases was made 4 rows after that; the 6, 4 sequence was repeated from * 12 more times to complete the total number of decreases.
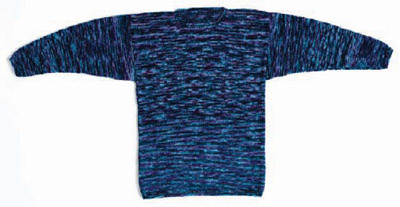
Bodice
Circumference: 45 inches
Width: 22½ inches; 101 stitches
Cast-On Stitches: 103 stitches (includes edge stitches)
Length With Edging: 23 inches; 160 rows
Length Without Edging: 22½ inches; 156 rows
Length of Lower Edging: ½ inches; 4 rows
Armhole Depth: 9½ inches; 66 rows
Back Neck Width Without Edging: 8½ inches; 39 stitches
Back Neck Width With Edging: 7½ inches; 33 stitches
Front Neck Depth Without Edging: 2½ inches; 18 rows
Front Neck Depth With Edging: 1½ inches
Neckline Edging: 4 rows
Lower Front Neck Width: 5 stitches
Begin Front Neck At: 20½ inches
Shoulder Width: 7 inches; 32 stitches
Sleeves
Sleeve Length Without Edging: 18½ inches; 130 rows
Sleeve Length With Edging: 19 inches; 134 rows
Cuff Circumference: 7½ inches; 34 stitches
Half Cuff Circumference: 3¾ inches; 17 stitches
Cuff Length: ½ inches; stitches; 4 rows
Upper Arm Circumference: 19 inches; 86 stitches
Half Upper Arm Circumference: 9½ inches; 43 stitches
Sleeve Taper Rate: 2 stitches decreased every 5 rows 26 times; 130 rows
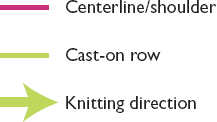
Sweater Map for Up-and-Down Classic Crew
Using the yarn, needles, and stitch pattern you plan to use for your sweater, knit a generous sample swatch to determine stitch and row gauge (Chapter One, page 8). Enter this information for Gauge in the Fitter List.
Using a tape measure, measure your body circumference at your chest, waist, and hips. Use the largest of these measurements for your torso measurement. Add the desired amount of ease to this body measurement (Chapter One, page 14)—0–2" for a close fit, about 2–4" for a standard fit, or 4" or more for an oversized fit. Enter this number for Bodice Circumference in the Fitter List. Divide this number by two for the Bodice Width.
Alternatively, measure a shirt or sweater that fits the way you like, ideally one that has a drop-shoulder construction. Lay the garment on a flat surface and measure the width. Enter this number for Bodice Width in the Fitter List. Double this number for the Bodice Circumference.
To determine the sweater length, ask a friend to measure you from your shoulder line straight down the center of your back to where you want the hem to fall. Alternatively, measure the length (from shoulder seam at the neckline to hem) of a sweater that’s the length you want. Enter this number for Bodice Length With Edging in the Fitter List. Decide how much of this length you’ll want to devote to edging and enter this number for Length of Lower Edging. Subtract Length of Lower Edging from Bodice Length With Edging and enter this number for Bodice Length Without Edging.
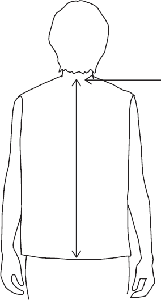
Measure your desired bodice length from the nape of your neck to the desired position of the hem. It’s best to have someone else do this for you.
Multiply your stitch gauge by your desired bodice circumference to determine the number of stitches you’ll need to make the bodice the size you want. Mary had a stitch gauge of 4½ stitches per inch. She wanted a circumference of 45" for a standard, comfortable fit. Mary therefore needed 202.5 stitches (4.5 stitches per inch × 45 inches = 202.5 stitches). Mary rounded this down to 202 stitches. Divide this number by two to determine the number of stitches for just the bodice back (or the bodice front). For Mary, this was 101 stitches. If you want to add selvedge stitches (see below) to facilitate seaming later, add them to this number. Enter the total number of stitches in the Fitter List for Cast-On Stitches.
Mary wanted to use a chain selvedge and sew the seams with a mattress stitch 1 stitch from each selvedge edge. This meant that she’d lose the equivalent of 4 stitches total in the side seams, which translates to almost 1" in the total finished circumference at Mary’s gauge of 4½ stitches per inch. To make up for this difference, Mary decided to add an extra stitch at each selvedge edge, so she increased her cast-on number to 103 stitches. If Mary had been working with a finer yarn whose selvedge stitches added up to ½" or less of width, or if she had chosen a different selvedge/seam combination, she might have chosen not to add these extra stitches.
Multiply your row gauge by the desired bodice length to determine the number of rows you’ll need to work. At this point, this number is only a guideline—you can always adjust the number of rows later if you want to finetune the length.
In knitting, the selvedges are the first and last stitch of each row, and they are incorporated into the seams when the pieces are sewn together (there are no selvedge stitches in pieces knitted in the round). There are a number of different ways to work selvedge stitches (see Glossary, page 139), and the way you choose can greatly facilitate working seams (or picking up stitches) later. Different types of selvedge stitches work best with different types of seaming stitches, so you’ll want to decide on the type of selvedge stitches and seams in the early stages of your design process.
Some types of seams cause the selvedge stitches to turn into the seam allowance. If you don’t allow for these stitches to be “lost” in the seams, the finished dimensions of your sweater, especially one knitted with bulky yarn, can be 1" (or more) smaller than you calculated. Other types of seams can be worked with the knitted pieces butted up against one another without any overlap. These types of seams don’t affect the finished dimensions of garments.
Knitters often complain about having to sew seams (and we show several ways to avoid seaming in your projects). But more often than not, it’s not the process of sewing seams that’s problematic, it’s the fact that the selvedge edges are uneven and the knitters are having trouble seeing where to guide the seaming needle. If you pay attention to selvedges as you are knitting, they will be easier to see when it comes time to sew, and the task will not seem so distasteful.
Using the method of your choice (Glossary, pages 131–132), cast on the desired number of stitches. Work the edging of your choice for the desired length (Mary worked knit 1, purl 1 rib for 4 rows), then work your chosen stitch pattern (Mary used stockinette stitch) until the piece measures about 3" above the edging. Lay the piece on a flat surface and measure the width to confirm it’s the size you intended. If the piece is not the correct width, remeasure your gauge, recalculate the number of stitches to cast on, and reknit the piece to this point. Once you’re satisfied that the width is correct, continue to work in your chosen stitch pattern until the piece measures the desired Bodice Length With Edging.
At this point, you can fine-tune the length by holding the piece (while it’s still on the needles) against your body. While standing up, center the knitting on your body, holding the needles even with the top of your shoulders. Allowing the piece to hang naturally, confirm that you like where the lower edge falls. It’s an easy matter to add or subtract rows at this point to get exactly the length you want, but if you do make adjustments, be sure to update the information on the Fitter List.
Once you’ve reached the desired length, use the method of your choice (Glossary, pages 131–132) to loosely bind off the stitches. Mary used a simple loop bind-off.
The first and last rows of any piece of knitting are just as important as all the rows in between. Even though the techniques of casting on and binding off are different, they serve the same function: to create a stable edge that won’t ravel. These rows can be finished edges that stand alone; they can become incorporated into a seam; they can become an invisible part of the fabric when grafted together. There are dozens of ways to cast on and bind off stitches and the methods to choose depend on the look and function you want.
You can choose cast-ons and bind-offs that mirror each other so that the edges have the same look and feel. For example, there are loop, chain, and cable methods of casting on that have corresponding techniques for binding off. When you pair them in a sweater, you’ll be hard pressed to say which is the cast-on and which is the bind-off edge. See pages 132–134 of the Glossary for a variety of cast-ons and pages 131–132 for bind-offs.
Tip Adding Stitch Patterns
If you wish to knit this sweater with a repeating stitch pattern, you may need to adjust your cast-on number to accommodate full pattern repeats and to center the pattern.
If you plan to add an edging such as ribbing or lace later, subtract the number of inches in your desired edging from the overall bodice length.
You’ll use the knitted Bodice Back to map out the exact number of stitches and rows involved in the neck opening on the Bodice Front. First, find the center line of the knitted Bodice Back. If you worked on an even number of stitches, the center line will be the space between 2 stitches. Mark this line with a vertical pin. If you worked on an odd number of stitches, the center line will be an entire stitch. Place a vertical pin on each side of the center stitch.
Standing in front of a mirror, hold the Bodice Back against your body, aligning the centerline of the bodice with the centerline of your body. With straight or safety pins, pin the shoulder edges of the Bodice Back (without stretching or pulling the piece) to the shoulder lines of the shirt you’re wearing, leaving the center part unpinned to suggest the desired neck width. This will give you a good idea of how the finished sweater will hang.
Tip Loose Bind-Off
A loose bind-off tension will ensure a nonbinding neck and shoulder seams. To ensure that the bind-off is sufficiently loose, knit the last row on needles one size larger, then use the larger needle’s mate to work the bind-off row.
Bobby pins are marvelous for marking your knitting—they stay where you put them and they won’t pierce your clothes or fingers.
Mark the desired finished neck width on each side of the center with vertically placed bobby pins. Mark the desired finished neck depth on the center line with a horizontally placed bobby pin. Be sure not to pin through to your shirt.
Remove the Bodice Back from your shirt and lay it on a flat surface. With a ruler or tape measure, measure the neck width between the vertical pins and enter this number in the Fitter List for Back Neck Width With Edging. Count the number of stitches between the pins and enter this number as well. Measure the neck depth from the shoulder line to the marking pin and enter this number for Front Neck Depth With Edging. Count the number of rows between the shoulder line and marking pin, round up or down to achieve an even number, and enter this number as well.
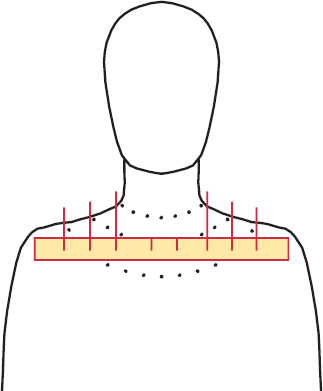
The dotted lines indicate a few possible necklines.
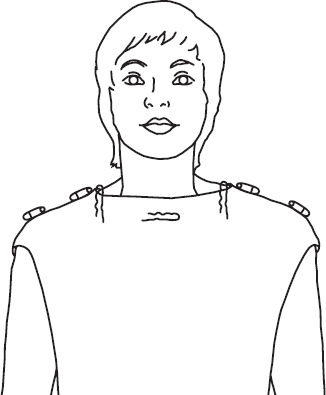
Pin the Bodice Back to the shirt you’re wearing and mark the desired neckline width and depth with bobby pins.
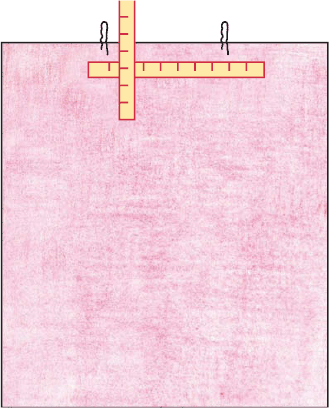
Measure the marked neckline width and depth and translate these measurements to stitches and rows. Plot this shaping onto graph paper.
Once you know how wide and deep you want your neckline in terms of rows and stitches, you can detail the exact shape on graph paper, allowing each square of the graph paper to represent one stitch. If possible, use knitter’s proportional graph paper (Resources, page 142) so the shape you draw will match the shape you’ll knit.
First, draw a horizontal line to represent the shoulder line. Bisect this with a vertical line to represent the center front. If you worked the bodice on an even number of stitches, draw the center line on the vertical line of the graph paper. If you worked on an odd number of stitches (as Mary did), shade in a vertical column of squares to represent the center front stitch. Draw a dashed horizontal line at the desired finished neckline depth. This represents the neckline after the ribbing has been added. Mary wanted a finished neckline depth of 2", which translates to 14 rows at her gauge of 7 rows to the inch. Next, account for the depth of neckline ribbing by drawing another horizontal line the appropriate number of rows below for the neckline depth without ribbing. Mary wanted 4 rows of ribbing, which translates to about ½". Mary’s total neck depth (before ribbing) is therefore 18 rows (14 rows plus 4 rows). Enter this number of rows in the Fitter List for Front Neck Depth Without Edging.
Next, mark the desired finished back neck width along the horizontal shoulder line, centered about the center line. Mary wanted a Back Neck Width With Edging of 7½", which at her gauge, translates to 33.75 stitches. Because Mary has an odd number of stitches to begin with, she rounded this down to 33 stitches. To allow for the ½" neckband, Mary needed to allow 8½" for the Back Neck Width Without Edging, which translates to 38.25 stitches. Mary rounded this up to 39 stitches. Mark the slope between the back and front neck by drawing lines from the edges of the back neck width (without edging) to the front neck depth (without edging). Draw these as jagged lines, working down 2 rows, then toward the center line 1 stitch, until you reach the line marking the neck depth (without edging). These lines represent a 1-stitch decrease for every 2 rows of knitting, which produces a nice, rounded neck. Count the number of stitches that remain between the jagged lines on the neck depth (23 stitches in Mary’s case) and enter this number in the Fitter List for Lower Front Neck Width.
Tip Measuring Knitting
Use a pair of crossed pins to mark a particular point on your knitting. Place a vertical pin parallel to the ladder or stitch line and a horizontal pin parallel to the row line to mark a beginning stitch. The point where the pins cross marks the exact point from which you can measure in either a horizontal or vertical direction.

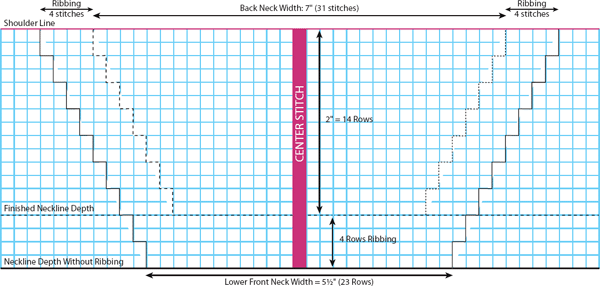
Each square of the neckline chart represents 1 stitch. The lower neck edge is shaped by binding off stitches; the sides are shaped by working single decreases every 2 rows.
Knit the Bodice Front just like the Bodice Back up to where the neckline shaping begins. To determine where to begin the neckline, subtract the number of rows in Front Neck Depth Without Edging (18 rows in Mary’s case) from the number of rows for Bodice Length (160 rows in Mary’s case). When you get to this point, mark the center front stitch (or each side of the center front stitch if you’re working on an odd number of stitches) with a safety pin or removable stitch marker. This corresponds to the center stitch on your neckline graph. Count the number of stitches on each side of the center stitch to where the neckline shaping begins and mark these with additional markers. Mary had 23 stitches at the base of her neckline, which leaves 40 stitches on each side, given Mary’s total stitch count of 103 stitches. You can bind off the center stitches or place them on a holder to incorporate later into the ribbing. Following the neckline graph, work each side of the front neck separately, shaping it by decreasing 1 stitch (k2tog or ssk) at the center front edge every other row (see About Decreases box on page 23) until you reach the total number of rows in the Bodice Length With Edging. Mary worked k2tog decreases on one side and ssk decreases on the other until she reached a total of 160 rows. Enter the number of stitches remaining in the Fitter List for Shoulder Width. For Mary’s sweater, 32 stitches remained for each shoulder after the neckline graph was completed. Bind off the remaining stitches.
Gently steam-block the pieces unless you’re working with a synthetic fiber such as nylon that doesn’t require blocking.
In most knitting methods (including the English and Continental), the k2tog decrease slants to the right and the ssk decrease slants to the left (Glossary, page 135). Sometimes it doesn’t matter which way the decrease slants—all that matters is that you reduce the number of stitches in the row. But sometimes when you’re shaping a neckline, you’ll want the decreases on each side of the opening to slant toward each other or in opposite directions.
The directions for k2tog and ssk can be misleading to some knitters—I’m one of them. I knit the Eastern crossed method, which means that my stitches appear twisted on the needle compared to those who use the more common English or Continental methods of knitting. My ssk is the same as someone else’s k2tog. I avoid the confusion by thinking of the direction of slant of the decrease rather than the name: a right decrease slants to the right, a left decrease slants to the left. No matter how you knit, this will make sense.
Working increases and decreases in the first and last 2 stitches of a row together leaves knot-like bumps in the selvedge edge. These bumps make it difficult to sew a smooth seam. Indenting increases or decreases by working them one stitch in from the selvedge edge makes the selvedge appear regular, thereby making it easier to sew a flawless seam.
Now you’re ready to begin the sleeves. First, you’ll need to measure the desired armhole depth, sleeve length from cuff to armhole, and cuff circumference. Although you can take these measurements on your body or from a sweater that fits the way you like, you’ll get much better results if you take them with respect to the pieces you’ve already knitted. Knitted fabric has drape and the amount of drape is a factor of your yarn and gauge. One fabric may drape farther off the shoulders than another fabric, and that will determine how wide and how long you’ll want to make the sleeves.
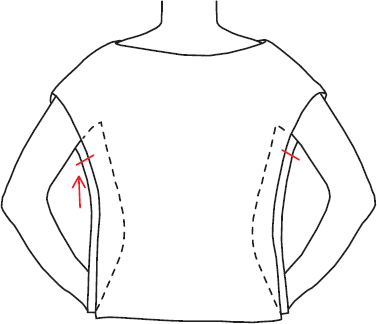
Place the joined bodice front and back over your head, then pin them together at the desired armhole depth.
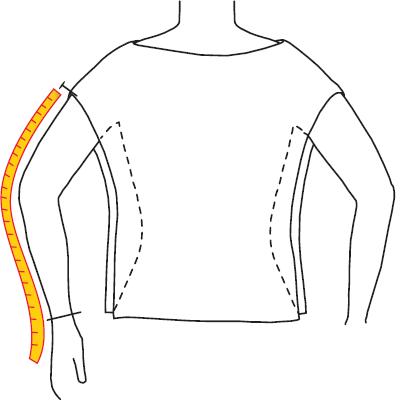
Measure the sleeve length from the shoulder seam down your bent arm to the desired sleeve length.
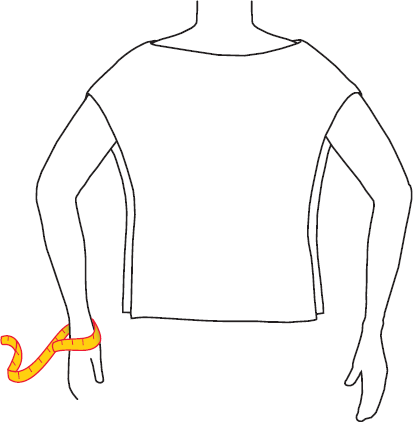
Measure the circumference of your wrist (or arm) where you want the cuff to fall.
Aligning the side (armhole) edges, sew the Bodice Front to the Bodice Back at the shoulders, stitch for stitch, using a mattress stitch (Glossary, page 138). The remaining stitches along the center back neck will correspond to the number of stitches listed for Back Neck Width Without Edging (39 in Mary’s case). To determine the desired armhole depth, hang the joined sweater bodice from your shoulders, allowing the shoulder seams to drape naturally along the tops of your arms. (At this point don’t worry about aligning the shoulder seams with the exact tops of your shoulders; you’ll do that later.) Grasp the sides of the front and back under your arm where you’d like the base of the armhole to be—allow between 2½" and 3" of ease under your arm for a classic loose-fitting women’s sweater (less for children, more for men). Pin the front and back together at this point, aligning the pin with a single row of knitting on each side.
Lay the bodice on a flat surface so that the wrong sides of the front and back face together and the pinned side edges are aligned. Measure straight down from the fold (which should be near, but may not be exactly at the shoulder seam) to the horizontal pin marking the base of the armhole. Enter this measurement in the Fitter List for Armhole Depth (Mary used a depth of 9½"). Double this number for the upper arm circumference and enter this number in the Fitter List for Upper Arm Circumference (Mary used a circumference of 19").
Remove the pins, carefully refold the bodice pieces exactly at the shoulder seam, and use safety pins to pin the side seams from the lower edges to the desired armhole depth. Try on the bodice again to confirm that you’re happy with the armhole depth (if not, make any necessary adjustments and note them on the Fitter List).
Allowing the bodice to drape off your shoulders, ask a friend to measure along the top of your arm from the edge of the bodice shoulder seam down your bent arm to the desired sleeve length (including edging). Enter this in the Fitter List for Sleeve Length With Edging. Decide how much of the total sleeve length you want to be in the edging pattern and enter this number in the Fitter List for Cuff Length (Mary allowed for ½"). Subtract the cuff length from the total sleeve length and enter this number in the Fitter List for Sleeve Length Without Edging. This is the length over which the sleeve taper will take place.
Measuring sleeve length this way allows you to take the drape of the knitting into consideration. Drape can vary widely from one fabric to the next, so it’s always wise to adjust your sleeve length every time you knit in a new fabric, even if you follow the same pattern. Length can be added or subtracted at the cuff or shoulder end of the sleeve, so you don’t have to recalculate the sleeve taper.
With a measuring tape, measure the circumference of your wrist (or arm) at the point where you want the cuff to fall. Be sure to take into account the way you want the cuff to fit, i.e., loose or snug. Enter this number in the Fitter List for Cuff Circumference. Mary used a cuff circumference of 7½". Divide this number by two for the Half Cuff Circumference (3¾" for Mary’s sweater).
Now that you know the dimensions of your sleeve, you can figure out exactly how to shape the taper from the cuff to the shoulder (or vice versa). And you can use the bodice that you’ve already knitted to determine the exact numbers of rows and stitches involved.
First, lay the bodice on a flat surface. If the surface is slippery, place a large towel between it and the bodice. Or pin the bodice to a blocking board. Position the bodice so that the selvedges are oriented at the top and bottom and the cast-on and bind-off rows are at the right and left—the rows of knitting will be oriented vertically. Take care to set up the fabric correctly and make sure that it doesn’t bias or torque. (You may want to steam-press the fabric lightly to even out the stitches first.) Use a yardstick or other nonflexible straightedge (not a measuring tape) to take measurements, and be sure to measure along a straight line (or “ladder”) of stitches or rows.
Using a yardstick, measure the length you entered on the Fitter List for Sleeve Length Without Edging, being careful to follow along a line (ladder) of stitches. Be sure to measure in the center of the fabric, away from the cast-on or bind-off rows, or any edgings that may affect stitch gauge. Mark the stitches at each end of the desired length with crossed pins. We’ll call these Point A and Point B on the illustration on page 25. Count the number of rows between these points (130 rows for Mary’s sweater). Round it off to an even number and enter this number in the Fitter List for the number of rows in Sleeve Length Without Edging.
Place the “0” end of the yardstick at Point A and orient it vertically so that it follows a single row of knitting. Measure the length you entered on the Fitter List for Armhole Depth (9½" for Mary’s sweater), and mark this point with crossed pins. We’ll call this Point C. Count the number of stitches between Point A and Point C and enter this number in the Fitter List for the number of stitches in Half Upper Arm Circumference (43 stitches for Mary’s sweater).
Tip Determining Armhole Depth
With a drop-shoulder sweater, the armhole should be deep enough to provide plenty of ease at the shoulders. Because this type of sweater has no armhole or sleeve cap shaping, the armhole depth is equal to half the width of the top of the sleeve.
If the armhole is too shallow, the sleeve will be too tight and will cause the neckline to pull towards the armholes and the sleeves to bind under the arms
If the armhole is too deep, the sleeves may have excess fabric that bunches under the arms. (Note that a kimono style has a drop shoulder with a deep armhole and a straight or nearly straight sleeve. This style lends itself very elegantly to a lightweight or drapey fabric, but can be cumbersome knitted in a standard worsted fabric.)
Place the “0” end of the yardstick at Point B and orient it vertically so that it follows a single row of knitting. Measure the length you entered on the Fitter List for Half Cuff Circumference, and mark this point with crossed pins. We’ll call this Point D. Count the number of stitches between Point B and Point D and enter this number in the Fitter List for the number of stitches in Half Cuff Circumference (3¾" for Mary’s sweater). Double this number and enter it for the number of stitches in Cuff Circumference.
Now that you know the numbers of stitches and rows in the sleeve, you can draw it to scale on graph paper, allowing each square to represent 1 stitch, and plot the exact taper as shown on page 27. You can use any type of graph paper, but only knitter’s proportional graph paper will show the correct shape of the sleeve. You need to plot only the front (or back) half of the sleeve.
Using the numbers of stitches and rows entered in the Fitter List and allowing 1 square of graph paper to represent 1 stitch, draw a horizontal line for Sleeve Length Without Edging, and label Point A and Point B as before. Draw a vertical line down from Point A for the Half Upper Arm Circumference, and label the base of the line Point C. Draw another vertical line down from Point B for the Half Cuff Circumference, and label the base of this line Point D.
Place a ruler between Point C and Point D and draw a straight line to connect the two. This line represents the seam line of the sleeve and shows the number of stitches that will have to be increased if you knit upward from the cuff or the number of stitches that will have to be decreased if you knit downward from the shoulder. Starting at Point C, follow along to Point D and use a pencil to mark a dot at every point where this line crosses a horizontal line of the graph paper. Every dot represents a stitch that will need to be increased (if you’re working upward from the cuff) or decreased (if you’re working downward from the shoulder). Keep in mind that because only half of the sleeve is plotted, each dot represents a total of 2 stitches increased or decreased—1 stitch at each end of the needle. Now count the number of vertical lines in the graph paper (representing rows) between the dots to determine the number of rows between increases (or decreases). For example, if your dots appear every 4 rows, you’ll want to work the increases (or decreases) at the beginning and end of every 4th row.
Most likely, there won’t be a consistent number of rows between dots. For example, there might be 3 rows between some dots and 4 rows between others. In this case, you’ll need to alternate between working 3 and 4 rows between the shaping rows. If the number of rows between dots involves fractions, as in 4½ rows between dots, you’ll want to alternate between 5 rows and 4 rows between shaping rows. As long as you finish with the desired number of stitches and rows, and as long as you’ve maintained a relatively consistent rate of increases or decreases, the sleeve will end up the right size and shape. Some knitters prefer to work shaping on right-side rows only. If they are faced with a taper rate that involves an odd number of rows, say 5, which would call for every other shaping row to be a wrong-side row, they’ll adjust the rate so that the shaping is worked on right-side rows. This was the case for Mary’s sleeve. So that she could work her decreases (she worked downward from the shoulder) on right-side rows only, she simply alternated working the decreases on the 6th row, then the 4th.
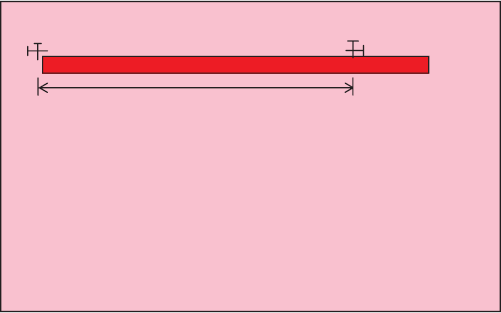
Measure the desired sleeve length along a ladder of stitches and mark the boundaries with crossed pins. Count the number of rows between these points.
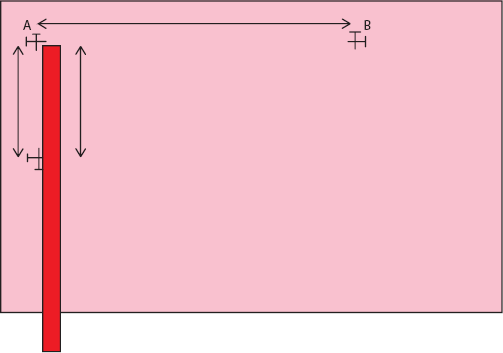
Lay a yardstick along the row line at point A and mark the desired armhole depth with crossed pins. Count the number of stitches between these points.
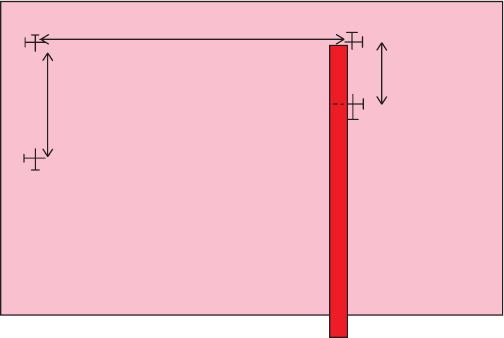
Lay a yardstick along the row line at point B and mark the desired armhole depth with crossed pins. Count the number of stitches between crossed pin markers.
Mary’s Sleeve Taper
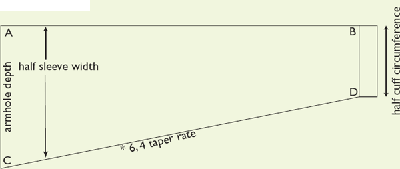

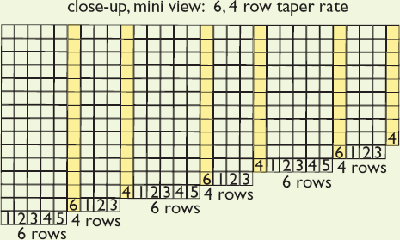
The first step is to decide whether you want to knit the sleeves from cuff to shoulder or shoulder to cuff. It doesn’t matter which you choose. For drop-shoulder sweaters, I prefer to pick up and knit stitches around the armhole and knit downward to the cuff, eliminating the need to sew the sleeve into the armhole. I also like that the pickup edge has less bulk than a sewn seam, and that I can try on the sweater to ensure that I like the length before I bind off the stitches. For bulky sweaters, though, I might choose to knit the sleeves upward from the cuffs so that I can work them in individual pieces, rather than having them attached to the bodice. Also, if I plan to include a special edging or ribbing on the cuff, I’ll choose to work the sleeve from the cuff upward. But either way, the taper rate will be the same, because the cuff is not included in the taper rate calculation.
If you want to work your sleeve from the cuff to the shoulder, you’ll cast on the number of stitches entered in the Fitter List for Cuff Circumference. If you want to work downward from the shoulder, you’ll begin with the number of stitches entered for Upper Arm Circumference. If you want to work the sleeve seperately, simply cast on this number of stitches. If you want to pick up stitches for the upper arm around the armhole, you’ll want to make sure that those stitches are evenly spaced all the way around the front and back armhole. To do so, lay the bodice on a flat surface with the right side of the knitting facing upward. Place a straight pin at the shoulder seam line to mark the center of the sleeve. Place an additional pin each on the front and back at the desired armhole depth (according to the number of rows for Armhole Depth in the Fitter List). For Mary’s sweater, she placed pins 9½" down from the shoulder (66 rows). Divide the number of stitches entered for Upper Arm Circumference by two to determine the number of stitches to pick up and knit from each the front and back. Mary had an Upper Arm Circumference of 86 stitches, so she picked up 43 stitches each along the front and back armhole.
With the right side facing and beginning at the base of the armhole, pick up and knit (Glossary, page 135) the designated number of stitches between pins, removing the pins as you come to them.
Using the seaming method of your choice (Glossary, page 136), sew the pieces together. If you picked up stitches for the sleeves, you’ll only have to sew the sleeve and side seams. If you knitted the sleeves separately, you’ll need to sew the upper sleeve to the bodice front and back (centered on the shoulder seam) before sewing the sleeve and side seams.
Now it’s time to add edgings. To finish the neckline, you’ll want to pick up and knit stitches around the neck opening and work a few rows of a noncurling edging pattern (Mary used knit 1, purl 1 rib). With double-pointed needles or a short (16") circular needle, pick up and knit stitches evenly spaced around the neckline opening. The number of stitches to pick up depends on the size of the opening and your stitch gauge. In general, pick up 1 stitch for every stitch along a bind-off edge (i.e., along the back neck and lower front neck), and pick up about 3 stitches for every 4 rows along sloped edges (i.e., along the angled edges of the front neck) for an edging that lies flat. Join for working in rounds and work your choice of edgings for the desired number of rounds (Mary worked 4 rounds). Loosely bind off the stitches following the pattern stitch (i.e., knit 1, purl 1 rib) with one size larger needle.
Tip Armhole Depth Measurements
To make sure that you have measured to the same point on the front and back, count the number of selvedge stitches along the side seam line. Not only will this help you pick up stitches evenly along the front and back armhole, it will also ensure that there will be the same number of stitches between the armhole and hem on the front and back and that the side seams will be even without puckers.
Work in loose ends with a tapestry needle. Steam-press or block the sweater.