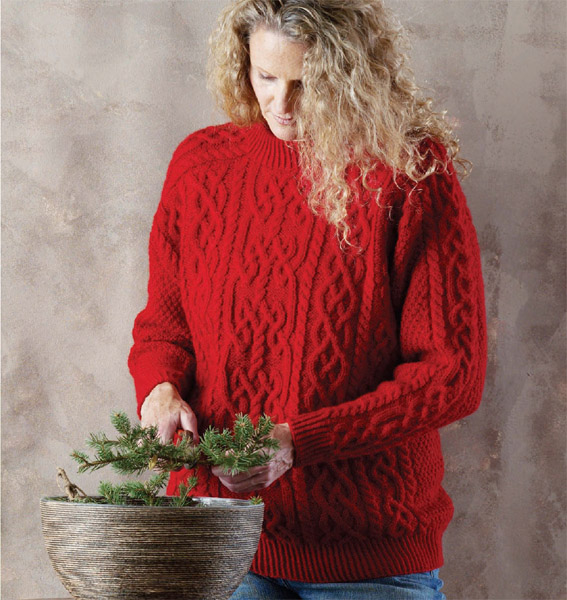
Gail Marracci used both up-and-down and side-to-side elements in this impressive Aran. She worked the bodice from the top down, but added side-to-side shoulder saddles that extended from the neck to the armholes, then continued down to the sleeve cuffs. Gail cast on for the neck, worked the neck in the round to the desired length, then separated the stitches for the bodice front, bodice back, and each shoulder saddle. She worked the saddles first for the length of the shoulders, then picked up stitches along the saddle selvedges and knitted the rest of the sweater from the top down, working the sleeves and the bodice below the armholes in the round. The bodice is worked in a combination of cable panels that make up the desired circumference.
Gail had been working up to designing this Aran for 14 years, ever since she saw a red Penny Straker Aran Sweater in a yarn store window. She tried to find a red Aran on a trip to Scotland to no avail. When presented with the challenge to design a sweater, Gail didn’t give it a second thought—it would be a red Aran.
“Since I had never designed my own Aran, I researched the nuts and bolts of constructing them in the traditional seamless top-down fashion. The hardest part was to select a limited number of cables. It was great fun to swatch all the cable patterns I liked and arrange them in a variety of ways. I modified the cable patterns to my preferences, then made my final decision based on how each cable looked next to its neighbors, being careful to choose cables with staggering row repeat numbers. Upon choosing the ‘finalists,’ I knitted a large swatch of the front including the whole center panel to confirm the overall cable interaction. I made my final calculations for size, the number of filler moss stitches required, and cast on.”

The Fitter List for Gail’s Red Aran
Yarn name: Chuckanut Bay Yarns: 100% Perendale Wool 10 ply (distributed by Russi Sales): #382 red, nine 390-yd hanks.
Fiber content: 100% Perendale wool
Weight classification: (#4 Medium)
WPI: 11
Number of yards/pounds used: 3,200
Stitches per inch per panel:
Panel A, saddle: 8 (in charted pattern)
Panel B: 5½ (in charted pattern)
Panel C: 7 (in charted pattern)
Panel D: 6½ (in charted pattern)
Panel E: 5 (in moss stitch)
Rows per inch: 7 (averaged for all stitches)
Needle size: US 8 (5 mm) for bodice and sleeves (36" circular); US 6 (4 mm) for edgings (16" circular or a set of double-pointed)
Cast-on method: Loop
Bind-off method: Chain
Selvedge treatment: Stockinette stitch on saddle and upper bodice
Sleeve increase/decrease method: Paired decreases
Seam technique: NA
Saddle Shoulders: Front Neck Depth (Saddle Width): 4"; 32 stitches
Length of Saddle (Shoulder Width): 10"; 70 rows
Sleeve Stitches Picked up Along Front Armhole: 30 stitches
Sleeve Stitches Picked up Along Back Armhole: 38 stitches
Collar: Length of Collar: 4" folds over to 2"; 29 rounds
Bodice
Circumference: 50 inches
Width: 25 inches; 154 stitches
Panel A: 4 inches; 32 stitches
Panel B: 5 inches; 28 stitches (increases to 36 then decreases back to 28)
Panel C: 4 inches; 28 stitches
Panel D: 3 inches; 20 stitches (increases to 22 then decreases back to 20)
Panel E: 3 inches; 15 stitches
Cast-On Stitches: 120 stitches
Length With Edging: 27½ inches
Length Without Edging: 22 inches
Length of Lower Edging: 2½ inches; 18 rounds
Armhole Depth: 9 inches
Front Armhole Depth (not including saddle): 6 inches; 42 rows
Back Armhole Depth (not including saddle): 8 inches; 56 rows
Back Neck Width Without Edging: 5 inches; 28 stitches
Back Neck Width With Edging: NA
Front Neck Depth Without Edging: 4 inches; 32 stitches
Front Neck Depth With Edging: 2 inches
Lower Front Neck Width: 5 inches; 28 stitches
Begin Front Neck At: NA
Shoulder Width (Saddle Length): 10 inches; 70 rows
Sleeves
Sleeve Length Without Edging: 14 inches; 98 rounds
Sleeve Length With Edging: 16½ inches; 116 rounds
Cuff Circumference: 8 inches;50 stitches
Half Cuff Circumference: 4 inches; 25 stitches
Cuff Length: 2½ inches;18 rounds
Upper Arm Circumference: 18 inches; 100 stitches
Half Upper Arm Circumference: 9 inches; 50 stitches
Sleeve Taper Rate: 2 stitches decreased every 4 rounds 24 times, then work 2 rounds even, then decrease 2 stitches on last round

Sweater Map for Red Aran

Work as for the Up-and-Down Classic Crew (page 17), figuring the gauge for each panel separately.
Work as for the Up-and-Down Classic Crew (page 17).
Determine the bodice stitch count based on the gauge of each panel. After swatching each panel, Gail moved them around to find the sequence she liked best, then she measured the collective width of the center five panels, which added up 19". Gail wanted a width of 25" so she needed to add another 6" in width. She added a 3"-wide panel of seed stitch to each side. Gail sketched the panels on her Sweater Map and added up the number of stitches in each to find the number of stitches she’d need in her bodice width.
Tip Determining Cable Arrangement

Sample the cables in separate swatches so you can see how they work together.
The bodice back and front are worked from the top down, beginning with a faced mock turtleneck. When the neck is the desired length, stitches are divided for the back, front, and two shoulder saddles. The saddles are worked side to side to the length of the shoulder, then stitches are picked up along the selvedge edges of the saddles for the front and back, which are worked separately to the base of the armholes, and finally, the front and back are joined together and worked in the round to the hemline.
Using a ruler, measure the desired neck width and enter this number in the Fitter List. Using a tape measure, measure the desired front neck depth, which will be the same as the saddle width. Enter this number in the Fitter List.
Counting from your swatches, choose a cable panel for your center bodice that matches (or is close to matching) your desired neck width, and another panel that matches (or is close to matching) your desired neck depth. Refer to the box on page 102 for ways to add or subtract stitches to the panels if necessary to get the desired widths. Be sure to add a selvedge stitch at each edge of shoulder panels for picking up stitches for the front and back. Keep in mind that when working with cable patterns, it’s not always possible to get exactly the number of stitches you aim for, but you can come close.
Panel A (Saddle and Sleeve)
Panel B (Bodice Center)
Panel C (Bodice Front and Back)
Panel D (Bodice Front and Back)

Moss Stitch Panel (Bodice Front and Back, Sleeves)


Determine the number of stitches to cast on for the mock turtleneck by adding the number of stitches in the center front panel (Panel B), the center back panel (Panel B), and the two shoulder saddle panels (Panel A). For Gail, this added up to 120 stitches.
With smaller double-pointed needles or a short (16") circular needle, use the backward loop method (Glossary, page 133) to cast on stitches for the turtleneck and join for working in the round. Work in twisted rib until the piece measures 2", or the desired length of the facing. Purl all stitches on the next round to form a turning ridge. Continue in twisted rib until the piece measures 2" from turning ridge, or desired length.
Twisted K1, P1 Rib (even number of stitches)
All rows: *K1 through back loop, p1 through back loop; rep from *.
Place the stitches for the bodice front on one holder, the stitches for one shoulder saddle on a second holder, and the stitches for the bodice back on a third holder, leaving the stitches for the remaining shoulder saddle on the needles. Gail put the first 28 stitches on one holder for the bodice front, the next 32 stitches on a second holder for one shoulder saddle, and the following 28 stitches on a third holder for the bodice back, leaving the remaining 32 saddle stitches on the needles. (There are more stitches on the saddles than the front or back due to the extreme draw-in of the shoulder cable panels.)
Change to larger needle and work the saddle stitches according to Panel A chart (on page 99) for the desired shoulder width (Gail worked for 10"). Place these stitches on a holder. Return the stitches for the other saddle onto the needles and work them exactly the same way. Place these stitches on another holder.


Measure from a horizontal line parallel to the nape of your neck across your shoulder to a horizontal line parallel to the top of the notch of your sternum. Take the measurement directly beside your neck. It helps to have someone else take this measurement for you.
With larger needles, pick up and knit the desired number of bodice stitches along the back selvedge edge of one saddle, knit across the held bodice stitches of the neckline, then pick up and knit the same number of stitches along the back selvedge edge of the other saddle. Gail picked up 63 stitches along each saddle and knitted 28 held stitches of the neckline for a total of 154 stitches. Work the stitches according to the cable panels until the piece measures the desired armhole depth. Gail worked 15 stitches according to the Moss Stitch chart, 20 stitches according to Panel D chart, 28 stitches according to Panel C chart, 28 stitches according to Panel B chart (center back), 28 stitches according to Panel C chart, 20 stitches according to Panel D chart, and the remaining 15 stitches according to the Moss Stitch chart.
If you want to knit this sweater with a different finished width, you can adjust the number of stitches a variety of ways.
To Narrow or Widen a Little: The moss stitch panels at the sides of the central cable are the most easily adjusted. If you only need to adjust by a few stitches either side, start here. This is especially true if you want to widen the design.
To Narrow or Widen a Little More: If you want to narrow or widen the bodice dramatically, you can also remove or add purl stitches in the background border of each cable between the edges of the cables and the 4-stitch cables that separate each panel. For example, if you remove 1 purl stitch from each side of each of the five main cable panels, you’ll remove a total of 10 stitches from the bodice width (20 stitches from the circumference). Conversely, if you add 1 stitch each side of those cable panels, you’ll increase width by 10 stitches (and the circumference by 20 stitches).
You can also narrow the width by converting the 4-stitch cables to 2-stitch cables. This will result in 12 fewer stitches in the width (24 stitches fewer in the circumference). Widen the 4-stitch cables to 6-stitch cables, and you’ll increase the width by 12 stitches (the circumference by 24 stitches).
To Narrow or Widen a Lot: Combine the above techniques for the most dramatic change. To convert Gail’s sweater to a child’s size, remove the smallest cable panel at both sides and leave the three central cable panels, or knit the sweater with a sportweight yarn on smaller needles, adjusting your stitch numbers accordingly.
Because the shoulder saddles contribute to the armhole depth, the bodice back measured less than the total desired armhole depth. Gail wanted an armhole depth of 9". If she centered the 4" saddle along the shoulder line, 2" would contribute to the front armhole and 2" would contribute to the back armhole, and she’d need to knit the bodice for 7" to end up with the desired 9". But Gail wanted to shift the saddle forward 1" so that the saddle, which also accounts for the front neck depth, would be 3" deep on the bodice front and only 1" deep on the bodice back. This meant that Gail needed to knit the bodice back to 8" and the bodice front to 6" to end up with the desired 9" for each.
With larger needles, pick up and knit stitches along the front selvedge edges of the saddles for the bodice front as for the bodice back. Work the front as for the back for 6" so that the total armhole depth is 9", as for the back (the saddles contribute 3" of the armhole depth on the front).
Join the stitches for the front and back and continue working the patterns as established in rounds until the bodice measures 2½" less than the desired length. Work in twisted rib on smaller needles as for the neck for 2½". Use the chain method (Glossary, page 131) to bind off all the stitches in pattern.
The cable panels in Gail’s Aran are aligned vertically so that the center cable panel is centered at the center front (and center back) of the bodice. To align the cables vertically, the center stitch (or the space between the two center stitches) should fall along the bodice centerline. The cable panels on the bodice back are also aligned horizontally, that is, both Panel C and Panel D begin with the same row (Row 1) of the cable charts. However, because Gail chose to shift the shoulder saddles to the bodice front, the bodice front is shorter than the bodice back. Therefore, she began Row 1 of the charts lower on the bodice front than the bodice back. This simply means that when the front and back were joined at the base of the armholes for working in rounds, the pattern rows on the back did not match the pattern rows on the front.
If Gail had wanted to align the cables horizontally, she would have had to determine the difference in the number of rows in the bodice back and bodice front, and begin her back pattern that number of rows before the row she chose to start the front. Then, when she joined the two at the base of the armholes, she’d be at the same row of each pattern on the front and back.
Work as for the Up-and-Down Classic Crew (page 22).
Work as for the Up-and-Down Classic Crew (page 24).
The sleeves are worked downward from the shoulders to the cuffs so that the held saddle stitches continue in the established cable pattern; the other stitches are picked up and worked in seed stitch.
Using your moss stitch gauge as a guide, determine the number of stitches that corresponds to 6" along the front armhole (Gail picked up 30 stitches), and the number of stitches that corresponds to 8" along the back armhole (Gail picked up 38 stitches).
Continuing in the established cable pattern, work across the saddle stitches, then pick up and knit the desired number of stitches evenly around the entire armhole, ending at the cable. On the next row, place a marker to mark the underarm seam line aligned at the bottom of the armhole. Work the sleeve in the round, working the taper rate as paired decreases on each side of the marker, ending 2½" short of the desired total length. Work twisted rib for 2½". Use the chain method to bind off all stitches.
Because the sweater was knitted in the round, there are no seams to sew.
Fold the collar to the wrong side of the work along the purled turning row and sew the facing to the inside. Weave in the loose ends. Lightly steam- or wet-block, being careful not to flatten the cables.