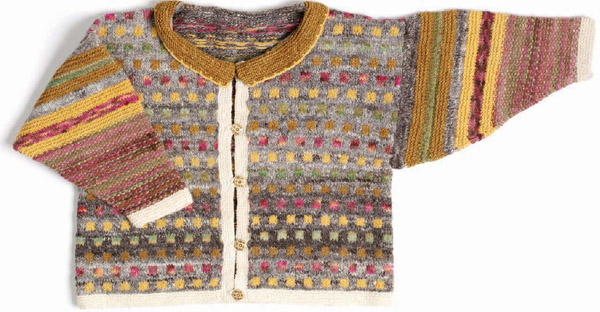
Lori Lawson designed this cardigan for her coastal Southern California climate. Following the lines of the Up-and-Down Classic Crew, she divided the front bodice in half to make a cardigan. To keep the sweater from being too warm, she designed the front without an overlap and the sleeves three-quarter length. The shoulders are shaped at a natural angle and the neckline is carved a little wider and deeper than a crewneck and is finished off with a foldover collar. Lori simplified the bodice by knitting it in one piece up to the armholes, eliminating the need for side seams. She knitted the deep sleeves in the round, alternating bands (and colors) of stockinette stitch, garter stitch, and seed stitch.
“Jacob’s Windows was my maiden voyage into designing as well as knitting with my own handspun and handdyed yarn. In previous years I knitted many sweaters with commercial yarns and patterns, but when I learned to spin I found a new passion.
“At our local zoo on shearing day, the shearer saw me spinning and gave me some of the newly shorn hoggit fleece of a Jacob lamb. I was so excited; I washed, carded, and spun it within days. Lacking enough to knit a whole sweater, I searched my stash of handdyed handspun Columbia I had been hoarding for who knows what, and the idea of using the Jacob’s yarn as a backdrop for windows of colored yarns was born.
“I really didn’t plan this sweater out as carefully as it sounds. I had a picture in my mind and just started knitting. When I ran out of Jacob’s yarn partway into the sleeve, I abandoned my plan to extend the windows into the sleeve. When I ran out of the colors I used in the body of the sweater, I handpainted a roving in some of the same colors I’d used to dye those yarns.
“I purposefully did not overlap the front bodice but made loop buttonholes that would cross over to the buttons. I knitted three-quarter sleeves because I am always pushing up my sleeves anyway. These sleeves sit right where I would have pushed them up.”
The Fitter List for Lori’s Jacob’s Windows Sweater
Measure your body and allow for the appropriate amount of ease (see page 14) or measure a sweater that fits the way you like and enter the numbers below. Refer to your gauge swatch for your stitch and row gauges, then translate each measurement into numbers of stitches and/or rows as you go along.
Yarn name: Lori’s handspun two-ply and singles
Fiber content: Columbia and Jacob wools
Weight classification: Worsted (#4 Medium)
WPI: 11
Number of yards/pounds used: 630 yards of gray heather;150 yards of variegated (100 yards each of 4 contrasting colors); 80 yards of white
Bodice: Stitches per inch (in charted pattern): 4.75 Rows per inch: 5.7
Sleeve: Stitches per inch (in stockinette stitch and garter stitch): 4.76
Rows per inch (averaged between stocinette stitch and garter stitch): 7.69
Needle size: US size 8 (5.5 mm; 36" or longer circular)
Cast-on method: Long-tail
Bind-off method: Chain
Selvedge treatment: Stockinette stitch
Sleeve increase/decrease method: Paired decreases
Seam technique: NA (stitches picked up, not seamed)
Work fronts and back as a single piece: To avoid side seams, cast for the full bodice circumference and work the fronts and back in a single piece to the armhole. At the armhole, divide the fronts and back and work each separately to the shoulders.
Cardigan variation: Five ¾" buttons; single crochet loops sewn to left front for buttonholes Bodice Front Width (One Half Bodice) Without Edging: 10½"; 50 stitches
Center Front Overlap Width: 0"
Center Front Borders: 1"; 10 rows garter stitch (worked sideways)
Shaped Shoulders: Begin Shoulder Shaping At: 118 rows (including border). Work shaping in three groups: 10 stitches, 10 stitches, 9 stitches
Collar variation: Collar picked up around neckline at a rate of 5 stitches for every 4 stitches/rows and worked in garter stitch for 2" (18 rows). Collar edged with picot crochet.
Bodice
Circumference: 45 inches; 205 stitches (without front edgings)
Width: 22 inches; 105 stitches
Cast-On Stitches: 205 stitches
Length With Edging: 21 inches; 124 rows
Length Without Edging: NA
Length of Lower Edging: 1 inches; 10 rows
Armhole Depth: 10½ inches; 60 rows
Back Neck Width Without Edging: 10 inches; 47 stitches
Back Neck Width With Edging: NA
Front Neck Depth Without Edging: 4 inches; 24 rows (includes 5 rows of shoulder shaping)
Front Neck Depth With Edging: NA
Lower Front Neck Width: 4 inches (includes edging)
Begin Front Neck At: 17 inches; 102 rows (includes edging)
Shoulder Width: 6 inches; 29 stitches
Sleeves
Sleeve Length Without Edging: 13 inches; 100 rows
Sleeve Length With Edging: 14 inches; 110 rows
Cuff Circumference: 9 inches; 44 stitches
Half Cuff Circumference: 4½ inches; 22 rows
Cuff Length: 1 inches; 10 rows
Upper Arm Circumference: 21 inches; 100 stitches
Half Upper Arm Circumference: 10½ inches; 50 stitches
Sleeve Taper Rate: 2 stitches decreased alternating every 3 rows, then every 4 rows 28 times (i.e., *work a pair of decreases on the 3rd row, work the next pair of decreases on the 4th row after that; repeat from * until 28 sets of decrease rows are completed)
Sweater Map for Lori’s Jacob’s Windows Sweater
Windows
Tip Centering the Pattern on the Sweater
The Windows chart (above) that Lori used for this sweater repeats over 6 stitches. In order to center her design over the center back, Lori needed to add 3 stitches to the end of the pattern (making the repeat a multiple of 6 stitches plus 3). The pattern repeats over 24 rows, alternating 3 rows of main color followed by 3 rows of window pattern worked in one of four contrasting colors against the main color. Lori changed the contrasting color for each window band, working the four colors in the same order to the shoulders. She worked the shoulder shaping in the main color to avoid working partial blocks of color.
To center the pattern on her sweater, Lori subtracted 3 from her total number of stitches (this is the 3-stitch square she used to center the pattern on the Bodice Back), then she divided the remaining stitches by 6 (the number of stitches in each pattern repeat). Lori had 4 stitches left over, so these became 2-stitch partial squares at the beginning and the end of each pattern row (i.e. the center front edges). The first row of pattern was worked as follows: K2 with main color, *k3 with appropriate contrasting color, k3 with main color; repeat from * to last 5 stitches, k3 with appropriate contrasting color, k2 with main color.
Work as for the Up-and-Down Classic Crew (page 17), but determine gauge for bodice according to Windows chart at left. Determine gauge for sleeves in seed stitch.
Work as for the Up-and-Down Classic Crew (page 17).
Work as for the Up-and-Down Classic Crew (page 18), but include both fronts and back in a single piece with the cardigan opening along the center front. Lori subtracted 2" from her desired bodice circumference (to allow for center front edging she planned to knit later from side to side) to get the number of stitches to cast on for both fronts and back. She rounded this to an odd number so she could center a 3-stitch square at the center back and end the left front with a half repeat to mirror the right front.
Work the bodice back and two fronts in a single piece to the armholes, then split the pieces and work the back and fronts separately to the shoulders.
Using the long-tail method (Glossary, page 133) cast on stitches for the entire bodice circumference. Work as for the Up-and-Down Classic Crew (page 18) to the armholes, beginning with 1" of garter stitch edging in white, then changing to the Windows chart with heathered gray for the background color and varying contrast colors as specified on the chart. Center the charted pattern as described at left.
Lay the knitting on a flat surface and fold the fronts on top of the back along the side “seams” so that the front selvedges are 2" apart (to compensate for the center front edging to be added later). The front and back will split at the folds—count the stitches for each front (Lori had 50 stitches—she wanted her front to be slightly larger than the back so that the front wouldn’t have a tendency to gap) and the stitches for the back (Lori had 105 stitches) to make sure the folds are centered at the sides. The center back square should be at the exact center of the bodice. Place the stitches for each front on a holder to work separately later.
Working the back stitches only, continue to the desired bodice length to shoulders.
Determine the number of stitches that correspond to the desired back neck width. Use markers to mark these stitches centered on the bodice back. The stitches outside these markers are the shoulder stitches. To shape the shoulders, use the chain method (Glossary, page 131) to bind off the shoulder stitches in three steps, beginning at the armhole edge (to minimize the stair-step effect, see the tip in the Glossary, page 132). Lori had 29 stitches for each shoulder, so she bound of 10 stitches in the first two groups, then she bound off the remaining 9 stitches. Here’s how it worked for each shoulder:
Row 1: (begins at armhole edge) Bind off 10 stitches, work to end—19 stitches remain.
Row 2: Work even.
Row 3: Bind off 10 stitches, work to end—9 stitches remain.
Row 4: Work even.
Row 5: Bind off remaining 9 stitches.
Work as for the Up-and-Down Classic Crew (page 19), but instead of drawing a straight line for the shoulder line, include the 5 rows of shoulder shaping as described above.
Working the bodice front in two pieces as established, continue in pattern to the base of the neckline. Shape the neckline and shoulders following your neckline graph.
Work as for the Up-and-Down Classic Crew (page 19), but work each front separately.
Neckline Chart for Lori’s Jacob’s Window
Shape the shoulders as for the Bodice Back.
Work as for the Up-and-Down Classic Crew (page 22), measuring for three-quarter-length sleeves.
Work as for the Up-and-Down Classic Crew (page 24).
First, join the shoulder seams with a mattress stitch for bind-off edges (Glossary, page 138). Work the sleeves as for the Up-and-Down Classic Crew (page 26), picking up and knitting stitches around the bodice and working downward to the cuff, according to the taper rate. Lori knitted the sleeves in the round (page 43), alternating 1" bands of stockinette stitch and garter stitch, and changed colors with each band, for a total of 8 bands. Then she worked seed stitch in her variegated handspun singles to her desired sleeve length without edging. Along the way, she paired her decreases on each side of a marker at the underarm seam according to her taper rate, and ended with a chain bind-off. Combining different stitch patterns in the sleeves worked for Lori because the stitch gauge was similar for all stitches. However, the row gauge did vary with stitch pattern, so she needed to rely on actual length measurements rather than numbers of rows to make her sleeves the desired length.
Because Lori knitted the fronts and back in one piece and picked up the sleeves from the armholes and worked them in the round to the cuffs, there were no seams to sew.
With white, pick up and knit stitches along each front selvedge edge. To determine the number of stitches to pick up along the fronts, Lori measured the length of her center front edges (17"), then counted the number of stitches in that length along the garter stitch edging she’d already knitted along the hemline. Pick up this number of stitches evenly spaced along the length of the center front and work the edging sideways in garter stitch for 1". Bind off all the stitches.
Pick up and knit stitches around the neckline opening. To make the collar wider then the neckline opening so that the collar would fold over and lie flat, Lori picked up an extra stitch every 4 stitches around the opening. To make the collar curve even more, after she had knitted 6 rows, Lori use the lifted method (Glossary, page 135) to increase 1 stitch at each shoulder line every other row until she reached her desired collar length.
Lori finished the collar with a decorative crochet edging in a contrasting color at a repeat of 4 stitches plus 1 as follows (Glossary, page 134): Single crochet into first stitch of bind-off row, *chain 5, single crochet into 4th bind-off stitch; repeat from * to last 4 stitches, chain 5, single crochet into last bind-off stitch.
Work as for the Up-and-Down Classic Crew (page 27). Sew buttons to left front; sew single crochet button loops to right front.