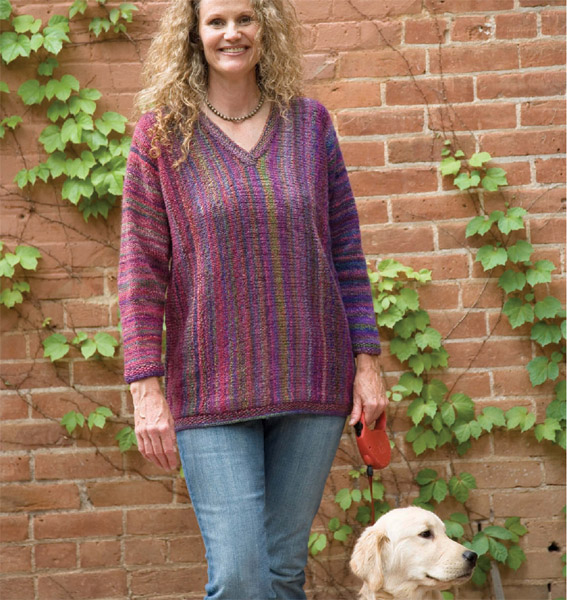
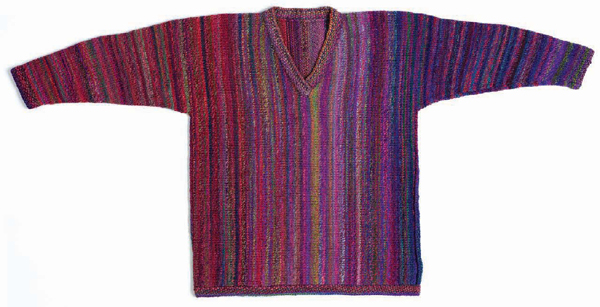
For this V-necked pullover, I varied the Side-to-Side Classic Crew by lengthening it and using a provisional cast-on at the center back and center fronts, and working each section outward to the cuff, ending with a narrow edging of seed stitch. At the neck and hemlines, I picked up stitches and knitted seed stitch for 1½". These changes, though minor overall, enabled me to gradate colors from cuff to cuff using a limited amount of handspun yarn.
At the Black Sheep Wool Gathering in Eugene, Oregon, I bought the only 8-ounce bundle of Blue Faced Leicester fiber that Sandy had dyed in a beautiful rose and blue colorway. I later bought 4 ounces each of four beautiful colorways including predominantly geranium and cyclamen pink tones, and two with periwinkle and cobalt blues tones. When I laid them next to Sandy’s roving, it looked as though I’d consciously chosen them to match. To get enough yarn for a sweater, I dyed 16 more ounces of roving in coordinating colorways for a total of 2½ pounds (so I’d have plenty to play with) of nine variegated rovings that grade from rose to blue.
I spun and plied the yarn in various combinations. I wound the yarn into balls and laid them in the sequence I envisioned for the sweater: from rose at one cuff through lavender to blue on the other. I chose the center color of the sequence for the center of the bodice. I rewound that ball into two balls of equal size and set aside one for the sweater front. I divided the other ball in two, one half for each side of the back. When that ball ran out, I chose the next yarn in the sequence and divided it into two balls (one for the front, one for the back) and continued in this fashion until I had completed one half of the sweater back. I set the remaining whole skeins in the sequence aside for that sleeve, then returned to the center line and began knitting my color sequence in the opposite direction, similarly dividing the balls as I worked to the other side seam. I set the remainder of the skeins in that sequence aside for that sleeve.
Once the back was knitted, I worked each front from the center to the side edges, maintaining the same color sequence as the back. For the center front, I wound off about a third of the yarn for the neckline edging before I divided the remainder in half. Once I got to the sleeves, I didn’t have to divide the balls. I just knitted from shoulder to cuff using the color sequence I had already arranged for each side. I used a ball of yarn that had a good balance of all the colors for the hem edging. I worked the neckline edging with the ball I set aside from the center front.
I knitted the sweater from the center outwards so that I could manage the color sequence with the limited amount of yarn that I had. If the color sequence of the yarns weren’t an issue, it would be easy to knit this sweater from one cuff to the shoulder, across the body to the other shoulder, then down to the other cuff.

The Fitter List for Rose-to-Blue V-Neck Pullover
Measure your body and allow for the appropriate amount of ease (see page 14) or measure a sweater that fits the way you like and enter the numbers below. Refer to your gauge swatch for your stitch and row gauges, then translate each measurement into numbers of stitches and/or rows as you go along.
Yarn name: My two-ply handspun
Fiber content: 100% Blue Faced Leicester wool
Weight classification: Heavy worsted (between #4 Medium and #5 Bulky)
WPI: 10
Number of yards/pounds used: 1,214 yards; 23½ ounces
Bodice: Stitches per inch (in stockinette stitch): 4 Rows per inch: 6
Needle size: US size 9 (5.5 mm; 36" or longer circular)
Cast-on method: Provisional
Bind-off method: Chain
Selvedge treatment: Chain stitch
Sleeve increase/decrease method: Paired decreases
Seam technique: Mattress stitch at shoulders and along sleeves; crochet chain stitch worked on the right side of the fabric (size H/8 [5 mm] crochet hook) for side seams.
V Neckline
Beginning at the center front (base of V), shape the V by casting on 3 stitches every 2 rows 10 times, then casting on 5 stitches once. Edge the neckline with 10 rows of seed stitch.
Bodice
Circumference: 48 inches
Width (excluding overlaps): 24 inches; 144 rows
Cast-On Stitches (including selvedge stitches): 106 stitches
Length With Edging: 28 inches
Length Without Edging: 26½ inches; 106 stitches
Length of Lower Edging: 1½ inches; 10 rows
Armhole Depth: 10 inches; 40 stitches
Back Neck Width Without Edging: 7 inches; 42 rows
Back Neck Width With Edging: 5½ inches
Front Neck Depth Without Edging: 8¾ inches; 35 stitches
Front Neck Depth With Edging: 7¼ inches
Lower Front Neck Width: NA
Shoulder Width: 8½ inches; 52 rows
Sleeves
Sleeve Length Without Edging: 17 inches; 104 rows
Sleeve Length With Edging: 18 inches; 112 rows
Cuff Circumference: 9 inches; 36 stitches (includes 2 selvedge stitches)
Half Cuff Circumference: 4½ inches; 18 stitches
Cuff Length: 1 inches; 8 rows in seed stitch
Upper Arm Circumference: 20 inches; 80 stitches (plus 2 selvedge stitches)
Half Upper Arm Circumference: 10 inches; 40 stitches (plus 1 selvedge stitch)
Sleeve Taper Rate: 2 stitches decreased every 6 rows 3 times, then every 4 rows 20 times

Work as for the Up-and-Down Classic Crew (page 17).
Work as for the Up-and-Down Classic Crew (page 17).
Work as for the Side-to-Side Classic Crew (page 31).
Work as for the Side-to-Side Classic Crew (page 31), but use a provisional cast-on (Glossary, page 134) at the center back and work each half to the side seam (for me, this was 72 rows), leaving stitches for the sleeves live (40 stitches in my case), and binding off the stitches between the lower edge and the base of the armhole (66 stitches in my case).
Work as for the Side-to-Side Classic Crew (page 32), but substitute a V neckline (page 39).
Knit the front in two sections, beginning with a provisional cast-on at the center front and working each half outward to the side seam, shaping the V neckline along the way.
To determine the number of stitches to cast on for the front (71 stitches for me), subtract the number of stitches in the neckline depth without edging (35 stitches) from the total number of stitches cast on for the bodice back (106 stitches).
Following the neckline graph from center line outwards, shape the neckline by casting on stitches according to the taper rate of 3 stitches every 2 rows 10 times, then casting on 5 stitches once. When the neckline shaping is complete, there will be the same number of stitches as worked for the bodice back (106 stitches for me). Continue straight until the piece measures half the desired bodice width (12"), at which point you’ll be at the side seam. Place the stitches that correspond to the half upper arm circumference (40 stitches) on waste yarn to work later for the sleeve. Use the chain method (see Glossary, page 131) to bind off the remaining stitches that correspond to the side seam (66 stitches). Remove the waste yarn from the provisional cast-on at the center front and work the other half of the front to match.

Neckline graph for Rose-to-Blue V-Necked Pullover
Tip Hiding Chain Selvedges at the Shoulder Line
When you knit the first row of the sleeve, work 2 stitches together on each side of the shoulder seam—use a left decrease (i.e., ssk; Glossary, page 135) on the right side of the seam and right decrease (i.e., k2tog; Glossary, page 135) on the left side. This will make the selvedge stitches disappear and eliminate an unsightly bump at the transition from shoulder to sleeve.
Work as for the Up-and-Down Classic Crew (page 22).
Work as for the Up-and-Down Classic Crew (page 24).
Join the shoulder seams and knit the sleeves from the shoulders to the cuffs, beginning with live stitches of the bodice front and bodice back.
Join the shoulder seams with a mattress stitch (Glossary, page 138).
Return the number of stitches that correspond to the half upper arm circumference (40 stitches) for the bodice front and the bodice back to the needles. Work the sleeves downward to the cuffs, working paired decreases every 6 rows 3 times, then every 4 rows 20 times to end up with the desired number of stitches for the cuff (36 stitches). Work 8 rows of seed stitch for the cuff. Use the chain method to bind off all the stitches.
Join the side seams with a crochet chain stitch (Glossary, page 134) so that the seam allowance is on the right side of the garment. This is a decorative as well as a practical choice for heavy yarns that would otherwise make a bulky seam allowance on the inside of garment. Join sleeve seams with a mattress stitch (Glossary, page 138).
With a circular needle, pick up and knit about 3 stitches for every 4 rows around the hem. Work seed stitch in the round for 10 rounds. Use the chain method to loosely bind off all the stitches.
Beginning at the base of the V, pick up and knit about 3 stitches for every 4 rows along the front neckline and about 1 stitch for every stitch across the back neck, then about 3 stitches for every 4 rows along the other front neckline. Work seed stitch for 1½". Use the chain method to bind off all the stitches. Overlap the edging at the bottom of the V and sew the selvedges of the edging band in place.
Work as for the Side-to-Side Classic Crew (page 35).

My dyed fiber graded from dominantly rose to dominantly blue.
