CHAPTER 1: Software Engineering Principles
© Repina Valeriya/Shutterstock
At this point in your computing career, you have completed at least one computer science course. You can take a problem of medium complexity, write an algorithm to solve the problem, code the algorithm in C++, and demonstrate the correctness of your solution. Now that you are starting a new class, it is time to stop and review those principles that, if adhered to, guarantee that you can indeed do what your previous syllabus claimed.
In this chapter, we review the software design process and the verification of software correctness. In Chapter 2, we review data design and implementation.
1.1 The Software Process
When we consider computer programming, we immediately think of writing a program for a computer to execute—the generation of code in some computer language. As a beginning student of computer science, you wrote programs that solved relatively simple problems. Much of your initial effort went into learning the syntax of a programming language such as C++: the language’s reserved words, its data types, its constructs for selection (if-else and switch) and looping (while, do while, and for), and its input/output mechanisms (cin and cout).
You may have learned a programming methodology that took you from the problem description that your instructor handed out all the way through the delivery of a good software solution. Programmers have created many design techniques, coding standards, and testing methods to help develop high-quality software. But why bother with all that methodology? Why not just sit down at a computer and write code? Aren’t we wasting a lot of time and effort, when we could just get started on the “real” job?
If the degree of our programming sophistication never had to rise above the level of trivial programs (like summing a list of prices or averaging grades), we might get away with such a code-first technique (or, rather, lack of technique). Some new programmers work this way, hacking away at the code until the program works more or less correctly—usually less.
As your programs grow larger and more complex, you must pay attention to other software issues in addition to coding. If you become a software professional, you may work as part of a team that develops a system containing tens of thousands, or even millions, of lines of code. The successful creation of complex programs requires an organized approach. We use the term software engineering to refer to the discipline concerned with all aspects of the development of high-quality software systems. It encompasses all variations of techniques used during the software life cycle plus supporting activities such as documentation and teamwork. A software process is a specific set of interrelated software engineering techniques, used by a person or organization to create a system.
Software engineering is a broad field. Most computing education programs devote one or more advanced courses to the topic. In fact, there are several schools that offer degrees in the discipline. This section provides a brief introduction to this important field.
Software Life Cycles
The term “software engineering” was coined in the 1960s to emphasize that engineering-like discipline is required when creating software. At that time software development was characterized by haphazard approaches with little organization. The primary early contribution of the disciplined approach was the identification and study of the various activities involved in developing successful systems. These activities make up the “life cycle” of a software project and include
Problem analysis Understanding the nature of the problem to be solved
Requirements elicitation Determining exactly what the program must do
Requirements specification Specifying what the program must do (the functional requirements) and the constraints on the solution approach (non-functional requirements, such as what language to use)
High- and low-level design Recording how the program meets the requirements, from the “big picture” overview to the detailed design
Implementation of the design Coding a program in a computer language
Testing and verification Detecting and fixing errors and demonstrating the correctness of the program
Delivery Turning over the tested program to the customer or user (or instructor!)
Operation Actually using the program
Maintenance Making changes to fix operational errors and to add or modify the function of the program
Classically, these activities were performed in the sequence shown above. Each stage would culminate in the creation of structured documentation, which would provide the foundation upon which to build the following stage. This became known as the “waterfall” life cycle, because its graphical depiction resembled a cascading waterfall, as shown in Figure 1.1a. Each stage’s documented output would be fed into the following stage, like water flowing down a river.
The waterfall approach was widely used for a number of years and was instrumental in organizing software development. However, software projects differ from one another in many important ways, for example size, duration, scope, required reliability, and application area. It is not reasonable to expect that one life-cycle approach is best for all projects. The waterfall approach’s inflexible partitioning of projects into separate stages and its heavy emphasis on documentation caused it to lose popularity. It is still useful when requirements are well understood and unlikely to change, but that is often not the case for modern software development.

Figure 1.1 Life-cycle models
Alternate life-cycle approaches evolved for projects that did not conform well to the waterfall cycle. For example, the spiral model depicted in Figure 1.1b directly addresses major risks inherent in software development, for example, the risk of creating an unneeded product, the risk of including unnecessary features, and the risk of creating a confusing interface. Important activities, such as objective-setting, risk assessment, development, and validation, are repeated over and over in a spiral manner as the project moves from its original concept to its final form. Unlike the waterfall model, where development blindly proceeds until the testing stage is reached, the spiral model emphasizes continual assessment and adjustment of goals.
Many other models of the software process have been defined. There are models that emphasize prototyping, models for real-time systems development, and models that emphasize creative problem solving. In one sense, there are as many models as there are organizations that develop software. All organizations, if they have wise management, pull ideas from the various standard approaches that best fit with their goals and create their own version of the life cycle, one that works best for them. The top organizations constantly measure how well their approach is working and attempt to continually improve their process. Software development in the real world is not easy and requires good organization, flexibility, and vigilant management.
A Programmer’s Toolboxes
What makes our jobs as programmers or software engineers challenging is the tendency of software to grow in size and complexity and to change at every stage of its development. Part of a good software process is the use of tools to manage this size and complexity. Usually a programmer has several toolboxes, each containing tools that help to build and shape a software product.
Hardware
One toolbox contains the hardware itself: the computers and their peripheral devices (such as displays, keyboards, trackpads, and network interfaces), on which and for which we develop software.
Software
A second toolbox contains various software tools: operating systems to control the computer’s resources, development environments to help us enter programs, compilers to translate high-level languages like C++ into something that the computer can execute, interactive debugging programs, test-data generators, and so on. You’ve used some of these tools already.
Ideaware
A third toolbox is filled with the shared body of knowledge that programmers have collected over time. This box contains the algorithms that we use to solve common programming problems as well as data structures for modeling the information processed by our programs. Recall that an algorithm is a step-by-step description of the solution to a problem. How we choose between two algorithms that carry out the same task often depends on the requirements of a particular application. If no relevant requirements exist, the choice may be based on the programmer’s own style.
Ideaware contains programming methodologies such as top-down and object-oriented design and software concepts, including information hiding, data encapsulation, and abstraction. It includes aids for creating designs such as Classes, Responsibilities, and Collaborations (CRC) cards and methods for describing designs such as the Unified Modeling Language (UML). It also contains some tools for measuring, evaluating, and proving the correctness of our programs. We devote most of this book to exploring the contents of this third toolbox.
Some might argue that using these tools takes the creativity out of programming, but we don’t believe that to be true. Artists and composers are creative, yet their innovations are grounded in the basic principles of their crafts. Similarly, the most creative programmers build high-quality software through the disciplined use of basic programming tools.
Goals of Quality Software
Quality software entails much more than a program that somehow accomplishes the task at hand. A good program achieves the following goals:
It works.
It can be modified without excessive time and effort.
It is reusable.
It is completed on time and within budget.
It’s not easy to meet these goals, but they are all important.
Goal 1: Quality Software Works
The program must do the task it was designed to perform, and it must do it correctly and completely. Thus the first step in the development process is to determine exactly what the program is required to do. To write a program that works, you first need to have a definition of the program’s requirements. For students, the requirements often are included in the instructor’s problem description: “Write a program that calculates. . . .” For programmers working on a government contract, the requirements document may be hundreds of pages long.
We develop programs that meet the user’s requirements using software specifications. The specifications indicate the format of the input and the expected output, details about processing, performance measures (how fast? how big? how accurate?), what to do in case of errors, and so on. The specifications tell exactly what the program does, but not how it is done. Sometimes your instructor will provide detailed specifications; other times you may have to write them yourself, based on the requirements definition, conversations with your instructor, or guesswork. (We discuss this issue in more detail later in this chapter.)
How do you know when the program is right? A program must be complete (it should “do everything” specified) and correct (it should “do it right”) to meet its requirements. In addition, it should be usable. For instance, if the program needs to receive data directly from a person, it must indicate when it expects input. The program’s outputs should be readable and understandable to users. Indeed, creating a good user interface is an important subject in software engineering today.
Finally, Goal 1 means that the program should be as efficient as it needs to be. We would never deliberately write programs that waste time or space in memory, but not all programs demand great efficiency. When they do, however, we must meet these demands or else the programs will not satisfy the requirements. A space-launch control program, for instance, must execute in “real time”; that is, the software must process commands, perform calculations, and display results in coordination with the activities it is supposed to control. Closer to home, if a word processing program cannot update the screen as rapidly as the user can type, the program is not as efficient as it needs to be. In such a case, if the software isn’t efficient enough, it doesn’t meet its requirements; thus, according to our definition, it doesn’t work correctly. In Chapter 2, we introduce a way to compare the efficiency of different algorithms.
To summarize, a typical program needs to be
complete: It should “do everything” needed.
correct: It should “do it right.”
usable: Its user interface should be “easy to work with.”
efficient: It should finish in a “reasonable amount of time” considering the complexity and size of the task.
Goal 2: Quality Software Can Be Modified
When does software need to be modified? Changes occur in every phase of its existence.
Software gets changed in the design phase. When your instructor or employer gives you a programming assignment, you begin to think of how to solve the problem. The next time you meet, however, you may be notified of a small change in the problem description.
Software gets changed in the coding phase. You make changes in your program as a result of compilation errors. Sometimes you suddenly see a better solution to a part of the problem after the program has been coded, so you make changes.
Software gets changed in the testing phase. If the program crashes or yields wrong results, you must make corrections.
In an academic environment, the life of the software typically ends when a corrected program is turned in to be graded. When software is developed for real-world use, however, most of the changes take place during the “maintenance” phase. Someone may discover an error that wasn’t uncovered in testing, someone else may want to include additional functions, a third party may want to change the input format, and a fourth person may want to run the program on another system.
As you see, software changes often and in all phases of its life cycle. Knowing this fact, software engineers try to develop programs that are modified easily. If you think it is a simple matter to change a program, try to make a “small change” in the last program you wrote. It’s difficult to remember all the details of a program after some time has passed, isn’t it? Modifications to programs often are not even made by the original authors but rather by subsequent maintenance programmers. (Someday you may be the one making the modifications to someone else’s program.)
What makes a program easy to modify? First, it should be readable and understandable to humans. Before it can be changed, it must be understood. A well-designed, clearly written, well-documented program is certainly easier for human readers to understand. The number of pages of documentation required for “real-world” programs usually exceeds the number of pages of code. Almost every organization has its own policy for documentation. Reading a well-written program can teach you techniques that help you write good programs. In fact, it’s difficult to imagine how anyone could become a good programmer without reading good programs.
Second, the program should readily be able to withstand small changes. The key idea is to partition your programs into manageable pieces that work together to solve the problem, yet remain relatively independent. The design methodologies reviewed later in this chapter should help you write programs that meet this goal.
Goal 3: Quality Software Is Reusable
It takes time and effort to create quality software. Therefore, it is important to realize as much value from the software as possible.
One way to save time and effort when building a software solution is to reuse programs, classes, functions, and other components from previous projects. By using previously designed and tested code, you arrive at your solution sooner and with less effort. Alternatively, when you create software to solve a problem, it is sometimes possible to structure that software so it can help solve future, related problems. By doing so, you gain more value from the software created.
Creating reusable software does not happen automatically. It requires extra effort during the specification and design phases. To be reusable, software must be well documented and easy to read, so that a programmer can quickly determine whether it can be used for a new project. It usually has a simple interface so that it can easily be plugged into another system. It is also modifiable (Goal 2), in case a small change is needed to adapt it to the new system.
When creating software to fulfill a narrow, specific function, you can sometimes make the software more generally usable with a minimal amount of extra effort. In this way, you increase the chances that you can reuse the software later. For example, if you are creating a routine that sorts a list of integers into increasing order, you might generalize the routine so that it can also sort other types of data. Furthermore, you could design the routine to accept the desired sort order, increasing or decreasing, as a parameter.
One of the main reasons for the rise in popularity of object-oriented approaches is that they lend themselves to reuse. Previous reuse approaches were hindered by inappropriate units of reuse. If the unit of reuse is too small, then the work saved is not worth the effort. If the unit of reuse is too large, then it is difficult to combine it with other system elements. Object-oriented classes, when designed properly, can be very appropriate units of reuse. A class encapsulates both data and actions on the data, making it ideal for reuse.
Goal 4: Quality Software Is Completed on Time and Within Budget
You know what happens in school when you turn in your program late. You probably have grieved over an otherwise perfect program that received only half credit—or no credit at all—because you turned it in one day late.
Although the consequences of tardiness may seem arbitrary in the academic world, they are significant in the business world. The software for controlling a space launch must be developed and tested before the launch can take place. A patient database system for a new hospital must be installed before the hospital can open. In such cases, the program doesn’t meet its requirements if it isn’t ready when needed.
“Time is money” may sound trite, but failure to meet deadlines is expensive. A company generally budgets a certain amount of time and money for the development of a piece of software. As a programmer, you are paid a salary or an hourly wage. If your part of the project is only 80% complete when the deadline arrives, the company must pay you—or another programmer—to finish the work. The extra expenditure in salary is not the only cost, however. Other workers may be waiting to integrate your part of the program into the system for testing. If the program is part of a contract with a customer, monetary penalties may be assessed for missed deadlines. If it is being developed for commercial sales, the company may be beaten to the market by a competitor and eventually forced out of business.
Once you have identified your goals, what can you do to meet them? Where should you start? Software engineers use many tools and techniques. In the next few sections of this chapter, we review some of these techniques to help you understand, design, and code programs.
Specification: Understanding the Problem
No matter which programming design technique you use, the first steps are always the same. Imagine the following all-too-familiar situation. On the third day of class, you are given a 12-page description of Programming Assignment 1, which must be running perfectly and turned in by noon, one week from yesterday. You read the assignment and realize that this program is three times larger than any program you have ever written. What is your first step?
The responses listed here are typical of those given by a class of computer science students in such a situation:
Panic 39%
Sit down at the computer and begin typing 30%
Drop the course 27%
Stop and think 4%
Response 1 is a predictable reaction from students who have not learned good programming techniques. Students who adopt Response 3 will find their education progressing rather slowly. Response 2 may seem to be a good idea, especially considering the deadline looming ahead. Resist the temptation, though—the first step is to think. Before you can come up with a program solution, you must understand the problem. Read the assignment, and then read it again. Ask questions of your instructor (or manager, or client). Starting early affords you many opportunities to ask questions; starting the night before the program is due leaves you no opportunity at all.
The problem with writing first is that it tends to lock you into the first solution you think of, which may not be the best approach. We have a natural tendency to believe that once we’ve put something in writing, we have invested too much in the idea to toss it out and start over.
On the other hand, don’t agonize about all the possibilities until the day before your deadline. (Chances are that a disk, network, or your whole computer will fail that day!) When you think you understand the problem, you should begin writing your design.
Writing Detailed Specification
Many writers experience a moment of terror when faced with a blank piece of paper—where to begin? As a programmer, however, you don’t have to wonder about where to begin. Using the assignment description (your “requirements”), first write a complete definition of the problem, including the details of the expected inputs and outputs, the necessary processing and error handling, and all assumptions about the problem. When you finish this task, you have a detailed specification—a formal definition of the problem your program must solve, which tells you exactly what the program should do. In addition, the process of writing the specifications brings to flight any holes in the requirements. For instance, are embedded blanks in the input significant or can they be ignored? Do you need to check for errors in the input? On which computer system(s) will your program run? If you get the answers to these questions at this stage, you can design and code your program correctly from the start.
Many software engineers work with user/operational scenarios to understand the requirements. In software design, a scenario is a sequence of events for one execution of the program. For example, a designer might consider the following scenario when developing the software for a bank’s automated teller machine (ATM):
The customer inserts a bank card.
The ATM reads the account number on the card.
The ATM requests a personal identification number (PIN) from the customer.
The customer enters 5683.
The ATM successfully verifies the account number/PIN combination.
The ATM asks the customer to select a transaction type (deposit, show balance, withdrawal, or quit).
The customer selects the show balance option.
The ATM obtains the current account balance ($1,204.35) and displays it.
The ATM asks the customer to select a transaction type (deposit, show balance, withdrawal, or quit).
The customer selects quit.
The ATM returns the customer’s bank card.
Scenarios allow us to get a feel for the behavior expected from the system. Of course, a single scenario cannot show all possible behaviors. For this reason, software engineers typically prepare many different scenarios to gain a full understanding of the system’s requirements.
You must know some details to write and run the program. Other details, if not explicitly stated in the program’s requirements, may be handled according to the programmer’s preference. Assumptions about unstated or ambiguous specifications should always be written explicitly in the program’s documentation.
The detailed specification clarifies the problem to be solved. But it does more than that: It also serves as an important piece of written documentation about the program. There are many ways in which specifications may be expressed and a number of different sections that may be included, depending on the nature of the problem. Our recommended program specification includes the following sections:
Processing requirements
Sample inputs with expected outputs
Assumptions
If special processing is needed for unusual or error conditions, it should be specified as well. Sometimes it is helpful to include a section containing definitions of terms used. Likewise, it may prove useful to list any testing requirements so that verifying the program is considered early in the development process.
1.2 Program Design
Remember, the specification of the program tells what the program must do, but not how it does it. Once you have fully clarified the goals of the program, you can begin to develop and record a strategy for meeting them; in other words, you can begin the design phase of the software life cycle. In this section, we review some ideaware tools that are used for software design, including abstraction, information hiding, stepwise refinement, and visual tools.
Abstraction
The universe is filled with complex systems. We learn about such systems through models. A model may be mathematical, like equations describing the motion of satellites around the earth. A physical object such as a model airplane used in wind-tunnel tests is another form of model. In this approach to understanding complex systems, the important concept is that we consider only the essential characteristics of the system; we ignore minor or irrelevant details. For example, although the earth is an oblate ellipsoid, globes (models of the earth) are spheres. The small difference between the earth’s equatorial diameter and polar diameter is not important to us in studying the political divisions and physical landmarks on the earth. Similarly, the model airplanes used to study aerodynamics do not include in-flight movies.
An abstraction is a model of a complex system that includes only the essential details. Abstractions are the fundamental way that we manage complexity. Different viewers use different abstractions of a particular system. Thus, while we may see a car as a means to transport us and our friends, the automotive brake engineer may see it as a large mass with a small contact area between it and the road (Figure 1.2).
What does abstraction have to do with software development? The programs we write are abstractions. A spreadsheet program that is used by an accountant models the books that were once used to record debits and credits. An educational computer game about wildlife models an ecosystem. Writing software is difficult because both the systems we model and the processes we use to develop the software are complex. One of our major goals is to convince you to use abstractions to manage the complexity of developing software. In nearly every chapter, we make use of abstraction to simplify our work.

Figure 1.2 An abstraction includes the essential details relative to the perspective of the viewer
Information Hiding
Many design methods are based on decomposing a problem’s solution into modules. A module is a cohesive system subunit that performs a share of the work. Decomposing a system into modules helps us manage complexity. Additionally, the modules can form the basis of assignments for different programming teams working separately on a large system. One important feature of any design method is that the details that are specified in lower levels of the program design remain hidden from the higher levels. The programmer sees only the details that are relevant at a particular level of the design. This information hiding makes certain details inaccessible to the programmer at higher levels.
Modules act as an abstraction tool. Because the complexity of its internal structure can be hidden from the rest of the system, the details involved in implementing a module remain isolated from the details of the rest of the system.
Why is hiding the details desirable? Shouldn’t the programmer know everything? No! In this situation, a certain amount of ignorance truly is advantageous. Information hiding prevents the higher levels of the design from becoming dependent on low-level design details that are more likely to be changed. For example, you can stop a car without knowing whether it has disc brakes or drum brakes. You don’t need to know these lower-level details of the car’s brake subsystem to stop it.
Furthermore, you don’t want to require a complete understanding of the complicated details of low-level routines for the design of higher-level routines. Such a requirement would introduce a greater risk of confusion and error throughout the whole program. For example, it would be disastrous if every time we wanted to stop our car, we had to think, “The brake pedal is a lever with a mechanical advantage of 10.6 coupled to a hydraulic system with a mechanical advantage of 7.3 that presses a semi-metallic pad against a steel disc. The coefficient of friction of the pad/disc contact is. . . .”
Information hiding is not limited to driving cars and programming computers. Try to list all the operations and information required to make a peanut butter and jelly sandwich. We normally don’t consider the details of planting, growing, and harvesting peanuts, grapes, and wheat as part of making a sandwich. Information hiding lets us deal with only those operations and information needed at a particular level in the solution of a problem.
The concepts of abstraction and information hiding are fundamental principles of software engineering. We will come back to them again and again throughout this book. Besides helping us manage the complexity of a large system, abstraction and information hiding support our quality-related goals of modifiability and reusability. In a well-designed system, most modifications can be localized to just a few modules. Such changes are much easier to make than changes that permeate the entire system. Additionally, a good system design results in the creation of generic modules that can be used in other systems.
To achieve these goals, modules should be good abstractions with strong cohesion; that is, each module should have a single purpose or identity, and the module should stick together well. A cohesive module can usually be described by a simple sentence. If you have to use several sentences or one very convoluted sentence to describe your module, it is probably not cohesive. Each module should also exhibit information hiding so that changes within it do not result in changes in the modules that use it. This independent quality of modules is known as loose coupling. If your module depends on the internal details of other modules, it is not loosely coupled.
Stepwise Refinement
In addition to concepts such as abstraction and information hiding, software developers need practical approaches to conquer complexity. Stepwise refinement is a widely applicable approach. Many variations of it exist, such as top-down, bottom-up, functional decomposition, and even “round-trip gestalt design.” Undoubtedly you have learned a variation of stepwise refinement in your studies, as it is a standard method for organizing and writing essays, term papers, and books. For example, to write a book, an author first determines the main theme and the major subthemes. Next, the chapter topics can be identified, followed by section and subsection topics. Outlines can be produced and further refined for each subsection. At some point the author is ready to add detail—to actually begin writing sentences.
In general, with stepwise refinement, a problem is approached in stages. Similar steps are followed during each stage, with the only difference reflecting the level of detail involved. The completion of each stage brings us closer to solving our problem. Let’s look at some variations of stepwise refinement:
Top-down With this approach, the problem is first broken into several large parts. Each of these parts is, in turn, divided into sections, the sections are subdivided, and so on. The important feature is that details are deferred as long as possible as we move from a general to a specific solution. The outline approach to writing a book involves a form of top-down step-wise refinement.
Bottom-up As you might guess, with this approach the details come first. Bottom-up development is the opposite of the top-down approach. After the detailed components are identified and designed, they are brought together into increasingly higher-level components. This technique could be used, for example, by the author of a cookbook who first writes all the recipes and then decides how to organize them into sections and chapters.
Functional decomposition This program design approach encourages programming in logical action units, called functions. The main module of the design becomes the main program (also called the main function), and subsections develop into functions. This hierarchy of tasks forms the basis for functional decomposition, with the main program or function controlling the processing. The general function of the method is continually divided into subfunctions until the level of detail is considered fine enough to code. Functional decomposition is top-down stepwise refinement with an emphasis on functionality.
Round-trip gestalt design This confusing term is used to define the stepwise refinement approach to object-oriented design suggested by Grady Booch,1 one of the leaders of the “object” movement. First, the tangible items and events in the problem domain are identified and assigned to candidate classes and objects. Next, the external properties and relationships of these classes and objects are defined. Finally, the internal details are addressed; unless these are trivial, the designer must return to the first step for another round of design. This approach entails top-down stepwise refinement with an emphasis on objects and data.
Good software designers typically use a combination of the stepwise refinement techniques described here.
Visual Tools
Abstraction, information hiding, and stepwise refinement are interrelated methods for controlling complexity during the design of a system. We now look at some tools that can help us visualize our designs. Diagrams are used in many professions. For example, architects use blueprints, investors use market trend graphs, and truck drivers use maps.

Software engineers use different types of diagrams and tables, such as the UML and CRC cards. The UML is used to specify, visualize, construct, and document the components of a software system. It combines the best practices that have evolved over the past several decades for modeling systems, and it is particularly well suited to modeling object-oriented designs. UML diagrams represent another form of abstraction. They hide implementation details and allow systems designers to concentrate on only the major design components. UML includes a large variety of interrelated diagram types, each with its own set of icons and connectors. A very powerful development and modeling tool, it is helpful for modeling and documenting designs after they have been developed. See Figure 1.3a.

Figure 1.3 UML Class Diagram and CRC Card
In contrast, CRC cards are a notational tool that helps us determine our initial designs. CRC cards were first described by Beck and Cunningham, in 1989, as a means to allow object-oriented programmers to identify a set of cooperating classes to solve a problem.
A programmer uses a physical 4” × 6” index card to represent each class that has been identified as part of a problem solution. Figure 1.3b shows a blank CRC card. If the class is of general use, the CRC card may have a place to record the class’s primary responsibility. It always contains room for the following information about a class:
Class name
Responsibilities of the class—usually represented by verbs and implemented by public functions (called methods in object-oriented terminology)
Collaborations—other classes or objects that are used in fulfilling the responsibilities
CRC cards are great tools for refining an object-oriented design, especially in a team programming environment. They provide a physical manifestation of the building blocks of a system that allows programmers to walk through user scenarios, identifying and assigning responsibilities and collaborations. We discuss a problem-solving methodology using CRC cards in Chapter 3.
Covering all of UML is beyond the scope of this text. We will, however, use the UML class diagram as shown in Figure 1.3a to document our classes. We will use CRC cards throughout as a design tool.
1.3 Design Approaches
We have defined the concept of a module, described the characteristics of a good module, and presented the concept of stepwise refinement as a strategy for defining modules. But what should these modules be? How do we define them? One approach is to break the problem into functional subproblems (do this, then do this, then do that). Another approach is to divide the problem into the “things” or objects that interact to solve the problem. We explore both of these approaches in this section.
Top-Down Design
One method for designing software is based on the functional decomposition and top-down strategies. First the problem is broken into several large tasks. Each of these tasks is, in turn, divided into sections, the sections are subdivided, and so on. As we said previously, the key feature is that details are deferred as long as possible as we move from a general to a specific solution.
To develop a computer program by this method, we begin with a “big picture” solution to the problem defined in the specification. We then devise a general strategy for solving the problem by dividing it into manageable functional modules. Next, each of the large functional modules is subdivided into several tasks. We do not need to write the top level of the functional design in source code (such as C++); rather, we can write it in English or “pseudocode.” (Some software development projects even use special design languages that can be compiled.) This divide-and-conquer activity continues until we reach a level that can be easily translated into lines of code.
Once it has been divided into modules, the problem is simpler to code into a well-structured program. The functional decomposition approach encourages programming in logical units, using functions. The main module of the design becomes the main program (also called the main function), and subsections develop into functions. This hierarchy of tasks forms the basis for functional decomposition, with the main program or function controlling the processing.
As an example, let’s start the functional design for making a cake.
The problem now is divided into five logical units, each of which might be further decomposed into more detailed functional modules. Figure 1.4 illustrates the hierarchy of such a functional decomposition.

Figure 1.4 A portion of a functional design for baking a cake
Object-Oriented Design
In object-oriented design, the first steps are to identify the simplest and most widely used objects and processes in the decomposition and to implement them faithfully. Once you have completed this stage, you often can reuse these objects and processes to implement more complex objects and processes. This hierarchy of objects forms the basis for object-oriented design.
Object-oriented design, like top-down design, takes a divide-and-conquer approach. However, instead of decomposing the problem into functional modules, we divide it into entities or things that make sense in the context of the problem being solved. These entities, called objects, collaborate and interact to solve the problem. The code that allows these objects to interact is called a driver program.
Let’s list some of the objects in our baking problem. There are, of course, all of the various ingredients: eggs, milk, flour, butter, and so on. We also need certain pieces of equipment, such as pans, bowls, measuring spoons, and an oven. The baker is another important entity. All of these entities must collaborate to create a cake. For example, a spoon measures individual ingredients, and a bowl holds a mixture of ingredients.
Groups of objects with similar properties and behaviors are described by an object class (usually shortened to class). Each oven in the world is a unique object. We cannot hope to describe every oven, but we can group oven objects together into a class called oven that has certain properties and behaviors.
An object class is similar to a C++ class (see the sidebar on page 20 on class syntax and the discussion in Chapter 2). C++ types are templates for variables; classes are templates for objects. Like types, object classes have attributes and operations associated with them. For example, an oven class might have an attribute to specify whether it is gas or electric and operations to turn it on or off and to set it to maintain a desired temperature.
With object-oriented design, we determine the classes from the things in the problem as described in the problem statement. We record each object class using a CRC card. From this work, we determine a set of properties (attributes) and a set of responsibilities (operations) to associate with each class. With object-oriented design, the functionality of the program is distributed among a set of collaborating objects. Table 1.1 illustrates some of the object classes that participate in baking a cake.
Once we have defined an oven class, we can reuse it in other cooking problems, such as roasting a turkey. Reuse of classes is an important aspect of modern software development. One major goal of this text is to introduce you to a number of classes that are particularly important in the development of software—abstract data types. We discuss the concept of an abstract data type in detail in Chapter 2. Throughout the book, we fully develop many abstract data types, and we describe others, leaving you to develop them yourself. As these classes are fundamental to computer science, we can often obtain the C++ code for them from a public or private repository or purchase it from vendors who market C++ components. In fact, the C++ language standard includes components in the Standard Template Library (STL). You may wonder why, if they are already available, we spend so much time on their development. Our goal is to teach you how to develop software. As with any skill, you need to practice the fundamentals before you can become a virtuoso.
Table 1.1 Example of Object Classes That Participate in Baking a Cake
| Class | Attributes | Responsibilities (Operations) |
|---|---|---|
| Oven | Energy source | Turn on |
| Size | Turn off | |
| Temperature | Set desired temperature | |
| Number of racks | ||
| Bowl | Capacity | Add to |
| Current amount | Dump | |
| Egg | Size | Crack |
| Separate (white from yolk) |
To summarize, top-down design methods focus on the process of transforming the input into the output, resulting in a hierarchy of tasks. Object-oriented design focuses on the data objects that are to be transformed, resulting in a hierarchy of objects. Grady Booch puts it this way: “Read the specification of the software you want to build. Underline the verbs if you are after procedural code, the nouns if you aim for an object-oriented program.”2
We propose that you circle the nouns and underline the verbs. The nouns become objects; the verbs become operations. In a functional design, the verbs are the primary focus; in an object-oriented design, the nouns are the primary focus.
1.4 Verification of Software Correctness
At the beginning of this chapter, we discussed some characteristics of good programs. The first of these was that a good program works—it accomplishes its intended function. How do you know when your program meets that goal? The simple answer is, test it.
Let’s look at testing as it relates to the rest of the software development process. As programmers, we first make sure that we understand the requirements. We then come up with a general solution. Next, we design the solution in terms of a computer program, using good design principles. Finally, we implement the solution, using good structured coding, with classes, functions, self-documenting code, and so on.
Once we have the program coded, we compile it repeatedly until no syntax errors appear. Then we run the program, using carefully selected test data. If the program doesn’t work, we say that it has a “bug” in it. We try to pinpoint the error and fix it, a process called debugging. Notice the distinction between testing and debugging. Testing is running the program with data sets designed to discover any errors; debugging is removing errors once they are discovered.
When the debugging is completed, the software is put into use. Before final delivery, software is sometimes installed on one or more customer sites so that it can be tested in a real environment with real data. After passing this acceptance test phase, the software can be installed at all customer sites. Is the verification process now finished? Hardly! More than half of the total life-cycle costs and effort generally occur after the program becomes operational, in the maintenance phase. Some changes correct errors in the original program; other changes add new capabilities to the software system. In either case, testing must occur after any program modification. This phase is called regression testing.
Testing is useful in revealing the presence of bugs in a program, but it doesn’t prove their absence. We can only say for sure that the program worked correctly for the cases we tested. This approach seems somewhat haphazard. How do we know which tests or how many of them to run? Debugging a whole program at once isn’t easy. Also, fixing the errors found during such testing can sometimes be a messy task. Too bad we couldn’t have detected the errors earlier—while we were designing the program, for instance. They would have been much easier to fix then.
We know how program design can be improved by using a good design methodology. Can we use something similar to improve our program verification activities? Yes, we can. Program verification activities don’t need to start when the program is completely coded; they can be incorporated into the entire software development process, from the requirements phase on. Program verification is more than just testing.
In addition to program verification, which involves fulfilling the requirement specifications, the software engineer has another important task—making sure the specified requirements actually solve the underlying problem. Countless times a programmer has finished a large project and delivered the verified software, only to be told, “Well, that’s what I asked for, but it’s not what I need.”
The process of determining that software accomplishes its intended task is called program validation. Program verification asks, “Are we doing the job right?”; program validation asks, “Are we doing the right job?”3
Can we really “debug” a program before it has ever been run—or even before it has been written? In this section we review a number of topics related to satisfying the criterion “quality software works.” The topics include
Designing for correctness
Performing code and design walk-throughs and inspections
Using debugging methods
Choosing test goals and data
Writing test plans
Structured integration testing
Origin of Bugs
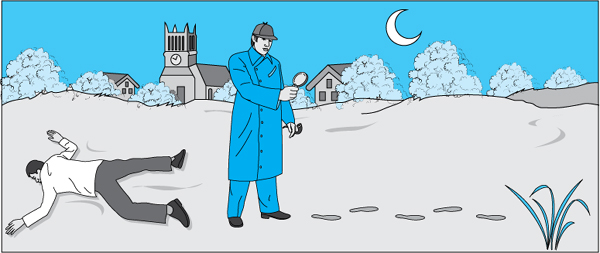
When Sherlock Holmes goes off to solve a case, he doesn’t start from scratch every time; he knows from experience all kinds of things that help him find solutions. Suppose Holmes finds a victim in a muddy field. He immediately looks for footprints in the mud, for he can tell from a footprint what kind of shoe made it. The first print he finds matches the shoes of the victim, so he keeps looking. Now he finds another print, and from his vast knowledge of footprints he can tell that it was made by a certain type of boot. He deduces that such a boot would be worn by a particular type of laborer, and from the size and depth of the print he guesses the suspect’s height and weight. Now, knowing something about the habits of laborers in this town, he guesses that at 6:30 P.M. the suspect might be found in Clancy’s Pub.
In software verification we are often expected to play detective. Given certain clues, we have to find the bugs in programs. If we know what kinds of situations produce program errors, we are more likely to be able to detect and correct problems. We may even be able to step in and prevent many errors entirely, just as Sherlock Holmes sometimes intervenes in time to prevent a crime from taking place.
Let’s look at some types of software errors that show up at various points in program development and testing and see how they might be avoided.
Specifications and Design Errors
What would happen if, shortly before you were supposed to turn in a major class assignment, you discovered that some details in the professor’s program description were incorrect? To make matters worse, you also found out that the corrections were discussed at the beginning of class on the day you got there late, and somehow you never knew about the problem until your tests of the class data set came up with the wrong answers. What do you do now?
Writing a program to the wrong specifications is probably the worst kind of software error. How bad can it be? Let’s look at a true story. Some time ago, a computer company contracted to replace a government agency’s obsolete system with new hardware and software. A large and complicated program was written, based on specifications and algorithms provided by the customer. The new system was checked out at every point in its development to ensure that its functions matched the requirements in the specifications document. When the system was complete and the new software was executed, users discovered that the results of its calculations did not match those of the old system. A careful comparison of the two systems showed that the specifications of the new software were erroneous because they were based on algorithms taken from the old system’s inaccurate documentation. The new program was “correct” in that it accomplished its specified functions, but the program was useless to the customer because it didn’t accomplish its intended functions—it didn’t work. The cost of correcting the errors measured in the millions of dollars.
How could correcting the error be so expensive? First, much of the conceptual and design effort, as well as the coding, was wasted. It took a great deal of time to pinpoint which parts of the specification were in error and then to correct this document before the program could be redesigned. Then much of the software development activity (design, coding, and testing) had to be repeated. This case is an extreme one, but it illustrates how critical specifications are to the software process. In general, programmers are more expert in software development techniques than in the “application” areas of their programs, such as banking, city planning, satellite control, or medical research. Thus correct program specifications are crucial to the success of program development.
Most studies indicate that it costs 100 times as much to correct an error discovered after software delivery than it does if the problem is discovered early in the software life cycle. Figure 1.5 shows how fast the costs rise in subsequent phases of software development. The vertical axis represents the relative cost of fixing an error; this cost might be measured in units of hours, hundreds of dollars, or “programmer months” (the amount of work one programmer can do in one month). The horizontal axis represents the stages in the development of a software product. As you can see, an error that would have taken one unit to fix when you first started designing might take 100 units to correct when the product is actually in operation!
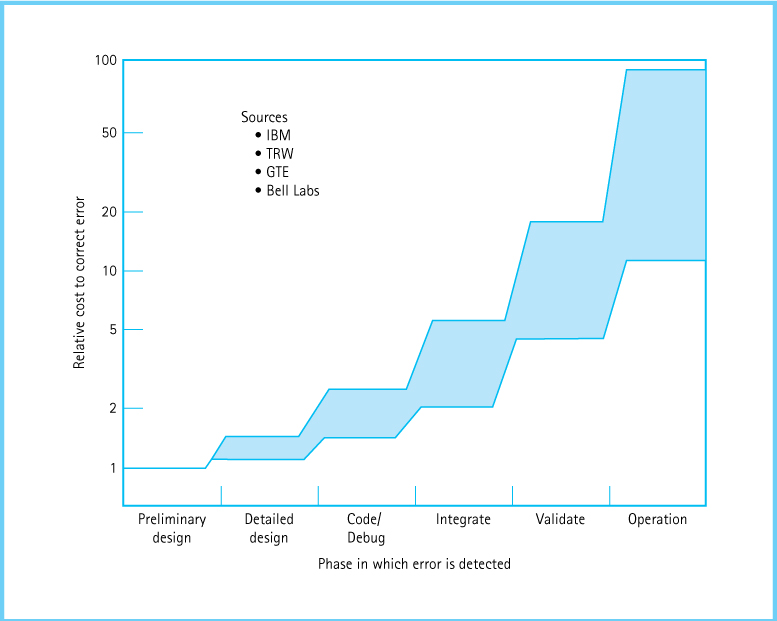
Figure 1.5 This graph demonstrates the importance of early detection of software errors
Good communication between the programmers (you) and the party who originated the problem (the professor, manager, or customer) can prevent many specification errors. In general, it pays to ask questions when you don’t understand something in the program specifications. And the earlier you ask, the better.
A number of questions should come to mind as you first read a programming assignment. What error checking is necessary? What algorithm or data structure should be used in the solution? What assumptions are reasonable? If you obtain answers to these questions when you first begin working on an assignment, you can incorporate them into your design and implementation of the program. Later in the program’s development, unexpected answers to these questions can cost you time and effort. In short, to write a program that is correct, you must understand precisely what your program is supposed to do.
Sometimes specifications change during the design or implementation of a program. In such cases, a good design helps you to pinpoint which sections of the program must be redone. For instance, if a program defines and uses type StringType to implement strings, changing the implementation of StringType does not require rewriting the entire program. We should be able to see from the design—either functional or object-oriented—that the offending code is restricted to the module where StringType is defined. The parts of the program that require changes can usually be located more easily from the design than from the code itself.
Compile-Time Errors In the process of learning your first programming language, you probably made a number of syntax errors. These mistakes resulted in error messages (for example, “TYPE MISMATCH,” “ILLEGAL ASSIGNMENT,” “SEMICOLON EXPECTED,” and so on) when you tried to compile the program. Now that you are more familiar with the programming language, you can save your debugging skills for tracking down really important logical errors. Try to get the syntax right the first time. Having your program compile cleanly on the first attempt is not an unreasonable goal. A syntax error wastes programmer time, and it is preventable. Some programmers argue that looking for syntax errors is a waste of their time, that it is faster to let the compiler or the syntax checking in the editor catch all the typos and syntax errors. Don’t believe them! Sometimes a coding error turns out to be a legal statement, syntactically correct but semantically wrong. This situation may cause very obscure, hard-to-locate errors.
As you progress in your college career or move into a professional computing job, learning a new programming language is often the easiest part of a new software assignment. This does not mean, however, that the language is the least important part. In this book we discuss abstract data types and algorithms that we believe are language independent. That is, they can be implemented in almost any general-purpose programming language. In reality, the success of the implementation depends on a thorough understanding of the features of the programming language. What is considered acceptable programming practice in one language may be inadequate in another, and similar syntactic constructs may be just different enough to cause serious trouble.
For this reason, it is worthwhile to develop an expert knowledge of both the control and data structures and the syntax of the language in which you are programming.
In general, if you have a good knowledge of your programming language—and are careful—you can avoid syntax errors. The ones you might miss are relatively easy to locate and correct. Most are flagged by the editor or the compiler with an error message. Once you have a “clean” compilation, you can execute your program.
Run-Time Errors
Errors that occur during the execution of a program are usually more difficult to detect than syntax errors. Some run-time errors stop execution of the program. When this situation happens, we say that the program “crashed” or “terminated abnormally.”
Run-time errors often occur when the programmer makes too many assumptions. For instance,
result = dividend / divisor;
is a legitimate assignment statement, if we can assume that divisor is never zero. If divisor is zero, however, a run-time error results.
Sometimes run-time errors occur because the programmer does not fully understand the programming language. For example, in C++ the assignment operator is =, and the equality test operator is ==. Because they look so much alike, they often are miskeyed one for the other. You might think that this would be a syntax error that the compiler would catch, but it is actually a logic error. Technically, an assignment in C++ consists of an expression with two parts: The expression on the right of the assignment operator (=) is evaluated and the result is returned and stored in the place named on the left. The key word here is returned; the result of evaluating the right-hand side is the result of the expression. Therefore, if the assignment operator is miskeyed for the equality test operator, or vice versa, the code executes with surprising results.
Let’s look at an example. Consider the following two statements:
count == count + 1;
if (count = 10)
.
.
.
The first statement returns false; count can never be equal to count + 1. The semicolon ends the statement, so nothing happens to the value returned; count has not changed. In the next statement, the expression (count = 10) is evaluated, and 10 is returned and stored in count. Because a nonzero value (10) is returned, the if expression always evaluates to true.
Run-time errors also occur because of unanticipated user errors. For instance, if newValue is declared to be of type int, the statement
cin >> newValue;
causes a stream failure if the user inputs a nonnumeric character. An invalid filename can cause a stream failure. In some languages, the system reports a run-time error and halts. In C++, the program doesn’t halt; the program simply continues with erroneous data.
Well-written programs should not stop unexpectedly (crash) or continue with bad data. They should catch such errors and stay in control until the user is ready to quit.
The ability of a program to recover when an error occurs is called robustness. If a commercial program is not robust, people do not buy it. Who wants a word processor that crashes if the user says “SAVE” when there is insufficient space on the drive? We want the program to tell us, “Delete some other files on the drive to make room, and try again.” For some types of software, robustness is a critical requirement. An airplane’s automatic pilot system or an intensive care unit’s patient-monitoring program cannot afford to just crash. In such situations, a defensive posture produces good results.
In general, you should actively check for error-creating conditions rather than let them abort your program. For instance, it is generally unwise to make too many assumptions about the correctness of input, especially input from a keyboard. A better approach is to check explicitly for the correct type and bounds of such input. The programmer can then decide how to handle an error (request new input, display a message, or go on to the next data) rather than leave the decision to the system. Even the decision to quit should be made by a program that controls its own execution. If worse comes to worst, let your program die gracefully.
Of course, not everything that the program inputs must be checked for errors. Sometimes inputs are known to be correct—for instance, input from a file that has been verified. The decision to include error checking must be based upon the requirements of the program.
Some run-time errors do not stop execution but do produce the wrong results. You may have incorrectly implemented an algorithm or used a variable before it was assigned a value. You may have inadvertently swapped two parameters of the same type on a function call or forgotten to designate a function’s output data as a reference parameter. (See the Parameter Passing sidebar, page 78.) These “logical” errors are often the hardest to prevent and locate. Later we will talk about debugging techniques to help pinpoint run-time errors. We will also discuss structured testing methods that isolate the part of the program being tested. But knowing that the earlier we find an error, the easier it is to fix, we turn now to ways of catching run-time errors before run time.
Designing for Correctness
It would be nice if there were some tool that would locate the errors in our design or code without our even having to run the program. That sounds unlikely, but consider an analogy from geometry. We wouldn’t try to prove the Pythagorean Theorem by proving that it worked on every triangle; that result would merely demonstrate that the theorem works for every triangle we tried. We prove theorems in geometry mathematically. Why can’t we do the same for computer programs?
The verification of program correctness, independent of data testing, is an important area of theoretical computer science research. Such research seeks to establish a method for proving programs that is analogous to the method for proving theorems in geometry. The necessary techniques exist, but the proofs are often more complicated than the programs themselves. Therefore a major focus of verification research is the attempt to build automated program provers—verifiable programs that verify other programs. In the meantime, the formal verification techniques can be carried out by hand.
Assertions
An assertion is a logical proposition that can be true or false. We can make assertions about the state of the program. For instance, with the assignment statement
sum = part + 1 ; // sum and part are integers.
we might assert the following: “The value of sum is greater than the value of part.” That assertion might not be very useful or interesting by itself, but let’s see what we can do with it. We can demonstrate that the assertion is true by making a logical argument: No matter what value part has (negative, zero, or positive), when it is increased by 1, the result is a larger value. Now note what we didn’t do. We didn’t have to run a program containing this assignment statement to verify that the assertion was correct.
The general concept behind formal program verification is that we can make assertions about what the program is intended to do, based on its specifications, and then prove through a logical argument (rather than through execution of the program) that a design or implementation satisfies the assertions. Thus the process can be broken down into two steps:
Correctly assert the intended function of the part of the program to be verified.
Prove that the actual design or implementation does what is asserted.
The first step, making assertions, sounds as if it might be useful to us in the process of designing correct programs. After all, we already know that we cannot write correct programs unless we know what they are supposed to do.
Preconditions and Postconditions
Let’s take the idea of making assertions down a level in the design process. Suppose we want to design a module (a logical chunk of the program) to perform a specific operation. To ensure that this module fits into the program as a whole, we must clarify what happens at its boundaries—that is, what must be true when we enter the module and what must be true when we exit.
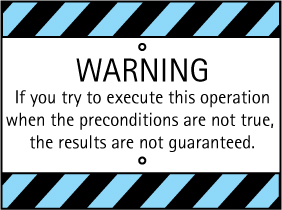
To make the task more concrete, picture the design module as it is eventually coded, as a function that is called within a program. To call the function, we must know its exact interface: the name and the parameter list, which indicates its inputs and outputs. But this information isn’t enough: We must also know any assumptions that must be true for the operation to function correctly. We call the assertions that must be true on entry into the function preconditions. The preconditions act like a product disclaimer:
For instance, when we said that following the execution of
sum = part + 1;
we can assert that sum is greater than part, we made an assumption—a precondition—that part is not INT_MAX. If this precondition were violated, our assertion would not be true.
We must also know what conditions are true when the operation is complete. The postconditions are assertions that describe the results of the operation. The postconditions do not tell us how these results are accomplished; rather, they merely tell us what the results should be.
Let’s consider the preconditions and postconditions for a simple operation, one that deletes the last element from a list and returns its value as an output. (We are using “list” in an intuitive sense here; we formally define it in Chapter 3.) The specification for GetLast is as follows:
What do these preconditions and postconditions have to do with program verification? By making explicit assertions about what is expected at the interfaces between modules, we can avoid making logical errors based on misunderstandings. For instance, from the precondition we know that we must check outside of this operation for the empty condition; this module assumes that at least one element is present in the list. The postcondition tells us that when the value of the last list element is retrieved, that element is deleted from the list. This fact is an important one for the list user to know. If we just want to take a peek at the last value without affecting the list, we cannot use GetLast.
Experienced software developers know that misunderstandings about interfaces to someone else’s modules are one of the main sources of program problems. We use preconditions and postconditions at the module or function level in this book because the information they provide helps us to design programs in a truly modular fashion. We can then use the modules we’ve designed in our programs, confident that we are not introducing errors by making mistakes about assumptions and about what the modules actually do.
Design Review Activities
When an individual programmer is designing and implementing a program, he or she can find many software errors with pencil and paper. Deskchecking the design solution is a very common method of manually verifying a program. The programmer writes down essential data (variables, input values, parameters of subprograms, and so on) and walks through the design, marking changes in the data on the paper. Known trouble spots in the design or code should be double-checked. A checklist of typical errors (such as loops that do not terminate, variables that are used before they are initialized, and incorrect order of parameters on function calls) can be used to make the deskcheck more effective. A sample checklist for deskchecking a C++ program appears in Figure 1.6.
Have you ever been really stuck trying to debug a program and showed it to a classmate or colleague who detected the bug right away? It is generally acknowledged that someone else can detect errors in a program better than the original author can. In an extension of deskchecking, two programmers can trade code listings and check each other’s programs. Universities, however, frequently discourage students from examining each other’s programs for fear that this exchange will lead to cheating. Thus many students become experienced in writing programs but don’t have much opportunity to practice reading them.
Figure 1.6 Checklist for deskchecking a C++ program
The Design
Does each module in the design have a clear function or purpose?
Can large modules be broken down into smaller pieces? (A common rule of thumb is that a C++ function should fit on one page.)
Are all the assumptions valid? Are they well documented?
Are the preconditions and postconditions accurate assertions about what should be happening in the module they specify?
Is the design correct and complete as measured against the program specification? Are there any missing cases? Is there faulty logic?
Is the program designed well for understandability and maintainability?
The Code
Has the design been clearly and correctly implemented in the programming language? Are features of the programming language used appropriately?
Are all output parameters of functions assigned values?
Are parameters that return values marked as reference parameters (have
&to the right of the type if the parameter is not an array)?Are functions coded to be consistent with the interfaces shown in the design?
Are the actual parameters on function calls consistent with the parameters declared in the function prototype and definition?
Is each data object to be initialized set correctly at the proper time? Is each data object set before its value is used?
Do all loops terminate?
Is the design free of “magic” numbers? (A “magic” number is one whose meaning is not immediately evident to the reader.)
Does each constant, type, variable, and function have a meaningful name? Are comments included with the declarations to clarify the use of the data objects?
Teams of programmers develop most sizable computer programs. Two extensions of deskchecking that are effectively used by programming teams are design or code walk-throughs and inspections. The intention of these formal team activities is to move the responsibility for uncovering bugs from the individual programmer to the group. Because testing is time consuming and errors cost more the later they are discovered, the goal is to identify errors before testing begins.
In a walk-through, the team performs a manual simulation of the design or program with sample test inputs, keeping track of the program’s data by hand on paper or on a blackboard. Unlike thorough program testing, the walk-through is not intended to simulate all possible test cases. Instead, its purpose is to stimulate discussion about the way the programmer chose to design or implement the program’s requirements.
At an inspection, a reader (not the program’s author) goes through the design or code line by line. Inspection participants point out errors, which are recorded on an inspection report. Some errors are uncovered just by the process of reading aloud. Others may have been noted by team members during their preinspection preparation. As with the walk-through, the chief benefit of the team meeting is the discussion that takes place among team members. This interaction among programmers, testers, and other team members can uncover many program errors long before the testing stage begins.
At the high-level design stage, the design should be compared to the program requirements to make sure that all required functions have been included and that this program or module correctly “interfaces” with other software in the system. At the low-level design stage, when the design has been filled out with more details, it should be reinspected before it is implemented. When the coding has been completed, the compiled listings should be inspected again. This inspection (or walk-through) ensures that the implementation is consistent with both the requirements and the design. Successful completion of this inspection means that testing of the program can begin.
For over 30 years, the Software Engineering Institute at Carnegie Mellon University has played a major role in supporting research into formalizing the inspection process in large software projects, including sponsoring workshops and conferences. A paper presented at the SEI Software Engineering Process Group (SEPG) Conference reported on a project that was able to reduce the number of product defects by 86.6% by using a two-tiered inspection process of group walk-throughs and formal inspections. The process was applied to packets of requirements, design, or code at every stage of the life cycle. Table 1.2 shows the defects per 1,000 source lines of code (KSLOC) that were found in the various phases of the software life cycle in a maintenance project. This project added 40,000 lines of source code to a software program of half a million lines of code. The formal inspection process was used in all of the phases except testing activities.
Looking back at Figure 1.5, you can see that the cost of fixing an error is relatively cheap until you reach the coding phase. After that stage, the cost of fixing an error increases dramatically. Using the formal inspection process clearly benefited this project.
Table 1.2 Defects Found in Different Phases*
| Stage | KSLOC |
|---|---|
| System Design | 2 |
| Software Requirements | 8 |
| Design | 12 |
| Code Inspection | 34 |
| Testing Activities | 3 |
*Dennis Beeson, Manager, Naval Air Warfare Center, Weapons Division, F-18 Software Development Team.
|
|
These design-review activities should be carried out in as nonthreatening a manner as possible. The goal is not to criticize the design or the designer, but rather to remove defects in the product. Sometimes it is difficult to eliminate the natural human emotion of pride from this process, but the best teams adopt a policy of egoless programming.
Exceptions At the design stage, you should plan how to handle exceptions in your program. Exceptions are just what the name implies: exceptional situations. When these situations occur, the flow of control of the program must be altered, usually resulting in a premature end to program execution. Working with exceptions begins at the design phase: What are the unusual situations that the program should recognize? Where in the program can the situations be detected? How should the situations be handled if they arise?
Where—indeed, whether—an exception is detected depends on the language, the software package design, the design of the libraries being used, and the platform (that is, the operating system and hardware). Where an exception should be detected depends on the type of exception, the software package design, and the platform. Where an exception is detected should be well documented in the relevant code segments.
An exception may be handled in any place in the software hierarchy—from the place in the program module where the exception is first detected through the top level of the program. In C++, as in most programming languages, unhandled built-in exceptions carry the penalty of program termination. Where in an application an exception should be handled is a design decision; however, exceptions should be handled at a level that knows what they mean.
An exception need not be fatal. In nonfatal exceptions, the thread of execution may continue. Although the thread of execution may be picked up at any point in the program, the execution should continue from the lowest level that can recover from the exception. When an error occurs, the program may fail unexpectedly. Some of the failure conditions may possibly be anticipated; some may not. All such errors must be detected and managed.
Exceptions can be written in any language. Some languages (such as C++ and Java) provide built-in mechanisms to manage exceptions. All exception mechanisms have three parts:
Defining the exception
Generating (raising) the exception
Handling the exception
C++ gives you a clean way of implementing these three phases: the try-catch and throw statements. We cover these statements at the end of Chapter 2 after we have introduced some additional C++ constructs.
Program Testing
Eventually, after all the design verification, deskchecking, and inspections have been completed, it is time to execute the code. At last, we are ready to start testing with the intention of finding any errors that may still remain.
The testing process is made up of a set of test cases that, taken together, allow us to assert that a program works correctly. We say “assert” rather than “prove” because testing does not generally provide a proof of program correctness.
The goal of each test case is to verify a particular program feature. For instance, we may design several test cases to demonstrate that the program correctly handles various classes of input errors. Alternatively, we may design cases to check the processing when a data structure (such as an array) is empty, or when it contains the maximum number of elements.
Within each test case, we perform a series of component tasks:
We determine inputs that demonstrate the goal of the test case.
We determine the expected behavior of the program for the given input. (This task is often the most difficult one. For a math function, we might use a chart of values or a calculator to figure out the expected result. For a function with complex processing, we might use a deskcheck type of simulation or an alternative solution to the same problem.)
We run the program and observe the resulting behavior.
We compare the expected behavior and the actual behavior of the program. If they match, the test case is successful. If not, an error exists. In the latter case, we begin debugging.
For now we are talking about test cases at a module, or function, level. It’s much easier to test and debug modules of a program one at a time, rather than trying to get the whole program solution to work all at once. Testing at this level is called unit testing.
How do we know what kinds of unit test cases are appropriate and how many are needed? Determining the set of test cases that is sufficient to validate a unit of a program is in itself a difficult task. Two approaches to specifying test cases exist: cases based on testing possible data inputs and cases based on testing aspects of the code itself.
Data Coverage
In those limited cases where the set of valid inputs, or the functional domain, is extremely small, we can verify a subprogram by testing it against every possible input element.
This approach, known as “exhaustive” testing, can prove conclusively that the software meets its specifications. For instance, the functional domain of the following function consists of the values true and false:
void PrintBoolean(bool error)
// Prints the Boolean value on the screen.
{
  if (error)
    cout << "true";
  else
    cout << "false";
  cout << endl;
}
It makes sense to apply exhaustive testing to this function because there are only two possible input values. In most cases, however, the functional domain is very large, so exhaustive testing is almost always impractical or impossible. What is the functional domain of the following function?
void PrintInteger(int intValue)
// Prints the integer value intValue on the screen.
{
  cout << intValue;
}
It is not practical to test this function by running it with every possible data input; the number of elements in the set of int values is clearly too large. In such cases we do not attempt exhaustive testing. Instead, we pick some other measurement as a testing goal.
You can attempt program testing in a haphazard way, entering data randomly until you cause the program to fail. Guessing doesn’t hurt (except possibly by wasting time), but it may not help much either. This approach is likely to uncover some bugs in a program, but it is very unlikely to find all of them. Fortunately, strategies for detecting errors in a systematic way have been developed.
One goal-oriented approach is to cover general classes of data. You should test at least one example of each category of inputs, as well as boundaries and other special cases. For instance, in the function PrintInteger there are three basic classes of int data: negative values, zero, and positive values. You should plan three test cases, one for each class. You could try more than three, of course. For example, you might want to try INT_MAX and INT_MIN; because the program simply prints the value of its input, however, the additional test cases don’t accomplish much.

Figure 1.7 Testing approaches
Other data coverage approaches exist as well. For example, if the input consists of commands, you must test each command. If the input is a fixed-sized array containing a variable number of values, you should test the maximum number of values—that is, the boundary condition. It is also a good idea to try an array in which no values have been stored or one that contains a single element. Testing based on data coverage is called black-box testing. The tester must know the external interface to the module—its inputs and expected outputs—but does not need to consider what is happening inside the module (the inside of the black box). (See Figure 1.7.)
Code Coverage
A number of testing strategies are based on the concept of code coverage, the execution of statements or groups of statements in the program. This testing approach is called clear- (or white-) box testing. The tester must look inside the module (through the clear box) to see the code that is being tested.
One approach, called statement coverage, requires that every statement in the program be executed at least once. Another approach requires that the test cases cause every branch, or code section, in the program to be executed. A single test case can achieve statement coverage of an if-then statement, but it takes two test cases to test both branches of the statement.
A similar type of code-coverage goal is to test program paths. A path is a combination of branches that might be traveled when the program is executed. In path testing, we try to execute all possible program paths in different test cases.
The code-coverage approaches are analogous to the ways forest rangers might check out the trails through the woods before the hiking season opens. If the rangers wanted to make sure that all trails were clearly marked and not blocked by fallen trees, they would check each branch of the trails (see Figure 1.8a). Alternatively, if they wanted to classify each of the various trails (which may be interwoven) according to its length and difficulty from start to finish, they would use path testing (see Figure 1.8b).
To create test cases based on code-coverage goals, we select inputs that drive the execution into the various program paths. How can we tell whether a branch or a path is executed? One way to trace execution is to put debugging output statements at the beginning of every branch, indicating that this particular branch was entered. Software projects often use tools that help programmers track program execution automatically.
These strategies lend themselves to measurements of the testing process. We can count the number of paths in a program, for example, and keep track of how many paths have been covered in our test cases. The numbers provide statistics about the current status of testing; for instance, we could say that 75% of the branches of a program have been executed or that 50% of the paths have been tested. When a single programmer is writing a single program, such numbers may be superfluous. In a software development environment with many programmers, however, such statistics are very useful for tracking the progress of testing.

Figure 1.8a Checking out all the branches

Figure 1.8b Checking out all the trails
These measurements can also indicate when a certain level of testing has been completed. Achieving 100% path coverage is often not a feasible goal. A software project might have a lower standard (say, 80% branch coverage) that the programmer who writes the module is required to reach before turning the module over to the project’s testing team. Testing in which goals are based on certain measurable factors is called metric-based testing. Test Plans Deciding on the goal of the test approach—data coverage, code coverage, or (most often) a mixture of the two—precedes the development of a test plan. Some test plans are very informal—the goal and a list of test cases, written by hand on a piece of paper. Even this type of test plan may be more than you have ever been required to write for a class programming project. Other test plans (particularly those submitted to management or to a customer for approval) are very formal, containing the details of each test case in a standardized format.
Implementing a test plan involves running the program with the input values listed in the plan and observing the results. If the answers are incorrect, the program is debugged and rerun until the observed output always matches the expected output. The process is complete when all test cases listed in the plan give the desired output.
Let’s develop a test plan for a function called Divide, which was coded from the following specifications:
Should we use code coverage or data coverage for this test plan? Because the code is so short and straightforward, let’s begin with code coverage. A code-coverage test plan is based on an examination of the code itself. Here is the code to be tested:
void Divide(int dividend, int divisor, bool& error, float& result)
// Set error to indicate if divisor is zero.
// If no error, set result to dividend / divisor.

{
  if (divisor = 0)
    error = true;
  else
    result = float(dividend) / float(divisor);
}
The code consists of one if statement with two branches; therefore, we can do complete path testing. There is a case where divisor is zero and the true branch is taken and a case where divisor is nonzero and the else branch is taken.
| Reason for Test Case | Input Values | Expected Output |
|---|---|---|
divisor is zero( dividend can be anything) |
divisor is 0dividend is 8 |
error is trueresult is undefined |
divisor is nonzero( dividend can be anything) |
divisor is 2dividend is 8 |
error is falseresult is 4.0 |
To implement this test plan, we run the program with the listed input values and compare the results with the expected output. The function is called from a test driver, a program that sets up the parameter values and calls the functions to be tested. A simple test driver is listed below. It is designed to execute both test cases: It assigns the parameter values for Test 1, calls Divide, and prints the results; then it repeats the process with new test inputs for Test 2. We run the test and compare the values output from the test driver with the expected values.
#include <iostream>

void Divide(int, int, bool&, float&);
// Function to be tested.

void Print(int, int, bool, float);
// Prints results of test case.

int main()
{
 using namespace std;

 bool error;
 float result;
 int dividend = 8;                                                             // Test 1
 int divisor = 0;

 Divide(dividend, divisor, error, result);
 cout << "Test 1: " << endl;
 Print(dividend, divisor, error, result);
 divisor = 2;                                                                  // Test 2
 Divide(dividend, divisor, error, result);
 cout << "Test 2: " << endl;
 Print(dividend, divisor, error, result);
 return 0;
}
For Test 1, the expected value for error is true, and the expected value for result is undefined, but the division is carried out anyway! How can that be when divisor is zero? If the result of an if statement is not what you expect, the first thing to check is the relational operator: Did we use a single = rather than ==? Yes, we did. After fixing this mistake, we run the program again.
For Test 2, the expected value for error is false, yet the value printed is true! Our testing has uncovered another error, so we begin debugging. We discover that the value of error, set to true in Test 1, was never reset to false in Test 2. We leave development of the final correct version of this function as an exercise.
Now let’s design a data-coverage test plan for the same function. In a data-coverage plan, we know nothing about the internal working of the function; we know only the interface that is represented in the documentation of the function heading.
void Divide(int dividend, int divisor, bool& error, float& result)
// Set error to indicate if divisor is zero.
// If no error, set result to dividend / divisor.
There are two input parameters, both of type int. A complete data-coverage plan would require that we call the function with all possible values of type int for each parameter—clearly overkill. The interface tells us that one thing happens if divisor is zero and another thing happens if divisor is nonzero. Clearly, we must have at least two test cases: one where divisor is zero and one where divisor is nonzero. When divisor is zero, error is set to true and nothing else happens, so one test case should verify this result. When divisor is nonzero, a division takes place. How many test cases does it take to verify that the division is correct? What are the end cases? There are five possibilities:
divisoranddividendare both positivedivisoranddividendare both negativedivisoris positive anddividendis negativedivisoris negative anddividendis positivedividendis zero
The complete test plan is shown below.
In this case the data-coverage test plan is more complex than the code-coverage plan: There are seven cases (two of which are combined) rather than just two. One case covers a zero divisor, and the other six cases check whether the division is working correctly with a nonzero divisor and alternating signs. If we knew that the function uses the built-in division operator, we would not need to check these cases—but we don’t. With a data-coverage plan, we cannot see the body of the function.
| Reason for Test Case | Input Values | |
|---|---|---|
divisor is zero( dividend can be anything) |
divisor is 0dividend is 8 |
error is trueresult is undefined |
divisor is nonzero( dividend can be anything)combined withdivisor is positivedividend is positive |
divisor is 2dividend is 8 |
error is falseresult is 4.0 |
divisor is nonzerodivisor is negativedividend is negative |
divisor is –2dividend is –8 |
error is falseresult is 4.0 |
divisor is nonzerodivisor is positivedividend is negative |
divisor is 2dividend is –8 |
error is falseresult is –4.0 |
divisor is nonzerodivisor is negativedividend is positive |
divisor is –2dividend is 8 |
error is falseresult is –4.0 |
dividend is zero( divisor can be anything) |
divisor is 2dividend is 0 |
error is falseresult is 0.0 |
For program testing to be effective, it must be planned. You must design your testing in an organized way, and you must put your design in writing. You should determine the required or desired level of testing and plan your general strategy and test cases before testing begins. In fact, you should start planning for testing before writing a single line of code.
Planning for Debugging In the previous section we discussed checking the output from our test and debugging when errors were detected. We can debug “on the fly” by adding output statements in suspected trouble spots when problems arise. But in an effort to predict and prevent problems as early as possible, can we also plan our debugging before we ever run the program?
By now you should know that the answer will be yes. When you write your design, you should identify potential trouble spots. You can then insert temporary debugging output statements into your code in places where errors are likely to occur. For example, to trace the program’s execution through a complicated sequence of function calls, you might add output statements that indicate when you are entering and leaving each function. The debugging output is even more useful if it also indicates the values of key variables, especially parameters of the function. The following example shows a series of debugging statements that execute at the beginning and end of the function Divide:
void Divide(int dividend, int divisor, bool& error, float& result)
// Set error to indicate if divisor is zero.
// If no error, set result to dividend / divisor.
{
 using namespace std;
 // For debugging
 cout << "Function Divide entered." << endl;
 cout << "Dividend = " << dividend << endl;
 cout << "Divisor = " << divisor << endl;
 //*************************
 // Rest of code goes here.
 //*************************
 // For debugging
 if (error)
   cout << "Error = true ";
 else
   cout << "Error = false ";
 cout << "and Result = " << result << endl;
 cout << "Function Divide terminated." << endl;
}
If hand testing doesn’t reveal all the bugs before you run the program, well-placed debugging lines can at least help you locate the rest of the bugs during execution. Note that this output is intended only for debugging; these output lines are meant to be seen only by the tester, not by the user of the program. Of course, it’s annoying for debugging output to show up mixed with your application’s real output, and it’s difficult to debug when the debugging output isn’t collected in one place. One way to separate the debugging output from the “real” program output is to declare a separate file to receive these debugging lines, as shown in the following example:
#include <fstream>

std::ofstream debugFile;

debugFile << "This is the debug output from Test 1." << endl;
Usually the debugging output statements are removed from the program, or “commented out,” before the program is delivered to the customer or turned in to the professor. (To “comment out” means to turn the statements into comments by preceding them with // or enclosing them between /* and */.) An advantage of turning the debugging statements into comments is that you can easily and selectively turn them back on for later tests. A disadvantage of this technique is that editing is required throughout the program to change from the testing mode (with debugging) to the operational mode (without debugging).
Another popular technique is to make the debugging output statements dependent on a Boolean flag, which can be turned on or off as desired. For instance, a section of code known to be error-prone may be flagged in various spots for trace output by using the Boolean value debugFlag:
// Set debugFlag to control debugging mode.
const bool debugFlag = true;
.
.
.
if (debugFlag)
  debugFile << "Function Divide entered." << endl;
This flag may be turned on or off by assignment, depending on the programmer’s needs. Changing to an operational mode (without debugging output) involves merely redefining debugFlag as false and then recompiling the program. If a flag is used, the debugging statements can be left in the program; only the if checks are executed in an operational run of the program. The disadvantage of this technique is that the code for the debugging is always there, making the compiled program larger. If a lot of debugging statements are present, they may waste needed space in a large program. The debugging statements can also clutter up the program, making it more difficult to read. (This situation illustrates another tradeoff we face in developing software.)
Some systems have online debugging programs that provide trace outputs, making the debugging process much simpler. If the system you are using has a run-time debugger, use it! Any tool that makes the task easier should be welcome, but remember that no tool replaces thinking.
A warning about debugging: Beware the quick fix! Program bugs often travel in swarms, so when you find a bug, don’t be too quick to fix it and run your program again. Often as not, fixing one bug generates another. A superficial guess about the cause of a program error usually does not produce a complete solution. In general, time devoted to considering all the ramifications of the changes you are making is time well spent.
If you constantly need to debug, your design process has flaws. Time devoted to considering all the ramifications of the design you are making is time spent best of all.
Integration Testing In the last two sections we discussed unit testing and planned debugging. In this section we explore many concepts and tools that can help you put your test cases for individual units together for structured testing of your whole program. The goal of this type of testing is to integrate the separately tested pieces, so it is called integration testing.
You can test a large, complicated program in a structured way by using a method very similar to the top-down approach to program design. The central idea is one of divide and conquer: test pieces of the program independently and then use the parts that have been verified as the basis for the next test. The testing can use either a top-down or a bottom-up approach, or a combination of the two.
With a top-down approach, we begin testing at the top levels. The purpose of the test is to ensure that the overall logical design works and that the interfaces between modules are correct. At each level of testing, the top-down approach is based on the assumption that the lower levels work correctly. We implement this assumption by replacing the lower-level subprograms with “placeholder” modules called stubs. A stub may consist of a single trace output statement, indicating that we have reached the function, or a group of debug output statements, showing the current values of the parameters. It may also assign values to output parameters if values are needed by the calling function (the one being tested).
An alternative testing approach is to test from the bottom up. With this approach, we unit test the lowest-level subprograms first. A bottom-up approach can be useful in testing and debugging a critical module, one in which an error would have significant effects on other modules. “Utility” subprograms, such as mathematical functions, can also be tested with test drivers, independently of the programs that eventually call them. In addition, a bottom-up integration testing approach can prove effective in a group-programming environment, where each programmer writes and tests separate modules. The smaller, tested pieces of the program are later verified together in tests of the whole program.
Testing C++ Data Structures
The major topic of this textbook is data structures: what they are, how we use them, and how we implement them using C++. This chapter has provided an overview of software engineering; in Chapter 2 we begin to focus on data and ways to structure it. It seems appropriate to end this section about verification with a look at how we test the data structures we implement in C++.
Throughout this book we implement data structures using C++ classes, so that many different application programs can use the resulting structures. When we first create a class that models a data structure, we do not necessarily have any application programs ready to use it. We need to test the class by itself first, before creating the applications. For this reason, we use a bottom-up testing approach utilizing test drivers.
Every data structure that we implement supports a set of operations. For each structure, we would like to create a test driver that allows us to test the operations in a variety of sequences. How can we write a single test driver that allows us to test numerous operation sequences? The solution is to separate the specific set of operations that we want to test from the test driver program itself. We list the operations, and the necessary parameters, in a text file. The test driver program reads the operations from the text file one line at a time, performs the specified operation by invoking the member function of the data structure being tested, and reports the results to an output file. The test program also reports its general results on the screen.
The testing approach described here allows us to easily change our test cases—we just change the contents of the input file. Testing would be even easier if we could dynamically change the name of the input file whenever we run the program. We could then run another test case or rerun a previous test case whenever we needed. Therefore, we construct our test driver to read the name of the input file from the console; we do the same for the output file. Figure 1.9 shows a model of our test architecture.
Our test drivers all follow the same basic algorithm. First, we prompt for and read the file names and prepare the files for input and output. Next, the name of the function to be executed is read from the input file. Because the name of the function drives the flow of control, let’s call it command. As long as command is not “quit,” we execute the function with that name, print the results, and read the next function name. We then close the files and quit. Did we forget anything? The output file should have some sort of a label. Let’s prompt the user to enter a label for the output file. We should also let the user know what is going on by keeping track of the number of commands and printing a closing message. Here, then, is the algorithm for our test driver program:

Figure 1.9 Model of test architecture
This algorithm provides us with maximum flexibility for minimum extra work when we are testing our data structures. Once we implement the algorithm by creating a test driver for a specific data structure, we can easily create a test driver for a different data structure by changing only the first two steps in the loop. Here is the code for the test driver with the data-structure-specific code left to be filled in. We demonstrate how this code can be written in the Case Study. The statements that must be filled in are shaded.

Note that the test driver gets the test data and calls the member functions to be tested. It also provides written output about the effects of the member function calls, so that the tester can visually check the results. Sometimes test drivers are used to test hundreds or thousands of test cases. In such situations, the test driver should automatically verify whether the test cases were handled successfully. We leave the expansion of this test driver to include automatic test case verification as a programming assignment.
This test driver does not do any error checking to confirm that the inputs are valid. For instance, it doesn’t verify that the input command code is really a legal command. Remember that the goal of the test driver is to act as a skeleton of the real program, not to be the real program. Therefore, the test driver does not need to be as robust as the program it simulates.
By now you are probably protesting that these testing approaches are a lot of trouble and that you barely have time to write your programs, let alone “throwaway code” like stubs and drivers. Structured testing methods do require extra work. Test drivers and stubs are software items; they must be written and debugged themselves, even though they are seldom turned in to a professor or delivered to a customer. These programs are part of a class of software development tools that take time to create but are invaluable in simplifying the testing effort.
Such programs are analogous to the scaffolding that a contractor erects around a building. It takes time and money to build the scaffolding, which is not part of the final product; without it, however, the building could not be constructed. In a large program, where verification plays a major role in the software development process, creating these extra tools may be the only way to test the program.
Practical Considerations
It is obvious from this chapter that program verification techniques are time consuming and, in a job environment, expensive. It would take a long time to do all of the things discussed in this chapter, and a programmer has only so much time to work on any particular program. Certainly not every program is worthy of such cost and effort. How can you tell how much and what kind of verification effort is necessary?
A program’s requirements may provide an indication of the level of verification needed. In the classroom, your professor may specify the verification requirements as part of a programming assignment. For instance, you may be required to turn in a written, implemented test plan. Part of your grade may be determined by the completeness of your plan. In the work environment, the verification requirements are often specified by a customer in the contract for a particular programming job. For instance, a contract with a military customer may specify that formal reviews or inspections of the software product be held at various times during the development process.
A higher level of verification effort may be indicated for sections of a program that are particularly complicated or error-prone. In these cases, it is wise to start the verification process in the early stages of program development so as to avoid costly errors in the design.
A program whose correct execution is critical to human life is obviously a candidate for a high level of verification. For instance, a program that controls the return of astronauts from a space mission would require a higher level of verification than would a program that generates a grocery list. As a more down-to-earth example, consider the potential for disaster if a hospital’s patient database system had a bug that caused it to lose information about patients’ allergies to medications. A similar error in a database program that manages a Christmas card mailing list, however, would have much less severe consequences.
The error rates over various industries confirms this distinction. The more human-critical, the lower the error rate (Table 1.3).
Table 1.3 Error Rates upon Delivery by Application Domain1
| Application Domain | Number of Projects | Error Range (Errors/KESLOC2) | Normative Error Rate (Errors/KESLOC2) | Notes |
|---|---|---|---|---|
| Automation | 55 | 2 to 8 | 5 | Factory automation |
| Banking | 30 | 3 to 10 | 6 | Loan processing, ATM |
| Command & Control | 45 | 0.5 to 5 | 1 | Command centers |
| Data Processing | 35 | 2 to 14 | 8 | DB-intensive systems |
| Environment/Tools | 75 | 5 to 12 | 8 | CASE, compilers, etc. |
| Military—All | 125 | 0.2 to 3 | < 1.0 | See subcategories |
| • Airborne | 40 | 0.2 to 1.3 | 0.5 | Embedded sensors |
| • Ground | 52 | 0.5 to 4 | 0.8 | Combat center |
| • Missile | 15 | 0.3 to 1.5 | 0.5 | GNC system |
| • Space | 18 | 0.2 to 0.8 | 0.4 | Attitude control system |
| Scientific | 35 | 0.9 to 5 | 2 | Seismic processing |
| Telecommunications | 50 | 3 to 12 | 6 | Digital switches |
| Test | 35 | 3 to 15 | 7 | Test equipment devices |
| Trainers/Simulations | 25 | 2 to 11 | 6 | Virtual reality simulator |
| Web Business | 65 | 4 to 18 | 11 | Client/server sites |
| Other | 25 | 2 to 15 | 7 | All others |
1 Source: Donald J. Reifer, Industry Software Cost, Quality and Productivity Benchmarks, STN Vol. 7(2), 2004.
2 KESLOC: thousands of equivalent source lines of code.
|
||||
Summary
How are our quality software goals met by the strategies of abstraction and information hiding? When details are hidden at each level, the code becomes simpler and more readable, which makes the program easier to write and modify. Both functional decomposition and object-oriented design processes produce modular units that are also easier to test, debug, and maintain.
One positive side effect of modular design is that modifications tend to be localized in a small set of modules, so the cost of modifications is reduced. Remember that whenever a module is modified, it must be retested to make sure that it still works correctly in the program. By localizing the modules affected by changes to the program, we limit the extent of retesting needed.
We increase reliability by making the design conform to our logical picture and delegating confusing details to lower levels of abstraction. An understanding of the wide range of activities involved in software development—from requirements analysis through maintenance of the resulting program—leads to an appreciation of a disciplined software engineering approach. Everyone knows some programming wizard who can sit down and hack out a program in an evening, working alone, coding without a formal design. But we cannot depend on wizardry to control the design, implementation, verification, and maintenance of large, complex software projects that involve the efforts of many programmers. As computers grow more powerful, the problems that people want to solve on them become larger and more complex. Some people refer to this situation as a software crisis. We’d like you to think of it as a software challenge.
It should be obvious by now that program verification is not something you begin the night before your program is due. Design verification and program testing go on throughout the software life cycle.
Verification activities begin when the software specifications are developed. At this point, the overall testing approach and goals are formulated. Then, as program design work begins, these goals are applied. Formal verification techniques may be used for parts of the program, design inspections are conducted, and test cases are planned. During the implementation phase, the test cases are developed and test data to support them are generated. Code inspections give the programmer extra support in debugging the program before it is ever run. When the code has been compiled and is ready to be run, unit (module-level) testing is done, with stubs and drivers used for support. After these units have been completely tested, they are put together in integration tests. Once errors have been found and corrected, some of the earlier tests are rerun to make sure that the corrections have not introduced any new problems. Finally, acceptance tests of the whole system are performed. Figure 1.10 shows how the various types of verification activities fit into the software development life cycle. Throughout the life cycle, one thing remains constant: The earlier in this cycle program errors are detected, the easier (and less costly in time, effort, and money) they are to remove. Program verification is a serious subject; a program that doesn’t work isn’t worth the filespace it’s stored in.
| Analysis | Make sure that specifications are completely understood. Understand testing requirements. |
| Specification | Verify the identified requirements. Perform requirements inspections with your client. |
| Design | Design for correctness (using assertions such as preconditions and postconditions). Perform design inspections. Plan the testing approach. |
| Code | Understand the programming language well. Perform code inspections. Add debugging output statements to the program. Write the test plan. Construct test drivers and/or stubs. |
| Test | Unit test according to the test plan. Debug as necessary. Integrate tested modules. Retest after corrections. |
| Delivery | Execute acceptance tests of the completed product. |
| Maintenance | Execute regression test whenever the delivered product is changed to add new functionality or to correct detected problems. |
Figure 1.10 Life-cycle verification activities
Exercises
-
Explain what we mean by “software engineering.”
-
Which of these statements is always true?
All of the program requirements must be completely defined before design begins.
All of the program design must be complete before any coding begins.
All of the coding must be complete before any testing can begin.
Different development activities often take place concurrently, overlapping in the software life cycle.
-
Name three computer hardware tools that you have used.
-
Name two software tools that you have used in developing computer programs.
-
Explain what we mean by “ideaware.”
-
Explain why software might need to be modified
in the design phase.
in the coding phase.
in the testing phase.
in the maintenance phase.
-
Software quality goal 4 says, “Quality software is completed on time and within budget.”
Explain some of the consequences of not meeting this goal for a student preparing a class programming assignment.
Explain some of the consequences of not meeting this goal for a team developing a highly competitive new software product.
Explain some of the consequences of not meeting this goal for a programmer who is developing the user interface (the screen input/output) for a spacecraft launch system.
-
For each of the following, describe at least two different abstractions for different viewers (see Figure 1.1).
A dress
An aspirin
A carrot
A key
A saxophone
A piece of wood
-
Functional decomposition is based on a hierarchy of ____________________, and object-oriented design is based on a hierarchy of ____________________.
-
What is the difference between an object and an object class? Give some examples.
-
Make a list of potential objects from the description of the ATM scenario given in this chapter.
-
Have you ever written a programming assignment with an error in the specifications? If so, at what point did you catch the error? How damaging was the error to your design and code?
-
Explain why the cost of fixing an error is higher the later in the software cycle that the error is detected.
-
Explain how an expert understanding of your programming language can reduce the amount of time you spend debugging.
-
Give an example of a run-time error that might occur as the result of a programmer making too many assumptions.
-
Define “robustness.” How can programmers make their programs more robust by taking a defensive approach?
-
The following program has three separate errors, each of which would cause an infinite loop. As a member of the inspection team, you could save the programmer a lot of testing time by finding the errors during the inspection. Can you help?
void Increment(int); int main() { int count = 1; while(count < 10) cout << " The number after " << count; /* Function Increment Increment(count); adds 1 to count */ cout << " is " << count << endl; return 0; } void Increment (int nextNumber) // Increment the parameter by 1. { nextNumber++; } -
Is there any way a single programmer (for example, a student working alone on a programming assignment) can benefit from some of the ideas behind the inspection process?
-
When is it appropriate to start planning a program’s testing?
During design or even earlier
While coding
As soon as the coding is complete
-
Differentiate between unit testing and integration testing.
-
Explain the advantages and disadvantages of the following debugging techniques:
Inserting output statements that may be turned off by commenting them out
Using a Boolean flag to turn debugging output statements on or off
Using a system debugger
-
Describe a realistic goal-oriented approach to data-coverage testing of the function specified below:
FindElement(list, targetItem, index, found) Function: Search list for targetItem. Preconditions: Elements of list are in no particular order; list may be empty. Postconditions: found is true if targetItem is in list; otherwise, found is false. index is the position of targetItem if found is true. -
A program is to read a numeric score (0 to 100) and display an appropriate letter grade (A, B, C, D, or F).
What is the functional domain of this program?
Is exhaustive data coverage possible for this program?
Devise a test plan for this program.
-
Explain how paths and branches relate to code coverage in testing. Can we attempt 100% path coverage?
-
Differentiate between “top-down” and “bottom-up” integration testing.
-
Explain the phrase “life-cycle verification.”
-
Write the corrected version of the function
Divide. -
Why did we type cast
dividendanddivisorin the functionDivide? -
The solution to the Case Study did not consider negative fractions.
How should a negative fraction be represented?
Which of the member functions would have to be changed to represent negative fractions? What changes would be involved?
Rewrite the test plan to test for negative fractions.
-
One of the member functions in the Case Study needs an additional test. Which function is it, and what should the data be?
-
Name four tools used in software design.
-
Define information hiding.
-
Name four types of step-wise refinement.
-
What is the key feature of top-down design?
-
What characterizes functional decomposition?
-
Name two visual tools used by software developers.
-
In reviews and inspections, what is being reviewed or inspected?
-
Give the basic design of a test driver.
-
Why is exhaustive code-coverage testing virtually impossible?
-
Why is exhaustive data-coverage testing virtually impossible?