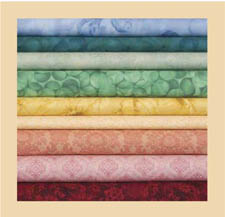

For a quiltmaker, fabric and color become a love affair. Quilters tend to buy fabric impulsively. There is something about the color, texture, and feel of fabric that lures us into this art in the first place. So building a collection is no problem. In order to have a great collection, you need to have a wide variety of colors and prints.
How do you go about collecting fabric? You begin by understanding that different fabrics fall into different categories and that you need a combination of fabrics from these various categories. This basic knowledge will make fabric collecting much less intimidating and will help you determine whether your collection is a full-spectrum, balanced collection.
Let’s start out by looking at the categories fabrics fall into and what their effect can be on a quilt.
Solid fabrics have no design or markings printed on them. With solids, you can create a very clean, contemporary look or a very traditional look like that of Amish quilts. Solids define and accentuate the print fabrics they are next to in the quilt design. However, solids do show every piecing flaw and uneven quilting stitch, so if you are a beginner, you may want to avoid working with a large amount of solid fabric in the beginning.
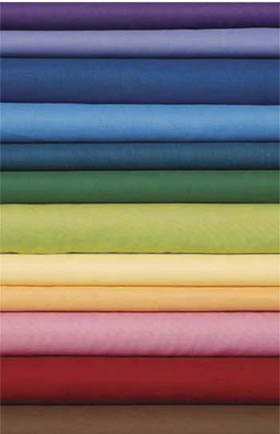
Solid fabrics
Neutrals are the beiges, tans, creams, grays, browns, and blacks. These colors will not change other colors, but they can add richness and compatibility to color schemes that seem to fight. This is a color group that you can never have enough of. These colors aren’t exciting to buy, but they will enhance every one of your quilts.
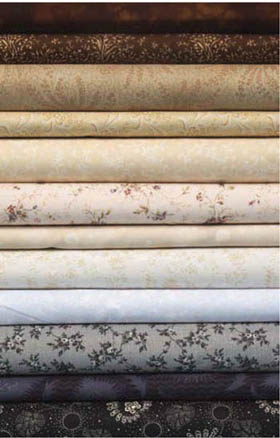
Blender and neutral fabrics
Small-print fabrics usually have a small and subtle print of two contrasting colors. These fabrics tend to look like a solid from a distance but will add the texture that solids lack. This category of fabrics makes excellent backgrounds for piecing designs that have a very definite pattern to them.
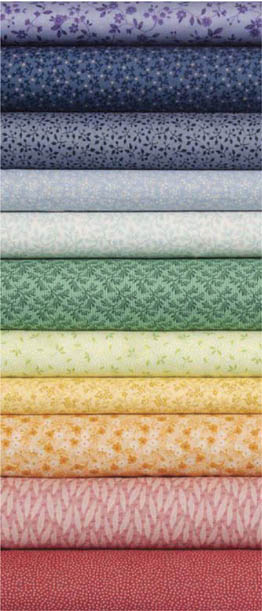
Small prints
Also known as tone-on-tone fabrics, these fabrics are printed within the same color family, usually with a lighter background and a darker print, or a mottled effect of several shades. An example would be a fabric that uses three different blues to create a floral pattern on a lighter blue background.
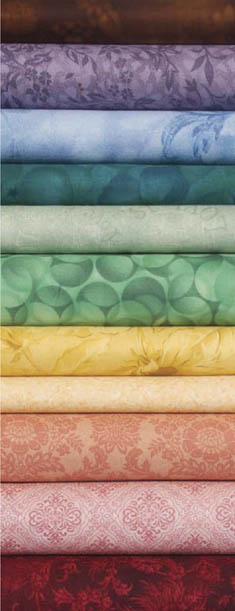
Tonals
Calico prints are fabrics with small prints that have one color for the background and two or more colors in the print design. Because of the various colors and sizes of the prints, be sure to stand back from the fabric and see which colors are predominant. In some calicoes, the background will be the only color you see from a distance, while in others, one or more colors from the print will stand out. Use calicoes in limited quantity in your quilts because they can look very “busy,” and they don’t give your eye a place to rest or the ability to take in the overall design of the quilt.
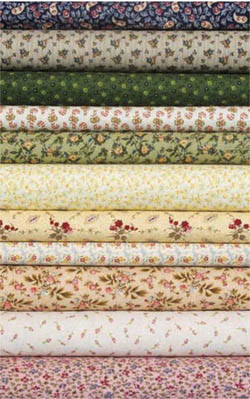
Calicoes
Dots are fabrics with a one-color background and a dot or a print that looks like a dot from a distance, such as a print with flowers or apples. Your eyes tend to jump around when trying to focus on these fabrics. Dots can add interest, but, as with calicoes, too many can become very busy and detract from the design of the quilt. The fewer the fabrics your quilt design has, the more important it becomes to limit the use of this type of print.
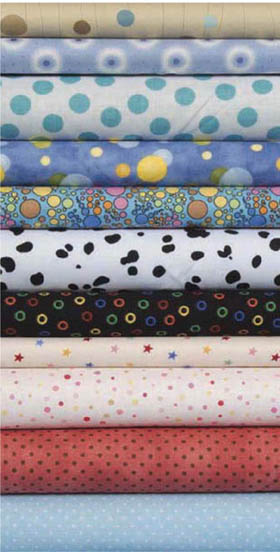
Dots
Viny prints tend to be larger in scale than small prints, with meandering lines running throughout. They have one background color and at least one other contrasting color used in the print. These prints read as airy and light, and add a lot of interest to the patchwork.
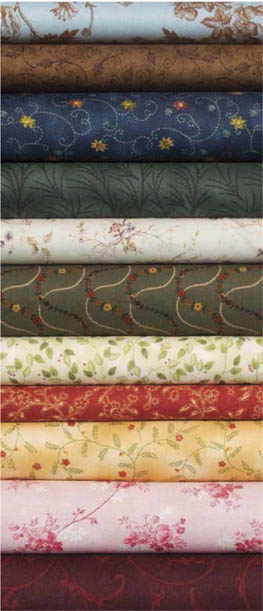
Viny prints
Large prints are prints with large patterns—usually of multiple colors—that can be splashy or subtle. Large prints offer many possibilities. When cut into pieces, they create movement and a variety of color combinations. Kept as a whole piece for a large square in a design, a large print becomes the focus fabric that everything else in the quilt works around.
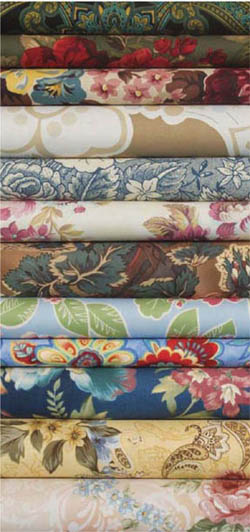
Large prints
Striped fabrics contain bands of print or lines that most often run parallel to the selvage. They can be simple two-color stripes or multicolored, intricately patterned stripes. Stripes are exciting when used as borders or sashing.
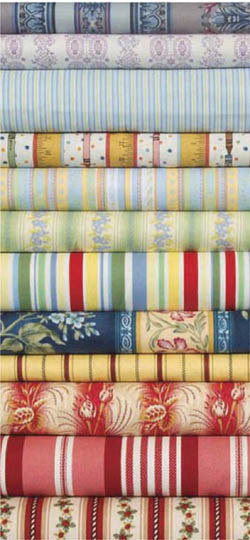
Stripes
Plaids are fabrics with lines—either woven or printed on the surface—that run perpendicular to each other. As with stripes, if it is important that the lines of the plaid be straight with a pattern, as in borders, sashing, and alternate blocks, then be advised that printed plaids (or stripes) are frequently printed off-grain, making them difficult to work with. Both plaids and stripes that are not straight are okay for use in pieced blocks, as long as having the lines of the print askew with the piecing does not distract your eye from the design of the quilt. These fabrics can add more interest to your quilts.
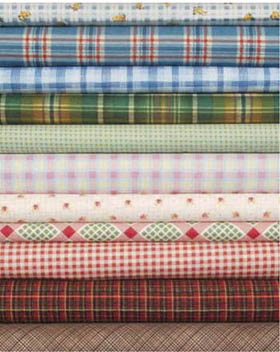
Plaids
If you have made a quilt in colors that you like on their own, but you were not happy with the end result, you might jump to the conclusion that you have trouble with color.
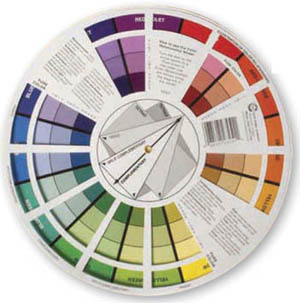
Color wheel
The first thing to do is to figure out what bothers you about the quilt. Perhaps it is too washed out, or the opposite—too high-contrast. Maybe there are too many busy prints or too many of the same scale or size of prints. Not everyone likes the same kind of feeling in a quilt, so don’t ask someone else how to fix the problem until you know what the problem is for you.
First and foremost, it is important to know that, like beauty, color is very much in the eye of the beholder and is a matter of personal taste. If you like a particular color combination, then it is okay to use it! Color theory classes can be helpful, but just as often we have found that trying to pick fabric for a quilt based on artificial rules of the “proper use of color” only makes you afraid to trust your instincts about what you do and don’t like. All colors go together!
There are four basic color schemes to keep in mind:
 Monochromatic (all one color)
 Complementary (colors that are across from one another on the color wheel)
 Analogous (colors that are next to one another on the color wheel)
 Polychromatic (all colors)
Every possible combination of colors fits somewhere into one of these color schemes. So relax! Trust your instincts and personal taste when selecting various colors to put together in your quilts.
Value is the lightness or darkness of a color. The pure color from the color wheel is made lighter by adding white (a tint) or darker by adding black (a shade). Value is relative! The color, as well as the value, of a fabric will change according to the type of print, adjacent colors and objects, the light source and its position, the finish of the fabric, and so on.
All fabrics have their place on the light/dark scale. An example would be placing a medium green between a pale yellow and pale pink. The green would look quite dark in comparison. The same medium green placed between a dark navy and a burgundy would appear light. Fabrics of the same value will combine and run together when placed next to each other. An understanding of value will keep you from creating quilts that lack depth and interest.
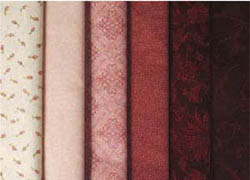
Light to dark
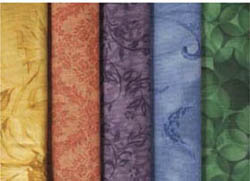
Fabrics of the same value
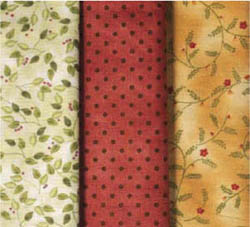
Value is relative to placement
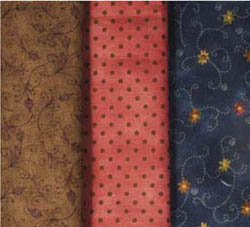
Value is relative to placement
Intensity is the brightness factor of a color. A color can range from very dull to very bright. The pure color from the color wheel is the most intense it can be. The intensity of a color is changed when gray is added. The more gray you add, the duller the color appears.
It is really not important to know whether a certain piece of fabric is light or dark, dull or bright, unless that fabric is causing your quilt to look like it is missing something.
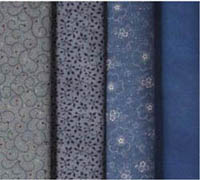
Range of color intensity
So, how do you really begin to learn about fabrics and color? Our best suggestion is to visit your local quilt shop and just spend some time playing with combinations of fabrics. To learn about the different categories of prints, walk among the shelves and displays and start to identify the small prints, calicoes, viny and large prints, plaids, and stripes.
To learn about value and intensity, stack up combinations of fabrics and see what happens when you put something you may consider a medium with two lighter fabrics or two darker fabrics. A crutch you can use for determining value is a value finder, which can be a red see-through plastic report cover from a stationery store, or a tool such as a Ruby Beholder (available at quilt shops). When you look at a stack of fabrics through the value finder, you will immediately have a sense of whether a fabric is lighter or darker than others in the stack. The colors of the fabrics in the stack make no difference; what comes across is which of the fabrics are darker and which are lighter.
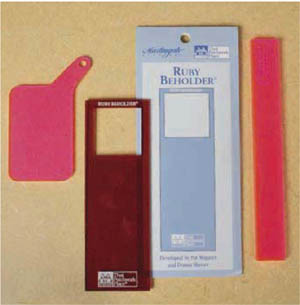
Value finder tools
Determining light, medium, and dark with a value finder
Most of all, remember that color choice is a personal preference. You may love a combination of colors and prints, only to have a salesclerk or friend try to discourage you and replace your choices with their preferences. Remember, this is your quilt and it must suit your likes and tastes. The more quilts you make, the more you’ll learn about your personal preferences.
Let us reassure you that a stash is not necessary, especially if you are a beginner. You may not know right now what colors you prefer. Perhaps, like Carrie, you may be very eclectic in your tastes, and you want to make a quilt with whatever fabric calls to you at the time. If you are feeling overwhelmed, we suggest that you simply buy the fabric you need as you come upon a quilt you want to make.
However, if you don’t have a stash and are interested in building one, here’s a good place to start: When you fall in love with a fabric for a particular quilt, buy the yardage you need for that quilt plus an extra ½ yard or more that will go into your stash. It may take you a while to build a usable stash this way, but it may also be the most economical way to do it.
Eclectic in your tastes or not, you may not find you need to possess a bunch of fabric, because again, if you are like Carrie, you just don’t make the “scrappy” kinds of quilts that stashes lend themselves to. Harriet, in contrast, loves antique reproduction fabric. Because of its limited availability, her stash is entirely comprised of fabric pieces ½ to 1 yard (or larger) in size that were available for only a very short time but that may be the perfect fabric in the next antique quilt she wants to reproduce.
No matter what your working style, or how you plan to go about quilting, you will need to choose fabrics for the quilts you want to make. Following is a list of suggestions to keep in mind when you are choosing fabrics for your next project.
 Start by falling in love with one fabric. You might find it easier if this is a multicolored print of medium to large scale. Other fabrics can be chosen that have the colors used in the print of this one “focus” fabric. Make sure that if the large print is taken away, the other fabrics still work together and can stand on their own.
 Choose prints that vary in scale. The use of many different types and scales of prints will make the quilt come to life! If only tiny prints are used, they will cancel each other out, and the quilt will “die.” If you select all large prints, the quilt will become extremely busy.
 Use small prints and tiny dot-type fabrics instead of solids to create interest.
 Use small prints and tonals as blenders. These subtle fabrics work as mortar to hold the units together. They are most often used as backgrounds in quilts because they don’t compete and they allow the more interesting fabrics to look their best. Blenders also allow the design or pattern to be dominant.
 Vary the theme of the print. Too much of one pattern is not a good thing. Too many paisleys, rosebuds, or leaves—no matter the scales of the prints—will become monotonous.
 Don’t just work within a line of fabric your local store may have on display. Branch out, and check for other fabrics on the shelves that may blend or add a spark to the focus fabric.
 Choose the darker fabrics first and lighter fabrics last. Medium and dark fabrics are easier to select. There are also more of them available than there are lights.
 Satisfy the quilt before the room it is to live in or the person it is to live with. Too many times, we overcoordinate a quilt to make it match wallpaper or carpeting, or to please the person to whom we plan on gifting the quilt, often to the detriment of the quilt. Let the quilt be a blending of the elements of the room it is to go in, instead of the showpiece. Instead of making the quilt in the recipient’s favorite color, use many shades of the colors he or she likes.
 Experiment with fabrics that may “clash” a bit. Clashing is not always bad. It keeps a quilt from being ho-hum. Instead of rust, try maroon. Instead of navy, try purple or mauve. Try a color that looks good with the whole quilt.
 Don’t be afraid to throw in a little black. Black will put life into colors and give them spark.
 Think about what you like the most. Think about the colors you tend to prefer. Become aware of color in your environment. Advertisements, greeting cards, upholstery color schemes, flower gardens, and so forth offer great inspiration. Clip out ideas from magazines, and make notes of color combinations you see and like.
 Three, five, or seven fabrics are good numbers to aim for when you begin to make quilts. Scrap quilts made of many fabrics can be overwhelming when you are first starting out.
 Pull the fabric off the quilt shop shelf and look at it alone and in the light. Other fabrics on the shelf, as well as shadows from the shelf itself, can affect the color of the fabric.
 Stack the selected bolts; then step back six to ten feet, and squint at them. This will help the colors stand out, and you’ll notice which colors are too similar or too bold, or blend too much. Squinting magnifies the differences between the fabrics. After some trial and error, you’ll develop a combination that includes dark, light, and medium, as well as varying print scales. If you squint at them, and they live harmoniously together, you probably have a winner!
 Lay the bolts on their sides so that you are seeing only the edges of the bolts. Remember that you’ll be cutting the fabric into small pieces. Seeing the fabrics in the relationship and proportion in which they will appear in the block can prove quite helpful.
 Go with your instincts. If you feel that a combination looks too busy, it probably is. If the colors make you nervous, don’t use them. You need to like your fabric, but remember that trial and error and experimentation are your best ways to learn. (Carrie made two different quilts for this book in which fabrics that looked great when they were selected just didn’t look right when pieced. One looked too busy, and in the other the colors just didn’t work.) Your tastes will change, but you must be willing to take a chance occasionally.
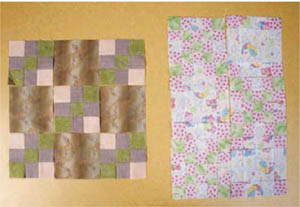
Carrie’s “missed” quilts
 Intense or contrasting colors can emphasize parts of a design. Conversely, a low-contrast combination can give the eye a place to rest.
 Be aware of one-way prints. They have a distinct up and down direction and can appear upside down if not placed carefully. Toiles are a very good example of one-way print fabrics.
 Utilize the “view-a-patch” system. Cut various template shapes and sizes from a sheet of frosted or white template plastic. Place one on the fabric to see how it will look when cut up. You can precut templates.
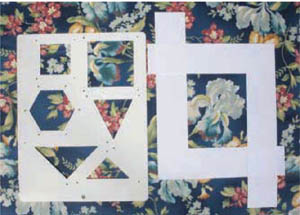
“View-a-patch” tools
 Among the following: type and scale of print, value and intensity, and color, you will find that color is the least important. If your fabric selections are strong on color but weak on the other two elements, you can end up with a very boring quilt!
 Look at the fabric in natural light if possible. Artificial lighting can distort colors and the way they relate to each other. When making a quilt for a specific place, we suggest that you also look at the fabrics in that environment to see how the colors work together.
In this lesson, you will be making twelve Nine-Patch blocks for the sampler quilt you have started. Nine-Patch blocks are not that different from Four-Patch blocks, but each square within the block tends to be smaller, and there is more sewing and butting seams involved. Nine-Patch blocks are made of three rows of three squares each.
 EXERCISE: CONSTRUCTING NINE-PATCH BLOCKS FOR THE SAMPLER QUILT
Materials:
Dark and light fabrics from Exercise: Sampler quilt blocks (page 27), in which you made the Fence Post and Four-Patch blocks

There are 2 different strip sets needed for Nine-Patch blocks. Rows 1 and 3 are the same, and Row 2 is the negative of 1 and 3, creating a checkerboard.

Color placement for strip sets
This block uses a 1″ grid. Many beginners are told that small grids are difficult, and the common theory is to teach beginners with large-scale grids. Harriet has found that her students love the detail and repeat of small grids, and that 1″ is not difficult—it just takes more blocks to fill the space needed. We hope you enjoy making 3″ Nine-Patch blocks. Remember, accuracy is critical.
1. To figure out how many strip sets you need to make the 12 blocks, count how many segments you need for the blocks for Rows 1 and 3. There are 2 segments in each block, so 2 × 12 blocks = 24 segments. The cut size of each is 1½″, so 24 × 1.5″ = 36″ needed. That is 1 set of strips, cut the width of the fabric. Row 2 is only 1 cut per block (1 × 12 = 12 × 1.5″ = 18″ needed). That’s about a ½ strip set.
Cut:
3 strips 1½″ wide of the solid blue fabric
2 strips 1½″ wide of the blue print fabric
2. Stitch a long blue and a blue print strip together, keeping the edges of the strips perfectly aligned. Press toward the blue strip and starch lightly. Measure from the seam to each raw edge, and check that the measurement is exactly 1¼″. If it isn’t, either trim or check the seam allowance for accurate sewing.
3. Add another long blue strip to the blue print side, and stitch, aligning the edges exactly. Press toward the blue strip, and check that it is now 1¼″ wide.
4. Repeat Steps 2 and 3 for Row 2, reversing the color of the strips, still pressing toward the blue strip.
5. Cut the strips into segments, each 1½″ wide. You now have 2 seams to align the ruler. Lay the strip set on the mat horizontally. Trim the ends off the strip set on the right end (left end if you are left-handed). Turn the strip around 180°, lay the 1½″ ruler line on the cut end, and align the horizontal ruler lines with the seamlines. Cut. Keep cutting 1½″ segments, keeping an eye on all the lines of the ruler.

Cutting strips into 1½″ segments
6. After a few cuts, you might find that the cut edge is not square with the seamlines. Turn the strip around and resquare the end, then resume cutting segments. You know from the figuring above that you need to cut 24 dark-light-dark segments and 12 light-dark-light segments.
7. Divide the segments into 3 stacks: 12 of Rows 1 and 3, 12 of Row 2, and 12 of Rows 1 and 3 again.
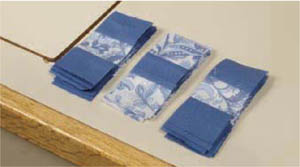
Stacks of nine-patch segments
8. Sew all 12 of Row 1 to Row 2. Fan the seam intersections, and press. Starch lightly. Check the width of each side of the seam to be sure it is 1¼″.
9. Add Row 3. Fan the seams, and press. Starch lightly again. Check the measurement. Your Nine-Patch blocks should be exactly 3½″ square.
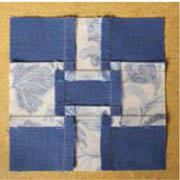
Back of block showing fanned seams
In this lesson, you will build on your piecing skills to make interesting quilts that use Nine-Patch blocks in different, creative ways.
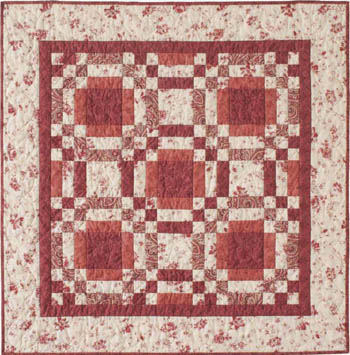
Interlacing Circles
Quilt top size: 27″ × 27″
(without borders)
Grid size of smallest unit: 1¼″
Block size: 3¾″ × 3¾″
Blocks:
16 Nine-Patch blocks (Block A)
16 Rail Fence blocks (Block B), Color Set 1
8 Rail Fence blocks (Block C), Color Set 2
5 solid red squares
4 light print squares
Layout: 7 rows of 7 blocks each
Yardage requirements:
⅝ yard cream print fabric
⅓ yard dark red fabric
¼ yard red paisley fabric
¼ yard dark pink fabric
¼ yard dark red fabric for inner border
⅝ yard cream print fabric for outer border
This complex-looking quilt is made up of 3 different blocks: 3-color Nine-Patch blocks, Rail Fence blocks in 2 different color sets, and solid squares arranged to create an “interlacing circle” appearance.
As with all your quilts, you will make the block with the most seams or the smallest grid first. Here, that’s the Nine-Patch block. These blocks, unlike the ones you made for the sampler quilt, are made from 3 different strip sets.
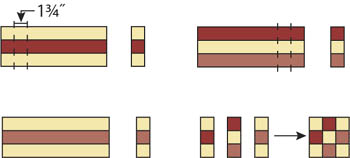
Nine-Patch strip sets and color placement for finished block
You will need 1 segment of each strip set to make each of the 16 Nine-Patch blocks. Each segment is cut 1¾″ wide, so 16 × 1.75″ = 28″, or 1 strip of each fabric for each strip set. This means you need to cut 2 strips of the dark red and the red paisley, and 5 strips of the cream print.
1. Sew together the first 2 strips of each of the strip sets. Press the seam allowance toward the dark fabric (either the red or the paisley), and starch. Check strip width accuracy, and trim down to 1½″ if necessary.
2. Sew the third strip onto each set, and again press, measure, and trim if needed.
3. Cut each strip set into 16 segments 1¾″ wide. Place the stacks of the 3 strip sets to the right of your machine. Pick up a cream-red-cream segment (1) in your left hand, and a red-cream-paisley segment (2) in your right. Put 2 on top of 1, right sides together, butt the seams, and sew. Repeat until all the segments in the 2 stacks are sewn together.
4. Until now, you have been fanning the seams for both Four-Patches and Nine-Patches. In this quilt you cannot fan the seams because they will only butt up properly half the time with the Rail Fence blocks they are sewn to. So, when you press the first construction seams of the Nine-Patches, you will be pressing the seams toward the red-cream-paisley segments. Press and starch, and again check for accuracy of width, and trim if necessary.
5. Add the last segments to the Nine-Patch. These segments are to be sewn onto the red-cream-paisley side of the block. Butt the seams, and sew. At the ironing board, you will press this new seam toward the red-cream-paisley segment, and starch. Check for strip width accuracy. The blocks should all measure 4¼″. Set these aside.
The Rail Fence blocks in this quilt have 2 different color combinations, and so you need to make 2 different strip sets, as shown.

Rail Fence strip sets
You will need 16 blocks from Strip Set A and 8 blocks from Strip Set B. The rail blocks will be cut 4¼″ wide, so for the Strip Set A blocks: 16 × 4.25″ = 68″, and 68″ ÷ 42″ fabric width = 1.6, or 2 strips of each color (paisley, cream, and dark pink). For the 8 blocks from Strip Set B: 8 × 4.25″ = 34″, or 1 strip of each color (dark pink, cream, and red). Cut 3 strips of the dark pink and cream, 2 strips of the paisley, and 1 strip of the red.
1. Sew these strip sets together just like you did for all the other Rail Fence blocks you have made thus far. Press the seam allowances toward the dark colors in the strip sets. Don’t forget to measure and check the strips for width every time you sew a seam—they should measure 1½″.
2. Once you have all 3 strips sewn together, the middle strip should measure 1¼″ wide. Cut the strips into 4¼″ blocks. Set aside. You’re almost finished!
You need 5 red and 4 cream squares. They all measure 4¼″ square. For the red, 5 × 4.25″ = 21.25″. For the cream, 4 × 4.25″ = 17″. So, you need 1 strip for each.
Cut the strips 4¼″ wide, then cut them into squares.
Referring to the layout diagram, lay out the quilt top. Be careful to turn those Nine-Patch blocks the right way to create the circle patterns!
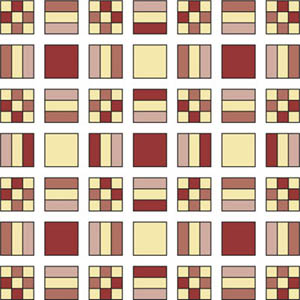
Layout for Interlacing Circles
1. Place all the blocks in each row into stacks, as described in Class 130 (pages 29–30), and take the complete quilt top to the sewing machine at one time. You will have 7 stacks of 7 blocks each beside your machine.
2. Construct all the rows. Press the seam allowances toward the Rail Fence blocks. Because this block appears in every other spot, the seams will be ready to butt properly.
3. Once the blocks are joined into rows and the rows are joined, set the quilt top aside. You will add borders when you get to Class 180.
border information for this quilt
The inner border for this quilt is cut from the red fabric; it is 1½″ wide, finished. The outer border is cut from the cream fabric; it is 5″ wide, finished.
Quilt top size: 45″ × 45″ (without borders)
Grid size of smallest unit: 1″
Block size: 9″ × 9″
Blocks:
12 Block A (Chain block)
13 Block B (Nine-Patch block)
Layout: 5 rows of 5 blocks each
Yardages for quilt top:
⅓ yard blue fabric
⅔ yard large-print fabric
1½ yards tan fabric
1 yard large-print fabric for border
note
Just a reminder that the yardages are the minimum you need. Remember to add enough for your comfort level in case of cutting errors, or if you need extra for straightening the grain (if the fabric was cut from the bolt).
This is a quilt of Nine-Patch blocks, and a Nine-Patch block made of nine-patches! However, if you look closely, the corners of the Chain block are different from a standard Nine-Patch. We are combining 2 grids to cut 1 wider piece to fill the place of 2 smaller pieces. Since the grid is 1″, the wider space equals 2″ plus the seam allowances.
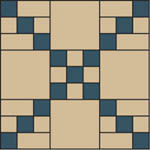
Chain block
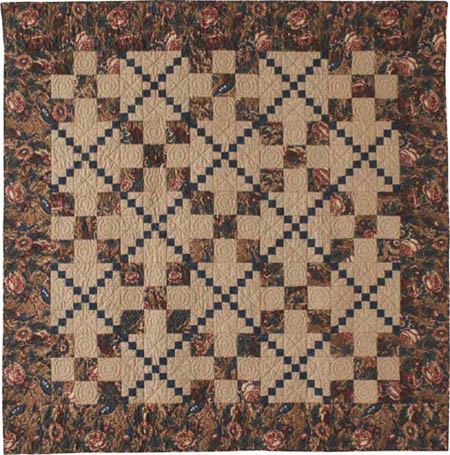
Double Nine-Patch Chain
1. Start by making the nine-patch units in the center of the block. How many strip sets are needed to accommodate 12 blocks?
Rows 1 and 3: 2 segments for each block × 1½″ cut = 3″ × 12 blocks = 36″, or 1 strip set
Row 2: 1 segment for each block × 1½″ cut = 1½″ × 12 blocks = 18″, or ½ strip set
You need 2 strips of blue for Rows 1 and 3, and ½ strip for Row 2 (you will have to cut a full strip). You need 1 strip of tan for Rows 1 and 3, and 1 strip for Row 2.
Cut:
3 strips of the blue fabric (1 cut in half)
2 strips of the tan fabric (1 cut in half)
Lay out the strips as follows:
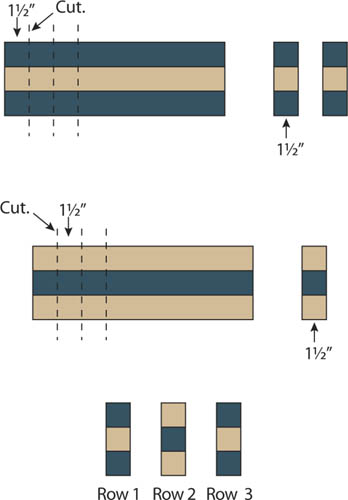
Color placement for strips
2. Construct strip sets as you have learned in this class, checking the width of each strip after each addition. Press, starch, and cut the strip sets into 1½″ segments. Build stacks of 12 segments for each row. Stitch together Row 1 and Row 2. Fan the seams, and press. Add Row 3. Fan the seams, and press. Measure to be sure that each block is exactly 3½″ square.
3. Make the corner blocks next. They are a bit different from a true Nine-Patch. Because of the chain that runs through the block, the 2 sides are mirror images of each other. Therefore, you will need to be careful to make them separately and lay out the small blocks carefully when constructing the large Chain block.

Corner blocks
4. Again you will need 2 strip sets. All the strip sets can be made at the same time, but when you get ready to build the blocks, the layout will be different.
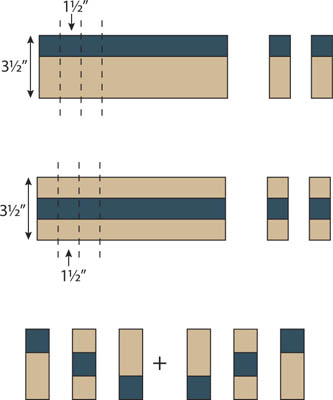
Color placement for strip sets
5. These strip sets are again cut into 1½″ segments. You need 4 modified Nine-Patch blocks for each large block, and there are 12 large blocks, for a total of 48 blocks you need to make.
6. Rows 1 and 3 are the same. You need 2 segments for each block: 2 × 4 = 8 × 1.5″ = 12″ × 12 blocks = 144″ ÷ 42″ = 3.43, or 4 strip sets. Row 2 is the same as Row 2 of the center nine-patch we made on page 78: 1 × 4 = 4 × 1.5″ = 6″ × 12 = 72″ ÷ 42″ = 1.71, or 2 strip sets. (All these strip sets could be made at the same time.)
Cut:
4 strips 1½″ wide of the blue fabric
4 strips 2½″ wide of the tan fabric
2 strips 1½″ wide of the blue fabric
4 strips 1½″ wide of the tan fabric
7. Construct these strip sets, press, starch, and measure for accuracy with each addition of a strip. Cut into segments. You will need 96 segments for Rows 1 and 3, and 48 segments for Row 2.
8. Before making the stacks for chain sewing, divide the segments in half. Because the position of the wide strip is mirrored from side to side, the blocks have different layouts.

Top left / bottom right block

Top right / bottom left block
Lay out the rows for the left blocks into stacks, and chain sew Rows 1 and 2. After fanning the seams and pressing, add Row 3. Repeat for the right blocks.
9. Now add the solid squares to the Chain blocks. Because of their size and the tricky layout of the corner blocks, it is smart to precut the squares and lay out the large block in rows. All the rows can be joined together as we have been doing, and the direction of the corner blocks can be checked during the process. Lay out the units of the large block as shown below.
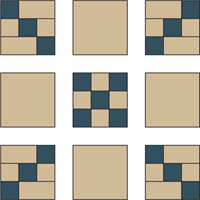
Block layout
10. Gather up each row and stack the blocks as before. You will have 12 units in each stack. Begin sewing by stitching the first 2 blocks of Row 1 together, 2 on top of 1. Press the seams toward the large square. Add the third block of the row. Again, press toward the large square. Repeat for Rows 2 and 3. Once the rows are finished, sew Row 1 to Row 2. Press toward Row 2. Add Row 3. Press toward Row 2 again. Starch the blocks to make sure all the seams are flat and well pressed.
11. Again, check the size and squareness of the blocks. Using a 4½″ ruler, place the 3¼″ line on a seam and check that the raw edge is exactly 3¼″. Do this to all 4 sides of all 12 blocks. The blocks must measure exactly 9½″, with the blue corner squares measuring 1¼″.
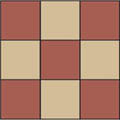
Nine-Patch block
1. Again, for each block 2 strip sets are needed. How many strip sets do you need? There are 13 blocks. Each row needs 3½″ for each segment. Two segments are needed per block for Rows 1 and 3, and 1 segment for Row 2.
Rows 1 and 3: 2 × 3.5″ = 7″ × 13 blocks = 91″ ÷ 42″ = 2.16, or about 2½ strip sets.
Row 2: 1 × 3.5″ = 3.5″ × 13 blocks = 45.5, or a bit more than 1 strip set. You can figure 1½ strip sets.
For both strip sets, cut:
7 strips 3½″ wide of the large-print fabric
6 strips 3½″ wide of the tan fabric
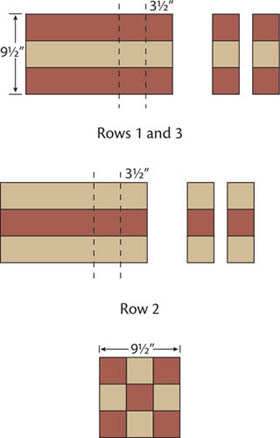
Color placement for strip sets
2. For Rows 1 and 3, sew 2½ strips of large print to 2½ strips of tan. Press each set of strips toward the large print. Measure both sides of the seam to check that the strips are now exactly 3¼″ wide. Add another large-print strip to the tan of each strip set. Press toward the large print again. Check that this strip is now exactly 3¼″ wide. Cut the strips into segments. You will need 26 segments 3½″ wide.
3. For Row 2, sew 1½ strips of tan to large-print strips. Press toward the large print. Check that each strip is now 3¼″ wide. Add another tan strip to the large-print sides. Press and check for width accuracy. Cut these strip sets into 13 segments 3½″ wide.
4. Lay out the segments to form the block shown. There must be 13 segments in each stack. Start constructing the block by sewing the 13 Row 1 segments to the 13 Row 2 segments, carefully butting the seams. Press this seam toward Row 1. Do not fan the seams in this block. Add the 13 segments for Row 3 to Row 2. Press this seam toward Row 3.
5. To check for accuracy, measure off each seam to the outside edge. Make sure each side is exactly 3¼″ wide from the seam.
6. You are now ready to lay out the blocks. The A and B blocks alternate, starting with the large Nine-Patch Block B in the top left corner. There are 5 blocks in each row, and 5 rows in the quilt top.
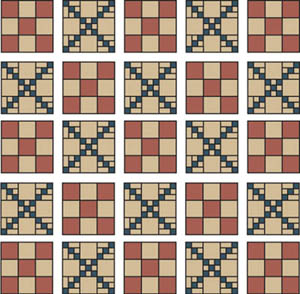
Double Nine-Patch Chain layout
7. As before, begin stacking up the rows with the first block on the left as #1, on top of 2, 3, 4, and finally 5. Mark the block to denote the top. Repeat with the next 4 rows. Lay these stacks beside your machine, and begin sewing by sewing the first 2 blocks of all the rows together. The seams should butt perfectly because of the direction the rows were pressed within each block. Press the seams toward the large Nine-Patch block. When all the rows are connected, roll Row 1 over Row 2, and sew the long seam, butting the seams exactly. Press in either direction. Continue until all 5 rows have been joined.
border information for this quilt
There is only a single border on this quilt that finishes to be 6″ wide.
Set your finished quilt top aside. In Class 180, you will learn how to check for square corners and accuracy of width and length, and how to add borders.