 -vs.- +
 .
.There is an information gap that separates masters from the rest of players. But the information isn’t arcane, technical material, like the best 17th move of a Najdorf Sicilian and how to draw -vs.- +.
The most valuable know-how that a master possesses and an amateur lacks concerns middlegame planning and pawn structures. A master knows what a good structure looks like, how to exploit it and when and how to change a structure that can be improved.
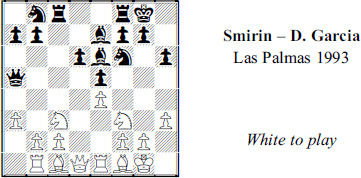
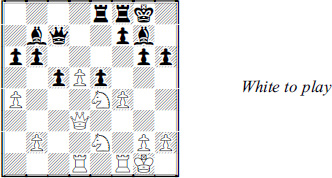
No threats and no easy targets. Not much seems to be happening, says the amateur.
The reality is quite different to a master. White can improve his position hugely with a few moves, starting with 1  b5.
b5.
This is another example of little tactics. White threatens xd6 and perhaps also the a-pawn if he can drive Black’s queen away.
Before playing 1 b5 White had to make sure it wouldn’t be refuted by 1 … a6 2 xd6 fd8, pinning the knight. Once he saw that 3 xb7 or 3 xc8 xd1 4 xe7+ are good, he can be confident that 1 b5 works tactically.
But this isn’t about tactics. White didn’t expect to win the d-pawn. He assumed Black would defend it, which he did, with 1 … fd8. White’s reasoning became clearer after the game continued 2 d2  a6.
a6.
Most amateurs – and masters as well – would be looking at the discovered attacks on the queen, such as 3 c7 or 3 d4.
But it turns out that there’s no way to win material, and 3 c7 c6 4 xe6 fxe6 5 d3 bd7, for example, isn’t a clear edge for White.
When White decided on 1 b5! he also had a positional goal: He wanted to push his c-pawn to the fourth rank. That would create a very favorable pawn structure, a very good version of the Maroczy Bind. It is called a bind because it virtually rules out Black’s main sources of counterplay, the advances … b5 and … d5.
Black couldn’t stop this plan, so the game continued 3 b3! bd7 4 c4!.

No Black counterplay means no White urgency, as we saw in Chapter Five. White has time to favorably reorganize his pieces. For example, he might continue c1 and d2, so that the a-pawn and e-pawn are protected. Then he can expand with b3-b4 and c3-d5!.
In the game, Black tried to thwart that with 4 … c5, threatening the e-pawn. But after White replied 5 c3, Black saw that 5 … xa3 would lose to 6 b4, e.g. 6 … cd7 7 a1 xb4 8 d5.
To avoid a positional rout, he tried 5 … b5. But this made matters worse and he was lost soon after 6 b4! cd7 7 cxb5 xa3 8 e3!. His queen is trapped and vulnerable to d5 or e1-c2.
Black lost after 8 … f8 9 e1! b6 10 c2. But the turning point occurred back at the first diagram when White realized he could achieve the Maroczy Bind structure and knew it would favor him greatly.
The first step towards obtaining a favorable pawn structure is simply knowing which structures are favorable. Here’s another example.

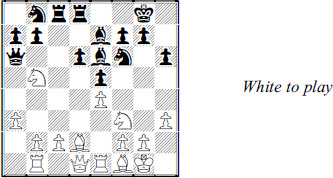
This structure is harder to evaluate. It doesn’t fit into any of the familiar patterns. Black has more pawns in the center. But White’s pawns do a better job of limiting enemy pieces.
This is a case where a pawn structure suggests a maneuver. White’s dark-squared bishop can control the best diagonal on the board after e3-f2-h4 or d2-e1-h4. But there’s a drawback to the bishop maneuver. On h4, the bishop no longer protects f4. The f-pawn would become Black’s best target, a source of counterplay.
So White looks for another plan. What do you do when you can’t exploit the pawn structure? Change it to a better one. White played 1 c4!.
His advantage would be evident after 1 … dxc4 2 xc4. A target at e6 is exposed and vulnerable to d6 and g5. Black can’t maintain a pawn on d5 because 1 … f7? allows 2 g5!.
That leaves 1 … d4, which White realized was a distinctly favorable structure. True, Black will have a protected passed d-pawn. But once again this is a case of what matters most. White can exploit the hole at d6 with g5-e4-d6. Or, after g5, he can attack the kingside with a3-h3 and e4.
So play went 1 … d4 2 g5! b8 3 a3! c6 4 h3 h6 5 e4. White threatens to win with 6 g4 and 7 xg6, since 6 … f7 walks into 7 d6!.
Black prepared to sacrifice a rook for the knight with 6 … ad8. White added more firepower with 7 dd3.

Thanks to his highly favorable structure, White has a choice of winning methods. He can double rooks on g-file. Or he can grab material with d6. He opted for the latter and Black resigned soon after 7 … f7 8 d2 b6 9 axb6 axb6 10 d6 xd6 11 exd6.
Students don’t pay much attention to pawn structures when they are starting out. They don’t have to. They usually play standard openings, such as the Ruy Lopez, Queen’s Gambit Declined, Giuoco Piano, and the Sicilian, Nimzo-Indian, King’s Indian and Queen’s Indian Defenses, and so on.
Each of these leaves you off, after 10 or so moves, with a more or less familiar pawn structure that is also more or less even. But when the middlegame begins, the structure begins to matter because either side can change it. A master not only knows what a good one looks like, but what to do about a bad one.

This structure is typical, at least in terms of the center pawns, of a Caro-Kann Defense and of some queenside openings. White enjoys more space but both his d-pawn and h-pawn can become targets. This explains 1 e5.
White sees that 1 … xe5 2 dxe5 would transform the position into quite a nice structure for him. In fact, 2 … xd1+? 3 xd1 and 4 d7 would be close to losing for Black.
Black understood this and answered 1 e5 with 1 … d8!. He prepares, among other things, the pawn-killing plan of 2 … d7 followed by 3 … fd8 and 4 … xd4.
There is no way for White to change the structure in his favor after 1 … d8! because 2 d5? would just drop a pawn. So White provided support for his d-pawn with 2 d3.

Now he can defend his d-pawn as many times as Black can attack it (2 … d7 3 hd1). That’s important: If there are no changes in the center, time begins to favor White. He would be free to turn his attention to the kingside where f3-f4 and g2-g4-g5! would give him a big edge.
But Black’s last move prepared another plan. He assured himself of a superior pawn structure with 2 … b5!.
The tactical point is that 3 cxb5 allows 3 … d5! and 4 … cxb5. Then Black has secured the pivotal d5 square, and the d4-pawn will remain a target for the foreseeable future (4 f4 cxb5 5 g4? e5). No better is 3 c5 d5.
White appreciated that keeping pawn control of d5 mattered more than loosening his king position. That led to 3 b3 bxc4 4 bxc4 e7 5  c2 fd8.
It’s isn’t easy to exploit White’s king. But as we saw in Chapter Seven, in positions like this, it should be much easier to play Black’s position than White’s. Black eventually won after 6 c5 8d7 7 hd1 h4 8 g4 f6 9 b4 f5!.
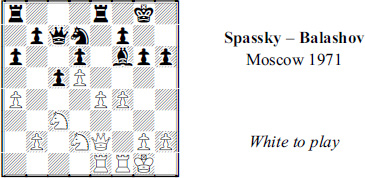
Note how often the structure provides a hint about priorities, about what matters most. A favorable structure can serve as a virtual roadmap in the middlegame. Here’s a memorable example.

Black knew he enjoyed the superior pawn structure, particularly in view of the weakening h2-h4. This told him that White’s threat – xa7 – may not be worth preventing. The a-pawn shouldn’t be as significant as one of White’s kingside pawns, should it?
It shouldn’t. Black considered 1 … fe8! 2 xa7 d6 and liked what he saw. The rook on d6 defends the b6-pawn and will go to f6 for an attack on f2.
In addition, he threatens 3 … xe2. White can’t defend that pawn without major concessions (3 e4? fxe3 or 3 f1 f6 and 4 … f5).
Instead, he tried to open lines for his rooks with 3 b4. But Black ignored that, too, with 3 … f6!.
There followed 4 bxc5? f5 5 f3 (or 5 f1? xe2 and 6 … xf2) h3 6 c7 ff5!.
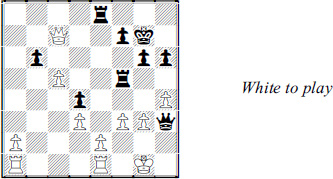
Black wants to plant a rook on e5. That would block the c7-g3 diagonal and threaten a winning … xg3+. White’s king has no escape because 7 f2 will allow … h2+.
The finish was instructive. After 7 cxb6 fe5 8 e4 Black coordinated his heavy pieces, 8 … xg3+ 9 h1 xh4+ 10 g2 g5+. White resigned after 11 f1 h3+ 12 e2 g2+ 13 d1 xf3+ 14 c1 f2.
It was very neatly done by Black and, since this occurred in an Interzonal tournament, the game played a role in chess history. It doomed one of Bent Larsen’s last chances to become world champion.
The outcome was influenced by what happened several moves before the previous diagram. That is, before the pawn structure turned sharply in Black’s favor. Here’s what it looked like then.
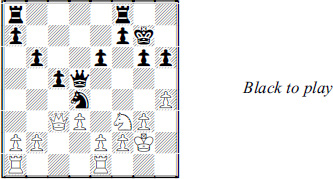
The first thing you’ll notice is that there were two knights on the board. That seems to benefit White, even though both are pinned.
One reason they help White is that he has an additional piece to defend his kingside. In addition, he can trade knights on d4 under much better circumstances than what happened in the game.
For example, if Black plays the hasty 1 … e5 White can reply 2 e4!, forcing the queen back before xd4. For example, 2 … d6 3 xd4! exd4 isn’t nearly as good for Black as it was when the White pawn was on e2. Black would have no target on the e-file and White can defend f2 more easily.
This explains why Black played 1 … ad8!. Now if 2 e4 and a queen retreat, Black can recapture on d4 with pieces and leave White to defend a backward pawn at d3 forever. For example, 2 … c6 3 xd4 xd4 and … fd8 is a clear edge for Black, thanks to the pawn structure.
Instead of 2 e4?, White played 2 g1. This unpins the knight so he can play 3 xd4, not fearing 3 … cxd4 4 c4 or 4 a3, or 3 … xd4 4 xd4. Black would have only a minimal edge, if any.
Black also unpinned, with 2 … e5 and threatened 3 … xf3+. White didn’t like retreating his knight because his kingside has no defender, e.g. 3 d2 g5! and 4 hxg5 hxg5 and … h8.
So there followed 3 xd4 exd4! 4 c4 h5.

We are nearly back to where we were in the first diagram we examined. But White still had a chance to make a fight of it through astute use of the pawn structure. Instead of 5 a4?, which he played, he should liquidate one of his weaknesses with 5 e4!.
True, after 5 … dxe3 6 xe3 he still has to worry about the pawn at d3. But his rooks will become active, unlike in the game, and he has plenty of operating space. That matters more.
After he played 5 a4? and Black found 5 … d6!, the game was largely decided.
How do you master pawn structures? The simplest way is to go over annotated games with different structures and figure out which structures are good, which are bad and which fall in between.
It’s important to work with annotated games because good notes – that is, notes with words, not just moves – reveal a lot of subtleties you might otherwise miss.
You might be able to figure out on your own that White is slightly better and his advantage lies in the d5-pawn. It gives him more operating space than Black.
Black can try to change that evaluation with 1 … xb3 2 axb3 xc3, threatening 3 … xd5. Or, he can tweak the move order with 1 … xc3 and then 2 bxc3 xb3.
In the game, Black chose the latter. Without the benefit of notes you might not think it mattered.
It does. If Black had chosen 1 … xb3 2 axb3 xc3 White would have been forced to save his d-pawn with 3 xb6! and then 3 … xb6 4 bxc3!.
If White is allowed to play 5 c4 he will have increased his edge appreciably because the structure is now plainly superior: He would have a target to pound at e7, the prospect of kingside attack with h2-h4-h5 and even the possibility of creating a passed queenside pawn.
Can Black change the structure? Yes, but he would be worse after 4 … xb3 5 ab1 and xb7. The same goes if Black tries to dissolve the d-pawn with 4 … e6 5 dxe6 xe6 6 xe6 xe6? 7 xb7 or 6 … fxe6 7 c4!.
But let’s scroll back to the previous diagram. In the game Black actually played 1 … xc3!. Then 2 bxc3 xb3 forces 3 xb6 once more.

But in this version Black was able to insert the forcing 3 … d2!. White wouldn’t like to play 4 xd8 xf3+. So Black’s trick allows him to equalize after 4 d3 xb6 5 xd2 and now, for example, 5 … ad8 6 c4 e6!.
White, a good annotator, pointed all this out, as well as noting that he should have tweaked the move order as well – by meeting 1 … xc3! with 2 xb6! and 2 … xb6 3 bxc3.
This makes sense because 3 … xb3 4 axb3 will have transposed into the favorable 1 … xb3 2 axb3 xc3 line we mentioned above. (However, Black might have equalized anyway, by avoiding 3 … xb3? in favor of 3 … f6 or 3 … d6.)
Now if you had played the game score over without notes – and just saw 1 … xc3 2 bxc3 xb3 3 xb6 d2 etc. – these subtleties would be lost and you would not be learning a valuable lesson about pawns.
Here’s a more elaborate example. The two players take turns trying to get a structure they want to play. Without good notes the would-be master could get quite confused. He would realize how often the structure changes but not why.
Razuvaev – Sveshnikov, Moscow 1995: 1 d4 d5 2 c4 e6 3 f3 c6 4 bd2 f6 5 g3 bd7 6 c2 b5
Black’s last move tries to force a favorable trade, 7 cxb5 cxb5. That would likely allow him to seize the open file with … c8. Also … b7 after the pawn trade would make it hard for White to carry out his best bet (e2-e4) for opening the position in his favor.
White appreciated all this and played 7 c5!. The new structure favors him. Why? Because he has more space and can open lines favorably for his pieces with either e2-e4 or a2-a4, or both.
Black saw this much too. He replied 7 … e5 (“Otherwise I’m just positionally bad,” he said afterwards).
The little tactic that makes 7 … e5 possible is 8 dxe5 g4, after which he must regain either the pawn at e5 or the one at c5.
So far, we’ve seen three tries at obtaining a better structure, 6 … b5, 7 c5 and 7 … e5. After 8 dxe5 g4 White considered one more change, 9 e6 and 9 … fxe6.
Black’s position would be loosened and there would be potential targets at e6 and h7. But White couldn’t see a way to exploit them in the near future.
Instead, he solidified his superior queenside with 9 b4!.

Left unchallenged, this move would allow White to create a bind with 10 b2 and b3-a5.
Black’s pieces would be in such a mess that he might try to break out with 9 … a5 before White has time for b3.
But White could then sacrifice a pawn favorably, 10 b2! axb4, in order to play 11 h3. After 11 … h6 his compensation lies in the positional pull of 12 b3 and a later e2-e4. Or, after 12 … e7, in the tactics of 13 e6! f6 14 g4.
Black appreciated as well as White did that the e5-pawn is the most important feature of these lines. He hurried to get it off the board with 9 … dxe5, rather than 9 … a5.
But, strangely enough, this was a mistake. (Correct was with 9 … gxe5!.)
The difference between the two captures was shown by 10 b2 xf3+ 11 exf3!.

Black had counted on 11 xf3 so that he could anticipate 12 a4 with 11 … a5!. Then his queenside inferiority is reduced.
But after 11 exf3! his knight is under attack and White has time to deter … a5. Play went 11 … f6 12 b3!.
The doubling of White’s pawns isn’t nearly as important as his ability to solidify on the queenside. He can complete his development and then make inroads with a2-a4 and/or a5. Or he can try to attack on the kingside with d3.
Black knew from his own experience how bad positions like 12 … e7 13 a4 bxa4 14 xa4 are. He became desperate and tried 12 … a5.
He planned to sacrifice with 13 xa5 xa5 14 bxa5 xa5+ 15 d2 xd2+ 16 xd2 xc5 or 15 c3 a3.

But White has one more favorable way to alter the pawns, 13 a4!, rather than 13 xa5. Then 13 … bxa4 14 xa4 would doom the a5-pawn without any compensation. Instead, Black chose 13 … axb4 14 axb5 xa1+ 15 xa1.
If Black allows 16 b6, the protected passed pawn leaves him positionally lost. But Black would lose even faster after 15 … cxb5 16 xb5+ d7 17 c6.
The game drew to a finish after 15 … e7 16 b6! 0-0 17 h4. White is taking minor precautions, to avoid complications such as 17 d3 h3 or 17 g2 a6.
After Black tried 17 … d4 18 c4 d5 19 xd4 e8, White took another safety step, 20 f1!, to avoid the complications of 20 0-0 xh4!?.
But the game had been decided earlier by clever pawn play. The bankruptcy of Black’s position was clear after 20 … f6 21 xf6 xf6 22 xd5 cxd5 23 g2 and the queenside pawns must win.
Obtaining the pawn structure you want to play is typically the first step of a two-step process. The equally important second step is knowing how to exploit it. The Russians gave us a word – priyome – to describe the technique that is appropriate for a particular pawn structure.
You already know some of these even if you’ve never heard of the word priyome. Suppose you’re playing a rook endgame with seven pawns apiece. There is one open file. The priyome is simply to seize control of the file with your rook. It’s virtually an automatic, no-think move for most players and it typically obtains an advantage.
Most priyomes are much more sophisticated than that. They are both tactical and strategic. They can provide you with just a hint of what the next move should be. Or they can hand you a full-blown middlegame script, leading almost to mate. Here’s an elaborate priyome that became familiar in the last 20 years and defeated some of the strongest players.

Knowing the priyome allows White to play his next half dozen moves with confidence. He begins with 1 g4!.
If allowed, he will continue 2 g5 followed by 3 g2, to free the rook at f1. Then comes 4 f3 and 5 h3, targeting h7. He follows up by getting his queen to the h-file and threatening xh7 mate.
This plan is so strong that if Black doesn’t take emergency action – say with 1 … d5!? 2 exd5 d8 – he can be overrun. In fact, the priyome begun by 1 g4 has won hundreds of games, in similar positions. Often Black has to do all the hard thinking – because White is being guided by the priyome.
This game illustrated this when it continued 1 … b8? 2 g5 d7 3 g2! e8 4 f3 c5? 5 h3. To stop 6 h5, Black played 5 … g6. White replied 6 g4.

The script goes much further: Black cannot stop h4. But he has a trick defense to it in … h5, since gxh6 would lose the queen to … xh4.
Nevertheless White will win if he is allowed to play f3xh5!. That’s what happened here: 6 … b4? 7 h4 h5 8 f3! f8 9 xh5 gxh5 10 xh5 g7 and now 11 d4! e5 12 f5! (12 … exd4 13 h7+ f8 14 f6).
There have been dozens of master games that began with g2-g4 and ended with Black resigning soon after xh5!. One of them is the following, which arose from quite a different opening variation.
Fedorov – Khurtsidze, Krasnodar 1998: 1 e4 c5 2 f3 e6 3 d4 cxd4 4 xd4 a6 5 c3 c7 6 g3 b4 7 d2 f6 8 g2 c6 9 b3 e7 10 f4 d6 11 0-0 0-0 12 g4! b5 13 g5 d7 14 a3 b7 15 f3 fe8 16 h3 g6 17 e1 b4 18 h4 h5

The first move to occur to Sicilian-beating masters is obvious, 19 f3!. The game was decided by 19 … bxc3 20 xh5! since 20 … gxh5 21 xh5 leads to immediate mate.
Black kept the game going with 20 … xg5 21 xg5 d8 but resigned soon after 22 h6! cxb2 23 f1 f6 24 c3.
Priyomes and pawn structures are intimately related. Changing the pawn structure, as White did with g2-g4-g5, will make little sense unless you know the priyome that is appropriate. A change in structure also lacks point if you don’t have the pieces to make the priyome work. Sometimes a pawn advance or capture can be a brilliant move or a positional blunder depending on whether you can carry out the priyome.

White is preparing the familiar minority attack, with b4-b5 followed by bxc6 to weaken Black’s pawns.
Black stopped that plan in the most direct way, with 1 … b5. He explained this is a “very typical move” in this kind of position.
But he added that it’s only good if Black can maneuver a knight to c4. That’s the priyome. In this case it’s a very short range plan that lasts only until Black plays … c4.
If he can’t plug the c-file that way, Black will be clearly worse. He will find the backward c6-pawn coming under heavy fire from rooks on the c-file, and the conclusion to draw is that 1 … b5? was a positional blunder.
But in this case, Black can get his knight to c4 and 1 … b5! was the most important move in the game. Play went 2 c2 axb4 3 axb4 d6! 4 b3 b6 5 e5 fc8 6 d3 bc4 and he was better. He went on to win a fine game.
Some priyomes are so sophisticated that they have inspired specific antidotes – a kind of counter-priyome. Here’s a pair of illustrations. In the first case the priyome succeeds perfectly. In the second it is foiled by a counter-priyome.
We see a typical King’s Indian/Benoni pawn structure. There are no obvious targets for either player. But White detected a slight Black weakness on the kingside in the vicinity of g6 and f6. That was enough to start calculating variations.
First, he could see that he lacks the firepower to make 1 e5 dxe5 2 fxe5 xe5 work. Even if prepared with 1 de1, the e4-e5 break is going to cost a pawn, with little to show for it.
White also looked at 1 f5. That threatens to target g6 and create a hole at e6 with 2 fxg6 fxg6.
But 1 f5 is also a major concession, granting Black a wonderful outpost at e5. For example, 1 … g5 2 g3 d7! and … e5.
Nevertheless White knew there should be something to do here because he knew his priyomes: He needs to clear e4 for his knights. After some calculation he found that the proper way to do that is 1 xf6! xf6 2 e5! and then 2 … dxe5 3 e4 g7.
But the priyome goes beyond what’s happened so far. After an exchange of White’s f-pawn or Black’s e-pawn, Black will have lots of piece activity, e.g. 5 fxe5? xe5 6 2c3 d4+ favors Black.
The key move is 5 f5!, which guarantees White an advantage. By stopping … f5 he secured e4 for his knight. White also prepares to probe the kingside with 2c3 followed by g3/f5-f6. Or, after 5 … g5, with 6 f6 and 2g3-f5.
Play went 5 … d8 6 2c3 gxf5 7 xf5. White is preparing f6+, with or without a rook lift, df1-f3-g3 or -h3. 7…f6

Black felt he had to play 7 … f6. This makes it hard for either player to change the structure further. But it’s a very favorable structure for White – and time is on his side because Black has little counterplay.
The way White finished off was instructive: 8 df1 e7 9 g3 h8 10 h4 xd5 11 xf6 b7 12 h5! xf6 13 xh6+! g8 (13 … xh6 14 xf6 wins) 14 fxf6! xf6 (or 14 … xh6 15 xh6 and g6+ wins) 15 xf6 and so on.
The priyome here consists mainly of 2 e5!, 3 e4 and 5 f5!. It became famous when a world champion was wiped out in the game Penrose – Tal, Leipzig 1960. That game and the one above have little in common except for a few pawns in the center and the priyome.
The would-be master will want to master this priyome because it arises so often. He can find dozens of games in Benoni and King’s Indian Defense databases. What he wants to learn is: When does the e4-e5 followed by f4-f5 succeed and how can it fail? He also wants to see if there are any good defenses to it.
In fact, there is a counter-priyome, and it was illustrated by another Spassky game, played about the same time as the one above.
White has just exchanged a bishop for a knight on f6, as he did in the previous example. Yes, there are differences between the two games. But the similarities are more important. They included White’s ability to control e4 with his knights, Black’s weakness at g6 and the potential outpost at f5.
That explains 1 e5! dxe5 2 f5. White is ready to carry out the same pressure plan as before, by means of de4 with its a threat of fxg6/ xf6+.
As in the previous example, he is trying to force Black to trade pawns on f5 so that he can retake xf5 and dominate the f-file.
Once again, 2 … g5, invites de4, this time with d5-d6 and d5 to come, an idea that was possible but impractical in the previous example.

The strength of the priyome is illustrated by a sample variation that begins 2 … g7 3 de4 h7 (not 3 … f6 4 xf6+ xf6 5 fxg6, threatening xf6).
White would be getting close to a win after 4 g4 in view of 4 … f8 5 f6 h8 6 h4 and g5+. Or 4 … d8 5 fxg6+ fxg6 6 f7.
But there was a counter-priyome that Black knew about and he replied 2 … e4!. This enabled him to occupy e5, which Black never managed to do in the previous example. Once again it’s a case of what matters most. Black appreciates that the loss of his extra pawn doesn’t mean as much as having room for his pieces to work.
There followed 3 fxg6 fxg6 4 dxe4 g7! and Black has protected key squares at g6 and f6.

White still has good play but Black had plenty of resources when the game continued 5 h1 and 5 … e5! 6 d2 ae8. A draw was the fair result following 7 g3 f5 8 xf5 gxf5 9 xf6 xe1+ 10 xe1 xf6.
It’s harder to acquire a good appreciation of priyomes than it is to master pawn structures. For one thing, there are many more priyomes than structures. Often a single structure can have two or three priyomes, as in the last example. This applies to attack as much as it does to positional play.

The hanging c- and d-pawns and the related d4-isolani are two of the most common pawn structures. Both offer White reason to be aggressive.
One of his priyomes is the explosive d4-d5. When White is better developed, this can give him a quick advantage. But here the tactics don’t justify 1 d5? exd5 2 xd5 b7. Black is at least equal.
Another priyome is the unlikely 1 h4!. White’s idea is to support g5, which will be followed by h5, to threat mate on h7. As strange as it may seem, it is quite common in positions with the same or similar pawn structures.
To play 1 h4 White has to realize it is a gambit, 1 … xh4 2 xh4 xh4 – and that it’s a promising gambit after 3 e3, with the idea of h3/c2 or g3/g5.
Should Black accept the pawn? That depends on his alternatives. If he stops 2 g5 with 1 … h6, White will play 2 d3 and 3 c2, forcing another weakening to avert mate on h7.
In the game Black chose 1 … b7 2 g5 and saw that 2 … h6 allows a strong 3 xe6! fxe6 4 xe6. So he played 2 … a5 instead and then came 3 c2.

The power of 1 h4! is now evident. If Black meets the xh7+ threat with 3 … g6, White can prepare h4-h5xh6 or go straight into a standard sacrifice – another priyome – 4 xh7 xh7 5 h5+ g8 6 xg6.
Black chose 3 … xg5 instead. But his kingside dark squares were a chronic weakness after 4 hxg5 and then 4 … d5 5 d3! g6 6 g3, followed by f4, ad1-d3 and h4.
Amateurs can play some positions well because they learned, often unconsciously, the appropriate priyomes. Masters can play many positions well because they know more of them.
“I think my advantage as a practical player,” said Hikaru Nakamura in a 2011 interview, lies in that “I play a great many positions. Even the best (opening) preparation at some moment comes to an end and then you need to fight.”
Here’s how to look at a game and add to your knowledge of structures and priyomes:

This is a standard Ruy Lopez middlegame structure. You can find thousands of games with these pawns on these squares, although the pieces may be placed differently.
If you search for similar games in databases, you’ll appreciate the basic themes. Black is trying to open up the queenside, where he has more space. Often he tries … c4, … a5 and then … b4xc3.
Meanwhile, White eyes the kingside. One priyome that you’ll find is to play a White knight to e3, his king to h2, his rook to g1 and then advance the g-pawn two squares. The priyome is completed when White gets his knight to f5. That’s a powerful attacking setup and has been examined in, for example, Pawn Power in Chess by Hans Kmoch.
But there’s also a matter of move order. White can start with h2 and e3, followed by g1/g2-g4 or g2-g4/g1. However, he chose the sloppy 1 g4?.
That gave Black an opportunity to carry out his own priyome with 1 … h5 – even though he seems to be attacking on the wing in which he is weaker. If you examine databases you’ll find similar examples that lead to double-edged play. In some rare cases White stands better after gxh5 and … xh3. Knowing the priyome only gives you a likely candidate. It doesn’t guarantee you the best move.
This time 1 … h5! is good. Black would stand well after 2 g5 h7! 3 h2 d8 because the g-pawn is overextended. White preferred 2 3h2 and Black traded pawns, 2 … hxg4 3 hxg4.

The kingside pawn structure is somewhat rare but once again there’s a priyome, 3 … h7! and … g5 or … g5. It puts Black in excellent shape to exploit the dark-square holes on the kingside. Play continued 4 e3 g6!.
If you’re not familiar with this kind of position, you might think it is fairly equal. It isn’t. And because White didn’t appreciate that, he didn’t feel he needed to defend.
There is a good defensive try and it can be considered – guess what? – another priyome. White should fortify his kingside with 5 f3! followed by g2 and h1.
Instead he felt he could still attack if he got f2-f4 in. The game continued 5 g2? g5 6 b3 g7! 7 f4 exf4 8 xf4 h8 9 d3 h4 10 g2 h7.

Black has the better pieces and the only targets to aim at. White tried to stem the tide with 11 xg5 xg5 12 e2 f6 13 c1. But it was too late and 13 … c4! opened up the diagonal leading to his king. There followed 14 e3 cxb3 15 axb3 ah8.
A pretty finish would have been 16 ef1 c5+ 17 g2 and now 17 … xh2+! 18 xh2 xh2+! 19 xh2 f2+ and … e5 with a mate.
Instead, White played 16 f3 b6 17 d4 and could have resigned after either 17 … h1+ 18 g2 8h2+ 19 f3 h4 or 19 … h3+ 20 g2 xe1 and … xe3.
And now for our final set of quiz positions.

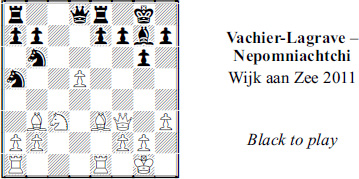
Where does Black’s counterplay lie and how should he get it moving?

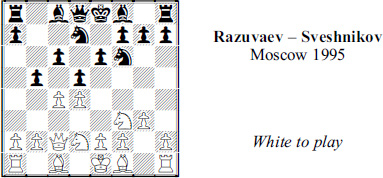
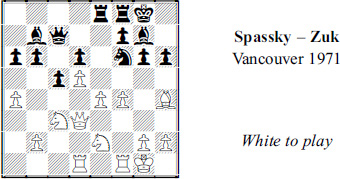
Is the pawn structure good for White and what should he do about it?

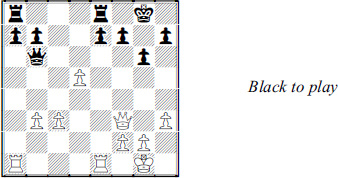
Who wants to change the pawn structure? What should Black do?

Black has allowed a tactical priyome. Which one?