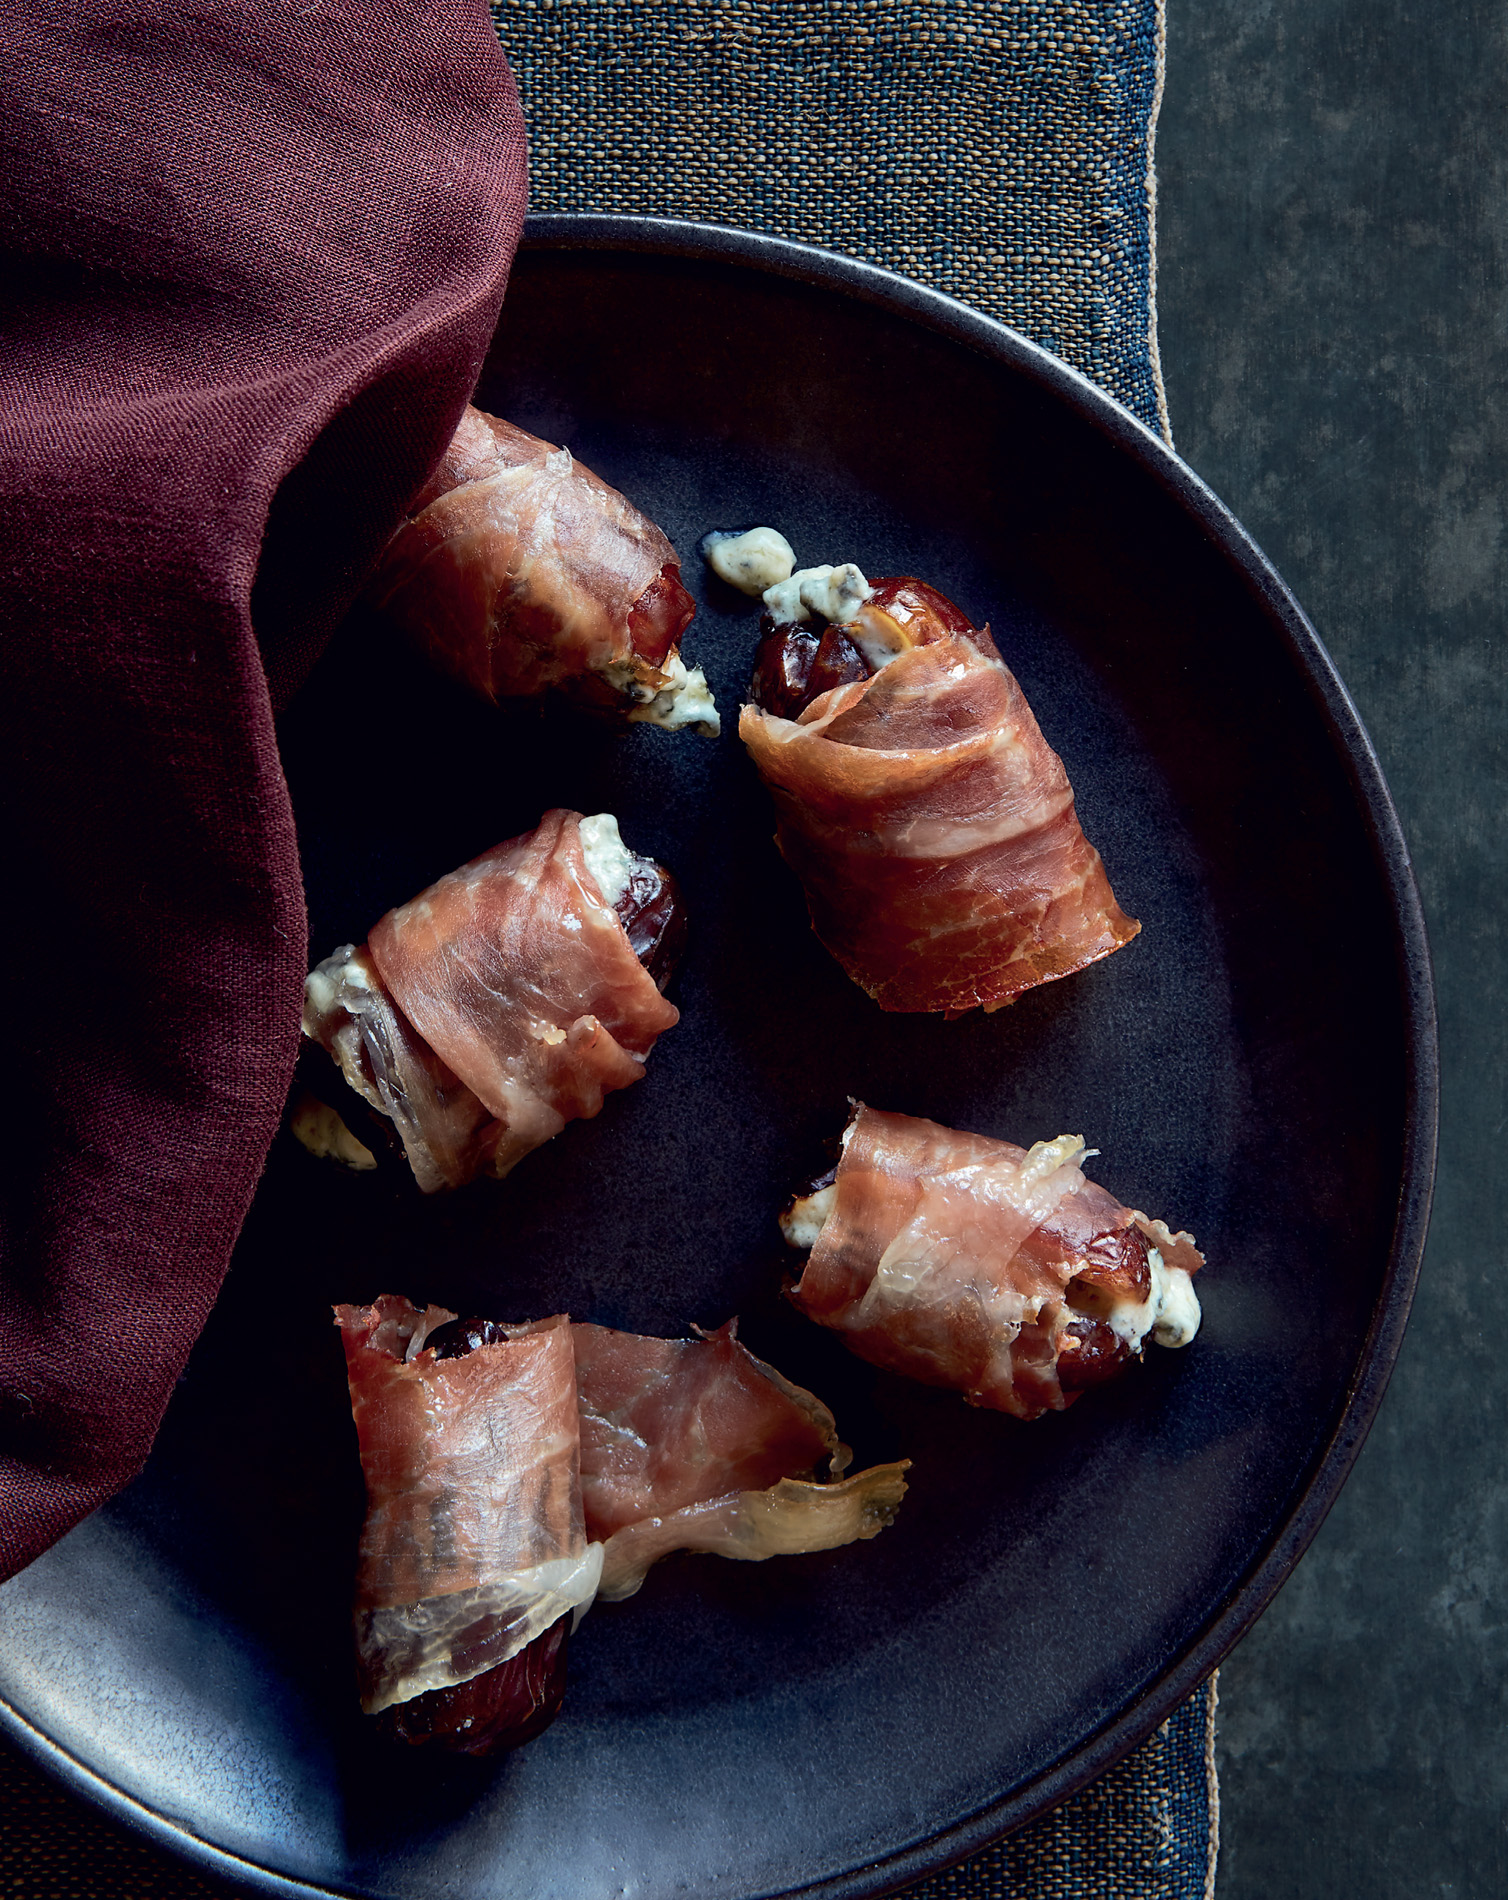
The Perfect Bite (Medjool Dates with Blue Cheese, Marcona Almonds and Prosciutto)
Warm Herbed Olives with Marcona Almonds
Green Mango with Chilli-Sugar-Salt
1990s Porowski Goat Cheese Canapés
Pickled Herring Tartines with Tart Apple and Shaved Radishes
Slow-Roasted Garlic with Parmigiano-Reggiano Nuggets and Honey
Cheesy Lemon-Rosemary Artichoke Dip
Radishes in Pink Peppercorn–and-Chive Butter
Herbed Lobster and Saffron Dip
Olive Oil and Pepper–Marinated Watermelon Bites with Halloumi
Ricotta with Pickled Wild Mushrooms, Toasted Hazelnuts and Honey
Alsatian Tart with Charred Red Onions and Crème Fraîche
Alsatian Tart with Melted Leeks, Gruyère and Prosciutto
Alsatian Tart with Miso-Glazed Squash
This simple hors d’oeuvre represents how I approach every dish I make, by seeking to achieve a balance of flavours. The little nugget first hits the lips with salt and a bit of fat, followed by sweet and sticky, then sharp and funky, and finally a welcoming crunch to finish it off. Medjool dates are known for their large size and caramel-like sweetness, attributes that make them perfect for this recipe. I like Marcona almonds here, because of their sweet, buttery flavour, but any good-quality roasted salted almonds will do.
Serves 4 to 6
24 Medjool dates, preferably stoned
115g thinly sliced prosciutto
75g blue cheese
24 roasted salted almonds, preferably Marcona
Heat the oven to 190°C/375°F/gas 5, with a rack in the middle. Line a baking tray with baking parchment.
If the dates are not already stoned, make an incision down the side of each one and remove the stones.
Cut or tear the slices of prosciutto lengthways into strips about 3cm (1¼ in) wide. If you don’t wind up with a total of 24 strips, cut a few in half to make up the difference.
Listening to Miles Davis’s Kind of Blue, stuff each date with a nub (about ½ teaspoon) of blue cheese and an almond. Gently press to close up the opening, then wrap the dates in the prosciutto strips. Place the dates on the baking tray, cut side up so that the cheese doesn’t all ooze out.
Bake the dates until warm and slightly bubbling, 7 to 10 minutes. Remove from the oven and let cool for a few minutes before serving. These are magical warm but totally acceptable at room temp.
With its creamy semisoft texture and funky but not-too-intense flavour, Saint Agur, which melts like a champ, is my preferred blue for this dish. That said, there really is no wrong blue cheese option here. Cambozola, a Brie-style blue, offers a luxe creaminess and milder flavour, while sharp Stilton gives the sweetness of the dates a more robust flavour to bump up against. A crumbly Danish variety wouldn’t be the end of the world, especially if you prefer milder blues, and, since it’s a drier cheese, it makes assembly a bit less messy.
I first had these warm olives at Le Dominion, my favourite hotel in Quebec City. Since then, I’ve made them a zillion times, varying the herbs and sometimes, as here, tossing in Marcona almonds, which add a sweet, toasty flavour and crunch. These are the perfect snack, enjoyed on their own or with a baguette and cheese. Any olive variety works well, but a mix is especially attractive.
Serves 4 to 6
350g mixed unseasoned olives (with or without pits), such as Castelvetrano, oil-cured Moroccan and Kalamata, drained
50g roasted salted Marcona almonds
60ml extra-virgin olive oil
1 tablespoon red wine vinegar
1½ teaspoons finely chopped fresh rosemary, plus 1 sprig, cut into 5cm (2in) lengths
1½ teaspoons finely chopped fresh thyme, plus 1 sprig, cut into 5cm (2in) lengths
In a medium saucepan, combine the olives, almonds, oil, vinegar and chopped rosemary and thyme and heat over medium heat, stirring occasionally, until the olives are warm and fragrant, 4 to 5 minutes. Remove from the heat.
Stir in the herb sprigs, then transfer to a serving bowl. Serve warm or at room temperature.
Although pitted olives always seem appealing at the market, I usually go for pits-in. Pitted olives tend to absorb more brine than their intact counterparts, and the brine adds extra salt, which can overwhelm the complex fruity notes and turn the flesh mushy or pasty.

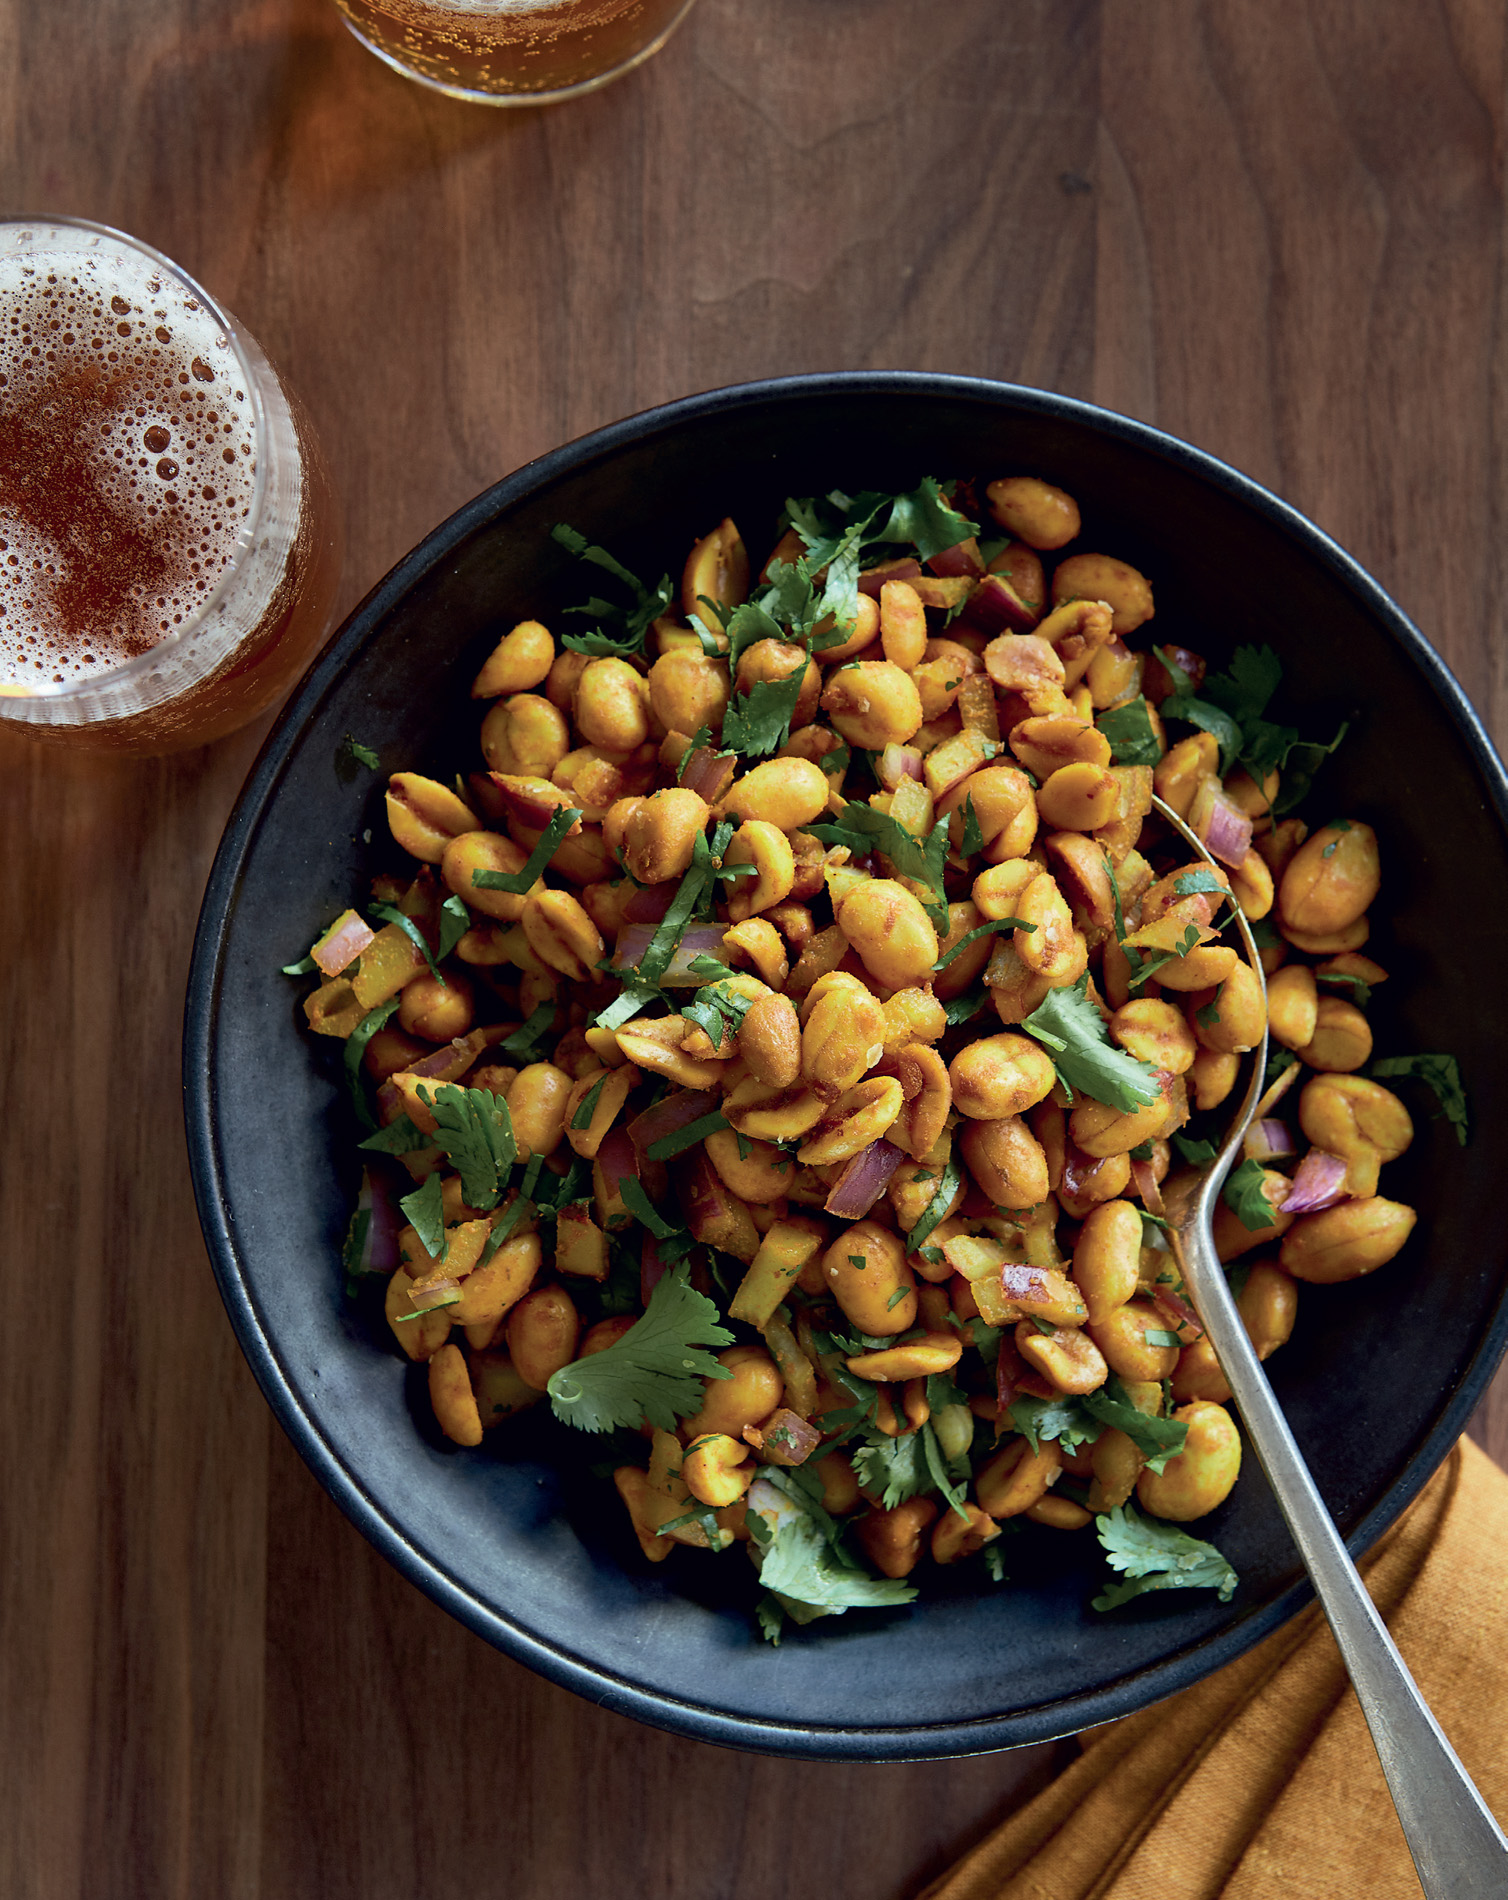
I smile whenever I make this recipe, not only because it’s completely addictive, but also because it makes me think of my very best friend, Reema Sampat, who shared it during season two of Queer Eye when I wanted a simple Indian-inspired, flavour-bomb snack. Jason (the Burning Man guy) was a big fan of both peanuts and Indian cuisine, so I introduced him to the vibrant, robust flavours that typify a lot of Indian street food and taught him how to take his favourite snack to another level. Browning the nuts in a little oil before tossing them with the spices crisps them and helps the spices adhere.
Makes about 700g
300g coarsely chopped red onions
2 teaspoons extra-virgin olive oil
1 (450g) jar roasted unsalted peanuts
2¼ teaspoons ground turmeric
½ teaspoon cayenne pepper
1 level tablespoon grated lime zest
75ml fresh lime juice (from 2 to 3 large limes)
1¾ teaspoons kosher salt
100g coarsely chopped fresh coriander leaves and tender stems
Place the onions in a medium bowl, add a few ice cubes and cover with very cold water. Set aside. (Soaking the onions removes a bit of the sharp bite. If you like intense, as my Reema does, skip this step.)
In a very large (30cm/12in) non-stick or stainless-steel frying pan, heat the oil over medium-high heat. Add the nuts, reduce the heat to medium-low, and cook, stirring frequently and keeping an eye on your pan (you can’t undo burnt nuts), until the nuts are about two shades darker and have a deeply roasty fragrance, 15 to 20 minutes. (The crunchier and darker brown, the better.)
Clear a space in the centre of your pan and add the turmeric and cayenne to the cleared space. Toast the spices, undisturbed, until fragrant, about 1 minute, then quickly but carefully add the lime zest, lime juice (the pan will steam a bit) and salt and stir everything together to coat the peanuts with the spices. Remove the pan from the heat, transfer the spiced nuts to a serving bowl, and let cool for 5 to 10 minutes.
Drain the onions and pat dry with a clean tea towel. Add the onions and coriander to the nuts and toss to combine. Serve with a spoon! No need for a finger orgy in the serving dish.

I love these two deliciously fresh street snacks, from different corners of the world. I learned about the jicama version from one of my besties, Ariadna. In Mexico, peeled jicama is cut into sticks, drenched in lime juice, seasoned with salt and chilli powder or Tajín Clásico (a popular seasoning made with dried chilli peppers, salt and dehydrated lime juice) and enjoyed as a crunchy snack. Jicama is available in specialist shops, but if you can’t get hold of it, you could use crisp green apple slices. The mango version, visually similar, is a Malaysian one that I discovered during my time as a waiter at Fatty Crab in New York City. Its flavour plays off a similar trifecta of tangy, spicy and subtly sweet seasonings. This duo exemplifies the universality of certain flavour profiles, whether you’re in Mexico or Malaysia. There’s something comforting and philosophical there, I believe.
Jicama with Lime and Tajín
Serves 4
1 tennis-ball-sized jicama (about 675g)
Grated zest and juice of 1 large lime
2 teaspoons Tajín Clásico seasoning (see Tip)
Flaky sea salt, such as Maldon
Peel the jicama with a sharp vegetable peeler, then slice it into 1cm (½in) thick sticks. In a large bowl, toss together the jicama, lime zest and juice, Tajín and a generous pinch of flaky salt. Arrange on a large platter and serve.
If you can’t find Tajín Clásico, Mrs Dash Fiesta Lime seasoning blend or any basic chilli powder makes a great substitute. If you go with one that is salt-free, you’ll want to add salt to taste.
Green Mango with Chilli-Sugar-Salt
Serves 4 to 6
1 tablespoon sugar
1 teaspoon chilli powder
½ teaspoon cayenne pepper
¼ teaspoon kosher salt
2 green (unripe) mangoes, peeled, stoned and cut into 1cm (½in)thick sticks
Mix together the sugar and spices in a small serving bowl. Arrange the mango sticks on a large platter and serve with the spice mixture for dipping.
Green (or underripe) mangoes are firmer and more tart than the ripe orange-red ones. They’re great in salads and this snack. To cut them, first remove the skin with a sharp veg peeler, then cut a small piece from the bottom (non-stem) end to create a flat base so you can stand the mango upright. With a chef’s knife, starting about 1cm (½in) to the right of the centre, so you don’t hit the stone, cut down the length of the fruit to remove the flesh in one piece. Repeat on the other side of the stone. Set the stone aside. Lay one piece of the cut flesh on your cutting board and cut lengthways into 1cm (½in) wide pieces, then cut each piece lengthways into irregular-shaped sticks. Repeat with the second cut piece. Now cut the flesh from the stone; these pieces will be very irregular, but they taste just as good.
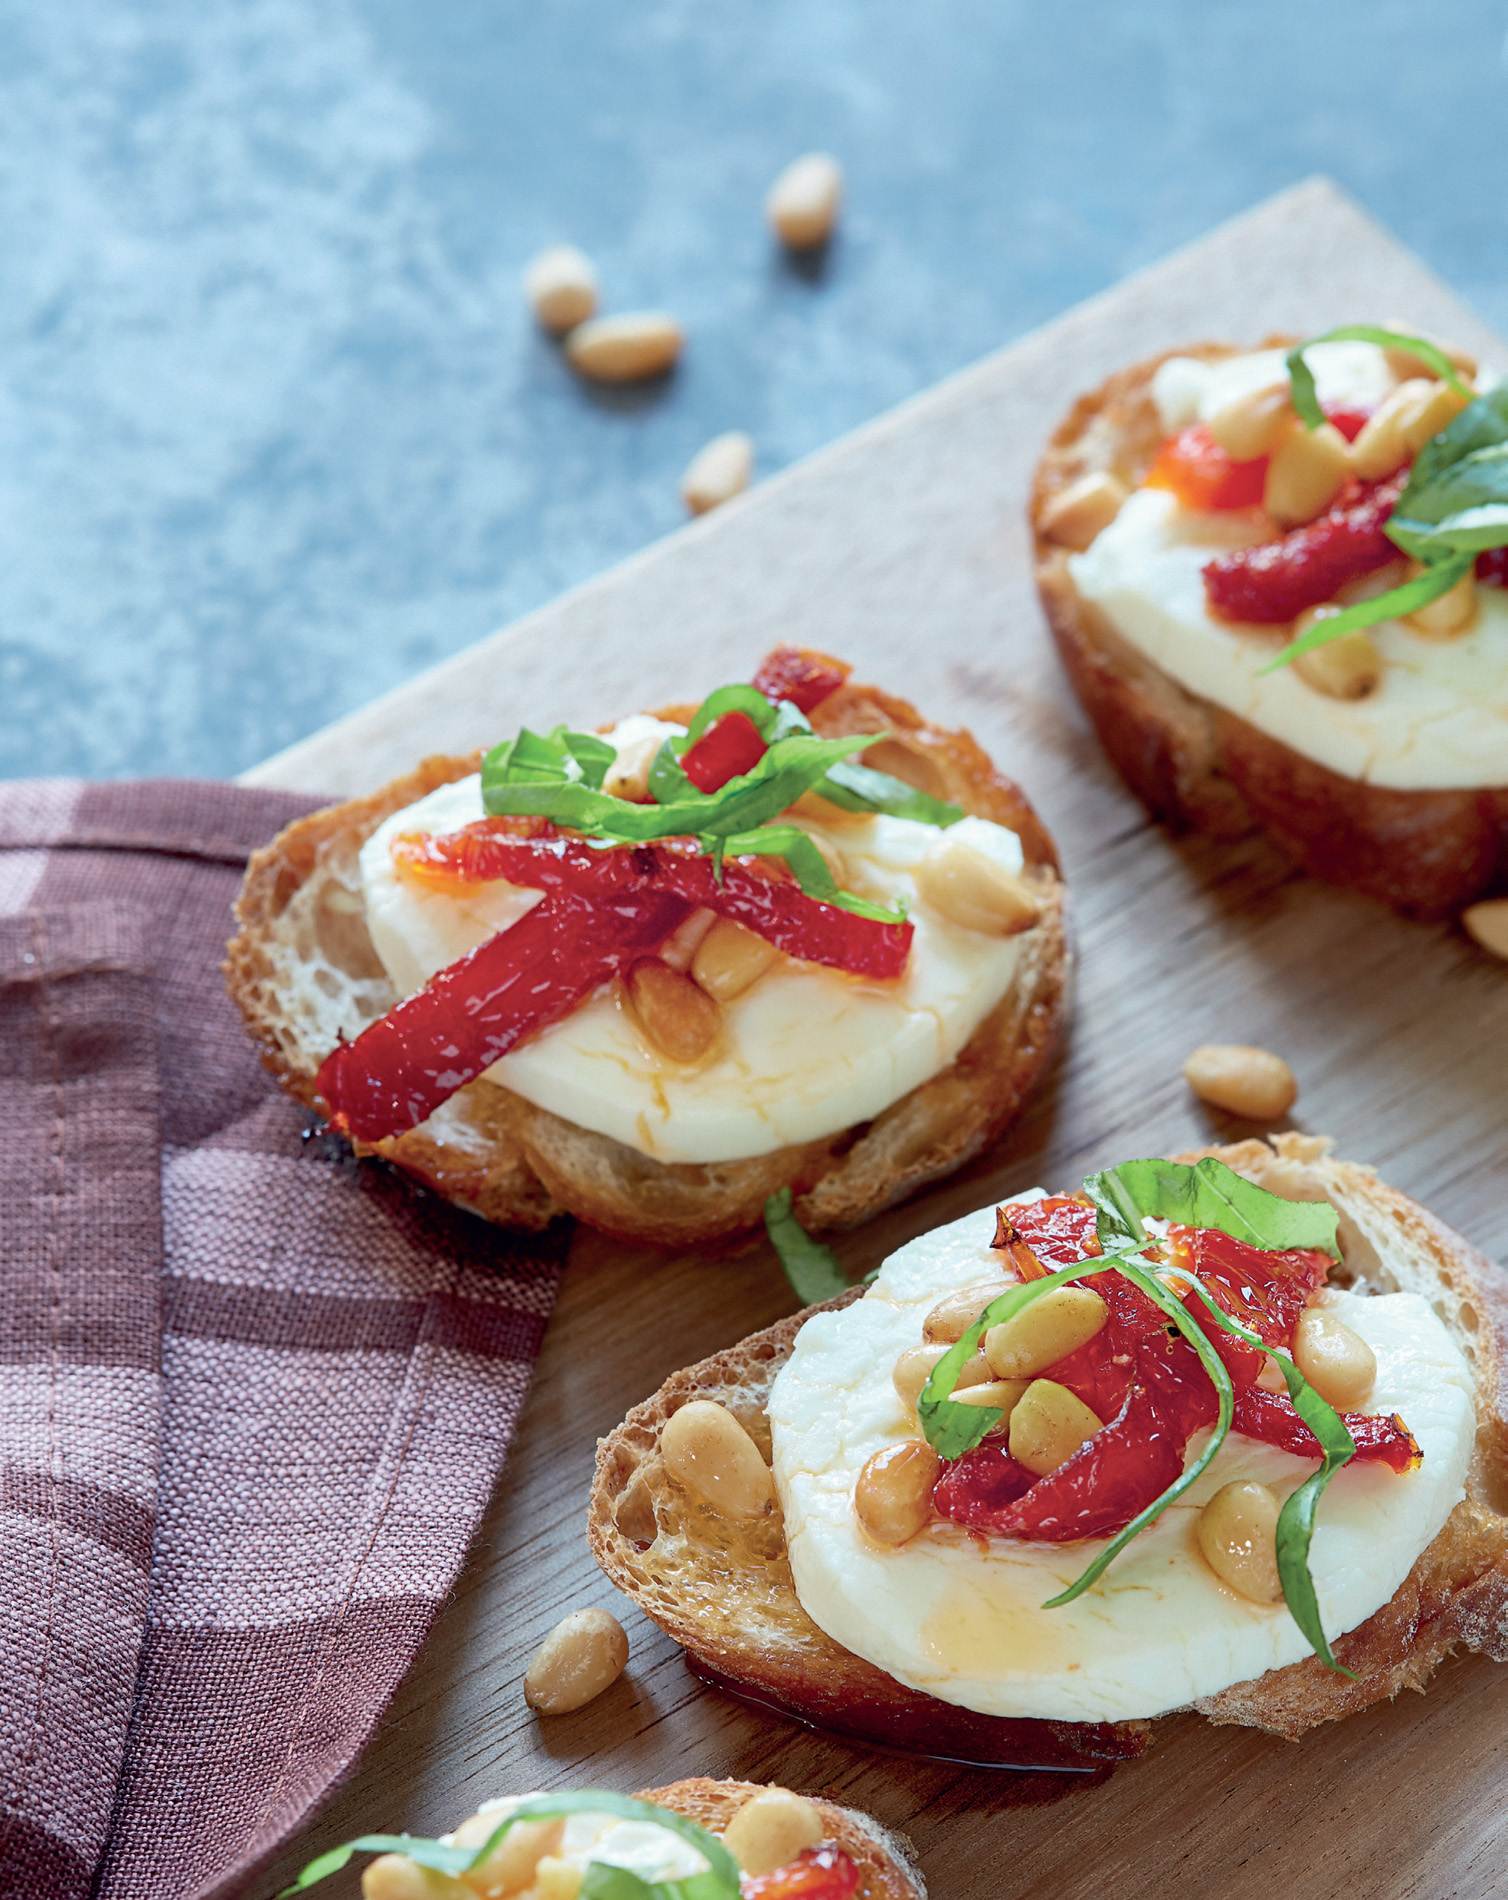
These were served at nine out of ten of the parties my parents threw before any holiday or event. I would watch my mother and middle sister, Aleks (who loved to do anything decorative), assemble each canapé with meticulous precision. Luckily, even with a lactose intolerance, I was able to eat goat’s cheese with abandon, so these were a saviour for me in the face of the many other cheesy delights I couldn’t enjoy at the time. (Yeah, I fought it out of me.) I love the texture and added flavour that a soft fresh goat’s cheese with a rind lends to these snacks (an option you’ll find at cheese markets or in supermarkets with a good selection), but you can also use the more common rindless variety.
Makes 18 canapés
1 baguette
1 (300g) log goat’s cheese (see headnote)
12 oil-packed sun-dried tomatoes, each sliced lengthways into 3 thin strips, plus 3 tablespoons oil from the jar
25g pine nuts
6 to 8 fresh basil leaves
Heat the oven to 200°C/400°F/gas 6, with a rack in the upper third.
Cut eighteen 1cm (½in) thick slices from the baguette and arrange on a baking tray.
Cut the goat’s cheese into 18 rounds. Arrange the cheese on top of the bread, then top each piece with 2 strips of sun-dried tomato arranged in an X. Top the canapés with the pine nuts and drizzle with the sun-dried tomato oil.
Bake until the pine nuts are golden and the cheese is beginning to melt, 6 to 8 minutes.
Meanwhile, stack the basil leaves in a neat pile, tightly roll them up lengthways and, using a sharp chef’s knife, cut the roll crossways into thin ribbons. (This cut is called a chiffonade, if you want to impress anyone creeping on your knife skills as you do it.)
Remove the canapés from the oven and transfer to a serving platter. Top with the basil. Serve hot.
For cheese slices that won’t stick to your knife, don’t use a knife! Instead, use a piece of unflavoured dental floss. Hold it taut with one end in each of your hands and press straight down through the log to make a clean, even cut. (You can use the same trick to cut logs of cookie dough.)
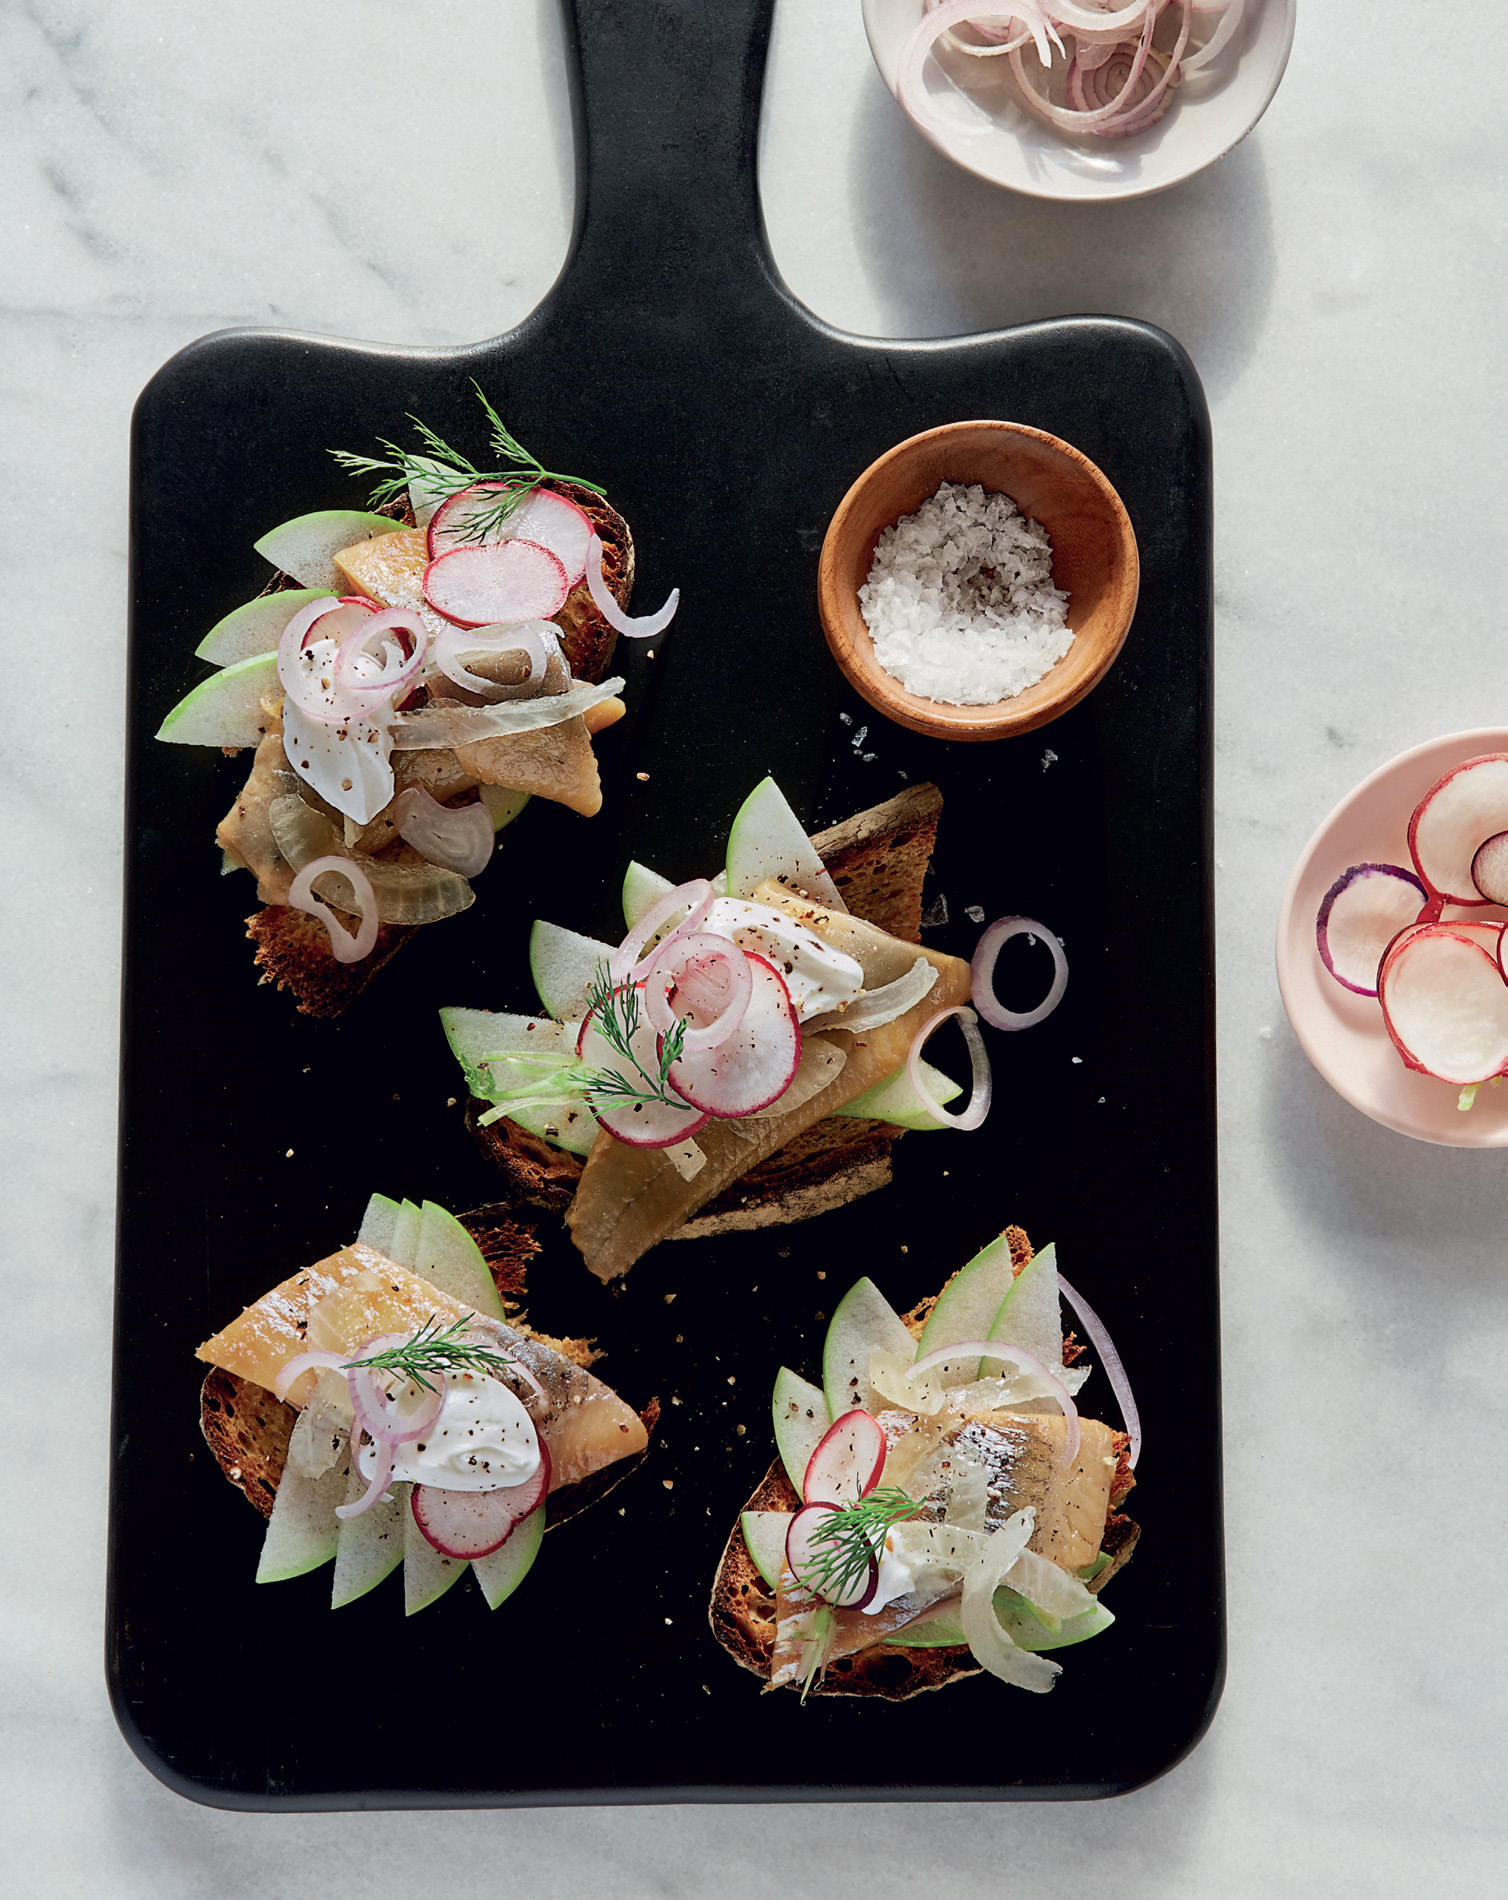
Traditionally served at our very Polish Christmas Eve, when we’d have platters piled high with herring and all sorts of accompaniments to create our own custom plates, these tartines recall the combination of flavours that my oldest sister, Karolina, and I love. Bites of thinly sliced peppery radish and sweet-tart green apple are the perfect contrast to the salty tang of pickled herring, and a dollop of sour cream and chopped dill round it all out. Delicious as tartines – breads or toasts topped with a few ingredients and served open-faced – these also make a delightful hors d’oeuvre when cut into bite-sized canapés.
Makes 6 tartines or 24 canapés
6 slices (about 5mm/¼in thick) dense Baltic rye, kamut or spelt bread, lightly toasted and cooled
5 tablespoons unsalted butter, slightly softened
Flaky sea salt, such as Maldon
1 small Granny Smith apple, halved, cored and thinly sliced
1 (350g) jar pickled herring in wine sauce, drained, any pickled onions reserved
4 small radishes, very thinly sliced
1 small shallot, thinly sliced
75ml full-fat sour cream
2 tablespoons coarsely chopped fresh dill
Coarsely ground black pepper
Spread the toasts with the butter. Sprinkle each with a pinch of flaky salt, then fan apple slices on top. Top each tartine with some herring, a few radish slices, some shallot and some reserved pickled onions, if you have them, then dollop with about 1 tablespoon of the sour cream. For canapés, cut each tartine into 4 pieces. Top with the dill and pepper and serve.
If you have a mandoline slicer, use it to slice the radishes into paper-thin rounds.
If you’re serving drinks with these tartines, go for an icy chilled vodka, as my family would do. (Store your vodka in the freezer, always. It’ll keep your cocktails cooler longer.) Wine does not pair well with pickled herring; it gives an unpleasant metallic aftertaste.
Slow-roasted garlic is my personal version of cookies baking in the oven: fragrant wafts of warmth and familiarity greet your guests as they enter your home. While you can blitz the deeply toasty roasted cloves into salad dressings, marinades, mojo sauces and more, this dish makes them star of the show, simply pairing them with good bread, high-quality cheese and a light drizzle of sweet, sticky honey. Set it out at your next dinner party and let guests build their own bites.
Serves 4 to 6
225g whole garlic heads (3 to 4, depending on size)
About 1½ tablespoons extra-virgin olive oil
Kosher salt
225g wedge of aged Parmigiano-Reggiano
1 baguette
75ml clover honey (or your favourite unflavoured variety) for drizzling
Heat the oven to 190°C/375°F/gas 5, with a rack in the middle.
Cut off the top 5mm to 1cm (¼ to ½in) from each garlic head, exposing the cloves. One at a time, place each head in the centre of a sheet of foil large enough to enclose it, drizzle with 1½ teaspoons of the oil, and sprinkle with a generous pinch of salt. Wrap the head fairly tightly in the foil.
Place the packages directly on the middle oven rack and roast until the cloves are dark brown and as soft as butter, 40 to 50 minutes. Remove the packets from the oven and let cool for 5 to 7 minutes, then unwrap.
To serve, set the heads of roasted garlic on a wooden cutting board or serving platter. Arrange your block of Parmigiano, a paring or ‘Parm’ knife for the cheese, a butter knife to spread the cloves and your baguette alongside.
For the perfect bite, tear off a piece of baguette, press a garlic clove or two out of its skin and smear it on top. Hack off a nugget of Parm, place it on top and drizzle with honey.
When you’re purchasing Parmigiano-Reggiano, make sure it’s called exactly that (not just Parmesan) and has been aged for at least two years. The name, which will be stencilled into the rind, indicates a Denominazione di Origine Controllata (DOC) Parm that by law must be made in the northern Italian regions of Emilia-Romagna and Lombardy. The ageing ensures fuller flavour. After you’ve used up the cheese, hang onto the rind (it’ll keep indefinitely, tightly wrapped and frozen); it’s a great flavour booster that can be added with the liquid when you’re cooking soups, sauces (page 190), chillies or stews. Remove and discard it after making the dish.
Rather than just serving a few hunks of cheese on a board, assemble a platter with know-how and creativity and make it memorable for your guests’ eyes (and your Instagram feed; see pages 50–51 for a photo). In the winter, I love choosing different dried fruits and/or spreads to accompany each cheese. In the summer, use sliced fresh fruit and berries.
Blue Cheese
The sharpness of blues, from crumbly Stilton to creamy Danish to funky French Saint Agur, pairs nicely with sweet grapes, dates and fresh or dried figs.
Chèvre (Goat’s Cheese)
I lean towards soft goat’s cheeses, which you might find fresh and rindless or soft-ripened with a thin, edible rind, such as Chabichon du Poitou or Crottin de Chavignol. I like to drizzle fresh logs with good-quality honey and ground or crushed pink peppercorns. When I buy the rind-on sorts, I enjoy them unadorned, accompanied by dried fruits (apricots pair well), nuts and/or crackers.
Sharp Cheddar
Vermont’s Cabot Creamery makes my favourite clothbound cheddar – it’s aged in cloth as opposed to wax, resulting in a drier cheese with a deeper, richer flavour. It’s fantastic with sweet spreads like pistachio butter or tart cherry or apricot preserves, and with Medjool dates. Cheddar is also great with savoury pairings like cornichons and your favourite grainy mustard.
Emmental and Gruyère
These full-flavoured, sweet but sharp, nutty mountain cheeses pair well with salted and roasted almonds, particularly Marcona, and cashews. Authentic Emmental (aka Emmentaler; Emmenthal) comes from Switzerland, but you’ll also find excellent versions from France (Emmental de Savoie and raw-milk Emmental Grand Cru, for example) and Germany. The best Gruyère cheeses come from Switzerland and Germany, as well as France, where Beaufort, Emmental and Comté (aka Gruyère de Comté) are made.
Stinky Cheeses
From creamy, sweet Robiola Piemonte to funky Epoisse and everything in between, these are best with hunks of fresh baguette. Stinky cheeses vary in texture and intensity, and are made with a variety of milks. Get to know them by trying different sorts.
Calculate 50g to 75g of cheese per person. Select at least two or three cheeses, even for a small board, and let them come to room temperature before serving. Think about texture, flavour, milk type, style and level of funkiness; it’s nice to mix things up. You can create a theme (all cow’s-milk cheeses or Spanish cheeses, for example), if you like, or keep it super simple. There are many ways to go and no hard-and-fast rules.

A Quick Cheese Platter Lesson (page 49)
Decadent, flavourful and perfect for anything from kettle chips or baguette to spears of endive (or your finger), this simple dip is a great gateway drug to a food coma. Using high-quality cheeses will make it memorable for your guests (or you alone on your couch – no judgement).
Makes 600g; serves 8
3 (200g) jars marinated artichokes, drained, coarsely chopped or quartered if whole
1 (225g) tub cream cheese, softened
175g Gruyère, grated
115g aged sharp white cheddar (such as Cabot clothbound), grated
225ml full-fat sour cream
2 tablespoons fresh lemon juice
2 teaspoons finely chopped fresh rosemary
¼ teaspoon freshly ground black pepper
Toasted baguette slices, crudités, and/or your favourite crackers or chips for serving
Heat the oven to 200°C/400°F/gas 6, with a rack in the middle.
Combine all the dip ingredients in a large bowl and stir until smooth. Transfer to a 20cm (8in) square baking dish or an 18 to 20cm (7 to 8in) ovenproof frying pan.
Bake until the dip is bubbly and light golden brown on top, 22 to 25 minutes. Let cool for 7 to 10 minutes before serving. (I’ve burned my mouth more times than I care to admit.) Serve with toasted baguette slices, crudités, and/or crackers or chips.
For the best taste and texture, go for artichokes marinated in oil (over the water-packed tinned ones), in a jar or from the supermarket salad bar.

One of my favourite restaurants, the NoMad in New York City, first brought this treat to my mouth’s attention. It’s both a savoury play on white-chocolate-covered strawberries and a take on the French tradition of serving crisp radishes with butter and salt. In this case, the butter is partly melted and then whisked to make it glossy but still soft enough to evenly coat the radishes. It’s seasoned with crushed pink peppercorns and chives. The radishes are given a quick dip and then a little chill in the fridge, which hardens the butter into a sheen.
Serves 4 to 6
2 bunches small to medium radishes (any variety)
120g good-quality unsalted French or Irish butter (such as Kerrygold or your local favourite)
1 tablespoon finely chopped fresh chives
1 teaspoon pink peppercorns, crushed with your fingers
Flaky sea salt, such as Maldon
Line a baking tray with baking parchment or greaseproof paper. Rinse the radishes well, removing any dirt from the greens (especially at the base), then pat thoroughly dry. Trim the stems to 1cm (½in), leaving 1 or 2 small leaves, if you wish.
In a medium microwave-safe bowl, heat the butter for 10-second intervals, watching it carefully, until it is half melted, 30 to 40 seconds; the key is to have about half the butter still intact.
Vigorously whisk the butter until it is completely opaque – it should be in a liquid state but the same colour as a chilled pat. If it’s translucent, you’ve overheated it. (Not to worry, just chill until solidified, then gently heat and whisk it again.) Fold in the chives, peppercorns and ½ teaspoon flaky salt.
Pat the radishes dry again if they’re at all damp. Dip one radish in the butter to coat, leaving a bit of the top exposed, and place on the prepared baking tray. (If the coating is too thin or not sticking, wait 2 to 3 minutes for the butter to cool a bit and try again. If the butter becomes gloppy while you’re dipping, it’s cooled a bit too much; gently rewarm and whisk it again.) Repeat with the remaining radishes, then chill the radishes until the butter is set, about 10 minutes. (The radishes can be kept in the fridge, uncovered, for up to 8 hours.) Serve the radishes on a wooden board or large platter with a mound of flaky salt alongside for dipping.
If the only high-quality butter available is salted or lightly salted (‘demi-sel’), leave out the crushed salt when you stir in the peppercorns and chives. If you don’t have a microwave, melt the butter in a small saucepan over very low heat, occasionally lifting the pan off the heat and swirling, until the butter is just half melted.

My Queer Eye castmate and bestie Jonathan Van Ness would probably threaten my life if I did not include at least one recipe just for him, so I present you with his queso. While we were filming in Georgia, we would order bowls of this delectably gooey appetizer (or main, if you’re us) at our go-to Tex-Mex restaurant in Atlanta. As Jonny pointed out – and continues to, wherever our travels take us – a good queso should be runny and – most important – there shouldn’t be a leaf of coriander in sight. While I wouldn’t dare garnish this version of the dish with one of my favourite herbs, I couldn’t help but add some crispy crumbled chorizo, which makes it (almost) a complete meal – right?
Makes about 800g; serves 4 to 6
450g white American cheese (such as Land O’Lakes) or mild white Cheddar, coarsely chopped
250ml whole milk
2 tablespoons unsalted butter
½ teaspoon ground cumin
¼ teaspoon garlic powder
1 (125g) tin chopped green chillies, drained
175g fresh chorizo sausage, casings removed (see Tip)
Tortilla chips for serving
In a large heatproof bowl, combine the cheese, milk, butter, cumin and garlic powder.
Fill a medium saucepan with 5cm (2in) of water. Bring the water to a gentle simmer. Place the bowl with the cheese mixture on top of the pan and cook, stirring frequently, until the mixture is melted, smooth and gently bubbling, 5 to 7 minutes. Stir in the chillies and remove from the heat.
Meanwhile, cook the chorizo in a medium frying pan over medium-high heat, stirring occasionally with a wooden spoon and breaking up the sausage into small pieces, until the fat is rendered and the chorizo is really crispy, about 4 minutes. Remove from the heat.
Transfer the queso to a serving bowl. Using a slotted spoon, scoop the chorizo from the frying pan and sprinkle it over the queso. Serve the queso hot, with tortilla chips for dipping.
Be sure to purchase fresh chorizo (i.e., the Mexican-type version) for this recipe, not the dry cured and/or smoked Spanish type. It’s found in many supermarkets as well as in Latin and gourmet shops.
American cheese is available at some specialist delis, but you could use mild white Cheddar.

This dip is an homage to one of my favourite French products, Boursin, a creamy, tangy, herbaceous French cheese that was the epitome of gourmet in North America in the 1970s and still deserves a place at the table. Folding in saffron and chunks of meaty lobster turns my version of the cheese into a chic party dish. Couple any leftovers (if you’re lucky to have them) with good-quality shredded cheddar to make a very special grilled cheese sandwich.
Serves 8 to 10
¼ teaspoon packed crumbled saffron threads
2 (225g) tubs cream cheese, softened
125ml mayonnaise
1 tablespoon grated lemon zest
2 tablespoons fresh lemon juice
2 garlic cloves, grated or minced
1 teaspoon kosher salt, or to taste
¼ teaspoon freshly ground black pepper, or to taste
450g cooked lobster meat (see Tip), cut into 2.5cm (1in) chunks
175g Parmesan, preferably Parmigiano-Reggiano, finely grated
3 tablespoons finely chopped fresh basil
1 tablespoon finely chopped fresh dill
1 tablespoon finely chopped fresh chives
Assorted crudités (such as carrots, celery, pepper, snap peas, radishes, cherry tomatoes and endive), waffle potato crisps and/or Ritz crackers for serving
In a small bowl, combine the saffron and 2 tablespoons hot water. Let stand until the water has turned a deep orange, about 10 minutes.
Meanwhile, combine the cream cheese, mayonnaise, lemon zest, lemon juice, garlic, salt and pepper in a large bowl and beat with an electric mixer on medium-high until airy and smooth, 1 to 2 minutes.
Fold the saffron mixture into the cream cheese mixture to combine, then fold in the lobster, Parmesan and herbs. Adjust the seasoning to taste.
Transfer the dip to a serving dish and chill for at least 30 minutes, or up to 6 hours, to allow the flavours to blend. Let stand at room temperature for 15 to 30 minutes before serving.
Serve the dip with your choice of crudités, crisps and/or Ritz crackers.
You can purchase cooked lobster meat for this recipe, or cook 3 (675g) lobsters to get 450g cooked meat.

This dish is one of my go-tos for summer entertaining: bites of sweet watermelon marinated in good-quality olive oil and coarsely cracked peppercorns, topped with salty grilled halloumi cheese and fresh mint. Refreshing, beautiful and super easy to prepare.
Serves 6 to 8
32 (2.5cm/1in) cubes seedless watermelon (from a 1.8kg melon)
60ml extra-virgin olive oil
1 tablespoon freshly ground black pepper or mixed peppercorns
1 (225 to 250g) packet halloumi cheese, drained and cut lengthways into 4 slices
A good-sized handful of fresh mint leaves, large leaves roughly torn
In a bowl, combine the watermelon, oil and pepper. Let stand for 10 to 15 minutes, gently stirring occasionally.
Pat the halloumi slices dry with kitchen paper. Heat a large dry non-stick frying pan over medium-high heat. Add the halloumi and cook, turning once, until golden brown on both sides, 4 to 6 minutes. Transfer the cheese slices to a cutting board and cut each one into 8 pieces.
Reserving the oil, use a slotted spoon to transfer the watermelon to a large serving platter. Set a piece of halloumi on each watermelon cube, then top with a mint leaf. Drizzle the bites with about 3 tablespoons of the reserved oil, spooning a healthy dose of the cracked peppercorns on top as you go. Serve immediately (it’s tastiest while the cheese is warm), inviting your guests to eat with their fingers.
Halloumi is a semi-hard brined cheese, traditionally from Cyprus, that holds up very well to heat (it is often grilled). Look for it in well-stocked supermarkets or at cheese shops. If you can’t find it, use squares of your favourite feta instead and don’t cook it. If the pieces of cheese aren’t perfectly cut, no stress – irregular-shaped chunks are totally fine.

When I was a kid, my parents would take me mushroom picking in the Eastern Townships in Canada. Morels were the prize for my mother, but my favourites were sweet chanterelles and meaty boletes (cèps). Pickling these beauties ensured we could enjoy them in the following months and at Christmas and Easter, as part of our Polish dinner or brunch spreads. In addition to high-quality pickled mushrooms (which you can make or purchase), good/fresh ricotta is key here. If you don’t have an Italian supermarket or farmers’ market (where the very best fresh ricotta generally comes from), just please buy the full-fat variety, which will be richer in flavour and more deeply milky than its reduced-fat counterpart.
Serves 4 to 6
50g hazelnuts
1 (425g) tub full-fat ricotta
2 tablespoons honey
Freshly ground black pepper
50g drained pickled chanterelles or other wild mushrooms, shop-bought or homemade (page 64), halved or quartered if large
About 2 tablespoons extra-virgin olive oil
Flaky sea salt, such as Maldon
15g celery leaves (from the heart of the bunch), large leaves torn
Celery sticks for serving
Crackers for serving (optional)
Heat the oven to 180°C/350°F/gas 4, with a rack in the middle.
Spread the hazelnuts on a baking tray and toast in the oven until fragrant and lightly golden, with blistered skins, 7 to 12 minutes. Remove from the oven and wrap the nuts in a clean tea towel. Let steam for 1 minute, then rub the nuts in the towel to remove the skins (it’s fine if not all the skins come off). Let cool completely, about 10 minutes, then coarsely chop.
Spread the ricotta into a nice thin round on a large serving plate. Drizzle with the honey, then season generously with pepper. Sprinkle the chopped hazelnuts evenly over the top, and then the mushrooms. Drizzle with 2 tablespoons oil and sprinkle with a generous pinch or two of flaky salt.
In a small bowl, toss together the celery leaves with ¼ teaspoon oil and a pinch of flaky salt. Sprinkle over the ricotta.
Serve with celery sticks and crackers, if desired.
Look out for Polish pickled mushrooms for this recipe. You can buy them from Polish markets or online specialists.

Pickled Wild Mushrooms
Pickled mushrooms are great with the ricotta on page 63, and terrific as part of a cheese board (page 49), atop rye toast with butter, in bitter green salads or as a pizza topping.
Makes 100g
250ml white wine vinegar
1 tablespoon sugar
3 garlic cloves, gently smashed and peeled
1 sprig fresh rosemary
¼ teaspoon kosher salt
About 150g wild mushrooms, stem ends trimmed, halved or quartered if large
In a medium saucepan, bring the vinegar, sugar, garlic, rosemary and salt just to a boil, stirring occasionally to dissolve the sugar. Remove the pan from the heat and stir in the mushrooms. Cover the pan and let stand until the mushrooms are flavourful, 10 to 15 minutes.
If serving immediately, drain and serve. Or let cool completely in the brine, then transfer the mushrooms and brine to a jar, cover and chill for up to 1 week.

I first tried a version of these snacks at Marc Vetri’s restaurant Cucina Vetri in Philadelphia and was struck by how simple yet perfect they were. Thinly sliced and lightly caramelized around the edges, with some melty cheese on top and a little red pepper kick, the vegetable becomes an elegant treat. I call these frico because they recall those lacy baked Parmesan cheese rounds, though they aren’t as crisp. Serve them with cocktails.
Makes about 4½ dozen; serves 8 to 10
1 large fennel bulb (about 450g without stalks), trimmed, leaving the root end intact
225g grated Parmigiano-Reggiano or Grana Padano
Kosher salt
¾ teaspoon red chilli flakes
1 to 2 large lemons
Heat the oven to 20°C/400°F/gas 6, with racks in the middle and upper thirds. Line two baking trays with baking parchment.
Using a sharp chef’s knife, cut the fennel bulb lengthways in half. Place one half flat side down on your cutting board and slice it lengthways into very thin slices, 1mm to 3mm (1⁄16 to ⅛in) thick (the thinner the better; any end pieces that fall apart can be pushed back together in the shape of a slice or saved for another use). Repeat with the remaining half bulb.
Spread 1 teaspoon of the Parmesan on one of the baking trays to just about the size of a fennel slice. Top with a fennel slice. Repeat, spacing the cheese and fennel slices about 1cm (½in) apart, until your baking trays are filled. (You’ll use about half of the total slices and half the cheese.)
Sprinkle a tiny pinch of salt over each fennel slice, then thinly cover each with 1 teaspoon more cheese. Sprinkle the slices with about half the red chilli flakes, then grate a little lemon zest over the top.
Bake, rotating the sheets and switching their positions halfway through, until the cheese is bubbling and golden, 8 to 10 minutes.
Slide the paper onto wire racks and let the frico cool, 4 to 5 minutes (the cheese will set and crisp a bit). Repeat, cooling and relining the baking trays. Serve warm or at room temperature.
The cheese melts and sets best in this recipe when it is grated on a Microplane or the small holes of a box grater.
Poutine – that Québécois favourite of French fries topped with melty cheese curds and gravy – is a classic in Montreal, where I grew up. It’s the favoured post-night-out vodka-absorber at late-night eateries and diners. In recent years, though, famous Québécois chefs – Chuck Hughes and Martin Picard among them – have elevated the dish, adding luxe ingredients like butter-poached lobster and foie gras. My take on the marriage of high and low involves pairing America’s beloved Tater Tots with a green-peppercorn demi-glace that replaces the traditional gravy and takes merely minutes to make.
Serves 4 to 6 as a side dish or snack
1 (800g) bag frozen Tater Tots, preferably ‘Extra Crispy’ (or see Tip)
1 (40g) container beef or veal demi-glace, dissolved in water to make 250ml (follow the packet instructions)
2½ teaspoons apple cider vinegar
1 bay leaf
1 tablespoon unsalted butter, chilled
1 teaspoon green peppercorns, coarsely chopped
¼ teaspoon kosher salt
175g cheese curds (see Tip), broken into small nuggets, at room temperature
1 tablespoon finely chopped fresh chives
Bake the Tater Tots as instructed on the packet (leave some space between them on your baking tray to help facilitate browning).
Meanwhile, in a small saucepan, bring the demi-glace mixture, vinegar and bay leaf to a simmer over medium-high heat and simmer until the sauce is slightly thickened, 2 to 3 minutes. Remove from the heat and whisk in the cold butter until the butter is just melted and the sauce is smooth. Stir in the green peppercorns and salt. Remove and discard the bay leaf.
Place half of the piping-hot Tater Tots in a large shallow bowl. Sprinkle with half of the cheese curds and chives, then drizzle half of the sauce on top. Repeat to make a second layer. Serve immediately.
Demi-glace is a reduced rich meat stock. For this recipe, buy a demi-glace concentrate. You’ll find this in large supermarkets, near the stocks and/or spices and online.
Cheese curds, tangy chunks of mild, fresh cheese that are delicious eaten out of hand as a snack and great for melting, are found in cheese shops, larger supermarkets, and online. They’re sometimes called ‘squeaky cheese’, for the sound they make when you bite into them.
If you can't get hold of Tater Tots you could use frozen potato croquettes.

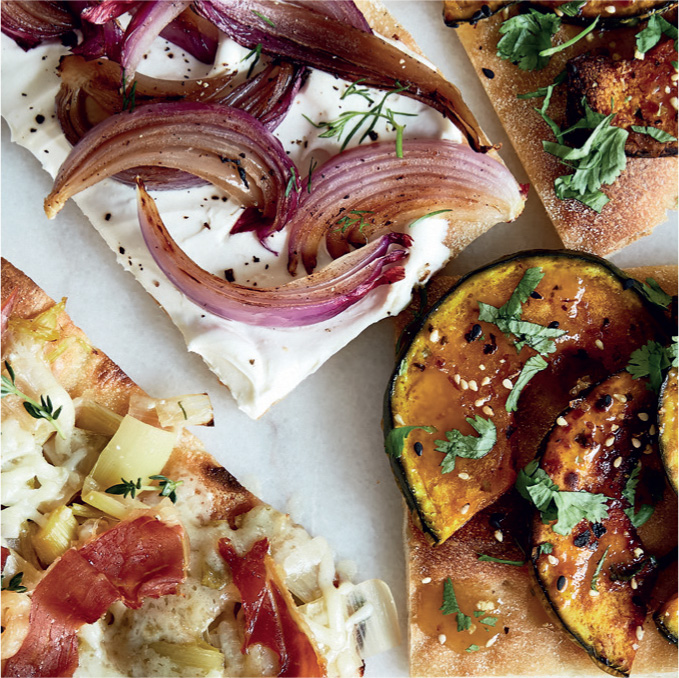
An Alsatian tart (also known as tarte flambée) is more like a flatbread than a tart. Here are three of my favourite versions. The no-fuss crust is made with shop-bought pizza dough, which you can top with whatever you like. A good rule of thumb when making up your own combinations is to keep it fairly simple and on the lighter side, weight-wise. Going with just three to four ingredients allows each one to shine, and it keeps the toppings from toppling off the crust as you’re eating. The photo is on pages 70–71.
Alsatian Tart with Charred Red Onions and Crème Fraîche
This rustic yet chic tart is a great vegetarian option. It makes me think of French onion soup in tart form, which isn’t the worst thing in the world.
Makes twelve 10cm (4in) squares
Olive oil for the griddle pan
4 medium red onions (about 900g), cut into 1cm (½in) thick wedges, leaving some of the root end intact
Alsatian Tart Crust (at right), warm
250ml crème fraîche, well stirred
Extra-virgin olive oil for drizzling
Flaky sea salt, such as Maldon
Freshly ground black pepper
Chopped fennel fronds or chives for sprinkling (optional)
Heat a griddle pan over medium-high heat. Brush lightly with oil. Arrange the onion wedges on the hot pan, cut side down, and cook, without disturbing, until the bottom sides are deeply golden and charred in spots, 5 to 6 minutes. Turn the wedges over and cook until the second sides are golden and the onions are crisp-tender, 5 to 6 minutes more. Transfer to a plate.
Place the warm crust on a large cutting board (cool if it’s still hot) and spread the crème fraîche over it, leaving about a 5mm (¼in) border. Arrange the charred onions on top. Cut the tart into 12 pieces and lightly drizzle with olive oil. Sprinkle with flaky salt, pepper, and fennel fronds or chives, if using, and serve.
ALSATIAN TART CRUST
Pizza dough can be purchased from well-stocked supermarkets. Give the dough time to come to room temperature before using, which allows it to stretch.
Makes 1 crust
2 tablespoons coarse polenta, plus more if needed
1 tablespoon extra-virgin olive oil
450g shop-bought white or whole wheat pizza dough, at room temperature
Heat the oven to 220°C/425°F/gas 7, with a rack in the middle.
Dust a 32 x 45cm (13 x 18in) baking tray with 1 tablespoon of the polenta, then drizzle with the oil. Place the dough on the baking tray and gently press and stretch it out to the tray edges, dusting your hands and/or the dough with a little polenta if the dough is too sticky. (If the dough springs back, let it rest for a few minutes, then resume; it’ll get there!) Dust the top of the dough with the remaining tablespoon of coarse polenta, then prick all over with the tines of a fork.
Bake until the bottom of the crust and the edges are golden, 14 to 16 minutes. Transfer to a wire rack and let cool. The crust can be baked up to 8 hours ahead and kept uncovered at room temperature. Rewarm in a 110°C/225°F/gas ¼ oven for a few minutes, if necessary, before topping.

Alsatian Tart Three Ways (pages 69–73)
Alsatian Tart with Melted Leeks, Gruyère and Prosciutto
This trio of toppings recalls the much-loved French combination of leeks, cheese and bacon. Also, I love saying ‘melted leeks’. Say it and try not to smile.
Makes twelve 10cm (4in) squares
6 medium leeks (1 to 1.1kg)
2 tablespoons unsalted butter
2 tablespoons extra-virgin olive oil
½ teaspoon kosher salt
150g thinly sliced prosciutto, preferably the packaged sort (from 2 packets)
Alsatian Tart Crust (page 69), warm or cooled
75g Gruyère or Emmental, coarsely grated
Fresh thyme leaves for sprinkling
Heat the oven to 180°C/350°F/gas 4, with racks in the middle and upper third. Line two baking trays with baking parchment.
Trim off and discard the root ends and tough green tops of the leeks. Cut the remaining parts lengthways in half, then cut into 2.5cm (1in) pieces. Submerge in a large bowl of cold water and swish the leeks around, separating the layers to remove the grit. Lift the leeks out of the water and transfer to a colander to drain. Spin-dry in a salad spinner or pat dry with a tea towel.
In large frying pan or casserole, heat the butter and oil over medium heat until the butter is melted. Add the leeks and cook, stirring occasionally and reducing the heat if the leeks begin to brown, until softened, 25 to 30 minutes. Add the salt and continue cooking, stirring occasionally, until the leeks are very soft and ‘melted’, 10 to 15 minutes more. Remove from the heat.
Meanwhile, arrange the prosciutto slices on the baking trays, leaving a little space between them. Bake until the slices are shrivelled and dark red and the fatty edges are golden, 12 to 15 minutes; keep an eye on them to avoid burning. Place the prosciutto ‘crisps’ on a wire rack set over a baking tray; they will crisp as they cool.
Break the prosciutto crisps into 2.5 to 5cm (1 to 2in) pieces and set aside. Heat the oven to broil, with the rack 10 to 13cm (4 to 5in) from the heat source.
Spread the leeks on top of the baked crust. Sprinkle with the cheese. Grill the tart until the top is bubbling and golden, 2 to 3 minutes. Transfer to a large cutting board. Cut into 12 pieces, top with the prosciutto crisps and thyme, and serve.
Packet sliced prosciutto is the perfect thickness for crisping in the oven. And since the slices come separated by nice neat sheets of paper, it’s quick and easy to get them from the packet to the pan without tearing.
Alsatian Tart with Miso-Glazed Squash
During my days as a waiter and manager at Bond Street restaurant in New York City, I was introduced to the technique of using miso in a glaze on everything from winter squash to fish. Kabocha squash has a sweeter flesh and drier texture than many other varieties, and it’s worth looking for at farmers’ markets.
Makes twelve 10cm (4in) squares
1 large winter squash (1 to 1.1kg), preferably Kabocha, Red Kuri or butternut
3 tablespoons extra-virgin olive oil
½ teaspoon kosher salt
3 tablespoons dry fruity white wine, such as Viognier or unoaked Chardonnay
2 tablespoons mirin
2 tablespoons sugar
1 tablespoon white miso
Freshly ground black pepper
Alsatian Tart Crust (page 69), warm or cooled
2 tablespoons hot pepper sesame oil or toasted sesame oil plus red chilli flakes to taste
1 heaping teaspoon furikake (see Tip) or toasted black or white sesame seeds
3 tablespoons coarsely chopped fresh coriander
Heat the oven to 230°C/450°F/gas 8, with racks in the middle and upper thirds. Line two baking trays with baking parchment.
Cut the squash in half (no need to peel if you are using the suggested varieties), then remove the seeds. Place each half cut side down on a cutting board and cut lengthways into 75mm (⅓in) thick slices.
Divide the squash slices between the baking trays. Drizzle with the oil and sprinkle with the salt. Toss gently to coat, then arrange cut side down on the trays. Roast, rotating the trays once halfway through, until the squash is crisp-tender, about 10 minutes.
Meanwhile, combine the wine, mirin and sugar in a small saucepan and bring just to a boil over medium heat, whisking frequently to dissolve the sugar. Reduce to a simmer, then whisk in the miso and continue simmering, whisking occasionally, until the glaze is thickened, syrupy and reduced to about a generous 60ml, 4 to 6 minutes more. Remove from the heat.
When the squash is ready, brush with the miso glaze. Return to the oven and continue roasting until the squash is tender and the glaze is bubbling, 4 to 6 minutes. Remove from the oven and sprinkle with pepper. Let cool for 5 to 10 minutes.
Transfer the baked crust to a large cutting board. Drizzle the hot sesame oil over the top. (Or, if you are using toasted sesame oil, drizzle over the crust, then sprinkle with red chilli flakes to taste.) Arrange the squash on top (overlapping the pieces a little if necessary). Sprinkle with the furikake or sesame seeds and coriander. Cut into 12 pieces and serve.
Furikake is a Japanese rice seasoning typically made of dried fish flakes, sesame seeds and dried nori, although it may also include other seasonings. I sprinkle it over salads, vegetables and fish. Look for it in the ethnic or spice sections of larger supermarkets, or buy it online.