12
JavaScript Blocks Editor
Python is a text-based programming language that is a little more difficult to learn than using a graphical language such as the JavaScript Blocks editor. This is partially because you don’t have to worry about getting the punctuation and indenting correct in a block language and also because you don’t have to remember much about function and method names because you just pick your blocks of code from lists. In this chapter, you will learn how you can apply much of what you have learned about programming the micro:bit to the JavaScript Blocks editor.
The Editor
The JavaScript Blocks editor works rather like the online version of the Python editor. It all happens on a web page (https://makecode.microbit.org). Open your browser on this page, and after a short delay while a new project is created for you, you will see something like Figure 12-1.
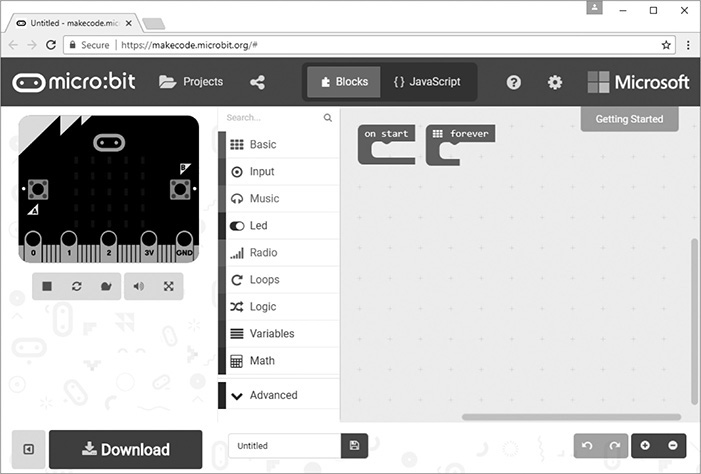
Figure 12-1 The JavaScripts Blocks editor.
One really nice feature of the Blocks editor is that the image of a micro:bit on the left of the screen is a virtual micro:bit on which you can run your programs before flashing them onto a real micro:bit. You can press its buttons with your mouse; it will display things, and if you used the GPIO pins as digital outputs, it will even highlight them when you write to them. You can also click on GPIO pins to simulate digital and analog inputs.
The middle section of the screen has different categories of blocks: Basic, Input, Music, and so on, where you can find blocks to put onto the right-hand “canvas” area. You can also use the Search box just above the list of block categories if you are not sure where to find the block that you want.
The Blocks editor actually generates code in the JavaScript programming language, and if you click on the button {} JavaScript, you can see the code that has been generated. Clicking on Blocks takes you back to the blocks view of things, which is much easier to follow.
Getting Started
Let’s start where we did with Python and have the display scroll the traditional words
“Hello World” and display the heart image repeatedly. When you start a new project,
you automatically get on start and forever blocks. We don’t need to do anything special when the project starts, so delete the
on start block by selecting it and then hitting the DELETE or BACKSPACE key. Next, you are going to add blocks to the forever block. Start by adding a show string block (in the Basic category). Click on the parameter to show string that currently says "Hello!" and change it to "Hello World". Your Blocks editor should now look like Figure 12-2.
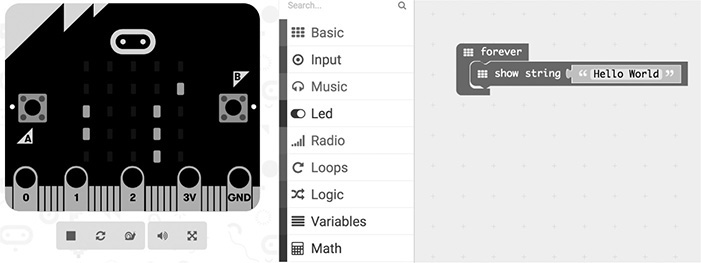
Figure 12-2 "Hello World" in blocks.
Notice how the display of your virtual micro:bit is now displaying the message “Hello World”. Add some more blocks to the forever block: show icon and pause (both of these are in the category Basic). Finally, edit the parameters of the show icon block to an image of your choice and the parameter of pause to be 2000. Your forever block should now look like Figure 12-3, and the virtual micro:bit should be behaving as expected.
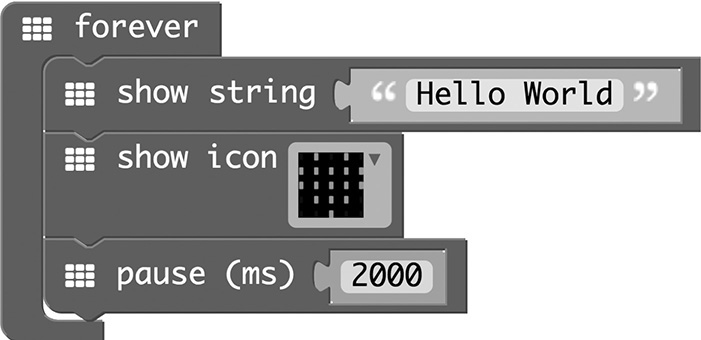
Figure 12-3 “Hello World” and an image in blocks.
If you want to, you can now save your project using the area at the bottom of the window, next to the Download button. Type in the name for your project, and then click on the somewhat anachronistic floppy disk icon to save the project—this will also generate a hex file that you can drag onto your micro:bit in the same way as the online Python editor, as described in Chapter 2.
The Blocks editor will remember any projects that you work on for a particular computer, and you can see them and reopen old projects from the Projects link at the top of the page.
Events
The JavaScript language that underpins the Blocks editor works rather differently from MicroPython when it comes to things like buttons. Whereas in Python you use a loop and continually check for a button press, in JavaScript and, by extension, the Blocks language, you use something called events.
The on start block that we deleted earlier is an example of an event—the event being that the
micro:bit started up because it was plugged in or its Reset button was pressed. Start
a new project, and this time delete both the on start and forever blocks. Add an on button pressed (another event) block, and then place a show string block inside it, changing the text that the show string block is to display so that it looks like Figure 12-4.

Figure 12-4 Button events in the Blocks editor.
Now, when you use your mouse to click on button A in the virtual micro:bit, it will scroll the message. You could also now try this on a real micro:bit.
Variables and Loops
The Blocks language also allows you to create loops and use variables in your programs.
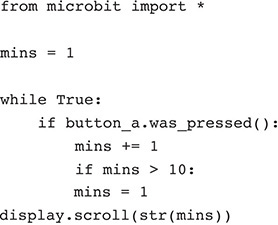
For example, let’s re-create the Python program ch03_timer_01.py. This was the first step in the timer project, allowing you to set the number of
minutes for the timer by repeatedly clicking on button A. Here is the MicroPython
code for reference:
The variable mins needs to be created in the on start block, so from the Variables category, find the set to block and place it inside on start. Then change the variable name from item to mins using the Rename option. We also want to display the value of mins when it’s set, so add a show number block to on start. To make the show number block display the value of the mins variable, go to the Variables category, and there you will find the variable mins that we just created (Figure 12-5). Drag the variable into the value part of the set to block.
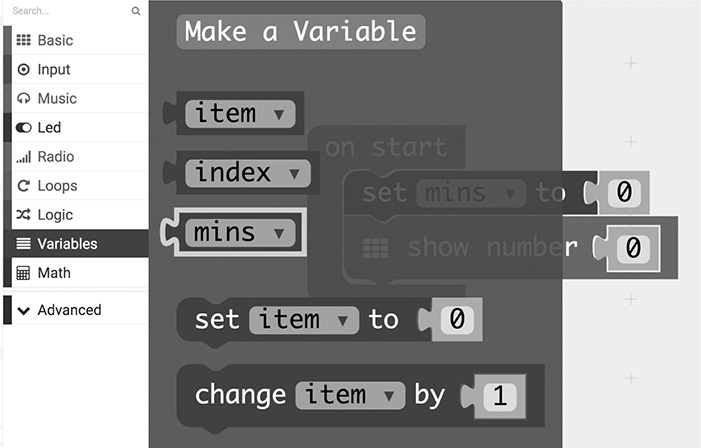
Figure 12-5 Plugging in a variable.
We now need an on button pressed event, into which you place a change by block and change the variable to mins. Now your code should look like Figure 12-6.

Figure 12-6 Adding an on button pressed event.
Next, we need a test to set mins to 1 when it gets past 10. This is accomplished by adding an if then block (found in the Logic category). For the condition part of the if then block, drag in a condition block, change the comparison to >, set the right-hand value to 10, and as you did before, add a variable mins to the left-hand side of the comparison.
The last step is to add another set to to the then connector of the if then block to set var to 1 and then copy the show number block from on start. The final program is shown in Figure 12-7.
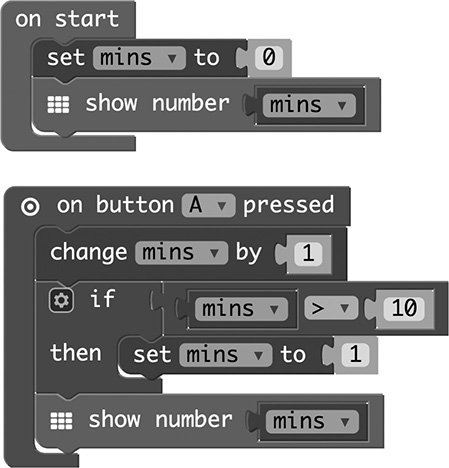
Figure 12-7 The final version of setting minutes in the timer example.
Magnetometer Example
You can do pretty much everything with the Blocks editor that you can with Python, and it’s a quick and easy language to explore. So we will just look at the magnetometer program that we built in Python to see how this can be built in the Blocks editor.
The Python program in question is ch09_magnetometer.py, and it displays more rows of lit LEDs the closer a magnet is brought to the micro:bit’s
magnetometer (behind button B). The Blocks version of the program is shown in Figure 12-8.
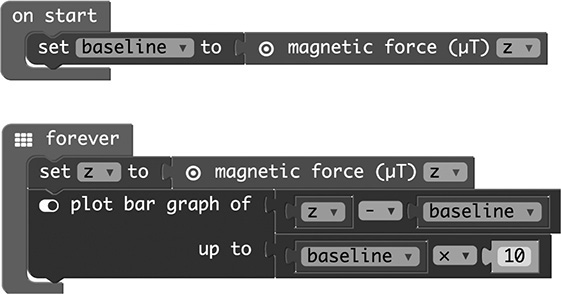
Figure 12-8 The magnetometer program in Blocks code.
The Blocks language is very easy to use (including a ready-made way of doing a bargraph-type display), but the payback for this is that it is not possible to define your own functions (although you can do this if you switch to the JavaScript view), also the math functions available are very limited. This could cause a problem for this example, which uses a function to provide inverse-square scaling of the magnetometer readings. However, if you try out the example of Figure 12-8, you will find that the project actually works pretty well without fancy scaling.
Summary
The JavaScript Blocks editor undoutedly provides a really simple way to start doing things with your micro:bit and is a great resource for teaching programming concepts, but it is not without its limitiations.
This is the final chapter, so I will end by pointing you at a few resources that you should find useful:
 http://microbit.org—the starting point for all things micro:bit
http://microbit-micropython.readthedocs.io/—the official documentation for MicroPython on the micro:bit
http://tech.microbit.org/hardware/schematic/—for details of how the hardware works, components datasheets, and more
http://tech.microbit.org/—the home page for the micro:bit developer community