2
Getting Started
In this chapter, you will learn how to run your first program on your micro:bit and also come to grips with the two most popular editors used to write and upload code onto the device.
MicroPython Editors
When it comes to programming the micro:bit using MicroPython, there are two main options for the editor with which to type your programs. The first is browser based. It doesn’t really have a formal name, so let’s just call it the online editor. Because it works in your browser, there is nothing to install. To use the MicroPython online editor, all you need to do is navigate to http://python.microbit.org/editor.html, and the Editor window will appear (see Figure 2-1).

Figure 2-1 The MicroPython browser editor.
There are some disadvantages to this option. For one, it is all too easy to accidentally lose the page and your code before you get around to saving it. The process of uploading the program to your micro:bit is also a bit fiddly. You also have to have an Internet connection to be able to use the editor.
The second option is an editor called Mu that is a normal application that you run on your computer. Mu also has a neat feature that allows you to try out individual lines of code directly on the micro:bit without having to upload an entire program.
You will begin by using the online editor and then move on to Mu. It is then up to you as to which you prefer to use for the rest of this book. The code will work equally well with both editors, but some of the coding experiments do require the use of Mu if you want to follow along.
Online Editor
Visit http://python.microbit.org/editor.html in your browser (you may want to bookmark this page), and you will see something like Figure 2-1. You can see that there is already a short program in the editor that will display the message “Hello, World!” on the LED display.
Across the top of the online editor is a row of toolbar buttons. The important ones are Download and Save. When you click on Download, the online editor will generate a hex file that is ready to flash onto your micro:bit and also download it into your computer’s Downloads area. Where this Downloads area is depends on your browser and operating system. Try this out now with the code already in the online editor by clicking on Download (the leftmost button). The download won’t take long because the file is small. You now have to transfer this program from your computer to your micro:bit.
When you connect a micro:bit to your computer, it “mounts” the micro:bit as if it were a USB flash drive. This makes copying the hex file from your computer to the micro:bit simply a matter of dragging the file from your computer to the micro:bit. The exact way to do this depends on your computer’s operating system.
Installing micro:bit Programs Using Windows
When you click on Download on a Windows computer using the Microsoft Edge browser, you will see the message “Microbit.hex finished downloading” along with two options, Open and View Downloads (Figure 2-2).

Figure 2-2 Downloading a micro:bit hex file.
Click on the option View Downloads, and a panel will open on the window (Figure 2-3) showing the file downloads made by the browser, including the one you just downloaded (microbit.hex).
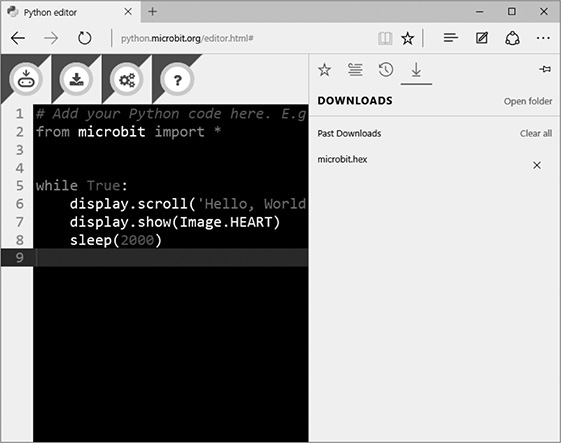
Figure 2-3 Viewing the file downloads.
You cannot copy this downloaded file from this window onto the micro:bit. Instead, you need a File Explorer window, which can be opened by clicking on the Open Folder option. This opens the File Explorer shown in Figure 2-4, from which you can just drag the file microbit.hex onto the micro:bit drive shown on the left of the window.
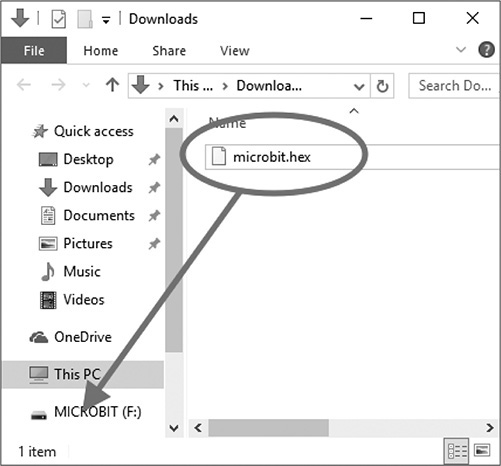
Figure 2-4 Dragging the hex file onto the micro:bit drive.
When you do this, the file copying dialog of Figure 2-5 will appear. A yellow LED on the micro:bit will flicker during the flashing. After a few seconds, the upload will be complete, the micro:bit will reset, and your micro:bit should start displaying the scrolling message.
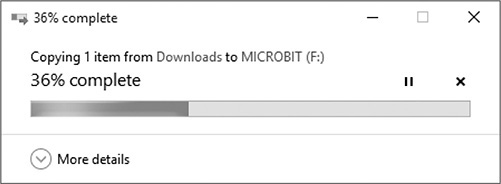
Figure 2-5 File upload progress.
Congratulations, you have uploaded your first program to your micro:bit! Having taken the long route to opening the File Explorer to copy hex files onto the micro:bit, you can just leave the File Explorer of Figure 2-4 open, ready to copy over another hex file.
Installing micro:bit Programs Using a Mac
Figure 2-6 shows the “Hello World!” program in Google Chrome on a Mac after clicking the Download button. You can see the downloaded file (microbit.hex) at the bottom of the window.
Figure 2-6 Downloading a micro:bit hex file on a Mac.
Click on the Menu button next to the download (Figure 2-7), and select the option Show in Finder. This will open the Finder with the hex file selected and ready to drag onto the micro:bit in the Devices section of the Finder window (Figure 2-8).
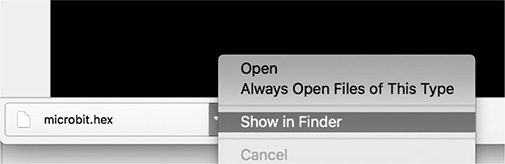
Figure 2-7 The Download options menu.
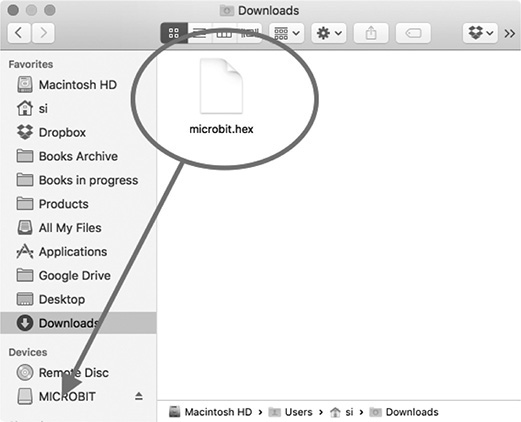
Figure 2-8 Dragging the hex file onto the micro:bit drive (on a Mac).
Installing micro:bit Programs Using Linux
Linux computers, including the Raspberry Pi, can be used with the micro:bit. Figure 2-9 shows a micro:bit connected to a Raspberry Pi.
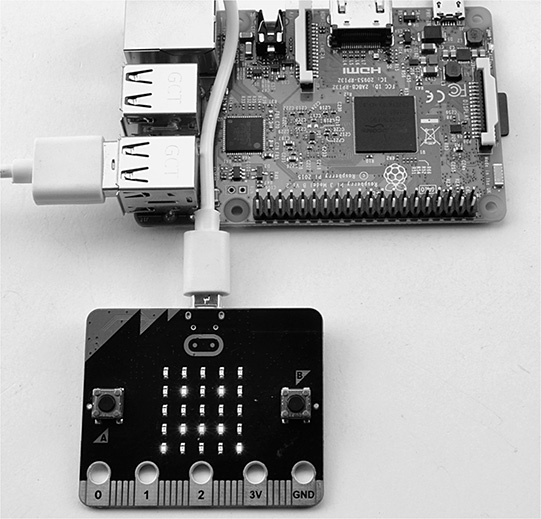
Figure 2-9 Using micro:bit with a Raspberry Pi.
The process is the same as for Windows and Mac. You first download the hex file onto your computer by clicking on the Download button. You then copy the downloaded hex file onto the micro:bit. The location of the downloaded file depends on which browser you are using, but for Chromium on the Raspberry Pi (Figure 2-10) and most browsers, the Downloads folder is in your home directory.

Figure 2-10 The online editor on a Raspberry Pi.
When you plug your micro:bit into your Raspberry Pi or other Linux computer, you may be prompted with a dialog like the one shown in Figure 2-11 that offers to treat the micro:bit as a removable storage device and open it in the File Manager so that you can copy hex files onto it (Figure 2-12).
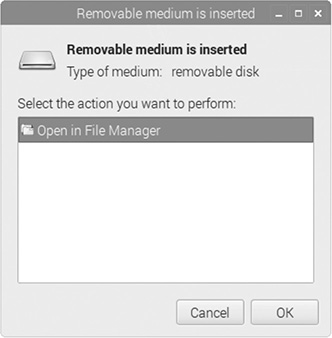
Figure 2-11 The micro:bit mounting as removable media.
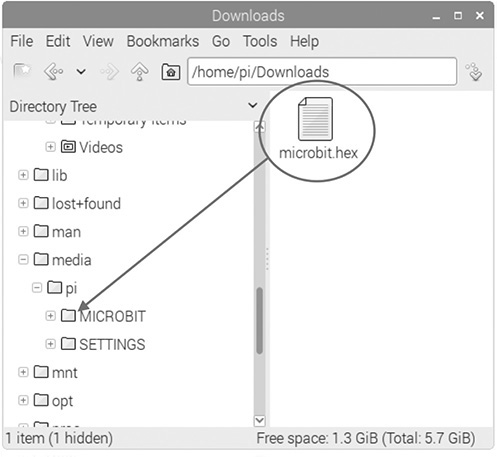
Figure 2-12 Using the Linux File Manager to install a program on the micro:bit.
Saving and Loading Programs
You will find the Save button in the button area at the top of the editor window. You might expect this to offer you a file dialog to let you save the file in a particular location. However, when you click on it, what it actually does is simply download the Python script shown in the editor into your computer’s Downloads area. You can then move the file somewhere else if you want to, probably after renaming it.
Loading files into the editor is simply a matter of dragging a file onto the online editor’s main editing area. But be careful because this will replace any text already in the editor.
The Mu Editor
The Mu editor (Figure 2-13) makes loading/saving and deploying a lot easier, but it does require you to download the application onto your computer, and if you are using Windows, you can install a USB driver if you want to make use of Mu’s advanced feature of allowing an interactive interface to the micro:bit called the Read Eval Print Loop (REPL).
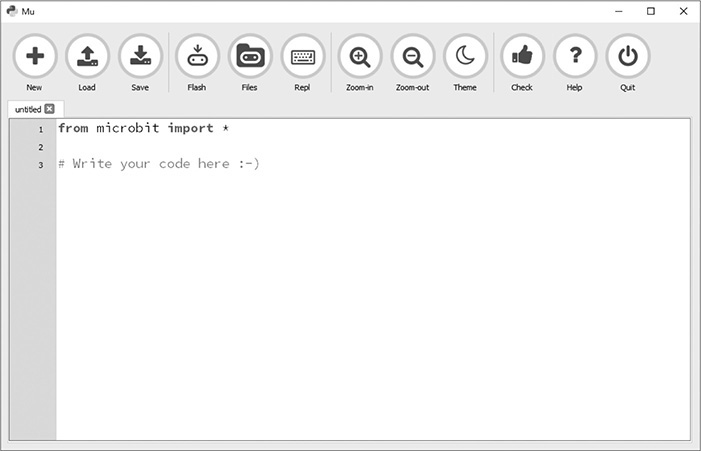
Figure 2-13 The Mu editor.
Installing Mu on Windows
Click on the Download for Windows button at https://codewith.mu (Figure 2-14), which will download the Mu application itself. Move this to your Desktop folder by using the File Explorer to drag it from your Downloads directory (Figure 2-15).
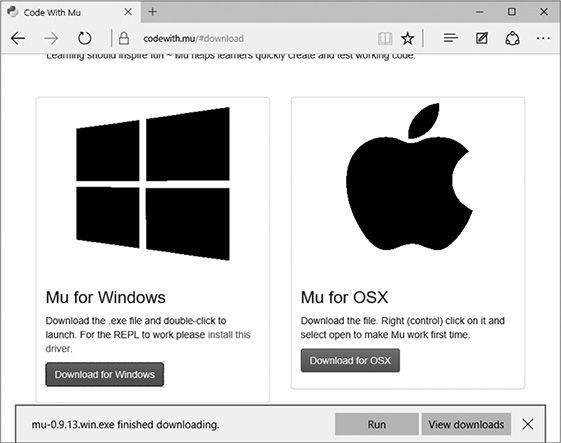
Figure 2-14 Downloading Mu.
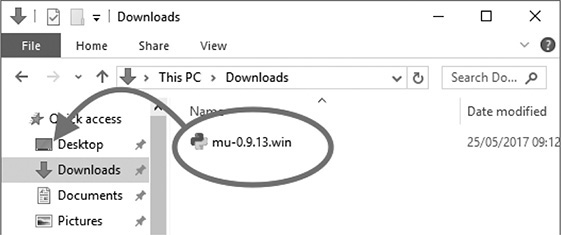
Figure 2-15 Moving Mu to the desktop.
To run Mu, double-click on the Mu icon on your desktop. Near the Download for Windows button on the Mu website’s download page, you will also find a link called “Install this Driver.” This is not essential, but it is well worth doing because it is needed if you want to experiment with the micro:bit’s REPL command-line interface. This will take you to a webpage hosted by ARMmbed for instructions on downloading and installing the driver. Follow the instructions there. Note that the installer program will not install the driver without your micro:bit being connected to your computer. Note also that you will need admin privileges on your computer to install the driver.
Installing Mu on a Mac
The Mac is the easiest platform on which to install Mu. Click on the Download for OSX button at https://codewith.Mu, which will download a Zip archive file. Unzip the file by double-clicking on it, and then drag the resulting application into your Applications folder. OSX includes the USB driver used by the micro:bit, so there is no need to install anything for the REPL to work.
Installing Mu on Linux
To install Mu on your Linux computer, including the Raspberry Pi, open a terminal session, and run the command:

Once installed, you will find a shortcut to Mu in the Programing submenu of your window manager.
Using Mu
Mu (see Figure 2-13) has a lot more buttons on its toolbar than the online editor but otherwise looks fairly similar. The main feature is a big area in the middle of the window for you to write your code. Let’s try the “Hello World!” example in Mu.
When you first start Mu, it will look like Figure 2-13. Mu is editing an unsaved program with the following content:

The first line is an import command that tells Mu that we need to use the “microbit” module that contains the
micro:bit-specific code for controlling the LEDs and other hardware. The second line,
which starts with a #, is a comment line. Comments are not actually program code; they are like notes that you the programmer
can leave in the code to either explain something tricky going on in the program or
(as is the case here) an instruction for someone else reading the code to do something.
Replace the comment line with the following code:
You will find that after the first line, Mu will automatically indent the next line
when you press ENTER. Any line that ends with a colon (:) will indicate to Mu that the line that follows it should be indented.
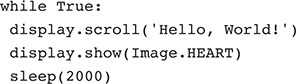
You can also indent lines of code manually by pressing the TAB key before you type the first character of the line. This inserts four spaces. MicroPython is very fussy about consistency in indentation and will give error messages if it’s not correct. When you have finished, the Mu window should look like Figure 2-16.
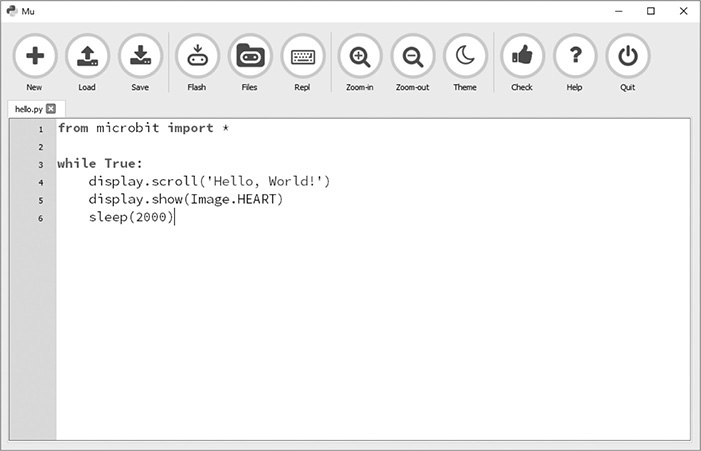
Figure 2-16 “Hello World!” in Mu.
Mu won’t stop you from downloading faulty programs onto your micro:bit, and Mu has a Check button that is intended to check your code before uploading. At the time of writing, this checking is a little overly zealous, so it will tell you such things as “Blank line contains whitespace,” which just means that there is a blank line with a few space characters on it. This means that the advice offered by the Check feature is somewhat verbose and makes it hard to pick out the genuine errors. Try it, because Mu is a young product that is improving all the time.
If your program does have errors when it is flashed onto your micro:bit, you will see the message scroll across the micro:bit’s display. The most useful piece of information is often the line number of the error. But remember that an error on one line is quite often caused by an error on the preceding line.
If you open the REPL (see the next section) before you flash the program, any error messages will appear there, where they are a lot easier to read than on the scrolling display.
Now is a good time to save your program, so click on the Save button, and choose a
file name (perhaps hello.py). The file extension .py indicates that the file is a Python program. By default, Mu will save your programs
in a folder called mu_code, but you can save the programs anywhere.
You can now transfer the program onto the micro:bit by clicking on the Flash button. If your micro:bit is connected to your computer, this will install the program automatically without you having to copy the file yourself. If you forget to plug your micro:bit in, before clicking Flash, Mu will open a file dialog allowing you to save the hex file for manual installation.
The REPL
REPL gives you a command line that actually runs on your micro:bit. It can be handy for trying out MicroPython commands on the micro:bit without having to go to the trouble of writing an entire program. To try it out, plug in your micro:bit, and then click on the Repl button in the toolbar. The result is shown in Figure 2-17.
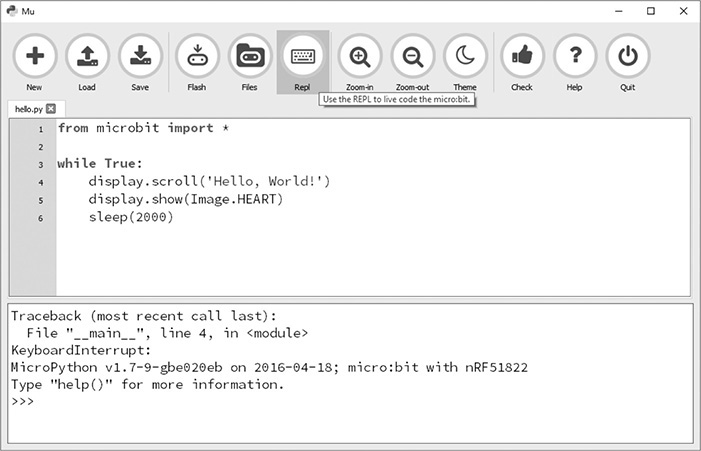
Figure 2-17 The REPL.
If you don’t see something like Figure 2-17, then try pressing CTRL-C on your keyboard. You are now communicating with the micro:bit, which is awaiting your command. So let’s have it do a bit of math for us. Type the following text into the REPL:

and then hit the ENTER key. You can see the result in Figure 2-18. Your micro:bit has added 2 and 2 together and is showing the result of 4.
Figure 2-18 Sums in the REPL.
Next, let’s try using the display to scroll a message from the REPL. To do this, you need to type the following two lines of code:

Be careful not to forget the single-quote marks around the text to be displayed. The message should appear on your micro:bit’s display as soon as you press ENTER after the second line.
You will find the first line of code at the top of all micro:bit MicroPython programs, and it “imports” all the micro:bit-specific code for things such as the display and buttons into the MicroPython environment, ready for you to use.
Downloading This Book’s Programs
Although it can be a good thing to actually copy in simple code examples by hand, as the programs in this book get longer, you definitely don’t want to be typing them in by hand. So all the programs used in this book can be downloaded from the book’s Github repository.
Now is a good time to download all the code examples so that they are there when you
need them. To do this, go to https://github.com/simonmonk/prog_mb with your browser. Click on the green Clone or Download button, and select the option
Download Zip (Figure 2-19). Unzip the file, which will create a folder called prog_mb. This will contain all the programs. To load one of these programs into the online
editor, just drag the file onto the Editor area.
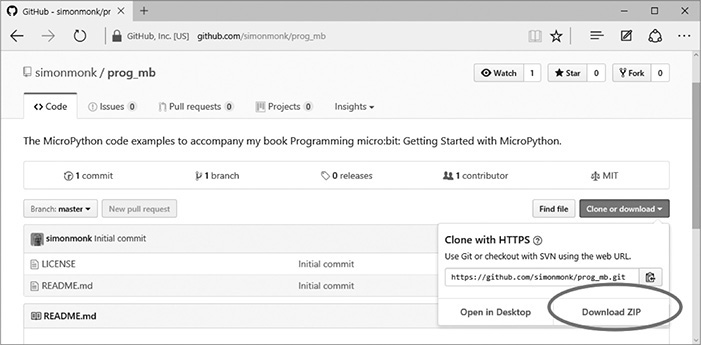
Figure 2-19 Downloading the example programs.
If you are using Mu, then it is worth moving the files to the special directory where
Mu expects to find your programs. This is in a directory called mu_code in your home directory. For example, in Windows 10, this is in C:\Users\YourName\mu_code. So move the downloaded and unzipped files from prog_mb into mu_code.
To load a file into Mu, click on the Load button, and navigate to the file you want to open.
Summary
Now that your computer is set up for the micro:bit and you know how to connect a micro:bit and program it, we can turn our attention to MicroPython. In Chapter 3 you will start to explore this programming language.