3
MicroPython Basics
In this chapter, you will learn a bit about programming in MicroPython and get your micro:bit running a few programs. MicroPython is one of many implementations of the Python language, and it is designed specifically for low-power microcontroller boards such as the micro:bit. All the general information in this book about MicroPython is equally applicable to other implementations of Python. The real differences arise when it comes to using the micro:bit hardware.
Numbers
Remember the Read Eval Print Loop (REPL) from Chapter 2? Well let’s start by carrying out a few experiments using the REPL. Start Mu, connect
your micro:bit to your computer, and click on the REPL button. Start by repeating
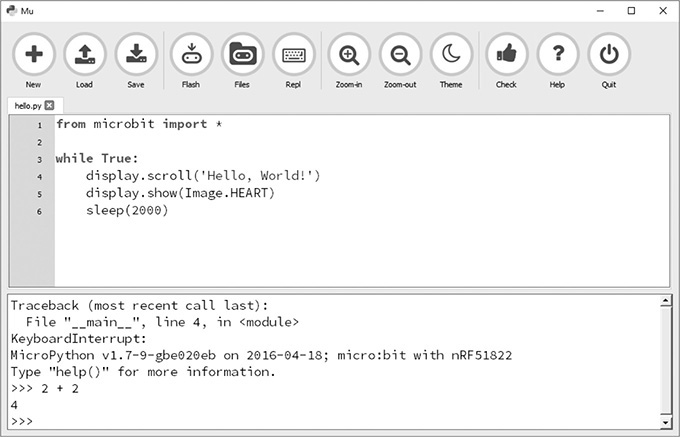
the REPL experiment of Chapter 2 and type 2 + 2 after the >>> prompt to see the result shown in Figure 3-1.
Figure 3-1 2 + 2 in the REPL.
Note that when you use the REPL like this, it doesn’t matter what program you have
loaded onto your micro:bit. It will be halted while you use the REPL and only restart
if you reset the micro:bit by pressing the RESET button, unplugging it and plugging
it back in, or uploading a new program. The Traceback message that you see before the >>> prompt is a result of the halting of whatever program was running.
There are two important types of numbers in Python: integers (or ints for short), which are whole numbers such as 1, 2, 3, and so on, and floats (floating points), which have a decimal place such as 1.1, 2.5, 10.5, and so on. In many situations, you can use them interchangeably. Now try typing the following after the REPL prompt:

As you can see, the result is 15.5, as you would expect. Try out a few sums for yourself.
If you want to do multiplication, use * and for division use /.
Doing some simple sums on your micro:bit is all very well, but you could do that on
a pocket calculator. Note that from now on, the things you need to type will be proceeded
by >>>, and the micro:bit’s response will start on a new line.
Enter the following into the REPL:

You are likely to get a different answer than 5. Repeat the randint(1, 6) line a few times by pressing the up arrow on your keyboard, and you will see a succession
of random numbers between 1 and 6. You have made a die of sorts!
The first line you typed imports the randint function from the module random. Modules are used to contain Python code that you may not need all the time. This
helps to keep the size of the code small enough to run on a micro:bit.
Variables
Try typing the following line into the REPL:

You can put spaces either side of the equals sign (=) or not—it’s a matter of personal preference. I think it looks neater with spaces,
so that’s the standard I will be sticking to in this book.
This line of code uses a variable called x. Now that the variable x has been given the value 10, try just typing x in the REPL:

Python is telling us that it remembers that the value of x is 10. You don’t have to use single-letter names for variables; you can use any word that
starts with a letter, but variables can include numbers and the underscore character
(_). Sometimes you need a variable name that’s made up of more than one human language
word. For example, you might want to use the name my number rather than x. You can’t use spaces in variable names, so you use the underscore character to join
the words like this: my_number.
By convention, variables usually start with a lowercase letter. If you see variables
that start with an uppercase letter, it usually means that they are what are called
constants. That is, they are variables whose value is not expected to change during the running
of the program but that you might want to change before you flash your program onto
your micro:bit. For example, in Chapter 11, the program ch11_messenger.py uses a constant called MY_ID that must be set to a different number for each micro:bit onto which it is flashed.
Returning to our experiments with REPL, now that Python knows about x, you can use it in sums. Try out the following examples:
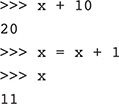
In this last command (x = x + 1), we have added 1 to x (making 11) and then assigned the result to x, so x is now 11. Increasing a variable by a certain amount is such a common operation that there is a shorthand way of doing it. Using += combines the addition and the assignment into one operation. Try the following, and
x will now be 21.

You can also use parentheses to group together parts of an arithmetic expression.
For example, when converting a temperature from degrees centigrade to degrees Fahrenheit,
an approximation is to multiply the temperature in degrees centigrade by 5/9 and then
add 32. Assuming that the variable c contains a temperature in degrees centigrade, you could write the following in Python:

The parentheses are not strictly necessary here because MicroPython will automatically perform multiplication and division before it does addition. But including them does make the code clearer.
Strings
Computers are really good at numbers. After all, this is what they were originally created for. However, in addition to doing math, computers often need to be able to use text. Most often this is to be able to display messages that we can read. In computer-speak, bits of text are called strings. You can give a variable a string value, just like numbers. Type the following into the REPL.

So first we assign a value of Hello to the variable s. The quotation marks around "Hello" tell Python that this is a string and not, say, the name of some variable. You can
use either single or double quotation marks, but they must match. We then check that
s does contain "Hello".
Rather like adding numbers, you can also join strings together (called concatenation). Try the following in the REPL:
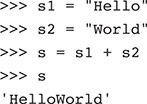
This might not be quite what we were expecting. Our strings have been joined together, but it would be better with a space between the words. Let‘s fix this:

Converting Numbers to Strings
Try the following example, which tries to combine a string with a number:
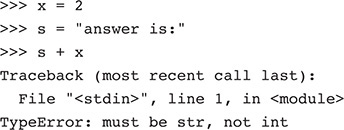
You assigned an int value of 2 to x and a string "answer is:" to a variable s. However, when you try to add the number onto the end of the string, you get an error
message. The key part of this error message is the last line TypeError: must be str, not int. This is saying that there is an error with the type of the variable and that you
are trying to add an int to a str (string).
To get around this problem, you need to convert the integer to a string before trying to add it, like this:

The command str is what’s called a function, and you will find out a lot more about functions in Chapter 4. For now, though, all you need to know is that if you place a number or a variable
containing a number inside the ( and ) after str, the resulting string version of the number can be added to another string.
Programs
The commands that we have been typing into the REPL are single-line commands that just do one thing. You can see how typing them one after the other leads to their being run (or executed) one after the other. For example, revisiting this example:

The four command lines are executed one after the other as fast as you can type them. If you were to put all four lines into a file and then tell the micro:bit to execute the whole file, you would have written a program.
Let’s try this now, but first we need to make one slight change. When you use the
REPL command line and simply type the name of a variable, the REPL will display the
value in that variable. However, when you run the same commands as a program, you
must use the print function for any value that you want to display. So click on New in Mu to create
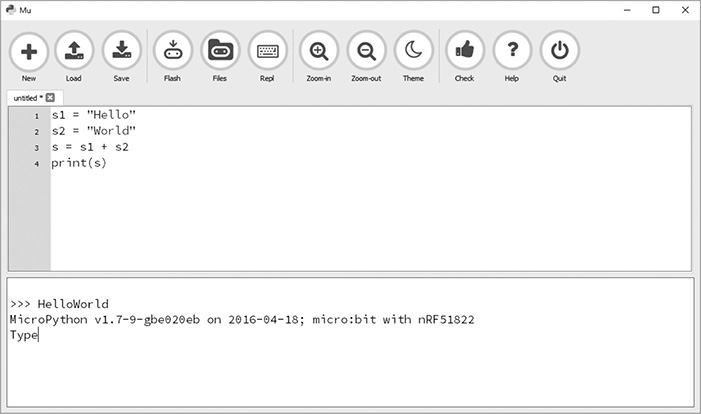
a new program, and then type the following lines into the window (Figure 3-2):
Figure 3-2 A very small program.

Click on the REPL button so that we can see the output from the micro:bit, and then
click on Flash to upload the program. When the program has uploaded, you will see
the text "HelloWorld" in the output of the REPL. Your program has worked; it joined two strings together
and printed out the result. You can now easily change the program so that instead
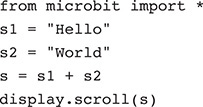
of using print to display the string, it scrolls the message across the micro:bit’s display.
You can either change the code in the Mu editor so that it looks like this:
Or you can go and find the program files that you downloaded for this book back in
Chapter 2 and open the program ch03_strings.py. Now when you run the program, the message "HelloWorld" will scroll across the screen just once.
The micro:bit has run each of these command lines in turn and then finished by showing
s on the display. Having run all its commands, the micro:bit has nothing further to
do. The program has ended.
Looping Forever
Generally speaking, you don’t want the program running on a micro:bit to end. It’s
not like running an app on your computer that you can just quit when you have finished
using it. A program on a micro:bit will basically run until you unplug it. It might
be waiting for button presses, reading a sensor, or displaying information, but it
will be running. This is why you find something called a while loop at the end of most micro:bit programs.
Either load program ch03_loops.py or type the following code into Mu:
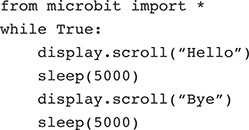
Before we look at what this code does, an important point about indentation needs
to be made. You will notice that after the while True: line, the remaining lines are all indented by four spaces. This indicates that those
lines belong inside the while command. Python insists that they line up exactly (or you will get an error message),
and the convention is to use four spaces of indentation. Helpfully, in Mu, when you
press the TAB key, you get four spaces inserted for you.
What happens when you upload (flash) this program onto the micro:bit is that the messages "Hello" and "Bye" appear in turn on the display and repeat until you unplug the micro:bit or upload
a different program.
Here’s how the code works. The command while True: tells the micro:bit to repeat all the indented lines (after the colon on the end
of the line) forever. The "Hello" message is then displayed. The line sleep(5000) tells the micro:bit to do nothing (sleep) for 5,000 milliseconds. A milliscond is 1/1,000 of a second, so 5,000 of them is
5 seconds. The "Bye" message is displayed, followed by another 5-second sleep, and then the cycle begins
again.
The line:

requires some special attention. The variable display is called an object, and it mirrors what is going on with the physical hardware of the micro:bit—in this
case the LED display. The function scroll() is a special kind of function called a method because it belongs to the display object. The dot between the object and its method is how you tell Python to use the
method.
If this all seems a bit mysterious, don’t worry; Chapter 7 is all about objects and their relatives: classes and methods.
for Loops
In this section, you will learn about for loops. This means telling Python to do things a number of times rather than just
once. In the following example, you will need to enter more than one line of Python
using the REPL.

When you hit RETURN and go to the second line, you will notice that Python is waiting. It has not immediately
run what you have typed because it knows that you have not finished yet. The colon
(:) at the end of the line means that there is more to do.
For the second line, type:

The REPL will automatically indent the second line for you.
To get the two-line program to actually run, press BACKSPACE and then ENTER after the second line is entered. Pressing BACKSPACE deletes the indentation so that the REPL knows that you have finished. Thus:
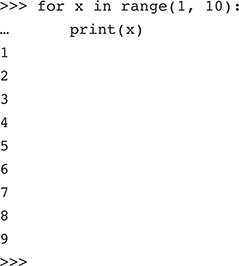
This program has printed out the numbers between 1 and 9 rather than 1 and 10. The range command has an exclusive end point—that is, it doesn’t include the last number in
the range, but it does include the first.
There is some punctuation here that needs a little explaining. The parentheses are
used to contain what are called parameters. In this case, range has two parameters from (1) and to (10) separated by a comma.
The for in command has two parts. After the word for, there must be a variable name. This variable will be assigned a new value each time
around the loop. So the first time it will be 1, the next time 2, and so on. After the word in, Python expects to see something that works out to be a list of things. In this case,
that list of things is a sequence of the numbers between 1 and 9.
The print command also takes an argument that displays it in the REPL area of Mu. Each time
around the loop, the next value of x will be printed out.
ifs and elses
Most programs are more than just a simple list of commands to be run over and over
again. They can make decisions and do some commands only if certain circumstances
apply. They do this using a special Python word called if and its optional counterpart, else.
To illustrate this, we are going to make your micro:bit respond to presses of button
A by displaying a message. Either load program ch03_button.py or type in the following code:

Inside the while loop we have an if. Immediately following the if is a condition that must be either True or False and then a colon. In this case, the condition is that button_a.was_pressed(). button_a is another object like display and is an object that mirrors what is going on with the physical button A. There
is a counterpart for button B called (you guessed it) button_b. Whereas the scroll method of display instructs the micro:bit’s processor to scroll a message across the screen (in other
words, to do something), the was_pressed method asks a question of the hardware (“Were you pressed?”). This answer can only
be yes or no, which in Python is represented as True or False.
Notice how the last line is double indented, one indent to put the code inside the
if and another because the if is inside the while.
It is not uncommon to want your code to do one thing if the condition is True and another if it is False. Let’s modify the preceding example. You can find the modified code in ch03_button_else.py.

The lines after else will only be run if the condition of the if was False. So now the micro:bit will repeatedly display the message Press button A until such time as you do, and then it will tell you not to do it again.
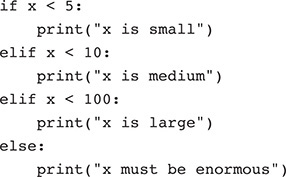
Sometimes you need more than just if and else. You actually need some conditions in between. In that case, you can use if followed by the word elif as many times as you need, optionally followed by an else. The following example illustrates this:
More on while
Earlier we saw how while True: is used to keep the micro:bit running indefinitely. The while command is actually more flexible than this. Whereas if will do something once if its condition is True, while will keep doing the things below it repeatedly while its condition is True.
By using while True:, the condition of the while will always be True, so the while loop will never finish. You can also put a condition after the while that could be True or False, as in the example of ch03_while.py:
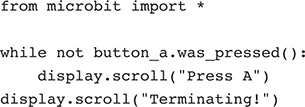
Flash the program and try it out. The while loop ensures that as long as button A is not pressed, the message "Press A" will be displayed. When the button is pressed, the condition for staying inside the
loop is no longer True (note use of not), so the last line of the program that is outside of the loop will run, and then
the program will quit. Your micro:bit will look like it has died. Don’t worry, it
will revive when you upload another program.
Timer Example
In the next few chapters, you will gradually build a kitchen timer project using the
micro:bit. Using what you have learned so far, you can make a start on the part of
the timer that will let you set the number of minutes to time for by pressing button
A. When the number of minutes exceeds 10, you will set it back to 1. You can find this code in ch03_timer_01.py.
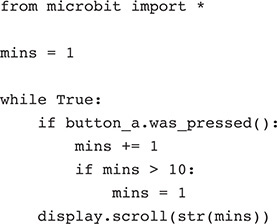
The variable mins is used to remember the current number of minutes. This is initially set to 1. This has to happen outside the while loop; otherwise, mins would just keep getting reset back to 1 each time around the loop.
Inside the loop, the if checks for a button press, and if there is one, it adds 1 to mins. This might make mins greater than 10, so we have a second if inside the first that checks for this and, if it’s the case, sets mins back to 1.
In this case, the condition for the if is that mins > 10. This means “if the value of the variable mins is greater than 10.” You can do all sorts of comparisons here: you can compare whether things are equal
in value (==), not equal (!=), less than (<), greater than (>), less than or equal to (<=), or greater than or equal to (>=). These comparisons are like questions and always give a result of either True or False (mins is greater than 10 or it isn’t—there is no middle ground).
Note that the == (double equals) comparison is used a lot, and a common mistake is to accidentally
use a single equals sign in comparisons. The single equals sign is only ever used
to set the value of a variable.
Conditions can be combined into more complicated forms. For example, if for some bizarre reason you only wanted the number of minutes to be increased if both buttons were pressed, you could modify the program to look like this:
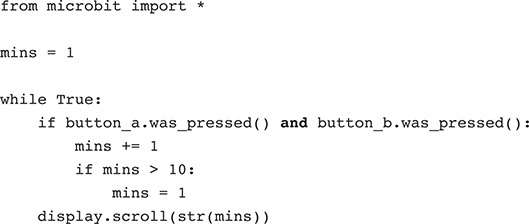
Try making the change, and then upload the code. You may have noticed that buttons
A and B do not have to be actually down at the same time; you can also press one after
the other quickly. This is so because the button object remembers when it has been pressed for the next time that the question was_pressed() is asked.
Summary
This chapter has covered quite a lot of ground in terms of basic programming concepts. If you are new to programming, it can take time to make sense of these ideas, so you may want to play with the code examples so far. Alter them, upload them, and see what happens. Experimenting is a great way to learn. If you mess up the programs, it doesn’t matter; you can just download them again. In Chapter 4, you will learn all about one of the most important features of the Python language—functions.
