7
Modules and Classes
Modules are collections of code that are made available for you to use. The microbit module that you import at the top of pretty much all your programs is one such module.
A module may just contain lots of functions and variables, but sometimes the module
will contain classes. Classes provide a further level of structure. In this chapter,
you will learn how all of this works and how to go about making use of modules and
classes as well as writing your own.
Built-in Modules
When you start one of your programs with this line:

you are telling MicroPython to use a module called microbit and import everything (*) from it. The microbit module is made up of classes that contain the methods you use to control your micro:bit.
The most important module for the micro:bit that we have been using throughout this
book is, not surprisingly, microbit. This module contains all the code that relates to using the hardware of the micro:bit
through MicroPython. The module is what makes it easy for us to scroll messages across
the display or tell whether a button has been pressed or not. This is why most of
your programs start with the line:

In Chapter 8, you will use the module random, and in Chapter 10, you will use a couple of other built-in modules called speech and music, both of which have to be imported at the start of your programs if you need to use
them.
You can think of importing a module in Python as taking the contents of a separate file of Python code (the module) and pasting it at the top of your program. Separating out code that could be useful into a separate file has the great benefit that the module can be reused in lots of your programs without having to copy and paste code every time. In reality, though, the importing mechanism is more subtle than this.
Importing Modules
A module is just another file full of Python code, and if we just want everything
in that code to be included in our program, we can do that, but we run the risk that
it will use variable or function names that are the same as ones that we have used.
This would cause errors. Because we can’t see the code for the microbit module, we are running a risk by making everything in the module visible.
Probably the most convenient way of knowing what is in the microbit (or any other) module is to find its documentation. This will tell us the things
that are part of the module. By the way, you can find the documentation for the microbit module at https://microbit-micropython.readthedocs.io/en/latest/microbit.html.
Another useful way of finding what’s in a module is to use Python’s built-in dir function. You can try this in the REPL now.

This shows us all the names that the module uses. So, if you import everything from the module using this line at the top of your program:

you cannot make a global variable, function, or class (more on classes later) with the same name as any of the names on the list.
You can import selectively from a module if you want. In the preceding REPL example, the line:

imports the microbit module, so it is available to use, but it does not actually import the names that
are used in your program. This means that you can still use scroll in your program, but instead of writing just:

you have to put the module name at the front of the line like this:

If you know that you want to use display and button_a but nothing else from the microbit module, then you could specify this in the import like this:

In most cases, however, it’s easiest just to import everything, especially in a package
like microbit, where you are likely to use the majority of the module’s names in your program.
Classes and Instances
When you use button_a and button_b in your programs, they are both instances of the class MicroBitButton. Note that these button instances use the same naming convention as variables (lowercase
letters with undersores between the words); classes use an uppercase initial letter
and start each new word with an uppercase letter.
The reason that button_a and button_b look like variables is because that’s exactly what they are. They are variables defined
in the microbit module. These two instances of MicroBitButton come ready to use and are the only two instances of MicroBitButton. After all, the micro:bit only has two buttons.
Similarly, display is the one and only instance of MicroBitDisplay. You can find out what class something is using the type function in the REPL. Try entering the following code. As you can see, pretty much
everything in Python is an instance of some kind of class.
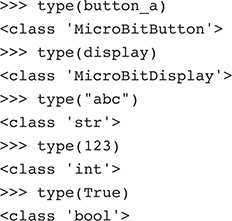
So what exactly is a class? A class contains a mixture of:
 Attributes (variables that belong to the class and should only be accessed via the class)
 Methods (functions that belong to the class and should only be accessed via the class)
For example, if you were to look at the MicroBitButton class source code, you would find no attributes, but you would find the method was_pressed, among others.
Inheritance
Classes are arranged in a hierarchy, and one class can “inherit” methods and variables
from another class. There is a good example of this in the built-in classes MicroBitDigitalPin and MicroBitTouchPin. Both of these classes are used to represent the connection pins on the edge connector
(you will find much more on the edge connector in Chapter 10). Just like display, button_a, and button_b, the pins on the micro:bit’s edge connector are also accessed by the use of variables
defined in the microbit package. Try running the following code in the REPL:

This tells us that pin2 (the center hole on the edge connector) is an instance of MicroBitTouchPin, whereas pin9 (see Figure 10-17) is an instance of MicroBitDigitalPin. They are different classes because they have different capabilities. pin2 can be used as a touch pin, whereas pin9 can only be used as a normal digital pin.
To confirm the methods that each pin has access to, you can use the dir function as follows:

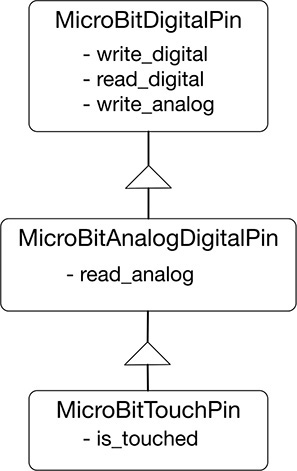
The two classes have most of the same methods, but the class that pin0 is an instance of has two extra methods, read_analog and is_touched. It would be wasteful if both MicroBitTouchPin and MicroBitDigitalPin implemented the methods that they had in common, and to avoid this repetition, a
mechanism called inheritance is used. This allows one class (MicroBitTouchPin) to inherit the methods and variables from another class (MicroBitDigitalPin). Figure 7-1 shows how the classes further down the hierarchy inherit methods from their parents.
Figure 7-1 The class hierarchy of pins on the micro:bit.
Please note that I have shown how these classes are organized so that you can see
how neat inheritance is. You don’t ever actually need to create instances of any of
these classes because all the instances you can ever use are already defined as pin0, pin1, and so on in the microbit module. Even though you don’t need to use it, its nice to know that this has been
implemented efficiently using inheritance.
Making Simple Modules
You may remember that in our timer example we had the problem of displaying either
min or mins after the number of minutes depending on whether it was more than one minute or not.
One (somewhat excessive) way to do this would be to define a function called pluralize that takes a string as a parameter, adds an s to the end of it, and then returns the result. This is a general-purpose function
that could be of use in other programs, so, as an example, let’s build it into a module
and then see how we could make the timer example use it.
This function looks like this:
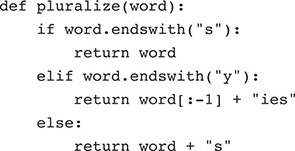
If the word already ends in s, it assumes that it’s already plural; if it ends in y, it removes the last letter and adds ies. Otherwise, an s is added to the word. This is a long way from perfect but will cope with the majority
of cases.
You can find the function in the file pluralize.py. Putting it in a separate file is enough to make it a module. We now need to copy
it onto the micro:bit so that we can use it for a second program, which can be a modified
version of the timer program. This is somewhat overkill for just adding an s to min, but it illustrates the process of using a module.
The program using the module needs the module to be on the micro:bit to run without giving an error, but also when you upload the program, reflashing the micro:bit, the module will be erased along with any other files on the micro:bit. The way around this apparent “chicken and egg” problem is to:
1. Flash the program that’s going to use the module onto the micro:bit and allow it to fail with an error because the module is missing.
2. Copy the module file onto the micro:bit.
3. Press the Reset button so that when the program runs, it now succeeds because the module file is now on the micro:bit too.
Unfortunately, you will have to do this every time you modify the program using the module.
You can find a version of the timer project that is modified to use the pluralize module in ch7_timer_using_module.py. The first change to the timer project code is an extra import at the top.

The other change is to the display_mins function so that it uses the module’s function.

Upload the program to your micro:bit, and don’t worry about the error message—that’s
just because the module’s not there yet. Now click the File button on Mu (make sure
that the REPL area is closed first), and drag the file pluralize.py from the Files on Your Computer area on the right to the Files on Your micro:bit”
area to the left (Figure 7-2). After copying, the module file should appear in the left-hand area where you dragged
it.
Figure 7-2 Copying the pluralize module onto a micro:bit.
Note that I encountered a few problems using the File feature of Mu. If the file fails
to copy, you may have to reset the micro:bit and/or quit and restart Mu. You can now
press the Reset button on the micro:bit, and the timer program should function just
as it did before, but now using the pluralize library.
Making a Module That Uses a Class
Although a module can be (and often is) a set of functions and/or variables, the microbit module clearly contains more than just variables and functions. We know this because
we can write code that uses the module that looks like this:

So unless you can have function names with a dot in them (which you can’t), there
must be something more going on. The dot indicates the calling of a special type of
function that belongs to a class of which display is one instance.
To illustrate how classes can be used in a module, let’s design a class that implements a very simple menu system on the micro:bit. The idea is that you use button A to cycle round the menu options, each one being scrolled across the display. Then, when the menu option you want is being displayed, pressing button B will make the selection.
Here is an example of how you might use the module to ask for an image to display.
You can find the program in ch07_menu_example.py. But to run it on the micro:bit, you will also need to copy the module file menu.py
onto your micro:bit.
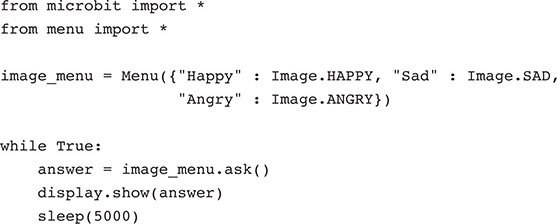
The menu is supplied with a dictionary at the time it is created, and the keys to
the dictionary are the names of the images (Happy, Sad, and Angry), and the values are the three corresponding images. To get the micro:bit to display
the menu, the method ask is called, and when a selection has been made from the menu, the ask function will return the image to be displayed. In the following sections, we will
gradually build up the menu module.
Module and Class Definition
This module is going to contain the class Menu and, just for good measure, will also define one instance of the class called Yes_No_Menu that makes a menu with two options: "Yes", which returns True when selected, and "No", which returns False. Because the menu module makes use of the microbit module, it must import it.
To define a class, you use the word class followed by the name of the class and a colon. All the methods within the class are
then indented.

Methods
Methods have the same structure as functions, except that every method must have a
first parameter called self. This is necessary even if the method doesn’t have any other parameters. The word
self denotes the object itself and is a way for methods to access other methods and variables
that belong to the class.
Most classes will need an initializer method called __init__. That’s init with two underscore characters on each side of it. This method will be run every
time a new instance of the class is created and is where you put any code that needs
to be run to set up the new instance.

In this case, the __init__ method takes the second parameter called choices and makes a new instance variable also called choices. This second choices is not a parameter like the first choices but a bit like a global variable, except rather than being global to the whole file,
choices actually belongs to an instance of the class. A second instance variable called selection is also created and is assigned the value 0 to indicate that by default the first item in the menu is to be selected. The final
instance variable, called num_choices is set to the length of the choices Dictionary.
The next method __watch_for_selection has a name that, like __init, is also prefixed by two underscores, indicating that the method is private. Being private means that the method should not be called from outside the class;
it is if you like a helper method to be used by the ask method, but only the ask method is public (can be used from outside the class). Both methods are listed next:
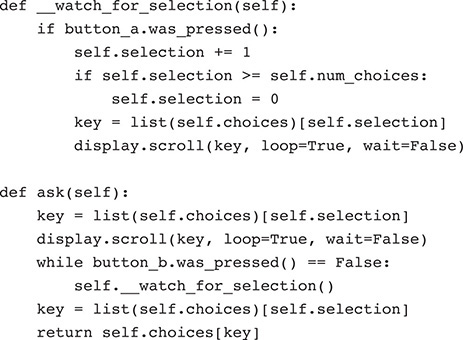
Let’s start in reverse order, looking at ask first. This first finds the currently selected key from the Dictionary and displays
it. Note the use of self before all references to the instance variables. Next, the while loop keeps calling __watch_for_selection until button B has been pressed, indicating that a final selection has been made.
When this happens, the newly selected key is found, and the value associated with
that key is returned.
The method __watch_for_selection checks to see if button A has been pressed, and if it has, it adds 1 to self.selection. It also checks whether the end of the menu options has been reached, and if it has,
it sets the instance variable self.selection back to 0. Finally, it displays the changed menu selection.
Using the Module
If you want to try out the example, you will need to carry out the procedure described earlier in the section “Making Simple Modules.” Alternatively, just to try out the code, you can forget that the module is a module and just paste the whole class definition at the top of your program.
Modules from the Community
One of the really nice things about most software communities is that people are willing to share the code they create so that other people can make use of it. Their Python modules are often referred to as libraries, and you will find a list of libraries and other micro:bit resources at https://github.com/carlosperate/awesome -microbit.
Most libraries that are contributed are concerned with connecting some external device, such as an ultrasonic rangefinder or a certain type of display. You will find more on using hardware in Chapter 10.
Summary
This chapter has explained the basics of modules as well as classes, instances, and
methods. You have seen how the built-in microbit module makes use of these. In Chapter 8, we will concentrate on the micro:bit’s LED display and the various ways that it
can be used.
