11
Radio and Communications
The micro:bit includes the hardware for transmitting and receiving data wirelessly. This radio hardware is intended for Bluetooth communication, but Bluetooth is not available in MicroPython (it uses too much memory). However, the good news is that you can still use the radio hardware to send messages wirelessly from one micro:bit to another. This chapter looks at using this radio hardware and also using the micro:bit’s USB interface to communicate with a computer.
Basic micro:bit-to-micro:bit Communication
Getting one micro:bit to send a message wirelessly to another is easy, thanks to the
built-in radio module. You’ll need two micro:bits for this, one with the program ch11_send.py flashed onto it and one with ch11_receive.py. Let’s look at the code for sending first.
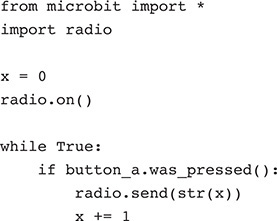
After the imports, the variable x is initialized to 0. This will be used to count. The next line turns on the radio hardware. The radio
can add up to another 10 mA to the current that the micro:bit consumes. The corresponding
off method can be used to reduce the power consumption by just turning on the radio when
it’s needed. The main loop waits for button A to be pressed and then sends the current
value of x after first converting it into a string.
Here is the corresponding receiver code from ch11_receive.py:
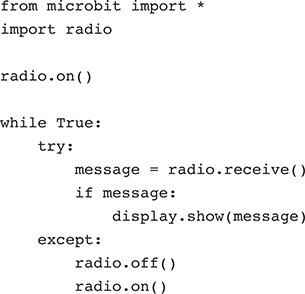
The receiver code uses the method receive, assigning the result to message. If there is no message to be received, then receive will return None, but if there is a message, it is shown on the display.
The try/except is there because there is a slight chance (especially in a room full of micro:bits)
of transmissions interfering with each other and causing errors. If this happens,
the except code restarts the radio by the time-honored method of turning it off and then on
again.
Messaging Different Users
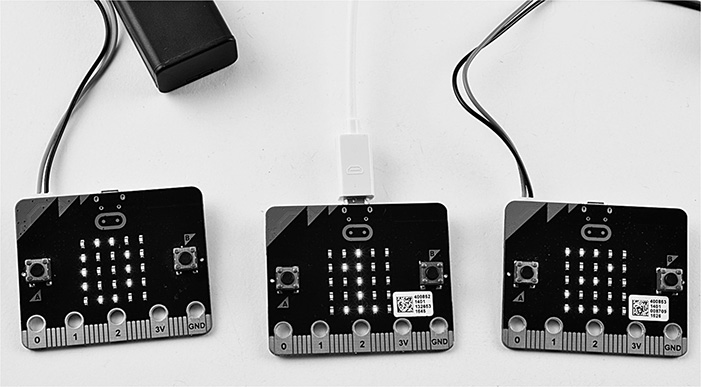
In the preceding example, if you had a third micro:bit, it too would receive the message. In this example, you can send messages to a specific micro:bit. To try out this example properly, you really need at least a couple of friends that also have a micro:bit, and each micro:bit will be identified by a number (Figure 11-1).
Figure 11-1 Sending messages to a particular micro:bit.
For example, we could have the same program running on each micro:bit that will be
listening for messages and also waiting for a press of button A to cycle through possible
recipents and a press of button B to send a message and cause the smile image to be displayed on the recipient. The program for this is in ch11_messenger.py.
Everyone involved in this project needs to select or be allocated a different number.
This will be the ID of their micro:bit, and they will need to change the value of
the constant MY_ID to match their ID number. It’s easiest if the numbers start at zero and run sequentially.
The constant NUM_MICROBITS also needs to be set to one more than the highest ID used.
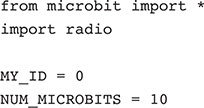
The global variable recipient indicates the ID to which the message is to be sent. This will be changed by pressing
button A.

Because it’s very easy to mix up a load of micro:bits, as each micro:bit starts, it will briefly display its own ID.

The main loop looks for button A to be pressed, and if it is, it adds 1 to recipient. If this makes recipient greater than or equal to NUM_MICROBITS, then recipient is set back to zero. If button B is pressed, then the recipient number is converted
into a string and then broadcast to all the other micro:bits.
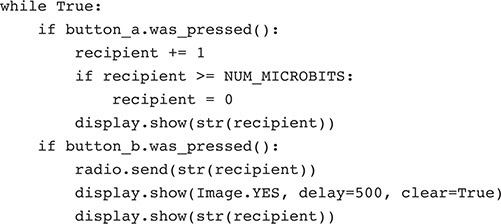
The final section of the main loop checks for incoming messages and whether the message matches the ID of the micro:bit, and then it smiles.

Advanced Radio Settings
Even at its default settings, the micro:bit’s radio has quite an impressive range.
Testing this outdoors using the test programs ch11_range_test_tx.py (transmit) and ch11_range_test_rx.py (receive), I found the range to be around 150 yards/meters in line of sight.
You can actually increase this range by changing the power level (the default is 6)
and the bit rate (the default is 1 Mbits/s) of the radio using the radio.config command:

The maximum size of the data sent is by default 32 bytes (or characters), and decreasing
this number using the optional parameter length also increases the chances of the message transmission being received successfully,
and hence increases the range.
Computer-to-micro:bit Communication
When you use the print function and text appears in the REPL, your micro:bit is sending a message to your
computer over the USB lead. You can also send messages in the other direction so that
when you type comething in the REPL, it is sent to the micro:bit. In Chapter 6, you saw how this can be useful when debugging a program by running Python commands
on the micro:bit. You can also have the Python program running on the micro:bit catch
messages typed in the REPL and, say, show them on the display. Program ch11_usb_receive.py shows how you can do this.
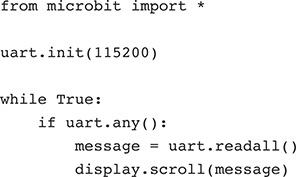
Flash the program onto your micro:bit, open the REPL, and try tying in some text. It should immediately be displayed on the micro:bit.
The micro:bit has an instance variable called uart (universal asynchronos receiver/transmitter) that handles all serial communications,
including communicating on the USB link. This has to be initialized to a certain data
transfer speed. For the micro:bit’s serial communication to the REPL, this needs to
be set to 115,200 baud (bits per second).
Inside the main loop, the any method is used to check whether any data have been sent that have not been read yet.
If so, the readall method is used to fetch the text, which is then shown on the micro:bit’s display.
Remote Control of Your micro:bit Using Python
Although in the preceding section you used the REPL to send messages to the micro:bit, other software, including Python running on your computer, can also send and, for that matter, receive messages.
This ability to send messages back and forth between Python running on your computer and MicroPython running on your micro:bit forms the basis of the Bitio Project created by David Whale. He originally developed bitio to allow a micro:bit to communicate with the game Minecraft so that you can, among other things, use a micro:bit as a controller for the game. You can read all about this in David’s excellent book, Adventures in Minecraft.
You can use bitio to remote control your micro:bit from a Python program on your computer (e.g., display things, control GPIO pins, etc.) but also do such things as detect button presses and sensor data from the micro:bit and use them in the program on your computer.
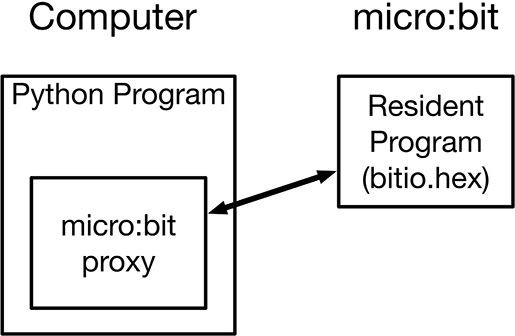
Figure 11-2 shows what’s going on when you use bitio.
Figure 11-2 How bitio works.
To use bitio, you do not need to write aything that actually runs on the micro:bit; you just flash a hex file onto it. This program runs on the micro:bit, providing the link between the micro:bit’s hardware and the USB messages between your computer and the micro:bit.
When it comes to using a Python program on your computer, a “proxy” for the micro:bit is used. Thus, when you do things such as this in your computer’s Python program, “Hello World” will actually scroll across your micro:bit’s display:

Python on Your Computer
To use bitio, you first need to get Python running on your computer. The good news
is that if you are a Mac or Linux user, your computer already has Python installed.
You can test this by starting a terminal session and entering the command python3. This is what I get on my Mac:

If you are a Windows user, you will need to install Python 3 by following the instructions at www.python.org/downloads/.
Getting Bitio
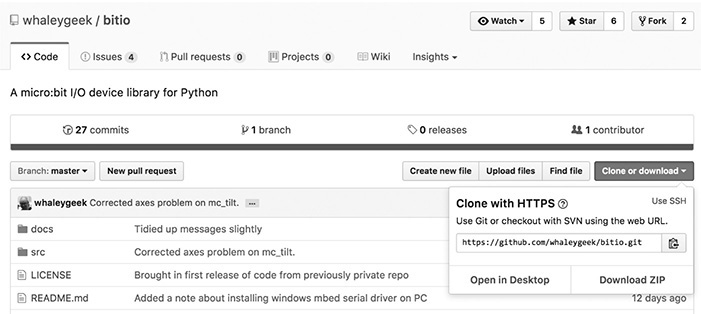
To install bitio on your computer, you first need to download it from https://github.com/whaleygeek/bitio. On this page, you will see a green button called Clone or Download. Click on this, and select the option Download ZIP (Figure 11-3).
Figure 11-3 Downloading bitio.
Installing the Resident Program
Unzip the file that you just downloaded, and inside you will find (among other things)
the file bitio.hex. Flash this onto your micro:bit.
Using Bitio from the Console
To use bitio either from a Python program or from your computer’s command line, your
program has to have access to the modules used by bitio. These are all contained in
the directory called microbit within a folder called src in the Zip archive that you just downloaded and extracted. So any Python programs
that you write for your computer to use bitio either need to be written in that same
src directory or the whole microbit directory needs to be copied into a new directory containing your program.
The quickest way to try out bitio from the command line is to change the directory
to the downloaded src directory and then run the command python3. Do this now, and then import the microbit module as shown here:
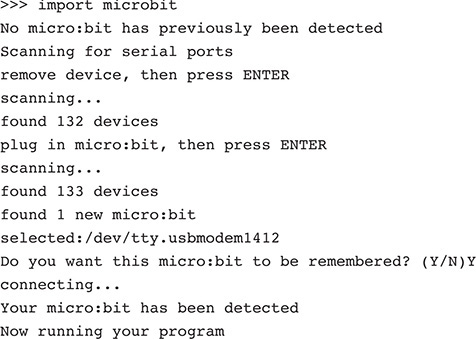
The first time that you import the microbit module into your computer’s Python program, you will be taken through a routine of
unplugging your micro:bit and then plugging it back in again so that bitio can detect
the port to which your micro:bit is connected. If you accept the option to remember
the device, then next time it will just connect automatically.
Once communication has been established, bitio will say Now running your program. Try entering the command:

You should see the now famous message scroll across the micro:bit’s display.
To check communication in the other direction, let’s try reading the accelerometer’s
x, y, and z values.

You will find documentation and a code example on the GitHub page for bitio mentioned earlier.
Summary
For such a small and low-cost device, the micro:bit’s wireless interface is powerful and easy to use. If you have a group of people with micro:bits, you can cook up some truly impressive projects. The micro:bit’s USB interface gives you the ability to use the micro:bit’s sensors and displays as peripherals to your computer.
This is the final chapter of MicroPython. In Chapter 12, you will find a brief introduction to the JavaScript Blocks editor, the other very common way of programming a micro:bit.
