6
Writing Your Own Programs
Writing Software
Writing programs for a device such as the micro:bit is actually a little different from the job of writing software for a “real” computer. When you are writing an app for a computer or phone, you will be writing a user interface that uses a large-resolution display (compared with the micro:bit) and have the benefit of a keyboard and mouse or touch screen to use as an input device. Also, an app for a computer or phone will be running on a processor hundreds of times faster with thousands of times more memory.
One of the joys of writing for a micro:bit is that by necessity the programs need to be short and sweet and work efficiently. There is no room for “bloat-ware.” Software written for small devices such as the micro:bit is called embedded software and (influenced by electronics engineers) comes with its own culture that is a little different from large-scale software development, although there are many good tricks to be taken from “big” software.
Keep It Simple
In particular, when you first start programming, it is better to start small with simple examples and gradually build on them rather than to type in hundreds of lines of code and then be faced with a mountain of errors and a confusing program that will then consume days of your time to fix. It takes time to track down and fix problems. Although it might seem like you waste a lot of time waiting while your latest version of the code is flashed onto the micro:bit, believe me, it’s much quicker to make small changes between each flashing than it is to track down tricky bugs.
Spikes and the REPL
When learning something new—perhaps exploring how the “sound” library works—try things out in the REPL. Reading the documentation is one thing, but actually trying things makes everything a lot more concrete. If you end up stringing a few lines together in the REPL, then you can always copy and paste them into your program later.
Similarly, professional programmers will often write spike solutions, small programs to test out a tiny part of a much bigger system. Once the spike has done its job of proving that something works, it is generally thrown away, although bits of it might be copied and pasted into the real program.
Versioning
In professional software development, every file that a programmer works on will be kept in a version management system, and whenever a change is made to a file of code that completes a small task of work, a new version of the file will be created. The version management system allows the programmer to, at any time, revert to how the code looked in an earlier version.
Version management is essential in professional programming but is not really necessary
for the small programs usually developed by a single person for the micro:bit. However,
it is a really good idea just to make a copy of your micro:bit program file before
you make any major changes. You can do this in your computer’s file system, and a
common convention is to make a copy of the file with _org (for “original”) after the program’s name but before the .py. In this way, if you mess up your program, you can just delete the broken program
and rename the last working version, removing the _org to reinstate it.
Another option, if you do mess up your program, is Mu’s undo feature. This can be really useful. Mu remembers the recent changes you have made.
On Windows and Linux computers, to undo your latest change, press CTRL-Z, and on a Mac, use CMD-Z.
Comments
Any line in Python that has a # indicates that the rest of the line after the # is a comment. Comments are ignored by MicroPython. They are just messages to anyone reading the
program (including you). Good reasons for adding comments to your code include
 To explain what the program does and maybe who wrote it
To explain how to tweak parts of the program that someone might need to change
To insert before a function, where the purpose of the function requires more explanation
than just the function name itself
To explain anything that is tricky to understand and you can’t make obvious by
refactoring (see later section)
As an aid to beginners who are learning to program
Aside from the “aid to beginners” reason, there is no point in commenting on the glaringly obvious. For example, writing the following is not only pointless, but it can also actually be misleading:

The code is already self-documenting, so it doesn’t need an extra comment. The reason that such comments are bad is that you now have two things to maintain and keep in step. So, if you later find that the code is supposed to subtract 1 rather than add 1, you have to change both comment and code. Often this double change doesn’t happen, leaving inconsistency. People who program for a living will generally mistrust comments and “let the code speak.”
Usually, when programming, comments have no effect on the size of the final running program. However, MicroPython is a little different in that the whole text of the program (comments and all) is stored in the micro:bit’s flash memory. So, if when you try to flash your program onto a micro:bit you get the error message, “Unable to flash. Your script is too long,” try removing the comments.
Refactoring
Good programmers are not judged by how many lines of code they write a day but by how few they need to write to get the job done. Good programmers have a need to keep things neat and tidy, and when they find code that is overcomplicated or repeats itself, they will refactor it, simplifying it and thereby reducing its size and making it easier to work on.
The acronym DRY (Don’t repeat yourself) means that where you find yourself repeating the same lines
of code more than once in the same program, you probably need to refactor those lines
into their own function. For example, the following version of ch5_message_board.py will work just fine but could be improved:
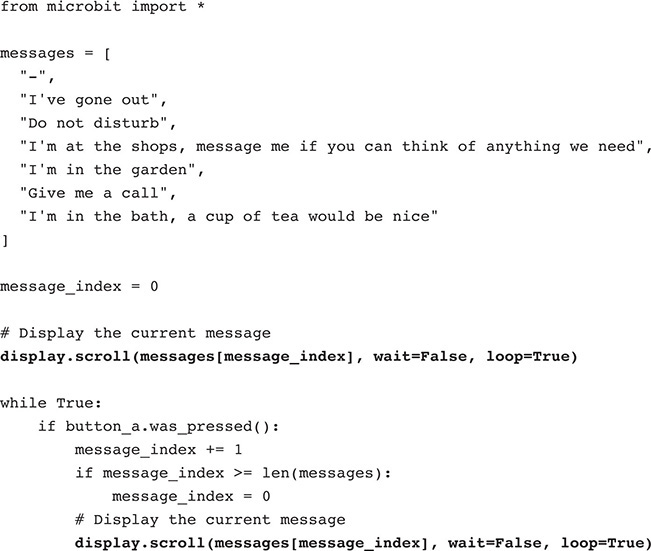
The two fairly long highlighted lines are identical. They both display the current message, but this needs to be done in these two places in the program. The fact that both lines are preceded by a comment saying what the next line does is a dead giveaway that this line should be made into its own function so that the comments become unnecessary because the meaning is there in the function name.
Here is the DRY version of the relevant part of the program:
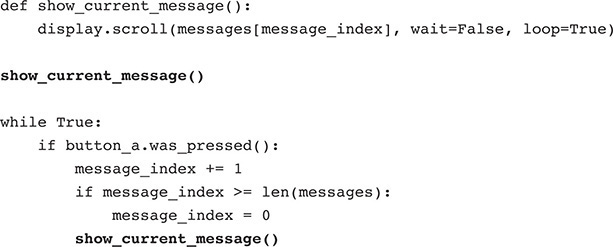
To illustrate why DRY code is important, imagine that you want to make the message
scroll more quickly by using the delay optional parameter to scroll. Since refactoring the code, all you need to do is alter
the one line inside show_current_message() to be

State Machine Design
The timer example that we started back in Chapter 3 actually gets surprisingly complicated when you start to think about how it should behave. What happens when you press the buttons is different depending on whether you are setting the time on the timer, or the timer is counting down, or the timer is buzzing to indicate that time is up. Programs for devices such as the micro:bit often need to make use of the idea of the program being in different modes or states, and a useful way to plan out exactly how the program should work and move between these modes is called a state machine. Actually, this concept, which has come from mathematics, is more properly called finite state machines (FSMs). But don’t worry, despite the very formal name, it’s actually pretty easy to draw a state machine diagram as an aid to writing your code.
The first step is to identify the states (think modes) that the timer can be in. It can be in one of the following three states:
SET—setting the number of minutes from which the timer will start
RUN—counting down
ALARM—sounding the alarm because the countdown has finished
By convention, constants such as SET, RUN, and ALARM are written in uppercase letters.
You now need to plan out just what will cause your program to change from one state to another and anything that may happen as that transition occurs. The best way to do this is as a diagram like the one in Figure 6-1.
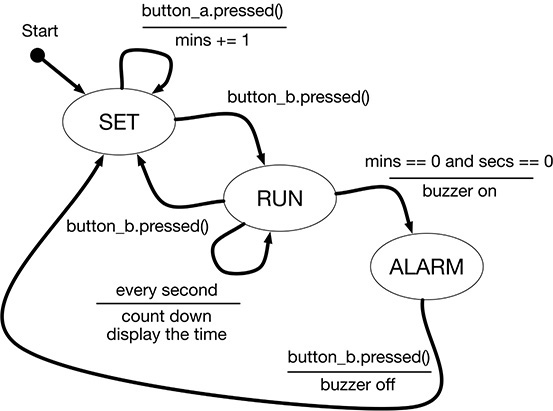
Figure 6-1 A state machine diagram for the timer example.
The first arrow from Start indicates that when the program runs; SET should be the first state that it enters. Once in the SET state, pressing button A will increase the number of minutes by one. This is indicated
by a piece of text above the line (button_a.pressed())—this is the condition. Below the line is the “action” to carry out (mins += 1), and the arrow bends all the way back to SET, indicating that after button A has been pressed, we still stay in the SET state. Here mins += 1 is actually shorthand for the whole adding of 1 to the minutes and wrapping around back to 1 when you get to 10 that we explored in Chapter 3.
If we are in the SET state and button B is pressed, then we change state to RUN, and we don’t need to do anything else when we change state, so there is no need
for a line or an action. From the RUN state, pressing button B again will take you straight back to SET. Also, while in the RUN state, the time will count down every second and be displayed. When the numbers of
minutes and seconds both reach zero, the buzzer will be turned on, and we will enter the ALARM state, from which we will return to the SET state, turning the buzzer off, when button B is pressed.
Revisiting the Timer Example
It’s time to revisit the code for the timer example and use the state machine diagram of Figure 6-1 to rewrite the code. So disregard what we have done so far in the timer example; we are going to start again.
Rather than trying to type in all the following code, I suggest loading the program
ch06_timer_03 to program ch06_timer_06 as they are referenced in the following discussion.
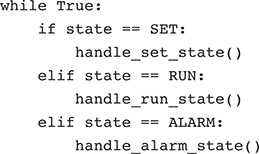
A State Machine Framework
Let’s start with the basic template for representing the SET, RUN, and ALARM states of our program. The following code isn’t a complete program, so don’t try
to run it.

The first line above assigns the values 0, 1, and 2 to SET, RUN, and ALARM. Each state has a unique number, but we don’t need to use the number for anything
other than telling the states apart because we will always refer to the state by its
variable name to make the code easier to read.
The variable state is a global variable used by the program to keep track of the current state. To help
keep the state in manageable units, three functions will be used to “handle” what
goes on in each state. These are empty at the moment, but we can start to fill them
out.
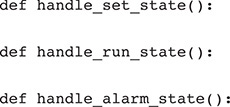
The main while loop is a sequence of if/elif commands that call the appropriate handler for the current state.
Switching Between States
Let’s now expand the program so that when we press button B, we toggle back and forth
between the SET and RUN states. The handlers for SET and RUN are listed in the next piece of code—you can run this example now using the program
ch06_timer_3.py.
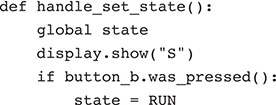
The first thing to note is that the first line of the handler is:

By default, Python will allow you to read values from a global variable from within
a function, but if you try to change the value of a variable inside a function, Python
creates a local variable with the same name as the global variable unless you use
the global command. Most programming languages do not do this; they allow unfettered access
to global variables. So if you have come from another language and your Python program
appears to be defying all logic, check that you are not accidentally “shadowing” a
global variable.
The next line displays the letter "S" just so that we can see that we are in the SET state. If button B has been pressed (since last time we checked), the global variable
state is set to RUN. The handler for the RUN state is pretty much a mirror image of the one for SET.

Adding Code to the SET State
Let’s add a bit more to handle_set_state so that we can adjust the minutes. We are now reintroducing code that we originally
wrote back in Chapter 4. You can find the revised program in ch06_timer_04.py. Here is the updated handle_set_state:
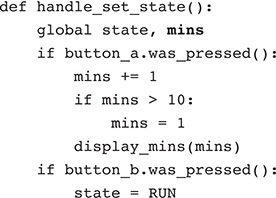
We have added mins to the list of global variables used because mins will be changed when you press button A. Whenever mins is changed, the function display_mins is called to update the display of minutes.
This is the same code that you met in Chapter 4, except that the optional parameters wait and loop have been added to scroll so that the message will repeatedly display the number of minutes set.
Try running ch06_timer_04.py, and notice how you can still switch between the modes using button B but can only
change the minutes when you press button A.
Adding Code for the RUN State
As it stands, the RUN state simply displays an R to show you that you are in the RUN state and allows you to return to the SET state using button B. Referring to Figure 6-1, we also need to add the following to the handler for this state:
Every second, decrease the count time (for which we will need a new display_time) function.
Check for mins and secs to have reached zero, and then sound the buzzer and go to the ALARM state.
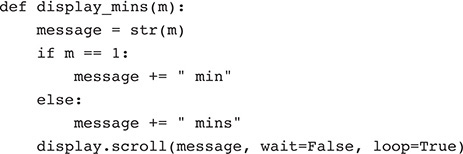
You can try out the revised version in the file ch06_timer_5.py. Before writing the handler itself, you are going to need a new function (display_time) that displays both the minutes and the seconds left in the countdown with a colon
between them.
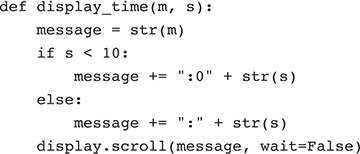
The message to display is always going to start with the number of minutes followed
by a colon, but if the number of seconds is a single digit (<10), then we need a leading 0 before the seconds.
The handle_run_state function is by far the most complex in this program. Here is the revised function:
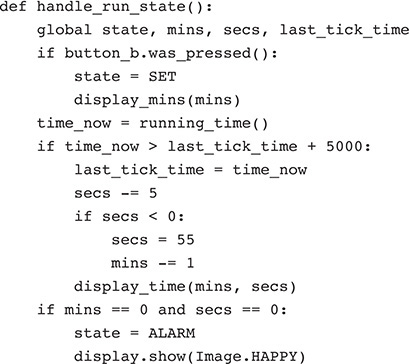
The first thing to notice is that there are two new global variables: secs, which records the current seconds count, and last_tick_time, which is used later in the function to determine whether it’s time to “tick” the
clock, reducing the time and updating the display. Both of these new variables are
declared near the top of the program.
After the check for button A being pressed, there is a new section of code that calls
a built-in function called running_time that returns the number of milliseconds since the micro:bit was last reset. This
value is assigned to the variable time_now. If this time_now is greater than last_tick_time by 5 seconds (5,000 milliseconds), then first of all last_tick_time is set to time_now (ready for the next 5-second period to elapse), and then the number of seconds is
reduced by 5. The timer counts down in steps of 5 seconds rather than the 1 second
suggested by Figure 6-1 because it takes longer than a second for the display to scroll the time remaining.
The final part of handle_run_state checks to see if mins and secs are both 0, and if they are, it sets the state to ALARM and displays the HAPPY image on the display. In Chapter 10, we will modify this example again to make an alarm sound when the countdown is complete.
Adding Code for the ALARM State
At the moment when the countdown is complete, the program will go to the ALARM state and just sit there until the micro:bit is reset. The handle_alarm_state needs to be modified as shown in the next piece of code so that when button B is
pressed, the program jumps all the way back to the SET state.

Load the timer example thus far from the file ch06_timer_06.py, and try it out.
Debugging
Programs rarely work perfectly first time. There is usually some debugging to be done to fix problems with the program not working correctly. The trouble is that it’s often hard to see what’s going wrong. If your bug actually causes an error message, then the REPL can be really useful in finding out what went wrong.
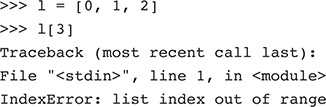
For example, load the program ch06_debug.py, but before you flash it onto your micro:bit, open the REPL.
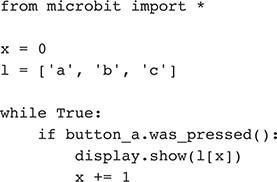
This is a program destined to fail because if you keep pressing button A, when it
gets to 3, there will be an “index out of range” exception. Try pressing button A to cause
the error. When the error occurs, the error message will be displayed in the REPL
and will also scroll itself across the micro:bit’s display agonizingly slowly. Of
more use, though, when it finishes its scrolling, the program exits, and you are left
at the REPL command line (Figure 6-2).
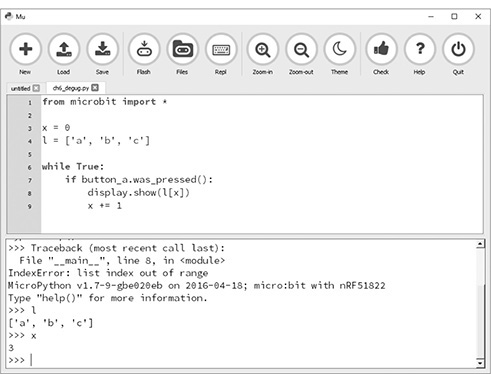
Figure 6-2 Debugging with the REPL.
From here you can run MicroPython commands, including checking on the values of variables.
Type l to see the List and x to see the value of the index position. It’s easy to see why the program failed.
More Python
In a “getting started with” book such as this, it is not possible to cover everything about Python. However, there are a few more things about Python that I think it would be useful to mention.
Formatting
If you are putting together a complicated message to be displayed either using display.scroll or print to print something in the REPL, you can append strings together using the plus sign
to build up your message. You’ll need to remember to turn any numbers into strings
first using str. For example:

An alternative way of doing this is to use the built-in format method on string. This method assumes that the string is a format string made up of plain text (which will be left unchanged) and placeholders, in the form
of pairs of curly braces, for values that will be substituted into the string. The
preceding example could also be written as:

There is actually a whole load more of string formatting options. If you find yourself needing to do something fancy, take a look at the Python 3 documentation on formatting strings at https://docs.python.org/3/library/string.html#format-string-syntax.
Exception Handling
Exceptions are things that go wrong unexpectedly in a program. In Chapter 5, you discovered that if you try to access an element of a List that doesn’t exist, you get an error message. You can deliberately cause this by typing the following in the REPL:
What happens when you do something like this, which is not allowed, is that MicroPython is said to raise an exception. That is, the normal flow of the program is interrupted to flag the error. The program then stops.
Load the program ch06_exceptions.py and upload it onto your micro:bit with the REPL open so that you can see the messages
it produces. Here is the program:

And here is the resulting output:

Using try and except in this way allows you to catch the exception and prevent it from crashing the program.
As you can see, output message 3 does not appear because as soon as the out-of-bounds
exception happens, the program jumps away to the except block. After the except block has been run, the program continues as normal, with the last line of code to
print message 5.
There is more to exceptions than I have covered here. You can, for instance, get hold
of the error message in the except block and also only respond to certain types of exceptions and even deliberately
raise your own exceptions. If you find yourself wanting to do something fancy with
exceptions, take a look at https://python.readthedocs.io/en/latest/c-api/exceptions.html.
Generally, it’s better to design your program so that exceptions do not get thrown, but sometimes this is outside the control of the program, as you will see in the next section.
File System
MicroPython can read from and write to files of data stored in a micro:bit’s internal storage. You can create files from your program, write data into them, and then read them.
You can see the files on your micro:bit by clicking on the File button in Mu (Figure 6-3). The left side of the File area shows the files on your micro:bit (data files, not
program code), and the right shows the files in the mu_code directory of Mu on your computer.
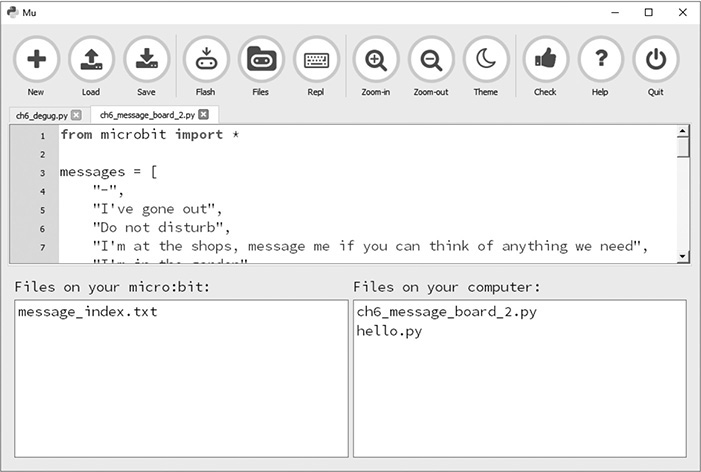
Figure 6-3 The micro:bit file system.
Files are a useful way of storing data that you don’t want to be lost every time you
restart your micro:bit. For example, let’s modify the message board project of Chapter 5 so that it stores the index position of the message in a file. You can find this
program in ch06_message_board_2.py.
The key changes to this project are the addition of two new functions: save_message_index and load_message_index. The first of these looks like this:

The with/open/as mechanism in Python is a neat way of ensuring that having opened a file to read,
it is always closed so that other programs can use the file. The open part takes the name of the file to be written as one parameter and the mode to open
it as its second (w for write); it then provides a handle to the file, in this case, the handle (also
a variable) called just file. You can then write data to the file within the with/open/as block of code, and when you leave the block (stop indenting), the file is automatically saved and closed.
In this case, inside the block, the message_index is first converted into a string and then saved. Here is the counterpart for reading
the file:
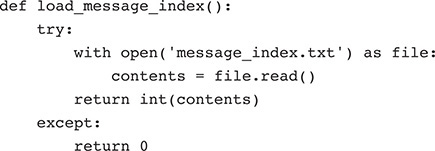
The function load_message_index will return the index value that was saved. However, there is a problem here. The
first time that the program runs, the file will not exist, so a try/except block is put around the file to catch the exception that occurs if this is the case.
When opening a file to read it, you do not need to supply the second parameter because
read mode is the default. If the file does exist, then the value is read from the file,
converted into an integer, and then returned. If, however, the file does not exist,
the exception is caught, and the value 0 returned, so the first message is displayed.
All that remains is to add in some calls to the new functions. The call to read_message_index only needs to occur once during startup, just before the message is displayed. However, the call to write_message_index needs to take place every time that the message index is changed. This all happens
toward the end of the program. This is listed in the next piece of code with the new
lines highlighted.
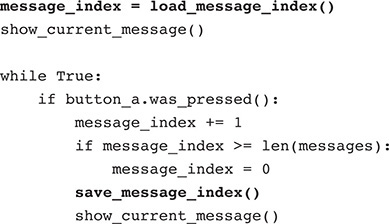
Try running the program, changing the selected message, and then unplugging your micro:bit. When you plug the micro:bit back in, your message choice will be displayed automatically. The file system on the micro:bit does not allow you to create directories. It’s just a list of files. It also gets erased every time a new program is flashed onto the micro:bit.
Summary
In this chapter, we have delved a bit deeper into Python but somehow still managed to avoid one of the key features of this language, that is, object orientation. In Chapter 7, we will look at classes and learn a bit more about the built-in classes as well as how to make your own.