5
Lists and Dictionaries
There are two ways of structuring data that are extremely useful and are found in most programming languages. One is a way of representing lists of things (called Lists in Python), and the other links data with a key (called Dictionaries in Python). In this chapter, you will learn all about Lists and Dictionaries and also build on what we have learned so far to write some more programs. To distinguish Python Lists and Dictionaries from the everyday use of those words, I will capitalize their first letter.
Lists
To get to know Python Lists, we will use the example program of a message board that allows us to select one message to be displayed from a number of predefined messages. You could, for example, make this into a physical project that you could leave on your door to express messages to other people in your house without having to resort to anything so crude as pen and paper.
Message Board Example
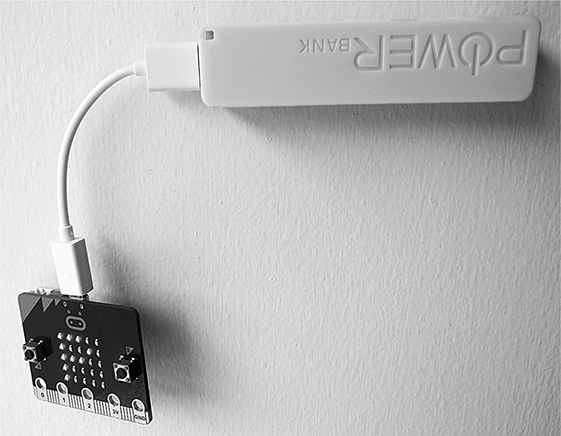
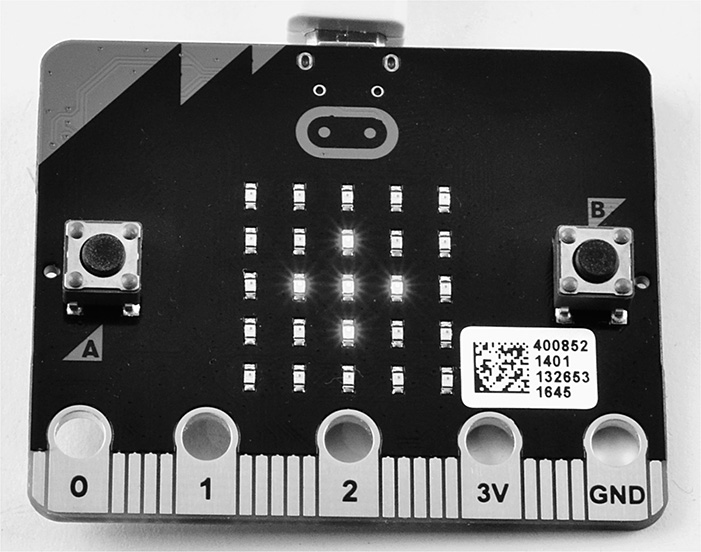
Rather than dealing with Lists in an abstract way, let’s jump right into an example, and then we can deal with the details of how you can use Lists in more detail later. This is a really simple project to make. You can use a battery power source for your micro:bit, or if you are going to place it close to an AC outlet, you can use a USB power lead. You will also need some way of fixing it to your door. Figure 5-1 shows my approach. The battery is a USB rechargeable battery pack that costs less than $5 and will power a micro:bit for around 24 hours before needing to be recharged. It’s stuck to the door with adhesive pads, and the micro:bit is attached by a short USB power lead.
Figure 5-1 Message board example.
The full code for this project can be found in ch05_message_board.py. The Listing for this program is broken into chunks. The first thing to note is the
messages List.
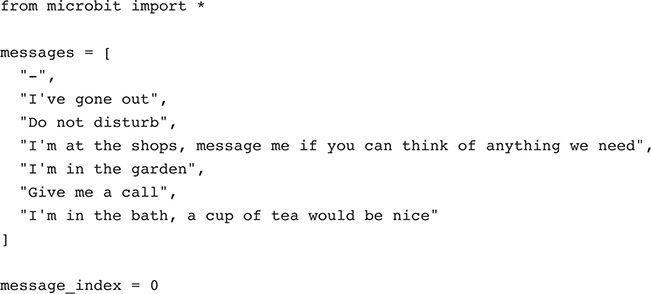
The variable messages is similar to other variables that you have used, but instead of having a value that
is a single number or string, messages is given a value that is a list of strings. Python knows that it’s a List because
the values for the List are enclosed in square brackets. Each element of the List
is separated by a comma, and to make the messages easier to read, each is on its own
line indented by four spaces. The first message is a simple "-" to indicate no message. You can replace my messages with messages of your own, and
you do not have to have the same number of messages.
The global variable message_index indicates the index position in the List of the message to be displayed. This is
the number of the string in the List to be displayed. An important point is that this
is initially set to 0 rather than 1. This is so because index positions in Python start at 0. So the first element in the List is 0, the second 1, the third 2, and so on.

The function show_current_message calls display.scroll. The first parameter in the message to be displayed is messages[message_index]. The square bracket after the List name containing an index number allows you to
fetch one particular element from the List. The two optional parameters to display.scroll tell the micro:bit not to wait until the message display has finished before carrying
on with the rest of the program, and the loop parameter tells it to keep displaying the message repeatedly. Immediately after show_current_message is defined, it is also run, so the first message of "-" is displayed.
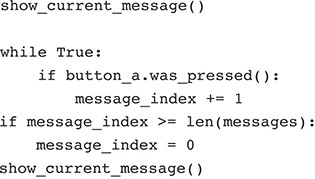
Next, we come to the main while loop. This checks for a button press on button A, and if it finds one, it adds one
to message_index. To make sure that we don’t run off the end of the List and cause a range error, the built-in function len is used to find the length of the List and compare it with message_index. If message_index is greater to or equal to the length of the messages List, then message_index is set back to 0.
Finally, and still only if button A is pressed, the message to be displayed is changed
to the message from the List with the index position message_index.
The Lowdown on Lists
This is quite a high-speed tour of the program, so now let’s go into more detail about how Lists work and what you can do with them. There is also a section in Appendix A that provides a reference for using Lists.
Accessing Elements of a List
As you saw earlier, to fetch a particular element of a List, you can put the index number of the element that you want after it inside square brackets. Start the REPL from Mu, and then try out the following commands from your micro:bit’s command line:
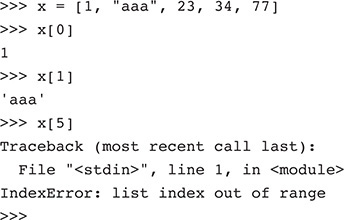
Here you have created a List in a variable called x that has five elements, which are a mixture of four integers and one string. When
you come to try and access the element with index 5, you get an error message telling you that the index is out of range.
In addition to being able to get a particular element, you can also set it. Now try entering the following lines:
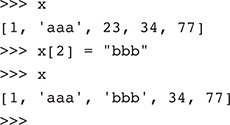
Entering just x on its own allows you to see the contents of the List. You then set list element
2 (the third element) to "bbb". Displaying the contents of the list again confirms the change.
In addition to being able to get individual elements of a List, you can also get a section of a List. For example, if you wanted the second and third elements of the List, you would type:

This is a little confusing because you might expect the number after the colon to
be 2, but actually the end point of the range is exclusive. That is, it is one more than
the last index.
Adding to a List
You can add elements to the end of a List using append, as illustrated in the next piece of code. Note that we are starting with a fresh
List.

If you want to add a new element at a different position in the List, you can use
insert.

The first parameter of insert is the position in the array where the new element should go, and the second parameter
is the element to insert (in this case, the integer 11).
Deleting from a List
The pop command allows you to remove an element from the List. By default, pop removes the last element from the List and returns it.
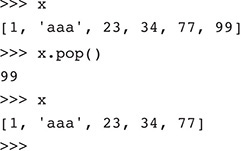
You can also “pop” a specific element from the List by using pop with a parameter of the position of the element to be popped.

Joining Lists Together
In the same way that you can join together strings using the plus sign (+), you can also use plus to join to arrays like this:

Note that this does not alter either l1 or l2; it returns a new List that is a combination of the two.
Strings as a List of Characters
Python lets you do many of the things that you can do to a List to strings. After all, a string is actually a list of characters. So you can do things like this to access a particular character of a string:

You cannot, however, modify a particular character in a string. If you try, you will get an error message like this:

You can also splice off sections of a string (called substrings) like this:

The function len works on both Lists and strings:

You will find a handy reference for using strings in Appendix A.
Dictionaries
Whereas you access elements of a List by their position, elements of a Dictionary are accessed by a key that can be a string or a number or pretty much anything. A value is associated with each key, so to find an element in a dictionary, you supply a key, and the Dictionary responds with the appropriate value.
An Example
The following mini-project (Figure 5-2) displays a different symbol on the display to represent the last movement gesture detected by the micro:bit.
Figure 5-2 The gesture-detector project.
You will learn more about gestures in Chapter 9, but the basic idea is that the micro:bit can use its accelerometer to detect the orientation of the board (face up, face down, tilted left, tilted right, tilted forward, or tilted backward). The program displays a different symbol for each type of gesture.
One way to write this program would be to have a whole load of ifs. Actually, there is nothing wrong with that, but the solution here has the advantage
that it is easier to change the symbols to display because they are all at the top
of the program in a Dictionary rather than being spread about the program. You can
find the program in ch05_gesture_detector.py.
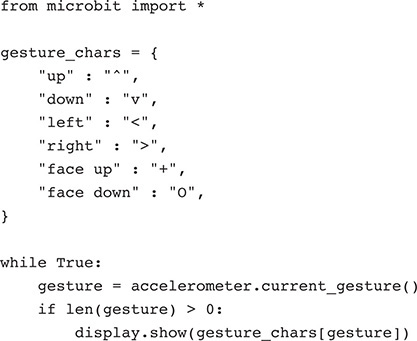
Whereas a List uses square brackets around its contents, a Dictionary uses curly braces
({ and }). Within the curly braces, each element is in two parts: the key before the colon
and the value after it. You do not have to put each key/value pair on a new line,
but I have done so here to make it easier for you to see what’s going on.
Looking at the Dictionary gesture_chars, you can see that the key of "up" has a value of "^" and that of "down" has a value of "v", and so on. The while loop first gets the current gesture, which will be a text string, and then, as long
as the string is not empty (length is greater than 0), it looks up the character to “show” using the same square-bracket syntax that you
use with a List, except that in this case you have a key (in this case, a string)
inside the square brackets rather than a position index.
Upload the program, and try tilting and shaking the micro:bit to see the display change.
Dictionaries in Detail
Let’s look in more detail at how to use Dictionaries. To get the hang of Dictionaries, open the REPL, and be prepared to try some experiments. You will also find a section in Appendix A that gives more information on using Dictionaries.
Accessing Elements of a Dictionary
Try this example in the REPL:

This line creates a new Dictionary with three elements. Each element has an integer as its key and a string as its value.
To retrieve one of the values, you must know its key. The following line will return
the element with a key of 5:

If you attempt to access an element of the Dictionary using a key that does not exist, you will get an error message:

The word KeyError tells you that the key has not been found. This can be inconvenient, especially if
you just want to see if the key exists in a Dictionary. To avoid such errors, use
get rather than the square-bracket notation.
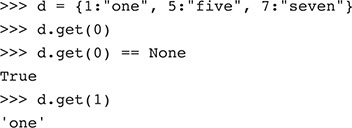
Now, when you try to get the value of a key that doesn’t exist, you get the special
value of None. None is used in Python to signify the absence of something.
Adding Items to a Dictionary
You can add items to a Dictionary like this:

To remove an element from the Dictionary, you can use pop. The parameter to pop is the key of the element to remove, and pop modifies the Dictionary and then returns the value for that key.

Summary
In this chapter, you have learned more about some of the fundamentals of Python. In Chapter 6, you will return to the timer project and also look at some more advanced programming techniques, as well as how to go about dealing with complex designs.
