
By Mitchell Davis
My husband is a palliative care doctor who helps people with serious illnesses make critical decisions, often at the end of their lives. Several years ago, I told him he had better learn how to make my family’s kasha varnishkes because they would be among my final requests. A combination of toasted buckwheat groats, mushrooms and onions sautéed—or, rather, steeped—in copious amounts of butter, and fresh egg noodles cooked separately and mixed together in roughly equal proportions is about as much of a recipe as we’ve ever used.
I like to pack the resulting kasha varnishkes in a casserole, baste it with broth to keep it moist, and bake until browned before serving alongside brisket) or roast chicken—perfect to soak up the pan juices. The butter is not exactly traditional, nor is it kosher, of course, if the kasha varnishkes is (or should it be “are”?) served alongside meat. But the butter is the secret to my family’s recipe, which I have seen turn kasha haters into lovers in one bite—a mitzvah in the face of gastro-anti-Semitism, if you ask me. In a kashrut pinch, you can substitute freshly rendered chicken schmaltz or extra-virgin olive oil for the butter, but the result will be less moreish.
Kasha was the staple grain of peasants in and around the Pale, and for many it still tastes of poverty. For me, it tastes of riches. (Maybe it’s all the butter?) While writing my Jewish cookbook, The Mensch Chef, I tried researching the origins of the dish and its name. Despite several oft-repeated theories, Yiddish scholars at YIVO cannot confirm the root of the word varnishkes. Their etymologists do not support the popular explanation that it’s derived from the word vareniki—the Russian equivalent of the Polish pierogi—and that it had something to do with scraps of leftover dumpling wrapper dough tossed into the kasha pot. From a frugal cook’s perspective, it’s a nice story, even if apocryphal. No matter. Kasha varnishkes is delicious in the singular and in the plural.
Kasha Varnishkes
Serves 8
For the Kasha
2 cups (480 milliliters) boiling water, stock, or chicken soup
2 tablespoons (30 grams) unsalted butter (optional)
1 teaspoon kosher salt
1 cup (205 grams) uncooked buckwheat groats
1 large egg or 2 large egg whites, lightly beaten
¼ teaspoon freshly ground black pepper
For the Mushrooms and Onions
4 ounces (1 stick/110 grams) unsalted butter, or ½ cup mixed peanut oil and melted chicken schmaltz
2 large yellow onions, chopped
¾ pound (340 grams) mushrooms, such as button, portobello, romano, or a combination, cleaned and finely chopped
2 teaspoons kosher salt
Freshly ground black pepper
8 ounces (227 grams) bow-tie pasta
Kosher salt and freshly ground black pepper
½ to 1 cup (120 to 240 milliliters) vegetable, chicken, or beef stock, if reheating in the oven
Make the kasha: Combine the water, butter (if using), and salt in a small saucepan and bring to a boil.
Meanwhile, place the buckwheat in a wide saucepan, add the egg or egg whites, and stir to combine. The buckwheat will clump together, but don’t worry about it. Set the pan over medium-high heat and cook, stirring continuously, until the clumps of buckwheat break apart into individual grains and start to give off a distinct nutty aroma, 5 to 7 minutes.
Pour in the hot liquid, then add the pepper. Reduce the heat to low, cover, and simmer until all the liquid has been absorbed and the kasha has plumped, 25 to 30 minutes. Remove from the heat and fluff with a fork. Set aside.
Make the mushrooms and onions: Melt the butter in a large saucepan or skillet over medium heat until warm. Add the onions and cook, stirring now and again, until translucent, 7 to 8 minutes. Add the mushrooms, salt, and pepper to taste and cook, stirring often, until the mushrooms have given off most of their water and the mushrooms and onions are soft, about 10 minutes. Taste and adjust the seasonings, if necessary. Transfer the mushroom-onion mixture to a large bowl and add the kasha.
Meanwhile, bring a large pot of salted water to a boil. Cook the pasta until al dente according to the instructions on the package. Drain and transfer to the bowl with the kasha and mushroom-onion mixture. Toss until everything is combined, then taste and adjust the seasonings, if needed.
Eat the kasha varnishkes as is, heat them up in a pot on the stove, or make them in the morning and reheat them in the oven before dinner. To reheat, preheat the oven to 325ºF (163ºC). Transfer the kasha varnishkes to a 2- or 3-quart (2- or 3-liter) baking dish. Pour over about half the stock. Cover with aluminum foil and bake for about 25 minutes. Remove the foil; if the mixture looks dry, pour another ½ cup (120 milliliters) stock over it. Increase the oven temperature to 375ºF (190ºC). Bake for 15 to 20 minutes more, until the noodles on top begin to brown. Remove from the oven and serve.
By Wayne Hoffman
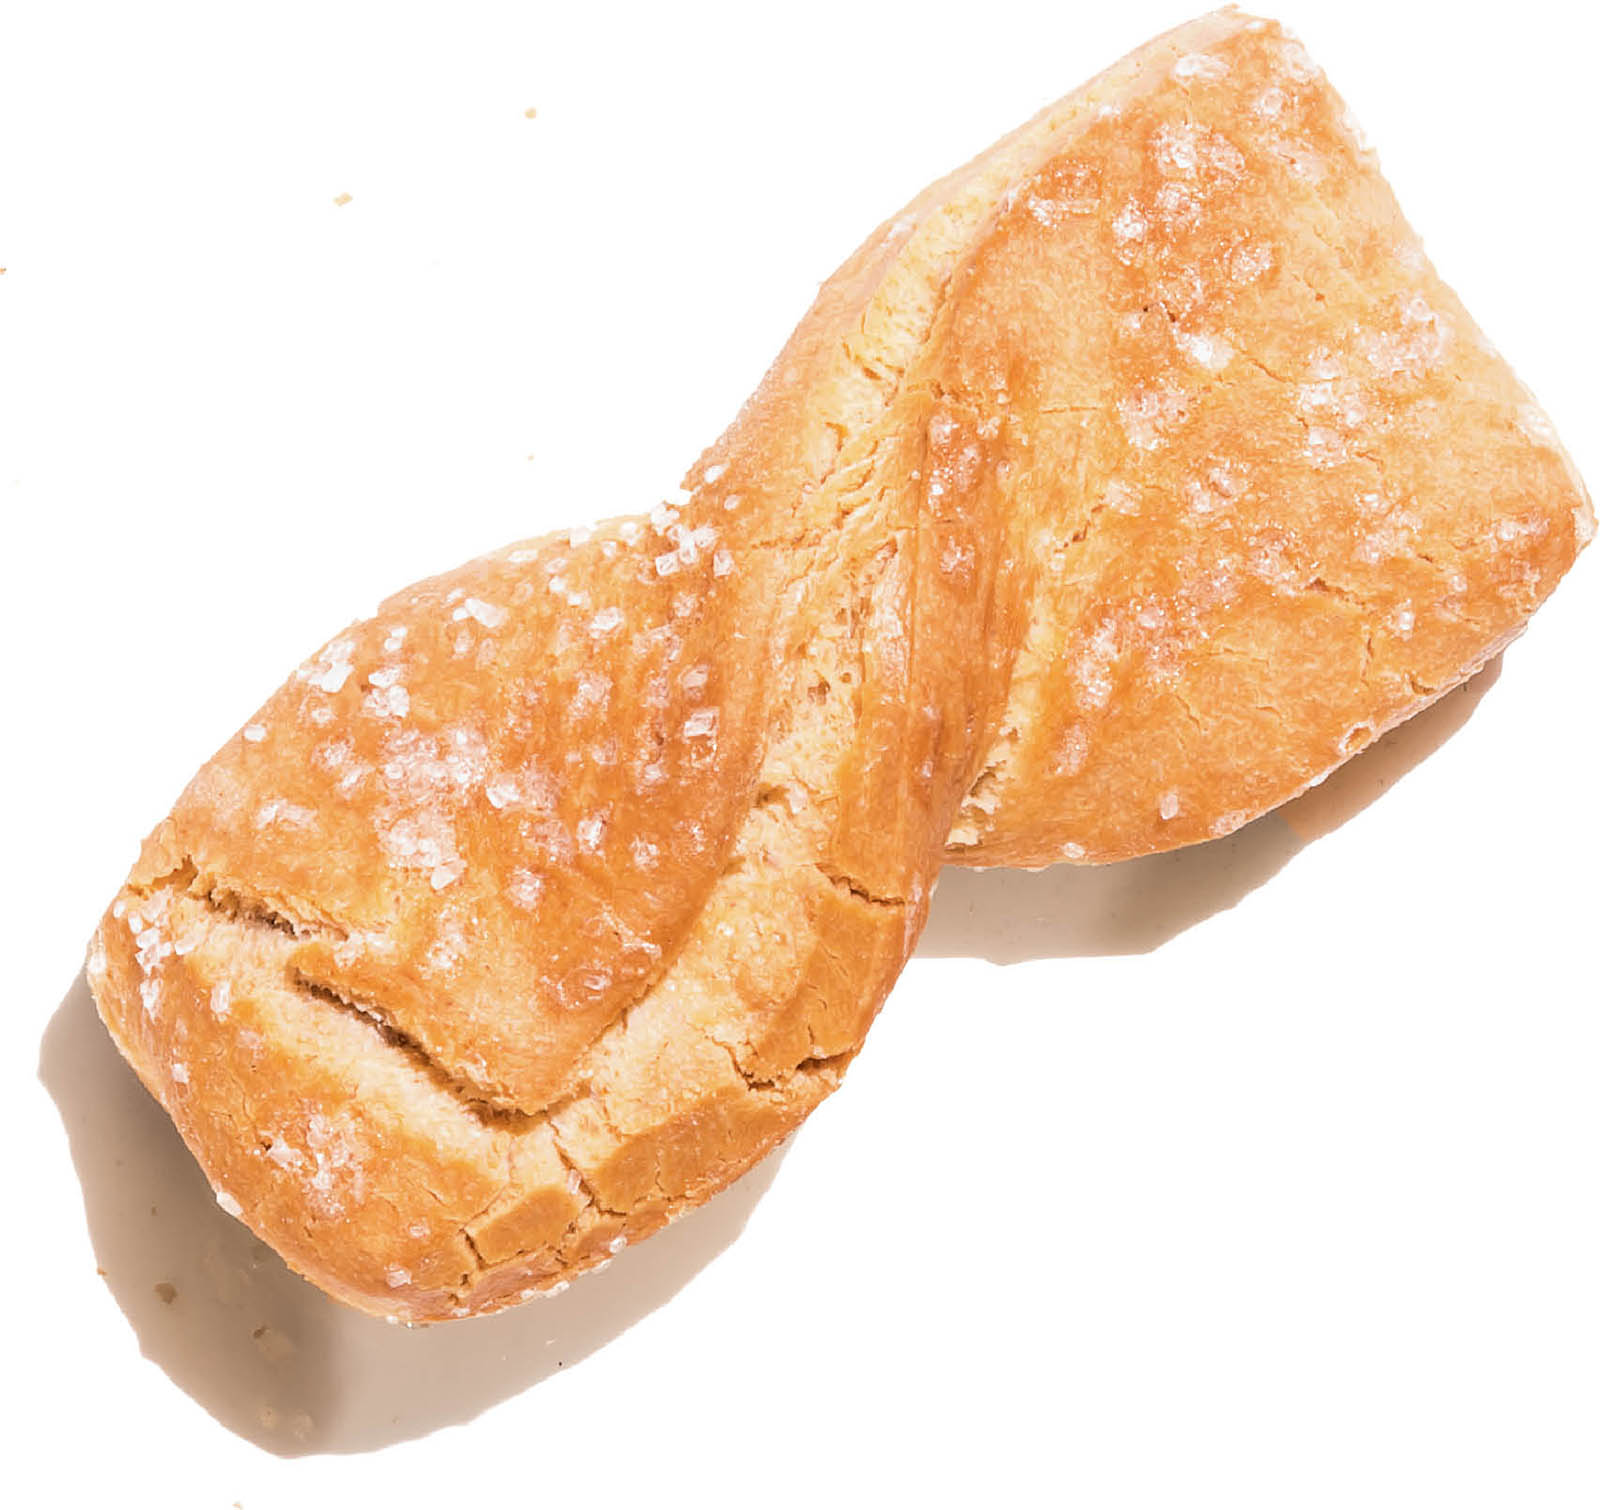
A cross between a bow tie and a fossil, kichel doesn’t seem to have much to recommend it. Lacking the sweet icing of a black-and-white, the joyous colors of a rainbow cookie, or the fruity lushness of hamantaschen, kichel is nonetheless the quintessential Jewish cookie: It has been gracing synagogues’ kiddush tables after Shabbat services as far back as anyone can remember, widely ignored by even the hungriest of cookie-loving children. It is entirely possible that only a dozen of these cookies have ever existed, and that these same dozen have been there all along, put out week after week. Kichel is dry and brittle, filled with air; how would anyone know if it was stale?
And yet. Something magical happens to Jews when they turn forty. Kichel suddenly becomes delicious. The faint whisper of sugar, the way it crumbles when you bite it, its legendary dryness practically crying out to be dunked in a cup of coffee—or, better yet, a glezele tey (glass of tea).
What was once the butt of our youthful Shabbat jokes has become the best reason to come to synagogue. Let the children laugh; let the grown-ups eat kichel.
History Lesson
A century ago, a kiddush in one traditional Ashkenazi synagogue more or less resembled any other, centering around three unchangeable foods: pickled herring, kichel, and schnapps or whiskey. This humble and decidedly odd trifecta was, for years, synonymous with kiddush, the breakfast and social hour that follows Saturday-morning services.
In early twentieth-century America, Kiddush with a capital “K” (the blessing) gave rise to kiddush with a lowercase “k” (the social hour). Community leaders began to understand the importance of the synagogue as a place for congregants to rest and form relationships—especially for hardworking immigrants in a new and unfamiliar country.
From a gastro-sociological level, the development of kiddush makes perfect sense: Whenever Jews and socializing meet, a little nosh is likely to follow. But the specific nosh that emerged (herring, kichel, and schnapps) was no accident. “Early twentieth-century synagogues rarely had kitchens, let alone iceboxes or refrigeration,” explained Gil Marks, author of the Encyclopedia of Jewish Food. So foods that traveled well and kept for long periods of time, like pickled fish, were ideal.
Because Kiddush is supposed to be said in association with a meal, that nosh also had to be substantial. Hence the kichel, an egg cookie sprinkled with sugar that, like other cookies, cakes, and other nonbread grain foods, requires one to say a mezonot blessing, bumping up its status to a near-meal. In a move that might horrify some contemporary taste buds, kiddush-goers would top the kichel with a juicy bite of fish and eat them together as a sweet, briny sandwich. And then there was the schnapps. Schnapps and whiskey were brought over from Eastern Europe, where they were considered chamar medina, or suitable ritual substitutes for wine. Never mind the whole issue about drinking early in the day; these drinks tasted like home.
Starting in the 1950s, though, things began to change. As Jewish communities acculturated, spread out, and climbed the social ladder, the synagogue kiddush followed suit, becoming increasingly elaborate. People’s tastes changed, too. “By the time the baby boomers came around, chocolate chip cookies were common, even in kosher bakeries,” said Marks. “Compare that to kichel and you’re going for the chocolate chip!”
Leah Koenig

Kichel
Makes about 36 cookies
1 large egg
6 egg yolks
¼ cup (60 milliliters) vegetable oil or other neutral flavored oil
1 teaspoon pure vanilla extract
2 cups (250 grams) unbleached all-purpose flour, plus more for rolling and shaping cookies
¾ cup (150 grams) natural cane sugar, such as Wholesome
¼ teaspoon salt
Stir together the egg, egg yolks, vegetable oil, and vanilla in a bowl. Set aside.
In the bowl of a stand mixer fitted with the paddle attachment, combine the flour, ⅓ cup (65 grams) of the sugar, and the salt. Pour in the egg mixture and mix on medium-low to medium speed, scraping down the bowl every once in a while, until the dough is shiny and stretchy, about 5 minutes.
Gather the dough into a ball and set aside. Wipe out the mixer bowl and sprinkle the inside with a bit of flour. Return the dough to the bowl, cover with a clean kitchen towel, and allow it to rest for 20 minutes to hydrate the flour.
Position the racks in the upper and lower thirds of the oven. Preheat the oven to 350ºF (177ºC). Line two baking sheets with parchment or silicone baking mats.
Halve the dough and set one half on a lightly floured work surface (keep the other covered with the towel). Roll out the dough, turning and flipping it and squaring up the sides so you have a rectangle about ¼ inch (6 millimeters) thick.
Lift the dough and sprinkle half of the remaining sugar underneath it. Sprinkle the rest of the sugar on top of the dough.
Cut the dough into rectangles about 1 by 2½ inches (2.5 by 6.5 centimeters). Space the rectangles 1 inch (2.5 centimeters) apart on the prepared baking sheets.
Turn one end of a rectangle over 180 degrees, twisting at the middle of the rectangle so that the dough now resembles a bow. Flatten it just slightly at the twist point to help prevent it from untwisting while baking. Repeat with the remaining dough.
Bake for 20 minutes, then reduce the oven temperature to 300ºF (148ºC) and bake until golden, 10 to 15 minutes more. Let cool completely on the baking sheets.
The kichel will keep in an airtight container at room temperature for up to 1 month.
By Alana Newhouse

“Those cookies were the beginning of the end of it all,” he said to me. The young rabbi had invited me to speak to the machers of the synagogue he now led. But the community he most wanted to tell me about was the one in which he was raised, the one in Pennsylvania that was no more.
Cause of death: kiddush cookies.
Anyone who’s frequented an American synagogue in the past half century knows what I mean—which is something of a miracle, since the list of touchstones still shared by the disparate strands of American Judaism numbers . . . I’ll be generous and say it’s in the single digits. But the cookies served after Saturday-morning services—a motley crew of sweet, pasty mounds, dabbed with chocolate or rainbow sprinkles and engineered to make you desperately need the grape juice on which a blessing had just been bestowed—are among them.
Anyway, back to my young rabbi and the story of his hometown. As it turns out, his mother was among a cohort of women tasked, for nearly two decades, with baking the cookies that would be served each Shabbat in their synagogue. That is, until the year the board hired an outside consulting firm to determine where and how it could cut costs. In what will come as no surprise to anyone who’s ever worked with a consulting firm or seen an episode of The Office, the first line item in the suggested changes was “pastries.” Cookies could be bought much cheaper, the firm noted, at a local supermarket.
What these geniuses didn’t comprehend was the one-two punch they were issuing to the gut of lived experience. In one fell swoop, the primary Jewish institution in town transmitted a dual message: To the women who had put their time and affection into baking these cookies, week in and week out, for nearly a quarter century, it told them that their commitment to Jewishness and their community was dispensable; to everyone else, it asserted the primacy of money as the only truly important marker of engagement in Jewish life. A decade and a half later, the shul—once a vibrant hub of American Jewish non-Orthodox success—was all but dead.
So you can sit there and rail against secularism or BDS or intermarriage or whatever other threat you imagine is decimating American Judaism, but from now on you can’t say someone didn’t school you in the real truth.
I just want to say two words to you. Just two words: kiddush cookies.
Kiddush Cookies
Makes 36 cookies
2 cups (250 grams) unbleached all-purpose flour
¾ teaspoon kosher salt
1 teaspoon baking powder
1 cup (2 sticks/225 grams) unsalted butter, at room temperature
⅔ cup (135 grams) sugar
2 large egg yolks
1½ teaspoons pure vanilla extract
¼ teaspoon almond extract
Rainbow sprinkles
6 ounces (170 grams) chocolate chips or chopped chocolate
Preheat the oven to 400ºF (204ºC).
Combine the flour, salt, and baking powder in a medium bowl and set aside.
In the bowl of a stand mixer fitted with the paddle attachment, beat the butter and sugar on medium-high speed for 3 to 4 minutes, until light and fluffy. Reduce the speed to medium and add the egg yolks one at a time, mixing well after each addition. Mix in the vanilla and almond extract. Reduce the speed to low and add the flour mixture. Mix to combine, increasing the speed of the mixer to medium once most of the flour mixture has been incorporated and periodically scraping down the sides of the bowl with a rubber spatula.
Transfer the dough to a spritz cookie press and pipe cookies out onto an ungreased, unlined cookie sheet, using two squeezes of the cookie press trigger per cookie and spacing the cookies 1 inch (2.5 centimeters) apart. Sprinkle with rainbow sprinkles or leave them plain so you can dip them in chocolate after they’re baked (or do a mix of both).
Bake until lightly browned around the edges, 8 to 10 minutes. Let cool slightly on the pan for 1 to 2 minutes, then use an offset spatula to carefully transfer the cookies to a wire rack and let cool completely.
To dip in chocolate, melt the chocolate in a heatproof bowl set over a saucepan of simmering water (the bottom of the bowl should not touch the water), or microwave the chocolate in 30-second increments, stirring after each, until it has melted. Dip the cookies halfway into the melted chocolate, scrape off any excess chocolate from the bottom, and place on a plate. Top with sprinkles, if desired. Let the chocolate harden.
The cookies will keep in an airtight container at room temperature for up to 5 days.
By Yair Rosenberg

Like many Jewish foods, from gefilte fish to cholent, kishke is the sort of thing that you’d never even think of consuming if you weren’t raised eating it. But for those who were, the Eastern European combination of intestines and grain proves both utterly irresistible and undeniably deleterious to their health. Aside from being delicious, though, kishke also has the distinction of being the most influential Jewish food in American politics, and the only one ever elevated to a political litmus test. Did President Obama possess a deep affinity for Israel in his kishkes? The jury is still out on this pressing matter of presidential proctology, but Google returns 33,000 results for “Obama kishkes,” with everyone from Jeffrey Goldberg to Debbie Wasserman Schultz weighing in on the question.
the “stuff” of life
When Juliet asked, “What’s in a name?” she was not likely stuffing meat and meal into animal parts, but if she were, she’d soon get a useful lesson in Jewish food taxonomy. For those of us who are fond of the sweet inner parts, three names loom large: kishke, derma, and helzl.
What are the differences? The first and the second are largely interchangeable: Take a cow’s intestines, stuff it with some fine schmaltz, some flour (or matzo meal, if it’s that time of year), and some spices, and you’ve got yourself a kishke. The word is Yiddish for “intestines,” but if you prefer a more Teutonic twist, you can also call it derma, as Darm is the German word for the exact same thing.
Helzl, on the other hand, stands alone: The casing here is a chicken’s neck, which is then stuffed with schmaltz, chopped-up gizzards or hearts, and some fried onions.
If you’re looking for culinary insights into which Jews eat which of the above and when, don’t bother: All are ubiquitous, and all common across the board. Iraqi Jews, for example, know helzl as tebit, which also includes rice and herbs. Stuff skin with good stuff, and we’ll eat it. A kishke by any other name will still taste as sweet.

By Lior Lev Sercarz
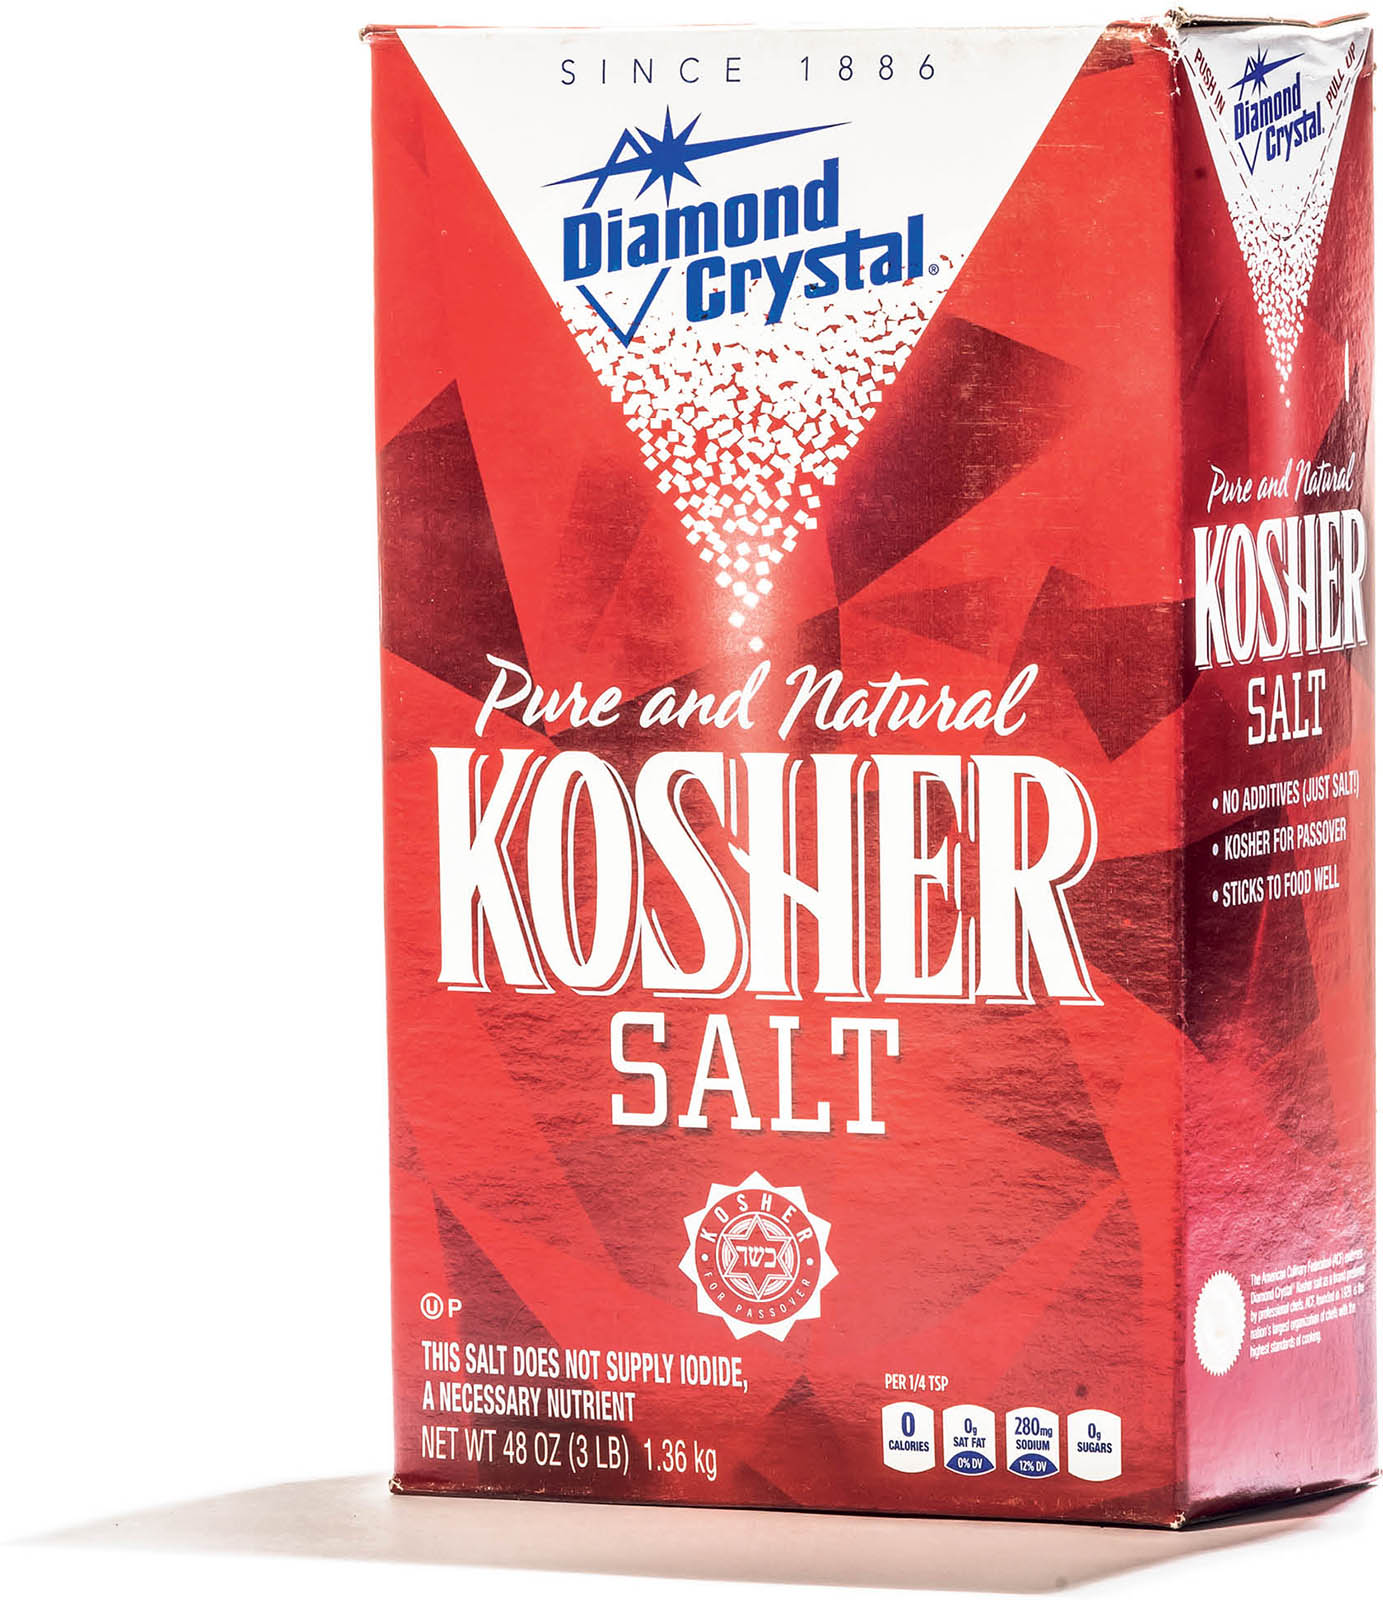
I wouldn’t be surprised if most people who use kosher salt have no idea that it was created to soak up the blood in meat, purify the meat, and make it permissible to eat. But that’s OK. It shows just how much our religion has affected our cuisine, and I like that.
In fact, I can’t think of any other spice that has religious observance attached to it in this way. The idea of salt is very important to Judaism: It’s sprinkled on challah during Shabbat to remind us of our covenant with God. When diluted in water, it stands in for the tears of slaves at the Passover Seder. And where would our appetizing shops and delis be without it? Salt is an ingredient that you can find in every Jewish kitchen in any culture, country, or place.
Perhaps it’s also the reason we Jews have always been . . . a little salty.
the key to kashering
A kosher animal, once properly slaughtered, is not kosher until it has been salted and its blood drained. This goes back to the Bible (Leviticus 17:12), and how to best remove animal blood is debated in the earliest codes of Jewish law. For much of Jewish history, this task fell to the Jewish housewife, or whoever was preparing the meat at home, but today is usually done before the meat is bought. The salting takes place after the meat is otherwise prepared—defeathered for chickens or deveined for larger animals like cows and goats—and is one reason some people say kosher meat does not need to be brined (cooks, like rabbis, disagree on this point).
This whole process should take place within 72 hours after the animal is slaughtered. It takes roughly 2 to 3 hours. First rinse off any visible blood on the surface and remove any congealed blood or clots. Submerge the meat in water and soak for 30 minutes. (There are varying opinions as to why the meat is soaked, but many agree that it softens it so the salt will be more effective in penetrating its surface.) Remove the meat from the water and shake off excess water so the meat is damp but not soaking wet. Now salt the meat, using a coarse salt that has sufficiently large crystals so it won’t be absorbed by the meat—this is where “kosher salt” (which was first marketed under the more appropriate name “koshering salt” before being shortened in the 1950s) comes in. Sea salt would also work, as long as the crystals are small enough that they can stick to the meat.
Some say the meat should be completely covered and packed in salt, while others say it need only be salted enough as to be inedible until rinsed. But basically, all agree it should be salted very well and all over.
Hang the salted meat or place it on a board in such a way that the blood can drain out freely and let drain for at least 1 hour. Any open cavity should be salted internally and placed downward. There should be sufficient space for the blood to drain out of the meat without pooling around it. Once drained, rinse the meat three times. This is to remove the salt so the meat becomes edible, but also because the salt is now full of forbidden blood. (The salt should not be rinsed onto utensils used for eating.) The first rinse should be under running water, and the meat should be rubbed and cleaned thoroughly. The second and third rinses can be done under running water, or the meat can be soaked twice in a basin of fresh water (prod and turn the meat over to properly rinse). Once rinsed, the meat is kashered and ready to be cooked.
Shira Telushkin
By Yair Rosenberg
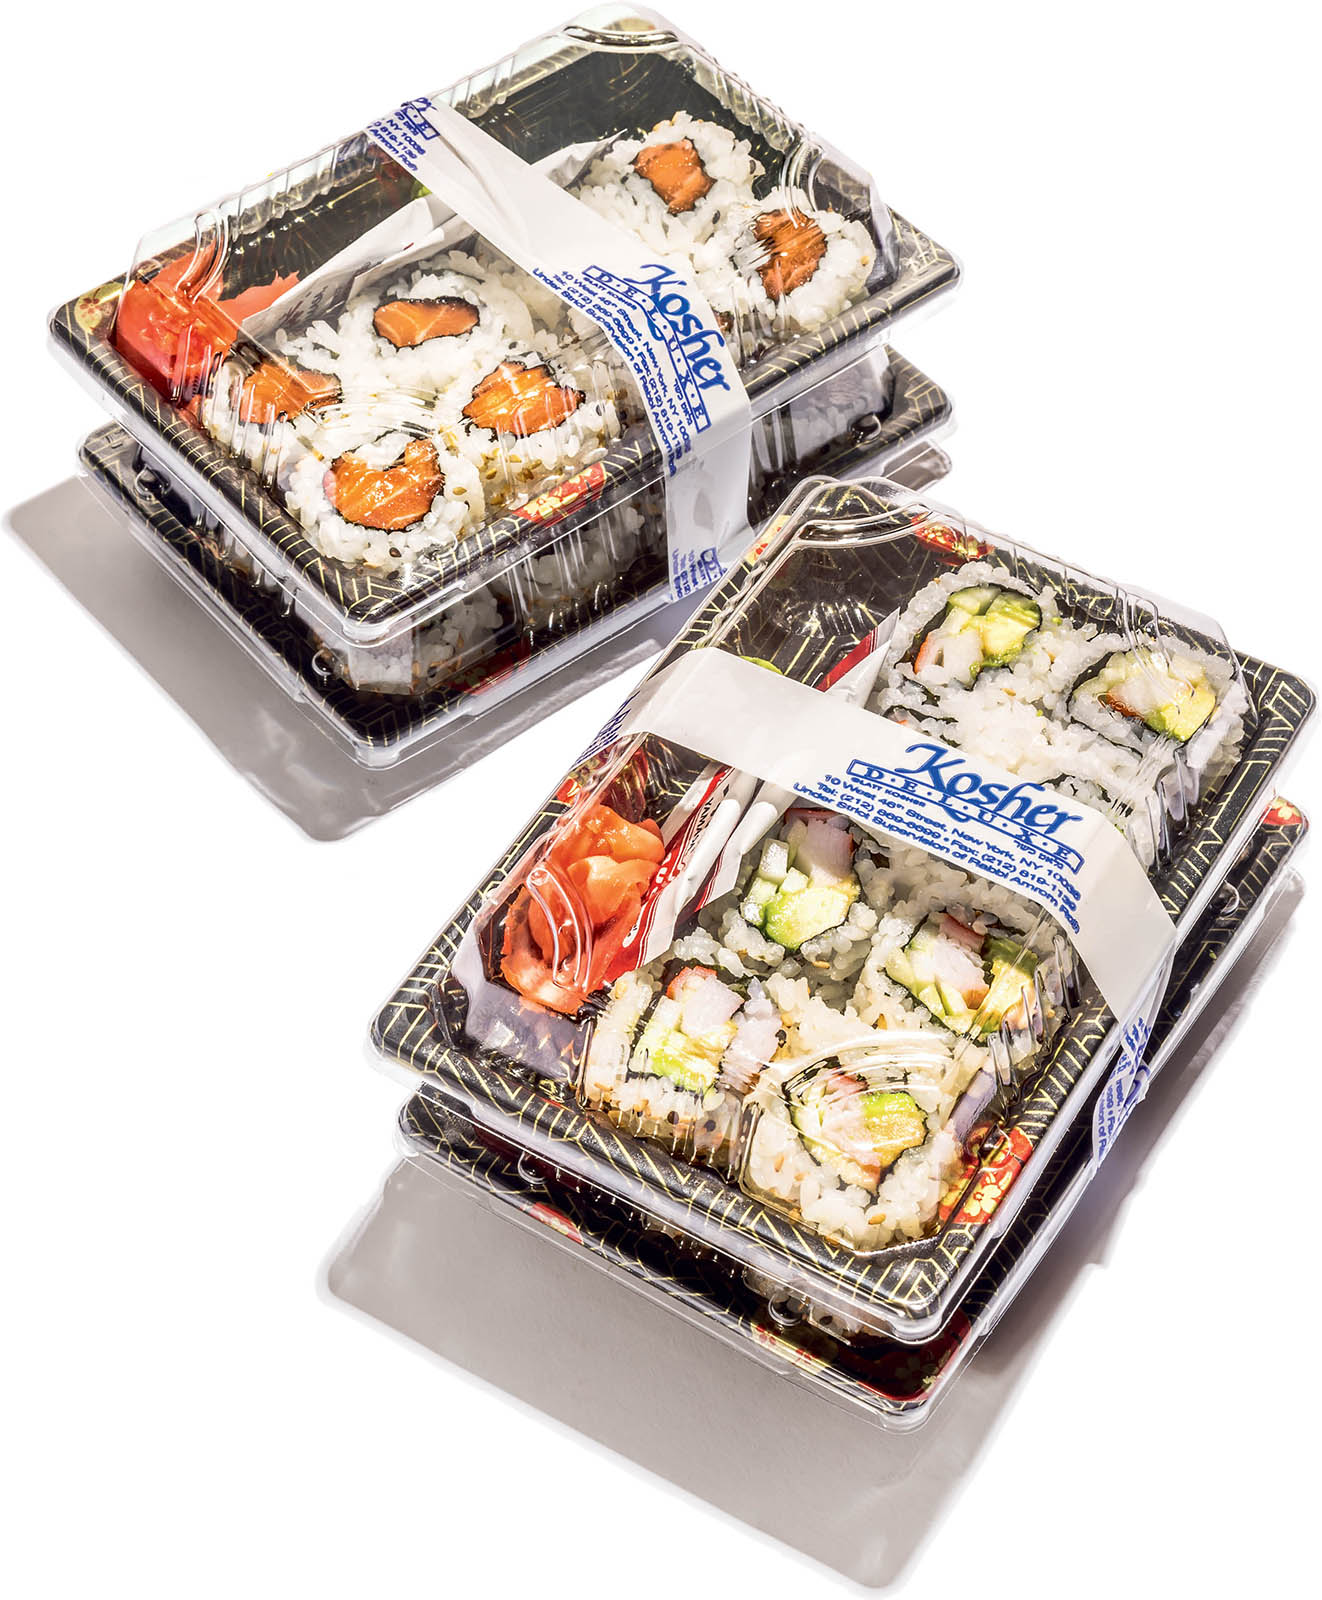
The Bible famously forbids observant Jews from eating any fish that lacks either fins or scales. That’s why you’ll never see shrimp, swordfish, or crab at your local kosher joint. Aside from this, however, kosher sushi is largely the same as regular sushi, except for the fact that it frequently appears in restaurants that have no business selling it—like delis and pizza shops—thus outing them as Jewish. Indeed, the superfluous sushi menu has become a staple of kosher establishments over the past decade. This proliferation has gotten so out of hand, with hundreds of kosher sushi bars in New York City alone, that the New York Times devoted an entire, somewhat incredulous, article to the subject. “I can tell you the when and the what,” Rabbi Moshe Elefant of the Orthodox Union’s kosher division told the paper of record, “but not the why.”
By Gabriel Sanders
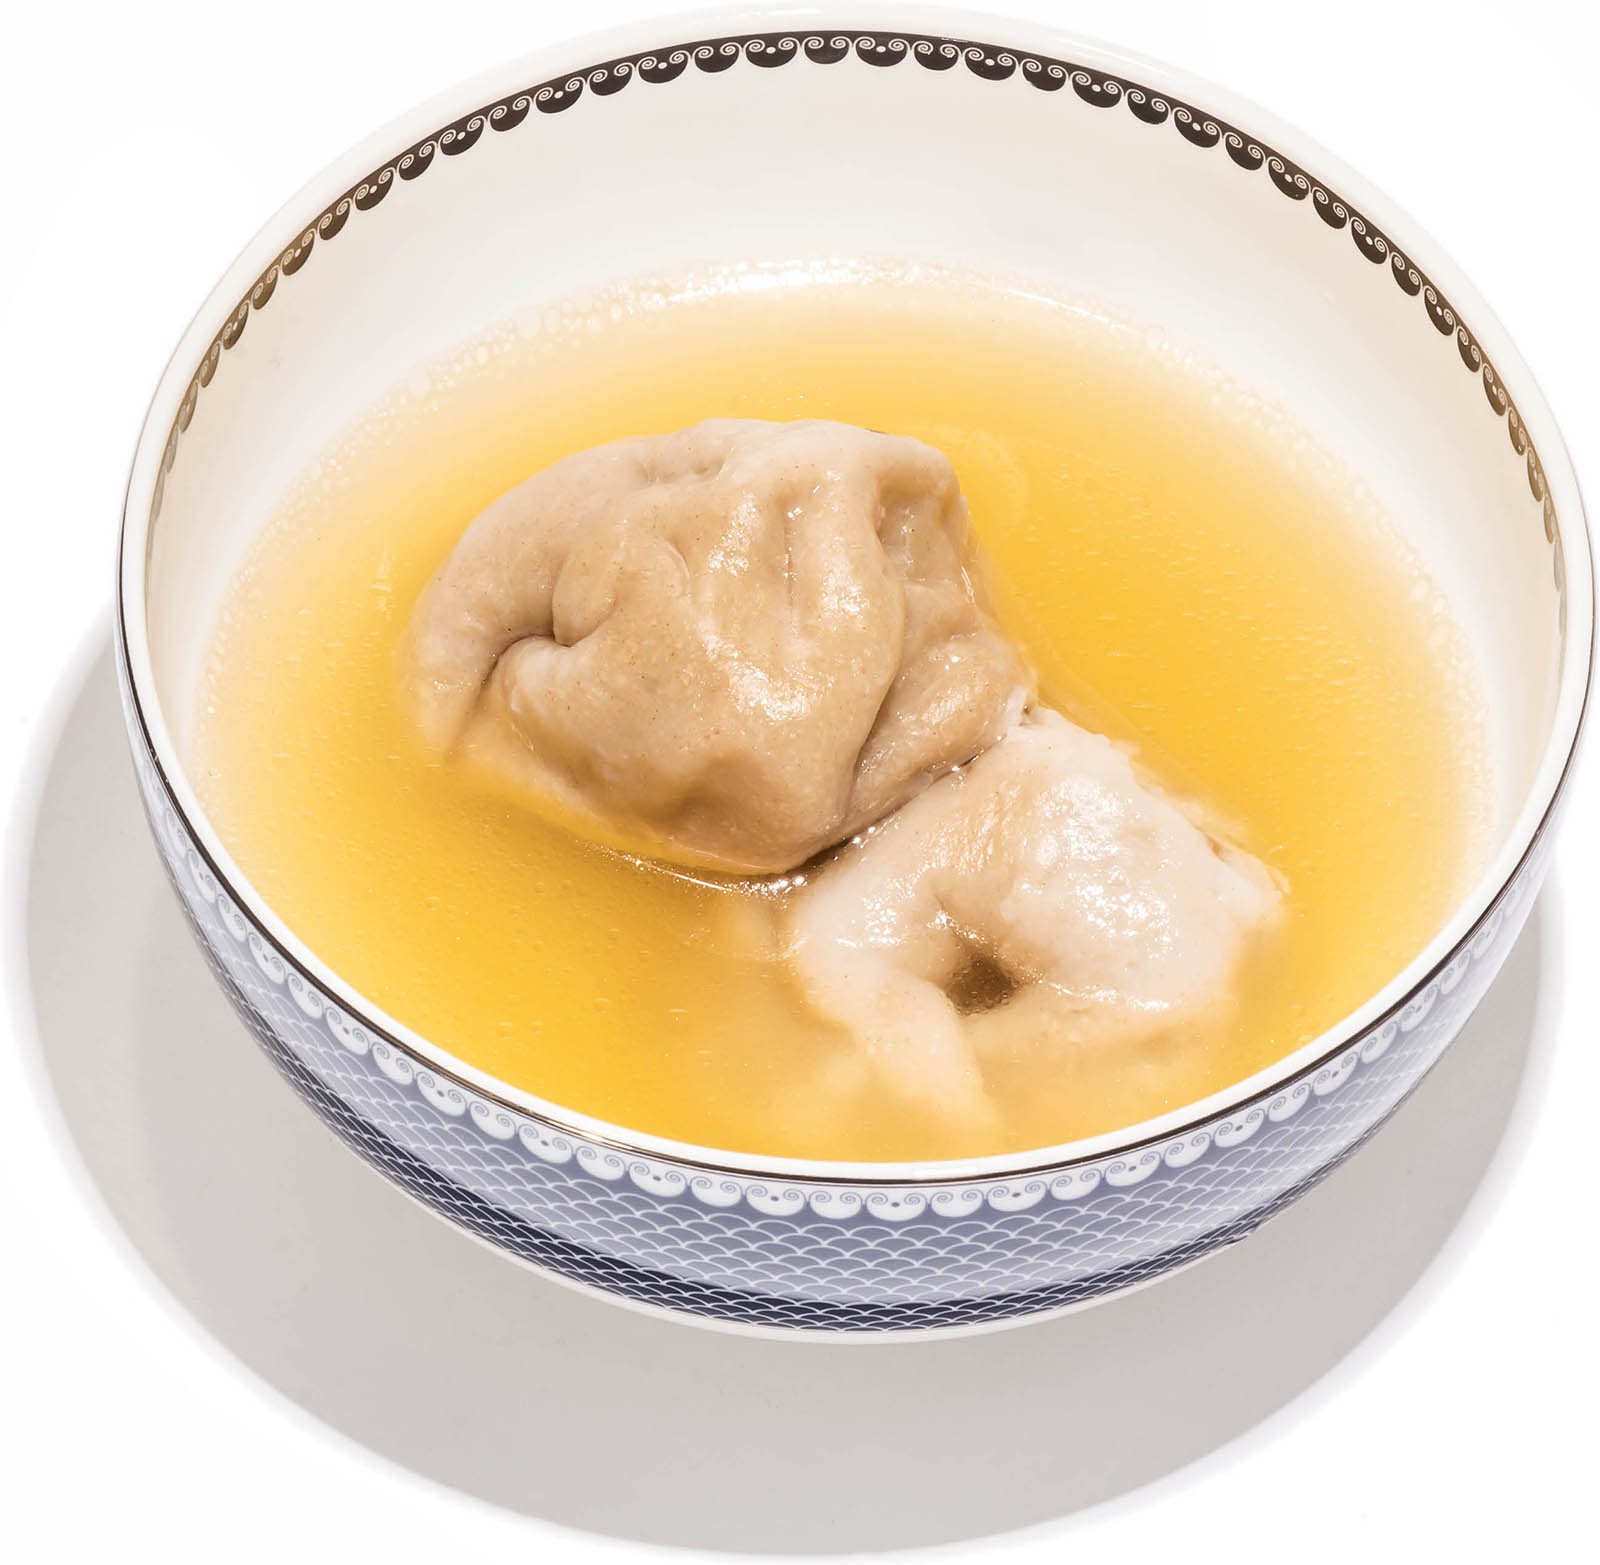
If the matzo ball is the common man of Jewish soup dumplings—doughy, resolute, and ready to serve—the kreplach is the aristocrat: shapely, well-tailored, and with untold riches squirreled away in hidden pockets. Traditionally eaten around the High Holidays, kreplach—along with other stuffed foods—assumes a special significance during Sukkot and its later days, when it is believed that the divine decree inscribed on Rosh Hashanah and sealed on Yom Kippur is delivered up to heaven. Kreplach here becomes more than just a food. It is a kind of prayer.
Kreplach
Makes about 24 dumplings; serves 4 to 6
For the Dough
3 cups (384 grams) unbleached all-purpose flour
1 teaspoon salt
3 large eggs, lightly beaten
¼ cup (60 milliliters) cold water
For the Meat Filling
2 tablespoons (30 milliliters) grapeseed or other mild-flavored oil
1 medium yellow onion, finely chopped
¾ pound (340 grams) ground beef (short rib or 80% lean chuck)
1¼ teaspoons kosher salt
1 large egg yolk
3 tablespoons (11 grams) finely chopped fresh parsley
3 tablespoons (11 grams) finely chopped fresh chives
½ teaspoon freshly ground black pepper
For the Egg Wash
1 large egg
1 teaspoon water
Pinch of salt
Make the dough: Sift the flour and salt into a large bowl. Create a well in the center of the flour.
Pour the eggs into the well. Start working the flour into the eggs, slowly, adding the water as you go. Knead the dough, taking it from shaggy to smooth and elastic, for about 15 minutes. (Alternatively, sift the flour and salt into the bowl of a stand mixer fitted with a dough hook, add the eggs, and begin to mix on medium-low. Add the water and mix until a shaggy dough forms. Mix for 8 minutes more, adding additional water, if needed, until the dough is elastic and smooth.)
Pull the dough together into a ball, place it in a clean bowl, cover with a damp towel, and refrigerate for 30 minutes.
Meanwhile, make the filling: Heat the oil in a large skillet over medium-low heat. Add the onion and cook, stirring regularly, until it browns and softens, 6 to 8 minutes.
Remove the onion from the pan, leaving any residual oil in the pan. Return the pan to medium heat and add the beef. Season with ½ teaspoon of the salt and cook, stirring frequently and breaking up the meat with a spoon as it cooks, until the beef is uniformly browned, 6 to 8 minutes. Return the onion to the pan, cook the beef with the onion for about a minute, then remove from the heat. Let cool.
Add the egg yolk, parsley, chives, the remaining ¾ teaspoon salt, and the pepper to the meat mixture and stir to combine.
To assemble, whisk together the egg wash ingredients in a small bowl. Set aside. Flour a baking sheet.
Cut the dough into quarters, setting one-quarter on a well-floured surface and leaving the rest covered with the towel. Roll the dough out to a roughly 14-inch (35-centimeter) square, about 1⁄16 inch (1.5 millimeters) thick. Cut the dough into 2½-inch (6-centimeter) squares.
Working with one square at a time, gently pull the dough along its edges, stretching it slightly. Place the dough in one hand and fill it with a scant ¾ teaspoon of the filling. Dip a finger of your free hand in the egg wash and run it along two adjacent sides of the square. Fold the dough in half over the filling, forming a triangle, with the two egg-washed sides against the two without egg wash. Pinch the edges together, making sure the filling isn’t falling out and pushing it back in with an index finger if necessary.
Pick up the corners farthest from each other and wet one of the tips with egg wash. Overlap the corners and pinch them to seal. Place the kreplach on the prepared baking sheet. Repeat with the remaining dough and filling.
At this point, you can freeze the kreplach. To freeze them, place on a well-floured baking sheet and freeze until solid, then transfer to a freezer bag and freeze for up to 3 months.
To cook, bring a large pot of well-salted water or stock to a rapid boil. Drop in the kreplach and cook for 20 minutes. If cooking from frozen, boil 3 to 5 minutes longer. Serve as is or in chicken soup.
three times the charm
Kreplach are strictly an Ashkenazi—mainly Hasidic—specialty, appearing on the menu three times during the year: the day before Yom Kippur, Hoshana Rabbah, and Purim. On all three of these days, the theme of mercy versus justice comes into play. (Yom Kippur and Hoshana Rabbah, the seventh day of Sukkot, are days of divine judgment, and in metaphysical terms, the Purim story was a victory of mercy over justice.)
Though some people fashion triangular kreplach—seeing, in the three sides, the three patriarchs, three sections of the Jewish people (Kohanim, Levites, and Israelites), and three pilgrimage holidays—you can shape them any way you like. Unlike eating matzo and bitter herbs at Passover, eating kreplach is strictly a minhag, or custom—meaning that it’s optional. But make these delicious dumplings once, and you’ll opt in.
Carol Ungar
By Gil Hovav
There are many things to say and write in favor of kubbeh, but there is no doubt that its best advantage is the fact that it gives Jerusalemites another reason to look down on Tel Avivians. There are no kubbeh restaurants in Tel Aviv. How do they live?
In Jerusalem, on the other hand, these are the jewels in our crown. These magic dumplings—the dough made from bulgur, semolina, potatoes, or rice, and stuffed with minced meat and herbs—are a grandma staple. They may be called kubbeh, kubbah, or kibbeh—it’s all the same to Mama.
Kubbeh options are endless. You can go Iraqi and eat your kubbeh in beet soup, round, purple, and sweet, or go Kurdish and have it in a yellow sauce, sour and flat, or be an Arab and fry it, or be a snob and eat it stuffed only with siska (beef confit), or maybe go to the extreme and eat only kubbeh hamo—a giant version of the dish that was actually invented in the Mahane Yehuda Market.
Anyway, whatever you choose to eat, the important part is to say, “They don’t have it in Tel Aviv. Of course they don’t. How could they? Filling kubbeh so the dough does not tear requires craftsmanship that they can never achieve. It’s all in Grandma’s wrist.” (And please don’t tell anyone that we all cheat and fill our kubbeh the easy way: You roll tiny meat patties, freeze them, then cover with dough. This is a Jerusalemite secret.)
history lesson
Sarit Agai is the current matriarch of Mordoch restaurant in Jerusalem’s Mahane Yehuda Market; her husband, Itzhak, and his father founded Mordoch, a homey, paper-tablecloth type of place, thirty years ago. The first restaurant was Itzhak’s grandfather’s, back when the Mahane Yehuda shuk was the spiritual center of the city and a melting pot for Jews of the Muslim world. Kubbeh had been most associated with Iraqi and Kurdish Jews, but the Agais are themselves mutts: Iraqi, says Agai, and “the other half is seven generations here in Israel from the Old City of Jerusalem. And another part from Persia and another part from Iraq, a blila [miscegenation] from generation to generation.” She herself is half Moroccan and half Spanioli, Sephardic in Jerusalem for many generations—some straight from Madrid in 1492, some via Turkey and Egypt.
That was typical of who was peopling the alleys of the shuk when, back in the ’60s, “there was a communal oven where everyone knew whose bread was whose by the marks,” says Agai. That’s why they have stuffed cabbage on the menu, and shakshuka with fresh crushed tomatoes, and cigarim and mejadra and even goulash.
Most people come for the soups, especially the older Jerusalemites who have fewer and fewer people with whom to reminisce about the Old World, and the visiting South American children of Iraqi Jews. “There are people that come in for kubbeh and say that they want to cry, because their mother is dead,” Agai says. Her own children work the kitchen and the tables.
By now, you can buy frozen kubbeh in the supermarket, but Mordoch is one of the few places that hasn’t changed—the Agai family still makes everything by hand, same as thirty years ago, nothing frozen and scarcely anything even ground by machines. They buy their produce in the morning at the shuk. “Our kubbeh is immediate, it’s here and now,” says Agai. “There’ll be new kubbeh in the morning.”
Irin Carmon
Kubbeh Hamusta Soup
Serves 6 to 8; makes about 36 dumplings
For the Dumplings
2 pounds 3 ounces (1 kilogram) finely ground semolina flour, plus more for rolling dumplings
5 to 6 tablespoons (75 to 90 milliliters) vegetable oil, plus more as needed
1¾ cups (420 milliliters) water, plus more if needed
2 large yellow onions, chopped
1 pound 1½ ounces (500 grams) ground beef
Kosher salt and freshly ground black pepper
4 garlic cloves, chopped
6 celery stalks, with leaves, finely chopped
For the Soup
6 celery stalks, with leaves, coarsely chopped
6 Swiss chard leaves (including white parts), thinly sliced
6 scallions, coarsely chopped
4 garlic cloves, minced
3 quarts plus 3 cups (1.75 liters) water
Kosher salt and freshly ground black pepper
⅓ cup (80 milliliters) fresh lemon juice, plus more to taste
2 tablespoons (30 milliliters) vegetable oil
3 medium zucchini, split lengthwise and sliced into ½-inch-thick (1.5 centimeter) half-moons
Lemon wedges, for serving
Make the dumplings: Mix the semolina and vegetable oil in a large bowl. While kneading, gradually add the water until a soft, homogenous, and easy-to-work-with dough forms. The dough should have the consistency of soft Play-Doh. If the dough seems too dry, add more water 1 tablespoon (15 milliliters) at a time until you achieve the desired consistency. Transfer the dough to a clean, lightly oiled bowl, cover, and let rest at room temperature for 30 minutes.
While the dough rests, coat the bottom of a pan with vegetable oil and heat the oil over medium heat. When the oil just begins to shimmer, add the onions and cook, stirring now and again, until browned, 20 to 30 minutes. Using a slotted spoon, transfer the onions to a large bowl and set aside. Add the ground beef to the pan, season with salt and pepper, and cook, stirring and mashing the meat with a fork, until dark brown and crumbly, about 10 minutes. Turn off the heat, transfer the meat to the bowl with the onions, and add the garlic and celery. Taste and season with salt and pepper, if needed.
Divide the dough into balls the size of an egg and flatten each ball to form a thin disk. Place 1 tablespoon (12 grams) of the filling in the center of each disk, close, and shape to form a ball. Gently flatten the balls to form thick disks, then gently roll the dumpling in semolina and set aside. Repeat until you are out of dough or filling, whichever comes first. Loosely cover the formed dumplings with a barely moist kitchen towel or plastic wrap and set aside until ready to cook.
Make the soup: Combine the celery, chard, scallions, garlic, water, and salt and pepper to taste in a large stockpot. Stir in the lemon juice and vegetable oil. Bring the soup to a boil over medium-high heat, reduce the heat to low, and simmer until the vegetables are tender, about 15 minutes.
Gently slide the dumplings into the soup and stir slowly. Add the zucchini and bring the soup back to a boil. Reduce the heat to medium so the soup is at a lively simmer and cook until the zucchini is tender, about 15 minutes.
Ladle the soup into bowls and serve hot with lemon wedges on the side.


By Michael Solomonov
The kugel that you grew up with, with the cottage cheese and the noodles and the pineapple and sugar and raisins? I hate to break it to you, but that is a shitty representation of Jewish food. It’s like spaghetti with meatballs on top and a side of bread—a European dish with American resources and terrible results.
Now, I can get behind a wild mushroom kugel served with a nice salad, or a cheese kugel with real vanilla and orange zest, baked up fluffy like a soufflé. At Zahav, we’ve made kugel like fideos with short, skinny noodles, thrown in leftover coffee-rubbed brisket, and served it in individual cast-iron crocks. In the end, a kugel rises or falls on who’s making it—since it really is just a kind of casserole.
That said, Yerushalmi kugel, I’ll confess, is the shit. It’s dark and slow-roasted and full of black pepper, and each strand of pasta tastes like it’s been caramelized. And I’ve heard that on the Friday before Purim, some Jews eat four kinds of kugel—apple, flour, noodle, and potato—since in Yiddish, the first letters of each flavor spell out the name Amalek, an enemy of the Jews, which is a cute tradition.
But still: No thanks. I’d rather have hamantaschen.
Yerushalmi Kugel
Serves 6 to 8
1 (12-ounce/340-gram) package thin egg noodles
1 cup (200 grams) sugar
⅓ cup (80 milliliters) vegetable oil
4 large eggs
1 teaspoon kosher salt
2 teaspoons freshly ground black pepper
Cook the noodles according to the package directions. Drain, transfer to a bowl, and set aside to cool.
Preheat the oven to 350ºF (177ºC).
Combine the sugar and vegetable oil in a small saucepan and heat over low heat, stirring to dissolve the sugar. Increase the heat to medium and cook, stirring occasionally, until the sugar turns a medium brown color, about 10 minutes. (The sugar might seem lumpy at first but will eventually dissolve. Don’t expect it to become homogenous with the oil—you should see the sugar browning on the bottom and the oil covering it on top.)
Immediately pour the sugar and oil over the noodles and toss with tongs to distribute and separate any lumps (some will remain, which is fine). Let cool to room temperature.
Mix the eggs with the salt and pepper in a medium bowl, then add them to the noodle mixture. Toss together to distribute.
Transfer the mixture to a 9 by 13-inch (23 by 33-centimeter) baking pan. Cover the pan with aluminum foil and bake for 30 minutes. Remove the foil and bake for 30 minutes more, or until the kugel is browned on top and you can see crispy noodles, especially in the corners of the pan. Serve hot or warm.