Free-motion stitching is the essential technique used to make most of these designs, and ″free″ is the operative word here and throughout this book. Feel free to loosen the pressure, feel free to skip the fussy details, feel free to leave an edge raw or roughed up. And, as outlined in this chapter, feel free to scribble on your fabric, write on it, and sketch your visions and dreams. Most importantly, forget about perfection; instead, free yourself to have fun.

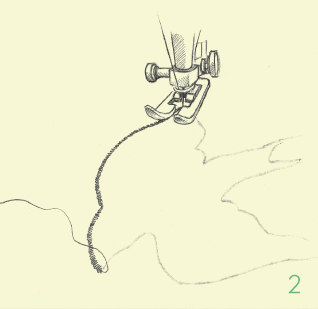
What to know: Doodling or scribbling with thread is a great way to explore free-motion stitching; it requires removing or reducing the presser foot pressure, and moving the fabric with your hands in any and every direction. It is important to have a good grip on the fabric so it can be manipulated as desired; this means that free-motion drawing can be tricky on really small pieces of fabric (though not impossible).
How to do it: Set the presser foot pressure to 0 (or install a specialty presser foot) and use a straight stitch (our stitch length is usually set on 1.5 to 2 for this technique). Grip the fabric with both hands and guide the fabric back and forth to create lots and lots of loops and circles.
For the boldest, most consistent stitches, keep the needle moving very fast, but move your hands and the fabric slowly. Stop every once in a while with the needle in the fabric to readjust your hands. If you lose your grip on the fabric, stop the machine but make sure to start up again with the needle in the fabric. Extra care needs to be taken as you get close to the fabric edge, since your hands are close to the machine mechanism.
What to know: A whole world of sewing opens up when you master drawing with thread. We like to use a sharp pencil, chalk, or vanishing ink pen to sketch some guidelines on the fabric before stitching. Come up with your own motifs, use templates (including those found in this book), or just improvise and design as you sew. Sketching with thread works best on non-stretch fabric, unless you want a textured effect (like the puckered look of our Doodled Scarf, page 136); if not, apply a stabilizer to support stretchy fabrics before you start stitching.
How to do it: Different line styles call for different approaches.
Outlines: When stitching the drawing’s main lines, sew slowly. Manipulate the fabric gently to negotiate curves. Stop often, checking your needle placement. At the point where lines intersect, stop sewing with the needle down, lift the presser foot, and turn the fabric, making sure that the stitches are always going forward to keep the lines clean and sharp. For bolder outlines, sew over the same lines two or three times. As a general rule, set your presser foot pressure to 2 for stitching gradual curves or right angles where you will stop and lift the foot to turn the fabric. This medium pressure helps keep the lines looking tidy but makes it easier to move the fabric. If the lines are small and tightly spaced, then decreasing the pressure to 0 or 1 would be better, giving you more control of the fabric.
a few supplies
There are a few supplies that make drawing with thread easier. First, it is a good idea to stabilize the back of the fabric under any free-motion stitching. There are many different stabilizers, and you can even use fusible interfacing; they all act to hold the fabric flat and support the stitches. It is helpful, though not necessary, to use a free-motion or darning presser foot. They hold the fabric against the throat plate without moving the fabric. You can also work with an appliqué foot or a spring-loaded embroidery foot. And of course, you might want to consider using some of the lustrous rayon, metallic, and silk threads that come in so many wonderful colors.
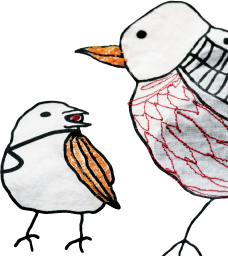
Scribbly areas: Set your presser foot pressure to 0 (we set our stitch length at 2). Get a good grip on the fabric on either side of the presser foot. Increase your stitching speed so you’re sewing quite fast, and manipulate the fabric by pulling it where you want the stitches to go, in tiny circles as in the pupils of a bird’s eye, or back and forth for zigzagging scribbles as in a monster’s hair. You can also use this technique to fill a shape with color.
What to know: Since letters have curved and straight parts, you can use a combo of techniques to stitch them. Mark your guidelines first, and don’t worry if your first few attempts look like a second-grader’s handwriting; that’s part of the charm.
How to do it: On large letters, use full presser foot pressure and a straight stretch stitch. On small letters, set your presser foot pressure to 1 or 2 and use a straight stitch with a stitch length of about 1.5. At sharp turns, leave the needle in the fabric, lift the foot, turn the fabric, put the foot down again, and continue stitching. The curve of most letters is gradual enough to follow while gently moving the fabric to keep the stitches on your guidelines. Take your time, but when you’re stitching, keep the needle moving fast.
stitch settings
For doodling, set your machine for straight stitch or straight stretch stitch. The former is easier to use, but the latter gives a nice bold line. If your design requires you to move the fabric around a lot, it will be a little trickier to use the straight stretch stitch; since it goes backward as well as forward, you may end up with little stitches going this way and that, especially when you’ve made curving turns. Use it when you have simple lines to follow, and try to end your lines on a backward moving stitch; otherwise, you may get more stray stitches than you like.
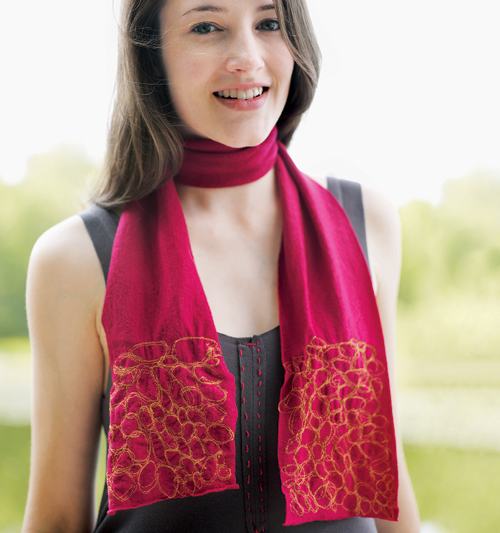
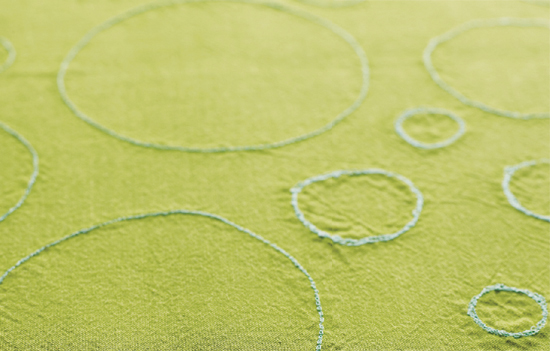
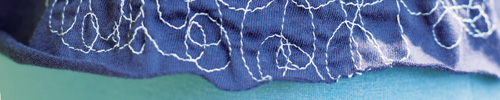
Stitching free-motion circles on jersey will make the fabric pucker a bit, lending it lots of interesting texture. For comfort’s sake, keep the doodling on the ends of the scarf and leave the central portion unadorned.
what you’ll need
• ¼ yard of wool jersey (at least 52″ wide)
• 1 spool of contrasting thread
Cut a rectangular piece of fabric that measures 6″ × 52″, cutting across the grain (see tip at right).
Before you start doodling, read the techniques intro on page 134, and practice on a scrap of the project fabric.
With a contrast color thread and a straight stitch (our stitch length was 2), use the free-motion doodling technique to stitch a pebble design on the two ends of the scarf, leaving a margin of ½″ at all edges and extending the thread doodles 6″ to 8″ up from the bottom edge of the scarf.
Tip: Trying these techniques are kind of like trying a new sport: you’ll have fun right from the start, but you’ll have even more fun as you practice and get better. Do plenty of test-stitching on swatches of your project fabric before you begin, and give yourself plenty of permission to mess up.

Cutting tip: Why cut across the grain? Because it’s the most frugal use of the fabric, and, since the doodled ″pebble″ design will keep the edges from rolling too much, there’s no need to cut with the grain.
Cutting tip: In the course of doodling, the shirt may become shorter in length, and if you doodle on only one part of the shirt, the bottom hem line may become a bit uneven. To avoid ending up with a shirt length problem, cut your shirt a little longer than the desired finished length, then trim the bottom edge once you are done doodling.
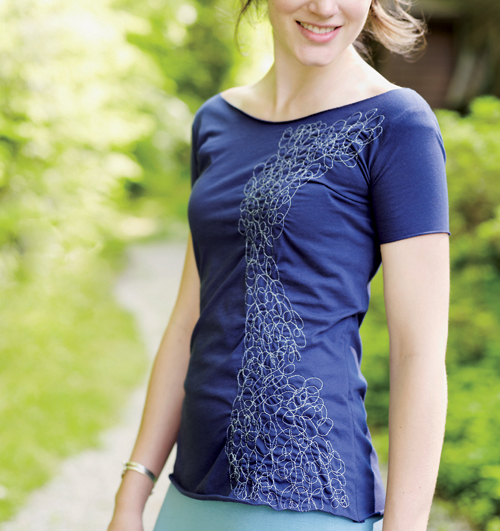
This project takes the Doodled Scarf (page 136) one step further by applying the pebble design to a shirt. The textured surface is fascinating and flattering, and the stitching is just plain fun to do. Here, we stitched up a tee based on our Two-Panel Garment design, but this technique also works wonders on any plain old store-bought t-shirt.
Follow the instructions for the Two-Panel Garment, adding sleeves, if desired (see chapter 3, pages 34 and 42).
Decide whether you want to doodle across the entire shirt front or just in one area. If you decide to stitch just in one area, mark borders.
Before you start free-motion stitching, read the techniques intro on page 134, and practice on a scrap of jersey.
With contrasting thread and a straight stitch (our stitch length was 2), doodle a pebble design. Continue until the desired area is filled.
what you’ll need
• Torso pattern piece to trace (see chapter 2, page 29)
• 1 yard of jersey fabric
• 1 spool of contrasting thread
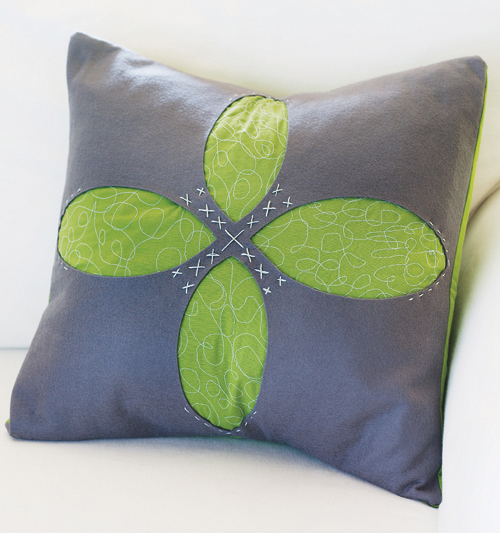
Remember how much fun it was to scribble? This project lets you go crazy with lines in a way you probably haven’t done since you were a kid. Embellishing the pillow’s front panel (under the felt layer) is a great way to get a feel for moving your fabric under the sewing machine needle, perfect prep for the sketching projects in this chapter. Plus, we love the simple envelope closure on the pillow back, and the soft felt overlay that tops it off.
what you’ll need
• ½ yard of solid woven cotton fabric
• 17″ square of wool felt*
• 1 spool of contrasting thread
• Embroidery thread and embroidery needle
• 16″ square pillow form
• Template for petal (page 302)
*Purl Soho (see Our Favorite Sources for Fabric and Specialty Supplies) sells precut 18″ squares of wool felt in a slew of colors.
With the woven fabric and the felt right side up, measure, mark, and cut the following pieces:
From the fabric:
—front panel: 17″ square
—small back panel: 17″ × 10″
—large back panel: 17″ × 12″
From the felt:
—felt panel: 17″ square
Before you start free-motion stitching, read the chapter intro, page 134, and practice on a scrap of the project fabric. Decrease the pressure on your presser foot to 0. Using a straight stitch (our stitch length was 2), stitch scribbled lines, randomly moving the fabric under the needle until the entire piece is embellished to your liking.
Fold the felt square in half, and then in half again. Trace the crescent-shaped petal template, using a vanishing ink pen or chalk, along each of the two folded edges as shown. Cut along the marked lines.
On each of the back panel pieces, press one long edge ½″ to the wrong side and then 1″ again to make a double-fold hem (leave the remaining edges unhemmed). Topstitch ¾″ from the edge to secure the hem.
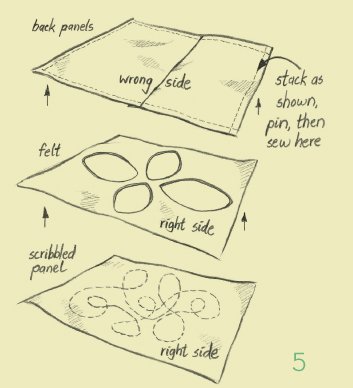
Stack the pieces in the following order:
1. Scribbled woven fabric panel, right side up
2. Cut felt square, right side up
3. Back panels, wrong side up
Pin the stacked fabrics together, overlapping the hemmed edges of the back panels so the outside edges align with the other pieces. Straight stitch a ½″ seam around all four edges. Clip the seam allowance at the corners, being careful not to snip the stitching. Finish the raw edges with a zigzag stitch to prevent fraying in the wash. Turn the pillow cover right side out.
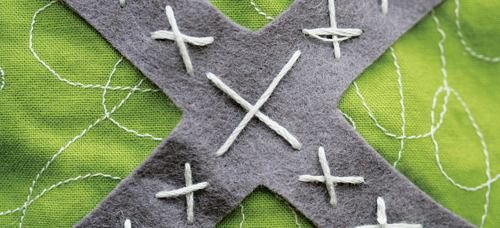
With embroidery thread, hand-sew a large X stitch in the center of the felt overlay to secure the felt to the scribbled fabric. Add a few more X stitches on the overlay as desired to decorate and further secure the two pieces. Hand-sew a running stitch around the ends of all the petal shapes. Insert the pillow form into the back opening.
Stitching tip: For consistent, even length stitches, move the fabric a little more slowly when making loops and turns, but keep the needle moving quickly.
Creating this skirt evokes the simple pleasures of putting crayons to paper. Embellishing a print gives it a whole new look, whether you stitch a few simple details or really layer on hue and texture. And keep in mind one of our guiding principles: it’s entirely fine to color outside the lines.
Follow the instructions for the Three-Panel Wrap Skirt (see chapter 3, page 49).
Before you start, read the techniques intro on page 134 and practice on a scrap of your print fabric. Load your machine with contrasting thread and embellish the designs in the fabric print of the skirt:
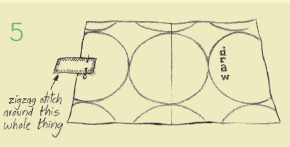
—Add curves and squiggles to fill in space by setting the foot-pressure dial to 0 and using free-motion doodling.
—Add blocks of color inside the shapes by free-motion doodling or stitching closely spaced or crosshatched lines.
—Zigzag along the shape outlines.
—Add words or other details with straight stretch stitches.
what you’ll need
• 2 yards of woven cotton print fabric with a simple, large-scale black-and-white print
• 6 yards of cotton ribbon or bias tape
• 1 spool of thread to match the skirt fabric
• 1 to 3 spools of contrasting thread
what you’ll need
• 10″ square of Birdseye cotton, glassware toweling, or other absorbent woven cotton fabric
• 1 to 3 spools of contrasting thread
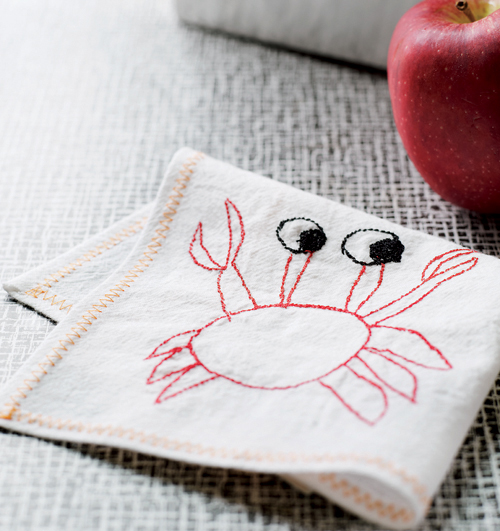
If you’re new to drawing with your sewing machine, hone your skills with this low-stakes, ultracheap project (you don’t even have to buy fabric if you have an old white bedsheet to cut up). This reusable napkin will make its owner proud in two ways: he or she gets to show off artwork and reduce lunchtime trash at the same time.
Tape the fabric taut to the table. With a vanishing ink pen or chalk, draw a simple design, either centered or in one corner, leaving at least a ¾″ margin on all sides for the hem.
Before you start drawing, read the techniques intro, page 134, and practice on a scrap of the project fabric. Set your presser foot pressure to 2; this allows you to manipulate your fabric easily but still follow the drawn lines. Using a straight stitch with the stitch length set at 1, stitch along the drawn guidelines.
Press the edges of the napkin ¼″ to the wrong side, and then ¼″ again to make a ½″ double-fold hem. Using contrasting thread and a narrow zigzag (our stitch width was 3 and stitch length 2.5), topstitch the hem in place, leaving the needle down and turning the fabric at the corners.
Stitching tip: It will make it easier for the sewist if the drawing isn’t itty-bitty, so guide the artist accordingly. For a younger child, frame the target area with tape to help him or her understand where and how big to draw the artwork.
Cutting tip: Why the extra fabric? Because it’s easier to thread-draw on fabric that is large enough to grab and hold.
Sketching tip: To make your drawing nice and tidy and easy to stitch, give your chalk a neat point with a pencil sharpener.
design variations
Mount your artwork on a thick wood block and stand it on a shelf. //// Mount your artwork on cardboard and frame it. //// Mount your artwork on a pre-stretched canvas. //// Mount several sewn swatches on a single large board. //// Mount artwork on three small panels hinged together to make a stand-up triptych.
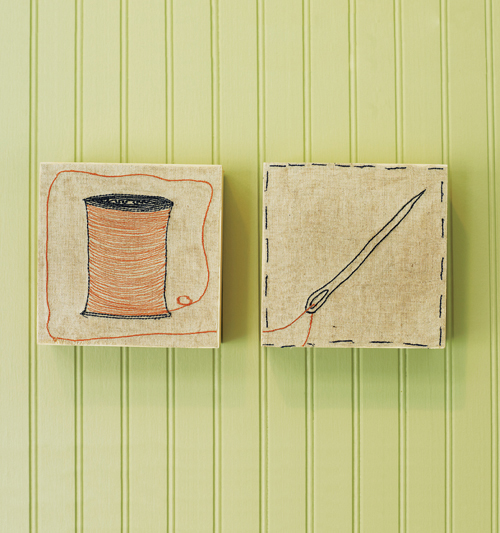
Great painters create their masterpieces on canvas, and that’s no accident. There’s something about fabric that’s way more eloquent and eternal than paper. Sew a small, simple design on linen or canvas, mount it on a panel of wood, and suddenly you’ve created something your grandkid’s grandkid will hang on a wall and admire.
With a vanishing pen or chalk, trace around the wood panel on the right side of the fabric. Measure and mark cutting lines at least 3″ bigger all around than the traced outline, then cut along the lines.
Before you start sketching, read the techniques intro, page 134, and practice on a scrap of the project fabric.
Draw your design on the right side of the fabric. Free-motion stitch over and around the lines one or more times.
If you like, add a stitched border before trimming the fabric to fit the mounting board. Stitch the border just inside the traced lines from step 1 that marked the perimeter of the mounting board.
Trim the fabric to the desired size. Brush Mod Podge on the mounting panel and lay the fabric over it with the wrong side down, smoothing out any wrinkles or bumps. Brush a topcoat of Mod Podge over the entire front side of the fabric and panel and allow it to dry thoroughly.
what you’ll need
• Linen, canvas, or other plain fabric (amount depends on size of art)
• 1 to 3 spools of contrasting thread
• Wood panel for mounting (we used ½″-thick board; dimensions depend on size of art)
• Fabric Mod Podge
• Foam brush
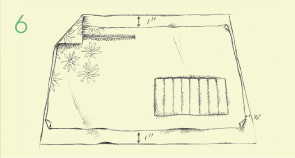
Cutting tip: These curtains are left unhemmed because the selvage provides a narrow fringed finish. Stitched lines add weight to the bottom edge, and the sides are stitched to minimize (while still allowing) fraying.

These airy window panels, with their dainty stitched lines on gossamer-thin fabric, seem to fill a room with soft breezes and sunlight even on a gloomy day. Sew up a pair in the time it takes to buy sheers from the big box store, or if you already own the store-bought version, take them down and embellish them!
To make two curtain panels, each measuring 26″ long × 18″ wide, fold the fabric in half lengthwise, with the right sides together and the selvages aligned. Press the fold lightly to crease it, then open it and cut along the crease.
Straight stitch four lines parallel to the bottom edge,  ″ apart, starting ¼″ from the bottom edge.
Change to the second thread color and stitch three lines between the original four stitched lines.
Use one of the contrasting threads to straight stitch a single line along both sides of each panel, ¼″ in from the raw edges.
what you’ll need
• ½ yard of 52″-wide voile fabric (selvage edges still attached)*
• 2 spools of contrasting color thread
• Buttons
• Embroidery floss and embroidery needle
• Template (page 305), optional
• Fine-tipped pencil
*Each finished curtain panel measures 26″ long × 18″ wide. If your windows are larger, purchase more fabric and piece it as necessary for the desired size panels.

Press the top edge of each panel ½″ to the wrong side and then again 1½″ to the wrong side.
Stitch two straight lines, parallel to the top folded edge, 1¼″ and 1½″ down from the top edge to make the casing for the curtain rod.
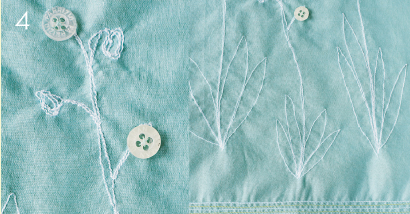
Draw your design on paper or use the template provided. Once you are happy with the design, lay one of the panels over it and lightly trace it with a fine-tipped pencil. Repeat with the other panel.
With the presser foot pressure set to 0, straight stitch (our stitch length was 1.5) up one of the design lines, turn around, and stitch back down. Continue to stitch all of the design lines, particularly the leaves in the template design, in this manner.
If the design has round or curved shapes, such as flowers at the end of the straight lines on the template design, use the free-motion doodling technique (see the chapter intro, page 134).
Hand-sew buttons as desired to highlight areas of the design. If you used the template, hand-sew a button on each of the round flower shapes, or skip drawing the flowers and simply add the buttons.
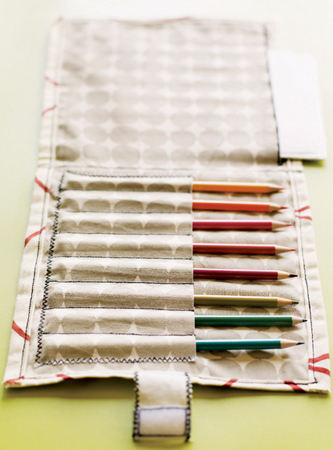
Pack a sketchpad and some drawing tools in this sweet book, and you’ll be ready whenever inspiration strikes. Black thread not only provides the strongest contrast to the fabric print, but it also evokes the bold lines of a pencil or charcoal sketch. The idea for this design came from our inspired and inspiring friend Catherine, who gave Nicole’s kids a couple of fabulous hand-sewn art kits for Christmas one year.
Measure and mark the following pieces on the right side of the fabric, and then cut them out:
—exterior: 10½″ × 18½″
—interior: 8½″ × 17½″
—pencil pocket: 4¼″ × 8″
—strap closure: 1½″ × 5″
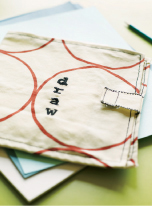
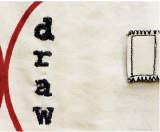
Fold the exterior piece in half with the wrong sides together and the short edges aligned. With the fabric pencil or pen, write the word “draw” down the right half of the fabric as shown in photo above.
Install the heavier denim needle in the sewing machine. Unfold the exterior piece and with the presser foot pressure set to 1, straight stitch to trace the outline of the lettering. Then, set the presser foot pressure to 0 and fill in the lettering with a narrow zigzag.
Fold the interior piece in half with the right sides together and short edges aligned. Press a crease to mark the center.
what you’ll need
• ½ yard of heavy canvas fabric (we used ¼ yard each of two complementary fabrics)
• 1 spool of contrasting thread (preferably black)
• 1¼″ piece of ¾″-wide sew-on Velcro
• Fabric marking pen or pencil
• Denim sewing machine needle
• Craft knife
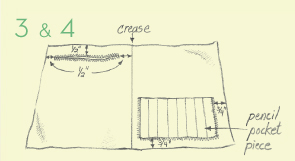
Open the interior piece and lay it out with the right side facing up. Pin the pocket piece with the right side up to the right of the fold line, ¾″ from the bottom and right edges.
Draw vertical lines every 1″ across the width of the pocket, starting and ending 1″ from each side.
To secure the pocket to the interior piece, zigzag along the side and bottom edges.
Topstitch along the pencil lines with a straight stretch stitch, securely backtacking at both ends.
To the left of the center crease, draw a line ½″ below the top edge that starts ½″ from the left edge, and ends ½″ from the crease. Using your machine’s manual buttonhole foot, stitch an elongated buttonhole centered on the marked line. With a craft knife, slowly cut it open, being careful not to cut through the stitches.
With the right side facing up, pin the strap piece to the right side of the exterior as shown, centered along the left edge. Zigzag around all the edges, attaching the strap to the exterior piece and overcasting the raw edges of the strap.
Attach the loop side of the Velcro to the wrong side of the strap end with a straight stitch around the edges.
Stitch the hook side of the Velcro to the right side of the exterior piece, ½″ from the edge, so it aligns with the Velcro on the strap.
Pin the exterior and interior pieces with the wrong sides together. The exterior piece will extend beyond the edges of the interior piece by ½″ on the sides and by 1″ on the top and bottom.
To enclose the raw edges of the interior piece, press the side edges of the exterior piece ¼″ to the wrong side and then a generous ¼″ again to cover the raw edges. Straight stitch close to the folded edges.
Design tip: We traced letters that we printed from the computer. To make it easier, we taped the printout to a window, held the fabric over it, and traced the letters.
Design tip: Designed to store a pad or sheets of paper, the ″slot″ is really a giant buttonhole, probably the biggest one you’ll ever make!
Press the top and bottom edges of the exterior piece ½″ to the wrong side and then a generous ½″ again to cover the interior piece’s raw edges. Straight stitch close to the folded edges.
Straight stretch stitch down the center of the book, over the pressed crease.
Finishing tip: The stitched line down the center crease adds bold definition and keeps the contents of the paper slot in place.
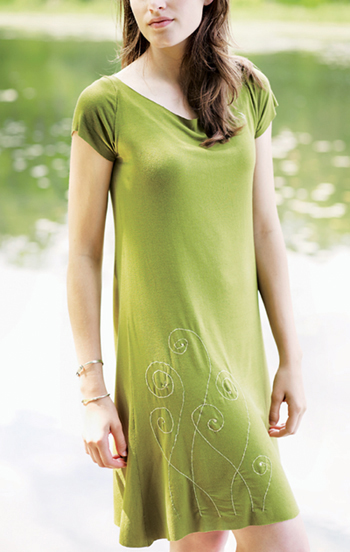
Nature is always the first place to turn for inspiring designs. We based this one on the ferns that sprout in profusion around the foundations of Debra’s house each spring. We added this motif to the two-panel dress with cap sleeves, a forgiving summer solution for staying cool while not baring all.
what you’ll need
• Torso pattern piece to trace (see chapter 2, page 29)
• 1½ yards of jersey fabric (we used a rayon jersey)
• 1 spool of contrasting thread
• Fusible tear-away stabilizer
• Fern template (page 304)
• Dressmaker’s carbon paper and pencil
Follow the instructions for the Two-Panel Garment (chapter 3, page 34). The appropriate amount of flare for the dress ranges from 3″ to 5″ on both sides, depending on the desired fit—the flare shown here is 4″. Add cap sleeves (see chapter 3, page 42).
Following the manufacturer’s instructions, press the stabilizer to the wrong side of the area you’d like to embellish.
Transfer the fern design by aligning the template over the carbon paper, and positioning them both on the dress at the desired location (with the carbon side of the paper facing the fabric). Draw over the template lines with a pencil to transfer the design.
Before stitching your design, read the techniques intro (page 134) and practice on a scrap of the project fabric.
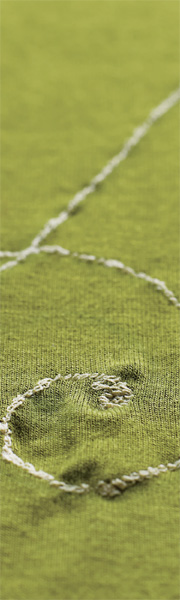
Using a straight stretch stitch and with the presser foot pressure set at 1, stitch over the lines (if you’re using our fiddlehead design, start sewing at the bottom of each fern). With your fingers firmly pressing the stabilized fabric, turn the fabric while the needle is moving to make the curves. You may need to stop and adjust your hold on the fabric every few inches. When stitching, get the needle going fast for a nice even stitch appearance.
When you’re finished stitching, carefully tear away the stabilizer.
Stitching tip: This isn’t free-motion drawing (which is tricky on this slinky fabric even with stabilizer); rather, you’re simply lowering the presser foot pressure so you can turn the fabric on the big curves.

what you’ll need
• 1¼ yards of cotton jersey
• Fusible tear-away or wash-away stabilizer
• 1 spool each of coordinating and contrasting thread
• 2 decorative buttons
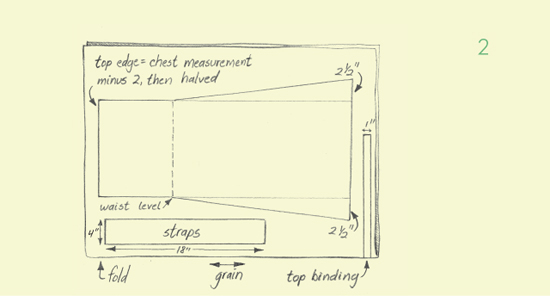
This simple tube of fabric is finished with shoulder straps and machine sketching, allowing you show off your shoulders and your artistic talents at the same time. Its two-panel construction is similar to the Two-Panel Garment (chapter 3, page 34) but with a little less flare and a little more bare.
With a measuring tape, take the following measurements:
—chest: snug around your body, under your arms where the top band of the dress will lie
—waist level: from underarm to waist
—length: underarm to desired hemline (hold the measuring tape at your armpit while stepping on the other end to hold it taut, then note where you’d like the hem to fall)
Fold the jersey with the right sides together and the straight grain running the length of the dress. Measure, mark, and then cut the following lines through both layers of fabric:
Dress:
—top edge: Subtract 2″ from the chest measurement, then divide the result in half. Center this line on the fabric.
—sides: Starting at each end of the top edge, draw vertical lines equal to the length measurement. Along these lines, make a mark at the waist level.
—bottom edge: Draw a line connecting the sides, and extending 2½″ beyond them on either side so the bottom edge is 5″ longer than the top edge.
—flare: Connect each end of the bottom edge line with the waist point. When cutting out the fabric, follow these flared design lines.
Also mark and cut the following:
—top binding: 1″ × 2″ smaller than the top edge measurement (cut on the cross grain)
—straps (cut 2): 4″ × 18″ (cut with the straight grain)
Straight stretch stitch the side seams with ½″ seam allowance.
Following the instructions in the chapter 4 intro, page 61, use the binding to make a binding loop, joining the ends with a ½″ seam.
Pin the binding to the top edge of the dress. Using a small zigzag (we set our stitch width at 3), edgestitch the binding to the dress.
Stitching tip: The stabilizer gives the fabric a bit of added structure, making it easier to draw.
Fold one strap in half lengthwise and press. Edgestitch both sides with a zigzag. Press the strap so the seam is in the center and can be positioned on the underside of the strap, when the strap is sewn in place. Repeat for the other strap.
Have the wearer put the dress on and pin one end of a strap in the desired location on the front of the dress with 1″ extending beyond the top edge of the dress. Pin the opposite end of the strap inside the dress in the back (if you are wearing the dress, it’s helpful to have a friend to do this), making sure it hugs the shoulder snugly.
Remove the dress. Measure the distance between the side seam and the strap, and use the measurement to pin the second strap in place on the dress’s opposite side.
With the dress right side out, topstitch each strap in place. Trim away any excess strap length and finish the strap with a zigzag.
Sew decorative buttons onto the front of the straps at the point where they meet the binding.
Cut a piece of stabilizer a little bigger than the area you’d like to decorate. Following the manufacturer’s instructions, fuse it on the wrong side of the dress at the desired location.
With chalk or a vanishing fabric pen, freehand draw a leaf and bud design (ours extends from the front of the dress to the back).
Straight stretch stitch (our stitch length was 2 to 2.5) along the lines using the Sketching with Thread technique (see page 134).
Stitch twice over the leaves and buds, and a few more times over the stem.
Tear away the stabilizer, and then wash the garment to remove any bits and pieces caught between the stitches.
Cutting tip: Feel free to adjust the flare to your liking. For a looser fit, try a bottom edge that’s 8″ wider than the top edge. Want to go slinky? Omit the flare and make a totally straight tube if you like dresses that accentuate your curves. If you’re lucky, your backside is bigger than the rest of your measurements, so a dress that fits your hips will get pretty snug around your butt, but if you’ve got it, flaunt it!

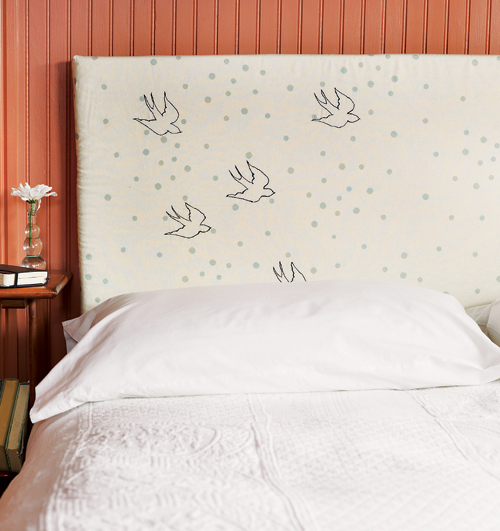
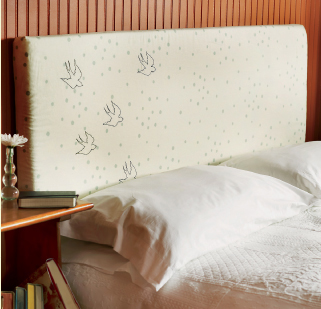
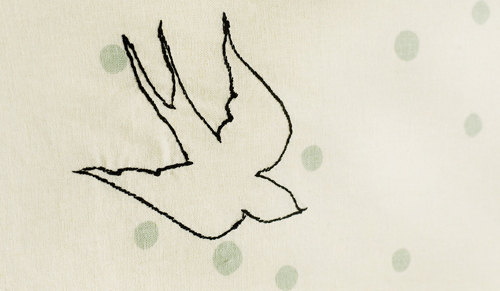
An embroidered headboard sounds impossibly luxurious, something found only in Spanish palaces or yachts docked in Dubai. But when you realize that you’re basically just adding decorative stitching to fabric and stapling it to a backing, you’ll want to stitch one up for your home, castle, or maybe even your yacht!
what you’ll need
• 2 yards of home-decor weight fabric*
• 1 spool of contrasting thread
• 24″ × 60″ piece of 2″-thick upholstery foam*
• 2 yards of cotton batting*
• 24″ × 60″ sheet of 5/8″-thick plywood*
• Hanging hardware (see note on page 164)
• Staple gun and staples
• Swallow template (page 310)
• Dressmaker’s carbon paper and pencil
*The measurements and material requirements are for a queen-size headboard.
Measure and mark the following pieces on the wrong side of the fabric and batting and cut them out:
—cover: 36″ × 66″ (mark the longer measurement along the fabric selvage)
—batting: 36″ × 66″
Draw lines 6″ in from each raw edge to mark where the fabric wraps around to the back of the headboard. With a vanishing ink pen or chalk, trace the template as desired, within the marked lines. Before sketching your design, read over the techniques intro (page 134) and practice on a scrap of the project fabric.
Using a straight stretch stitch and with the presser foot pressure set to 2, stitch along the design lines.
—To turn sharp corners, stop with the needle down, lift the presser foot, and turn the fabric.
—To stitch curves, as on the back of the wings, grasp the fabric on either side of the presser foot and control its movements, so the needle follows the line, with the needle moving fast. Try not to stop until the stitching reaches the end of the line.
Place the foam on top of the plywood. Center the batting on top of the foam; it will extend 6″ beyond the foam on all sides. Then, place the fabric, right side facing up, on the batting; it will also extend 6″ beyond the foam and wood on all sides.
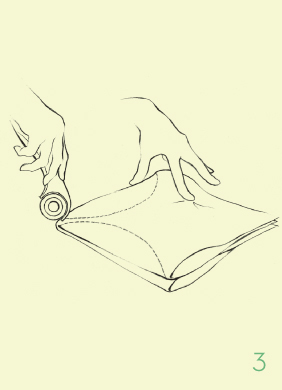
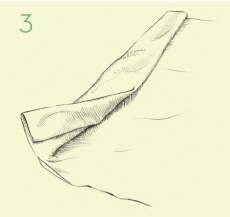
Wrap the batting and fabric around the foam and plywood on one long side, smooth it and then staple it to the plywood, starting at the center and moving out toward the corners. Repeat along the opposite long side, pulling the fabric taut before stapling.
Repeat along the short edges, making neat corners by tucking and folding the fabric over the already stapled fabric. Smooth, tighten, and staple anywhere the fabric seems loose.
Hang the headboard securely using the appropriate hardware for your wall.
Finishing tip: The back won’t look finished, but happily, it will be against a wall!
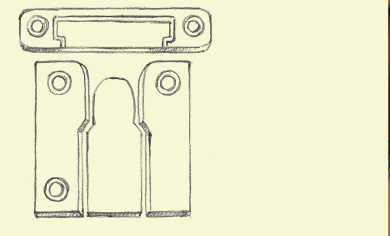
HARDWARE NOTE: We like these adjustable flush-mount hanger brackets, which we found for less than five dollars online. One piece is screwed into the back of the headboard, and its mate is screwed into the wall at a stud. The parts slide together, and you can use a few of them along the back for a very strong and stable mount.
Stitching tip: Remember, each straight stretch stitch is actually three tiny stitches, two forward and one back. Try to end each line on a backward stitch. This will make for cleaner lines without rogue backward stitches.
Stitching tip: Placing lightweight paper between the presser foot and the oilcloth keeps the foot from sticking. Use your seam ripper to help scratch away any paper left next to or in the stitches.

Nix the plastic wrap and sew a couple of these covers instead—they can be whipped up in the time it takes your lasagna to bake. You’ll feel better about not producing more trash, and you’ll be able walk into your next potluck party knowing that your casserole or salad bowl is outfitted just as gorgeously as you are.
With the wrong side of the fabric facing up, position your dish, pan, or bowl upside down in the center and trace around it. (Obviously, you’ll want to do this step before making your culinary creation.) Measure and mark a line 1½″ bigger all around than the traced line (a compass is the best tool if you’re drawing a circle). Cut along the larger marked line.
Draw your lettering and any other design elements on a lightweight piece of paper (tissue paper works especially well). Position the paper with the sketched design over the right side of the fabric.
Using a straight stitch and free-motion techniques (see page 134), topstitch over your design, through both the paper and the fabric. Tear away the paper.
Fold the elastic over the edge of the fabric. Using a zigzag stitch, sew it all around the edge of the circle, pulling the elastic as taut as possible. (see chapter 1, page 19 for fold over elastic instructions).
what you’ll need
• ½ to ¾ yard of oilcloth (any width will do as long as it fits your container)
• 1 spool of contrasting thread
• Tissue or tracing paper
• Fold over elastic

what you’ll need
• 18″ × 32″ piece of Homasote board (or desired size)
• 1 yard of 44/45″-wide fabric (or enough fabric to cut a piece 2″ bigger than the board on all sides)
• 1 spool of contrasting thread
• Staple gun and staples
• Picture-hanging hardware
Every household needs a place to tack up invitations, shopping lists, reminders, and love notes. That’s why this board makes a terrific gift, especially when it’s customized with a name or address.
Center the board on the right side of the fabric and trace around it with chalk, then set the board aside. Use chalk to draw guidelines for planning your words. Remember that 2″ on all sides will be wrapped to the back of the board, so avoid the edges. Mark your lettering within the guidelines.
Using a straight stretch stitch and the free-motion writing technique (see page 135), stitch along the marked design lines in contrasting thread, turning where necessary with the needle down to hold the fabric in place.
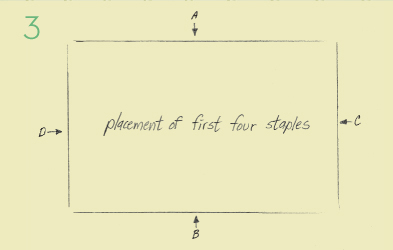
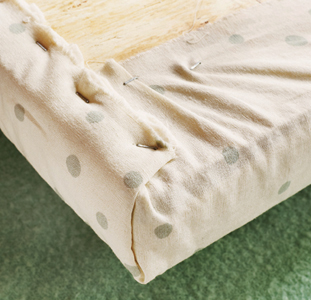
Center the board on the wrong side of the stitched fabric. Working on the long sides first, fold the fabric up and over the board and staple it in the center as shown in the illustration. Repeat on the two short sides. Then, staple the rest of the way around the board. Trim any excess fabric from the corners if necessary.
Finishing tip: If you like, add cup hooks to the bottom edge for hanging keys. Use picture-hanging hardware to display the board.
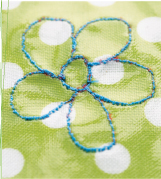
From afar, the flowers look stitched, but they’re actually part of the fabric’s pre-printed design.