26-gauge copper and brass sheet
24-gauge copper and brass sheet
6" (15 cm) of 14-gauge copper wire
12" (30.5 cm) of 16-gauge copper wire
4" (10 cm) of 18-gauge copper wire
61⁄2' (2 m) of 22-gauge copper wire
Two 9×14mm lampwork beads
20 amber 7×12mm oval beads
12 cobalt blue 4mm “glass tile” round beads
2" (5 cm) of 5mm oval brass chain
6 metal 2mm crimp tubes (optional)
Two 24" (61 cm) pieces of 3⁄8" (1 cm) wide deertan leather lacing
2 copper 1⁄4" (6.5 mm) long 1.5 mm flat-head rivets
2 brass 1⁄4" (6.5 mm) long 1.5 mm flat-head rivets
Template
Disc cutter
Metal file
Butane micro torch
Annealing pan with pumice stone
Utility pliers
Quenching bowl
Pickle
Mini crock
Copper tongs
0000 steel wool
1" (2.5 cm) diameter coins
Painter’s tape
Utility ball-peen hammer
Steel bench block
Ruler
Fine-tip Sharpie marker
1.5 mm metal hole-punch pliers
Metal shears
Brass texture sheets
Heavy-duty flush cutters
Riveting hammer
Large bail-forming pliers (7 mm)
2 pairs of chain-nose pliers
Flush cutters
Medium bail-forming pliers (3 mm)
Texturing hammer (optional)
Dapping block and punches
Oxidizer for copper and brass
Round-nose pliers
Fine- and ultrafine-grit sandpaper
Rotary tumbler
Mixed stainless steel shot
Stepped forming pliers (1.75–8mm)
Nylon-jaw pliers
Flat-nose pliers
Nylon or plastic hammer
321⁄2" (82.5 cm)
1. Cut two 1" (2.5 cm) 24-gauge copper discs and two 1" (2.5 cm) 24-gauge brass discs with the disc cutter. File the edges smooth. Anneal, quench, pickle, and dry, then clean with steel wool.
2. Texture each disc with 1" (2.5 cm) diameter coins (see Coins + Patterned Sheet).
3. Mark the exact center of one copper disc and one brass disc with the Sharpie. Pair the marked copper disc with the unmarked brass disc, smooth sides together, and make a hole through both coins at the mark with the hole-punch pliers. Do the same with the marked brass disc and the remaining unmarked copper disc.
4. Cut two 7 × 50 mm strips of copper or brass from 24-gauge sheet. Anneal, quench, pickle, dry, and clean. Texture with brass texture sheets or coins.
5. Punch a hole at the exact center of each strip with the hole-punch pliers. Place a strip between a copper/brass disc set with textured sides out. Insert a brass rivet through the front of the copper disc, front of the strip, and back of the brass disc (shown here in all copper) (Figure 1). Trim the end of the brass rivet to about 2 mm and flare the end with the riveting hammer (see Riveting with a Nail-head Rivet) (Figure 2). Repeat for the other copper/brass disc set.
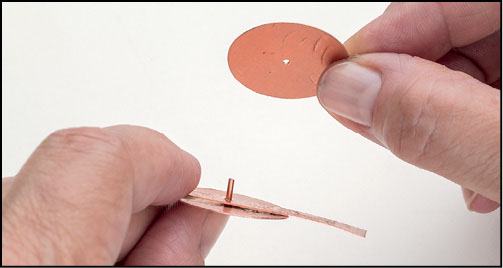
Figure 1
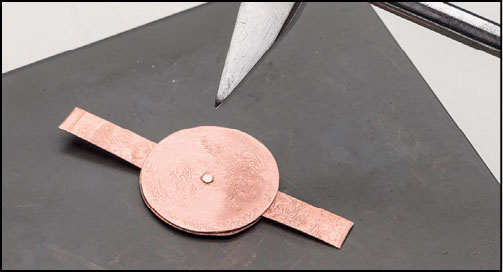
Figure 2
6. Using the 7 mm barrel of the large bail-forming pliers and flush cutters, make 4 jump rings (see Jump Rings) from 14-gauge copper wire. Close the jump rings and hammer to flatten them slightly. Wrap each seam with about 3" (7.5 cm) of 22-gauge copper wire, wrapping about seven times around.
7. With the 3 mm barrel of the medium bail-forming pliers, curl each protruding strip over partway (Figure 3) and insert a connector ring from Step 6. Curl the strip the rest of the way over the ring and tuck the edge of the strip in between the coins (Figure 4). Do this for all 4 protruding strips and the 4 connector rings.
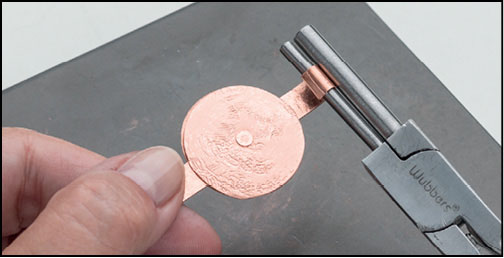
Figure 3
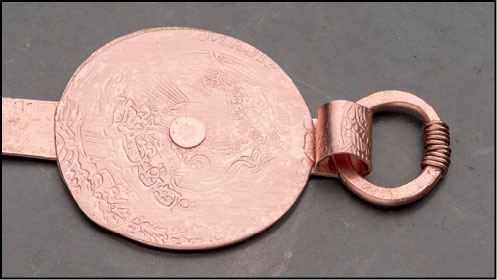
Figure 4
8. Cut two 1⁄2" (1.3 cm) discs from the 24-gauge brass sheet with the disc cutter. Texture the discs with a brass texture sheet, coin, or texturing hammer. Make a hole in the center of each disc with the hole-punch pliers.
9. With the textured side out, dome the discs with a dapping set. Oxidize and polish. Set aside.
10. Cut two 6" (15 cm) pieces of 16-gauge copper wire. Create loops with the 3 mm barrel of the medium bail-forming pliers at one end of each piece and hammer the loops lightly.
11. Slide a lampwork bead onto each piece of wire, place a brass bead cap from Step 8 on top of each, and fasten it to the bottom connector ring (if the coin focals have an “up” and “down”) with a wrapped loop. (If there is too much play in the bead, slide a few 2mm metal crimps inside the bead to tighten the fit.)
12. Make 34 copper 2" (5 cm) ball-end head pins with the torch (see Balling the End of Wire), using 22-gauge wire. Pickle, clean, then oxidize and clean again.
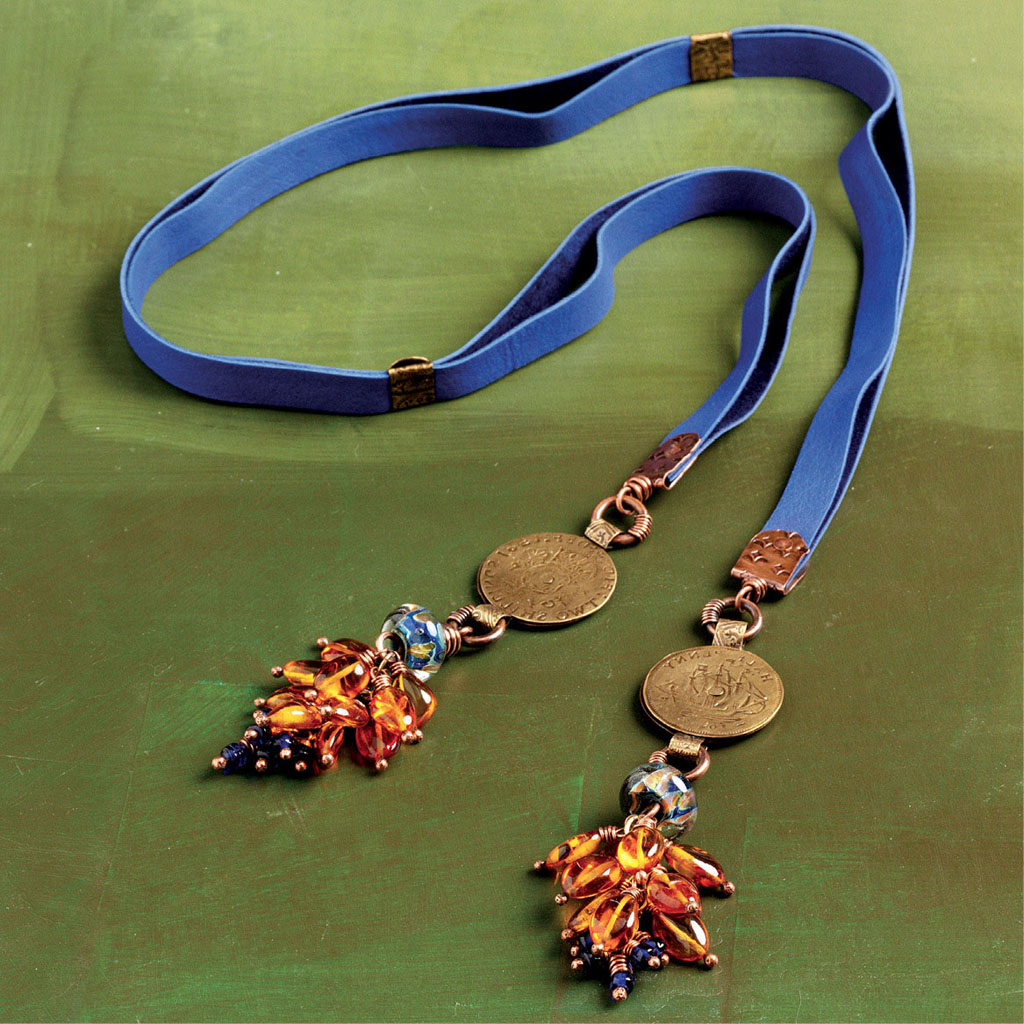
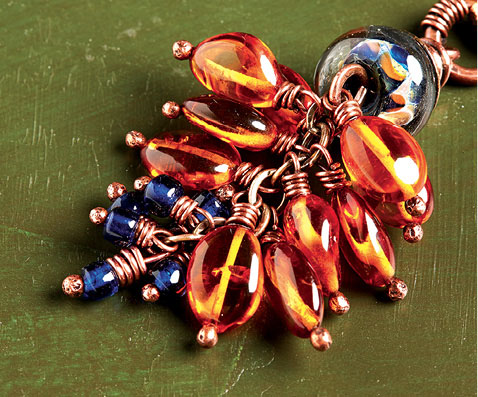
13. Attach a 1" (2.5 cm) length of oval brass chain to the bottom loop under each lampwork bead. Using the head pins, attach 6 round beads to the bottom 2 chain links on each coin focal using wrapped loops. Attach 10 oval beads to the remaining chain links on each focal using wrapped loops (Figure 5).

Figure 5
14. Cut two Leather Rivet Ends from 26-gauge copper sheet using the template (see Templates). Anneal, quench, pickle, and dry, then clean with steel wool. Texture each Leather Rivet End with brass texture sheets or coins. Round the corners with the shears and then sand all the edges with fine- and then ultrafine-grit sandpaper. You do not need to re-anneal. Oxidize and tumble, or hand-polish, now as you won’t be able to do this after it is fastened to the leather.
15. Create 2 copper 3" (7.5 cm) ball-end head pins from 18-gauge wire. Oxidize. Lightly hammer the balls to flatten them. Set aside.
16. Mark the center of each Leather Rivet End from Step 13 with the Sharpie. Make a hole at each mark with the hole-punch pliers. Grasp each piece, with the smooth side facing you, at the center where the hole is with the 1.75 mm barrel of the stepped forming pliers. Fold the rectangle gently into a wide V, with the textured side on the outside. The hole you made should be sitting right over the fold.
17. Insert a flattened ball-end head pin into the hole in one Leather Rivet End, with the ball inside the V (Figure 6). Keeping the flattened ball tight up against the inside of the V, bring the two sides almost together. Insert both pieces of the leather lacing, rough sides together, into the V, pushing it up as far as it will go, and bring the sides of the V together. Squeeze the V together gently over the leather with the nylon-jaw pliers, being sure to keep the edges of the metal flush with each other and the leather straight. You may use a bit of glue at this time if you like to keep the leather in place until you are ready to rivet it, but it is not necessary. If you use a bit of glue to hold the leather in place, let it dry.

Figure 6
18. Make a mark with the Sharpie on one side of the metal, centered and about 4 mm from the rounded, cut edge. Make a hole at the mark with the hole-punch pliers, going all the way through both sides of the metal and the leather.
19. Insert a flat-head copper rivet and trim the straight protruding end to about 2 mm above the metal. Flare the ends with a riveting hammer, being sure to keep the leather straight (Figure 7).
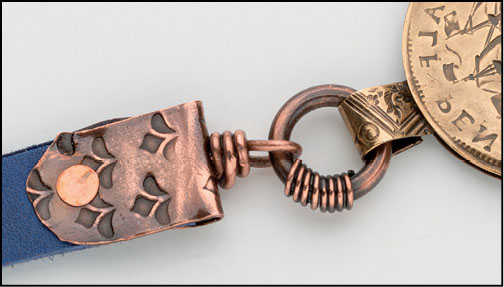
Figure 7
20. Create a wrapped loop with the protruding length of the head pin, fastening it to the connector ring on one of the coins before wrapping it closed. Repeat Steps 17–20 for the other end of the leather and the other coin focal.
21. Cut two 30 × 10 mm pieces of 26-gauge brass sheet. Anneal, quench, pickle, and dry, then clean them with steel wool. Texture with brass texture sheets or coins (the final dimensions will be slightly larger if you use this texturing technique). Round the corners with the shears and then sand all the edges with fine- and then ultrafine-grit sandpaper. Oxidize and polish.
22. With the smooth side facing you, bend the edges up 10 mm in from each side with flat-nose pliers and slide them onto the leather 8" (20.5 cm) from each end. Bend the edges the rest of the way over the leather and tap lightly with a nylon or plastic hammer to tighten (Figure 8).

Figure 8
Deertan lacing: leathercordUSA.com. Amber ovals, cobalt blue 4mm “glass tile” beads: firemountaingems.com. Copper and brass rivets: orrtec.etsy.com. Metal sheet: monsterslayer.com. Wubbers bail-forming pliers, stepped forming pliers, oxidizer: riogrande.com. Coins: joelscoins.com.