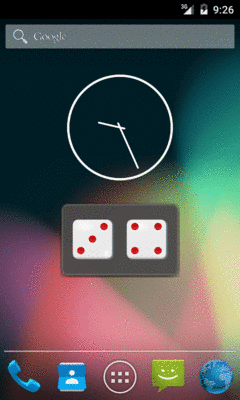
Figure 740: Pair of Dice, In Action
App widgets are live elements that the user can add to her home screen. Android ships with a variety of app widgets, such as a music player, and device manufacturers frequently add more. However, developers can add their own — in this chapter, we will see how this is done.
For the purposes of this book, “app widgets” will refer to these
items that go on the home screen. Other uses of the term “widget”
will be reserved for the UI widgets, subclasses of View, usually
found in the android.widget Java package.
Understanding this chapter requires that you have read the core chapters, particularly the chapters on:
Creating app widgets looks little like creating an activity. That is because the home screen is showing your app widget, whereas your own app shows your own activities. Having a third-party app (a home screen) show a UI from your app has some security ramifications.
Android’s security model is based heavily on Linux user, file, and process security. Each application is (normally) associated with a unique user ID. All of its files are owned by that user, and its process(es) run as that user. This prevents one application from modifying the files of another or otherwise injecting their own code into another running process. It would be dangerous for the home screen to run arbitrary code itself or somehow allow its UI to be directly manipulated by another process.
The app widget architecture, therefore, is set up to keep the home screen application independent from any code that puts app widgets on that home screen, so bugs in one cannot harm the other.
The way Android pulls off this bit of security is through the use of
RemoteViews.
The application component that supplies the UI for an app widget is
not an Activity, but rather a BroadcastReceiver (often in tandem
with a Service). The BroadcastReceiver, in turn, does not inflate
a normal View hierarchy, like an Activity would, but instead
inflates a layout into a RemoteViews object.
RemoteViews encapsulates a limited edition of normal widgets, in
such a fashion that the RemoteViews can be “easily” transported
across process boundaries. You configure the RemoteViews via your
BroadcastReceiver and make those RemoteViews available to
Android. Android in turn delivers the RemoteViews to the app widget
host (usually the home screen), which renders them to the screen
itself.
This architectural choice has many impacts:
FrameLayout, LinearLayout, and RelativeLayout for
containers, and AnalogClock, Button, Chronometer,
ImageButton, ImageView, ProgressBar, and TextView for widgets.
And, on API Level 11 and higher, you can use some AdapterView-based
widgets, like ListView, as we will examine
in the next chapter. And, as of API Level 16
(Android 4.1), you can use GridLayout… but
not its backport on earlier devices.Button and
ImageButton widgets. In particular, there is no EditText for text
input.OnClickListener to get button clicks; rather,
you tell RemoteViews a PendingIntent to invoke when a given
button is clicked.RemoteViews and reuse them yourself.
Rather, you create and send out a
brand-new RemoteViews whenever you want to change the contents of
the app widget. This, coupled with having to transport the
RemoteViews across process boundaries, means that updating the app
widget is expensive in terms of CPU time, memory, and battery
life, when compared to equivalent UI updates of one of your own
activities.BroadcastReceiver, you have to be quick (lest you take too long and
Android consider you to have timed out), you cannot use background
threads, and your component itself is lost once the request has been
completed. Hence, if your update might take a while, you will
probably want to have the BroadcastReceiver start a Service and
have the Service do the long-running task and eventual app widget
update.This will become somewhat easier to understand in the context of some
sample code. In the
AppWidget/PairOfDice
project, you will find an
app widget that displays a roll of a pair of dice. Clicking on the
app widget re-rolls, in case you want a better result.
First, we need to register our BroadcastReceiver implementation in
our AndroidManifest.xml file, along with a few extra features:
<?xml version="1.0" encoding="utf-8"?>
<manifest xmlns:android="http://schemas.android.com/apk/res/android"
  package="com.commonsware.android.appwidget.dice"
  android:versionCode="1"
  android:versionName="1.0">

  <uses-sdk
    android:minSdkVersion="7"
    android:targetSdkVersion="11"/>

  <supports-screens
    android:largeScreens="true"
    android:normalScreens="true"
    android:smallScreens="false"/>

  <uses-feature
    android:name="android.software.app_widgets"
    android:required="true"/>

  <application
    android:allowBackup="false"
    android:icon="@drawable/ic_launcher"
    android:label="@string/app_name">
    <receiver
      android:name=".AppWidget"
      android:icon="@drawable/cw"
      android:label="@string/app_name">
      <intent-filter>
        <action android:name="android.appwidget.action.APPWIDGET_UPDATE"/>
      </intent-filter>

      <meta-data
        android:name="android.appwidget.provider"
        android:resource="@xml/widget_provider"/>
    </receiver>

    <activity
      android:name="PairOfDiceActivity"
      android:theme="@android:style/Theme.Translucent.NoTitleBar">
      <intent-filter>
        <action android:name="android.intent.action.MAIN"/>

        <category android:name="android.intent.category.LAUNCHER"/>
      </intent-filter>
    </activity>
  </application>

</manifest>
Here, along with a do-nothing activity, we have a <receiver>. Of note:
<receiver> has android:label and android:icon
attributes, which are not normally needed on BroadcastReceiver
declarations. However, in this case, those are used for the entry
that goes in the roster of available widgets to add to the home screen.
Hence, you will probably want to supply values for both of those, and
use appropriate resources in case you want translations for other
languages.<receiver> has an <intent-filter> for the
android.appwidget.action.APPWIDGET_UPDATE action. This means we
will get control whenever Android wants us to update the content of
our app widget. There may be other actions we want to monitor —
more on this in a later section.<receiver> also has a <meta-data> element, indicating that
its android.appwidget.provider details can be found in the
res/xml/widget_provider.xml file. This metadata is described in
greater detail shortly.If the central point of your application is to provide an app widget,
you should strongly consider adding a <uses-feature> element to advertise
this fact to markets like the Play Store:
<uses-feature android:name="android.software.app_widgets" android:required="true" />
In principle, having this element means that markets should block the installation of your app on devices where there is no app-widget-capable home screen or other known places for supporting app widgets.
If, however, your app has an app widget, but it is an adjunct to
other forms of UI (typically a launcher activity), then you may wish to
leave off this <uses-feature> element, or set it to
android:required="false".
Next, we need to define the app widget provider metadata. This has to
reside at the location indicated in the manifest — in this
case, in res/xml/widget_provider.xml:
<appwidget-provider xmlns:android="http://schemas.android.com/apk/res/android"
  android:minWidth="144dip"
  android:minHeight="72dip"
  android:updatePeriodMillis="900000"
  android:initialLayout="@layout/widget"
/>
Here, we provide a few pieces of information:
android:minWidth
and android:minHeight). These are approximate — the app
widget host (e.g., home screen) will tend to convert these values
into “cells” based upon the overall layout of the UI where the app
widgets will reside. However, they should be no smaller than the
minimums cited here. Also, ideally, you use dip instead of px for
the dimensions, so the number of cells will remain constant
regardless of screen density.android:updatePeriodMillis). This is expressed
in terms of milliseconds, so a value of 3600000 is a 60-minute
update cycle. Note that the minimum value for this attribute is 30
minutes — values less than that will be “rounded up” to 30
minutes. Hence our 15-minute (900000 millisecond) request will
actually result in an update every 30 minutes.onUpdate() of our
AppWidgetProvider gets control.Note that the calculations for determining the number of cells for an
app widget varies. The dip dimension value for an N-cell dimension
was (74 * N) - 2 (e.g., a 2x3 cell app widget would request a width
of 146dip and a height of 220dip). The value as of API Level 14
(a.k.a., Ice Cream Sandwich) is now (70 * N) - 30 (e.g., a 2x3 cell
app widget would request a width of 110dip and a height of
180dip). To have your app widgets maintain a consistent number of
cells, you will need two versions of your app widget metadata XML,
one in res/xml-v14/ (with the API Level 14 calculation) and one in
res/xml/ (for prior versions of Android).
Eventually, you are going to need a layout that describes what the app widget looks like. You need to stick to the widget and container classes noted above; otherwise, this layout works like any other layout in your project.
For example, here is the layout for the PairOfDice app widget:
<?xml version="1.0" encoding="utf-8"?>
<RelativeLayout xmlns:android="http://schemas.android.com/apk/res/android"
    android:id="@+id/background"
    android:orientation="horizontal"
    android:layout_width="match_parent"
    android:layout_height="match_parent"
    android:background="@drawable/widget_frame"
    >
  <ImageView android:id="@+id/left_die"
    android:layout_centerVertical="true"
    android:layout_alignParentLeft="true"
    android:src="@drawable/die_5"
    android:layout_width="wrap_content"
    android:layout_height="wrap_content"
    android:layout_marginLeft="7dip"
  />
  <ImageView android:id="@+id/right_die"
    android:layout_centerVertical="true"
    android:layout_alignParentRight="true"
    android:src="@drawable/die_2"
    android:layout_width="wrap_content"
    android:layout_height="wrap_content"
    android:layout_marginRight="7dip"
  />
</RelativeLayout>
All we have is a pair of ImageView widgets (one for each die),
inside of a RelativeLayout. The RelativeLayout has a background,
specified as a nine-patch PNG file. This allows the
RelativeLayout to have guaranteed contrast with whatever wallpaper
is behind it, so the user can tell the actual app widget bounds.
Next, we need a BroadcastReceiver that can get control when Android
wants us to update our RemoteViews for our app widget. To simplify
this, Android supplies an AppWidgetProvider class we can extend,
instead of the normal BroadcastReceiver. This simply looks at the
received Intent and calls out to an appropriate lifecycle method
based on the requested action.
The one method that frequently needs to be implemented on the
provider is onUpdate(). Other lifecycle methods may be of interest
and are discussed later in this chapter.
For example, here is the implementation of the
AppWidgetProvider for PairOfDice:
package com.commonsware.android.appwidget.dice;

import android.app.PendingIntent;
import android.appwidget.AppWidgetManager;
import android.appwidget.AppWidgetProvider;
import android.content.ComponentName;
import android.content.Context;
import android.content.Intent;
import android.widget.RemoteViews;

public class AppWidget extends AppWidgetProvider {
  private static final int[] IMAGES={R.drawable.die_1,R.drawable.die_2,
                                      R.drawable.die_3,R.drawable.die_4,
                                      R.drawable.die_5,R.drawable.die_6};

  @Override
  public void onUpdate(Context ctxt, AppWidgetManager mgr,
                        int[] appWidgetIds) {
    ComponentName me=new ComponentName(ctxt, AppWidget.class);

    mgr.updateAppWidget(me, buildUpdate(ctxt, appWidgetIds));
  }

  private RemoteViews buildUpdate(Context ctxt, int[] appWidgetIds) {
    RemoteViews updateViews=new RemoteViews(ctxt.getPackageName(),
                                            R.layout.widget);

    Intent i=new Intent(ctxt, AppWidget.class);

    i.setAction(AppWidgetManager.ACTION_APPWIDGET_UPDATE);
    i.putExtra(AppWidgetManager.EXTRA_APPWIDGET_IDS, appWidgetIds);

    PendingIntent pi=PendingIntent.getBroadcast(ctxt, 0 , i,
                                                PendingIntent.FLAG_UPDATE_CURRENT);

    updateViews.setImageViewResource(R.id.left_die,
                                     IMAGES[(int)(Math.random()*6)]);
    updateViews.setOnClickPendingIntent(R.id.left_die, pi);
    updateViews.setImageViewResource(R.id.right_die,
                                     IMAGES[(int)(Math.random()*6)]);
    updateViews.setOnClickPendingIntent(R.id.right_die, pi);
    updateViews.setOnClickPendingIntent(R.id.background, pi);

    return(updateViews);
  }
}
To update the RemoteViews for our app widget, we need to build
those RemoteViews (delegated to a buildUpdate() helper method)
and tell an AppWidgetManager to update the widget via
updateAppWidget(). In this case, we use a version of
updateAppWidget() that takes a ComponentName as the identifier of
the widget to be updated. Note that this means that we will update
all instances of this app widget presently in use — the concept
of multiple app widget instances is covered in greater detail
later in this chapter.
Working with RemoteViews is a bit like trying to tie your shoes
while wearing mittens — it may be possible, but it is a bit
clumsy. In this case, rather than using methods like findViewById()
and then calling methods on individual widgets, we need to call
methods on RemoteViews itself, providing the identifier of the
widget we wish to modify. This is so our requests for changes can be
serialized for transport to the home screen process. It does,
however, mean that our view-updating code looks a fair bit different
than it would if this were the main View of an activity or row of a
ListView.
To create the RemoteViews, we use a constructor that takes our
package name and the identifier of our layout. This gives us a
RemoteViews that contains all of the widgets we declared in that
layout, just as if we inflated the layout using a LayoutInflater.
The difference, of course, is that we have a RemoteViews object,
not a View, as the result.
We then use methods like:
setImageViewResource() to set the image for each of our
ImageView widgets, in this case a randomly chosen die face (using
graphics created from a set of SVG files from the
OpenClipArt site)setOnClickPendingIntent() to provide a PendingIntent that
should get fired off when a die, or the overall app widget
background, is clickedWe then supply that RemoteViews to the AppWidgetManager, which
pushes the RemoteViews structure to the home screen, which renders
our new app widget UI.
If you compile and install all of this, you will have a new app widget entry available. How you add app widgets to the home screen varies based upon Android version and the home screen implementation, and there are too many possibilities to try to list here.
No matter how you add the Pair of Dice, the app widget will appear on the home screen:
Figure 740: Pair of Dice, In Action
As indicated above, you can have multiple instances of the same app
widget outstanding at any one time. For example, one might have
multiple picture frames, or multiple “show-me-the-latest-RSS-entry”
app widgets, one per feed. You will distinguish between these in your
code via the identifier supplied in the relevant AppWidgetProvider
callbacks (e.g., onUpdate()).
If you want to support separate app widget instances, you will need
to store your state on a per-app-widget-identifier basis. You will
also need to use an appropriate version of updateAppWidget() on
AppWidgetManager when you update the app widgets, one that takes
app widget identifiers as the first parameter, so you update the
proper app widget instances.
Conversely, there is nothing requiring you to support multiple
instances as independent entities. For example, if you add more than
one PairOfDice app widget to your home screen, nothing blows up
– they just show the same roll. That is because PairOfDice
uses a version of updateAppWidget() that does not take any app
widget IDs, and therefore updates all app widgets simultaneously.
There are three other lifecycle methods that AppWidgetProvider
offers that you may be interested in:
onEnabled() will be called when the first widget instance is
created for this particular widget provider, so if there is anything
you need to do once for all supported widgets, you can implement that
logic hereonDeleted() will be called when a widget instance is removed
from the home screen, in case there is any data you need to clean up
specific to that instanceonDisabled() will be called when the last widget instance for
this provider is removed from the home screen, so you can clean up
anything related to all such widgetsYou will need to add appropriate action strings to your <intent-filter>
for each of these events, such as ACTION_APPWIDGET_ENABLED to be
notified about enabled events via onEnabled().
As PairOfDice illustrates, you are not limited to updating your app
widget only based on the timetable specified in your metadata. That
timetable is useful if you can get by with a fixed schedule. However,
there are cases in which that will not work very well:
The recipe shown in PairOfDice will let you use AlarmManager
(described in another chapter) or proximity alerts or
whatever to trigger updates. All you need to do is:
Intent that will be picked
up by the BroadcastReceiver you are using for your app widget
providerIntent directly or pass it along
to a Service (such as an IntentService)Also, note that the updatePeriodMillis setting not only tells the
app widget to update every so often, it will even wake up the phone
if it is asleep so the widget can perform its update. On the plus
side, this means you can easily keep your widgets up to date
regardless of the state of the device. On the minus side, this will
tend to drain the battery, particularly if the period is too fast. If
you want to avoid this wakeup behavior, set updatePeriodMillis to
0 and use AlarmManager to control the timing and behavior of your
widget updates.
Note that if there are multiple instances of your app widget on the
user’s home screen, they will all update approximately simultaneously
if you are using updatePeriodMillis. If you elect to set up your
own update schedule, you can control which app widgets get updated
when, if you choose.
It may be that you want to offer multiple app widget sizes to your users. Some might only want a small app widget. Some might really like what you have to offer and want to give you more home screen space to work in.
The good news: this is easy to do.
The bad news: it requires you, in effect, to have one app widget per size.
The size of an app widget is determined by the app widget metadata
XML file. That XML file is tied to a <receiver> element in the
manifest representing one app widget. Hence, to have multiple sizes,
you need multiple metadata files and multiple <receiver> elements.
This also means your app widgets will show up multiple times in the app widget selection list, when the user goes to add an app widget to their home screen. Hence, supporting many sizes will become annoying to the user, if they perceive you are “spamming” the app widget list. Try to keep the number of app widget sizes to a reasonable number (say, one or two sizes).
As of API Level 11, it is possible to have a resizeable app widget.
To do this, you can have an android:resizeMode attribute in your
widget metadata, with a value of horizontal, vertical, or both
(e.g., horizontal|vertical). When the user long-taps on an existing
widget, they should see handles to allow the widget to be resized:

Figure 741: API Demos App Widget, Resizing
You can also have android:minResizeWidth and android:minResizeHeight
attributes, measured in dp, that indicate the approximate smallest size
that your app widget can support. These values will be interpreted in
terms of “cells”, as with the android:minWidth and android:minHeight
attributes, and so the dp values you supply will not be used precisely.
However, for Android 3.x and 4.0 (API Level 11-15), your code would not be informed about being resized. You had to simply ensure that your layout would intelligently use any extra space automatically. Hence, resizing tended to be used primarily with adapter-driven app widgets, as will be discussed in the next chapter.
Starting with API Level 16, though, you can find out when the user
resizes your app widget, so you can perhaps use a different layout for
a different size, or otherwise adapt to the available space. Finding
out about resize events takes a bit more work, as is illustrated in the
AppWidget/Resize
sample project.
This app widget project is similar to PairOfDice, described earlier in
this chapter. However, our layout skips the dice, replacing them with a
TextView widget in the RelativeLayout:
<?xml version="1.0" encoding="utf-8"?>
<RelativeLayout xmlns:android="http://schemas.android.com/apk/res/android"
  android:id="@+id/background"
  android:layout_width="match_parent"
  android:layout_height="match_parent"
  android:background="@drawable/widget_frame"
  android:orientation="horizontal">

  <TextView
    android:id="@+id/size"
    android:layout_width="wrap_content"
    android:layout_height="wrap_content"
    android:layout_centerInParent="true"
    android:textAppearance="?android:attr/textAppearanceMedium">

  </TextView>

</RelativeLayout>
Our widget_provider.xml resource stipulates our desired android:resizeMode
and minimum resize dimensions:
<appwidget-provider xmlns:android="http://schemas.android.com/apk/res/android"
  android:minWidth="180dip"
  android:minHeight="110dip"
  android:minResizeWidth="110dip"
  android:minResizeHeight="40dip"
  android:initialLayout="@layout/widget"
  android:resizeMode="horizontal|vertical"
/>
Finding out about app widget resizing is a different event than finding out
about app widget updates. Hence, we need to add a new <action> element
to the <intent-filter> of our <receiver> in the manifest, indicating
that we want APPWIDGET_OPTIONS_CHANGED as well as ACTION_UPDATE:
  <application
    android:allowBackup="false"
    android:icon="@drawable/ic_launcher"
    android:label="@string/app_name">
    <receiver
      android:name="AppWidget"
      android:icon="@drawable/ic_launcher"
      android:label="@string/app_name">
      <intent-filter>
        <action android:name="android.appwidget.action.APPWIDGET_UPDATE"/>
        <action android:name="android.appwidget.action.APPWIDGET_OPTIONS_CHANGED"/>
      </intent-filter>
Then, our app widget implementation can override an onAppWidgetOptionsChanged()
method:
  @Override
  public void onAppWidgetOptionsChanged(Context ctxt,
                                        AppWidgetManager mgr,
                                        int appWidgetId,
                                        Bundle newOptions) {
    RemoteViews updateViews=
        new RemoteViews(ctxt.getPackageName(), R.layout.widget);
    String msg=
        String.format(Locale.getDefault(),
                      "[%d-%d] x [%d-%d]",
                      newOptions.getInt(AppWidgetManager.OPTION_APPWIDGET_MIN_WIDTH),
                      newOptions.getInt(AppWidgetManager.OPTION_APPWIDGET_MAX_WIDTH),
                      newOptions.getInt(AppWidgetManager.OPTION_APPWIDGET_MIN_HEIGHT),
                      newOptions.getInt(AppWidgetManager.OPTION_APPWIDGET_MAX_HEIGHT));

    updateViews.setTextViewText(R.id.size, msg);

    mgr.updateAppWidget(appWidgetId, updateViews);
  }
You will notice that we skip onUpdate(). We will be called with
onAppWidgetOptionsChanged() when the app widget is added and resized. Hence,
in the case of this app widget, we can define what the app widget looks
like from onAppWidgetOptionsChanged(), eschewing onUpdate(). That being said,
more typical app widgets will wind up implementing both methods, especially
if they are supporting lower API levels than 16, where onAppWidgetOptionsChanged()
will not be called.
Also remember that your process may well be terminated in between calls to
app widget lifecycle methods like onUpdate() and onAppWidgetOptionsChanged().
Hence, if there is data from one method that you want in the other, be sure
to persist that data somewhere.
In the AppWidget implementation of onAppWidgetOptionsChanged(), we can find
out about our new app widget size by means of the Bundle supplied to our
method. What we cannot find out is our exact size. Rather, we are provided
minimum and maximum dimensions of our app widget via four values in the Bundle:
AppWidgetManager.OPTION_APPWIDGET_MIN_WIDTHAppWidgetManager.OPTION_APPWIDGET_MAX_WIDTHAppWidgetManager.OPTION_APPWIDGET_MIN_HEIGHTAppWidgetManager.OPTION_APPWIDGET_MAX_HEIGHTIn our case, we grab these int values and pour them into a String template,
using that to fill in the TextView of the app widget’s contents.
When our app widget is initially launched, we show our initial size ranges:
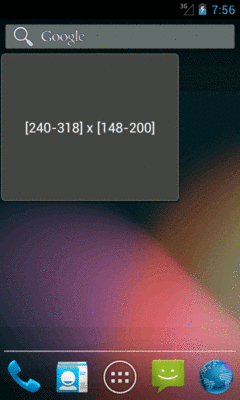
Figure 742: Resize Widget, As Initially Added
When the user resizes our app widget, we show the new size ranges:
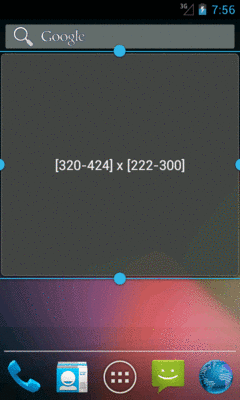
Figure 743: Resize Widget, During Resize Operation
However, not all home screen implementations will necessarily send the
APPWIDGET_OPTIONS_CHANGED when an app widget is added to the home screen,
only when the user resizes it later. For example, while the emulator’s home
screen for Android 4.1 broadcasts APPWIDGET_OPTIONS_CHANGED, it does not for
4.2 or 4.3. Hence, you may want to also examine the size information in
onUpdate() as well, so that you react to the initial size as well as
any future sizes. One way to do this is to simply iterate over the supplied
app widget IDs and invoke your own onAppWidgetOptionsChanged() method:
  // based on http://stackoverflow.com/a/18552461/115145

  @Override
  public void onUpdate(Context context,
                       AppWidgetManager appWidgetManager,
                       int[] appWidgetIds) {
    super.onUpdate(context, appWidgetManager, appWidgetIds);

    for (int appWidgetId : appWidgetIds) {
      Bundle options=appWidgetManager.getAppWidgetOptions(appWidgetId);

      onAppWidgetOptionsChanged(context, appWidgetManager, appWidgetId,
                                options);
    }
  }
Android’s lockscreen (a.k.a., the keyguard) had long been unmodifiable by developers. This led to a number of developers creating so-called “replacement lockscreens”, which generally reduce device security, as they can be readily bypassed. However, on Android 4.2 through 4.4, developers can create app widgets that the user can deploy to the lockscreen, helping to eliminate the need for “replacement lockscreens”.
However, note that this capability was dropped with Android 5.0. As a result, this particular app widget feature may not be something that you want to worry about. That being said, it is available for those versions, and you are welcome to support it for those versions.
Declaring that an app widget supports being on the lockscreen instead of
(or in addition to) the home screen is very easy. All you must do is add an
android:widgetCategory attribute to your app widget metadata resource.
That attribute should have a value of either keyguard (for the lockscreen),
home_screen, or both (e.g., keyguard|home_screen), depending upon where you
want the app widget to be eligible. By default, if this attribute is missing,
Android assumes a default value of home_screen.
Users cannot resize the lockscreen widgets at this time. However, you still
will want to specify an android:resizeMode attribute in your app widget
metadata, as whether or not you include vertical resizing will affect the
height of your app widget. Lockscreen widgets without vertical will have a fixed
small height on tablets, while lockscreen widgets with vertical will fill the
available height. Lockscreen widgets on phones will always be small (to fit
above the PIN/password entry area), and lockscreen widgets on all devices
will stretch to fill available space horizontally.
You can also specify a different starting layout to use when your app is added
to the lockscreen, as opposed to being added to the home screen. To do this,
just add an android:initialKeyguardLayout attribute to your app widget
metadata, pointing to the lockscreen-specific layout to use.
To see this in action, take a look at the
AppWidget/TwoOrThreeDice
sample project. This is a revised clone of the PairOfDice sample, allowing
the dice to be added to the lockscreen, and showing three dice on the lockscreen
instead of the two on the home screen.
Our app widget metadata now contains the lockscreen-related attributes:
android:widgetCategory and android:initialKeyguardLayout:
<appwidget-provider xmlns:android="http://schemas.android.com/apk/res/android"
  android:minWidth="144dip"
  android:minHeight="72dip"
  android:updatePeriodMillis="900000"
  android:initialLayout="@layout/widget"
  android:initialKeyguardLayout="@layout/lockscreen"
  android:widgetCategory="keyguard|home_screen"
/>
Our lockscreen layout simply adds a third die, middle_die:
<?xml version="1.0" encoding="utf-8"?>
<RelativeLayout xmlns:android="http://schemas.android.com/apk/res/android"
    android:id="@+id/background"
    android:orientation="horizontal"
    android:layout_width="match_parent"
    android:layout_height="match_parent"
    android:background="@drawable/widget_frame"
    >
  <ImageView android:id="@+id/left_die"
    android:layout_centerVertical="true"
    android:layout_alignParentLeft="true"
    android:src="@drawable/die_3"
    android:layout_width="wrap_content"
    android:layout_height="wrap_content"
    android:layout_marginLeft="7dip"
  />
  <ImageView android:id="@+id/middle_die"
    android:layout_centerInParent="true"
    android:src="@drawable/die_2"
    android:layout_width="wrap_content"
    android:layout_height="wrap_content"
    android:layout_marginLeft="7dip"
    android:layout_marginRight="7dip"
  />
  <ImageView android:id="@+id/right_die"
    android:layout_centerVertical="true"
    android:layout_alignParentRight="true"
    android:src="@drawable/die_2"
    android:layout_width="wrap_content"
    android:layout_height="wrap_content"
    android:layout_marginRight="7dip"
  />
</RelativeLayout>
However, by specifying a different layout for the lockscreen widget, we have a problem.
We need to know, in our Java code, what layout to use for the RemoteViews and
how many dice need to be updated. And, ideally, we would handle this in a
backwards-compatible fashion, so our app widget will have its original functionality
on older Android devices. Plus, supporting the lockscreen makes it that much more
likely that the user will have more than one instance of our app widget (e.g., one
on the lockscreen and one on the homescreen), so we should do a better job than
PairOfDice did about handling multiple app widget instances.
To deal with the latter point, our new onUpdate() method iterates over each
of the app widget IDs supplied to it and calls a private updateWidget() method
for each, so we can better support multiple instances:
  @Override
  public void onUpdate(Context ctxt, AppWidgetManager mgr,
                       int[] appWidgetIds) {
    for (int appWidgetId : appWidgetIds) {
      updateWidget(ctxt, mgr, appWidgetId);
    }
  }
The updateWidget() method is a bit more complicated than the PairOfDice
equivalent code:
  @TargetApi(Build.VERSION_CODES.JELLY_BEAN_MR1)
  private void updateWidget(Context ctxt, AppWidgetManager mgr,
                            int appWidgetId) {
    int layout=R.layout.widget;

    if (Build.VERSION.SDK_INT >= Build.VERSION_CODES.JELLY_BEAN_MR1) {
      int category=
          mgr.getAppWidgetOptions(appWidgetId)
             .getInt(AppWidgetManager.OPTION_APPWIDGET_HOST_CATEGORY,
                     -1);

      layout=
          (category == AppWidgetProviderInfo.WIDGET_CATEGORY_KEYGUARD)
              ? R.layout.lockscreen : R.layout.widget;
    }

    RemoteViews updateViews=
        new RemoteViews(ctxt.getPackageName(), layout);
    Intent i=new Intent(ctxt, AppWidget.class);

    i.putExtra(AppWidgetManager.EXTRA_APPWIDGET_ID, appWidgetId);

    PendingIntent pi=
        PendingIntent.getBroadcast(ctxt, appWidgetId, i,
                                   PendingIntent.FLAG_UPDATE_CURRENT);

    updateViews.setImageViewResource(R.id.left_die,
                                     IMAGES[(int)(Math.random() * 6)]);
    updateViews.setOnClickPendingIntent(R.id.left_die, pi);
    updateViews.setImageViewResource(R.id.right_die,
                                     IMAGES[(int)(Math.random() * 6)]);
    updateViews.setOnClickPendingIntent(R.id.right_die, pi);
    updateViews.setOnClickPendingIntent(R.id.background, pi);

    if (layout == R.layout.lockscreen) {
      updateViews.setImageViewResource(R.id.middle_die,
                                       IMAGES[(int)(Math.random() * 6)]);
      updateViews.setOnClickPendingIntent(R.id.middle_die, pi);
    }

    mgr.updateAppWidget(appWidgetId, updateViews);
  }
First, we need to choose which layout we are working with. We assume that we are
to use the original R.layout.widget resource by default. But, if we are on API
Level 17 or higher, we can call getAppWidgetOptions() on the AppWidgetManager,
to get the Bundle of options — the same options that we could be delivered in
onAppWidgetOptionsUpdate() as described
in the previous section. One value that will be in this
Bundle is AppWidgetManager.OPTION_APPWIDGET_HOST_CATEGORY, which will be an
int with a value of AppWidgetProviderInfo.WIDGET_CATEGORY_KEYGUARD if our app
widget is on the lockscreen. In that case, we switch to using R.layout.lockscreen.
In addition, we know then we need to update the middle_die when we are updating
the other dice.
There is also a subtle change in our getBroadcast() call to PendingIntent: we
pass in the app widget ID as the second parameter, whereas in PairOfDice we passed
0. PendingIntent objects are cached in our process, and by default we will get
the same PendingIntent when we call getBroadcast() for the same Intent. However,
in our case, we may want two or more different PendingIntent objects for the
same Intent, with differing extras (EXTRA_APPWIDGET_ID). Since extras are not
considered when evaluating equivalence of Intent objects, just having different
extras is insufficient to get different PendingIntent objects for those Intent
objects. The second parameter to getBroadcast() (and getActivity() and
getService()) on PendingIntent is a unique identifier, to differentiate between
two otherwise equivalent Intent objects, forcing PendingIntent to give us distinct
PendingIntent objects. This way, we can support two or more app widget instances,
each having their own PendingIntent objects for their click events.
On an Android 4.2+ lockscreen, you should be able to swipe to one side (e.g., a bezel swipe from left to right), to expose an option to add an app widget:

Figure 744: Lockscreen Add-A-Widget Panel, On a 4.2 Emulator
Tapping the “+” indicator (and, if needed, entering your device PIN or password), brings up an app widget chooser:
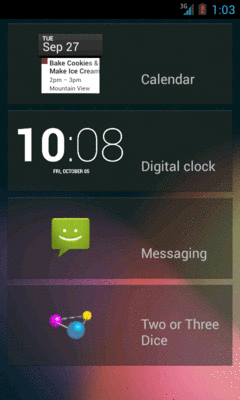
Figure 745: Lockscreen Widget Selection List, On a 4.2 Emulator
Choosing TwoOrThreeDice will then add the app widget to the lockscreen, with three
dice, not two:
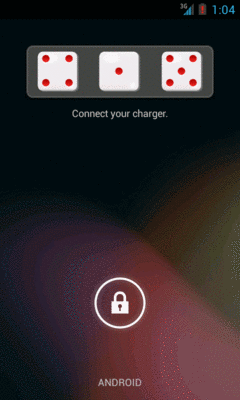
Figure 746: Lockscreen with TwoOrThreeDice, On a 4.2 Emulator
App widgets can have preview images attached. Preview images are drawable resources representing a preview of what the app widget might look like on the screen. On tablets, this will be used as part of an app widget gallery, replacing the simple context menu presentation you used to see on Android 1.x and 2.x phones:
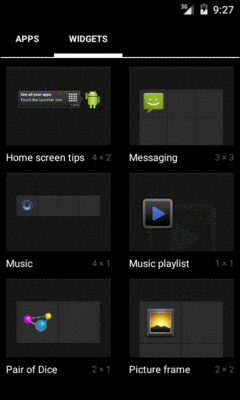
Figure 747: App Widget Gallery, on Android 5.0
To create the preview image itself, the Android 3.0+ emulator images contain a Widget Preview application that lets you run an app widget in its own container, outside of the home screen:
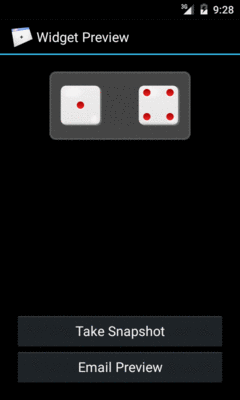
Figure 748: The Widget Preview application, showing a preview of the Analog Clock app widget
From here, you can take a snapshot and save it to external storage,
copy it to your project’s res/drawable-nodpi/ directory (indicating
that there is no intrinsic density assumed for this image), and
reference it in your app widget metadata via an
android:previewImage attribute. We will see an example of such an
attribute in the chapter on advanced app widgets.
In addition to creating your own app widgets, it is possible to host app widgets. This is mostly aimed for those creating alternative home screen applications, so they can take advantage of the same app widget framework and all the app widgets being built for it.
This is not very well documented, but it
involves the AppWidgetHost and AppWidgetHostView classes. The
latter is a View and so should be able to reside in an app widget
host’s UI like any other ordinary widget.