Figure 294: Android Studio Project Explorer, Showing assets/book/
At this point, you are probably wondering when we are ever going to have our digital book reader let us read a digital book.
Now, in this tutorial, your patience will be rewarded.
This is a continuation of the work we did in the previous tutorial.
You can find the results of the previous tutorial and the results of this tutorial in the book’s GitHub repository.
Note that starting in this tutorial, it is assumed that you know how to add
import statements as needed as we refer to new classes in existing code, and so
the required imports are not always going to be specified.
First, we need a book. Expecting you to write a book as part of this tutorial would seem to be a bit excessive. So, instead, we will use an already-written book: The War of the Worlds, by H. G. Wells, as distributed by Project Gutenberg.
EDITOR’S NOTE: We realize that this choice of book may be seen as offensive by Martians, as it depicts them as warlike invaders with limited immune systems. Please understand that this book is a classic of Western literature and reflects the attitude of the times. If you have any concerns about this material, please contact us at martians-so-do-not-exist@commonsware.com.
Download http://misc.commonsware.com/WarOfTheWorlds.zip
and unpack its contents (a book/ directory of files)
into your assets/ folder of your project. Windows and Linux Android Studio
users can drag this book/
directory into the project and drop it in assets/ to copy the files
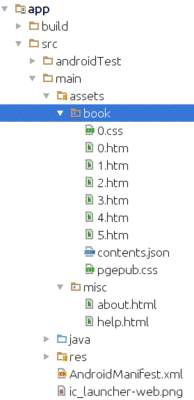
to the proper location. You should wind up with assets/book/ and files inside
of there:
Figure 294: Android Studio Project Explorer, Showing assets/book/
In that directory, you will find some HTML and CSS files with the prose of the
book, plus a contents.json file with metadata. We will examine this metadata
in greater detail in the next section.
This sample project will use the “model fragment” pattern to hold onto the data about the book to be viewed. The “model fragment” pattern works well for cases where:
Something has to load that BookContents, ideally in the background, since
reading an asset and parsing the JSON will take time. Also,
something has to hold onto that BookContents, so it can be used from
EmPubLiteActivity and the various chapter fragments in the ViewPager.
To that end, we will create a new class, cunningly named ModelFragment.
Right-click over the com.commonsware.empublite package in your java/ directory
and choose New > Java Class from the context menu. Fill in ModelFragment
as the name, android.app.Fragment as the superclass,
and click OK to create the empty class.
That contents.json file contains a bit of metadata about the contents of the
book: the book’s title and a roster of its “chapters”:
{
  "title": "The War of the Worlds",
  "chapters": [
    {
      "file": "0.htm",
      "title": "Book One: Chapters 1-9"
    },
    {
      "file": "1.htm",
      "title": "Book One: Chapters 10-14"
    },
    {
      "file": "2.htm",
      "title": "Book One: Chapters 14-17"
    },
    {
      "file": "3.htm",
      "title": "Book Two: Chapters 1-7"
    },
    {
      "file": "4.htm",
      "title": "Book Two: Chapters 7-10"
    },
    {
      "file": "5.htm",
      "title": "Project Gutenberg"
    }
  ]
}
In the case of this book
from Project Gutenberg, the assets/book/ directory contains six HTML files
which EmPubLite will consider as “chapters”, even though each of those HTML
files contains multiple chapters from the source material. You are welcome to
reorganize that HTML if you wish, updating contents.json to match.
We need to load contents.json into memory, so EmPubLite knows how many
chapters to display and where those chapters can be found. We will pour
contents.json into a BookContents model object, leveraging the GSON
library that we added to our project in an earlier tutorial.
Right-click over the com.commonsware.empublite package in your java/ directory
and choose New > Java Class from the context menu. Fill in BookContents
as the name and click OK to create the empty class.
Then, replace the contents of that class with the following:
package com.commonsware.empublite;

import java.util.List;

public class BookContents {
  List<BookContents.Chapter> chapters;

  int getChapterCount() {
    return(chapters.size());
  }

  String getChapterFile(int position) {
    return(chapters.get(position).file);
  }

  String getChapterTitle(int position) {
    return(chapters.get(position).title);
  }

  static class Chapter {
    String file;
    String title;
  }
}
If you prefer, you can view this file’s contents in your Web browser via this GitHub link.
BookContents is a GSON interpretation of the JSON structure of contents.json.
BookContents holds onto the chapters, as
a List of BookContents.Chapter objects, each of which holds onto its
file.
BookContents also supplies three accessor methods:
getChapterCount(), to identify the number of chapters (i.e., the size
of the chapters array in the JSON)getChapterFile(), to return the relative path within assets/book/ that
represents our “chapter” of HTMLgetChapterTitle(), to return the title of this “chapter” of the bookWe will want to load the JSON and create the BookContents on a background
thread, as we will be performing enough I/O and parsing that we might make
our UI a bit sluggish if we do the work on the main application thread.
However, we need to let the UI layer (EmPubLiteActivity and its ViewPager)
know when the book is loaded, so it can be poured into the user interface.
We could use an AsyncTask for that, notifying the activity in onPostExecute().
However, we will need more flexible inter-component communication over time, things
that cannot be handled by a simple AsyncTask. Hence, we will start using
the event bus pattern here, employing greenrobot’s EventBus library that we
added to our project in a previous tutorial.
With EventBus, we create our own event classes. The one event that we have up
front is one to indicate that our book metadata has been loaded and is ready
for use, in the form of a BookContents object. Hence, in this step of the
tutorial, we will define a BookLoadedEvent that will be posted when the book
is loaded. And, we will have the event hold onto the BookContents, to lightly
simplify populating the UI later on.
Right-click over the com.commonsware.empublite package in your java/ directory
and choose New > Java Class from the context menu. Fill in BookLoadedEvent
as the name and click OK to create the empty class.
Then, replace the contents of that class with the following:
package com.commonsware.empublite;

public class BookLoadedEvent {
  private BookContents contents=null;

  public BookLoadedEvent(BookContents contents) {
    this.contents=contents;
  }

  public BookContents getBook() {
    return(contents);
  }
}
If you prefer, you can view this file’s contents in your Web browser via this GitHub link.
Now, we need to actually arrange to load the book on a background thread
and post our newly-created BookLoadedEvent. This is one of the key jobs
of our ModelFragment: to manage the loading of our activity’s model, using
background threads.
With that in mind, replace our stub ModelFragment implementation with the
following:
package com.commonsware.empublite;

import android.app.Activity;
import android.app.Fragment;
import android.content.res.AssetManager;
import android.os.Bundle;
import android.os.Process;
import android.util.Log;
import com.google.gson.Gson;
import org.greenrobot.eventbus.EventBus;
import java.io.BufferedReader;
import java.io.IOException;
import java.io.InputStream;
import java.io.InputStreamReader;
import java.util.concurrent.atomic.AtomicReference;

public class ModelFragment extends Fragment {
  final private AtomicReference<BookContents> contents=
    new AtomicReference<>();

  @Override
  public void onCreate(Bundle savedInstanceState) {
    super.onCreate(savedInstanceState);
    setRetainInstance(true);
  }

  @Override
  public void onAttach(Activity host) {
    super.onAttach(host);

    if (contents.get()==null) {
      new LoadThread(host.getAssets()).start();
    }
  }

  public BookContents getBook() {
    return(contents.get());
  }

  private class LoadThread extends Thread {
    private AssetManager assets=null;

    LoadThread(AssetManager assets) {
      super();

      this.assets=assets;
    }

    @Override
    public void run() {
      Process.setThreadPriority(Process.THREAD_PRIORITY_BACKGROUND);
      Gson gson=new Gson();

      try {
        InputStream is=assets.open("book/contents.json");
        BufferedReader reader=
          new BufferedReader(new InputStreamReader(is));

        contents.set(gson.fromJson(reader, BookContents.class));

        EventBus.getDefault().post(new BookLoadedEvent(getBook()));
      }
      catch (IOException e) {
        Log.e(getClass().getSimpleName(), "Exception parsing JSON", e);
      }
    }
  }
}
If you prefer, you can view this file’s contents in your Web browser via this GitHub link.
In onCreate(), we call setRetainInstance(true), to tell the framework
to keep this fragment despite a configuration change, just passing it to the
new activity created as a result of that configuration change.
In onAttach(), if we do not already have our BookContents object, we fork
a LoadThread to populate it, and we cannot readily get at an AssetManager
until we are attached to the hosting activity. This is why we are not forking
LoadThread in onCreate(). You may see this method name appear with
strikethrough formatting. onAttach() taking a Context as a parameter was
added in API Level 23, and onAttach() taking a Activity as a parameter
was deprecated. However, our minSdkVersion is lower than 23, so we need
to use the older callback method.
LoadThread takes the AssetManager as a parameter, stashing it in a field
in the LoadThread constructor.
Then, in the run() method that is called on the background thread,
we call setThreadPriority() to drop the thread’s priority to that of a background
thread. This reduces how much we compete with the main application thread
for CPU time. Then, we
read in the JSON using GSON to create the BookContents instance. GSON
automatically de-serializes our JSON into the BookContents and
BookContents.Chapter instances, given that we are telling the fromJson()
method that it is to be loading an instance of a BookContents object.
Finally, we post() a BookLoadedEvent to the default EventBus.
The BookContents is wrapped in an AtomicReference, in case the
main application thread tries to get the BookContents at the same
time our background thread tries to set that field’s value. Using
an AtomicReference handles our thread synchronization for us.
The open() method on AssetManager could throw an IOException. Normally,
this indicates a development-time bug (e.g., we failed to actually set up the
book/contents.json file), which is why we log the message to LogCat. A
production-grade book reader should also post() an EventBus event to
allow the UI layer to let the user know that we could not load the book. As it
stands, the book reader will remain stuck on the ProgressBar forever in case
of this sort of problem. Augmenting the tutorial in this way is left as an
exercise for the reader.
Note that the LoadThread implementation has a pair of references to Process.
In this case, this is android.os.Process, not java.lang.Process. Since
java.lang.Process is automatically imported, if you fail to import
android.os.Process, you will see errors about how THREAD_PRIORITY_BACKGROUND
and setThreadPriority() are not defined. Since we are not using
java.lang.Process in this class, having the import to android.os.Process
(as shown in the code listing above) resolves this conflict.
Right now, our BookLoadedEvent will be posted… and ignored, as nothing
in the application is set up to watch for such events. Our EmPubLiteActivity
needs to know about these events, and the first step to accomplishing that
is to have it register for events in general with the EventBus.
Add the following two methods to EmPubLiteActivity:
@Override
  public void onStart() {
    super.onStart();
    EventBus.getDefault().register(this);
  }

  @Override
  public void onStop() {
    EventBus.getDefault().unregister(this);
    super.onStop();
  }
These simply register the activity with the EventBus while it is in the foreground.
Before we can use the BookContents, we need to update ContentsAdapter
to display the prose on the screen.
First, add a BookContents data member to ContentsAdapter:
final BookContents contents;
Then, add the BookContents parameter to the constructor, assigning it to the
new data member:
  public ContentsAdapter(Activity ctxt, BookContents contents) {
    super(ctxt.getFragmentManager());

    this.contents=contents;
  }
Next, update getCount() to use the getChapterCount() of our BookContents:
  @Override
  public int getCount() {
    return(contents.getChapterCount());
  }
Then, modify getItem() to retrieve the relative path for a given chapter
from the BookContents and create a SimpleContentFragment on the complete
file:///android_asset path to the file in question:
  @Override
  public Fragment getItem(int position) {
    String path=contents.getChapterFile(position);

    return(SimpleContentFragment.newInstance("file:///android_asset/book/"
      + path));
  }
Note that you may need to change the parameter name in the getItem() declaration
to be position, as it may be another value (e.g., arg0).
Finally, add getPageTitle(), pulling our tab title from the chapter
title:
  @Override
  public CharSequence getPageTitle(int position) {
    return(contents.getChapterTitle(position));
  }
Now, we can actually add the logic to display the book once it is loaded.
Create a setupPager() method on EmPubLiteActivity as follows:
  private void setupPager(BookContents contents) {
    adapter=new ContentsAdapter(this, contents);
    pager.setAdapter(adapter);

    MaterialTabs tabs=(MaterialTabs)findViewById(R.id.tabs);
    tabs.setViewPager(pager);
  }
The contents of this method are almost identical to some lines in onCreate() –
we have just moved them to a separate method. Remove those duplicate lines from
onCreate(), so you have:
  @Override
  protected void onCreate(Bundle savedInstanceState) {
    super.onCreate(savedInstanceState);
    setContentView(R.layout.main);

    pager=(ViewPager)findViewById(R.id.pager);
  }
Then, add the following onBookLoaded() method to EmPubLiteActivity:
  @SuppressWarnings("unused")
  @Subscribe(threadMode =ThreadMode.MAIN)
  public void onBookLoaded(BookLoadedEvent event) {
    setupPager(event.getBook());
  }
This tells EventBus that if a BookLoadedEvent is posted, we are interested
in it, and it should be delivered to our onBookLoaded() method on the
main application thread. This method looks like it is unused, because it
will be called using reflection by the EventBus, and the IDE does not know
that. The @SuppressWarnings("unused") annotation indicates that this
method is used.
We also need to add some code to set up the ModelFragment — it will not magically
appear on its own. So, the first time we create an EmPubLiteActivity, we want
to create our ModelFragment. To do that, define a static data member named
MODEL in EmPubLiteActivity:
private static final String MODEL="model";
Then, update the onStart() method in EmPubLiteActivity
to see if we already have the fragment before creating one:
@Override
public void onStart() {
  super.onStart();
  EventBus.getDefault().register(this);

  if (adapter==null) {
    ModelFragment mfrag=
        (ModelFragment)getFragmentManager().findFragmentByTag(MODEL);

    if (mfrag == null) {
      getFragmentManager().beginTransaction()
          .add(new ModelFragment(), MODEL).commit();
    }
  }
}
If you run the result in a device or emulator, you will see the book content appear:

Figure 295: EmPubLite, With Content
Swiping left and right will take you to the other portions of the book.
While you can see the book contents now, if you try rotating the screen, the
book contents will not appear. That is because the ModelFragment has already
loaded the contents (so the BookLoadedEvent has passed), but we have no logic
in EmPubLiteActivity to populate the book by other means.
To do that, simply add an else if clause to the if in onStart(), to get
the book contents over to setupPager() if they are ready:
  @Override
  public void onStart() {
    super.onStart();
    EventBus.getDefault().register(this);

    if (adapter==null) {
      ModelFragment mfrag=
        (ModelFragment)getFragmentManager().findFragmentByTag(MODEL);

      if (mfrag==null) {
        getFragmentManager().beginTransaction()
          .add(new ModelFragment(), MODEL).commit();
      }
      else if (mfrag.getBook()!=null) {
        setupPager(mfrag.getBook());
      }
    }
  }
Now, if you run the sample and rotate the screen (e.g., Ctrl-Right on the Windows/Linux emulator), the book will appear in either case.
Since we are now starting to do disk I/O, particularly aiming to have it done on background
threads, it would be a good idea to configure StrictMode, so it will complain if we fail
in our quest and accidentally do this I/O on the main application thread.
Add the following method to EmPubLiteActivity:
  private void setupStrictMode() {
    StrictMode.ThreadPolicy.Builder builder=
      new StrictMode.ThreadPolicy.Builder()
        .detectAll()
        .penaltyLog();

    if (BuildConfig.DEBUG) {
      builder.penaltyFlashScreen();
    }

    StrictMode.setThreadPolicy(builder.build());
  }
Here, we create a StrictMode.ThreadPolicy.Builder, configured to detect
all violations on the main application thread, logging them to LogCat.
In addition, if we are in a DEBUG build, we will flash a red border
around the screen.
Note, though, that this red border will appear even if we do not make
any mistakes. Unfortunately, Google engineers
do not check the framework code for these sorts of violations, leading to some
bugs that we as app developers cannot resolve. Those will be reported
as StrictMode violations, just as if we had made the mistakes ourselves.
Then, just after super.onCreate() in the onCreate() method in EmPubLiteActivity, add
in a call to the new setupStrictMode() method. This will give you an onCreate() method that
looks like:
  @Override
  protected void onCreate(Bundle savedInstanceState) {
    super.onCreate(savedInstanceState);
    setContentView(R.layout.main);

    setupStrictMode();
    pager=(ViewPager)findViewById(R.id.pager);
  }
… we will allow the user to manipulate some preferences in our tutorial project.