Figure 258: ACTION_PICK of a Contact
Devices sometimes change while users are using them, in ways that our application will care about:
In all of these cases, it is likely that we will want to change what resources we use. For example, our layout for a portrait screen may be too tall to use in landscape mode, so we would want to substitute in some other layout.
This chapter will explore how to provide alternative resources for these different scenarios — called “configuration changes” — and will explain what happens to our activities when the user changes the configuration while we are in the foreground.
Different pieces of Android hardware can have different capabilities, such as:
Some of these, in the eyes of the core Android team, might drive the selection of resources, like layouts or drawables. Different screen sizes might drive the choice of layout. Different screen densities might drive the choice of drawable (using a higher-resolution image on a higher-density device). These are considered part of the device’s “configuration”.
Other differences — ones that do not drive the selection of resources — are not part of the device’s configuration but merely are “features” that some devices have and other devices do not. For example, cameras and Bluetooth and WiFi are features.
Some parts of a configuration will only vary based on different devices. A screen will not change density on the fly, for example. But some parts of a configuration can be changed during operation of the device, such as orientation (portrait vs. landscape) or language. When a configuration switches to something else, that is a “configuration change”, and Android provides special support for such events to help developers adjust their applications to match the new configuration.
One set of resources may not fit all situations where your application may be used. One obvious area comes with string resources and dealing with internationalization (I18N) and localization (L10N). Putting strings all in one language works fine — probably at least for the developer — but only covers one language.
That is not the only scenario where resources might need to differ, though. Here are others:
The way Android currently handles this is by having multiple resource directories, with the criteria for each embedded in their names.
Suppose, for example, you want to support strings in both English and Spanish.
Normally, for a single-language setup, you would put your strings in a file
named res/values/strings.xml. To support both English and Spanish, you could
create two folders, res/values-en/ and res/values-es/, where the value
after the hyphen is the ISO 639-1
two-letter code for the language you want. Your English-language strings would
go in res/values-en/strings.xml and the Spanish ones in
res/values-es/strings.xml. Android will choose the proper file based on the
user’s device settings. Note that Android 5.0 added support for
BCP 47 three-letter language and locale values,
though these also require Gradle for Android 1.1.0 (or higher)
and Android Studio 1.1.0 (or higher).
However, the better approach is for you to consider some language to be your
default, and put those strings in res/values/strings.xml. Then, create other
resource directories for your translations (e.g., res/values-es/strings.xml
for Spanish). Android will try to match a specific language set of resources;
failing that, it will fall back to the default of res/values/strings.xml. This
way, if your app winds up on a device with a language that you do not expect,
you at least serve up strings in your chosen default language. Otherwise, if
there is no such default, you will wind up with a ResourceNotFoundException,
and your application will crash.
This, therefore, is the bedrock resource set strategy: have a complete set of
resources in the default directory (e.g., res/layout/), and override those
resources in other resource sets tied to specific configurations as needed
(e.g., res/layout-land/).
Note that Android Studio has a translations editor to help you manage your string resources for your default language and whatever translations you are going to include in your app.
Perhaps the most important resource set qualifiers that we have not yet seen are the ones related to screen size and orientation. Here, “orientation” refers to how the device is being held: portrait or landscape.
Orientation is fairly easy, as you can just use -port or -land as resource
set qualifiers to restrict resources in a directory to a specific orientation.
The convention is to put landscape resources in a -land directory (e.g.,
res/layout-land/) and to put portrait resource in the default directory (e.g.,
res/layout/). However, this is merely a convention, and you are welcome to
use -port if you prefer.
Screen size is a bit more complicated, simply because the available approaches have changed over the years.
Way back in the beginning, with Android 1.0, all screen sizes were created equal… mostly because there was only one screen size, and that mostly because there was only one device.
Android 1.5, however, introduced three screen sizes and associated resource
set qualifiers, with a fourth (-xlarge) added later:
-small for screens at or under 3” in diagonal size-normal for screens between 3” and 5” in diagonal size-large for screens between 5” and 10” in diagonal size-xlarge for screens at or over 10” in diagonal sizeAs we will see, these resource set qualifiers establish lower bounds for when
a directory’s worth of resources will be used. So a res/layout-normal/ directory
will not be used for -small screens but would be used for -normal, -large,
and -xlarge screens.
The problem with the classic size buckets is that they were fairly inflexible. What if you think that so-called “phablets”, like the Samsung Galaxy Note series, should have layouts more like phones, while larger tablets, such as the 8.9” Kindle Fire HD, should have layouts more like 10” tablets? That was not possible given the fixed buckets.
Android 3.2 gave us more control. We can have our own buckets for screen size,
using the somewhat-confusing -swNNNdp resource set qualifier. Here, the NNN
is replaced by you with a value, measured in dp, for the smallest width
of the screen. “Smallest width” basically means the width of the screen when
the device is held in portrait mode. Hence, rather than measuring based on
diagonal screen size, as with the classic buckets, your custom buckets are based
on the linear screen size of the shortest screen side.
For example, suppose that you wish to consider a dividing line between resources
to be at the 7” point — 7” and smaller devices would get one set of layouts,
while larger devices would get a different set of layouts.
7” tablets
usually have a smallest width of around 3.5” to 3.75”, given common
aspect ratios. Since 1 dp
is 1/160th of an inch, those smallest widths equate to 560-600 dp. Hence,
you might set up a -sw600dp resource set for your larger layouts, and put the
smaller layouts in a default resource set.
Using -swNNNdp does not address orientation, as the smallest width is the
same regardless of whether the device is held in portrait or landscape. Hence,
you would need to add -swNNNdp-land as a resource set for landscape resources
for your chosen dividing line.
An alternative is to use -wNNNdp or -hNNNdp. These resource set qualifiers
work much like -swNNNdp, particularly in terms of what NNN means. However,
whereas -swNNNdp refers to the smallest width, -wNNNdp refers the current
width, and -hNNNdp refers to the current height. Hence, these change with
orientation changes.
-swNNNdp, -wNNNdp, and -hNNNdp were added in API Level 13. Hence, older
devices will ignore any resource sets with those qualifiers.
In principle, this might seem like a big problem, for those developers still supporting older devices.
In practice, it is less of an issue than you might expect, simply because the vast majority of those older devices were phones, not tablets. The only Android 2.x tablets that sold in any significant quantity were three 7” models:
Of those, only the Galaxy Tab had the then-Android Market (now the Play Store).
Hence, if you are only distributing via the Play Store, you might be in position
to simply ignore pre-API Level 13 tablets. Use -swNNNdp to create your dividing
line for larger devices, and the Galaxy Tab will simply use the layouts for
your smaller devices.
If this concerns you, or you are also supporting the Kindle Fire and early
NOOKs, you can use layout aliases to minimize code duplication. For
example, suppose that you have a res/layout/main.xml that you wanted to
have different versions for phones and tablets, and you want to use -swNNNdp
for your dividing line as to where the tablet layouts get used, but you also
want to have the older tablets, like the Galaxy Tab, use the following
recipe:
res/layout/, but with different filenames
(e.g., res/layout/main_to_be_used_for_tablets.xml)res/values-swNNNdp/layouts.xml, for your chosen value of NNN, put
aliases (via <item> elements) for the original names (via the name attribute)
pointing to the resources you want to use for -swNNNdp devices:
<resources>
    <item name="main" type="layout">@layout/main_to_be_used_for_tablets</item>
</resources>
res/values-large/layouts.xml, put those same aliasesNow, both older and newer devices, when referencing the same resource name, will get routed to the right layouts for their screen size.
Where things start to get complicated is when you need to use multiple disparate criteria for your resources.
For example, suppose that you have drawable resources that are locale-dependent, such as a stop sign. You might want to have resource sets of drawables tied to language, so you can substitute in different images for different locales. However, you might also want to have those images vary by density, using higher-resolution images on higher-density devices, so the images all come out around the same physical size.
To do that, you would wind up with directories with multiple resource set qualifiers, such as:
res/drawable-ldpi/res/drawable-mdpi/res/drawable-hdpi/res/drawable-xhdpi/res/drawable-en-rUK-ldpi/res/drawable-en-rUK-mdpi/res/drawable-en-rUK-hdpi/res/drawable-en-rUK-xhdpi/(with the default language being, say, US English, using a US stop sign)
Once you get into these sorts of situations, though, a few rules come into play, such as:
-en) have a particular order of
precedence, and they must appear in the directory name in that order. The
Android documentation
outlines the specific order in which these
options can appear. For the purposes of this example, screen size is more
important than screen orientation, which is more important than screen density,
which is more important than whether or not the device has a keyboard.For example, you might want to have different layouts based upon screen size and orientation. Since screen size is more important than orientation in the resource system, the screen size would appear in the directory name ahead of the orientation, such as:
res/layout-sw600dp-land/res/layout-sw600dp/res/layout-land/res/layout/Given that you can have N different definitions of a resource, how does Android choose the one to use?
First, Android tosses out ones that are specifically invalid. So, for example,
if the language of the device is -ru, Android will ignore resource sets that
specify other languages (e.g., -zh). The exceptions to this are density qualifiers
and screen size qualifiers — we will get to those exceptions later.
Then, Android chooses the resource set that has the desired resource and has the most important distinct qualifier. Here, by “most important”, we mean the one that appears left-most in the directory name, based upon the directory naming rules discussed above. And, by “distinct”, we mean where no other resource set has that qualifier.
If there is no specific resource set that matches, Android chooses the
default set — the one with no suffixes on the directory name (e.g., res/layout/).
With those rules in mind, let’s look at some scenarios, to cover the base case plus the aforementioned exceptions.
Let’s suppose that we have a main.xml file in:
res/layout-land/res/layout/When we call setContentView(R.layout.main), Android will choose the main.xml
in res/layout-land/ if the device is in landscape mode. That particular resource
set is valid in that case, and it has the most important distinct qualifier
(-land). If the device is in portrait mode, though, the res/layout-land/
resource set does not qualify, and so it is tossed out. That leaves us with
res/layout/, so Android uses that main.xml version.
It is possible, though bizarre, for you to have a project with main.xml in:
res/layout-en/res/layout-land/res/layout/In this case, if the device’s locale is set to be English, Android will choose
res/layout-en/, regardless of the orientation of the device. That is because
-en is a more important resource set qualifier — “Language and region”
appears higher in the “Table 2. Configuration qualifier names” from the
Android documentation than does “Screen orientation” (for -land). If the
device is not set for English, though, Android will toss out that resource
set, at which point the decision-making process is the same as in Scenario #1 above.
Now let’s envision a project with main.xml in:
res/layout-en/res/layout-land-v11/res/layout/You might think that res/layout-land-v11/ would be the choice, as it is
more specific, matching on two resource set qualifiers versus the one
or none from the other resource sets.
(in fact, the author of this book thought this was the choice for many years)
In this case, though, language is more important than either screen orientation
or Android API level, so the decision-making process is similar to
Scenario #2 above: Android chooses res/layout-en/ for English-language
devices, res/layout-land-v11/ for landscape API Level 11+ devices, or
res/layout/ for everything else.
Let’s change the resource mix, so now we have a project with main.xml in:
res/layout-land-night/res/layout-land-v11/res/layout/Here, while -land is the most important resource set qualifier, it
is not distinct — we have more than one resource set with -land.
Hence, we need to check which is the next-most-important resource set qualifier.
In this case, that is -night, as night mode is a more important category
than is Android API level, and so Android will choose res/layout-land-night/
if the device is in night mode. Otherwise, it will choose res/layout-land-v11/
if the device is running API Level 11 or higher. If the device is not in night
mode and is not running API Level 11 or higher, Android will go with res/layout/.
Now, let’s look at the first exception to the rules: screen density.
Android will always accept a resource set that contains a screen density, even if it does not match the density of the device. If there is an exact density match, of course, Android uses it. Otherwise, it will use what it feels is the next-best match, based upon how far off it is from the device’s actual density and whether the other density is higher or lower than the device’s actual density.
The reason for this is that for drawable resources, Android will downsample or upsample the image automatically, so the drawable will appear to be the right size, even though you did not provide an image in that specific density.
The catch is two-fold:
So, now let’s pretend that our project has main.xml in:
res/layout-mdpi/res/layout-nonav/res/layout/Android will choose res/layout-mdpi/, even for -hdpi devices that
do not have a “non-touch navigation method”. While -mdpi does not
match -hdpi, Android will still choose -mdpi. If we were dealing with
drawables resources, Android would upsample the -mdpi image.
If you have resource sets tied to screen size, Android will choose the one that is closest to the actual screen size yet smaller than the actual screen size. Resource sets for screen sizes larger than the actual screen size are ignored.
This works for -swNNNdp, -wNNNdp, and -hNNNdp for all devices.
On -large or -xlarge devices, Android applies the same logic
for the classic screen size qualifiers (-small, -normal, -large,
-xlarge). However, Android does not apply this logic for -small
or -normal devices — a -normal device will not load a -small
resource.
Now let’s pretend that our project has main.xml in:
res/layout-normal/res/layout-land/res/layout/Android will choose res/layout-normal/ if the device is not -small.
Otherwise, Android will choose res/layout-land/ if the device is
landscape. If all else fails, Android will choose res/layout/.
Similarly, if we have:
res/layout-w320dp/res/layout-land/res/layout/Android will choose res/layout-w320dp/ for devices whose current
screen width is 320dp or higher.
Otherwise, Android will choose res/layout-land/ if the device is
landscape. If all else fails, Android will choose res/layout/.
As noted previously in this chapter, the -vNNN set of suffixes
indicate that the resources in that directory are for the stated
API level or higher. So, for example, res/values-v21/ indicates
that the resources in that directory should only be used on API
Level 21 (Android 5.0) and higher. Devices running older versions
of Android will ignore those resources.
This is a particularly important set of suffixes for dealing with major Android version changes. The look and feel of a stock Android app changed significantly at API Level 11 (Android 3.0) and API Level 21 (Android 5.0). You may find that you want to have different resources starting at those API level split points, so that your UI looks appropriate on all versions of Android that you are supporting.
One big use case for this feature is having different themes by API level.
Even if your minSdkVersion is 11 or higher, you may want to have
two different themes for your app:
Theme.Holo
Theme.Material
Your rough alternative is to use the appcompat-v7 backport
of the action bar and bits of the Material Design aesthetic. For
highly stylized apps, or in cases where you are sure that you want
Material Design on pre-Android 5.0 devices, appcompat-v7 is
worth considering. But if you want to blend in better on each
major native UI variant, you will want to support Theme.Holo
on Android 3.x and 4.x and Theme.Material after that.
The hard work here is setting up your themes themselves, such as what was outlined back in the chapter on the action bar. Having them both be available, depending upon device version, is merely a matter of putting the resources into the proper directories.
For example, take a look at the
ActionBar/VersionedColor
sample project. This is a “mashup” of the HoloColor and
MaterialColor sample projects, where the determination of
which theme to use is based on API level.
In the res/values/ directory, we have a styles.xml file
that is the same as the one in the HoloColor example, just
with the filename standardized to styles.xml. It uses a custom
theme (Theme.Apptheme) generated by the Action Bar Style
Generator.
There is also a res/values-v21/ directory, indicating values
resources to be used on API Level 21 and higher. It has the
theme originally seen in the MaterialColor example, where
the style resource is renamed to Theme.Apptheme, to match
the one defined in res/values/.
Then, with <application> referencing Theme.Apptheme, we
get the right action bar on the right device.
Here, having the style resources names be the same is important,
as we are referencing the name in the <application> element in
the manifest. To be able to pull in the right one, we need them
both to have the same name. However, resources that are referred
to by only one of those themes, such as color and drawable resources,
could go in a versioned directory or not, as you see fit. They
have to go in versioned directories and have to have the same
names if you want multiple editions where the API level chooses which
edition to use.
For example, the Theme.Material-based theme defined in
res/values-v21/styles.xml references three color resources.
The file for those resources happens to also be in res/values-v21/
(colors.xml). However, since we are not looking to replace those
colors based on API level, the colors.xml file could be placed
in res/values/ and work just as well. And, if we did want to
have different colors by API level, we would need those colors
defined in all relevant resource sets, such as both res/values/
and res/values-v21/.
When you call methods in the Android SDK that load a resource (e.g., the
aforementioned setContentView(R.layout.main)), Android will walk through
those resource sets, find the right resource for the given request, and use it.
But what happens if the configuration changes after we asked for the resource?
For example, what if the user was holding their device in portrait mode, then
rotates the screen to landscape? We would want a -land version of our layouts,
if such versions exist. And, since we already requested the resources, Android
has no good way of handing us revised resources on the fly… except by forcing
us to re-request those resources.
So, this is what Android does, by default, to our foreground activity, when the configuration changes on the fly.
The biggest thing that Android does is destroy and recreate our activity. In other words:
onPause(), onStop(), and onDestroy() on our original instance
of the activityIntent that was used to create the original instanceonCreate(), onStart(), and onResume() of the new activity
instanceThis may seem… invasive. You might not expect that Android would wipe out a perfectly good activity, just because the user flicked her wrist and rotated the screen of her phone. However, this is the only way Android has that guarantees that we will re-request all our resources.
If your activity is using fragments, the new instance of the activity will contain the same fragments that the old instance of the activity does. This includes both static and dynamic fragments.
By default, Android destroys and recreates the fragments, just as it destroys and recreates the activities. However, as we will see, we do have an option to tell Android to retain certain dynamic fragment instances — for those, it will have the new instance use the same fragment instances as were used by the old activity, instead of creating new instances from scratch.
Regardless of whether or not Android recreates all of the fragments, it will
call onCreateView() of all of the fragments (plus call onDestroyView() on
the original set of fragments). In other words, Android recreates all of the
widgets and containers, to pour them into the new activity instance.
Android will hold onto the “instance state” of some of the widgets we have in our activity and fragments. Mostly, it holds onto obviously user mutable state, such as:
EditText
CompoundButton, like a CheckBox or RadioButton, is checked or notAndroid will collect this information from the widgets of the old activity instance, carry that data forward to the new activity instance, and update the new set of widgets to have that same state.
However:
android:id
values, you meet this requirement. If, however, you are creating the
widgets directly in Java code, those widgets do not have an ID.
You would need to call setId() to give them an ID or manage the
state yourself (using the onSaveInstanceState() technique described
later in this chapter).ArrayAdapter. And, usually, those
widgets are read-only and do not have any state to save. However, if
you attempt putting user-modifiable widgets in the layouts inflated
by the adapter, or you otherwise have multiple user-modifiable widgets
with the same ID, you will need to manage the
state yourself (again, using the onSaveInstanceState() technique described
later in this chapter).When the user rotates the screen, or puts the device in a car dock, or changes the language of the device, your process is not terminated. Your foreground activity will be re-created by default — as will your widgets and fragments — but the process sticks around.
However, there are plenty of cases when your process will be terminated once you move into the background. That might be done automatically by Android or manually by the user.
Depending on how your process is terminated, there may be ways that the user can return to your app and expect that they will return to it just how they left it. For example, suppose the user is in your app, then presses HOME to move your app to the background. Hours pass, and Android terminates your process to free up memory for other apps. Sometime after that, the user brings up the recent-tasks list and taps on your app in that list. From the user’s perspective, they should be returning to your app in the same state that they left it when they pressed HOME. However, if your process was terminated, by default you lost all that state.
Some of the techniques for dealing with a configuration change — those involving
the “saved instance state Bundle” — will also help you handle the recent-tasks-list
scenario. Some of the other techniques — such as retaining a fragment — only help
with handling configuration changes and will do nothing for you in terms of
the recent-tasks-list scenario.
The general rule of thumb, therefore, is to use the Bundle where you can, and use
other techniques (e.g., retained fragments) where the Bundle is inappropriate or
inadequate. We will see those techniques in the next section.
However, bear in mind that all of this state is designed for transient data, data that the user will not mind if they never see again. For example, suppose the user is in your app, then presses HOME to move your app to the background. Hours pass, and due to the user having busily used their device, you “fall off” the recent-tasks list, as that list will not extend indefinitely. In this case, if the user starts up your app again (e.g., via the home screen launcher icon), you will not get any state information back for use. Data that the user filled into the old app instance, where that data must be remembered and reused in any future run of your app, will need to be persisted yourself, in a database or other type of file.
With all of that in mind, let’s examine our options for dealing with the transient state, with an emphasis on configuration changes.
As noted, a configuration change is fairly invasive on your activity, replacing it outright with all new content (albeit with perhaps some information from the old activity’s widgets carried forward into the new activity’s widgets).
Hence, you have several possible approaches for handling configuration changes in any given activity.
The easiest thing to do, of course, is to do nothing at all. If all your state is bound up in stuff Android handles automatically, you do not need to do anything more than the defaults.
For example, the ViewPager/Fragments demo from
the preceding chapter works correctly “out of the box”. All of
our “state” is tied up in EditText widgets, which Android handles automatically.
So, we can type in stuff in a bunch of those widgets, rotate the screen (e.g.,
via ^[Ctrl>-<Right]^ in the emulator on a Windows or Linux PC), and our entered
text is retained.
Alas, there are plenty of cases where the built-in behavior is either incomplete or simply incorrect, and we will need to do more work to make sure that our configuration changes are handled properly.
One approach for handling these sorts of configuration changes is to have Android retain a dynamic fragment.
Here, “retain” means that Android will keep the same fragment instance across the configuration change, detaching it from the original hosting activity and attaching it to a new hosting activity. Since it is the same fragment instance, anything contained inside that instance is itself retained and, therefore, is not lost when the activity is destroyed and recreated.
To see this in action, take a look at the
ConfigChange/Fragments
sample project.
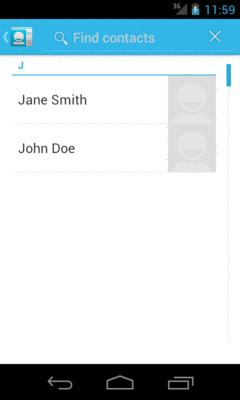
The business logic for this demo (and for all the other demos in this chapter) is that we want to allow the user to pick a contact out of the roster of contacts found on their device or emulator. We will do that by having the user press a “Pick” button, at which time we will display an activity that will let the user pick the contact and return the result to us. Then, we will enable a “View” button, and let the user view the details of the selected contact. The key is that our selected contact needs to be retained across configuration changes — otherwise, the user will rotate the screen, and the activity will appear to forget about the chosen contact.
The activity itself just loads the dynamic fragment, following the recipe seen previously in this book:
package com.commonsware.android.rotation.frag;

import android.app.Activity;
import android.os.Bundle;

public class RotationFragmentDemo extends Activity {
  @Override
  public void onCreate(Bundle savedInstanceState) {
    super.onCreate(savedInstanceState);

    if (getFragmentManager().findFragmentById(android.R.id.content)==null) {
      getFragmentManager().beginTransaction()
                                 .add(android.R.id.content,
                                      new RotationFragment()).commit();
    }
  }
}
The reason for checking for the fragment’s existence should now be clearer. Since Android will automatically recreate (or retain) our fragments across configuration changes, we do not want to create a second copy of the same fragment when we already have an existing copy.
The fragment is going to use an R.layout.main layout resource, with two
implementations. One, in res/layout-land/, will be used in landscape:
<?xml version="1.0" encoding="utf-8"?>
<LinearLayout xmlns:android="http://schemas.android.com/apk/res/android"
  android:orientation="horizontal"
  android:layout_width="match_parent"
  android:layout_height="match_parent"
  >
  <Button android:id="@+id/pick"
    android:layout_width="match_parent"
    android:layout_height="match_parent"
    android:layout_weight="1"
    android:text="@string/pick"
    android:enabled="true"
  />
  <Button android:id="@+id/view"
    android:layout_width="match_parent"
    android:layout_height="match_parent"
    android:layout_weight="1"
    android:text="@string/view"
    android:enabled="false"
  />
</LinearLayout>
The portrait edition, in res/layout/, is identical save for the orientation
of the LinearLayout:
<?xml version="1.0" encoding="utf-8"?>
<LinearLayout xmlns:android="http://schemas.android.com/apk/res/android"
  android:orientation="vertical"
  android:layout_width="match_parent"
  android:layout_height="match_parent"
  >
  <Button android:id="@+id/pick"
    android:layout_width="match_parent"
    android:layout_height="match_parent"
    android:layout_weight="1"
    android:text="@string/pick"
    android:enabled="true"
  />
  <Button android:id="@+id/view"
    android:layout_width="match_parent"
    android:layout_height="match_parent"
    android:layout_weight="1"
    android:text="@string/view"
    android:enabled="false"
  />
</LinearLayout>
Here is the complete implementation of RotationFragment:
package com.commonsware.android.rotation.frag;

import android.app.Activity;
import android.app.Fragment;
import android.content.Intent;
import android.net.Uri;
import android.os.Bundle;
import android.provider.ContactsContract;
import android.view.LayoutInflater;
import android.view.View;
import android.view.ViewGroup;

public class RotationFragment extends Fragment implements
    View.OnClickListener {
  static final int PICK_REQUEST=1337;
  Uri contact=null;

  @Override
  public View onCreateView(LayoutInflater inflater, ViewGroup parent,
                           Bundle savedInstanceState) {
    setRetainInstance(true);

    View result=inflater.inflate(R.layout.main, parent, false);

    result.findViewById(R.id.pick).setOnClickListener(this);

    View v=result.findViewById(R.id.view);

    v.setOnClickListener(this);
    v.setEnabled(contact != null);

    return(result);
  }

  @Override
  public void onActivityResult(int requestCode, int resultCode,
                               Intent data) {
    if (requestCode == PICK_REQUEST) {
      if (resultCode == Activity.RESULT_OK) {
        contact=data.getData();
        getView().findViewById(R.id.view).setEnabled(true);
      }
    }
  }

  @Override
  public void onClick(View v) {
    if (v.getId() == R.id.pick) {
      pickContact(v);
    }
    else {
      viewContact(v);
    }
  }

  public void pickContact(View v) {
    Intent i=
        new Intent(Intent.ACTION_PICK,
                   ContactsContract.Contacts.CONTENT_URI);

    startActivityForResult(i, PICK_REQUEST);
  }

  public void viewContact(View v) {
    startActivity(new Intent(Intent.ACTION_VIEW, contact));
  }
}
In onClick(), we hook up the “Pick” button to a pickContact() method.
There, we call startActivityForResult() with an ACTION_PICK Intent,
indicating that we want to pick something from the
ContactsContract.Contacts.CONTENT_URI collection of contacts. We will discuss
ContactsContract in greater detail later in this book.
For the moment, take
it on faith that Android has such an ACTION_PICK activity, one that will display
to the user the list of available contacts:
Figure 258: ACTION_PICK of a Contact
In addition to the ACTION_PICK Intent, we also supply a unique int
to startActivityForResult(). This int should be a 16-bit value
(0 to 65535) that is unique for this particular startActivityForResult()
call from this activity. This value does not have to be unique compared
to such calls from other activities of yours, let alone across the entire
device.
If the user picks a contact, control returns to our activity, with a call to
onActivityResult(). onActivityResult() is passed:
startActivityForResult(), to help identify this
result from any others we might be receivingRESULT_OK if the user did pick a contact, or RESULT_CANCELED if the user
abandoned the pick activityIntent containing the result from the pick activity, which, in this case,
will contain a Uri representing the selected contact, retrieved via getData()
We store that Uri in a data member, plus we enable the “View” button, which,
when clicked, will bring up an ACTION_VIEW activity on the selected contact
via its Uri:
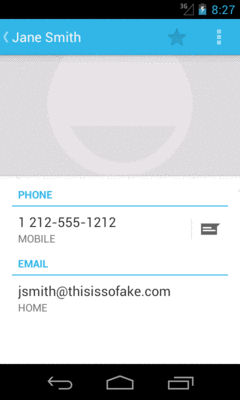
Figure 259: ACTION_VIEW of a Contact
Up in onCreateView(), we called setRetainInstance(true). This tells Android
to keep this fragment instance across configuration changes. Hence, we can pick
a contact in portrait mode, then rotate the screen (e.g., ^[Ctrl>-<Right]^ in the
emulator on Windows or Linux), and view the contact in landscape mode. Even
though the activity and the buttons were replaced as a result of the rotation,
the fragment was not, and the fragment held onto the Uri of the selected
contact.
Note that setRetainInstance() only works with dynamic fragments, not static
fragments. Static fragments are always recreated when the activity is itself
destroyed and recreated.
The benefit of this technique, over others, is that you can retain any sort of data you want: any data type, any size, etc. However, this approach does not save state that will be given back to you after your process had been terminated, such as when the user goes back to your app via the recent-tasks list.
A variation on this theme is the “model fragment”. While fragments normally
are focused on supplying portions of the UI to a user, that is not really a
requirement. A model fragment is one that simply uses setRetainInstance(true)
to ensure that it sticks around as configurations change. This fragment then
holds onto any model data that its host activity needs, so as that activity
gets destroyed and recreated, the model data sticks around in the model fragment.
This is particularly useful for data that might not otherwise have a fragment
home. For example, imagine an activity whose UI consists entirely of a ViewPager,
(like the tutorial app). Even though that ViewPager might hold fragments, there
will be many pages in most pagers. It may be simpler to add a separate, UI-less
model fragment and have it hold the activity’s data model for the ViewPager.
This allows the activity to still be destroyed and recreated, and even allows
the ViewPager to be destroyed and recreated, while still retaining the
already-loaded data.
Google recommends using a model fragment instead of using setRetainInstance(true)
with a regular fragment. The less the retained fragment holds, the less likely
it is that you will hold something that you should not be holding, such as a
string that needs to be reloaded from a string resource due to a possible locale
change. That being said, if you are careful and make sure that all your data
members are accounted for properly, using setRetainInstance(true) from any
fragment can be made safe.
If you want state to be maintained not only for configuration changes, but
also for process terminations, you will want to
use onSaveInstanceState() and onRestoreInstanceState().
You can override onSaveInstanceState() in your activity. It is passed a
Bundle, into which you can store data that should be maintained across the
configuration change. The catch is that while Bundle looks a bit like it
is a HashMap, it actually cannot hold arbitrary data types,
which limits the sort of information you can retain via onSaveInstanceState().
onSaveInstanceState() is called around the time of onPause() and onStop().
The widget state maintained automatically by Android is via the built-in
implementation of onSaveInstanceState(). If you override it yourself, typically
you will want to chain to the superclass to get this inherited behavior, in
addition to putting things into the Bundle yourself.
That Bundle is passed back to you in two places:
onCreate()onRestoreInstanceState()Since onCreate() is called in many cases other than due to a configuration
change, frequently the passed-in Bundle is null. onRestoreInstanceState(),
on the other hand, is only called when there is a Bundle to be used.
To see how this works, take a look at the
ConfigChange/Bundle
sample project.
Here, RotationBundleDemo is an activity with all the same core business logic as was in
our fragment in the preceding demo. Since the activity will be destroyed and
recreated on a configuration change, we override onSaveInstanceState()
and onRestoreInstanceState() to retain our contact, if one was selected prior
to the configuration change:
  @Override
  protected void onSaveInstanceState(Bundle outState) {
    super.onSaveInstanceState(outState);

    if (contact != null) {
      outState.putParcelable("contact", contact);
    }
  }

  @Override
  protected void onRestoreInstanceState(Bundle state) {
    super.onRestoreInstanceState(state);

    contact=state.getParcelable("contact");
    viewButton.setEnabled(contact != null);
  }
Here, we use putParcelable() to put the Uri into the Bundle. Parcelable
is an interface that you can implement on a Java class to allow an instance of it
to be put into a Bundle. Uri happens to implement Parcelable. The full
details of what Parcelable means and how you can make things implement
Parcelable are provided later in this book.
The downside of this approach is that not everything can go into a Bundle. A
Bundle cannot hold arbitrary data types, so you cannot put a Socket into a
Bundle, for example. Also, this Bundle needs to be fairly small, as it is
passed across process boundaries, so you cannot put large objects (e.g., bitmaps)
into the Bundle. For those cases, you will have to settle for the retained-fragment
approach.
Fragments also have an onSaveInstanceState() method that they can override.
It works just like the Activity equivalent — you can store data in the
supplied Bundle that will be supplied back to you later on. The biggest
difference is that there is no onRestoreInstanceState() method — instead,
you are handed the Bundle in other lifecycle methods:
onCreate()onCreateView()onViewCreated()onActivityCreated()We can see this in the
ConfigChange/FragmentBundle
sample project. This is effectively a mashup of the previous two samples:
using fragments, but also using onSaveInstanceState() instead of setRetainInstance(true).
Our RotationFragment now has an onSaveInstanceState() method that looks
a lot like the one from the ConfigChange/Bundle sample’s activity:
  @Override
  public void onSaveInstanceState(Bundle outState) {
    super.onSaveInstanceState(outState);

    if (contact != null) {
      outState.putParcelable("contact", contact);
    }
  }
Our onCreateView() method examines the passed-in Bundle, and if it is not
null tries to obtain our contact from it:
  @Override
  public View onCreateView(LayoutInflater inflater, ViewGroup parent,
                           Bundle state) {
    View result=inflater.inflate(R.layout.main, parent, false);

    result.findViewById(R.id.pick).setOnClickListener(this);

    View v=result.findViewById(R.id.view);

    v.setOnClickListener(this);

    if (state != null) {
      contact=(Uri)state.getParcelable("contact");
    }

    v.setEnabled(contact != null);

    return(result);
  }
This does not allow our fragment to hold onto arbitrary data, the way
setRetainInstance(true) does. However, as with onSaveInstanceState() at the
activity level, there are scenarios that onSaveInstanceState() handles that
retained fragments will not, such as terminating your process due to low memory,
yet the user later uses BACK to return to what should have been your activity
(and its fragments).
If you were to go back to early versions of this book, one of the options
discussed in this chapter was onRetainNonConfigurationInstance().
That approach was deprecated in API Level 11, replaced with retained fragments.
However, in an unprecedented move, Google un-deprecated
onRetainNonConfigurationInstance() in API Level 24, making it safe for
use again.
Despite the really long method name, its use is simple:
onRetainNonConfigurationInstance() on your Activity,
returning (nearly) any object you want.onCreate() of your Activity, call getLastNonConfigurationInstance().
If it is not null, then it is the same object that you returned from
onRetainNonConfigurationInstance() milliseconds ago, as part of
a configuration change. You can cast the getLastNonConfigurationInstance()
return value to the appropriate type, save it in a field (or whatever),
and use it however you were using it in the previous activity instance.If you need more than one object to be retained this way, simply have
onRetainNonConfigurationInstance() wrap up the objects in some data
structure of your own design.
The
ConfigChange/Retain
sample project is nearly identical to the ConfigChange/Bundle example
shown earlier. In this case, the saved instance state Bundle was
replaced with a retained object. Since onRetainNonConfigurationInstance()
can return an object of any type, we can just return the Uri representing
our contact directly:
  @Override
  public Object onRetainNonConfigurationInstance() {
    return(contact);
  }
In onCreate(), we set contact to be the result of getLastNonConfigurationInstance()
(casting it to a Uri) and update the viewButton to reflect whether
or not contact is null:
  @Override
  public void onCreate(Bundle savedInstanceState) {
    super.onCreate(savedInstanceState);
    setContentView(R.layout.main);

    viewButton=(Button)findViewById(R.id.view);
    contact=(Uri)getLastNonConfigurationInstance();
    viewButton.setEnabled(contact != null);
  }
When the user rotates the screen, the Uri is passed from the old
activity instance to the new one, and so we remember our previously-selected
contact.
Under the covers, retained fragments uses onRetainNonConfigurationInstance()
and getLastNonConfigurationInstance().
As a result, the limitations on onRetainNonConfigurationInstance()
are reminiscent to the limitations on retained fragments:
Views from onRetainNonConfigurationInstance(),
as they will be tied to the old activity instance, not the new oneBundle — which
also handles other scenarios, such as process termination — but instead
use it for things that cannot go into that Bundle due to size or
data typeNOTE: If you try using onRetainNonConfigurationInstance(), and it
shows up with the deprecation strikethrough formatting in your IDE,
your compileSdkVersion is somewhere between 11 and 23. Raise it
to 24 to clear up the deprecation warning.
In a few cases, even a retained fragment is insufficient,
because transferring and re-applying the state would be too complex or too
slow. Or, in some cases, the hardware will get in the way, such as when trying
to use the Camera for taking pictures — a concept we will cover later in this
book.
If you are completely desperate, you can tell Android to not destroy and recreate the activity on a configuration change… though this has its own set of consequences. To do this:
android:configChanges entry in your AndroidManifest.xml file,
listing the configuration changes you want to handle yourself versus allowing
Android to handle for youonConfigurationChanged() in your Activity, which will be called
when one of the configuration changes you listed in android:configChanges
occursNow, for any configuration change you want, you can bypass the whole activity-destruction process and simply get a callback letting you know of the change.
For example, take a look at the
ConfigChange/DIY
sample project.
In AndroidManifest.xml, we add the android:configChanges attribute to the
<activity> element, indicating that we want to handle several configuration
changes ourselves:
    <activity
      android:name="RotationDIYDemo"
      android:configChanges="keyboardHidden|orientation|screenSize"
      android:label="@string/app_name">
      <intent-filter>
        <action android:name="android.intent.action.MAIN"/>

        <category android:name="android.intent.category.LAUNCHER"/>
      </intent-filter>
    </activity>
Many recipes for this will have you handle orientation and keyboardHidden.
However, nowadays, you need to also handle screenSize
(and, in theory, smallestScreenSize),
if you have your android:targetSdkVersion set to 13 or higher. Note that this
will require your build target (e.g., compileSdkVersion in Android Studio)
to be set to 13 or higher.
Hence, for those particular configuration changes, Android will not destroy
and recreate the activity, but instead will call onConfigurationChanged().
In the RotationDIYDemo implementation, this simply toggles the orientation
of the LinearLayout to match the orientation of the device:
  @Override
  public void onConfigurationChanged(Configuration newConfig) {
    super.onConfigurationChanged(newConfig);

    LinearLayout container=(LinearLayout)findViewById(R.id.container);

    if (newConfig.orientation == Configuration.ORIENTATION_LANDSCAPE) {
      container.setOrientation(LinearLayout.HORIZONTAL);
    }
    else {
      container.setOrientation(LinearLayout.VERTICAL);
    }
  }
Since the activity is not destroyed during a configuration change, we do not
need to worry at all about the Uri of the selected contact — it is not
going anywhere.
The problem with this implementation is twofold:
locale in android:configChanges, we not only need to update
the LinearLayout but also the captions of the Button widgets, since Android
will not do that for us automatically.It is these two problems that are why Google does not recommend the use of this technique unless absolutely necessary.
Also, bear in mind that this approach does not help at all for retaining state when your process is terminated and the user returns to your app via the recent-tasks list.
No doubt that you have seen some Android applications that simply ignore any attempt to rotate the screen. Many games work this way, operating purely in landscape mode, regardless of how the device is positioned.
To do this, add android:screenOrientation="sensorLandscape", or possibly
android:screenOrientation="sensorPortrait", to your manifest. The “sensor” portions
of those names indicate that your app can work in regular or “reverse” versions
of the orientation (e.g., “regular” landscape is the device rotated 90 degrees
counter-clockwise from portrait, while “reverse” landscape is the device rotated
90 degrees clockwise from portrait). On API Level 18+, you
could use userLandscape or userPortrait instead, as those will honor the user’s
system-level choice of whether to lock screen rotation or not, defaulting to the
behavior of sensorLandscape or sensorPortrait if the user has not locked screen
rotation.
Also, if you use this to lock one or more of your activities to a particular
orientation, also use the corresponding <uses-feature> element in your
manifest:
<uses-feature android:name="android.hardware.screen.portrait"/> if you
have an activity locked to portrait<uses-feature android:name="android.hardware.screen.landscape"/> if you
have an activity locked to landscapeThis element would go as a child of the root <manifest> element but
outside of the <application> element.
The role of this <uses-feature> element is to advertise to the Play Store
and similar app distribution channels that your app requires certain
hardware features. Such channels might block distribution of your app
to platforms where your required orientation is not supported (e.g., portrait
activities on a TV-centric device like Android TV).
Earlier in the book, when introducing Android Studio, we saw the Android project view.
One of the reasons why the Android project view was created was to help you manage resources, particularly across various resource sets.
For example, here is a screenshot of the same Android project, but this
time with the values resources expanded in the tree:
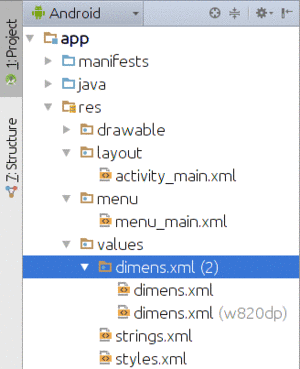
Figure 260: Android Project View, Showing Dimension Resources
The tree makes it appear as though there is just a res/values/dimens.xml
file… but that the file somehow has children. One child has just the
bare dimens.xml filename, while the other one has a “(w820dp)” appended.
This reflects the fact that there are two versions of dimens.xml: one
in res/values/ and one in res/values-w820dp/:
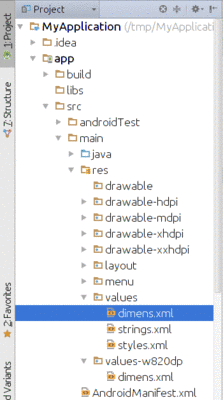
Figure 261: Classic Project View, Showing Dimension Resources
In the Android project view, resources are organized by resource, not by resource set. This can be useful for finding all files that need to be adjusted when you go to adjust one version of the resource, for example.
Some newer Android versions have added new and exciting challenges when dealing with resources and configuration changes.
Android 7.0+ users can indicate that they support more than one language:
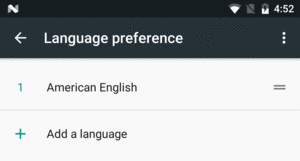
Figure 262: Android 7.0 Language Settings
The user can choose the relative priorities of these languages, by grabbing the handle on the right side of the row and dragging the language higher or lower in the list.
This has impacts on resource resolution for any locale-dependent
resources, such as strings. Now Android will check multiple languages
for resource matches, before falling back to the default language
(e.g., whatever you have in res/values/strings.xml). Hence, it is
important that you ensure that you have a complete set of strings for
every language that you support, lest the user perhaps wind up with
a mixed set of languages in the UI.
You can find out what languages the user has requested via a LocaleList
class and its getDefault() static method. This, as the name suggests,
has a list of Locale objects representing the user’s preferred languages.
If you had previously been using Locale alone for this (e.g., for
specialized in-app language assistance beyond resources), you will want
to switch to LocaleList for Android 7.0 and beyond.
Developers have had the ability to change the effective density of a
device, by using adb commands. Android 7.0+ users
can do this directly from Settings.
In Settings > Display > Display Size, the user can choose five different “display sizes”:
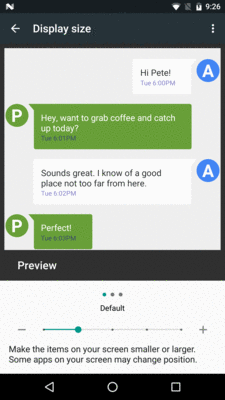
Figure 263: Display Size, Showing Default Setting
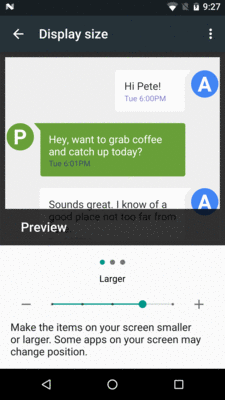
Figure 264: Display Size, Showing “Larger” Setting
While this is described to the user as a “size” or “zoom” setting, in reality it is affecting the apparent screen density, with Android scaling things based on a combination of actual density and the user’s stated “display size” preference.
Anything that is already density-independent should work just fine, though you certainly will want to run some tests to ensure that your app is working properly. In fact, this feature makes for a way to easily test your app on a variety of densities, without having to have dedicated hardware for those densities.
If your app is running at the time of the density change, what happens varies:
targetSdkVersion is 23 or below, Android will terminate your
process. Since you will be in the background at the time (Settings is in
the foreground), this will be little different than if Android terminated
your process due to low memory conditions, and your app should already
handle this. The documentation suggests that if you have a foreground service,
that Android will not terminate the process but instead treat this as a configuration
change.targetSdkVersion is 24 or higher, this will be treated
as a configuration change for all processes.For the configuration-change scenarios, if your app is caching information that depends on screen density, be sure to flush those caches and get fresh information based on the new screen density.