Figure 327: Gmail, On a Galaxy Nexus, Showing Conversations
So far, we have been generally ignoring screen size. With the vast majority of Android devices being in a fairly narrow range of sizes (3” to just under 5”), ignoring size while learning is not a bad approach. However, when it comes time to create a production app, you are going to want to strongly consider how you are going to handle other sizes, mostly larger ones (e.g., tablets).
What you want is to be able to provide a high-quality user experience without breaking your development budget — time and money — in the process.
An app designed around a phone, by default, may look fairly lousy on a tablet. That is because Android is simply going to try to stretch your layouts and such to fill the available space. While that will work, technically, the results may be unpleasant, or at least ineffective. If we have the additional room, it would be nice to allow the user to do something with that room.
At the same time, though, you do not have an infinite amount of time to be dealing with all of this. After all, there are a variety of tablet sizes. While ~7” and ~10” screens are the most common, there are certainly others that are reasonably popular (e.g., Amazon’s Kindle Fire HD 8.9”).
Some apps will use the additional space of a large screen directly. For example, a painting app would use that space mostly to provide a larger drawing canvas upon which the user can attempt to become the next Rembrandt, Picasso, or Pollock. The app might elect to make more tools available directly on the screen as well, versus requiring some sort of pop-up to appear to allow the user to change brush styles, choose a different color, and so forth.
However, this can be a lot of work.
Some apps can make a simplifying assumption: the tablet UI is really a bunch of phone-sized layouts, stitched together. For example, if you take a 10” tablet in landscape, it is about the same size as two or three phones side-by-side. Hence, one could imagine taking the smarts out of a few activities and having them be adjacent to one another on a tablet, versus having to be visible only one at a time as they are on phones.
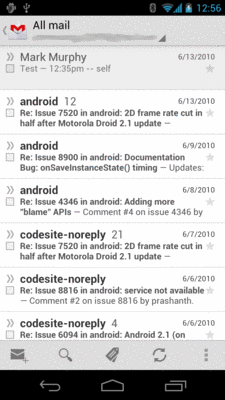
For example, consider the original edition of the Gmail app for Android.
On a phone, you would see conversations in a particular label on one screen:
Figure 327: Gmail, On a Galaxy Nexus, Showing Conversations
… and the list of labels on another screen:
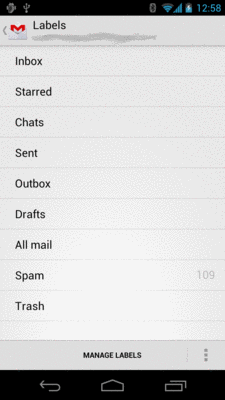
Figure 328: Gmail, On a Galaxy Nexus, Showing Labels
… and the list of messages in some selected conversation in a third screen:
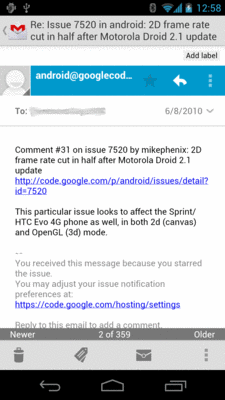
Figure 329: Gmail, On a Galaxy Nexus, Showing Messages
Whereas on a 7” tablet, you would see the list of labels and the conversations in a selected label at the same time:
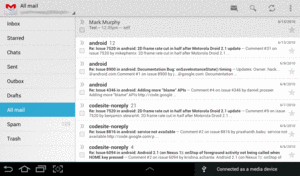
Figure 330: Gmail, On a Galaxy Tab 2, Showing Labels and Conversations
On that 7” tablet, tapping on a specific conversation brings up the list of messages for that conversation in a new screen. But, on a 10” tablet, tapping on a specific conversation showed that conversation, plus the list of conversations, side-by-side:
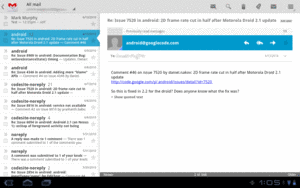
Figure 331: Gmail, On a Motorola XOOM, Showing Conversations and Messages
Yet all of that was done with one app with very little redundant logic, by means of fragments.
The list-of-labels, list-of-conversations, and list-of-messages bits of the UI were implemented as fragments. On a smaller screen (e.g., a phone), each one is displayed by an individual activity. Yet, on a larger screen (e.g., a tablet), more than one fragment is displayed by a single activity. In fact — though it will not be apparent from the static screenshots — on the 10” tablet, the activity showed all three fragments, using animated effects to slide the list of labels off-screen and the list of conversations over to the left slot when the user taps on a conversation to show the messages.
The vision, therefore, is to organize your UI into fragments, then choose which fragments to show in which circumstances based on available screen space:
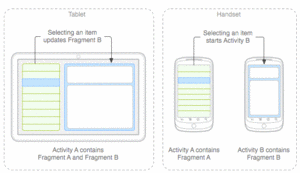
Figure 332: Tablets vs. Handsets (image courtesy of Android Open Source Project)
One solution is to say that you have the same fragments for all devices and all configurations, but that the sizing and positioning of those fragments varies. This is accomplished by using different layouts for the activity, ones that provide the sizing and positioning rules for the fragments.
So far, most of our fragment examples have been focused on activities with a single fragment, like you might use on smaller screens (e.g., phones). However, activities can most certainly have more than one fragment, though you will need to provide the “slots” into which to plug those fragments.
For example, you could have the following in res/layout-w720dp/main.xml:
<?xml version="1.0" encoding="utf-8"?>
<LinearLayout
  xmlns:android="http://schemas.android.com/apk/res/android"
  android:orientation="horizontal"
  android:layout_width="match_parent"
  android:layout_height="match_parent">
  <FrameLayout
    android:id="@+id/countries"
    android:layout_weight="30"
    android:layout_width="0px"
    android:layout_height="match_parent"
  />
  <FrameLayout
    android:id="@+id/details"
    android:layout_weight="70"
    android:layout_width="0px"
    android:layout_height="match_parent"
  />
</LinearLayout>
Here we have a horizontal LinearLayout holding a pair of FrameLayout containers.
Each of those FrameLayout containers will be a slot to load in a fragment, using
code like:
getSupportFragmentManager().beginTransaction()
                                 .add(R.id.countries, someFragmentHere)
                                 .commit();
In principle, you could also have a res/layout-h720dp/main.xml that holds both
of the same FrameLayout containers, but just in a vertical LinearLayout:
<?xml version="1.0" encoding="utf-8"?>
<LinearLayout
  xmlns:android="http://schemas.android.com/apk/res/android"
  android:orientation="vertical"
  android:layout_width="match_parent"
  android:layout_height="match_parent">
  <FrameLayout
    android:id="@+id/countries"
    android:layout_weight="30"
    android:layout_height="0dp"
    android:layout_width="match_parent"
  />
  <FrameLayout
    android:id="@+id/details"
    android:layout_weight="70"
    android:layout_height="0dp"
    android:layout_width="match_parent"
  />
</LinearLayout>
As the user rotates the device, the fragments will go in their appropriate slots.
However, for larger changes in screen size, you will probably need to have larger changes in your fragments. The most common pattern is to have fewer fragments on-screen for an activity on a smaller-screen device (e.g., one fragment at a time on a phone) and more fragments on-screen for an activity on a larger-screen device (e.g., two fragments at a time on a tablet).
So, for example, as the counterpart to the res/layout-w720dp/main.xml
shown in the previous section, you might have a res/layout/main.xml that
looks like this:
<?xml version="1.0" encoding="utf-8"?>
<FrameLayout xmlns:android="http://schemas.android.com/apk/res/android"
  android:id="@+id/countries"
  android:layout_width="match_parent"
  android:layout_height="match_parent"
/>
This provides a single slot, R.id.countries, for a fragment, one that fills
the screen. For a larger-screen device, held in landscape, you would use the
two-fragment layout; for anything else (e.g., tablet in portrait, or phone in
any orientation), you would use the one-fragment layout.
Of course, the content that belongs in the second fragment would have to show up somewhere.
Sometimes, when you add another fragment for a large screen, you only want it
to be there some of the time. For example, a digital book reader (like the one
we are building in the tutorials) might normally take up the full screen with
the reading fragment, but might display a sidebar fragment based upon an
action bar item click or the like. If you would like the BACK button to reverse
your FragmentTransaction that added the second fragment — so pressing
BACK removes that fragment and returns you to the single-fragment setup — you
can add addToBackStack() as part of your FragmentTransaction construction:
getSupportFragmentManager().beginTransaction()
                           .addToBackStack(null)
                           .replace(R.id.sidebar, f)
                           .commit();
We will see this in the next tutorial.
So, what is the activity doing?
First, the activity is the one loading the overall layout, the one indicating
which fragments should be loaded (e.g., the samples shown above). The activity
is responsible for populating those “slots” with the appropriate fragments. It
can determine which fragments to create based on which slots exist, so it would
only try to create a fragment to go in R.id.details if there actually is an
R.id.details slot to use.
Next, the activity is responsible for handling any events that are triggered
by UI work in a fragment (e.g., user clicking on a ListView item), whose
results should impact other fragments (e.g., displaying details of the
clicked-upon ListView item). The activity knows which fragments exist at
the present time. So, the activity can either call some method on the second
fragment if it exists, or it can call startActivity() to pass control to
another activity that will be responsible for the second fragment if it does
not exist in the current activity.
Finally, the activity is generally responsible for any model data that spans multiple fragments. Whether that model data is held in a “model fragment” (as outlined in the chapter on fragments) or somewhere else is up to you.
This will make a bit more sense as we work through another example, this time focused on a common pattern: a list of something, where clicking on the list brings up details on the item that was clicked upon. On a larger-screen device, in landscape, both pieces are typically displayed at the same time, side-by-side. On smaller-screen devices, and sometimes even on larger-screen devices in portrait, only the list is initially visible — tapping on a list item brings up some other activity to display the details.
The sample app for this section is
LargeScreen/EU4You.
This app has a list of member nations of the European Union (EU). Tapping on
a member nation will display the mobile Wikipedia page for that nation in a
WebView widget.
The data model — such as it is and what there is of it — consists of a
Country class which holds onto the country name (as a string resource ID),
flag (as a drawable resource ID), and mobile Wikipedia URL (as another string
resource ID):
Country(int name, int flag, int url) {
  this.name=name;
  this.flag=flag;
  this.url=url;
}
The Country class has a static ArrayList of Country objects representing
the whole of the EU, initialized in a static initialization block:
  static {
    EU.add(new Country(R.string.austria, R.drawable.austria,
                       R.string.austria_url));
    EU.add(new Country(R.string.belgium, R.drawable.belgium,
                       R.string.belgium_url));
    EU.add(new Country(R.string.bulgaria, R.drawable.bulgaria,
                       R.string.bulgaria_url));
    EU.add(new Country(R.string.cyprus, R.drawable.cyprus,
                       R.string.cyprus_url));
    EU.add(new Country(R.string.czech_republic,
                       R.drawable.czech_republic,
                       R.string.czech_republic_url));
    EU.add(new Country(R.string.denmark, R.drawable.denmark,
                       R.string.denmark_url));
    EU.add(new Country(R.string.estonia, R.drawable.estonia,
                       R.string.estonia_url));
    EU.add(new Country(R.string.finland, R.drawable.finland,
                       R.string.finland_url));
    EU.add(new Country(R.string.france, R.drawable.france,
                       R.string.france_url));
    EU.add(new Country(R.string.germany, R.drawable.germany,
                       R.string.germany_url));
    EU.add(new Country(R.string.greece, R.drawable.greece,
                       R.string.greece_url));
    EU.add(new Country(R.string.hungary, R.drawable.hungary,
                       R.string.hungary_url));
    EU.add(new Country(R.string.ireland, R.drawable.ireland,
                       R.string.ireland_url));
    EU.add(new Country(R.string.italy, R.drawable.italy,
                       R.string.italy_url));
    EU.add(new Country(R.string.latvia, R.drawable.latvia,
                       R.string.latvia_url));
    EU.add(new Country(R.string.lithuania, R.drawable.lithuania,
                       R.string.lithuania_url));
    EU.add(new Country(R.string.luxembourg, R.drawable.luxembourg,
                       R.string.luxembourg_url));
    EU.add(new Country(R.string.malta, R.drawable.malta,
                       R.string.malta_url));
    EU.add(new Country(R.string.netherlands, R.drawable.netherlands,
                       R.string.netherlands_url));
    EU.add(new Country(R.string.poland, R.drawable.poland,
                       R.string.poland_url));
    EU.add(new Country(R.string.portugal, R.drawable.portugal,
                       R.string.portugal_url));
    EU.add(new Country(R.string.romania, R.drawable.romania,
                       R.string.romania_url));
    EU.add(new Country(R.string.slovakia, R.drawable.slovakia,
                       R.string.slovakia_url));
    EU.add(new Country(R.string.slovenia, R.drawable.slovenia,
                       R.string.slovenia_url));
    EU.add(new Country(R.string.spain, R.drawable.spain,
                       R.string.spain_url));
    EU.add(new Country(R.string.sweden, R.drawable.sweden,
                       R.string.sweden_url));
    EU.add(new Country(R.string.united_kingdom,
                       R.drawable.united_kingdom,
                       R.string.united_kingdom_url));
  }
The fragment responsible for rendering the list of EU nations is CountriesFragment.
It is a ListFragment, using a CountryAdapter to populate the list:
  class CountryAdapter extends ArrayAdapter<Country> {
    CountryAdapter() {
      super(getActivity(), R.layout.row, R.id.name, Country.EU);
    }

    @Override
    public View getView(int position, View convertView, ViewGroup parent) {
      CountryViewHolder wrapper=null;

      if (convertView == null) {
        convertView=
            LayoutInflater.from(getActivity()).inflate(R.layout.row,
                                                       parent, false);
        wrapper=new CountryViewHolder(convertView);
        convertView.setTag(wrapper);
      }
      else {
        wrapper=(CountryViewHolder)convertView.getTag();
      }

      wrapper.populateFrom(getItem(position));

      return(convertView);
    }
  }
This adapter is somewhat more complex than the ones we showed in the
chapter on selection widgets. We will get into what
CountryAdapter is doing, and the CountryViewHolder it references, in
a later chapter of this book. Suffice it to say for now that the rows in the
list contain both the country name and its flag.
When the user taps on a row in our ListView, something needs to happen –
specifically, the details of that country need to be displayed. However,
displaying those details is not the responsibility of CountriesFragment, as it
simply displays the list of countries and nothing else. Hence, we need to
pass the event up to the hosting activity to handle.
We could accomplish this using an event bus, as seen in other examples earlier
in the book. The EU4You series of samples, though, use a different approach,
referred to as the contract pattern. In this pattern,
the fragment defines an interface, which is the “contract”
that all hosting activities of that fragment must implement. This requirement
is enforced by the superclass, ContractListFragment:
/***
  Copyright (c) 2013 Jake Wharton
  Portions Copyright (c) 2013 CommonsWare, LLC

  Licensed under the Apache License, Version 2.0 (the "License"); you may not
  use this file except in compliance with the License. You may obtain a copy
  of the License at http://www.apache.org/licenses/LICENSE-2.0. Unless required
  by applicable law or agreed to in writing, software distributed under the
  License is distributed on an "AS IS" BASIS, WITHOUT WARRANTIES OR CONDITIONS
  OF ANY KIND, either express or implied. See the License for the specific
  language governing permissions and limitations under the License.

  From _The Busy Coder's Guide to Android Development_
    https://commonsware.com/Android
 */

// derived from https://gist.github.com/JakeWharton/2621173

package com.commonsware.android.eu4you;

import android.app.Activity;
import android.app.ListFragment;

public class ContractListFragment<T> extends ListFragment {
  private T contract;

  @SuppressWarnings("unchecked")
  @Override
  public void onAttach(Activity activity) {
    super.onAttach(activity);

    try {
      contract=(T)activity;
    }
    catch (ClassCastException e) {
      throw new IllegalStateException(activity.getClass()
                                              .getSimpleName()
          + " does not implement contract interface for "
          + getClass().getSimpleName(), e);
    }
  }

  @Override
  public void onDetach() {
    super.onDetach();

    contract=null;
  }

  public final T getContract() {
    return(contract);
  }
}
onAttach() is called when the fragment has been attached to an activity,
whether that is from when the activity was initially created, after a configuration
change, or whenever. In those cases, we cast the activity to be the contract
interface (provided via the data type in the declaration), raising an exception
if the cast fails. Subclasses can then access the contract object via the
getContract() method.
CountriesFragment inherits from ContractListFragment and defines its contract.
Hence, any activity that hosts a CountriesFragment is responsible for implementing
this contract interface, so we can call onCountrySelected() when the user clicks on a
row in the list:
  @Override
  public void onListItemClick(ListView l, View v, int position, long id) {
    if (getContract().isPersistentSelection()) {
      getListView().setChoiceMode(ListView.CHOICE_MODE_SINGLE);
      l.setItemChecked(position, true);
    }
    else {
      getListView().setChoiceMode(ListView.CHOICE_MODE_NONE);
    }

    getContract().onCountrySelected(Country.EU.get(position));
  }
CountriesFragment also has quite a bit of code dealing with clicked-upon
rows being in an “activated” state. This provides visual context to the user
and is often used in the list-and-details pattern. For example, in the tablet
renditions of Gmail shown earlier in this chapter, you will notice that the
list on the left (e.g., list of labels) has one row highlighted with a blue
background. This is the “activated” row, and it indicates the context for the
material in the adjacent fragment (e.g., list of conversations in the label).
Managing this “activated” state is a bit beyond the scope of this section,
however, so we will delay discussion of that topic to
a later chapter in this book.
The details to be displayed come in the form of a URL to a mobile Wikipedia
page for a country, designed to be displayed in a WebView. The EU4You sample
app makes use of the same WebViewFragment that we saw earlier in this book,
such as in the tutorials. DetailsFragment itself, therefore, simply needs to
expose some method to allow a hosting activity to tell it what URL to display:
package com.commonsware.android.eu4you;

import android.os.Bundle;
import android.view.View;
import android.webkit.WebView;
import android.webkit.WebViewClient;
import android.webkit.WebViewFragment;

public class DetailsFragment extends WebViewFragment {
  @Override
  public void onViewCreated(View view, Bundle savedInstanceState) {
    super.onViewCreated(view, savedInstanceState);

    getWebView().setWebViewClient(new URLHandler());
  }

  public void loadUrl(String url) {
    getWebView().loadUrl(url);
  }

  private static class URLHandler extends WebViewClient {
    @Override
    public boolean shouldOverrideUrlLoading(WebView view, String url) {
      view.loadUrl(url);

      return(true);
    }
  }
}
You will notice that this fragment is not retained via setRetainInstance().
That is because, as you will see, we will not always be displaying this fragment.
Fragments that are displayed in some configurations (e.g., landscape) but
not in others (e.g., portrait), where a device might change between those
configurations at runtime, cannot be retained without causing crashes.
You will also notice that this fragment uses setWebViewClient() to associate
a URLHandler with the WebView. This URLHandler class simply forces
all URLs back into the WebView, as opposed to launching a browser. Wikipedia
now uses HTTPS for many pages, and it uses HTTP Strict Transport Security (HSTS)
to redirect HTTP requests to their HTTPS counterparts as appropriate. The
mobile Wikipedia URLs used in the app all have the https scheme, and so
in theory there should be no server-side redirects. But, just in case,
the URLHandler ensures that such redirects will stay within the WebView.
Our launcher activity is also named EU4You. It uses two of the layouts shown
above. Both are main.xml, but one is in res/layout-w720dp/:
<?xml version="1.0" encoding="utf-8"?>
<LinearLayout
  xmlns:android="http://schemas.android.com/apk/res/android"
  android:orientation="horizontal"
  android:layout_width="match_parent"
  android:layout_height="match_parent">
  <FrameLayout
    android:id="@+id/countries"
    android:layout_weight="30"
    android:layout_width="0px"
    android:layout_height="match_parent"
  />
  <FrameLayout
    android:id="@+id/details"
    android:layout_weight="70"
    android:layout_width="0px"
    android:layout_height="match_parent"
  />
</LinearLayout>
The other is in res/layout/:
<?xml version="1.0" encoding="utf-8"?>
<FrameLayout xmlns:android="http://schemas.android.com/apk/res/android"
  android:id="@+id/countries"
  android:layout_width="match_parent"
  android:layout_height="match_parent"
/>
Both have a FrameLayout for the CountriesFragment (R.id.countries), but
only the res/layout-w720dp/ edition has a FrameLayout for the
DetailsFragment (R.id.details).
Here is the complete implementation of the EU4You activity:
package com.commonsware.android.eu4you;

import android.app.Activity;
import android.content.Intent;
import android.os.Bundle;

public class EU4You extends Activity implements
    CountriesFragment.Contract {
  private CountriesFragment countries=null;
  private DetailsFragment details=null;

  @Override
  public void onCreate(Bundle savedInstanceState) {
    super.onCreate(savedInstanceState);
    setContentView(R.layout.main);

    countries=
        (CountriesFragment)getFragmentManager().findFragmentById(R.id.countries);

    if (countries == null) {
      countries=new CountriesFragment();
      getFragmentManager().beginTransaction()
                                 .add(R.id.countries, countries)
                                 .commit();
    }

    details=
        (DetailsFragment)getFragmentManager().findFragmentById(R.id.details);

    if (details == null && findViewById(R.id.details) != null) {
      details=new DetailsFragment();
      getFragmentManager().beginTransaction()
                                 .add(R.id.details, details).commit();
    }
  }

  @Override
  public void onCountrySelected(Country c) {
    String url=getString(c.url);

    if (details != null && details.isVisible()) {
      details.loadUrl(url);
    }
    else {
      Intent i=new Intent(this, DetailsActivity.class);

      i.putExtra(DetailsActivity.EXTRA_URL, url);
      startActivity(i);
    }
  }

  @Override
  public boolean isPersistentSelection() {
    return(details != null && details.isVisible());
  }
}
The job of onCreate() is to set up the UI. So, we:
CountriesFragment, by asking our
FragmentManager to give us the fragment in the R.id.countries slot — this
might occur if we underwent a configuration change, as CountriesFragment
would be recreated in that caseCountriesFragment instance, create one and execute a
FragmentTransaction to load it into R.id.countries of our layoutDetailsFragment (which, since DetailsFragment is not retained,
should always return null, but, as they say, “better safe than sorry”)DetailsFragment and the layout has an R.id.details
slot, create a DetailsFragment and execute the FragmentTransaction to
put it in that slot… but otherwise do nothingThe net result is that EU4You can correctly handle either situation, where
we have both fragments or just one.
Similarly, the onCountrySelected() method (required by the Contract
interface) will see if we have our DetailsFragment or not (and whether it is
visible, or is hidden because we created it but it is not visible in the current
screen orientation). If we do, we just
call loadUrl() on it, to populate the WebView. If we do not have a
visible DetailsFragment, we need to do something to display one. In principle, we
could elect to execute a FragmentTransaction to replace the CountriesFragment
with the DetailsFragment, but this can get complicated. Here, we start up
a separate DetailsActivity, passing the URL for the chosen Country
in an Intent extra.
DetailsActivity is similar:
package com.commonsware.android.eu4you;

import android.app.Activity;
import android.os.Bundle;

public class DetailsActivity extends Activity {
  public static final String EXTRA_URL=
      "com.commonsware.android.eu4you.EXTRA_URL";
  private String url=null;
  private DetailsFragment details=null;

  @Override
  public void onCreate(Bundle savedInstanceState) {
    super.onCreate(savedInstanceState);

    details=(DetailsFragment)getFragmentManager()
                               .findFragmentById(android.R.id.content);

    if (details == null) {
      details=new DetailsFragment();

      getFragmentManager().beginTransaction()
                                 .add(android.R.id.content, details)
                                 .commit();
    }

    url=getIntent().getStringExtra(EXTRA_URL);
  }

  @Override
  public void onResume() {
    super.onResume();

    details.loadUrl(url);
  }
}
We create the DetailsFragment and load it into the layout, capture the URL
from the Intent extra, and call loadUrl() on the DetailsFragment. However,
since we are executing a FragmentTransaction, the actual UI for the
DetailsFragment is not created immediately, so we cannot call loadUrl()
right away (otherwise, DetailsFragment will try to pass it to a non-existent
WebView, and we crash). So, we delay calling loadUrl() to onResume(),
at which point the WebView should exist.
On a larger-screen device, in landscape, we have both fragments, though there
is nothing initially loaded into the DetailsFragment:
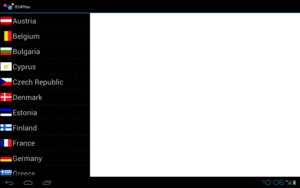
Figure 333: EU4You, On a Tablet Emulator, Landscape
Tapping on a country brings up the details on the right:
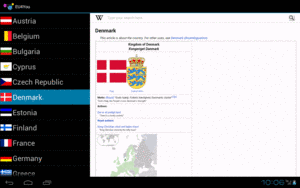
Figure 334: EU4You, On a Tablet Emulator, Landscape, With Details
In any other configuration, such as a smaller-screen device, we only see
the CountriesFragment at the outset:
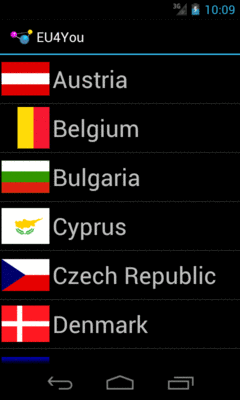
Figure 335: EU4You, On a Phone Emulator
Tapping on a country brings up the DetailsFragment full-screen in the
DetailsActivity:
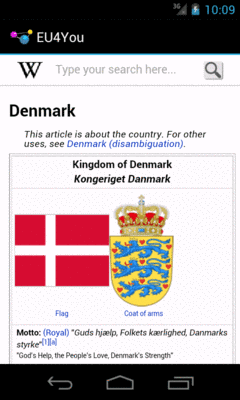
Figure 336: EU4You, On a Phone Emulator, Showing Details
The EU4You sample from above is one way of approaching this master-detail pattern. It is not the only one. In this section, will we review other implementations of EU4You that use other techniques for implementating the master-detail pattern.
In the original EU4You activity, both fragments were dynamic, each added via a
FragmentTransaction. DetailsFragment has to be dynamic, as whether or not
it is visible depends upon screen size and orientation. However, there is no
particular need for our CountriesFragment to be dynamic, as you will see in
the
LargeScreen/EU4YouStaticCountries
sample project.
Here, our single-pane layout uses a <fragment> element to wire in the
CountriesFragment:
<?xml version="1.0" encoding="utf-8"?>
<fragment xmlns:android="http://schemas.android.com/apk/res/android"
  android:id="@+id/countries"
  android:layout_width="match_parent"
  android:layout_height="match_parent"
  android:name="com.commonsware.android.eu4you3.CountriesFragment"
/>
Similarly, our dual-pane layout uses a <fragment> element for the
CountriesFragment, alongside the FrameLayout for the details:
<?xml version="1.0" encoding="utf-8"?>
<LinearLayout xmlns:android="http://schemas.android.com/apk/res/android"
  android:layout_width="match_parent"
  android:layout_height="match_parent"
  android:baselineAligned="false"
  android:orientation="horizontal">

  <fragment
    android:id="@+id/countries"
    android:name="com.commonsware.android.eu4you3.CountriesFragment"
    android:layout_width="0px"
    android:layout_height="match_parent"
    android:layout_weight="30"/>

  <FrameLayout
    android:id="@+id/details"
    android:layout_width="0px"
    android:layout_height="match_parent"
    android:layout_weight="70"/>

</LinearLayout>
Our onCreate() for EU4You is simpler, in that we do not need to mess with
the CountriesFragment at all:
  @Override
  public void onCreate(Bundle savedInstanceState) {
    super.onCreate(savedInstanceState);
    setContentView(R.layout.main);

    details=
        (DetailsFragment)getFragmentManager().findFragmentById(R.id.details);

    if (details == null && findViewById(R.id.details) != null) {
      details=new DetailsFragment();
      getFragmentManager().beginTransaction()
                                 .add(R.id.details, details).commit();
    }
  }
Neither CountriesFragment or anything involving the details necessarily needs
to change.
You might wonder why we need to bother with DetailsActivity. After all, the
EU4You activity is perfectly capable of showing the DetailsFragment in a second
pane — why not have it display the DetailsFragment in the first pane as well,
in single-pane scenarios? Surely, this will be much simpler, as we can dispense
with the activity and its entry in the manifest!
Yes, this is possible. No, it is not simpler.
The reason for the complexity is now managing all of our possible mix of fragments. We already had to deal with the following possibilities:
DetailsFragment exists in
the FragmentManager, but is not visibleIf we get rid of DetailsActivity and dump all the responsibility onto EU4You,
we have more scenarios:
FragmentTransaction
Basically, what we must do now is replace() the CountriesFragment with the
DetailsFragment, when we are in single-pane mode, when the user taps on a country
in the list. This requires a fairly extensive number of changes, as you will see
in the
LargeScreen/EU4YouSingleActivity
sample project.
In our single-pane mode, our one pane will either hold the CountriesFragment
or the DetailsFragment, depending upon what the user has done. Right now,
our FrameLayout is named R.id.countries, which was fine before, but now seems
like an inappropriate name. So, the new project’s layouts change this to
R.id.mainfrag, without changing anything else:
<?xml version="1.0" encoding="utf-8"?>
<FrameLayout xmlns:android="http://schemas.android.com/apk/res/android"
  android:id="@+id/mainfrag"
  android:layout_width="match_parent"
  android:layout_height="match_parent"
/>
The “simple” part of the changes comes in the revised onCountrySelected() method
in EU4You:
  @Override
  public void onCountrySelected(Country c) {
    String url=getString(c.url);

    details.loadUrl(url);

    if (details.getId() != R.id.details) {
      getFragmentManager().beginTransaction()
                                 .replace(R.id.mainfrag, details,
                                          TAG_DETAILS)
                                 .addToBackStack(null).commit();
    }
  }
In our revised scenario, we will always have a DetailsFragment. The question
is merely whether it is presently visible. Hence, we can call loadUrl() on
details directly.
However, there are two possible scenarios for the status of our DetailsFragment
at the point in time of onCountrySelected() being called:
details FrameLayout of our dual-pane layout resourceYou might think that there would be a third scenario, where it is the visible
fragment in the mainfrag FrameLayout. Indeed, sometimes DetailsFragment
will be in that container… just not now. The only time that onCountrySelected()
will be called is if the user tapped on an item in our CountriesFragment, which
means that CountriesFragment must be in mainfrag.
The ID of a fragment, from getId(), is the ID of its container, when used with
dynamic fragments. So, we check to see whether our DetailsFragment is in the
details FrameLayout by comparing ID values. If they differ, then we commit()
a replace() FragmentTransaction to put DetailsFragment into mainfrag.
Note, though, that we use addToBackStack(), so if the user presses the BACK button,
we will roll back this transaction and return to the CountriesFragment.
If you thought that was messy, you will not like the changes required to
onCreate() of EU4You much more:
  @Override
  public void onCreate(Bundle savedInstanceState) {
    super.onCreate(savedInstanceState);
    setContentView(R.layout.main);

    countries=
        (CountriesFragment)getFragmentManager().findFragmentByTag(TAG_COUNTRIES);
    details=
        (DetailsFragment)getFragmentManager().findFragmentByTag(TAG_DETAILS);

    if (countries == null) {
      countries=new CountriesFragment();
      getFragmentManager().beginTransaction()
                                 .add(R.id.mainfrag, countries,
                                      TAG_COUNTRIES).commit();
    }

    if (details == null) {
      details=new DetailsFragment();

      if (findViewById(R.id.details) != null) {
        getFragmentManager().beginTransaction()
                                   .add(R.id.details, details,
                                        TAG_DETAILS).commit();
      }
    }
    else {
      if (details.getId() == R.id.mainfrag) {
        if (findViewById(R.id.details) != null) {
          getFragmentManager().popBackStackImmediate();
        }
      }
      else {
        getFragmentManager().beginTransaction().remove(details)
                                   .commit();
      }

      if (findViewById(R.id.details) != null) {
        getFragmentManager().beginTransaction()
                                   .add(R.id.details, details,
                                        TAG_DETAILS).commit();
      }
    }
  }
This sample is derived from the original EU4You sample, and so we are still using
a FragmentTransaction to set up the CountriesFragment in mainfrag, if we did not
create CountriesFragment earlier.
Dealing with DetailsFragment, though, is decidedly more complicated. The flow that
we want is if we were in dual-pane mode and switch to single-pane mode, that we show
the CountriesFragment in that single pane. If we switch from single-pane mode to
dual-pane mode, both fragments will be shown, of course.
First, we have the case where our DetailsFragment does not yet exist. This is much
like the original sample: we need to create the fragment and put it into the details
FrameLayout, if the details FrameLayout exists.
If the DetailsFragment exists, we need to make sure that it winds up in the
details FrameLayout, if one exists.
To do that, we first check its ID to see
if it is presently located
in mainfrag. If it is, and if we have a details FrameLayout, we have switched
to dual-pane mode and need to pop our back stack, in preparation for moving the
DetailsFragment to the details FrameLayout.
If the DetailsFragment exists but is not in mainfrag, we remove() it entirely.
Then, if the DetailsFragment exists, regardless of where it was before, we add()
it to the details FrameLayout.
In testing, there are now scenarios in which CountriesFragment is called with
onSaveInstanceState(), but without its views having been created (i.e.,
onCreateView() was not called). This would cause us to fail when trying to use
getListView(), as that method would return null, since the ListView did not
exist. So, we modify onSaveInstanceState() to be a bit more robust:
  @Override
  public void onSaveInstanceState(Bundle state) {
    super.onSaveInstanceState(state);

    if (getView() != null) {
      state.putInt(STATE_CHECKED,
                   getListView().getCheckedItemPosition());
    }
  }
We also need to beef up DetailsFragment a bit. Before, we relied on the fact that,
on a configuration change, our extras on our Intent for DetailsActivity would
still be available. Now, though, there is no DetailsActivity, which means that
DetailsFragment has to maintain its state, so that we do not lose the URL we were
viewing when the user rotates the screen or causes another configuration change.
And, to top it off, we have the same potential issue as with CountriesFragment,
where the fragment might exist but not have onCreateView() called (e.g., we were
in dual-pane mode and switched to single-pane mode, and DetailsFragment has not yet
been displayed), so we cannot assume that getWebView() will always return a non-null
value.
To that end, DetailsFragment gets complicated:
package com.commonsware.android.eu4you2;

import android.os.Bundle;
import android.view.View;
import android.webkit.WebView;
import android.webkit.WebViewClient;
import android.webkit.WebViewFragment;

public class DetailsFragment extends WebViewFragment {
  private static final String STATE_URL="url";
  private String url=null;
  @Override
  public void onViewCreated(View view, Bundle savedInstanceState) {
    super.onViewCreated(view, savedInstanceState);

    getWebView().setWebViewClient(new URLHandler());
  }

  @Override
  public void onActivityCreated(Bundle savedInstanceState) {
    super.onActivityCreated(savedInstanceState);

    if (url == null && savedInstanceState != null) {
      url=savedInstanceState.getString(STATE_URL);
    }

    if (url != null) {
      loadUrl(url);
      url=null;
    }
  }

  @Override
  public void onSaveInstanceState(Bundle outState) {
    super.onSaveInstanceState(outState);

    if (url == null) {
      outState.putString(STATE_URL, getWebView().getUrl());
    }
    else {
      outState.putString(STATE_URL, url);
    }
  }

  void loadUrl(String url) {
    if (getView() == null) {
      this.url=url;
    }
    else {
      getWebView().loadUrl(url);
    }
  }

  private static class URLHandler extends WebViewClient {
    @Override
    public boolean shouldOverrideUrlLoading(WebView view, String url) {
      view.loadUrl(url);

      return(true);
    }
  }
}
The url data member will temporarily hold the URL of the page we should be viewing,
particularly when we have no WebView to work with. So, our loadUrl() method now
puts the URL into url if we have no WebView or loads it into the WebView if the
WebView exists. onSaveInstanceState() will put the URL — whether from url or
from the WebView — into the state Bundle. onActivityCreated() will attempt to
populate url from the Bundle (if we do not already have a URL), then use that
to populate the WebView (which should exist if onActivityCreated() is called).
url is set to null to indicate that the WebView holds our URL, once that is
completed.
From a user experience standpoint, things have not significantly changed. The user still sees the list, still sees the details when tapping on an entry in the list, and still gets the dual-pane experience on larger screens.
However, the transition between the list and the details in single-pane mode is a
bit faster, as a FragmentTransaction takes less time than does starting up another
activity. However, by default, our FragmentTransaction does not apply any transition
effects, and so the fragment changes “just happen” without any fades, zooms, or the
like. It is certainly possible to specify fragment transition effects, if desired,
though this is outside the scope of this chapter.
It should be possible to combine the two revised versions of EU4You, having a
single activity manage all the fragments, with CountriesFragment set up as a static
fragment. The proof that this is possible is left to the reader.
The R13 update to the Android Support package introduced SlidingPaneLayout, another
way of handling this sort of master-detail pattern. SlidingPaneLayout significantly
reduces the level of effort for setting up master-detail, as it handles all of the
“dirty work” of showing the different fragments in different scenarios (normal screen,
large screen, etc.).
In the master-detail pattern, we are showing both the master and the detail fragment, side-by-side, on larger screens, while showing only one at a time on smaller screens. In the preceding examples, we had to manage all of that ourselves, in terms of deciding how many fragments to show and for switching between those fragments as needed.
SlidingPaneLayout encapsulates that logic.
SlidingPaneLayout will detect the screen size. If the screen size is big enough,
SlidingPaneLayout will display its two children side-by-side. If the screen size
is not big enough, SlidingPaneLayout will display one child at a time. However, by
default, when the “master” child is visible, a thin strip on the right will allow the
user to return to the “detail” child. Similarly, a swiping gesture can switch from
the “detail” back to the “master” child. These are in addition to any changes in context
you might introduce based on UI operations (e.g., tapping on an element in a master
ListView automatically switching to the detail child).
The
LargeScreen/EU4YouSlidingPane
sample project represents a rework of the EU4You core sample, this time using
SlidingPaneLayout for handling the master-detail pattern.
Since SlidingPaneLayout encapsulates the master-detail logic, we can drop a lot of
stuff that we used before but no longer need, including:
DetailsActivity (as SlidingPaneLayout works akin to our single-activity
implementation)SlidingPaneLayout “bakes in” the logic for
handling different screen sizes)SlidingPaneLayout will work better with static fragments,
anyway)isPersistentSelection() (as we will always want to use activated rows, on API Level
11+, as the user can more readily switch back and forth between master and detail
on smaller screens, and we want to indicate in the master what the context is that is
displayed in the detail)However, we did have to add a bit of pane management, plus move around some list-related
behaviors in our CountriesFragment.
For starters, our res/layout/main.xml file now contains a SlidingPaneLayout,
along with our two fragments, each set up as static <fragment> elements:
<?xml version="1.0" encoding="utf-8"?>
<android.support.v4.widget.SlidingPaneLayout xmlns:android="http://schemas.android.com/apk/res/android"
  android:id="@+id/panes"
  android:layout_width="match_parent"
  android:layout_height="match_parent">

  <fragment
    android:id="@+id/countries"
    android:name="com.commonsware.android.eu4you4.CountriesFragment"
    android:layout_width="300sp"
    android:layout_height="match_parent"/>

  <fragment
    android:id="@+id/details"
    android:name="com.commonsware.android.eu4you4.DetailsFragment"
    android:layout_width="400dp"
    android:layout_height="match_parent"
    android:layout_weight="1"/>

</android.support.v4.widget.SlidingPaneLayout>
By putting an android:layout_weight on our details fragment, we indicate that
we want that one to take up all remaining room when the two fragments are shown
side-by-side. You might think that we should then set the width of the details
fragment to 0dp; however, for some reason, this does not work.
The size of the countries (master) fragment will be honored on larger screens.
On smaller screens, the size of the master fragment will be dictated by the width of the
screen, minus a strip to allow the user to see a portion of the detail fragment and
swipe that to display the detail fragment in toto.
Our CountriesFragment now always sets up the ListView to be single-choice
mode, in onActivityCreated(). It also calls onCountrySelected() on our
CountriesFragment.Contract, to ensure that the master is highlighting the last
selection — this is needed to make sure that everything is displayed properly after a
configuration change:
  @Override
  public void onActivityCreated(Bundle state) {
    super.onActivityCreated(state);

    setListAdapter(new CountryAdapter());
    getListView().setChoiceMode(ListView.CHOICE_MODE_SINGLE);

    if (state != null) {
      int position=state.getInt(STATE_CHECKED, -1);

      if (position > -1) {
        getListView().setItemChecked(position, true);
        getContract().onCountrySelected(Country.EU.get(position));
      }
    }
  }
onListItemClick() of CountriesFragment becomes a bit simpler:
  @Override
  public void onListItemClick(ListView l, View v, int position, long id) {
    l.setItemChecked(position, true);
    getContract().onCountrySelected(Country.EU.get(position));
  }
The EU4You activity overall becomes substantially simpler:
package com.commonsware.android.eu4you4;

import android.app.Activity;
import android.os.Bundle;
import android.support.v4.widget.SlidingPaneLayout;

public class EU4You extends Activity implements
    CountriesFragment.Contract {
  private DetailsFragment details=null;
  private SlidingPaneLayout panes=null;

  @Override
  public void onCreate(Bundle savedInstanceState) {
    super.onCreate(savedInstanceState);
    setContentView(R.layout.main);

    details=
        (DetailsFragment)getFragmentManager().findFragmentById(R.id.details);
    panes=(SlidingPaneLayout)findViewById(R.id.panes);
    panes.openPane();
  }

  @Override
  public void onBackPressed() {
    if (panes.isOpen()) {
      super.onBackPressed();
    }
    else {
      panes.openPane();
    }
  }

  @Override
  public void onCountrySelected(Country c) {
    details.loadUrl(getString(c.url));
    panes.closePane();
  }
}
In SlidingPaneLayout terminology, the pane is “open” if the master is shown on
smaller screens, and the pane is “closed” if the detail is shown on smaller screens.
If this feels a bit counter-intuitive to you, you are not alone in that regard.
By default, the SlidingPaneLayout is closed. So, if we want to start (on smaller screens)
with the master pane shown, we need to call openPane(), as we do in onCreate().
Similarly:
CountriesFragment,
we need to call closePane() in onCountrySelected()
onBackPressed() and consume that event (calling openPane()),
instead of performing the normal superclass behaviorOn a larger screen, the SlidingPaneLayout edition of the EU4You activity looks the same
as the prior examples.
However, on a smaller screen, things look slightly different. Specifically:
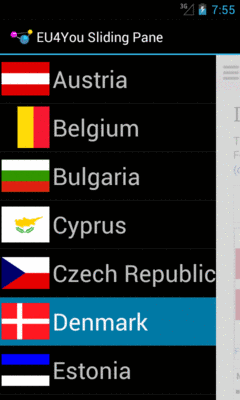
Figure 337: EU4YouSlidingPane, On a Phone Emulator, Showing Master
ViewPager is a popular container in Android, as horizontal swiping is an
increasingly popular navigational model, to move between peer pieces of content
(e.g., swiping between contacts, swiping between book chapters). In some cases,
when the ViewPager is on a larger screen, we simply want larger pages — a digital
book reader, for example, would simply have a larger page in a bigger font for easier
reading.
Sometimes, though, we might not be able to take advantage of the full space offered
by the large screen, particularly when our ViewPager takes up the whole screen.
In cases like this, it might be useful to allow ViewPager, in some cases, to show
more than one page at a time. Each “page” is then designed to be roughly phone-sized, and
we choose whether to show one, two, or perhaps more pages at a time based upon the
available screen space.
Mechanically, allowing ViewPager to show more than one page is fairly easy, involving
overriding one more method in our PagerAdapter: getPageWidth(). To see this in action,
take a look at the
ViewPager/MultiView1
sample project.
Each page in this sample is simply a TextView widget, using the activity’s style’s
“large appearance”, centered inside a LinearLayout:
<LinearLayout xmlns:android="http://schemas.android.com/apk/res/android"
  android:layout_width="match_parent"
  android:layout_height="match_parent"
  android:gravity="center"
  android:orientation="vertical">

  <TextView
    android:id="@+id/text"
    android:layout_width="wrap_content"
    android:layout_height="wrap_content"
    android:textAppearance="?android:attr/textAppearanceLarge"/>

</LinearLayout>
The activity, in onCreate(), gets our ViewPager from the res/layout/activity_main.xml
resource, and sets its adapter to be a SampleAdapter:
  @Override
  public void onCreate(Bundle savedInstanceState) {
    super.onCreate(savedInstanceState);
    setContentView(R.layout.activity_main);

    pager=(ViewPager)findViewById(R.id.pager);
    pager.setAdapter(new SampleAdapter());
    pager.setOffscreenPageLimit(6);
  }
In this case, SampleAdapter is not a FragmentPagerAdapter, nor a
FragmentStatePagerAdapter. Instead, it is its own implementation of the PagerAdapter
interface:
  /*
   * Inspired by
   * https://gist.github.com/8cbe094bb7a783e37ad1
   */
  private class SampleAdapter extends PagerAdapter {
    @Override
    public Object instantiateItem(ViewGroup container, int position) {
      View page=
          getLayoutInflater().inflate(R.layout.page, container, false);
      TextView tv=(TextView)page.findViewById(R.id.text);
      int blue=position * 25;

      final String msg=
          String.format(getString(R.string.item), position + 1);

      tv.setText(msg);
      tv.setOnClickListener(new OnClickListener() {
        @Override
        public void onClick(View v) {
          Toast.makeText(MainActivity.this, msg, Toast.LENGTH_LONG)
               .show();
        }
      });

      page.setBackgroundColor(Color.argb(255, 0, 0, blue));
      container.addView(page);

      return(page);
    }

    @Override
    public void destroyItem(ViewGroup container, int position,
                            Object object) {
      container.removeView((View)object);
    }

    @Override
    public int getCount() {
      return(9);
    }

    @Override
    public float getPageWidth(int position) {
      return(0.5f);
    }

    @Override
    public boolean isViewFromObject(View view, Object object) {
      return(view == object);
    }
  }
To create your own PagerAdapter, the big methods that you need to implement are:
instantiateItem(), where you create the page itself and add it to the supplied
container. In this case, we inflate the page, set the text of the TextView based
on the supplied position, set the background color of the page itself to be a different
shade of blue based on the position, set up a click listener to show a Toast when
the TextView is tapped, and use that for our page. We return some object
that identifies this page; in this case, we return the inflated View itself. A
fragment-based PagerAdapter would probably return the fragment.destroyItem(), where we need to clean up a page that is being removed from the
pager, where the page is identified by the Object that we had previously returned
from instantiateItem(). In our case, we just remove it from the supplied container.isViewFromObject(), where we confirm whether some specific page in the pager
(represented by a View) is indeed tied to a specific Object returned from
instantiateItem(). In our case, since we return the View from instantiateItem(),
we merely need to confirm that the two objects are indeed one and the same.getCount(), as with the built-in PagerAdapter implementations, to return how
many total pages there are.In our case, we also override getPageWidth(). This indicates, for a given position,
how much horizontal space in the ViewPager should be given to this particular page.
In principle, each page could have its own unique size. The return value is a float,
from 0.0f to 1.0f, indicating what fraction of the pager’s width goes to this page.
In our case, we return 0.5f, to have each page take up half the pager.
The result is that we have two pages visible at a time:
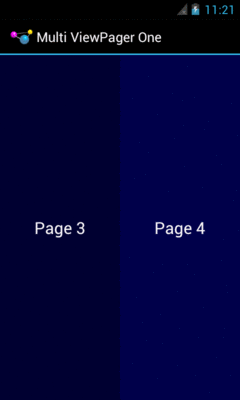
Figure 338: Two Pages in a ViewPager on Android 4.0.3
It is probably also a good idea to call setOffscreenPageLimit()
on the ViewPager, as we did in onCreate(). By default (and at minimum),
ViewPager will
cache three pages: the one presently visible, and one on either
side. However, if you are showing more than one at a time, you should
bump the limit to be 3 times the number of simultaneous pages.
For a page width of 0.5f — meaning two pages at a time –
you would want to call setOffscreenPageLimit(6), to make sure that
you had enough pages cached for both the current visible contents
and one full swipe to either side.
ViewPager even handles “partial swipes” — a careful swipe can
slide the right-hand page into the left-hand position and slide in
a new right-hand page. And ViewPager stops when you run out of pages,
so the last page will always be on the right, no matter how many
pages at a time and how many total pages you happen to have.
The biggest downside to this approach is that it will not work well
with the current crop of indicators. PagerTitleStrip and
PagerTabStrip assume that there is a
single selected page. While the indicator will adjust properly,
the visual representation shows that the left-hand page is the one
selected (e.g., the tab with the highlight), even though two or more
pages are visible. You can probably overcome this with a custom
indicator (e.g., highlight the selected tab and the one to its right).
Also note that this approach collides a bit with setPageMargin()
on ViewPager. setPageMargin() indicates an amount of whitespace
that should go in a gutter between pages. In principle, this would work
great with showing multiple simultaneous pages in a ViewPager. However,
ViewPager does not take the gutter into account when interpreting
the getPageWidth() value. For example, suppose getPageWidth()
returns 0.5f and we setPageMargin(20). On a 480-pixel-wide
ViewPager, we will actually use 500 pixels: 240 for the left page,
240 for the right page, and 20 for the gutter. As a result, 20 pixels
of our right-hand page are off the edge of the pager. Ideally, ViewPager
would subtract out the page margin before applying the page width.
One workaround is for you to derive the right getPageWidth()
value based upon the ViewPager size and gutter yourself, rather than
hard-coding a value. Or, build in your gutter into your page
contents (e.g., using android:layout_marginLeft and
android:layout_marginRight) and skip setPageMargin() entirely.
Another pattern — using pages for smaller screens and having the “pages” side-by-side in columns for larger screens — will be explored later in the book.
Yet another approach for taking advantage of larger screen sizes is to always show a full-size master and a full-size detail — perhaps using different activities — but to use a grid rather than a list for the master. This works well when the data being shown in the grid can be represented as “cards”, often dominated by some photo or other image.
The basic approach is to use fewer grid columns (e.g., 1 or 2) on smaller screen sizes
and more grid columns (e.g., 3 or 4) on larger screen sizes. This way, the application
flow is identical across screen sizes, yet the screen usage on larger screens is
more effective. This is particularly true if you use on of the “staggered” grid widgets
available from third parties, like
Etsy’s AndroidStaggeredGrid
or Maurycy Wojtowicz’s StaggeredGridView:

Figure 339: StaggeredGridView Demo (image courtesy of Maurycy Wojtowicz)
Here are some other common questions about the use of fragments in support of large screen sizes:
In a word, no.
UI constructs that do not change based on screen size, configurations, and the like could simply be defined in the activity itself. For example, the activity can add items to the action bar that should be there regardless of what fragments are shown.
While fragments are useful, they do not solve all problems. Few games will use fragments for the core of game play, for example. Applications with other forms of specialized user interfaces — painting apps, photo editors, etc. – may also be better served by eschewing fragments for those specific activities and doing something else.
That “something else” might start with custom layouts for the different sizes and
orientations. At runtime, you can determine what you need either by inspecting
what you got from the layout, or by using Configuration and DisplayMetrics
objects to determine what the device capabilities are (e.g., screen size).
The activity would then need to have its own code for handling whatever you
want to do differently based on screen size (e.g., offering a larger painting
canvas plus more on-screen tool palettes).
Much of the focus on “larger-screen devices” has been on tablets, because,
as of the time of this writing, they are the most popular “larger-screen devices”
in use. However, there are plenty of scenarios involving Android on TV to consider.
A TV or other external display will presents itself
as a -large (720p) or -xlarge (1080p) screen. Fragments can certainly help
with displaying a UI for a TV, but there are other design considerations
to take into account, based upon the fact that the user sits much further
from a TV than they do from a phone or tablet (so-called “10-foot user experience”).
This is covered in greater detail later in the book.
Even if we take the “tablet = several phones” design approach, the size of the “phone” will vary, depending on the size of the tablet. Plus, there are real actual phones, and those too vary in size. Hence, our fragments (or activities hosting their own UI directly) need to take into account micro fluctuations in size, as well as the macro ones.
Screen density is also something that affects us tactically. It is rare that an application will make wholesale UI changes based upon whether the screen is 160dpi or 240dpi or 320dpi or something else. However, changes in density can certainly impact the sizes of things, like images, that are intrinsically tied to pixel sizes. So, we need to take density into account as we are crafting our fragments to work well in a small range of sizes.
As a unit of measure, the pixel (px) is a poor choice, because its size
varies by density. Two phones might have very similar screen sizes but
radically different densities. Anything specified in terms of pixels will be
smaller on the higher-density device, and typically you would want them to
be about the same size. For example, a Button should not magically shrink
for a ~4” phone just because the phone happens to have a much higher screen
density than some other phone.
The best answer is to avoid specifying concrete sizes where possible. This
is why you tend to see containers, and some widgets, use
match_parent and wrap_content for their size — those automatically adjust
based upon device characteristics.
Some places, though, you have to specify a more concrete size, such as with padding or margins. For these, you have two major groups of units of measure to work with:
dp or dip), which try to size
each dp to be about 1/160 of an inch. These also include scaled pixels (sp),
which scales the size based upon the default font size on the device — sp
is often used with TextView (and subclasses) for android:textSize
attributes.mm (millimeters), in
(inches), and pt (points = 1/72 of an inch).Any of those tends to be better than px. Which you choose will depend on
which you and your graphics designer are more comfortable with.
If you find that there are cases where the dimensions you want to use
vary more widely than the automatic calculations from these density-aware
units of measure, you can use dimension resources. Create a dimens.xml file
in res/values/ and related resource sets, and put in there <dimen> elements
that give a dimension a name and a size. In addition to perhaps making things
a bit more DRY (“don’t repeat yourself”), you can perhaps create different
values of those dimensions for different screen sizes, densities, or other cases
as needed.
Web designers need to deal with the fact that the user might resize their browser window. The approaches to deal with this are called “fluid” designs.
Similarly, Android developers need to create “fluid” layouts for fragments,
rows in a ListView, and so on, to deal with similar minor fluctuations
in size.
Each of “The Big Three” container classes has its approach for dealing with this:
android:layout_weight with LinearLayout to allocate extra spaceandroid:stretchColumns and android:shrinkColumns with TableLayout
to determine which columns should absorb extra space and which columns should
be forcibly “shrunk” to yield space for other columns if we lack sufficient
horizontal roomRelativeLayout to anchor widgets as needed to
other widgets or the boundaries of the container, such that extra room flows
naturally wherever the rules call forImages, particularly those used as backgrounds, will need to be resized to take everything into account:
TextView)Android supports what is known as the “nine-patch” PNG format, where resizing information is held in the PNG itself. This is typically used for things like rounded rectangles, to tell Android to stretch the straight portions of the rectangle but to not stretch the corners. Nine-patch PNG files will be examined in greater detail in a later chapter of this book.
The ShapeDrawable XML drawable resource uses an ever-so-tiny subset of
SVG (Scalable Vector Graphics) to create a vector art definition of an
image. Once again, this tends to be used for rectangles and rounded
rectangles, particularly those with a gradient fill. Since Android interprets
the vector art definition at runtime, it can create a smooth gradient,
interpolating all intervening colors from start to finish. Stretching a PNG
file — even a nine-patch PNG file — tends to result in “banding effects”
on the gradients. ShapeDrawable is also covered later in this book.
Third-party libraries can also help. The svg-android
project supplies a JAR that handles more SVG capabilities than does
ShapeDrawable, though it too does not cover the entire SVG specification.
Also, WebView has some ability to view SVG files on Android 3.0+.
Sometimes, though, there is no substitute for your traditional bitmap image.
Icons and related artwork are not necessarily going to be stretched at
runtime, but they are still dependent upon screen density. A 80x80 pixel image
may look great on a Samsung Galaxy Nexus or other -xhdpi device, coming
in at around a quarter-inch on a side. However, when viewed on a -mdpi device, that
same icon will be a half-inch on a side, which may be entirely too large.
The best answer is to create multiple renditions of the icon at different
densities, putting each icon in the appropriate drawable resource
directory (e.g., res/drawable-mdpi, res/drawable-hdpi). This is what
Android Asset Studio did for us in the tutorials, creating launcher icons
from some supplied artwork for all four densities. Even better is to create
icons tailored for each density — rather than just reducing the pixel count,
take steps to draw an icon that will still make sense to the user at the lower
pixel count, exaggerating key design features and dropping other stuff off.
Google’s Kiril Grouchnikov has
an excellent blog post on this aspect
However, Android will let you cheat.
If you supply only some densities, but your app runs on a device with a different
density, Android will automatically resample your icons to try to generate
one with the right density, to keep things the same size. On the plus side,
this saves you work — perhaps you only ship an -xhdpi icon and let Android
do the rest. And it can reduce your APK size by a bit. However, there are costs:
There are other things you should consider when designing your app to work on multiple screen sizes, beyond what is covered above.
It is easy to think of screen size issues as being “phones versus tablets”.
However, not only do tablets come in varying sizes (5” Samsung Galaxy Note to
a bunch of 10.1" tablets), but phones come in varying sizes. Those that
have less than a 3” diagonal screen size will be categorized as -small screen
devices, and you can have different layouts for those.
Getting things to work on small screens is sometimes more difficult than moving
from normal to larger screens, simply because you lack sufficient room. You can
only shrink widgets so far before they become unreadable or “untappable”.
You may need to more aggressively use ScrollView to allow your widgets to have
more room, but requiring the user to pan through your whole fragment’s worth
of UI. Or, you may need to divide your app into more fragments than you
originally anticipated, and use more activities or other tricks to allow the user
to navigate the fragments individually on small-screen devices, while stitching
them together into larger blocks for larger phones.
Android runs in lots of different resolutions.
Lots and lots of different resolutions.
Trying to create artwork for each and every resolution in use today will be tedious and fragile, the latter because new resolutions pop up every so often, ones you may not be aware of.
Hence, try to design your app to avoid some sort of full-screen background, where you are expecting the artwork to perfectly fit the screen. Either:
For most conventional apps, just using the background from your stock theme will typically suffice. This problem is much bigger for 2D games, which tend to rely upon backgrounds as a game surface.
There are two elements you can add to your manifest that impact how your application will behave with respect to screen sizes.
<compatible-screens> serves as an advertisement of your capabilities, to
the Google Play Store and similar “markets”. You can have a <compatible-screens>
element with one or more child <screen> elements — each <screen> enumerates
a combination of screen size and screen density that you support:
<compatible-screens>
    <!-- all possible normal size screens -->
    <screen android:screenSize="normal" android:screenDensity="ldpi" />
    <screen android:screenSize="normal" android:screenDensity="mdpi" />
    <screen android:screenSize="normal" android:screenDensity="hdpi" />
    <screen android:screenSize="normal" android:screenDensity="xhdpi" />
    <!-- all possible large size screens -->
    <screen android:screenSize="large" android:screenDensity="ldpi" />
    <screen android:screenSize="large" android:screenDensity="mdpi" />
    <screen android:screenSize="large" android:screenDensity="hdpi" />
    <screen android:screenSize="large" android:screenDensity="xhdpi" />
</compatible-screens>
The Google Play Store will filter your app, so it will not show up on devices
that have screens that do not meet one of your <screen> elements.
However, new densities show up every year or so, and devices running those
densities will not be supported by your <compatible-screens> element
unless you add the appropriate <screen> element for that density. For example,
the above <compatible-screens> element does not cover tvdpi or
xxhdpi devices. As a result, Google discourages the use of
<compatible-screens>.
There is also a <supports-screens> element, as we saw when we set up our
initial project in the tutorials. Here, you indicate what screen sizes you
support, akin to <compatible-screens> (minus any density declarations).
And, the Google Play Store will filter your app, so it will not show up
on devices that have screens smaller than what you support.
So, for example, suppose that you have a <supports-screens> element like this:
<supports-screens android:smallScreens="false"
                  android:normalScreens="true"
                  android:largeScreens="true"
                  android:xlargeScreens="false"
/>
You will not show up in the Google Play Store for any -small screen
devices. However, you will show up in the Google Play Store for any
-xlarge screen devices — Android will merely apply some runtime logic to
try to help your app run well on such screens. So, while <compatible-screens>
is purely a filter, <supports-screens> is a filter for smaller-than-supported
screens, and a runtime “give me a hand!” flag for larger-than-supported screens.
-tvdpi — around 213dpi — was added for Android TV, and is the density used for
720p Android TV devices. However, Google also elected to use -tvdpi for the
Nexus 7 tablet. However, not even Google bothered to create many -tvdpi-specific
resources, allowing the OS to downsample from the -hdpi edition.
-xxhdpi was added in late 2012 and is for devices with a screen density around
480dpi. While Android can
up-sample an -xhdpi image for -xxhdpi, the results may not be as crisp as you
would like. Hence, you may wish to consider creating -xxhdpi as your “top tier”
density, so other devices can downsample if needed. At the time of this writing,
about 15% of Play Store-equipped Android devices are -xxhdpi.
-xxxhdpi is for devices with screens around 640dpi. At the time of this writing
-xxxhdpi is not in significant use.