Figure 251: Tablets vs. Handsets (image courtesy of Android Open Source Project)
Fragments are an optional layer you can put between your activities and your widgets, designed to help you reconfigure your activities to support screens both large (e.g., tablets) and small (e.g., phones).
This chapter will cover basic uses of fragments.
In the world of journalism, the basics of any news story consist of six questions, the Five Ws and One H. Here, we will apply those six questions to help frame what we are talking about with respect to fragments.
Fragments are not activities, though they can be used by activities.
Fragments are not containers (i.e., subclasses of ViewGroup), though typically
they create a ViewGroup.
Rather, you should think of fragments as being units of UI reuse. You define a fragment, much like you might define an activity, with layouts and lifecycle methods and so on. However, you can then host that fragment in one or several activities, as needed.
Android does not precisely implement UI architectures like Model-View-Controller (MVC), Model-View-Presenter (MVP), Model-View-ViewModel (MVVM), etc. To the extent that you wish to shove Android into the MVC architecture, fragments and activities combine to be the controller layer. Fragments serve as a local controller, focused on their set of widgets, populating them from model data, and handling their events. Activities will serve as more of an orchestration layer, handling cross-fragment communications (e.g., a click in Fragment A needs to cause a change in what is displayed in Fragment B).
Functionally, fragments are Java classes, extending from a base Fragment class.
As we will see, there are two versions of the Fragment class, one native
to API Level 11 and one supplied by the Android Support package.
Since fragments are Java classes, your fragments will reside in one of your application’s Java packages. The simplest approach is to put them in the same Java package that you used for your project overall and where your activities reside, though you can refactor your UI logic into other packages if needed.
Typically, you create fragment implementations yourself, then tell Android when to use them. Some third-party Android library projects may ship fragment implementations that you can reuse, if you so choose.
Some developers start adding fragments from close to the outset of application development — that is the approach we will take in the tutorials. And, if you are starting a new application from scratch, defining fragments early on is probably a good idea. That being said, it is entirely possible to “retrofit” an existing Android application to use fragments, though this may be a lot of work. And, it is entirely possible to create Android applications without fragments at all.
Fragments were introduced with Android 3.0 (API Level 11, a.k.a., Honeycomb).
Ah, this is the big question. If we have managed to make it this far through the book without fragments, and we do not necessarily need fragments to create Android applications, what is the point? Why would we bother?
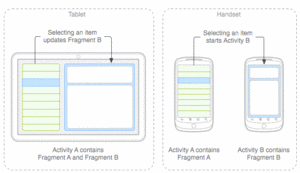
The primary rationale for fragments was to make it easier to support multiple screen sizes.
Android started out supporting phones. Phones may vary in size, from tiny ones with less than 3” diagonal screen size (e.g., Sony Ericsson X10 mini), to monsters that are over 5” (e.g., Samsung Galaxy Note). However, those variations in screen size pale in comparison to the differences between phones and tablets, or phones and TVs.
Some applications will simply expand to fill larger screen sizes. Many games will take this approach, simply providing the user with bigger interactive elements, bigger game boards, etc. Any one of the ever-popular Angry Birds game series, when played on an tablet, gives you bigger birds and bigger pigs, not a phone-sized game area surrounded by ad banners.
However, another design approach is to consider a tablet screen to really be a collection of phone screens, side by side.
Figure 251: Tablets vs. Handsets (image courtesy of Android Open Source Project)
The user can access all of that functionality at once on a tablet, whereas they would have to flip back and forth between separate screens on a phone.
For applications that can fit this design pattern, fragments allow you to support phones and tablets from one code base. The fragments can be used by individual activities on a phone, or they can be stitched together by a single activity for a tablet.
Details on using fragments to support large screen sizes is a topic for a later chapter in this book. This chapter is focused on the basic mechanics of setting up and using fragments.
Well, answering that question is what the rest of this chapter is for, plus coverage of more advanced uses of fragments elsewhere in this book.
Most developers will use the implementation of fragments that has been part
of Android since API Level 11. You will use android.app.Fragment and have them
be hosted by your regular activities.
However, there is a backport of the fragment system available in the Android
Support package. This works back to API Level 4, so if your minSdkVersion is
lower than 11 and you want to use fragments, the backport is something that
you will wish to consider. You will need to add the support-v4 JAR to your
project (e.g., via compile 'com.android.support:support-v4:...' in your
dependencies in build.gradle, for some value of ...).
You will also need to use
android.support.v4.app.Fragment instead of android.app.Fragment. Also, you will
need to host those fragments in an activity inheriting from
android.support.v4.app.FragmentActivity (as the regular android.app.Activity
base class does not know about fragments prior to API Level 11).
This book focuses mostly on using the native API Level 11 implementation of fragments, with the occasional example of using the backport where the backport is necessary for one reason or another.
In many ways, it is easier to explain fragments by looking at an implementation,
more so than trying to discuss them as abstract concepts. So, in this section,
we will take a look at
the Fragments/Static
sample project. This is a near-clone of the
Activities/Lifecycle
sample project from the previous chapter. However,
we have converted the launcher activity from one that will host widgets directly
itself to one that will host a fragment, which in turn manages widgets.
Our fragment is going to manage our UI, so we have a res/layout/mainfrag.xml
layout file containing our Button:
<?xml version="1.0" encoding="utf-8"?>
<Button xmlns:android="http://schemas.android.com/apk/res/android"
  android:id="@+id/showOther"
  android:layout_width="match_parent"
  android:layout_height="match_parent"
  android:text="@string/hello"
  android:textSize="20sp"/>
Note, though, that we do not use the android:onClick attribute. We will explain
why we dropped that attribute from the previous editions of this sample shortly.
The project has a ContentFragment class that will use this layout and handle
the Button.
As with activities, there is no constructor on a typical Fragment subclass.
The primary method you override, though, is not onCreate() (though, as we
will see later in this chapter, that is possible). Instead, the primary method
to override is onCreateView(), which is responsible for returning the
UI to be displayed for this fragment:
  @Override
  public View onCreateView(LayoutInflater inflater,
                           ViewGroup container,
                           Bundle savedInstanceState) {
    View result=inflater.inflate(R.layout.mainfrag, container, false);

    result.findViewById(R.id.showOther).setOnClickListener(this);

    return(result);
  }
We are passed a LayoutInflater that we can use for inflating a layout file,
the ViewGroup that will eventually hold anything we inflate, and the
Bundle that was passed to the activity’s onCreate() method.
While we are used to framework classes loading our layout resources for us,
we can “inflate” a layout resource at any time using a LayoutInflater. This
process reads in the XML, parses it, walks the element tree, creates Java objects
for each of the elements, and stitches the results together into a parent-child
relationship.
Here, we inflate res/layout/mainfrag.xml, telling Android that its contents
will eventually go into the ViewGroup but not to add it right away. While
there are simpler flavors of the inflate() method on LayoutInflater, this
one is required in case the ViewGroup happens to be a RelativeLayout, so
we can process all of the positioning and sizing rules appropriately.
We also use findViewById() to find our Button widget and tell it that
we, the fragment, are its OnClickListener. ContentFragment must then
implement the View.OnClickListener interface to make this work. We do this
instead of android:onClick to route the Button click events to the fragment,
not the activity.
Since we implement the View.OnClickListener interface, we need the corresponding
onClick() method implementation:
  @Override
  public void onClick(View v) {
    ((StaticFragmentsDemoActivity)getActivity()).showOther(v);
  }
Any fragment can call getActivity() to find the activity that hosts it. In
our case, the only activity that will possibly host this fragment is
StaticFragmentsDemoActivity, so we can cast the result of getActivity() to
StaticFragmentsDemoActivity, so that we can call methods on our activity. In
particular, we are telling the activity to show the other activity, by means
of calling the showOther() method that we saw in the original
Activities/Lifecycle sample (and will see again shortly).
That is really all that is needed for this fragment. However, ContentFragment
also overrides many other fragment lifecycle methods, and we will examine these
later in this chapter.
Originally, the res/layout/main.xml used by the activity was where we had our
Button widget. Now, the Button is handled by the fragment. Instead, our
activity layout needs to account for the fragment itself.
In this sample, we are going to use a static fragment. Static fragments are
easy to add to your application: just use the <fragment> element in a layout
file, such as our revised res/layout/main.xml:
<?xml version="1.0" encoding="utf-8"?>
<fragment xmlns:android="http://schemas.android.com/apk/res/android"
  android:layout_width="match_parent"
  android:layout_height="match_parent"
  android:name="com.commonsware.android.sfrag.ContentFragment"/>
Here, we are declaring our UI to be completely comprised of one fragment,
whose implementation (com.commonsware.android.sfrag.ContentFragment) is
identified by the android:name attribute on the <fragment> element. Instead
of android:name, you can use class, though most of the Android documentation
has now switched over to android:name.
Android Studio users can drag a fragment out of the “Custom” section of the
graphical layout editor tool palette, if desired, rather than setting up the <fragment> element
directly in the XML.
StaticFragmentsDemoActivity — our new launcher activity — looks identical
to the previous version, with the exception of the class name:
package com.commonsware.android.sfrag;

import android.content.Intent;
import android.os.Bundle;
import android.view.View;

public class StaticFragmentsDemoActivity extends
    LifecycleLoggingActivity {
  @Override
  public void onCreate(Bundle savedInstanceState) {
    super.onCreate(savedInstanceState);
    setContentView(R.layout.main);
  }

  public void showOther(View v) {
    Intent other=new Intent(this, OtherActivity.class);

    other.putExtra(OtherActivity.EXTRA_MESSAGE,
                   getString(R.string.other));
    startActivity(other);
  }
}
Since the res/layout/main.xml file has the <fragment> element, the fragment
is simply loaded into position in the call to setContentView().
Fragments have lifecycle methods, just like activities do. In fact, they support most of the same lifecycle methods as activities:
onCreate()onStart() (but not onRestart())onResume()onPause()onStop()onDestroy()By and large, the same rules apply for fragments as do for activities with
respect to these lifecycle methods (e.g., onDestroy() may not be called).
In addition to those and the onCreateView() method we examined earlier in
this chapter, there are four other lifecycle methods that you can elect to
override if you so choose.
onAttach() will be called first, even before onCreate(), letting you know
that your fragment has been attached to an activity. You are passed the
Activity that will host your fragment.
onViewCreated() will be called after onCreateView(). This is particularly
useful if you are inheriting the onCreateView() implementation but need
to configure the resulting views, such as with a ListFragment and needing
to set up an adapter.
onActivityCreated() will be called after onCreate() and onCreateView(),
to indicate that the activity’s onCreate() has completed. If there is something
that you need to initialize in your fragment that depends upon the activity’s
onCreate() having completed its work, you can use onActivityCreated() for
that initialization work.
onDestroyView() is called before onDestroy(). This is the counterpart to
onCreateView() where you set up your UI. If there are things that you need
to clean up specific to your UI, you might put that logic in onDestroyView().
onDetach() is called after onDestroy(), to let you know that your fragment
has been disassociated from its hosting activity.
If you set your project to have a compileSdkVersion of 23 or higher,
and you attempt to override onAttach(), you may get a deprecation warning:
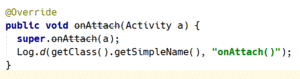
Figure 252: Android Studio, Showing Deprecated onAttach()
That is because there are two versions of onAttach() (and onDetach())
starting with API Level 23. One takes an Activity as a parameter, and
the other takes a Context as a parameter.
The roles of onAttach() and onDetach() are the same with either parameter:
let you know when the fragment has been attached to or detached from its
host. However, now, the host could be anything that extends Context,
not merely an Activity.
On API Level 22 and below, though, only the Activity flavor of onAttach()
and onDetach() exists. This leads to a conundrum, as you try to determine
exactly how to handle this for your app.
On the whole, if your minSdkVersion is below 23, overriding just
onAttach(Activity) is your best route. It will work on all Android
devices that support fragments. Overriding only onAttach(Context) will
not work, as older devices will ignore it (despite Activity being
a subclass of Context). You could override both methods, but on API
Level 23+ devices, both flavors will be called, which may or may not
be a good idea for your Fragment subclass.
Static fragments are fairly simple, once you have the Fragment implementation:
just add the <fragment> element to where you want to have the fragment appear
in your activity’s layout.
That simplicity, though, does come with some costs. We will review some of those limitations in the next chapter.
Those limitations can be overcome by the use of dynamic fragments. Rather than
indicating to Android that you wish to use a fragment by means of a <fragment>
element in a layout, you will use a FragmentTransaction to add a fragment at
runtime from your Java code.
With that in mind, take a look at the
Fragments/Dynamic
sample project.
This is the same project as the one for static fragments, except this time
we will adjust OtherActivity to use a dynamic fragment, specifically a
ListFragment.
ListFragment serves the same role for fragments as ListActivity does for
activities. It wraps up a ListView for convenient use. So, to have a more
interesting OtherActivity, we start with an OtherFragment that is a
ListFragment, designed to show our favorite 25 Latin words as seen in
previous examples.
Just as a ListActivity does not need to call setContentView(), a
ListFragment does not need to override onCreateView(). By default, the
entire fragment will be comprised of a single ListView. And just as ListActivity
has a setListAdapter() method to associate an Adapter with the ListView,
so too does ListFragment:
package com.commonsware.android.dfrag;

import android.app.Activity;
import android.app.ListFragment;
import android.os.Bundle;
import android.util.Log;
import android.view.View;
import android.widget.ArrayAdapter;

public class OtherFragment extends ListFragment {
  private static final String[] items= { "lorem", "ipsum", "dolor",
      "sit", "amet", "consectetuer", "adipiscing", "elit", "morbi",
      "vel", "ligula", "vitae", "arcu", "aliquet", "mollis", "etiam",
      "vel", "erat", "placerat", "ante", "porttitor", "sodales",
      "pellentesque", "augue", "purus" };

  @Override
  public void onViewCreated(View view, Bundle savedInstanceState) {
    super.onViewCreated(view, savedInstanceState);

    setListAdapter(new ArrayAdapter<String>(getActivity(),
                    android.R.layout.simple_list_item_1, items));
  }
We call setListAdapter() in onViewCreated(), as we know that the
ListView is now ready for use.
This class also overrides many fragment lifecycle methods, logging their results,
akin to our other Fragment and LifecycleLoggingActivity.
Now, OtherActivity no longer needs to load a layout — we have removed
res/layout/other.xml from the project entirely. Instead, we will use a
FragmentTransaction to add our fragment to the UI:
package com.commonsware.android.dfrag;

import android.os.Bundle;

public class OtherActivity extends LifecycleLoggingActivity {
  @Override
  public void onCreate(Bundle savedInstanceState) {
    super.onCreate(savedInstanceState);

    if (getFragmentManager().findFragmentById(android.R.id.content) == null) {
      getFragmentManager().beginTransaction()
                          .add(android.R.id.content,
                               new OtherFragment()).commit();
    }
  }
}
To work with a FragmentTransaction, you need the FragmentManager. This object
knows about all of the fragments that exist in your activity. If you are using
the native API Level 11 edition of fragments, you can get your FragmentManager
by calling getFragmentManager(). If you are using the Android Support package,
you need to call getSupportFragmentManager() instead.
Given a FragmentManager, you can start a FragmentTransaction by calling
beginTransaction(), which returns the FragmentTransaction object.
FragmentTransaction operates on the builder pattern, so most methods on
FragmentTransaction return the FragmentTransaction itself, so you can chain a
series of method calls one after the next.
We call two methods on our FragmentTransaction: add() and commit(). The add()
method, as you might guess, indicates that we want to add a fragment to the
UI. We supply the actual fragment object, in this case by creating a new
OtherFragment. We also need to indicate where in our layout we want this
fragment to reside. Had we loaded a layout, we could drop this fragment in
any desired container. In our case, since we did not load a layout, we supply
android.R.id.content as the ID of the container to hold our fragment’s
View. Here, android.R.id.content identifies the container into which the
results of setContentView() would go — it is a container supplied by
Activity itself and serves as the top-most container for our content.
Just calling add() is insufficient. We then need to call commit() to make
the transaction actually happen.
You might be wondering why we are trying to find a fragment in our
FragmentManager before actually creating the fragment. We do that to help deal with
configuration changes, and we will be exploring that further
in the next chapter.
Fragments can add items to the action bar by calling setHasOptionsMenu(true) from
onCreate() (or any other early lifecycle method). This indicates to the
activity that it needs to call onCreateOptionsMenu() and onOptionsItemSelected()
on the fragment.
The
Fragments/ActionBarNative
sample application demonstrates this. This has the same functionality as does the
ActionBar/ActionBarDemoNative sample from the chapter on the action bar,
just with the activity converted into a dynamic fragment.
In onCreate(), we call setHasOptionsMenu(true), to indicate that we are interested
in participating in the action bar:
  @Override
  public void onCreate(Bundle savedInstanceState) {
    super.onCreate(savedInstanceState);

    setRetainInstance(true);
    setHasOptionsMenu(true);
  }
(we will discuss that setRetainInstance(true) call in a later chapter)
That will trigger our fragment’s onCreateOptionsMenu() and onOptionsItemSelected()
methods to be called at the appropriate time:
  @Override
  public void onCreateOptionsMenu(Menu menu, MenuInflater inflater) {
    inflater.inflate(R.menu.actions, menu);

    super.onCreateOptionsMenu(menu, inflater);
  }

  @Override
  public boolean onOptionsItemSelected(MenuItem item) {
    switch(item.getItemId()) {
      case R.id.add:
        addWord();

        return(true);

      case R.id.reset:
        initAdapter();

        return(true);
    }

    return(super.onOptionsItemSelected(item));
  }
Here, we initialize our action bar from the R.menu.actions menu XML resource,
along with the logic to respond to the add and reset action bar items.
Our activity does not need to do anything special to allow the fragment to contribute to the action bar — it just sets up the dynamic fragment:
package com.commonsware.android.abf;

import android.app.Activity;
import android.os.Bundle;

public class ActionBarFragmentActivity extends Activity {
  @Override
  public void onCreate(Bundle savedInstanceState) {
    super.onCreate(savedInstanceState);

    if (getFragmentManager().findFragmentById(android.R.id.content) == null) {
      getFragmentManager().beginTransaction()
                          .add(android.R.id.content,
                               new ActionBarFragment()).commit();
    }
  }
}
Historically, one major limitation with fragments is that they could not contain
other fragments.
In most cases, this does not pose a major problem. However, there will be times
when you might trip over this limitation, such as when using a ViewPager, as
will be described in a later chapter.
Android 4.2 — and the Android Support package –
added support for nested fragments. Whereas an activity
works with fragments via a FragmentManager obtained via getFragmentManager()
or getSupportFragmentManager(), fragments can work with nested fragments
via a call to getChildFragmentManager().
However, Android 3.0 through 4.1 have a version of fragments that does not
have getChildFragmentManager(). Hence, you have two options:
We will see how getChildFragmentManager() works in
the chapter on ViewPager.
A fragment should handle functionality purely within the fragment itself. Anything
outside the fragment should be the responsibility of the calling activity. For
example, if the user taps on an item in a ListFragment, and the effects of that
event might go beyond what is inside the ListFragment itself, the ListFragment
should forward the event to the hosting activity, so it can perhaps perform
additional steps (e.g., launch an activity, update another fragment hosted by
the activity).
As we will see in a later chapter, it is entirely possible — perhaps even likely — that some of our fragments will be hosted by multiple different activities. For example, we might have a fragment that is hosted in one case by an activity designed for larger screens (e.g., tablets) and in another case by an activity designed for smaller screens (e.g., phones).
In these cases, the fragment does not know at compile time which activity class will be hosting it at runtime. For those cases, you have three major options:
getActivity() to that interface, so it can call
methods on the hosting activity without knowing its exact implementation.We will see much more on this subject when we get into large-screen strategies in a later chapter.