
Figure 450: Split-Screen Mode on Nexus 9
From the standpoint of users, the most visible new capability in Android 7.0 is multi-window support. Now, the user can be working with more than one Android activity at a time, whether from separate apps or — with the assistance of the app — from the same app. This is akin to the proprietary implementations seen in devices from Samsung, LG, Jide, and other manufacturers.
The good news — more or less — is that support for multi-window is automatic. You do not need to change anything in your Android app to have your app moved into a portion of the screen, instead of taking up the full screen.
However, you may want to tweak your app to behave better in a multi-window environment.
Understanding this chapter requires you to have read the core chapters of the book.
In the beginning, we were happy to have just one app on the screen at a time.
However, as phones got larger, there was increasing interest in having more than one app visible at a time. Some manufacturers handled this via their own “small apps”, such as floating calculator windows.
However, some, such as Samsung and LG, added support for split-screen dual-window environments, where two apps could be run side-by-side. These were proprietary extensions to Android that developers had to opt into.
Other manufacturers, such as Jide, set up alternative versions of Android (e.g., Jide’s Remix OS) that supported windows akin to desktop operating systems, with an arbitrary number of overlapping windows. These too were proprietary extensions, unique to those environments.
With Android 7.0, these sorts of capabilities are now part of the core OS, with standardized ways for developers to work with them.
For most Android devices, the user experience will be what is known as the split-screen view:
Figure 450: Split-Screen Mode on Nexus 9
The user can enter split-screen mode by long-pressing on the OVERVIEW button (the one that brings up the recent tasks). The existing foreground activity will be put in one pane, with the overview screen in the other pane, where the user can choose another app.
If the user rotates the screen, the split-screen remains, still splitting along the long axis:
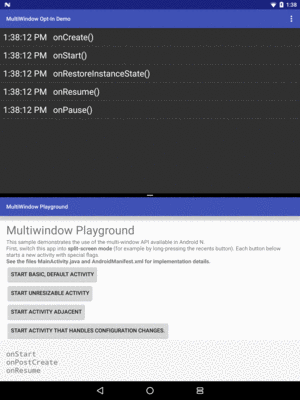
Figure 451: Split-Screen Mode on Nexus 9, Portrait Mode
The divider is movable between three positions, to either equally split the space (default) or to give one pane or the other about two-thirds of the space:
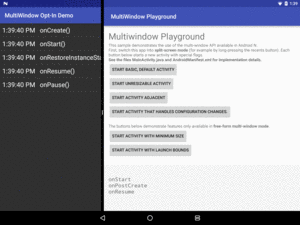
Figure 452: Split-Screen Mode on Nexus 9, After Moving Divider
Android TV devices support a “picture-in-picture” mode instead, where one activity is in a small floating window, overlaying the other activity.
The documentation also describes a “freeform” mode, where Android behaves like a desktop OS with overlapping fully-resizable windows. At the time this paragraph was written (October 2016), no production devices officially support freeform multi-window, though power users have a way of enabling it.
From your activity’s standpoint, the fact that it once used most of the screen, and now is only smaller part of a screen, is just a configuration change, no different than orientation changes or other screen size changes (e.g., putting the device in a dock that provides a larger screen).
Whatever activity the user tapped on last is considered to be the foreground activity. Other activities that are visible, such as the activity in the adjacent split-screen pane, will be paused. This is in line with the way Android has always worked:
You will want to think through what business logic of your activities
belongs in onStart()/onStop() and what belongs in onResume()/onPause().
Historically, since being visible but not in the foreground was an uncommon,
short-lived state, we did not necessarily have to worry that much about
the distinction between “paused” and “stopped”. Now the distinction takes
on much greater importance.
In split-screen mode, if the user moves the divider, your activity initially will be simply redrawn to adopt the extra space. Once the user lets go of the divider, and it settles on its final position, your activity may undergo a configuration change. Whether you undergo a configuration change seems somewhat random. With luck, this will be more predictable in the future.
If needed, activities and fragments can find out what is going on with respect to multi-window behavior:
isInMultiWindowMode() to find out if they are in multi-window
mode presently… in theoryonMultiWindowModeChanged() to find out if the multi-window
state changesThere are also variants of these for picture-in-picture mode for Android
TV: isInPictureInPictureMode() and onPictureInPictureModeChanged(). However,
picture-in-picture mode is a particular case of multi-window mode. For example,
if isInPictureInPictureMode() returns true, so will isInMultiWindowMode().
However, isInMultiWindowMode() is unreliable,
apparently by design. Ideally, avoid doing anything specific for when
you are in multi-window mode or not.
For various reasons, you may not want your activity to be eligible to be used in some form of multi-window mode. This may disappoint your users, but you may have valid reasons for this decision.
If your targetSdkVersion is N (or whatever that turns into, probably 24,
when Android 7.0 ships in final form), you can have an
android:resizableActivity="false" attribute on a specific <activity>
element or on the <application> element in your manifest. This
will tell Android to always give you the full screen, even if the user tries
launch your activity into some form of multi-window mode.
If your targetSdkVersion is 23 or lower, whether you support
multi-window mode is determined by the android:screenOrientation
attribute (on an <activity> or inherited from the <application>).
A fixed-orientation activity — such as one that is locked to landscape –
will not be put into multi-window mode.
Note that if your targetSdkVersion is 23 or lower, and you support
any orientation (e.g., you do not have android:screenOrientation),
Android will allow the user to use your activity in multi-window mode.
However, a Toast will appear, advising the user that your activity
is not designed for multi-window mode and there may be compatibility issues.
However, this will serve as a note to users that your app is out of
date with respect to newer versions of Android, which may not be in
your best interests.
As noted, Android will allow your activity to be put in multi-window mode by default.
To avoid the aforementioned warning Toast, set your targetSdkVersion
to N. Optionally, you can explicitly have android:resizableActivity="true"
in the manifest, though this is the default.
Note that not all activities need to support multi-window mode. For example,
you might have some general activities that are fine in multi-window
mode, plus a video player that really should be full-screen in landscape.
You might put android:resizableActivity="false" on that latter activity,
plus have android:resizableActivity="true" on the <application> element
(for documentation purposes).
If, for some reason, regular multi-window modes are fine, but picture-in-picture
will be a problem, you can have android:supportsPictureInPicture="false"
on an <activity>.
You can add a <layout> element as a child to your <activity> element,
to control aspects of how the activity appears on the screen in multi-window
mode.
The only facet of <layout> that we can use today is the minimal
size, represented by android:minWidth and android:minHeight
attributes.
These indicates how small you are willing to have your activity be
in the stated direction. If the user moves the divider, and the resulting size of
your activity is smaller than your requested minimal size, your activity
will appear to extend “under” the other pane.
For example, the
MultiWindow/OptIn
sample application has its minimal width set to 3 inches (480dp):
  <application
    android:allowBackup="false"
    android:icon="@drawable/ic_launcher"
    android:label="@string/app_name"
    android:resizeableActivity="true"
    android:theme="@style/Theme.Apptheme">
    <activity
      android:name="MainActivity">
      <intent-filter>
        <action android:name="android.intent.action.MAIN" />

        <category android:name="android.intent.category.LAUNCHER" />
      </intent-filter>
      <layout android:minWidth="480dp" />
    </activity>
  </application>

</manifest>
When positioned on the left of the split-screen, with a size less than 3 inches, the activity “extends beneath” the right pane:
Figure 453: 3-Inch Minimum Size on Left of Split-Screen
The OptIn sample app has a ListView showing the events received
in the lifetime of this activity instance, so you can see the effect
of tapping on one activity versus the other in the split-screen mode.
Also, the other activity shown in these screenshots is Google’s official multi-window sample app.
For freeform multi-window mode, you also have:
android:defaultWidth and android:defaultHeight, to supply a suggested
size for your window (as a dimension or as a fraction of the screen size), andandroid:gravity, which works like the equivalent widget attribute,
suggesting where on the screen your window should be openedSince resizing an activity in multi-window mode may cause a configuration change, it is very important for you to handle configuration changes quickly:
Bundle, use the saved
instance state Bundle, so that your new activity (and fragments) can
not only rapidly handle these configuration changes but also handle
other scenarios, such as your process being terminated while in the
background.Bundle, use
a retained fragment or a process-level cache. Be careful with the latter
technique, though, so that you do not consume too much heap space.What you want to avoid, if at all possible, is having to do I/O of any form due to a configuration change.
In addition, while the user is resizing your activity, it is simply being redrawn using its current UI, pending completion of the resize (at which point, a configuration change may occur). The more work you do to render the UI, the more work that needs to be done to redraw the UI while the user is resizing, and the more likely that it is that the user will perceive some jank. Possible problem areas include:
In a pinch, you can optimize certain configuration changes, overriding
the default activity destroy-and-recreate cycle, via android:configChanges.
On the plus side, you can try to make fine-grained changes to your UI
and react more responsively. However, this is an optimization, not a
replacement for proper state management (e.g., saved instance state
Bundle), as state management is for more than configuration changes.
If you wish to use android:configChanges to opt out of automatic handling
of certain configuration changes, the ones of relevance for multi-window are:
screenSizesmallestScreenSizescreenLayoutorientationIf you have not used this technique before, you can read more about it in the chapter on configuration changes.
While the user is resizing the window, Android does not attempt to re-render your UI. Instead, if the window is being shrunk, your existing UI is clipped. If the window is being expanded, a background is shown over the new area. Only once the resize is done does Android perform the configuration change and re-render your UI.
The android:windowBackground and android:windowBackgroundFallback
theme attributes control what that background looks like. You may wish
to set android:windowBackground in your app’s theme to a value that
matches your natural window background, so there is a seamless
transition between your regular background and the new background added
by Android during the resize operation.
The smallest window size in split-screen mode is 220dp. Your activity
should aim to support a width or height of 220dp for maximum compatibility.
Using android:minWidth and android:minHeight will allow
your activity to support those small sizes by having your UI be
clipped, but this is not an ideal user experience. Rely on
android:minWidth and android:minHeight only for cases where
you have no good way of supporting 220dp directly.
It is unclear whether this 220dp minimum also holds for freeform or picture-in-picture multi-window mode.
Suppose your activity launches in a window size that, based on your layout rules, pulls in a phone-sized layout resource. Now, the user resizes your window, and the resulting size would pull in a tablet-sized layout resource.
Assuming that you are handling all of this properly via the configuration change, technically your activity should work just fine. But from the user’s standpoint, it may result in a jarring transition, if the UI for one screen size is significantly different from the UI for another screen size.
You sometimes see this with Web sites. Some sites apply their site designs based solely on the size of the browser viewport, so they are not dependent upon flaky ways of detecting whether the browser is coming from a mobile device or not. If the viewport is small enough, the page’s CSS renders a mobile-friendly UI; larger viewports result in more of a desktop feel. However, if this is based on CSS, resizing a desktop browser window to be small causes the Web page to dynamically shift from desktop to mobile mode, or vice versa. This puts some stress on the Web page design, so that the design not only works statically (i.e., a small rendition works well on mobile) but also dynamically (i.e., the user does not get too confused when the Web page transitions from one set of CSS rules to another).
We will wind up with the same problem in multi-window on Android, as the user resizes windows past our natural transition points.
Ideally, your app uses one UI for everything from small phones (or small
windows in multi-window) to large tablets (or large windows in multi-window),
regardless of window orientation. Few UI designs work well this way.
And since you cannot reliably determine whether or not you are in
multi-window mode via isInMultiWindowMode(), you cannot reliably treat
that as a separate case.
As such, the community will eventually need to evolve some patterns for handling this scenario.
Normally, multi-window is for multiple apps. For example, the user might be watching a video in one pane while taking notes in another.
However, there will be cases where it might help the user to have two activities of yours be in the panes of the split-screen mode. Or, there may be cases where users want to launch some content of yours into a separate window in freeform mode.
To do this, you can add FLAG_ACTIVITY_LAUNCH_ADJACENT to the Intent
that starts up another activity. If the device is in some form of multi-window
mode, this serves as a hint that you want this new activity to be in a
different pane or window than is the current activity. If the device
is not in multi-window mode, adding this flag has no effect — you cannot
force a device into multi-window mode.
Because this is only conditionally available, you will want to set up your UI to reflect that fact. Possible strategies include:
isInMultiWindowMode()
returns true, or toggling its availability in onMultiWindowChanged()
isInMultiWindowMode() returns false at that point, show
a dialog or Snackbar or something to point out that the user has to
set up multi-window mode firstHowever, the two activities (e.g., the ones in each pane of split-screen)
need to be part of separate tasks. The recipe for doing this is to not
only use FLAG_ACTIVITY_LAUNCH_ADJACENT, but also FLAG_ACTIVITY_NEW_TASK
and FLAG_ACTIVITY_MULTIPLE_TASK.
For example, MainActivity in the OptIn sample app has an overflow
menu with a “Clone” menu item. This opens a second
instance of MainActivity into the other split-screen pane:
  @Override
  public boolean onOptionsItemSelected(MenuItem item) {
    if (item.getItemId()==R.id.clone) {
      Intent i=
        new Intent(this, MainActivity.class)
          .setFlags(Intent.FLAG_ACTIVITY_LAUNCH_ADJACENT |
            Intent.FLAG_ACTIVITY_NEW_TASK |
            Intent.FLAG_ACTIVITY_MULTIPLE_TASK);

      startActivity(i);
      return(true);
    }

    return(super.onOptionsItemSelected(item));
  }
Note that the Intent gets all three of the aforementioned flags:
FLAG_ACTIVITY_LAUNCH_ADJACENT, FLAG_ACTIVITY_NEW_TASK, and
FLAG_ACTIVITY_MULTIPLE_TASK.
The chapter on consuming documents using the Storage Access
Framework profiles a TinyTextEditor sample app
that further demonstrates how to open a separate window from an existing
one. In this case, it will be to move a text editor from a tab in one
activity into a separate activity in its own window.
You also have the option of using the two-parameter startActivity()
that takes a Bundle, building that Bundle using the
ActivityOptions class. On ActivityOptions, there is setLaunchBounds(),
to indicate where on the screen the new task’s window should appear.
The parameter to setLaunchBounds() is either a Rect (providing that
size/location in screen coordinates) or null (indicating that the
new task’s window should occupy the full screen).
We are used to the notion that when the user presses HOME, we are called
with onStop(). In fact, onStop() is even more important than before
with Android 7.0, as our activities will be paused (but not stopped)
a lot more with multi-window. So, whereas we might have used onResume()
and onPause() for setting up and tearing down foreground work, we might
now switch to onStart() and onStop().
However, onStop() is not always called when the user presses HOME.
If the device is in normal, non-split-screen mode, and the user presses
HOME, your foreground activity moves to the background, and onStop()
is called.
If the device is in split-screen mode, and your activity is in the bottom
or right pane (depending on device orientation), and the user presses HOME,
your activity is stopped, so you get an onStop() call. Visually, the
activity animates off-screen fully, and if the user presses the RECENTS
button, the pane you had been occupying is replaced with the recent-tasks
list.
But, if your activity is in the top or left pane of split-screen, and the user presses HOME, your activity is not stopped.
Unfortunately, we are not given any sort of callback or other indication that this has occurred. The theory is that the device will be in this “transient home” state for a short period of time, but that is not guaranteed.
For many activities, there is no real problem,
but if your activity is holding a wakelock (e.g., you are using
android:keepScreenOn or setKeepScreenOn()), you are not given an
opportunity to release that wakelock, so as long as the device stays in
this state, you drain the battery.
For something like a wakelock, you could release that in onPause(), while
continuing to do the “real work” of the activity until onStop().
That is not ideal — the user might be intentionally watching the video
in split-screen and want the screen to stay on. However,
until we get some means of identifying this state,
our options are limited.
If an activity of yours is in the foreground, and the user enters into split-screen mode, your activity will undergo a configuration change. We tend to focus on the fact that the amount of screen space is cut in half. However, in addition, your orientation is likely to change, as half the screen probably has the opposite orientation from the full screen.
As a result, if you have resources, such as layouts, that are orientation-dependent, as the user flips between split-screen and normal modes, your activity will change orientations. This may even occur if the user drags the divider between the split-screen panes, depending on the aspect ratio of the device screen.
From a programming standpoint, this should not be a problem, as there are many more common ways for a device to change orientation (e.g., user rotates the device). However, the user might not expect a significant layout change based solely on entering or exiting split-screen mode, whereas they may be more comfortable with such a change when rotating the screen.
Furthermore, freeform multi-window mode allows the user to arbitrarily resize the window. In that case, the user might switch orientations by resizing the window.
Aim to minimize orientation-dependent resources. Where you need them, try to make the transition between orientations fairly gentle, so the user does not have an adverse reaction to seeing your UI shift on the fly.
Android 7.0 started shipping in August 2016. By September 2016, apps were appearing on the Play Store that allow users to do what some bloggers think is launch multiple instances of an app.
In reality, they launch multiple instances of your launcher activity in separate panes of a split-screen multi-window environment. So, for example, you could have two instances of Google’s News and Weather up side-by-side, even though the app does not directly support this:
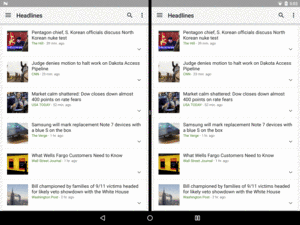
Figure 454: Pair of “News and Weather” Activities
This does not require (much) devious hacking, and it is very possible that we will start seeing device manufacturers offer this sort of capability built into their Android 7.0+ devices.
To understand what’s going on, let’s examine the
Introspection/Sidecar
sample application. This sample application allows the user to add
a custom tile to the quick-settings area of the
notification shade. When this Sidecar tile is tapped, a user-specified
activity will launch into one of the panes of the split-screen mode. And,
as a bonus, if the activity tries blocking split-screen operation via
android:resizableActivity="false", the Sidecar gets around that.
The net effect is that any Sidecar user can get two instances of a launcher
activity side-by-side… at least, for most apps. For example, the
screenshot shown above was set up via Sidecar.
Sidecar is not really a production-ready app.
That being said, if you want to play around with this, run and install the app on an
Android 7.0+ device. You will be greeted by an activity that shows
a list of candidate activities for the Sidecar tile to open. Tap on
one. The activity will vanish, showing a “Saved!” Toast.
Then, open the notification shade all the way and click “Edit” in the quick-settings area. You should see a “Sidecar” tile that you can drag into the quick-settings area:
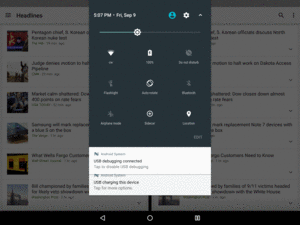
Figure 455: Quick Settings, Showing Sidecar Tile
At this point, if you enter into multi-window mode, then open the notification shade and tap on the Sidecar tile, it will launch the activity you chose into one of the available windows. In mobile device split-screen mode, usually the Sidecar-launched activity will appear in the top or left pane. This will happen even if you have another instance of that same activity in the opposite pane.
Sidecar’s MainActivity is a near-clone of the Launchalot activity
profiled elsewhere in the book. It uses PackageManager
and queryIntentActivities() to find all activities that have the
ACTION_MAIN/CATEGORY_LAUNCHER <intent-filter>, sorts them alphabetically,
and displays them in a ListView. The differences here are the filtering
performed in Sidecar and what happens when the user taps on a ListView
row.
In Launchalot, the entire roster of launchable activities is shown
in the ListView. In Sidecar’s MainActivity, only a subset are
shown, specifically rejecting those whose android:launchMode is
set to singleInstance or singleTask:
  @Override
  public void onCreate(Bundle savedInstanceState) {
    super.onCreate(savedInstanceState);

    PackageManager pm=getPackageManager();
    Intent main=new Intent(Intent.ACTION_MAIN, null);

    main.addCategory(Intent.CATEGORY_LAUNCHER);

    List<ResolveInfo> launchables=pm.queryIntentActivities(main, 0);
    List<ResolveInfo> filtered=new ArrayList<>();

    for (ResolveInfo launchable : launchables) {
      int launchMode=launchable.activityInfo.launchMode;

      if (launchMode!=ActivityInfo.LAUNCH_SINGLE_INSTANCE &&
        launchMode!=ActivityInfo.LAUNCH_SINGLE_TASK) {
        filtered.add(launchable);
      }
    }

    Collections.sort(filtered,
                     new ResolveInfo.DisplayNameComparator(pm));

    adapter=new AppAdapter(pm, filtered);
    setListAdapter(adapter);
  }
So, we iterate over the launchables, find the launchMode for
each, and only add the “good” ones to filtered. The filtered list
is what gets shown in the ListView.
In Launchalot, when the user taps on a row, we create an Intent
identifying that particular activity, then start up that activity.
In Sidecar’s MainActivity, we save the ComponentName identifying
the activity to a SharedPreferences for later use:
  @Override
  protected void onListItemClick(ListView l, View v,
                                 int position, long id) {
    ResolveInfo launchable=adapter.getItem(position);
    ActivityInfo activity=launchable.activityInfo;
    ComponentName name=new ComponentName(activity.applicationInfo.packageName,
                                         activity.name);

    PreferenceManager
      .getDefaultSharedPreferences(this)
      .edit()
      .putString(SidecarTileService.PREF_TO_LAUNCH,
        name.flattenToString())
      .apply();
    Toast
      .makeText(this, R.string.msg_saved, Toast.LENGTH_LONG)
      .show();
    finish();
  }
The easiest way to persist a ComponentName is to use flattenToString(),
then persist the String. That value can later be used with the
unflattenFromString() static method on ComponentName to get back
an equivalent ComponentName, as will be seen shortly.
So, the job of MainActivity is to let the user choose an activity
for the Sidecar to launch.
A TileService is the Android 7.0+ way to set up tiles that the user
can add to the quick-settings area of the notification shade. Full
details on how to set up one of those can be found
elsewhere in the book. Suffice it to say that
we are called with onClick() in a subclass of TileService — named
SidecarTileService — when the user taps on our tile. At this
point, what we want to do is launch the user’s requested activity.
package com.commonsware.android.sidecar;

import android.content.ComponentName;
import android.content.Intent;
import android.content.SharedPreferences;
import android.content.pm.ActivityInfo;
import android.preference.PreferenceManager;
import android.service.quicksettings.TileService;
import android.util.Log;
import android.view.Gravity;
import android.widget.Toast;
import java.lang.reflect.Field;

public class SidecarTileService extends TileService {
  static final String PREF_TO_LAUNCH="toLaunch";

  @Override
  public void onClick() {
    super.onClick();

    SharedPreferences prefs=
      PreferenceManager.getDefaultSharedPreferences(this);
    String cnFlat=prefs.getString(PREF_TO_LAUNCH, null);

    if (cnFlat!=null) {
      ComponentName cn=ComponentName.unflattenFromString(cnFlat);

      try {
        ActivityInfo info=getPackageManager().getActivityInfo(cn, 0);
        Intent i=new Intent().setComponent(cn);
        Field f=ActivityInfo.class.getField("resizeMode");
        Integer resizeMode=(Integer)f.get(info);
        boolean resizeable=(resizeMode.intValue()!=0);

        if (resizeable) {
          i.setFlags(Intent.FLAG_ACTIVITY_NEW_TASK |
            Intent.FLAG_ACTIVITY_MULTIPLE_TASK |
            Intent.FLAG_ACTIVITY_LAUNCH_ADJACENT);

          startActivity(i);
        }
        else {
          Intent taskRoot=
            new Intent(this, TaskRootActivity.class)
              .putExtra(Intent.EXTRA_INTENT, i)
              .setFlags(Intent.FLAG_ACTIVITY_NEW_TASK |
                Intent.FLAG_ACTIVITY_MULTIPLE_TASK |
                Intent.FLAG_ACTIVITY_LAUNCH_ADJACENT);

          startActivity(taskRoot);
        }
      }
      catch (Exception e) {
        Log.e(getClass().getSimpleName(),
          "Exception trying to launch activity", e);

        toast(R.string.msg_sorry);
      }
    }
    else {
      toast(R.string.msg_choose);
    }
  }

  private void toast(int msg) {
    Toast t=Toast.makeText(this, msg, Toast.LENGTH_LONG);

    t.setGravity(Gravity.END | Gravity.BOTTOM, 32, 32);
    t.show();
  }
}
First, we get our SharedPreferences and go looking for our saved
ComponentName. If that is not found — getString() returns null
for our PREF_TO_LAUNCH — then the user has not chosen an activity
from the Sidecar MainActivity. So, we show a Toast to let the user
know that they need to choose an activity.
The setGravity() call
in the toast() method shoves our Toast over into a lower
corner of the screen, to try to get it a bit out of the way of
the opened notification shade, as the shade will float over the Toast.
This approach only works well on wider screens. A production-quality
app would do something else here.
Given that we have the String representation of the ComponentName,
we unflattenFromString() to get the ComponentName back, then put
that ComponentName into an Intent. In most cases, we will then
add the multiple-instance flags to the Intent (FLAG_ACTIVITY_NEW_TASK,
FLAG_ACTIVITY_MULTIPLE_TASK, and FLAG_ACTIVITY_LAUNCH_ADJACENT), then
start the activity.
However, if the activity in question has android:resizableActivity set
to false, we have more work to do.
First, to determine if that is the case for this activity, we have to
access a hidden resizeMode field inside the ActivityInfo object.
ActivityInfo contains a lot of the information from the <activity>
element, though not all of it is part of the public Android SDK. Hacking
into SDK objects using reflection is strongly discouraged, as there
is no guarantee that this field will exist on all devices, courtesy of
firmware modifications. Using reflection this way is a great way to get
a lot of customer service complaints from users about your app crashing.
Regardless, we use the technique here. Based on the ActivityInfo
source code, android:resizableActivity="false" turns into a resizeMode
of 0. So, the activity is resizable if resizeMode is anything other
than 0.
However, as was discussed earlier in this chapter, android:resizableActivity
is only honored if your activity is the root of the task. For resizable
activities, then, we can just launch the activity directly, but for
non-resizable activities, we need to arrange to have something else
be the task root. To that end, we have a TaskRootActivity that simply
takes a supplied Intent (via an EXTRA_INTENT extra), starts an
activity using that Intent, and finishes:
package com.commonsware.android.sidecar;

import android.app.Activity;
import android.content.Intent;
import android.os.Bundle;

public class TaskRootActivity extends Activity {
  @Override
  protected void onCreate(Bundle savedInstanceState) {
    super.onCreate(savedInstanceState);

    startActivity((Intent)getIntent().getParcelableExtra(Intent.EXTRA_INTENT));
    finish();
  }
}
TaskRootActivity is set up in the manifest to have a theme
of Theme.Translucent.NoTitleBar, so the user will not usually see
the activity, just the one that it starts. However, that is sufficient
to allow TaskRootActivity to decide the resize rules for the task,
overriding those of the user’s chosen activity.
So, for non-resizable activities, SidecarTileService wraps the
real Intent in one for TaskRootActivity, sets the multiple-instance
flags, and starts that activity, which in turn starts the real activity
in the separate pane.
So, what can we learn from Sidecar about these other apps that do this sort of thing?
If your activity is exported — as are launcher activities — then
there is little that you can do to stop other apps from launching
your activity in a separate task to enable this sort of multi-window/multi-instance
behavior. One thing that does stop it is to have android:launchMode
of singleInstance or singleTask. That at least prevents multiple
instances of your activity being launched in parallel, as it overrides
the FLAG_ACTIVITY_NEW_TASK and FLAG_ACTIVITY_MULTIPLE_TASK flags.
Similarly — as we saw earlier in the chapter — there is nothing much that you can do to stop some other app from launching your activity in an existing task, thereby blocking you from controlling whether your activity gets resized.
Ideally, you do not worry much about either of these things, but instead set up your app to be able to work acceptably in these cases. Again, it is well within reason that device manufacturers will start offering this sort of “start another copy of the app” feature to their users. Sidecar, in this respect, can serve as a testbed for how well your app behaves when the user does this sort of thing.
As noted earlier in the chapter, some manufacturers experimented with multi-window implementations prior to Google rolling it into Android 7.0. These come in three flavors:
Since the manifest-only modifications are “low-hanging fruit”, giving your
users some benefit with little additional work, let’s take a look at
how to enable those. The
MultiWindow/Legacy
sample application is a clone of the OptIn sample, adjusted to allow
pre-N versions of Android to run the app, and adjusted to support
Samsung’s and LG’s legacy multi-window implementation.
The changes lie purely in the manifest:
<?xml version="1.0" encoding="utf-8"?>
<manifest package="com.commonsware.android.multiwindow"
  xmlns:android="http://schemas.android.com/apk/res/android"
  android:versionCode="1"
  android:versionName="1.0">

  <supports-screens
    android:anyDensity="true"
    android:largeScreens="true"
    android:normalScreens="true"
    android:smallScreens="true" />

  <application
    android:allowBackup="false"
    android:icon="@drawable/ic_launcher"
    android:label="@string/app_name"
    android:resizeableActivity="true"
    android:theme="@style/Theme.Apptheme">
    <uses-library
      android:name="com.sec.android.app.multiwindow"
      android:required="false" />

    <meta-data
      android:name="com.sec.android.support.multiwindow"
      android:value="true" />
    <meta-data
      android:name="com.lge.support.SPLIT_WINDOW"
      android:value="true" />

    <activity android:name="MainActivity">
      <intent-filter>
        <action android:name="android.intent.action.MAIN" />

        <category android:name="android.intent.category.LAUNCHER" />
        <category android:name="android.intent.category.MULTIWINDOW_LAUNCHER" />
      </intent-filter>
      <layout android:minWidth="480dp" />
    </activity>
  </application>

</manifest>
LG requires only one thing: a <meta-data> element in the <application>,
with a name set to com.lge.support.SPLIT_WINDOW and a value of true.
It assumes that your launcher activity (or activities) are suitable
for showing in a split screen view.
Samsung requires three things:
<meta-data> element, setting com.sec.android.support.multiwindow
to true
<uses-library> element, pulling in a firmware-supplied
com.sec.android.app.multiwindow library, if it is available (android:required="false")<category android:name="android.intent.category.MULTIWINDOW_LAUNCHER" /> added
to any <intent-filter> of any activity that you want to be able to be
launched into the split-screen environmentIn this case, we have only one activity, so it now has two
<category> elements, for LAUNCHER and MULTIWINDOW_LAUNCHER. Note
that while android.intent.category.MULTIWINDOW_LAUNCHER has
the android.intent.category namespace, and not something like
com.sec.android, MULTIWINDOW_LAUNCHER is not part of standard
Android.
For supported devices from those manufacturers, your app will be available for split-screen use:
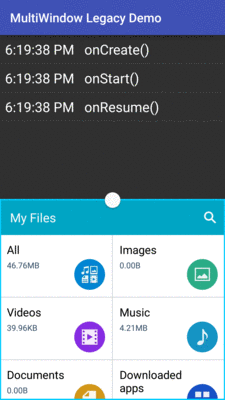
Figure 456: Samsung Legacy Split-Screen Mode
In the case of Samsung, it may also be available as a popup floating window:

Figure 457: Samsung Legacy Popup Window Mode
One notable difference between these implementations and Android 7.0’s multi-window implementation comes with lifecycle events. Android 7.0 will call lifecycle methods on your activity as appropriate during the transition to and from multi-window mode, and sometimes based on size changes of your window. Neither Samsung’s nor LG’s legacy multi-window does this.
Freeform multi-window mode — with desktop-style overlapping resizable windows — is not presently available in an official fashion. However, there are tricks for making it work, even without rooting a device. As a result, some power users will start playing with your app in freeform windows, despite the lack of official support.
If you would like to play with the unofficial freeform multi-window mode, there are a few ways of going about it.
There are some apps out on the Play Store and other distribution channels that allow you to launch apps in freeform mode, such as Braden Farmer’s Taskbar app.
Freeform support requires you to go into the “Developer options” area of the Settings app and enable “Force activities to be resizable”:
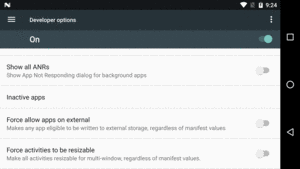
Figure 458: Resizable Windows Developer Setting
If you allow Taskbar to be your home screen, it can launch freeform windows reliably. If you use Taskbar solely as a floating launcher bar – the default — it can launch freeform windows from the overview screen (a.k.a., recent-tasks list) or the home screen, but not elsewhere, and occasionally there will be hiccups where the activity will be launched normally (not freeform).
If you prefer, you can enable freeform multi-window mode for your device or emulator via:
adb shell settings put global enable_freeform_support 1
Then, after a reboot, when you visit the overview screen, you will see a window-inset icon in the title bar of the overview cards:
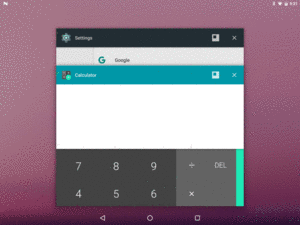
Figure 459: Overview Screen, Showing Freeform Title Bar Icons
Tapping that freeform-window icon will open that particular task in a freeform window:
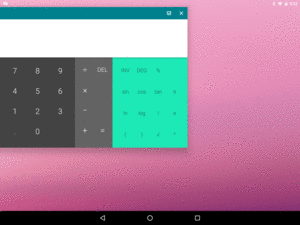
Figure 460: Calculator in Freeform Window
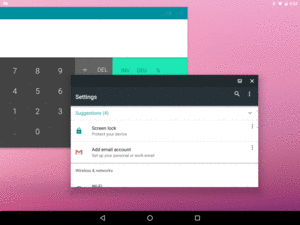
Figure 461: Calculator and Settings in Freeform Window
To undo this change, run:
adb shell settings put global enable_freeform_support 0
After a reboot, platform-level freeform multi-window support will be disabled again.
Braden Farmer’s Taskbar app is open source. All that it is doing is using documented APIs to describe how a window should be displayed in freeform mode, so one can imagine that home screen app developers might start offering a similar capability.
The
Introspection/Freecar
sample application is a simpler demonstration of launching freeform
windows on devices where either “Force activities to be resizable”
or the enable_freeform_support global setting is enabled. This is a
clone of the earlier Sidecar sample, except this time the notification
shade tile will launch the chosen activity in freeform mode.
API Level 16 added a version of startActivity() that takes both an
Intent and a Bundle as parameters. The Bundle is a way of providing
additional information to Android describing how the activity should
be started. That Bundle is typically created via an ActivityOptions
object, where you configure a set of options, call toBundle() on it
to convert the options into a Bundle, then pass that Bundle to
startActivity().
On API Level 24+ devices, setLaunchBounds() on ActivityOptions
indicates that you would like the window to be launched in freeform
mode at a particular location, described via a Rect.
FreecarTileService — the TileService for our notification shade
tile — responds to a click by getting the chosen activity details
and using setLaunchBounds() as part of startActivity():
  @Override
  public void onClick() {
    super.onClick();

    SharedPreferences prefs=
      PreferenceManager.getDefaultSharedPreferences(this);
    String cnFlat=prefs.getString(PREF_TO_LAUNCH, null);

    if (cnFlat!=null) {
      ComponentName cn=ComponentName.unflattenFromString(cnFlat);

      try {
        ActivityInfo info=getPackageManager().getActivityInfo(cn, 0);
        ActivityInfo.WindowLayout layout=info.windowLayout;
        Intent i=
          new Intent()
            .setComponent(cn)
            .addFlags(Intent.FLAG_ACTIVITY_NEW_TASK);
        Point size=new Point();

        getSystemService(DisplayManager.class)
          .getDisplay(Display.DEFAULT_DISPLAY)
          .getSize(size);

        if (layout==null) {
          size.x=size.x/2;
          size.y=size.y/2;
        }
        else {
          if (layout.widthFraction>0.0f) {
            size.x=
              Math.max(layout.minWidth,
                (int)(size.x*layout.widthFraction));
          }
          else {
            size.x=layout.width;
          }

          if (layout.heightFraction>0.0f) {
            size.y=
              Math.max(layout.minHeight,
                (int)(size.y*layout.heightFraction));
          }
          else {
            size.y=layout.height;
          }
        }

        ActivityOptions opts=
          ActivityOptions
            .makeBasic()
            .setLaunchBounds(new Rect(0, 0, size.x, size.y));

        startActivity(i, opts.toBundle());
      }
      catch (Exception e) {
        Log.e(getClass().getSimpleName(),
          "Exception trying to launch activity", e);

        toast(R.string.msg_sorry);
      }
    }
    else {
      toast(R.string.msg_choose);
    }
  }
There are a few possibilities for the values for the window size:
<layout> element as a child of
its <activity> element in the manifest, we have no idea how big the
activity should be, so we set it to be half of the screen size.<layout> element, use its android:width,
android:height, android:minWidth, and android:minHeight values,
along with the window size, to calculate the desired size.We find out about those values by getting the ActivityInfo for this
activity from the PackageManager and looking at the WindowLayout
provided via the windowLayout field. This will be null if we have
no <layout> element; otherwise, it will contain the values specified
in that <layout> element.
While basic freeform multi-window support shipped with Android 7.0, it is unclear how close it is to something that device manufacturers might enable. It is also unclear whether Google endorses this or whether the 7.0 freeform multi-window support is merely for experimentation purposes.
As such, probably it is not worthwhile to spend a lot of time testing your app in freeform multi-window mode. Once we have a better idea of whether this is something that substantial numbers of users will have access to, we will be able to better judge how much testing time is warranted.