Figure 569: Gmail Fragments (image courtesy of Google and AOSP)
Users like things that move. Or fade, spin, or otherwise offer a dynamic experience.
Much of the time, such animations are handled for us by the framework. We do not have
to worry about sliding rows in a ListView when the user scrolls, or as the user pans
around a ViewPager, and so forth.
However, sometimes, we will need to add our own animations, where we want effects that either are not provided by the framework innately or are simply different (e.g., want something to slide off the bottom of the screen, rather than off the left edge).
Android had an animation framework back in the beginning, one that is still available for you today. However, Android 3.0 introduced a new animator framework that is going to be Android’s primary focus for animated effects going forward. Many, but not all, of the animator framework capabilities are available to us as developers via a backport.
Understanding this chapter requires that you have read the core chapters of this book. Also, you should read the chapter on custom views, to be able to make sense of one of the samples.
Let’s say that you want to fade out a widget, instead of simply setting its visibility
to INVISIBLE or GONE.
For a widget whose name is v, on API Level 11 or higher, that is as simple as:
v.animate().alpha(0);
Here, “alpha” refers to the “alpha channel”. An alpha of 1 is normal opacity, while
an alpha of 0 is completely transparent, with values in between representing various
levels of translucence.
That may seem rather simple. The good news is, it really is that easy. Of course, there is a lot more you can do here, and you might have to worry about supporting older Android versions, and we need to think about things other than fading widgets in and out, and so forth.
First, though, let’s consider what is really going on when we call animate() on a
widget on API Level 11+.
The call to animate() returns an instance of ViewPropertyAnimator. This object
allows us to build up a description of an animation to be performed, such as calling
alpha() to change the alpha channel value. ViewPropertyAnimator uses a so-called
fluent interface, much like the
various builder classes (e.g., Notification.Builder) — calling a method on a
ViewPropertyAnimator() usually returns the ViewPropertyAnimator itself. This
allows you to build up an animation via a chained series of method calls, starting
with that call to animate() on the widget.
You will note that we do not end the chain of method calls with something like a
start() method. ViewPropertyAnimator will automatically arrange to start the
animation once we return control of the main application thread back to the framework.
Hence, we do not have to explicitly start the animation.
You will also notice that we did not indicate any particulars about how the animation
should be accomplished, beyond stating the ending alpha channel value of 0.
ViewPropertyAnimator will use some standard defaults for the animation, such as a
default duration, to determine how quickly Android changes the alpha value from
its starting point to 0. Most of those particulars can be overridden from their
defaults via additional methods called on our ViewPropertyAnimator, such as
setDuration() to provide a duration in milliseconds.
There are four standard animations that ViewPropertyAnimator can perform:
We will see an example of changing a widget’s position, using the translationXBy()
method, later in this chapter.
You are welcome to use more than one animation effect simultaneously, such as
using both alpha() and translationXBy() to slide a widget horizontally and
have it fade in or out.
There are other aspects of the animation that you can control. By default, the
animation happens linearly — if we are sliding 500 pixels in 500ms, the widget
will move evenly at 1 pixel/ms. However, you can specify a different “interpolator”
to override that default linear behavior (e.g., start slow and accelerate as the
animation proceeds). You can attach a listener object to find out about
when the animation starts and ends. And, you can specify withLayer() to indicate
that Android should try to more aggressively use hardware acceleration for an
animation, a concept that we will get into in greater detail
later in this chapter.
To see this in action, take a look at the
Animation/AnimatorFade
sample app.
The app consists of a single activity (MainActivity). It uses a layout that
is dominated by a single TextView widget, whose ID is fadee:
<RelativeLayout xmlns:android="http://schemas.android.com/apk/res/android"
  xmlns:tools="http://schemas.android.com/tools"
  android:layout_width="match_parent"
  android:layout_height="match_parent">

  <TextView
    android:id="@+id/fadee"
    android:layout_width="wrap_content"
    android:layout_height="wrap_content"
    android:layout_centerHorizontal="true"
    android:layout_centerVertical="true"
    android:text="@string/fading_out"
    android:textAppearance="?android:attr/textAppearanceLarge"
    tools:context=".MainActivity"/>

</RelativeLayout>
In onCreate(), we load up the layout and get our hands on the fadee widget:
  @Override
  public void onCreate(Bundle savedInstanceState) {
    super.onCreate(savedInstanceState);
    setContentView(R.layout.activity_main);

    fadee=(TextView)findViewById(R.id.fadee);
  }
MainActivity itself implements Runnable, and our run() method will perform
some animated effects:
  @Override
  public void run() {
    if (fadingOut) {
      fadee.animate().alpha(0).setDuration(PERIOD);
      fadee.setText(R.string.fading_out);
    }
    else {
      fadee.animate().alpha(1).setDuration(PERIOD);
      fadee.setText(R.string.coming_back);
    }

    fadingOut=!fadingOut;

    fadee.postDelayed(this, PERIOD);
  }
Specifically,
we use ViewPropertyAnimator to fade out the TextView over a certain period
(fadee.animate().alpha(0).setDuration(PERIOD);) and set its caption
to a value indicating that we are fading out. If we are to
be fading back in, we perform the opposite animation and set the caption
to a different value. We then flip the fadingOut boolean for the next pass
and use postDelayed() to reschedule ourselves to run after the period has
elapsed.
To complete the process, we run() our code initially in onStop() and
cancel the postDelayed() loop in onStart():
  @Override
  public void onStart() {
    super.onStart();

    run();
  }

  @Override
  public void onStop() {
    fadee.removeCallbacks(this);

    super.onStop();
  }
The result is that the TextView smoothly fades out and in, alternating
captions as it goes.
However, it would be really unpleasant if all this animator goodness worked only on API Level 11+. Fortunately for us, somebody wrote a backport.
Jake Wharton wrote NineOldAndroids. This is, in effect,
a backport of ViewPropertyAnimator
and its underpinnings. There are some slight changes in how you use it, because
NineOldAndroids is simply a library. It cannot add methods to existing classes
(like adding animate() to View), nor can it add capabilities that the underlying
firmware simply lacks. But, it may cover many of your animator needs, even if the
name is somewhat inexplicable, and it works going all the way back to API Level 1,
ensuring that it will cover any Android release that you care about.
NineOldAndroids is an Android library project.
Android Studio users can add a compile statement
to their dependencies closure in build.gradle to pull in com.nineoldandroids:library:...
(for some version indicated by ...).
Since NineOldAndroids cannot add animate() to View, the recommended approach
is to use a somewhat obscure feature of Java: imported static methods. An
import static statement, referencing a particular static method of a class,
makes that method available as if it were a static method on the class that you are
writing, or as some sort of global function. NineOldAndroids has an animate() method
that you can import this way, so instead of v.animate(), you use animate(v)
to accomplish the same end. Everything else is the same, except perhaps some imports,
to reference NineOldAndroids instead of the native classes.
You can see this in the
Animation/AnimatorFadeBC
sample app.
In addition to having the NineOldAndroids JAR in libs/, the only difference
between this edition and the previous sample is in how the animation is set up.
Instead of lines like:
fadee.animate().alpha(0).setDuration(PERIOD);
we have:
animate(fadee).alpha(0).setDuration(PERIOD);
This takes advantage of our static import:
import static com.nineoldandroids.view.ViewPropertyAnimator.animate;
If the static import makes you queasy, you are welcome to simply import
the com.nineoldandroids.view.ViewPropertyAnimator class, rather than the
static method, and call the animate() method on ViewPropertyAnimator:
ViewPropertyAnimator.animate(fadee).alpha(0).setDuration(PERIOD);
ViewPropertyAnimator itself is a layer atop of a more primitive set of animators,
known as value and object animators.
A ValueAnimator handles the core logic of transitioning some value, from an old
to a new value, over a period of time. ValueAnimator offers replaceable “interpolators”,
which will determine how the values change from start to finish over the animation
period (e.g., start slowly, accelerate, then end slowly). ValueAnimator also handles
the concept of a “repeat mode”, to indicate if the animation should simply happen once,
a fixed number of times, or should infinitely repeat (and, in the latter cases,
whether it does so always
transitioning from start to finish or if it reverses direction on alternate passes,
going from finish back to start).
What ValueAnimator does not do is actually change anything. It is merely
computing the different values based on time. You can call getAnimatedValue() to
find out the value at any point in time, or you can call addUpdateListener()
to register a listener object that will be notified of each change in the value, so
that change can be applied somewhere.
Hence, what tends to be a bit more popular is ObjectAnimator, a subclass of
ValueAnimator that automatically applies the new values. ObjectAnimator does
this by calling a setter method on some object, where you supply the object and the
“property name” used to derive the getter and setter method names. For example,
if you request a property name of foo, ObjectAnimator will try to call getFoo()
and setFoo() methods on your supplied object.
As with ViewPropertyAnimator, ValueAnimator and ObjectAnimator are implemented
natively in API Level 11 and are available via the NineOldAndroids backport as well.
To see what ObjectAnimator looks like in practice, let us examine the
Animation/ObjectAnimator
sample app.
Once again, our activity’s layout is pretty much just a centered TextView,
here named word:
<RelativeLayout xmlns:android="http://schemas.android.com/apk/res/android"
  xmlns:tools="http://schemas.android.com/tools"
  android:layout_width="match_parent"
  android:layout_height="match_parent">

  <TextView
    android:id="@+id/word"
    android:layout_width="wrap_content"
    android:layout_height="wrap_content"
    android:layout_centerHorizontal="true"
    android:layout_centerVertical="true"
    android:textAppearance="?android:attr/textAppearanceLarge"
    tools:context=".MainActivity"/>

</RelativeLayout>
The objective of our activity is to iterate through 25 words, showing
one at a time in the TextView:
package com.commonsware.android.animator.obj;

import android.app.Activity;
import android.os.Bundle;
import android.widget.TextView;
import com.nineoldandroids.animation.ObjectAnimator;
import com.nineoldandroids.animation.ValueAnimator;

public class MainActivity extends Activity {
  private static final String[] items= { "lorem", "ipsum", "dolor",
      "sit", "amet", "consectetuer", "adipiscing", "elit", "morbi",
      "vel", "ligula", "vitae", "arcu", "aliquet", "mollis", "etiam",
      "vel", "erat", "placerat", "ante", "porttitor", "sodales",
      "pellentesque", "augue", "purus" };
  private TextView word=null;
  int position=0;

  @Override
  public void onCreate(Bundle savedInstanceState) {
    super.onCreate(savedInstanceState);
    setContentView(R.layout.activity_main);

    word=(TextView)findViewById(R.id.word);

    ValueAnimator positionAnim = ObjectAnimator.ofInt(this, "wordPosition", 0, 24);
    positionAnim.setDuration(12500);
    positionAnim.setRepeatCount(ValueAnimator.INFINITE);
    positionAnim.setRepeatMode(ValueAnimator.RESTART);
    positionAnim.start();
  }

  public void setWordPosition(int position) {
    this.position=position;
    word.setText(items[position]);
  }

  public int getWordPosition() {
    return(position);
  }
}
To accomplish this, we use NineOldAndroids version of ObjectAnimator,
saying that we wish to “animate” the wordPosition property of the activity
itself, from 0 to 24.
We configure the animation to run for 12.5 seconds (i.e., 500ms per
word) and to repeat indefinitely by restarting the animation from the beginning
on each pass. We then call start() to kick off the animation.
For this to work, though, we need getWordPosition() and setWordPosition()
accessor methods for the theoretical wordPosition property. In our case,
the “word position” is simply an integer data member of the activity, which
we return in getWordPosition() and update in setWordPosition(). However,
we also update the TextView in setWordPosition(), to display the
word at that position.
The net effect is that words appear in our TextView, changing on
average every 500ms.
In the previous section, we animated an int property of an Activity. That
works, because Android knows how to compute int values between the start
and end position, through simple math.
But, what if we wanted to animate something that is not a simple number?
For example, what if we want to animate a Color, or a LatLng from
Maps V2, or a TastyTreat class of our own design?
So long as we can perform the calculations, we can animate a type of
anything we want, using TypeEvaluator and ofObject() on ObjectAnimator.
A TypeEvaluator is a simple interface, containing a single method that
we need to override: evaluate(). However, TypeEvaluator uses generics,
and so our implementation will actually be of some concrete class (e.g.,
a TypeEvaluator of TastyTreat). Our job in evaluate() is to return
a value of our designated type (e.g., TastyTreat) given three inputs:
Note that the fraction is not limited to being between 0 and 1, as certain interpolators (e.g., an overshoot interpolator) might result in a fraction being negative (e.g., we overshot past the initial value) or greater than one (e.g., we overshot past the end value).
For example, to have a TypeEvaluator of Color, we might have evaluate()
generate a new Color instance based upon applying the fraction to the
initial and end red, green, blue, and alpha channels.
To use a TypeEvaluator, instead of ofInt(), ofFloat(), or similar
simple factory methods on ObjectAnimator, we use ofObject(). ofObject()
takes the object to be animated, the property to be animated, the TypeEvaluator
to assist in the actual animation, and the final value of the animation (or,
optionally, a series of waypoints to be animated along).
A flavor of
ofObject() that takes the property name — akin to the wordPosition ofInt()
used in the previous section — has been around since API Level 11. API Level
14 added an ofObject() method that takes a Property value instead of the
name of the property. This version has the added benefit of type-safety, as it
can ensure that your object to be animated, TypeEvaluator, and final position
are all of the same type.
You can see an example of using TypeEvaluator this way in
the chapter on Maps V2, as we animate the movement
of a map marker from a starting point to an ending point.
Animated effects operate much more smoothly with hardware acceleration. There are two facets to employing hardware acceleration for animations: enabling it overall and directing its use for the animations themselves.
Hardware acceleration is enabled overall on Android devices running Android
4.0 or higher (API Level 14). On Android 3.x, hardware acceleration is
available but is disabled by default — use android:hardwareAccelerated="true"
in your <application> or <activity> element in the manifest to enable
it on those versions. Hardware acceleration for 2D graphics operations like
widget animations is not available on older versions of Android.
While this will provide some benefit across the board, you may also wish
to consider rendering animated widgets or containers in an off-screen buffer,
or “hardware layer”, that then gets applied to the screen via the GPU. In
particular, the GPU can apply certain animated transformations to a hardware
layer without forcing software to redraw the widgets or containers (e.g.,
what happens when you invalidate() them). As it turns out, these GPU-enhanced
transformations match the ones supported by ViewPropertyAnimator:
By having the widget be rendered in a hardware layer, these ViewPropertyAnimator
operations are significantly more efficient than before.
However, since hardware layers take up video memory, generally you do not
want to keep a widget or container in a hardware layer indefinitely. Instead,
the recommended approach is to have the widget or container be rendered in a
hardware layer only while the animation is ongoing, by calling setLayerType()
for LAYER_TYPE_HARDWARE before the animation begins, then calling
setLayerType() for LAYER_TYPE_NONE (i.e., return to default behavior) when
the animation completes. Or, for ViewPropertyAnimator on API Level 16 and
higher, use withLayer() in the fluent interface to have it apply the hardware
layer automatically just for the animation duration.
We will see examples of using hardware acceleration this way in the next section.
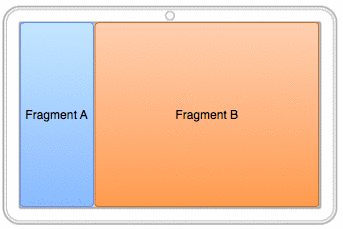
The original tablet implementation of Gmail organized its landscape main activity into two panes, one on the left taking up ~30% of the screen, and one on the right taking up the remainder:
Figure 569: Gmail Fragments (image courtesy of Google and AOSP)
Gmail had a very specific navigation mode in its main activity when viewed in landscape on a tablet, where upon some UI event (e.g., tapping on something in the right-hand area):
And a BACK button press reversed this operation.
This is a bit tricky to set up, leading to the author of this book posting a question on Stack Overflow to get input. Here, we will examine one of the results of that discussion, based in large part on the implementation of the AOSP Email app, which has a similar navigation flow. The other answers on that question may have merit in other scenarios as well.
You can see one approach for implementing the three-pane solution in the
Animation/ThreePane
sample app.
The logic to handle the animated effects is encapsulated in a ThreePaneLayout
class. It is designed to be used in a layout XML resource where you supply the
contents of the three panes, sizing the first two as you want, with the
third “pane” having zero width at the outset:
<com.commonsware.android.anim.threepane.ThreePaneLayout xmlns:android="http://schemas.android.com/apk/res/android"
  xmlns:tools="http://schemas.android.com/tools"
  android:id="@+id/root"
  android:layout_width="match_parent"
  android:layout_height="match_parent">

  <FrameLayout
    android:id="@+id/left"
    android:layout_width="0dp"
    android:layout_height="match_parent"
    android:layout_weight="3"/>

  <FrameLayout
    android:id="@+id/middle"
    android:layout_width="0dp"
    android:layout_height="match_parent"
    android:layout_weight="7"/>

  <Button
    android:layout_width="0dp"
    android:layout_height="match_parent"/>

</com.commonsware.android.anim.threepane.ThreePaneLayout>
ThreePaneLayout itself is a subclass of LinearLayout, set up to always
be horizontal, regardless of what might be set in the layout XML resource.
  public ThreePaneLayout(Context context, AttributeSet attrs) {
    super(context, attrs);
    initSelf();
  }

  void initSelf() {
    setOrientation(HORIZONTAL);
  }
When the layout finishes inflating, we grab the three panes (defined as the
first three children of the container) and stash them in data members named
left, middle, and right, with matching getter methods:
  @Override
  public void onFinishInflate() {
    super.onFinishInflate();

    left=getChildAt(0);
    middle=getChildAt(1);
    right=getChildAt(2);
  }

  public View getLeftView() {
    return(left);
  }

  public View getMiddleView() {
    return(middle);
  }

  public View getRightView() {
    return(right);
  }
The major operational API, from the standpoint of an activity using ThreePaneLayout,
is hideLeft() and showLeft(). hideLeft() will switch from showing the
left and middle widgets in their original size and position to showing
the middle and right widgets wherever left and middle had been originally.
showLeft() reverses the operation.
The problem is that, initially, we do not know where the widgets are or how
big they are, as that should be able to be set from the layout XML resource
and are not known until the ThreePaneLayout is actually applied to the
screen. Hence, we lazy-retrieve those values in hideLeft(), plus remove
any weights that had been originally defined, setting the actual pixel widths
on the widgets instead:
  public void hideLeft() {
    if (leftWidth == -1) {
      leftWidth=left.getWidth();
      middleWidthNormal=middle.getWidth();
      resetWidget(left, leftWidth);
      resetWidget(middle, middleWidthNormal);
      resetWidget(right, middleWidthNormal);
      requestLayout();
    }

    translateWidgets(-1 * leftWidth, left, middle, right);

    ObjectAnimator.ofInt(this, "middleWidth", middleWidthNormal,
                         leftWidth).setDuration(ANIM_DURATION).start();
  }
The work to change the weights into widths is handled in resetWidget():
  private void resetWidget(View v, int width) {
    LinearLayout.LayoutParams p=
        (LinearLayout.LayoutParams)v.getLayoutParams();

    p.width=width;
    p.weight=0;
  }
After the lazy-initialization and widget cleanup, we perform the two animations.
translateWidgets() will slide each of our three widgets to the left by the
width of the left widget, using a ViewPropertyAnimator and a hardware layer:
  private void translateWidgets(int deltaX, View... views) {
    for (final View v : views) {
      v.setLayerType(View.LAYER_TYPE_HARDWARE, null);

      v.animate().translationXBy(deltaX).setDuration(ANIM_DURATION)
       .setListener(new AnimatorListenerAdapter() {
         @Override
         public void onAnimationEnd(Animator animation) {
           v.setLayerType(View.LAYER_TYPE_NONE, null);
         }
       });
    }
  }
The resize animation — to set the middle size to be what left had been –
is handled via an ObjectAnimator, for a theoretical property of middleWidth
on ThreePaneLayout. That is backed by a setMiddleWidth() method that
adjusts the width property of the middle widget’s LayoutParams and triggers
a redraw:
  @SuppressWarnings("unused")
  private void setMiddleWidth(int value) {
    middle.getLayoutParams().width=value;
    requestLayout();
  }
The showLeft() method simply performs those two animations in reverse:
  public void showLeft() {
    translateWidgets(leftWidth, left, middle, right);

    ObjectAnimator.ofInt(this, "middleWidth", leftWidth,
                         middleWidthNormal).setDuration(ANIM_DURATION)
                  .start();
  }
The sample app uses one activity (MainActivity) and one fragment
(SimpleListFragment) to set up and use the ThreePaneLayout. The objective
is a UI that roughly mirrors that of the AOSP Email app: a list
on the left, a list in the middle (whose contents are based on the item chosen
in the left list), and something else on the right (whose contents are based
on the item chosen in the middle list).
SimpleListFragment is used for both lists. Its newInstance() factory
method is handed the list of strings to display. SimpleListFragment just
loads those into its ListView, also setting up CHOICE_MODE_SINGLE for
use with the activated style, and routing all clicks on the list to
the MainActivity that hosts the fragment:
package com.commonsware.android.anim.threepane;

import android.app.ListFragment;
import android.os.Bundle;
import android.view.View;
import android.widget.ArrayAdapter;
import android.widget.ListView;
import java.util.ArrayList;
import java.util.Arrays;

public class SimpleListFragment extends ListFragment {
  private static final String KEY_CONTENTS="contents";

  public static SimpleListFragment newInstance(String[] contents) {
    return(newInstance(new ArrayList<String>(Arrays.asList(contents))));
  }

  public static SimpleListFragment newInstance(ArrayList<String> contents) {
    SimpleListFragment result=new SimpleListFragment();
    Bundle args=new Bundle();

    args.putStringArrayList(KEY_CONTENTS, contents);
    result.setArguments(args);

    return(result);
  }

  @Override
  public void onActivityCreated(Bundle savedInstanceState) {
    super.onActivityCreated(savedInstanceState);

    getListView().setChoiceMode(ListView.CHOICE_MODE_SINGLE);
    setContents(getArguments().getStringArrayList(KEY_CONTENTS));
  }

  @Override
  public void onListItemClick(ListView l, View v, int position, long id) {
    ((MainActivity)getActivity()).onListItemClick(this, position);
  }

  void setContents(ArrayList<String> contents) {
    setListAdapter(new ArrayAdapter<String>(
                                            getActivity(),
                                            R.layout.simple_list_item_1,
                                            contents));
  }
}
MainActivity populates the left FrameLayout with a SimpleListFragment
in onCreate(), if the fragment does not already exist (e.g., from a configuration
change). When an item in the left list is clicked, MainActivity populates
the middle FrameLayout. When an item in the middle list is clicked, it
sets the caption of the right Button and uses hideLeft() to animate
that Button onto the screen, hiding the left list. If the user presses
BACK, and our left list is not showing, MainActivity calls showLeft()
to reverse the animation:
package com.commonsware.android.anim.threepane;

import android.app.Activity;
import android.os.Bundle;
import android.widget.Button;
import java.util.ArrayList;

public class MainActivity extends Activity {
  private static final String KEY_MIDDLE_CONTENTS="middleContents";
  private static final String[] items= { "lorem", "ipsum", "dolor",
      "sit", "amet", "consectetuer", "adipiscing", "elit", "morbi",
      "vel", "ligula", "vitae", "arcu", "aliquet", "mollis", "etiam",
      "vel", "erat", "placerat", "ante", "porttitor", "sodales",
      "pellentesque", "augue", "purus" };
  private boolean isLeftShowing=true;
  private SimpleListFragment middleFragment=null;
  private ArrayList<String> middleContents=null;
  private ThreePaneLayout root=null;

  @Override
  public void onCreate(Bundle savedInstanceState) {
    super.onCreate(savedInstanceState);
    setContentView(R.layout.activity_main);

    root=(ThreePaneLayout)findViewById(R.id.root);

    if (getFragmentManager().findFragmentById(R.id.left) == null) {
      getFragmentManager().beginTransaction()
                          .add(R.id.left,
                               SimpleListFragment.newInstance(items))
                          .commit();
    }

    middleFragment=
        (SimpleListFragment)getFragmentManager().findFragmentById(R.id.middle);
  }

  @Override
  public void onBackPressed() {
    if (!isLeftShowing) {
      root.showLeft();
      isLeftShowing=true;
    }
    else {
      super.onBackPressed();
    }
  }

  @Override
  protected void onSaveInstanceState(Bundle outState) {
    super.onSaveInstanceState(outState);

    outState.putStringArrayList(KEY_MIDDLE_CONTENTS, middleContents);
  }

  @Override
  protected void onRestoreInstanceState(Bundle inState) {
    middleContents=inState.getStringArrayList(KEY_MIDDLE_CONTENTS);
  }

  void onListItemClick(SimpleListFragment fragment, int position) {
    if (fragment == middleFragment) {
      ((Button)root.getRightView()).setText(middleContents.get(position));

      if (isLeftShowing) {
        root.hideLeft();
        isLeftShowing=false;
      }
    }
    else {
      middleContents=new ArrayList<String>();

      for (int i=0; i < 20; i++) {
        middleContents.add(items[position] + " #" + i);
      }

      if (getFragmentManager().findFragmentById(R.id.middle) == null) {
        middleFragment=SimpleListFragment.newInstance(middleContents);
        getFragmentManager().beginTransaction()
                            .add(R.id.middle, middleFragment).commit();
      }
      else {
        middleFragment.setContents(middleContents);
      }
    }
  }
}
If you run this app on a landscape tablet running API Level 11 or higher, you start off with a single list of words on the left:
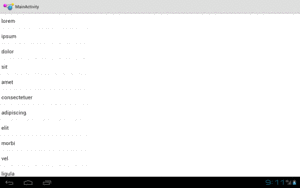
Figure 570: ThreePane, As Initially Launched
Clicking on a word brings up a second list, taking up the rest of the screen, with numbered entries based upon the clicked-upon word:
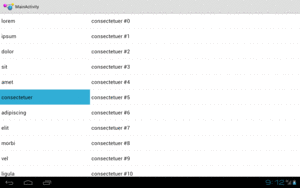
Figure 571: ThreePane, After Clicking a Word
Clicking on an entry in the second list starts the animation, sliding the first list off to the left, sliding the second list into the space vacated by the first list, and sliding in a “detail view” into the right portion of the screen:
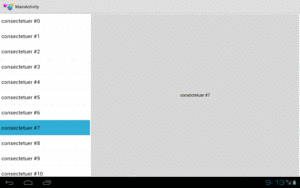
Figure 572: ThreePane, After Clicking a Numbered Word
Pressing BACK once will reverse the animation, restoring you to the two-list perspective.
The ThreePane sample described above uses the native API Level 11 version of the
animator framework and the native implementation of fragments. However, the same
approach can work using the Android Support package’s version of fragments and
NineOldAndroids. You can see this in the
Animation/ThreePaneBC
sample app.
Besides changing the import statements and adding the NineOldAndroids JAR file, the only other changes of substance were:
ViewPropertyAnimator.animate(v) instead of v.animate() in translateWidgets()
setLayerType() in
translateWidgets() based upon API level, as that method was only added in API Level 11The smoothness of animations, though, will vary by hardware capabilities. For example, on a first-generation Kindle Fire, running Android 2.3, the backport works but is not especially smooth, while the animations are very smooth on more modern hardware where hardware acceleration can be applied.
As we will see in the chapter on “jank”, there is some stutter in the rendering of this app. Fixing it requires removing the animated change in the width of the middle pane, which in turn makes the animation itself look worse. More details on the analysis can be found in the “jank” chapter.