6
Small Fish
You’ve probably heard the old adage that good things come in small packages. Diamonds, go-carts, hotel-size shampoo bottles . . . everything in miniature is better, for some reason. And this is absolutely the axiom of tiny fish.
Tiny fish are a fish-lover’s fish. They pack in a ton of flavor, they’re inexpensive, and they are usually more sustainable than their larger ocean cousins. But why preserve something so small? Because nature tends to give us a whole bunch of tiny fish all at once — more than we could ever eat fresh. Happily, tiny fish are much easier to preserve than their larger counterparts. Small fish can usually be scaled, beheaded, and gutted with little more than a butter knife and your fingers. And if you’re packing fish in oil, which I totally recommend, they store very easily in the refrigerator in a jar on the back of the shelf.
The trick with the tiny guys, however, is finding them at the peak of their season. Fresh anchovies here in Northern California show up unexpectedly at the market in the spring. The herring here run only for a couple of weeks. They take some time to process, so I can only hope that when I cross paths with the tiny fish, I have the time to put them up.
Cheers to the small, the mighty, and the fishy!
Pickled Herring
I love every pickled fish I’ve ever met. Pickled herring is certainly an acquired taste; if you’re not used to it, the flavor can seem particularly strong. But if you like pickles, and you like fish, I think you will find this insanely delicious. While herring is a good sustainable seafood, it has a short season. Sardines, mackerel, or whitefish are great pinch hitters in this preparation. Pickled herring makes a great appetizer on its own, and it’s excellent on top of toast, bagels, or green salad.
Ingredients
- 3 pounds herring, cleaned and filleted
For the curing solution
- 1⁄4 cup kosher salt
- 4 cups water
- 4 dried bay leaves
- 1 tablespoon black peppercorns
- 1 small yellow onion, cut into 1⁄3-inch-wide strips
For the brine
- 1 cup distilled white vinegar
- 3⁄4 cup water
- 1⁄2 cup dry white wine
- 1 tablespoon sugar
Variation
For a Scandinavian twist to the herring, add to the brine a rounded tablespoon of toasted coriander seeds, 8 whole cloves, and a thinly sliced lemon layered with the onion and the fish.
Instructions
- 1. Chop the fish into 21⁄2- to 3-inch pieces and stack them in a quart canning jar. To make the curing solution, combine the salt and the water in a medium bowl, then pour it over the fish to cover it completely. Cover and let sit in the refrigerator to cure for 6 to 8 hours, until the fish is firm.
- 2. Drain the fish and discard the curing solution. In the bottom of a clean quart canning jar, layer the bay leaves and the peppercorns with the onion strips and the cured fish, ending with onion on top. Press down on the solids gently to pack them closely together.
- 3. To make the brine, combine the vinegar, water, wine, and sugar in a medium saucepan over high heat and stir until the sugar is dissolved. Bring the brine to a boil. Pour the boiling brine over the packed fish to cover by at least 1 inch. Cover, let cool to room temperature, then move the jar to the refrigerator. Allow the fish to pickle for at least 1 day before eating.
Storage
Kept fully submerged in the brine, this herring will keep in the refrigerator for several months.
Creamed Herring
Some like their M&M’s with peanuts; some like them plain. Some insist that herring should be creamed, and so it shall be. Of course, I’m going to recommend that you start with a jar of homemade pickled herring, but you could simply start with the store-bought stuff if you’re looking for a quick fix.
Makes |
About 11⁄2 pounds |
Time |
At least 1 hour |
Method |
Pickling |
Ingredients
Instructions
- 1. Drain the brine from the pickled herring and save half of the brine in a medium bowl. (Discard the remaining brine or save it for another use, such as marinade or salad dressing.)
- 2. Combine the pickle brine with the sour cream, then pour this creamy brine back into the jar on top of the herring and onions.
- 3. Let the creamed herring sit, refrigerated, for at least 1 hour before eating.
Storage
Kept fully submerged in the brine, this herring will keep in the refrigerator for at least 2 months.
Cook It
Baked Chopped Herring
Makes |
12 servings |
Time |
About 11⁄2 hours |
This recipe is an excellent use for pickled herring. It is Depression-era cooking at its best, and my grandmother, Bubby Franks, used to make this beloved family favorite often. This is her recipe, passed along to me from my Aunt Simmie, with some minor modifications (Weetabix instead of breadcrumbs or saltine crumbs and butter instead of margarine for better flavor). It is economical, eco-friendly, and pure nostalgia for fish lovers. Eat it warm from the oven or cold from the fridge, either with a fork and knife (as you would meatloaf) or as a spread on crackers (which makes it portable!). I know the cinnamon and sugar on top may seem at odds with the fish flavor, but trust me — they are as at home here as ketchup on meatloaf.
Ingredients
- 12 ounces Pickled Herring, drained, brine reserved
- 2 large celery stalks, trimmed and cut into quarters
- 1 medium apple, peeled, cored, and cut into quarters
- 2 eggs, lightly beaten
- 3 tablespoons butter, melted
- 2 Weetabix cereal wafers, crumbled, or 1⁄4–1⁄2 cup breadcrumbs or cracker crumbs
- 1⁄2 teaspoon kosher salt
- Freshly ground black pepper
- Ground cinnamon, for sprinkling
- Sugar, for sprinkling
Instructions
- 1. Preheat your oven to 375°F (190°C) and oil an 8-inch square pan.
- 2. Combine the drained herring (with its pickled onions), celery, and apple in the bowl of a food processor. Pulse until the mixture is chopped and combined but still quite coarse. Scrape the mixture into a medium bowl.
- 3. Add the eggs and melted butter to the herring mixture. Add one of the crumbled Weetabix and stir until the mixture is somewhat stiff — it should hold its shape like the mixture for a meatloaf. If it’s still too wet, add additional Weetabix as needed. And if it gets too dry, add some of the pickle brine, 1 tablespoon at a time. Stir in the salt and season with pepper to taste.
- 4. Pour the mixture into the prepared pan and smooth the top evenly. Sprinkle it with cinnamon and sugar. Place on the middle rack in the oven and bake for about 50 minutes, or until the top is golden brown.
- 5. Let cool for 15 minutes before eating. Or cool and refrigerate until completely cold. Cut into squares and serve on its own or as a spread.
Storage
This will keep, covered, in the refrigerator for at least 1 week.
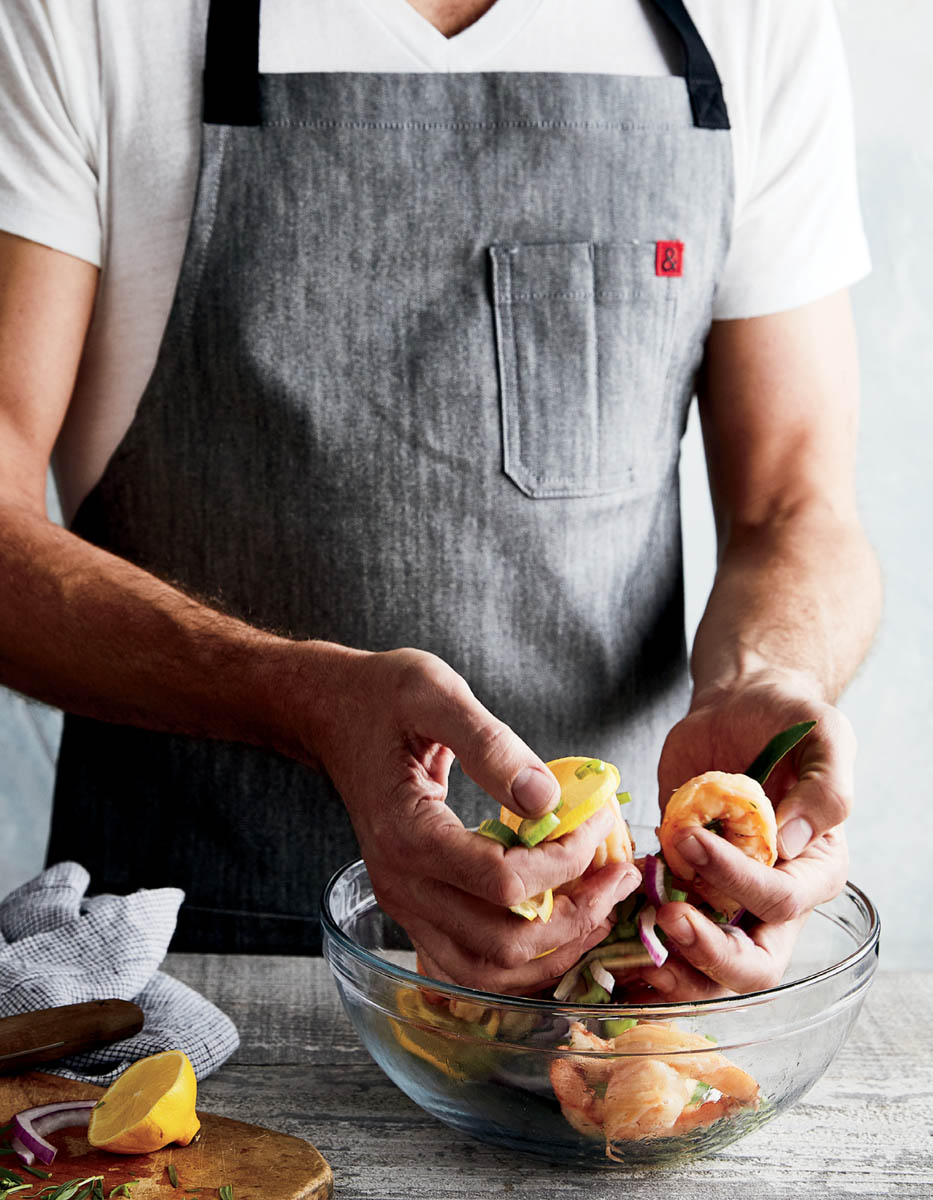
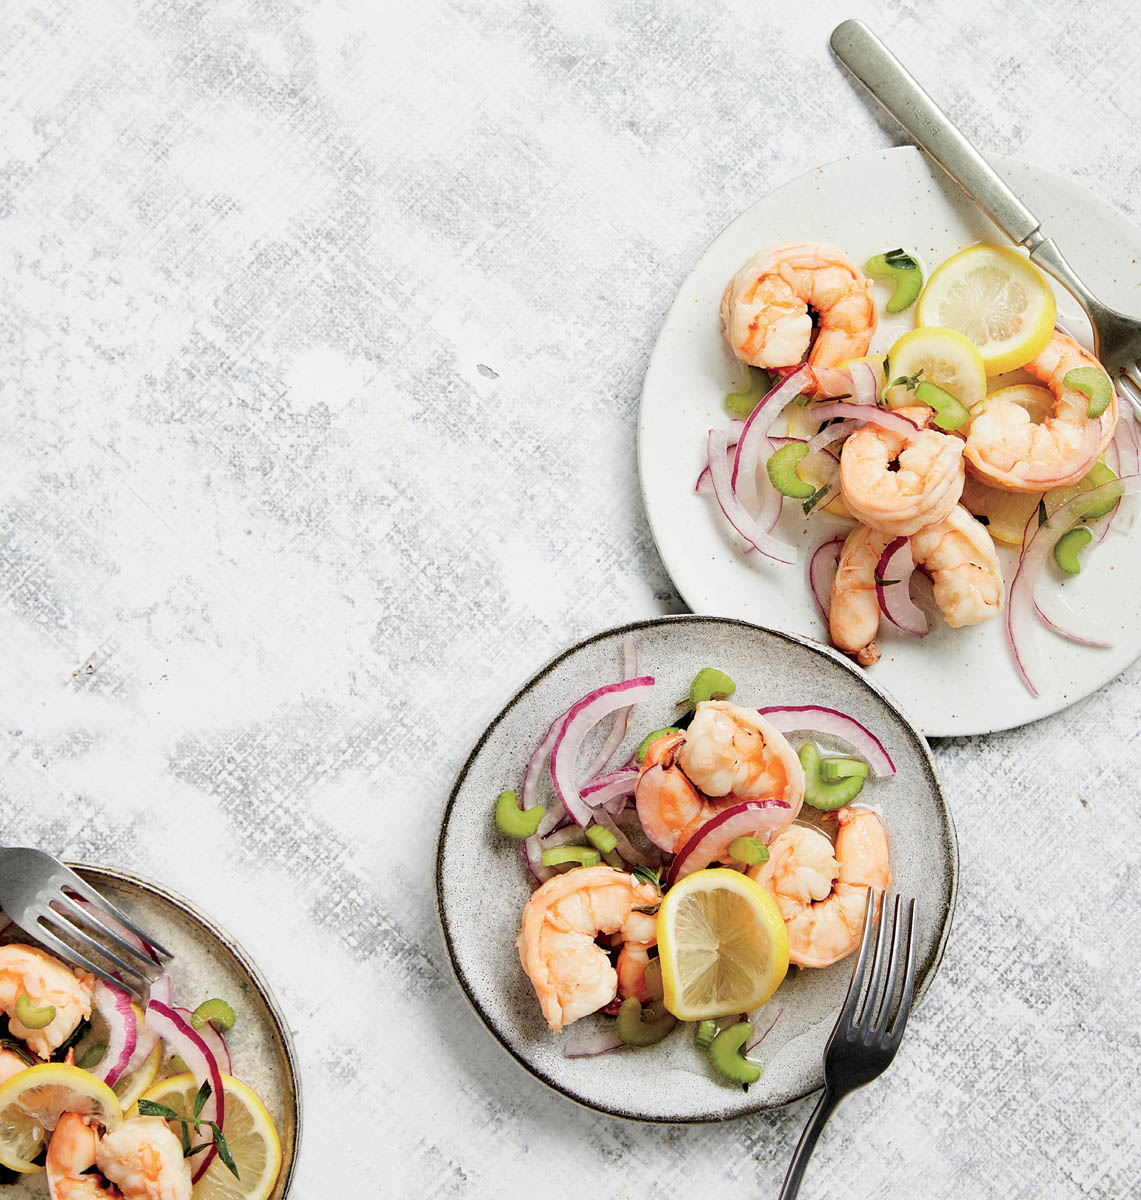
Pickled Shrimp
Not only is this a snap to put together, but it’s also a beautiful and elegant appetizer ready to plate for company. This is a Southern favorite that often calls for a spicy kick. Feel free to add the kick if you wish, but in my opinion the delicate shrimp get lost in the spice. Don’t forget to eat the onion and celery along with the shrimp — they are an essential part of this pickle. You can use smaller shrimp if you wish, but just make sure they’re fresh and high quality. A drizzle of good extra-virgin olive oil before serving can also work miracles.
Makes |
About 1 quart |
Time |
About 1 day |
Method |
Pickling |
Ingredients
- 63⁄4 cups water
- 2 tablespoons plus 2 teaspoons kosher salt
- 1 pound large shrimp (about 14), shelled and deveined
- 10–12 thin lemon slices
- 3⁄4 cup very thinly sliced red onion
- 3⁄4 cup very thinly sliced celery
- 2 teaspoons black peppercorns
- 4 whole cloves
- 4 dried bay leaves
- 1 fresh tarragon sprig, chopped
- 3⁄4 cup apple cider vinegar
- 1 large garlic clove, finely minced
- 2 tablespoons sugar
- Extra-virgin olive oil, for serving
Instructions
- 1. Combine 6 cups of the water and 2 tablespoons of the salt in a medium saucepan over high heat. Bring to a rapid boil, then drop the shrimp into the water and cook, stirring often, until they are completely curled, about 2 minutes. Drain the shrimp, then rinse them under cold running water to stop the cooking. Let them drain and cool. Hang on to the pot, as we’ll use it again to make the brine.
- 2. Combine the shrimp, lemon, onion, celery, peppercorns, cloves, bay leaves, and tarragon in a medium bowl. Firmly pack the mixture into a quart canning jar.
- 3. Combine the remaining 2 teaspoons salt with the remaining 3⁄4 cup water, the vinegar, the garlic, and the sugar in the medium saucepan. Heat over high heat until boiling, stirring to help dissolve the sugar and the salt. Pour the brine over the packed shrimp, making sure all the shrimp and vegetables are submerged. Cover the jar, let cool, and then refrigerate.
- 4. Allow the shrimp to marinate at least 4 hours in the refrigerator, but overnight (or longer) is best. Drizzle with olive oil before serving.
Storage
With all shrimp and vegetables fully submerged in the brine, these shrimp will keep for 2 to 3 weeks in the refrigerator. Note that if they sit for too long, their flavor will remain, but their texture will soften.
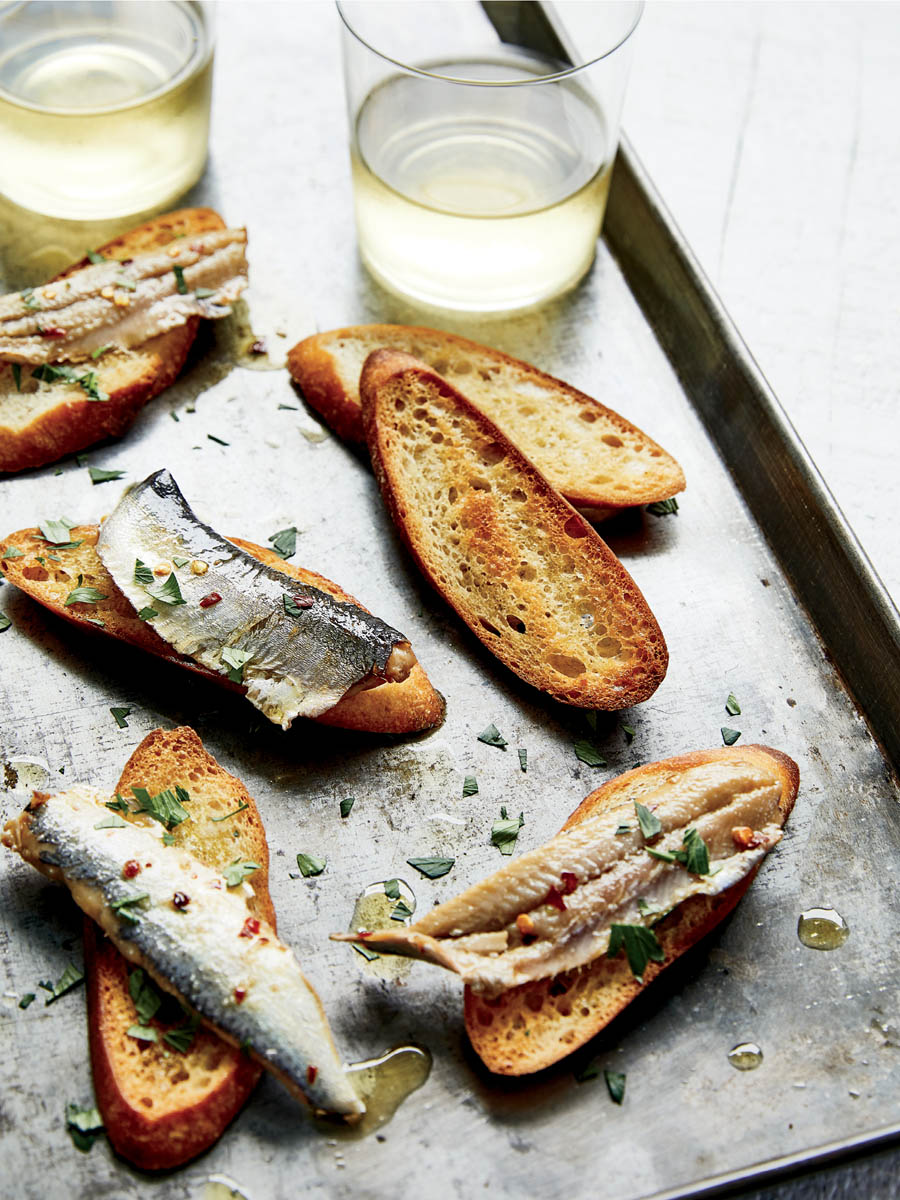
Cured Anchovies or Sardines
Fresh anchovies are hard to find. But when you are fortunate enough to find them, curing them this way produces something delicious that is a far cry from those packed anchovies you put in your pasta or Caesar salad. Fresh sardines (or other tiny fish) are also great in this fresh, briny cure. They are outrageously delicious atop crusty bread or crackers with cold vodka, beer, or a minerally, light white wine.
Ingredients
- 3 pounds very fresh anchovies, sardines, or other tiny fish
- 2⁄3 cup kosher salt
- 2 cups white wine vinegar, plus more as needed
- 2 cups extra-virgin olive oil, plus more as needed
- 2 large garlic cloves, very thinly sliced
- 1 teaspoon red pepper flakes (optional)
Instructions
- 1. Clean the fish following the directions, How to Fillet a Fish (this will take about 1 hour if the fish are really small). Rinse the fillets well and lay them on clean kitchen towels in a single layer to dry completely; pat dry until the surface is slightly tacky.
- 2. Pour the salt into a small rimmed dish and press each fish fillet into the salt to coat it completely on both sides. Pack the fish fillets tightly into an 8-inch square pan in layers, and top the fish with any of the remaining salt. Cover with plastic wrap and refrigerate for 12 hours.
- 3. Drain the liquid but leave the salt on the fish. Cover the fish completely with the vinegar (adding more vinegar as necessary to submerge the fish). Cover with plastic wrap and refrigerate for another 12 hours. The fish will be quite firm.
- 4. Drain off the vinegar and discard it. Cover the fish completely with the olive oil (adding more as needed to make sure the fish are completely submerged). Cover with plastic wrap again and refrigerate for at least 4 hours, but ideally for a couple of days.
Storage
The fish will keep, submerged completely beneath the oil and tightly covered, in the refrigerator for at least 4 months. If you like, once the fish have firmed up in the oil for a few days, you can carefully transfer them to a quart jar with a lid, covering them completely with the oil, for easier storage. Sprinkle or toss with the garlic and pepper flakes when you are ready to serve.