Chicken, turkey, duck, and other edible birds aren’t as rich in preserving traditions as the larger barnyard animals. It stands to reason, really: it’s easy enough for a small gathering of people to eat a whole fowl in one sitting; thus the need to preserve these animals was never as pressing.
Still, there are some fabulous traditions and some creative new ideas in bird preserving that you will want to take a gander at here. Making and preserving your own chicken stock is ground zero for everything that’s delicious in the kitchen, from soups and stews to rice and braises. While some people simply freeze their stock, it is always convenient to have it on the shelf. This is one of the most compelling reasons to dive deeply into pressure canning. Having homemade stock on hand can become habit-forming.
Classic duck confit is the Holy Grail of all that is confit. Tough duck parts are preserved, flavored, and tenderized, and the cooking fat that enrobes them is pure kitchen gold.
And this chapter includes a couple of takes on turkey. The flavors of Thanksgiving are captured in a dried jerky, and there is a brined, smoked turkey breast that would make any sandwich proud.
Spread your wings, and let your adventure into preserved poultry take flight!
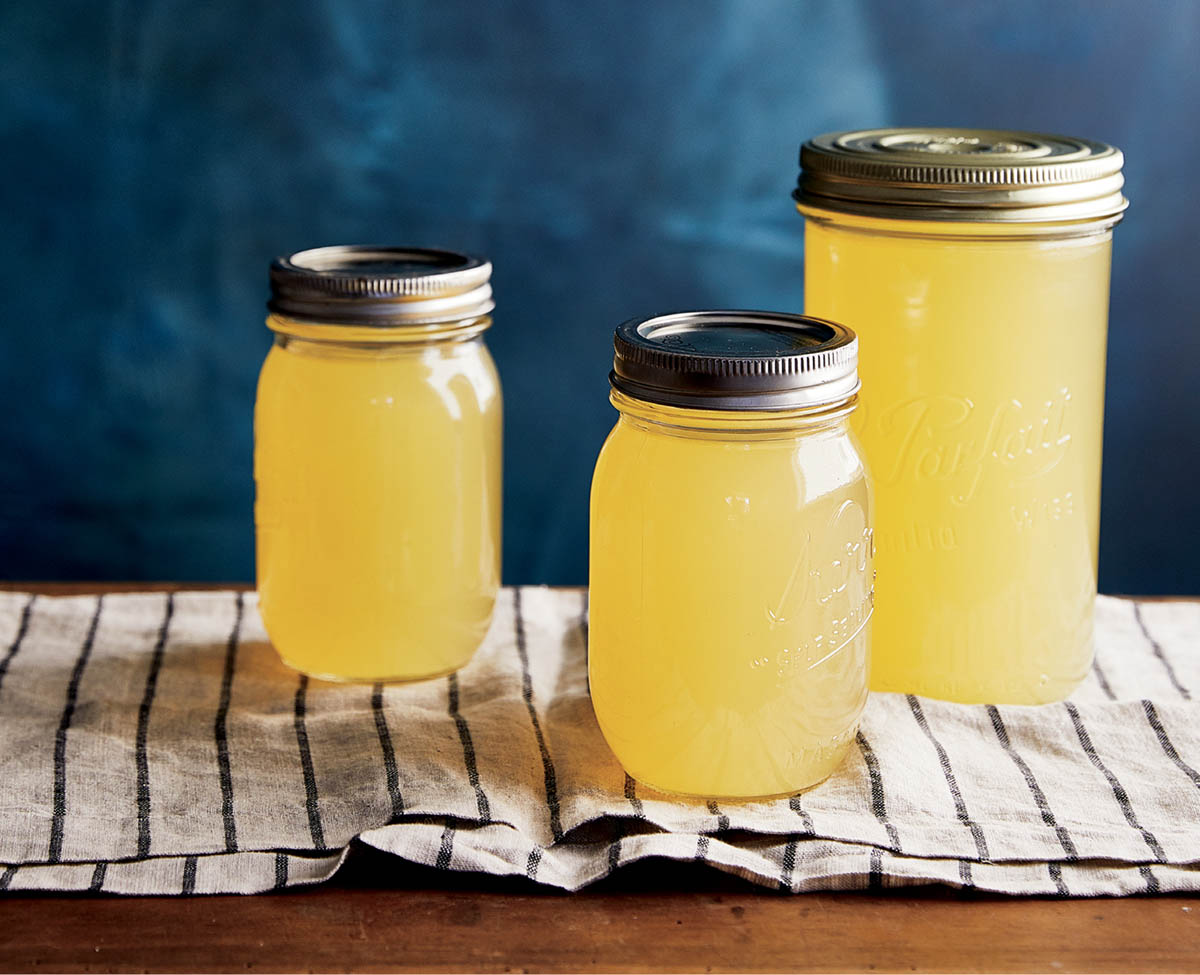
Chicken Stock
Stock is the flavored broth of long-simmered bones and, often, vegetables, and it is used as an ingredient. Soup is the flavored (with salt and herbs) finished dish made, quite often, using stock. There are few dishes that aren’t improved by your own flavorful homemade chicken stock, and few physical ailments that homemade chicken soup cannot cure. For shelf storage, chicken stock must be pressure-canned, but it’s also easy enough to portion the stock into small plastic containers and freeze it. If you freeze it, be sure to leave 1 inch of headspace at the top to accommodate the expanding liquid in the freezer.
4 pounds chicken bones, particularly backs and necks
2 carrots, coarsely chopped
2 celery stalks, coarsely chopped
1 yellow onion, peeled, whole, with the root end removed
Instructions
1. Place the chicken bones, carrots, celery, and onion in a large stockpot and cover with 3 inches of water. Cover the pot and bring to a boil over high heat. A foam will rise to the surface of the pot; skim it off (and keep skimming, as more foam will form) with a metal spoon and discard it. Reduce the heat to low, until the stock is just occasionally giving off small bubbles. Cover and let the stock cook for a minimum of 2 hours, or up to 12 hours, stirring occasionally. The longer it cooks, the richer the flavor will be.
2. Strain the stock through a colander or a fine-mesh sieve, pressing down on the solids to help them release all of their golden liquid. Discard the solids. Your stock is now ready to use or to store.
Pressure Canning
1. Review the directions for Pressure Canning. Bring the strained stock to a boil. Fill the jars with the stock, leaving 1 inch of headspace at the top. Wipe the rims and add the lids and bands.
2. Set the jars of stock in the canner. Be sure to check your canner’s water level — there should be 3 inches of water. Then turn the heat to high and, once steam has started to stream out, vent your pressure canner for 10 full minutes (or follow the manufacturer’s instructions).
3. For pint jars in a dial-gauge pressure canner, process for 20 minutes at 11 pounds of pressure. For quart jars, process for 25 minutes at 11 pounds. Add additional pressure as necessary for your elevation; see Pressure Canning Notes for details.
For pint jars in a weighted-gauge canner, process for 20 minutes at 10 pounds of pressure. For quart jars, process for 25 minutes at 10 pounds. Add additional pressure as necessary for your elevation; see Pressure Canning Notes for details.
4. Follow the instructions for cooling the jars in Pressure Canning.
Storage
The stock will keep in the refrigerator for up to 1 week, or in the freezer for up to 6 months. Pressure-canned stock will keep for up to 1 year.
Duck Confit
Duck confit is a classic example of preserving food in fat. Tough, fatty duck legs are made moist, flavorful, and lean by a three-step process: a brief salt cure, a slow poaching in fat, and then long-term storage covered in rich duck fat to keep out air. This dish has many uses, from classic cassoulet to duck rillettes to a simple salad with endive and apple (see recipe). Once you’ve made duck confit, the fat can be melted, strained, and reused in perpetuity. It gets richer and more flavorful with every use and is a wondrous thing for cooking. Duck fat can be hard to find commercially, however. If your local butcher doesn’t carry it, order the good stuff online from www.farmfreshduck.com.
1. Use a sharp knife to separate the duck drumsticks from the thighs.
2. Scatter half of the garlic, half of the thyme, half of the rosemary, and half of the bay in an 8-inch square pan. Sprinkle the duck with the salt on all sides, and place it in the dish. Place the remaining garlic, thyme, rosemary, and bay on top of the duck, and then press the herbs into the duck to flavor to the meat. Cover the dish with plastic wrap and refrigerate for 2 days.
3. Preheat the oven to 200°F (90°C).
4. Unwrap the duck and discard the herbs and garlic. Brush off any excess salt (but don’t rinse the duck) and pour out any liquid that has accumulated in the bottom of the dish. Place the duck back into the dish.
5. Melt the duck fat by either heating it in the microwave for 10 seconds at a time or placing it in a heatproof jar and setting the jar in a pan of warm water. Once the fat has liquefied, pour it over the duck to just cover it.
6. Place the duck in the oven and let it slowly poach for about 31⁄2 hours, or until the duck is tender to the bone. If you’ve left the leg quarters whole, the legs should wiggle easily in their joints.
7. Let the duck cool, then cover and let cure in the fat in the refrigerator. The duck is ready to eat at any time, but the meat will become more moist and tender if it sits in the refrigerator for at least 1 week.
Storage
The meat must be kept covered by the fat, and the container should be tightly covered. You can store the confit in its fat in the baking dish, covered with plastic wrap. Or, to save space in the refrigerator, transfer the duck to a widemouthed quart canning jar and pour the fat over it to cover completely. Use a knife or chopstick to pop any air bubbles inside the jar. The confit will keep for at least 5 months.
Cook It
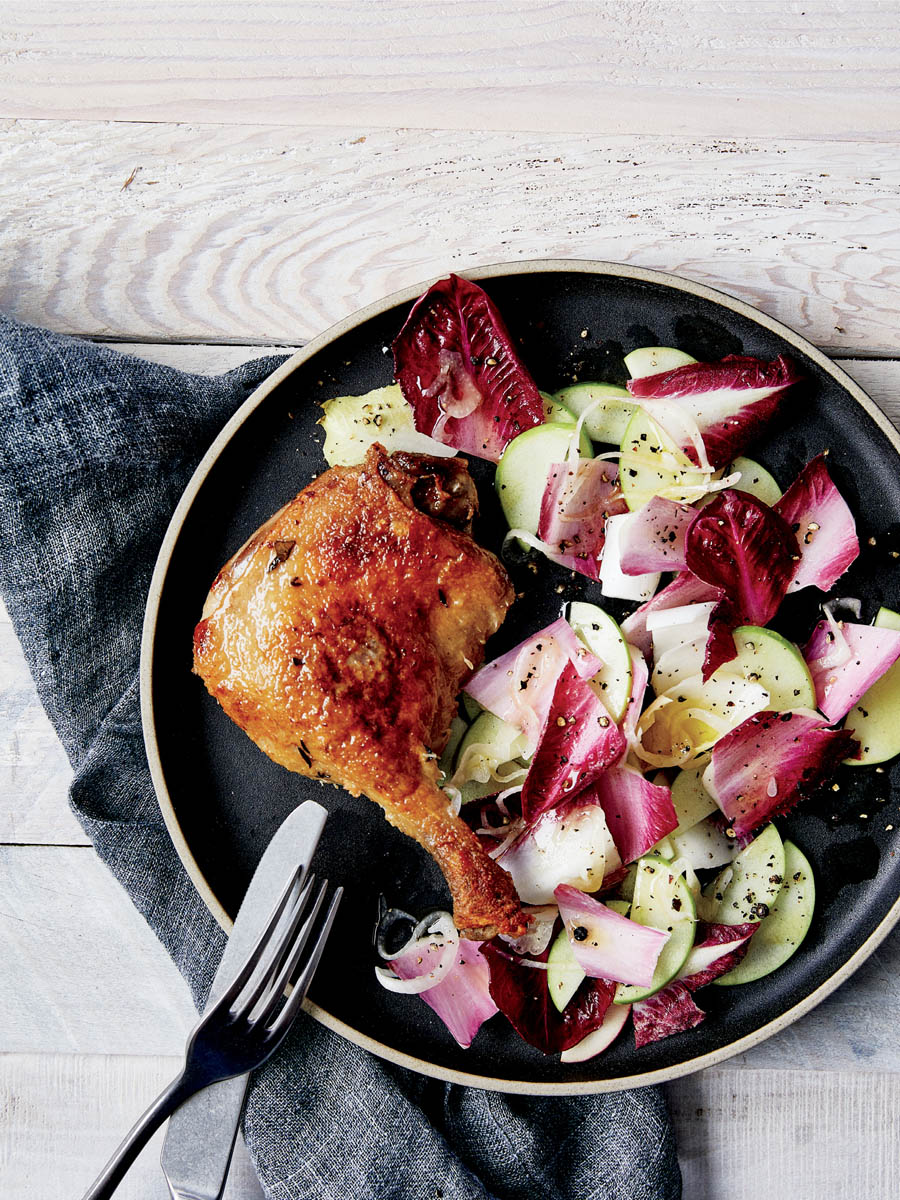
Duck Confit, Endive, and Apple Salad
Makes
2 servings
Time
30 minutes
Ingredients
1⁄2 teaspoon kosher salt
1 small shallot, sliced as thinly as possible
3 tablespoons extra-virgin olive oil
3 tablespoons lemon juice (from 1 juicy lemon)
1⁄2 teaspoon freshly ground black pepper
2 duck confit leg quarters (legs and thighs)
2 heads endive (about 8 ounces total)
1 medium tart apple
Instructions
1. Place the salt and shallot in a large salad bowl. Mash the salt into the shallot with the back of a sturdy spoon. Stir in a teaspoonful or so of the olive oil, then gradually add the rest, whisking until fully incorporated. Whisk in the lemon juice and the pepper. Set the dressing aside while you prepare the rest of the salad.
2. Remove the duck from its fat, scraping off nearly all the fat from the outside. Cook the duck, top side down, in a large skillet over medium-high heat for 5 to 7 minutes. Then turn the duck in the pan, cooking on all sides until all the skin is crisped, about 12 minutes total.
3. While the duck is cooking, chop the endive into bite-size pieces. Leave the skin on the apple, but remove its core. Slice the apple into thin half-moons. Toss the endive and apple in the bowl with the vinaigrette and spoon the salad onto plates. Top the salad with the warmed duck and serve.
Storage
Store leftover salad separately from the duck; it will keep for 1 to 2 days, covered, in the refrigerator. Wrap leftover duck tightly and keep it refrigerated for up to 1 week; re-crisp it before serving.
Duck Breast Prosciutto
This is about as effortless as home-cured meat can get. A little salt and sugar now will yield you a whole lot of flavor later. Not only is the flavor rich and fragrant, but the prosciutto also presents beautifully on a cutting board with crackers or crostini, aged cheese, pickles, and almonds. Save this for company, use it like you would pancetta to give flavor to roasted vegetables or pasta dishes, or serve it on a sandwich or a salad. It will be ready to eat after about 1 week, but I prefer to age it for 2 weeks or so in the refrigerator so that the texture is firmer.
1. Diagonally score the skin side of the duck breasts by lightly drawing a very sharp knife across the skin and through the fat cap, making the cuts about 1⁄2inch apart. Make a second set of diagonal cuts in the opposite direction so that the skin and fat are scored to make a diamond pattern.
2. Pat the breasts dry with paper towels until they are a bit tacky to the touch. Place them in a shallow dish that can hold the duck flat in a single layer.
3. Combine the sugar, salt, orange zest, coriander, sage, and pepper in a small bowl. Rub this cure all over both sides of the duck, including into the crevices of the skin. Place the duck back in the dish, skin side up. Cover the dish tightly with plastic wrap and refrigerate for 4 days. After a day or so, you’ll notice a lot of liquid in the bottom of the dish; this is normal and expected.
4. Flip the duck breasts and cover the dish tightly with the plastic wrap again. Refrigerate for another 3 days.
5. At this point, the duck should have a dark red color and feel firm all over, like a well-done steak. This means that your meat is cured. If it still feels very soft, flip the meat again and let it sit for another day or two.
6. Preheat your oven to 200°F (90°C). Place a rack over a rimmed baking sheet.
7. To ensure that your duck is safe to eat, place it on the rack, fat side up, in the preheated oven. Heat the duck for about 25 minutes, or until it reaches an internal temperature of 160°F (70°C).
8. Rinse the duck well and pat it very dry. Slice it razor-thin before serving.
Storage
Wrap your finished duck breast in waxed paper or parchment paper and store it in the cheese compartment of your refrigerator. If it gets too firm and dried out, shield it from the elements in a well-sealed ziplock bag. Wrapped well, it will keep in the refrigerator for at least 6 months.
Smoked Turkey Leg
Ready the mustard! A few slices of this smoked turkey, a good slather of your favorite mustard, and fresh, toothsome bread makes for sandwich heaven. Making smoked turkey is a two-step process: first brining the meat, and then smoking it. The liquid brine helps the meat stay juicy, and the salt helps preserve it and adds flavor. I like using bone-in legs because they have nice flavor. A meat thermometer is highly recommended here, as it is the only way to truly determine whether the meat is thoroughly smoked and safe to eat.
21⁄2 pounds bone-in turkey leg or turkey leg quarters
Instructions
1. Combine the water, salt, sugar, garlic, and peppercorns in a deep bowl or food-safe bucket or container and mix thoroughly to dissolve the salt and sugar. Submerge the turkey completely in the brine. Cover the bird with an inverted plate and weight the plate with rocks or a jar full of water to help keep the turkey below the brine line. Move the bucket to the refrigerator and let it sit for 2 days.
2. Discard the brine and all the solid ingredients and pat the turkey dry. Let it sit on a rack under a fan to help it dry while you prepare the grill for hot or cold smoking.
3. If hot-smoking, smoke the turkey skin side up, with the thickest portion closest to the flame, until it reaches an internal temperature of 160°F (70°C) in the center of its thickest part and away from the bone. Note that you may need a second batch of coals after about 11⁄2 hours, but the total cooking time should be 2 to 21⁄2 hours.
If cold-smoking, smoke the meat for 12 hours, then finish it in the oven at 250°F (120°C) or on a low-flame grill for about 1 hour, until it reaches an internal temperature of 160°F (70°C).
Storage
Wrap the cooked and cooled turkey tightly with a double layer of plastic wrap. Store in the refrigerator for up to 10 days or in the freezer for several months.
Thanksgiving Turkey Jerky
If the thought of enjoying Thanksgiving flavors in the backwoods or when snacking on the go is appealing to you, this is your jerky. Sweet, acidic cranberry and savory herbs flavor low-fat, high-protein dried turkey jerky and make it pinkish. Not included: dried nuggets of pumpkin pie and stuffing alongside.
3 fresh rosemary sprigs, cut into pieces, plus more for finishing
3 fresh sage sprigs, cut into pieces, plus more for finishing
Neutral cooking oil (like olive, avocado, sunflower, or safflower oil) to lightly oil the racks (for oven drying)
Instructions
1. Freeze the meat for 30 minutes to make it easier to slice thinly. With a very sharp knife, slice the meat against the grain as thinly as you possibly can (1⁄8 to 1⁄4 inch thick).
2. Pour the cranberry juice into a large bowl and add the salt, garlic, rosemary, and sage. Add the meat. Mix to combine, cover, and let the meat marinate in the brine in the refrigerator for 12 to 24 hours.
3. Drain the meat, discarding the brine and all of the solids. Now it’s time to dry the meat.
Drying in an Oven
1. Preheat your oven to its lowest setting. Position one rack in the middle of the oven and one rack on the bottom. Line two baking sheets with parchment paper.
2. Lightly oil two wire cooling racks and place them on top of the lined baking sheets. Lay the marinated meat on the rack completely flat. Don’t let the pieces touch; allowing airflow in between pieces will help them dry more quickly. Sprinkle the meat with some of the leaves from the remaining fresh herbs.
3. Place the baking sheets in the oven. If you don’t have a convection oven, wedge the oven door open with a wooden spoon handle. Depending on your oven, the weather, and the thickness of the meat, your jerky will be done in 3 to 8 hours. Start checking the jerky after 3 hours. It’s ready when you’re able to bend a piece of jerky and it breaks.
Drying in a Food Dehydrator
Lay the marinated meat on the rack completely flat. Don’t let the pieces touch; allowing airflow in between pieces will help them dry more quickly. Sprinkle the meat with some of the leaves from the remaining fresh herbs. Dry the meat at 160°F (70°C) for 3 to 10 hours, depending on your machine, the weather, and the thickness of the meat. Start checking the jerky after 3 hours. It’s ready when you’re able to bend a piece of jerky and it breaks.
Storage
While your dried jerky is still warm, blot it with paper towels to remove any fat that may be sweating on the surface. Let it cool, then store your jerky in a ziplock bag or an airtight container. While the jerky will keep at room temperature for several days, it will keep longer (6 weeks or more) refrigerated. Double-wrapped and frozen, the jerky will keep for several months. For best results, fill an empty tea bag or a small piece of cheesecloth with raw rice, close it securely, and place it inside the container to help absorb any residual moisture.