Chapter VI
PERSONAL PROTECTION
1. Priorities
a. Evaluate available resources and situation, then accomplish individual tasks accordingly.
b. First 24 hours in order of situational needs—
(1) Construct survival shelter according to selection criteria.
(2) Procure water.
(3) Establish multiple survival signals.
(4) Build Fire.
c. Second 24 hours in order of situational needs—
(1) Construct necessary tools and weapons.
(2) Procure food.
2. Care and Use of Clothing
a. Never discard clothing.
b. Wear loose and layered clothing.
(1) Tight clothing restricts blood flow regulating body temperature.
(2) Layers create more dead air space.
c. Keep entire body covered to prevent sunburn and dehydration in hot climates. When fully clothed, the majority of body heat escapes through the head and neck areas.
d. Avoid overheating.
(1) Remove layers of clothing before strenuous activities.
(2) Use a hat to regulate body heat.
(3) Wear a hat when in direct sunlight (in hot environment).
e. Dampen clothing when on the ocean in hot weather.
(1) Use salt water, NOT drinking water.
(2) Dry clothing before dark to prevent hypothermia.
f. Keep clothing dry to maintain its insulation qualities (dry damp clothing in the sun or by a fire).
g. If you fall into the water in the winter—
(1) Build fire.
(2) Remove wet clothing and rewarm by fire.
(3) Finish drying clothing by fire.
h. If no fire is available—
(1) Remove clothing and get into sleeping bag (if available).
(2) Allow wet clothes to freeze.
(3) Break ice out of clothing.
i. Keep clothing clean (dirt reduces its insulation qualities). Examine clothing frequently for damage.
(1) DO NOT sit or lie directly on the ground.
(2) Wash clothing whenever possible.
(3) Repair when necessary by using—
(a) Needle and thread.
(b) Safety pins.
(c) Tape.
j. Improvised foot protection (Figure VI-1).
(1) Cut 2 to 4 layers of cloth into a 30-inch square.
(2) Fold into a triangle.
(3) Center foot on triangle with toes toward corner.
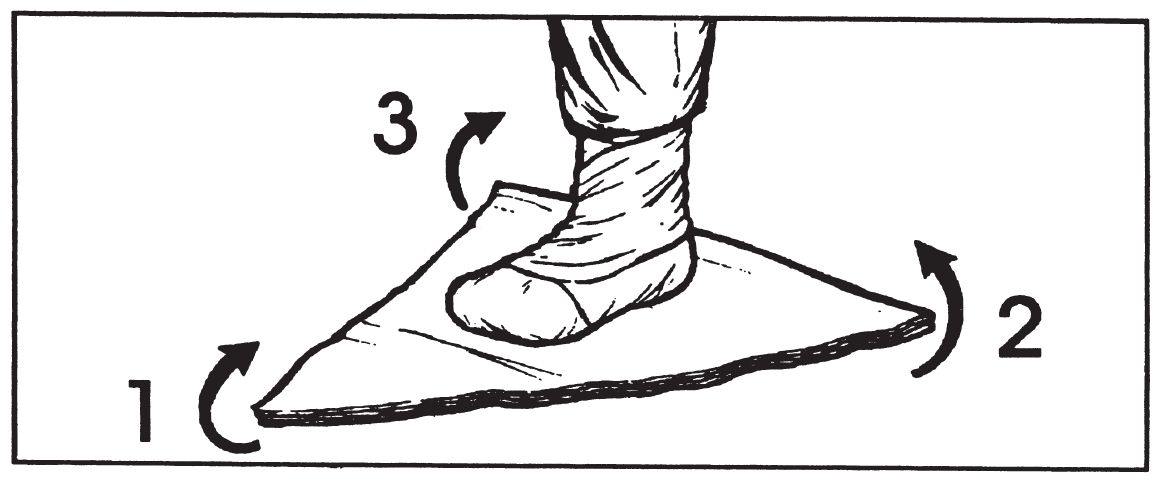
Figure VI-1 Improvised Foot Wear
(4) Fold front over the toes.
(5) Fold side corners, one at a time, over the instep.
(6) Secure by rope, vines, tape, etc., or tuck into other layers of material.
3. Other Protective Equipment
a. Sleeping bag.
(1) Fluff before use, especially at foot of bag.
(2) Air and dry daily to remove body moisture.
(3) Improvise with available material, dry grass, leaves, dry moss, etc.
b. Sun and snow goggles (Figure VI-2).
(1) Wear in bright sun or snow conditions.
(2) Improvise by cutting small horizontal slits in webbing, bark, or similar materials.

Figure VI-2. Sun and Snow Goggles
c. Gaiters (Figure VI-3). Used to protect from sand, snow, insects, and scratches (wrap material around lower leg and top of boots).
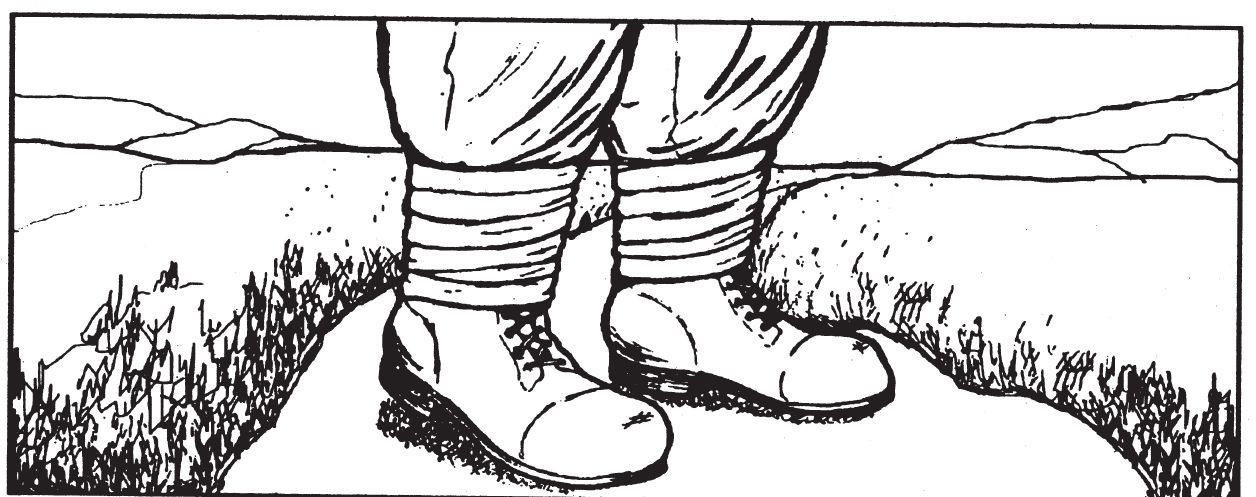
Figure VI-3. Gaiters
4. Shelters
Evasion considerations apply.
a. Site selection.
(1) Near signal and recovery site.
(2) Available food and water.
(3) Avoid natural hazards:
(a) Dead standing trees.
(b) Drainage and dry river beds except in combat areas.
(c) Avalanche areas.
(4) Location large and level enough to lie down in.
b. Types.
(1) Immediate shelters. Find shelter needing minimal improvements (Figure VI-4).
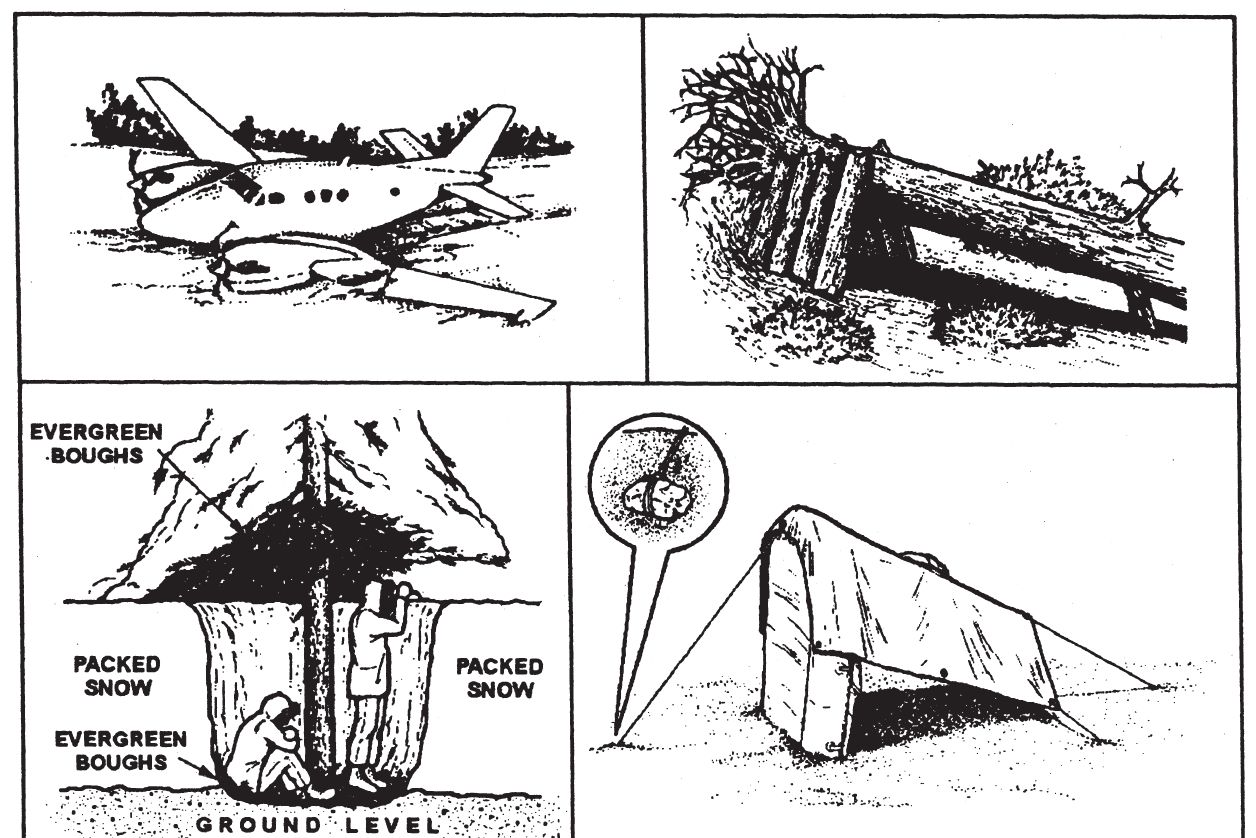
Figure VI-4. Immediate Shelters
(2) General shelter. Temperate climates require any shelter that gives protection from wind and rain.
(3) Thermal A Frame, Snow Trench, Snow Cave. (Figures VI-5 through VI-7). Cold climates require an enclosed, insulated shelter.
(a) Snow is the most abundant insulating material.
(b) Air vent is required to prevent carbon monoxide poisoning when using an open flame inside enclosed shelters.
Note: As a general rule, unless you can see your breath, your snow shelter is too warm and should be cooled down to preclude melting and dripping.
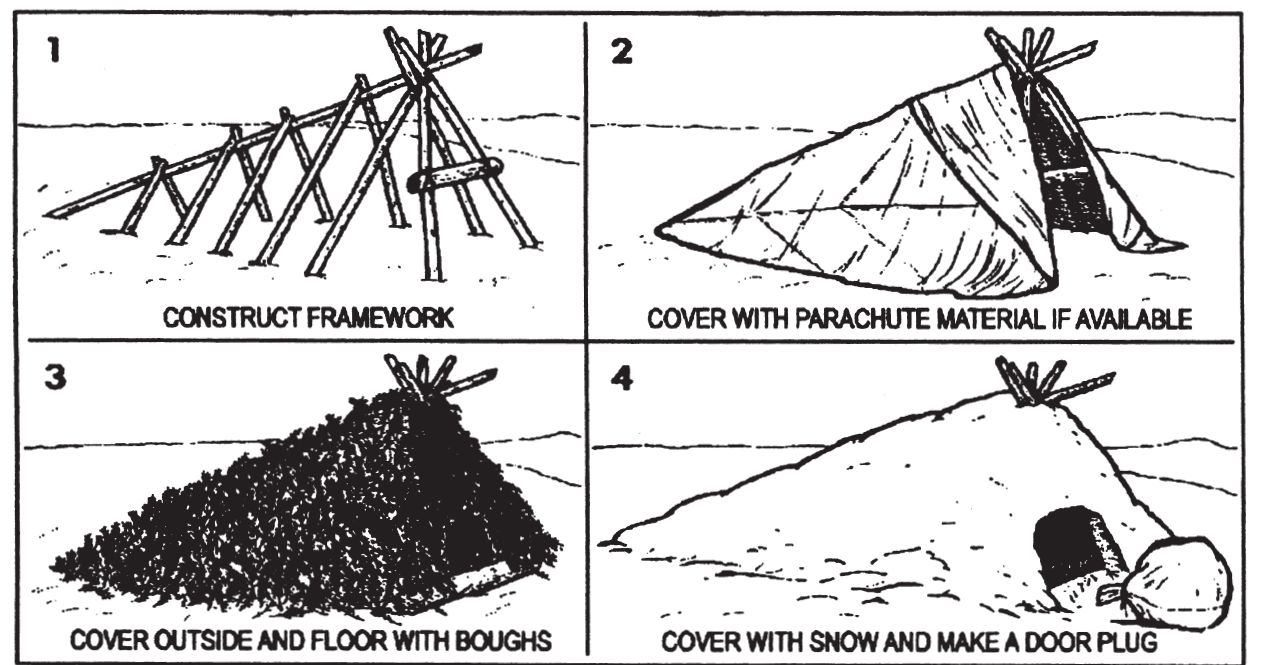
Figure VI-5. Thermal A Frame
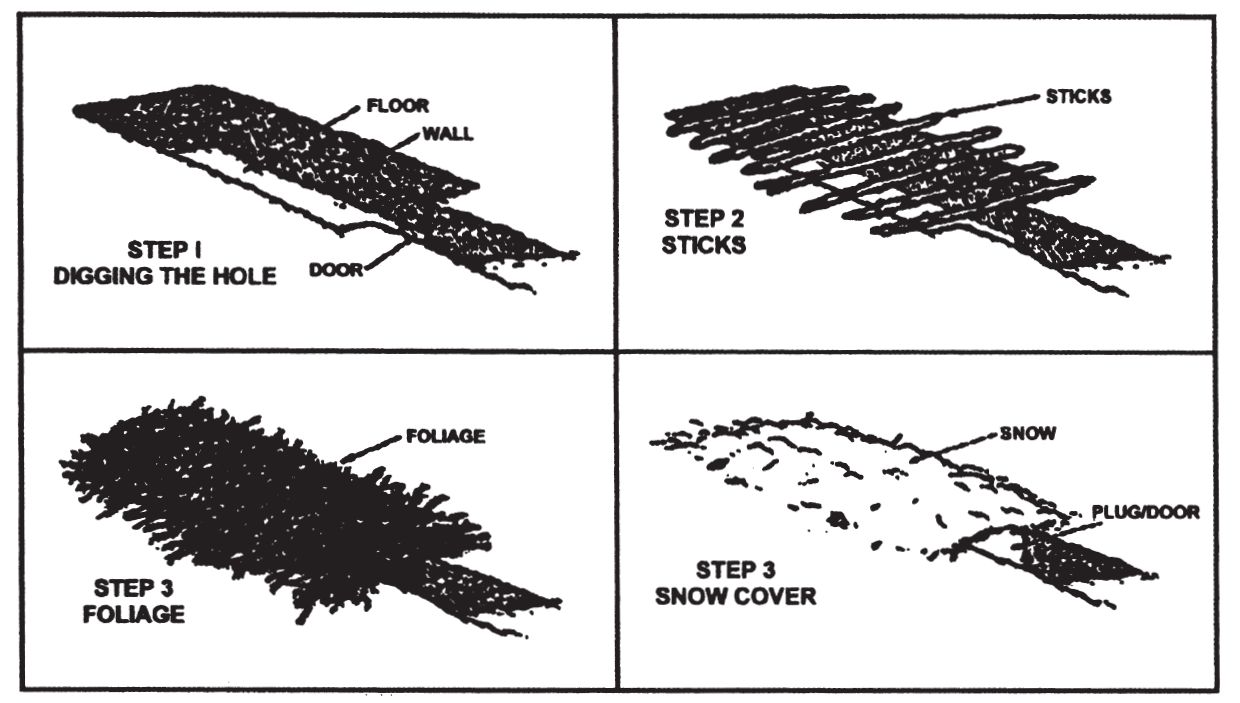
Figure VI-6. Snow Trench
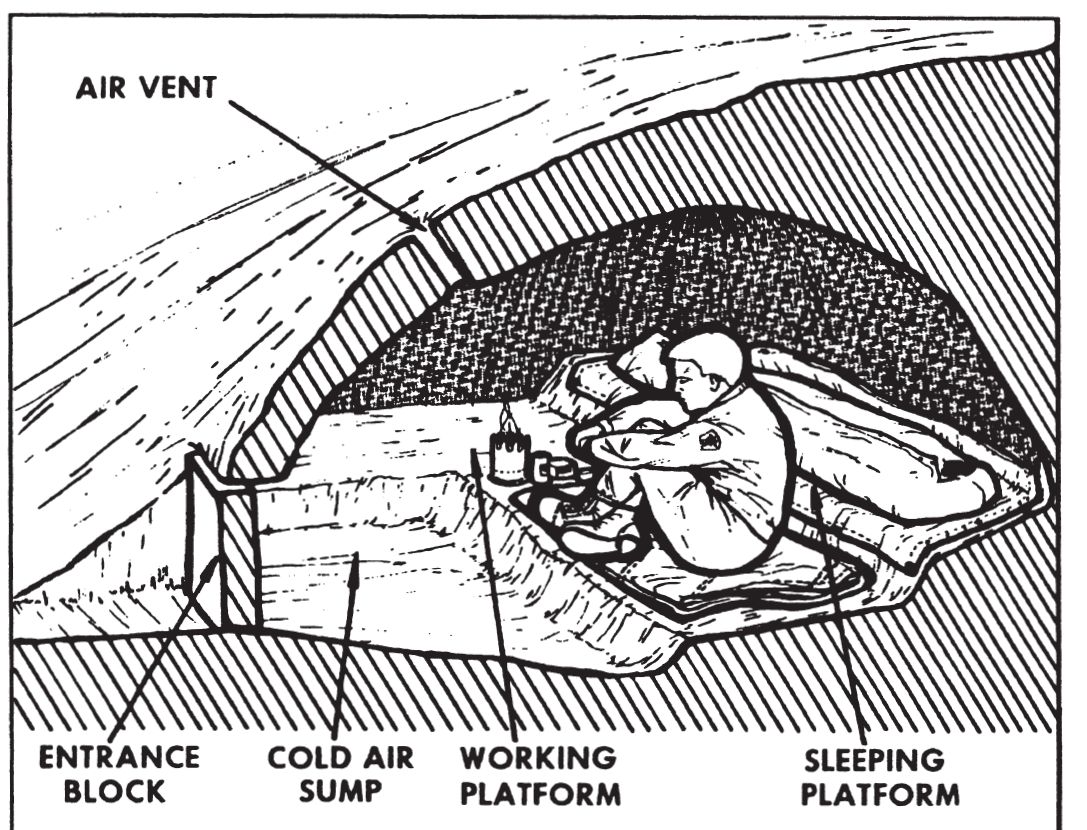
Figure VI-7. Snow Cave
(4) Shade shelter. Hot climates require a shade shelter to protect from ultraviolet rays (Figure VI-8).
(a) To reduce the surface temperature, the shelter floor should be elevated or dug down (approximately 18 inches).
(b) For thermal protection, a minimum of 2 layers of material suspended 12-18 inches above the head is required. White is the best color to reflect heat (inner most layer should be of darker material).
(5) Elevated platform shelter (Figure VI-9). Tropical/wet climates require enclosed, elevated shelter for protection from dampness and insects.
c. Shelter construction.
(1) Have entrance 45-90 degrees from prevailing wind.
(2) Cover with available material.
(a) If natural materials are used, arrange them in layers starting at the bottom with each layer overlapping the previous one. See Figure VI-10 for an example.
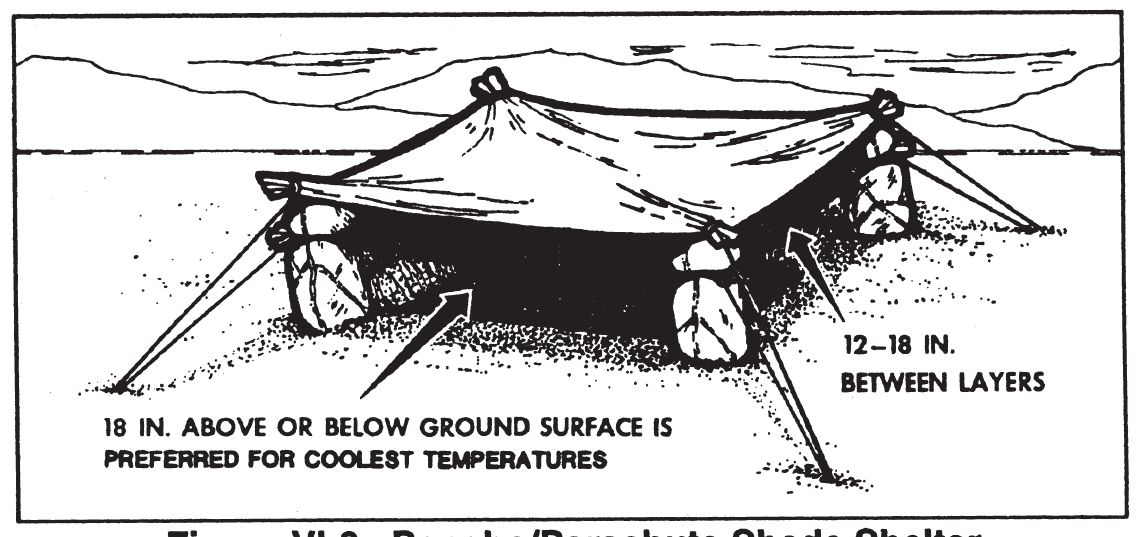
Figure VI-8. Poncho/Parachute Shade Shelter
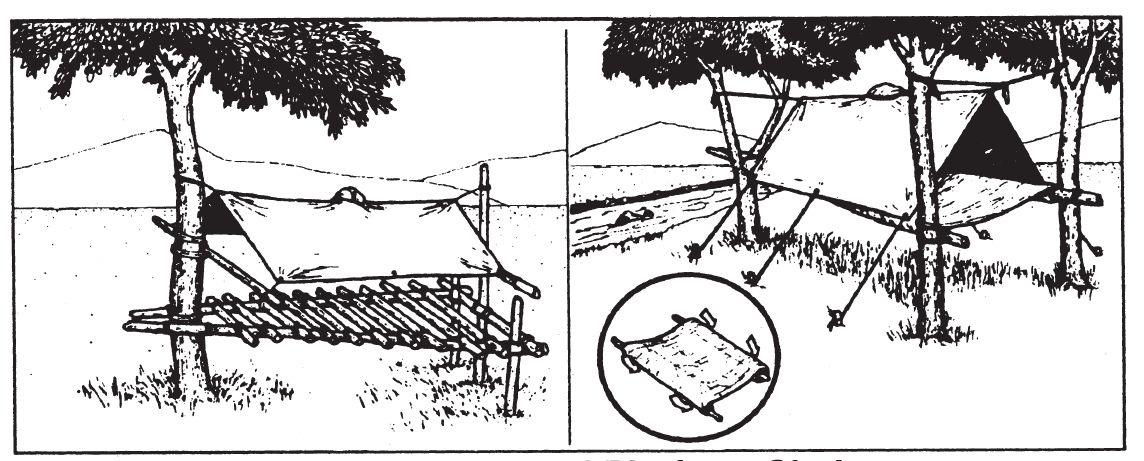
Figure VI-9. Elevated Platform Shelter
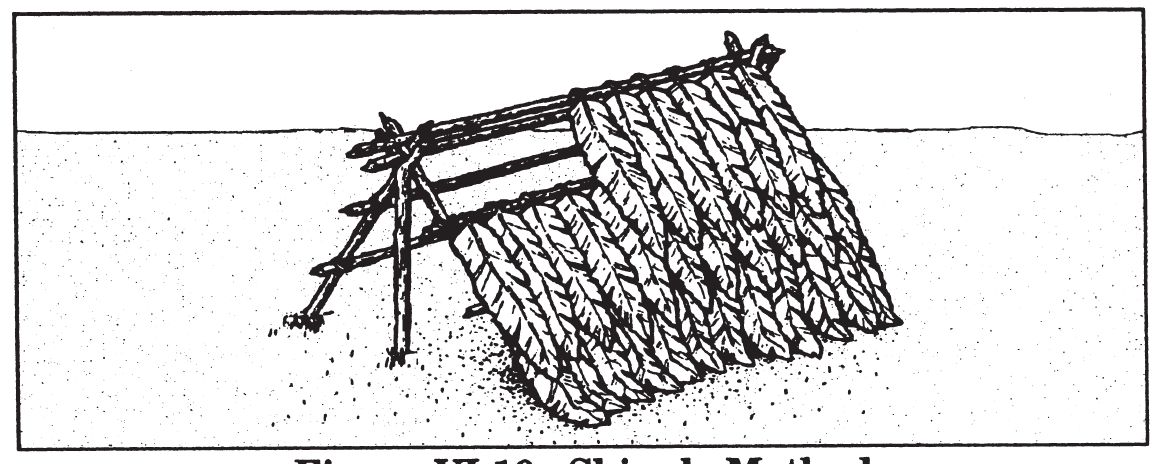
Figure VI-10. Shingle Method
(b) If using porous material like parachute, blankets, etc.—
- Stretch as tight as possible
- Use a 40—60 degree slope.
- Use additional layers in heavy rain.
d. Shelter construction materials:
(1) Raft and raft parts.
(2) Vehicle or aircraft parts.
(3) Blankets, poncho, or parachute material.
(4) Sheet of plastic or plastic bag.
(5) Bark peeled off dead trees.
(6) Boughs, broad leaves, dry moss.
(7) Grass and sod.
(8) Snow.
(9) Sand and rocks.
e. Bed construction. Construct a bed to protect from cold, damp, ground using—
(1) Raft or foam rubber from vehicle seats.
(2) Boughs, leaves, or dry moss.
5. Fires
CAUTION: Weigh hazards and risks of detection against the need for a fire.
a. Evasion considerations:
(1) Use trees or other sources to dissipate smoke.
(2) Use fires at dusk, dawn, or during inclement weather.
(3) Use fires at times when the local populace is cooking.
b. Fire building. The 3 essential elements for starting a fire are heat, fuel, and oxygen.
(1) Heat sources:
(a) Matches or lighter.
(b) Flint and steel (experiment with various rocks and metals until a good spark is produced).
(c) Sparks from batteries.
(d) Concentrated sunlight (use magnifying glass or flashlight reflectors).
(e) Pyrotechnics, such as flares (last resort), etc.
(f) Friction method (Figure VI-11). Without prior training, this method is difficult to master and requires a lot of time to build the device.
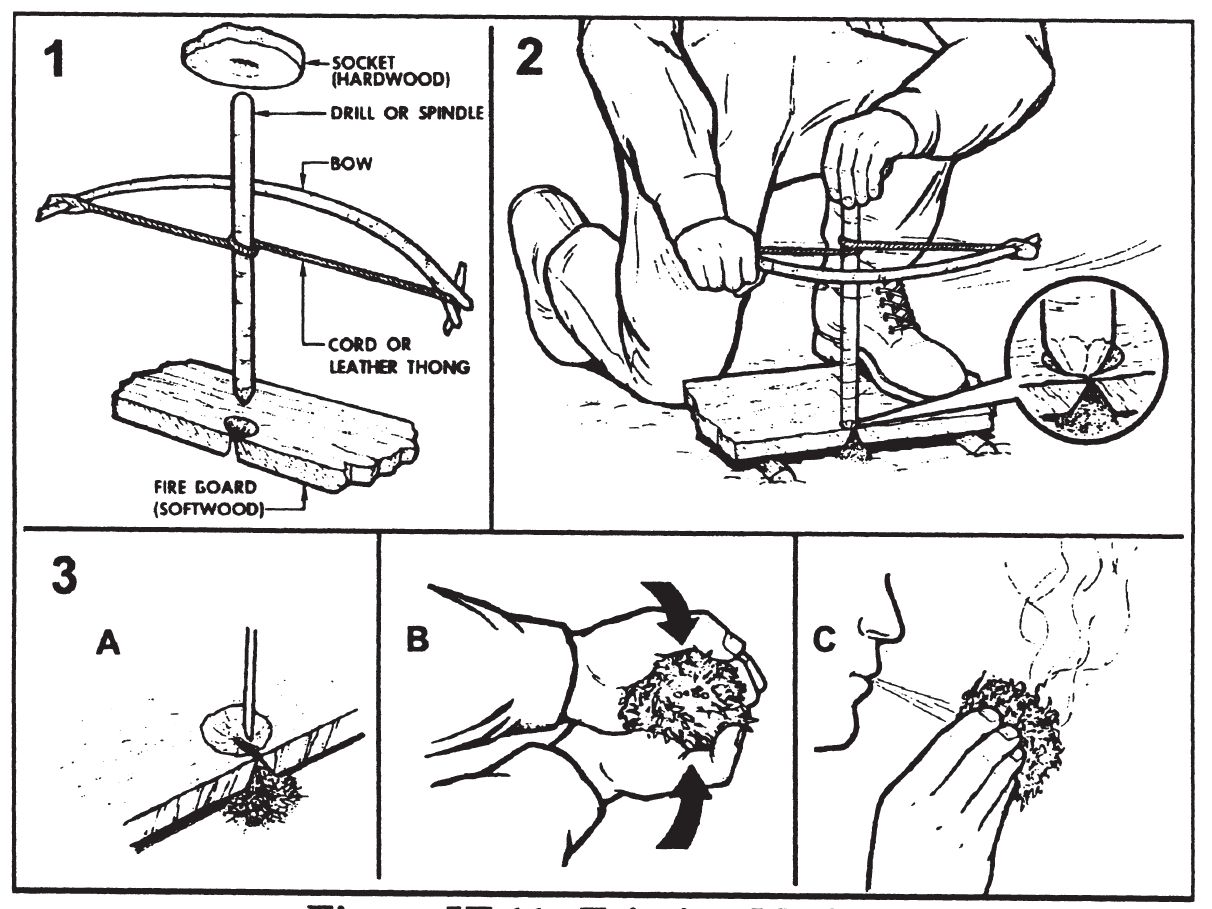
Figure VI-11. Friction Method
Note: If possible, carry a fire-starting device with you.
(2) Fuel is divided into 3 categories: tinder, kindling, and fuel. (Gather large amounts of each category before igniting the fire.)
(a) Tinder. Tinder must be very finely shaved or shredded to provide a low combustion point and fluffed to allow oxygen to flow through. (To get tinder to burn hotter and longer, saturate with Vaseline, Chapstick, insect repellant, aircraft fuel, etc.) Examples of tinder include—
- Cotton.
- Candle (shred the wick, not the wax).
- Plastic spoon, fork, or knife.
- Foam rubber.
- Dry bark.
- Dry grasses.
- Gun powder.
- Pitch.
- Petroleum products.
(b) Kindling. Kindling must be small enough to ignite from the small flame of the tinder. Gradually add larger kindling until arriving at the size of fuel to burn.
(c) Fuel. Examples of fuel include—
- Dry hardwood (removing bark reduces smoke).
- Bamboo (open chambers to prevent explosion).
- Dry dung.
c. Types. Fires are built to meet specific needs or uses.
(1) Tepee fire (Figure VI-12). Use the tepee fire to produce a concentrated heat source for cooking, lighting, or signaling.
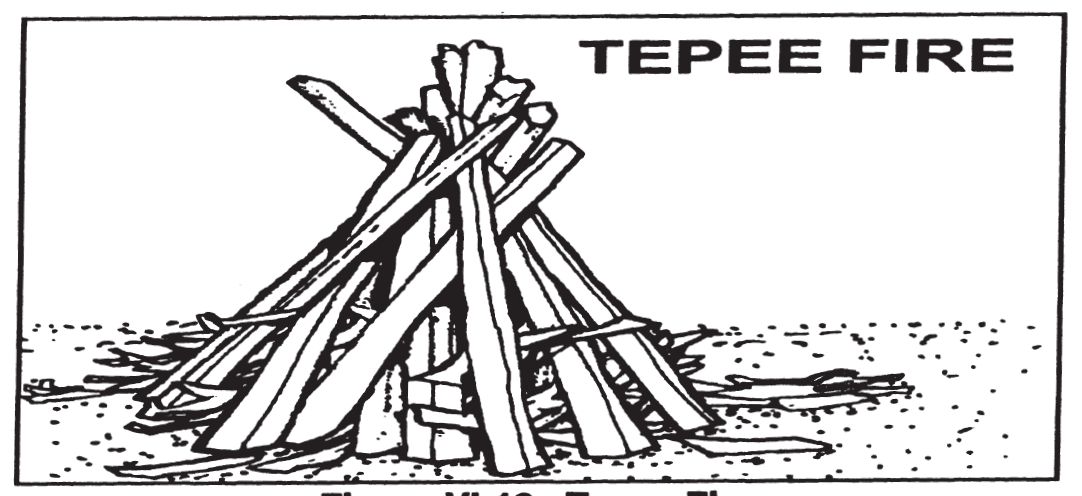
Figure VI-12. Tepee Fire
(2) Log cabin fire (Figure VI-13). Use the log cabin fire to produce large amounts of light and heat, to dry out wet wood, and provide coals for cooking, etc.
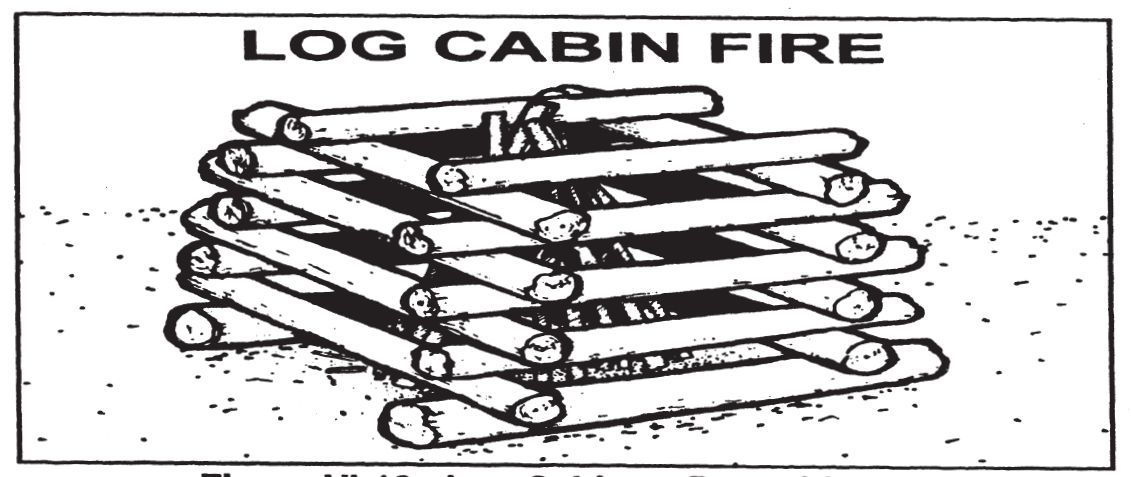
Figure VI-13. Log Cabin or Pyramid Fires
(3) Sod fire and reflector (Figure VI-14). Use fire reflectors to get the most warmth from a fire. Build fires against rocks or logs.
CAUTION: DO NOT use porous rocks or riverbed rock—they may explode when heated.
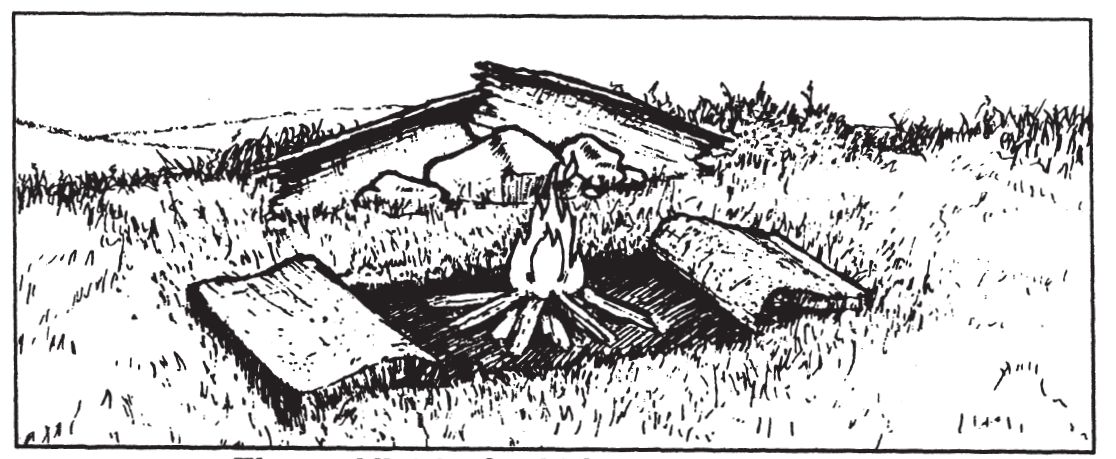
Figure VI-14. Sod Fire and Reflector
(4) Dakota fire hole (Figure VI-15). Use the Dakota fire hole for high winds or evasion situations.
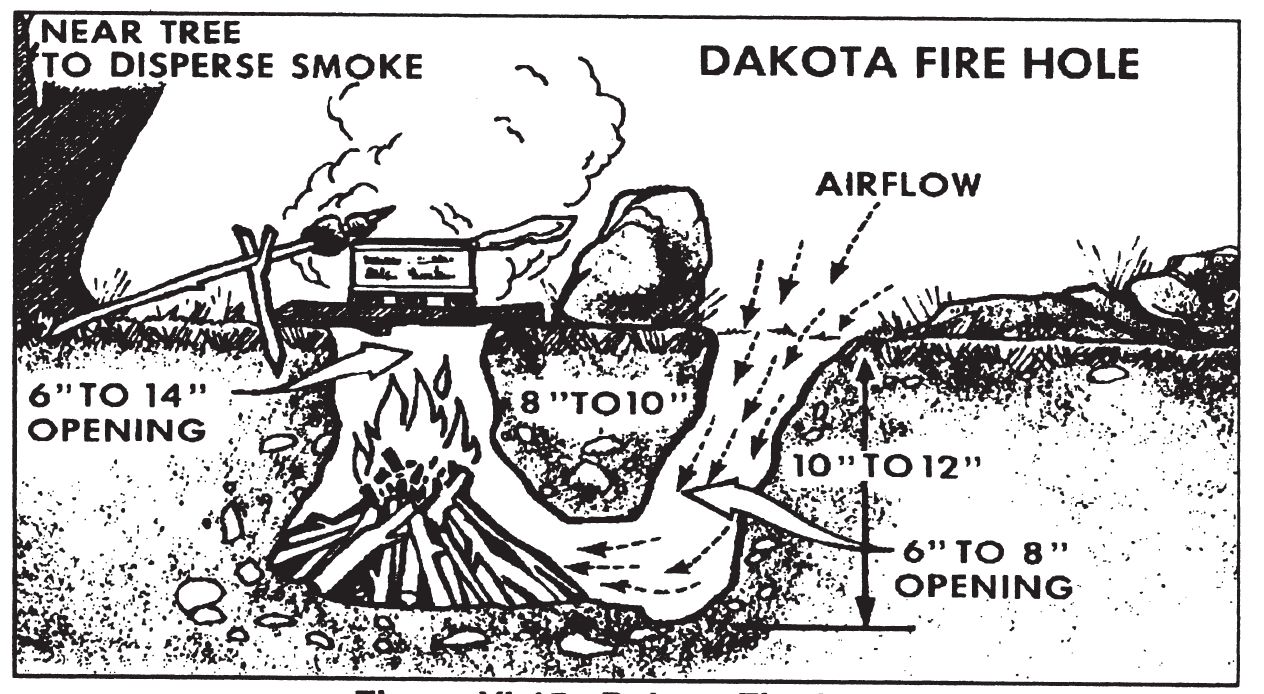
Figure VI-15. Dakota Fire Hole
(5) Improvised stoves (Figure VI-16). These are very efficient.
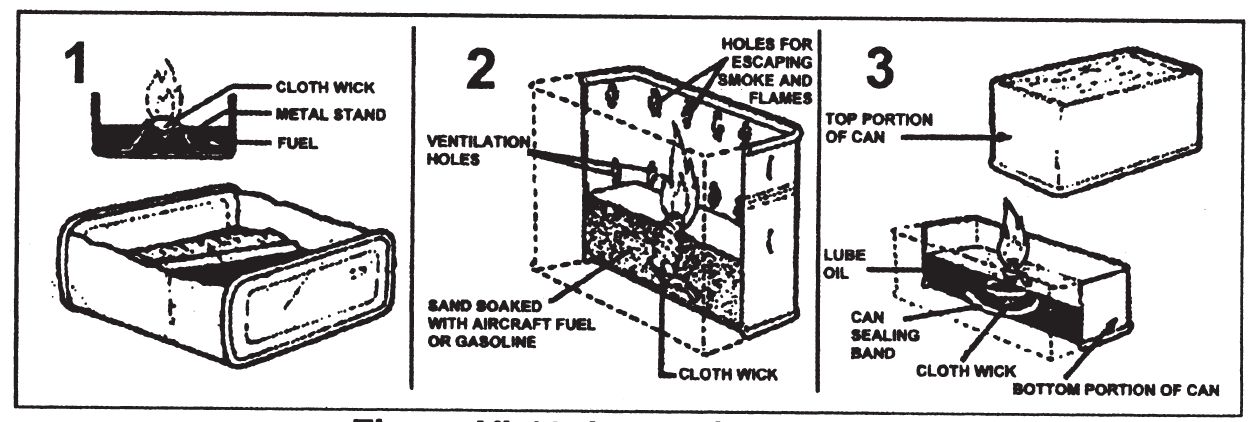
Figure VI-16. Improvised Stove