
The Headstand (see pages 102–3), considered the “king” of yoga poses, is highly beneficial for expansive breathing. With regular practice, it brings an abundance of radiant vyana energy to your head and upper body. It also rests your heart and circulatory system, which carry out the work of your vyana energy, by inverting your body and allowing gravity to assist the return of the blood to your heart. However, for newcomers to yoga, this pose may be daunting. Build up to it by practising Fish Pose (see opposite), which is also noted for its heart-expanding properties. This pose opens your chest, enhancing your breathing capacity and making your emotions feel more “open”, too. If you tend to breathe shallowly, have panic attacks or suffer from asthma, you may find that regular practice of this pose helps to strengthen your respiratory system and can ease your breathing problems (however, never practise any yoga poses during an asthma attack).
If you are new to yoga, start by practising Fish Pose on its own or after the Shoulder Stand and Plough Pose (see pages 146–7). Once you can comfortably hold the pose, try the Half Headstand (see page 102), and move on to the full pose when you feel confident. This may not be as physically difficult as you imagine and may bring you to face to face with your fears, encouraging you to overcome them – this is your vyana energy in action. If you already practise yoga, it is best to follow these poses in a sequence – start with full Headstand (see page 103), coming up into it through Half Headstand, and finish with Fish Pose. If the inversions are contraindicated for you (see caution, page 103), just practise Fish Pose instead.
1 Lie on your back on the floor with your legs stretched out straight. Bring your legs and feet together. Place your hands, palms downward, beneath your thighs, one on each side.
2 Bend your elbows, pushing them into the ground. Lift your chest up, then carefully take your head back until the crown of your head rests gently on the floor. Keep your body weight mainly on your elbows. There should be very little weight on your head or neck.
3 Hold the pose for 10–30 seconds. Your chest is wide open in this position, so take advantage by breathing as deeply as possible. To engage your ribcage in the breathing, imagine that your ribs are like the gills of a fish, opening to pull in oxygen. This encourages the circulation of vyana throughout your body. Gradually build up to a 2-minute hold.
4 To come out of the pose: lift your head slightly, slide your head back and lower your back to the ground. Lie here and relax for a few moments.

CAUTION: AVOID IF YOU SUFFER FROM MIGRAINE HEADACHES, HAVE HAD A WHIPLASH OR OTHER RECENT NECK INJURY, OR HAVE HIGH BLOOD PRESSURE.
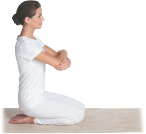
1 Kneel with your knees and feet together, then sit with your buttocks resting on your heels. Bend your elbows and grasp each elbow with your opposite hand.
2 Bend forward and place your elbows on the ground directly beneath your shoulders. Without moving your elbows, release your hands. Clasp your hands together by gently interlocking the fingers to create a tripod shape with your arms and hands. This will guide your body weight safely onto your elbows rather than onto your head or neck.

3 Place the top of your head on the ground and rest the back of your skull gently against your clasped hands. Straighten your knees without moving your head or your elbows.
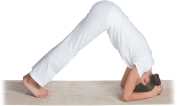
4 Slowly walk your feet forward until your hips are directly aligned over your head. Try to keep your arms and head still and make sure that your weight remains on your elbows and not your head. Remember that throughout the pose your elbows should be holding you up.
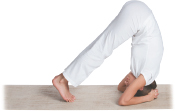
5 Bend your knees without letting your hips drop. Bring your heels up to your buttocks, keeping your knees bent. Do not jump; come up slowly. Breathe deeply and hold this position – the Half Headstand. Make sure you can comfortably hold it for at least 10 seconds before moving on. This may take some days or even weeks of practice. Until you are ready to move on, come down slowly and rest with your forehead on the ground for a minute.
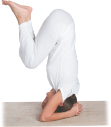
6 When you feel ready to progress to a full Headstand, practise steps 1–5, then, keeping your knees bent, slowly lift them toward the ceiling. Be aware of your elbows, allowing them to support most of your body weight.
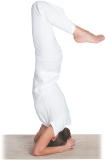
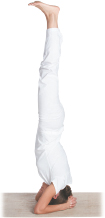
7 Gradually straighten your knees, lifting your feet until your body is in a straight line. Keep your weight evenly balanced on your elbows, with very little weight on your head or neck. Breathe deeply and hold the position for as long as you feel comfortable – begin with 10 seconds, gradually building up to 3 minutes. When you are ready, bend your knees and come down slowly. Keep your head down and rest your buttocks on your heels with your forehead on the ground for a full minute before sitting up.
CAUTION: AVOID BOTH POSES IF YOU HAVE HIGH BLOOD PRESSURE, GLAUCOMA, DETACHED RETINA, A COLD OR A BLOCKED NOSE, A WHIPLASH OR OTHER NECK INJURY, AND DURING PREGNANCY. DO NOT PRACTISE INVERTED POSES DURING MENSTRUATION.