Set Up Your Apple TV
The Apple TV is simple to set up; just connect the proper cables to your home entertainment center and follow the onscreen instructions. But I show you how to make that initial setup even easier. If you own a compatible iOS 7 device, all you have to do is turn on your Apple TV and touch your iPhone, iPod, or iPad to it!
In this chapter, I offer advice on what to do if you own an older TV without HDMI inputs, the best places to buy an HDMI cable, whether to use a wired or wireless Internet connection, and the settings you’ll want to look at right away.
Make the Connections
Before you can do anything with the Apple TV, you have to connect it to your television and network. Let’s look at the ports on the back of your Apple TV (Figure 1).
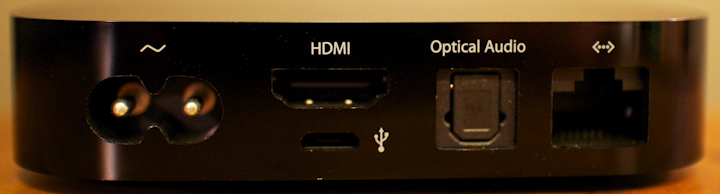
Figure 1: The ports on the back of your Apple TV, from left to right: Power, HDMI, Micro USB, Optical Audio, and Ethernet.
~ (Power)
Without electricity, the Apple TV is only an attractive paperweight. Insert one end of the included power cable into this port and connect the other end to a power outlet. But, wait, not yet! Read through this chapter before plugging it in, as the Apple TV powers on right away.
HDMI
Without a display, the Apple TV is again merely a pretty paperweight. HDMI transmits both audio and video from your Apple TV to your television. Unfortunately, an HDMI cable is not included, but the upside of that fact is that you can pick the length (and color) that will work best with your setup. After you track down an HDMI cable, connect one end of it to the Apple TV and the other end to your television set or receiver.
Micro USB
You will probably never have to touch this port. It’s needed only if you have to restore your Apple TV from iTunes or install developer betas.
Optical Audio
Also known as S/PDIF or TOSLINK, the optical audio output allows you to connect the Apple TV to home-theater receivers that do not feature an HDMI port, or don’t support audio over HDMI. You can also use it to connect an Apple TV to a soundbar. If you don’t own a receiver or soundbar, you can ignore this port. (I talk more about uses for this port in Rock Out with Apple TV.)
<···> (Ethernet)
If you wish to connect the Apple TV to your network with a wired network connection instead of using Wi-Fi, then you do that here.
Pick an Input Device for Setup
The Apple Remote works well enough for clicking around in the Apple TV interface, but typing login credentials for your Apple ID and wireless network, or for services like Hulu or Netflix, is like mowing the lawn with nail clippers. I’ll look carefully at each of these input options in Control Your Apple TV, but here’s a quick overview to get you through setup:
- Recent iOS device, running iOS 7: With iOS 7 installed on an iPhone 5 or later, third-generation iPad or later (including a first-generation iPad mini), or fifth-generation iPod touch, your initial setup is drastically simplified. However, all the initial setup does is speed you through inputting your Apple ID credentials and (possibly) your wireless network login. If you’ll be signing in to additional services or searching within your Apple TV content, install Apple’s free Remote app on your iOS device to make it possible to type using your device’s onscreen keyboard instead of the Apple Remote.
- An iOS device running at least iOS 5: After the first few minutes of setup, the Remote app is a good option for entering logins and for searching.
- Bluetooth keyboard: A Bluetooth keyboard makes it easy to enter your credentials. You (or a friend) may have a Bluetooth keyboard connected to a computer or iOS device that you can borrow temporarily to simplify set up. Or, if you have an extra keyboard, keep it connected to the Apple TV permanently to make it easier to navigate the interface. (If you don’t own a Bluetooth keyboard, you can use the Type2Phone app to control your Apple TV from a Mac. However, the setup can be tricky; see Control the Apple TV with Your Mac’s Keyboard.)
- Apple Remote: The interface for typing with the Apple Remote leaves a lot to be desired, but it can be done.
Set Up the Easy Way (Automatic Setup)
You need an iPhone, iPod touch, or iPad running iOS 7 in order to carry out this fun setup method.
With your Apple TV plugged into your TV and/or receiver, it’s time to fire it up. Plug the power cable into the Apple TV and it should boot up immediately. If not, press the Select button on the Apple Remote (the big silver button in the middle of the directional ring) to turn it on.
After a few loading screens, you’re presented with a welcome screen (Figure 2).
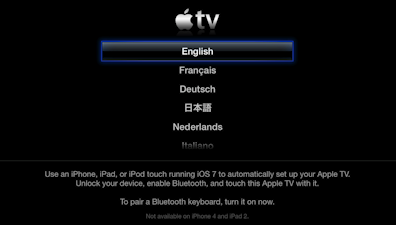
Figure 2: With the welcome screen showing, you can use a compatible iOS 7 device like a wizard’s wand to automate setup.
Pick up your iOS 7 device and check the status bar at the top of the Home screen. If Bluetooth is enabled, you’ll see a Bluetooth ![]() icon on the right side of the status bar. If you don’t see the icon, bring up Control Center by swiping up from the bottom of the screen, then tap the Bluetooth
icon on the right side of the status bar. If you don’t see the icon, bring up Control Center by swiping up from the bottom of the screen, then tap the Bluetooth ![]() button in the top row. You should now see the Bluetooth icon in the status bar.
button in the top row. You should now see the Bluetooth icon in the status bar.
With Bluetooth enabled, touch your iOS device to the Apple TV until the setup prompt appears on the iOS device’s screen. Enter your Apple ID password (Figure 3). You are asked if you want the Apple TV to remember your password. Go ahead and tap Yes. Next, you are asked if you’d like to automatically send data to Apple. If you value your privacy, tap No Thanks.

Figure 3: With the new Automatic Setup option in iOS 7 and Apple TV 6.0, you’re only a touch away from setting up your Apple TV.
The Apple TV imports your Apple ID and Wi-Fi credentials automatically. When you see the Apple TV main menu, with its icon grid, you’re done! However, you still must manually enter passwords for Netflix, Hulu, and other third-party services.
For now, skip ahead to Finishing Touches.
Set Up the Hard Way (Manual Setup)
To set up your Apple TV manually, you should proceed in one of two ways:
- If you’ll be using a Bluetooth keyboard for input, keep reading just below this list.
- If you won’t be using a Bluetooth keyboard for input, plug the power cable into your Apple TV to fire it up. If doesn’t turn on immediately, press the Select button on the Apple Remote (the big silver button in the middle of the directional ring). Skip ahead to Answer a Few Questions.
Pair a Bluetooth Keyboard
While any Bluetooth keyboard should work, Apple officially supports only its own Wireless Keyboard, so that’s what I use here. If you use another make of keyboard, refer to its instructions.
If you own a Bluetooth keyboard, I’m guessing you didn’t buy it to use exclusively with your Apple TV. If your keyboard is paired with a Mac or iOS device, you must first unpair it before using it to set up your Apple TV.
Unpair a Bluetooth Keyboard from a Mac
To unpair your keyboard from a Mac, open System Preferences and open the Bluetooth preference pane. Hover over the keyboard listing, then click the x ![]() that pops up (Figure 4). (In 10.8 Mountain Lion, select the keyboard and click the minus
that pops up (Figure 4). (In 10.8 Mountain Lion, select the keyboard and click the minus ![]() button in the lower left.)
button in the lower left.)
When asked if you want to remove the device, click Remove.
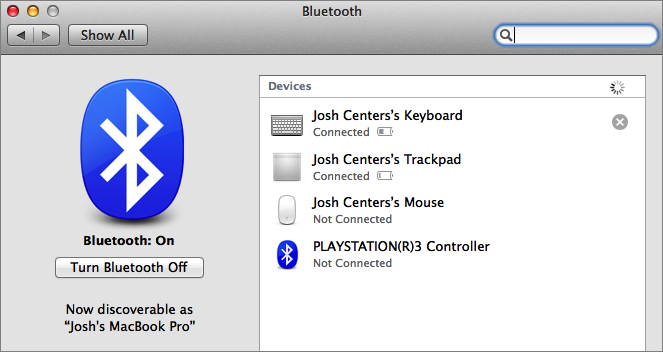
Figure 4: From the Bluetooth preference pane, move your pointer over the listing for your keyboard, then click the x that pops up.
Unpair a Bluetooth Keyboard from an iOS Device
To unpair your keyboard from an iOS device, open Settings, tap Bluetooth, identify your device, then tap the button to the far right of the keyboard’s name. In iOS 6, this button is a blue arrow ![]() ; in iOS 7, it’s an “i”
; in iOS 7, it’s an “i”  . Tap Forget This Device, then tap OK (Figure 5).
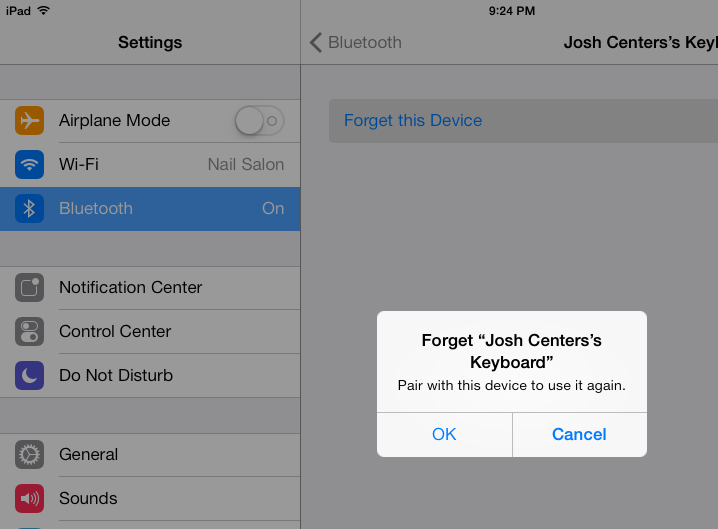
Figure 5: From Bluetooth settings, tap the button adjacent to your keyboard’s name, tap “Forget this Device,” and then tap OK.
Connect Your Keyboard to Apple TV
Once your keyboard is unpaired (an Apple Wireless Keyboard should have a blinking green light in the upper-right corner), turn it off (on the Apple Wireless Keyboard, hold the power button on the upper-right edge of the keyboard). Then turn on your Apple TV by pressing the Select button on the Apple Remote (of course, turn on your TV, too).
When the welcome screen appears, turn on your keyboard (on the Apple Wireless Keyboard, press the power button again). You’ll then be prompted to enter a four-digit code on the keyboard. Do so, then press Return on the keyboard. If pairing is successful, you’ll see a picture of a keyboard in the upper left of the welcome screen (Figure 6).

Figure 6: If keyboard pairing succeeded, you should see a picture of a keyboard in the upper left.
With the keyboard paired, you can navigate the Apple TV’s menus with the arrow keys, select items with the Return key, and exit out of menus with the Esc key. Select your language with the arrow keys on the keyboard, then press Return to continue, as I describe next.
Answer a Few Questions
If you don’t have an Ethernet cable plugged into your Apple TV, you’ll be prompted to select a Wi-Fi network. Select the network from the list, or select Other to manually enter a network name, and then enter your Wi-Fi password.
Finally, you’ll be prompted to automatically send user information to Apple. Select No Thanks to continue.
Finishing Touches
There are a few settings you may want to configure before continuing, or be aware of so you can come back to them later, once you are more familiar with your Apple TV. To access these settings, open the Settings app—the gray tile with a gear in the middle of it (Figure 7)—from the main menu by pressing the Apple Remote’s directional ring to move the selection to the Settings app, then press the center Select button.

Figure 7: To adjust to the Apple TV after initial setup, explore the Settings app in the main menu. In the above image, Settings is in the right column, second item down, with a faint blue selection outline.
Set Up Wi-Fi
If you set up your Apple TV with Ethernet, you can connect to Wi-Fi by going to General > Network > Wi-Fi and following the onscreen instructions.
Set Time Zone Automatically
Navigate to General > Time Zone, and choose Set Automatically. This way, your Apple TV will always have the correct time, without further intervention on your part. The Apple TV determines your time zone based on your network location. If it doesn’t correctly detect your time zone, you can turn this feature off and set it manually.
Turn VoiceOver On or Off
If you require VoiceOver, but didn’t turn it on during setup (or accidentally turned it on), go to General > Accessibility and choose VoiceOver.
Give Your Apple TV a Nickname
If you have multiple Apple TVs, it’s a good idea to name them so you can easily tell them apart in AirPlay menus. To name your Apple TV, select General > Name, and either choose a predefined name, like Living Room, or choose Custom to make up your own.
Sign In to the iTunes Store & iCloud
You’ll need to log in to these services to make and access iTunes purchases, listen to iTunes Match music, listen to iTunes Radio, and view iCloud Photos. You can use a different Apple ID for each service.
To sign in to each service, access the iTunes Store and iCloud menu options.
Enable Restrictions (Parental Controls)
If you have young children, you may want to enable restrictions under General > Restrictions. Select Turn On Restrictions and you’ll be prompted for a four-digit passcode. Be sure it’s one you’ll remember, as you’ll need it to disable or bypass restrictions later! Don’t worry, you’ll have to enter the passcode twice. If you ever forget your passcode, you’ll have to select General > Reset > Reset All Settings, which returns your Apple TV to factory condition.
You can set a number of restrictions, not all of which have to do with censoring content:
- Set Purchase & Rental to Ask to prevent unauthorized purchases.
- Limit iTunes movies and TV shows to certain ratings. For instance, you can limit iTunes to display only G- or PG-rated movies. If someone in the family wants to watch an R-rated movie, he’ll have to enter the passcode. You can do the same for music and podcasts labeled as explicit. Unfortunately, the Apple TV’s restrictions don’t apply to content within third-party apps, such as Netflix. For those, you must adjust each app’s parental controls individually. However, you can limit access to those apps entirely.
- In the Restrictions menu, scroll down to find a listing for almost every app on the Apple TV. You can set each one to Show, Hide, or Ask, the latter of which prompts you for the passcode to open the app. The default settings are pretty intelligent. For example, Trailers, MLB.TV, and Disney Channel are set to Show by default, while HBO GO and Netflix are set to Ask.
- You can also restrict AirPlay. Scroll to the bottom of the menu to see options to restrict AirPlay Settings. For more information on AirPlay, read Master AirPlay.