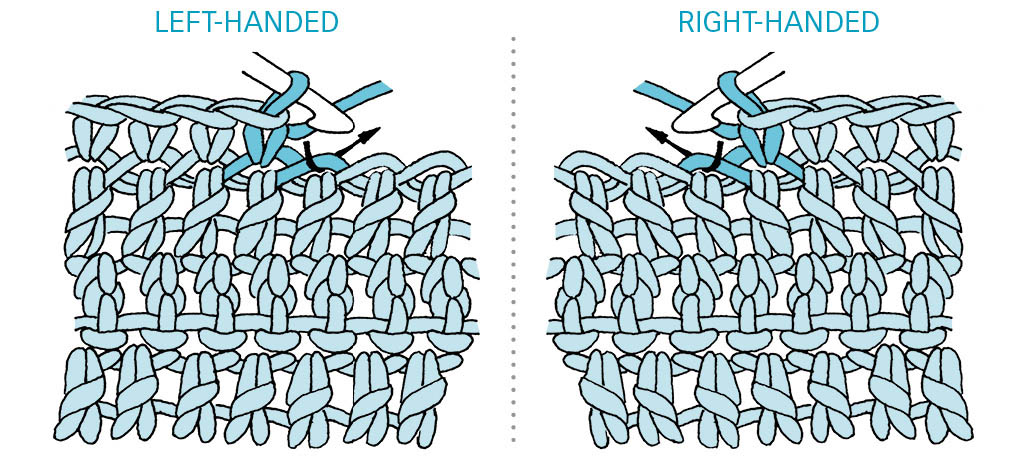
working on the opposite edge of the foundation chain
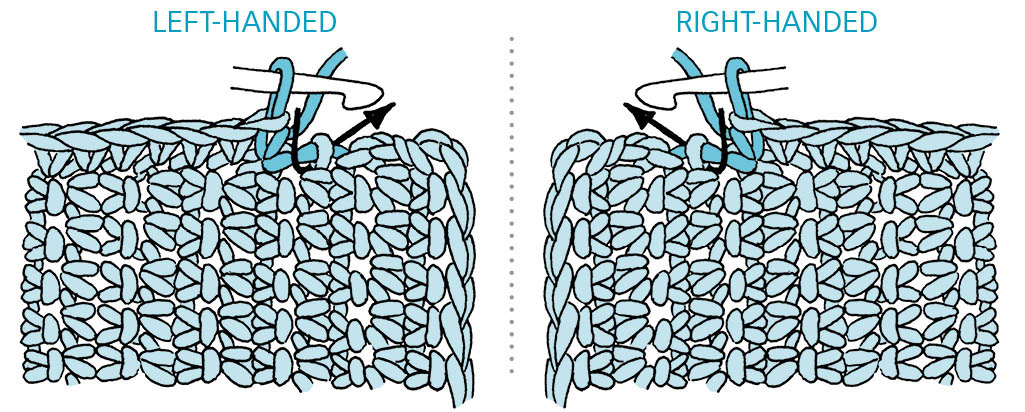
picking up along a side edge
A crocheted border can provide a stabilizing or decorative finished edge to a crocheted fabric. Many knitted sweaters have crocheted borders, and there are even entire books dedicated to crocheted edgings. You’ll find the basics here, but see Books for some additional suggestions.
Q: Where should I put my hook when picking up stitches along an edge?
A: Always work the first row of an edging with the right side facing you.

working on the opposite edge of the foundation chain

picking up along a side edge
Q: What if the gauge of my border stitch pattern is not the same as the gauge of my fabric?
A: You may have to make adjustments. On a horizontal edge, using your swatch as a guide, experiment to see if you should stitch into 3 out of 4 stitches (for instance, 1 stitch in each of the next 3 stitches, skip 1 stitch), into 5 for every 4 (for instance, 1 stitch in next 3 stitches, 2 stitches into next stitch), or some other combination. Do the same thing along a vertical edge, calculating how many stitches you need to put into each row along the edge. Your goal is to crochet a border that lies flat, without drawing in or flaring out. The most important thing is consistency. Take care to insert the hook the same distance into the fabric throughout the edge, and space the stitches evenly.
Q: How do I “pick up stitches” evenly along an edge?
A: If you followed my earlier advice about making a swatch, you can use your swatch to help you. Using a ruler, place markers at 2" intervals along the edge of your swatch. If the border will be worked on both horizontal and vertical edges, be sure to mark both. Using the same number of stitches between each mark, stitch the border you’d like to use on your larger piece. If you’re working from written instructions, there will be instructions for the border, possibly including the number of stitches to use. If you’re adding a different border pattern, or if the specific instructions are not given, or if you cannot achieve the same gauge stated in the instructions, you may have to experiment to get the border to lie perfectly flat. When you are happy with the results, make a note of how many stitches you have within each 2" space on your swatch.
See also: Getting Gauge for gauge swatch.
Now mark 2" intervals on your larger piece, and work the same number of stitches between the marks as you worked on your swatch. It’s usually easy to keep track of the number of stitches within that short distance. (Voice of Experience: Of course, you may skip practicing on the swatch, but you’ll have more to rip out if you don’t get it right the first time.)
Q: Why doesn’t my border lie flat?
A: It sometimes takes several tries to get this right. Start by analyzing what’s happening; then you know what approach to take to correct it:
Sometimes a border looks fine on the first few rows or rounds but starts to misbehave as you work farther. If this happens, use the same logic for adding or subtracting stitches described in How do I make my corners lie flat?.
Q: Can I stitch a continuous border around a piece without turning?
A: Yes. Pick up and work stitches along each vertical and horizontal edge as described above, but when you reach a corner or a curve, make certain adjustments to allow the edging to lie flat. (See the next question.)
Q: How do I make my corners lie flat?
A: For outside corners, think about turning a corner in a car: The outside wheels have to travel farther than the inside wheels to make the turn. The same principle applies when you work an edging on a crocheted piece. The outside rows/rounds have to travel farther than the inside rows/rounds, so you have to add stitches to increase the distance along the outer edge at each corner.
For example, on the first row/round of a single crochet border, work 3 single crochet stitches into each corner stitch. When you finish these 3 stitches, mark the center stitch of the 3-sc group, then when you come to that center stitch the next time around, work 3 single crochet stitches into it.

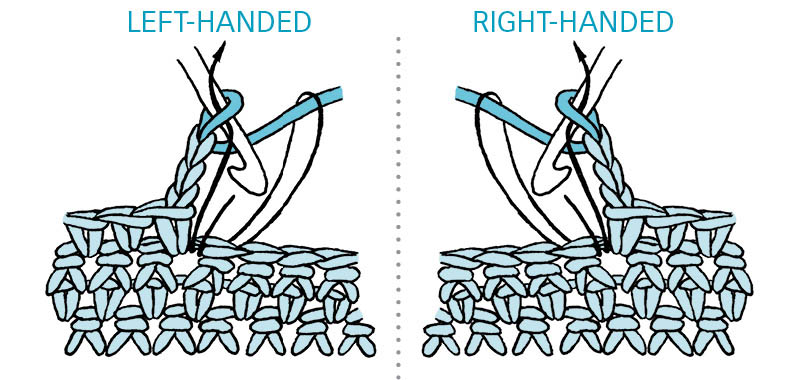
increasing in the corners
If you are working double crochet, put 5 stitches into the corner stitch on every row or round. In some cases on the final row/round of a border, you can put fewer increases at each corner to soften the edge.
For inside corners, the rows/rounds must get shorter rather than longer. Here you will have to decrease at the corners, usually working a double decrease for single crochet (3 sts to 1), or a quadruple decrease for double crochet (5 sts to 1).
Q: Why won’t my neck edge lie flat?
A: Make sure you are happy with the look of the first round/row of edging you worked. Does it lie flat? Are there the same number of stitches on each side of the neck? Are both sides of the front neck symmetrical? If so, on the next rounds/rows, you may need to do the opposite of what you do on outside corners. A neckline is a circle that gets smaller as the width of the neck border increases. Each subsequent round/row of the border needs to be a bit smaller than the previous ones. Putting a few decreases on each row/round usually solves the problem. The best place to put these decreases is usually in the front and back “corners” of the neck and at each shoulder.
Q: I tried to pick up stitches evenly along my edge, but the first row still looks sloppy. How can I fix it?
A: It can be difficult to make the first row or round of an edging look good, especially if it is in a contrasting color. You are making decisions about where to put each stitch, and if you have to skip a stitch here and there along the main fabric, the result can be an uneven-looking edge. Try working the first row/round with the same color as the main fabric, then stitch subsequent rows/rounds with the contrasting color. Be sure you have measured and are picking up stitches evenly and consistently throughout.
See also: Horizontal and vertical pick-up on edges
Q: How do I make a picot edge?
A: A picot edge is a nice touch for a simple edging, and it’s very easy to make.
Begin by working a row/round or two of single crochet along the edge. If working in rounds, join with a slip stitch.
Work the picots on the final row/round as follows: Chain 1, *sc in next sc, ch 3, sl st in same st, sc in next 2 sc; rep from * to end of row/round. Join with a slip stitch if working in rounds, and fasten off.

Q: How do I make a shell edge?
A: This classic edge is a great choice for any crocheted piece. Begin with a single crochet base row in a multiple of 6 stitches plus 1. If you are working in the round, begin with a multiple of 6.


Q: What if I don’t have the right multiple of stitches for the final edging row/round?
A: You can work an additional row/round of single crochet, increasing or decreasing a few times as needed to give you the desired multiple. Or just adjust the edging a bit, adding or subtracting a stitch between the pattern elements to make it come out right. As long as it looks good to you, it’s right.
Q: What are some other edging options?
A: Your options are limited only by your imagination — and by the number of stitches available to you. There are thousands of stitch patterns that could be used as borders, and with a bit of ingenuity (and keeping in mind stitch multiples and what you know about getting corners to lie flat), those stitch patterns can be engineered to go around corners without breaking the design. See Books for some additional suggestions.
Q: Which comes first, the buttons or the buttonholes?
A: If possible, choose the buttons first, then make the buttonholes to custom-fit the buttons.
Q: Do you have any advice about choosing buttons?
A: Choose a button in keeping with the style of the garment. Bulky outerwear usually requires large buttons, while lightweight lacy cardigans call for dainty buttons. If you are designing your own garment or want to make changes to a published pattern, before beginning the garment, decide whether you want the buttons and button bands to be a part of the design of the sweater or to be unobtrusive. Calculate the number of buttons you need by deciding how much space you want between buttons. Modesty may require more buttonholes on a garment meant to be worn next to the skin and which has little ease built into the design, while outerwear, which normally has more ease and is worn over other clothing, may require fewer buttons. If your sweaters often gap across the bust, an extra button or careful placement of buttons can prevent that dreaded “gaposis.”
See also: Making the Right Size for ease.
Q: How big should my buttonhole be?
A: A buttonhole should be only as big as it needs to be in order to get over the button. Buttonholes that are too big look sloppy and don’t hold. Loop-style buttonholes often stretch, so they may need to be a bit smaller in the beginning.
Q: Which comes first, the button band or the buttonhole band?
A: When working bands onto completed pieces, make the button band first. When the buttonholes will be integral to the main piece, make the button side first. You can use the button side to help determine buttonhole placement.
Q: Where do I put buttonholes?
A: Current fashion dictates that buttonholes go on the right front for women and on the left front for men. (I always have to go to the closet to check my other garments when it’s Buttonhole Time, or remember that “women are right.”)
Even if you are following a pattern that gives instructions for buttonhole spacing, it’s a good idea to double-check their placement before working the buttonholes. This is especially true if you have added or subtracted length from the sweater, as you’ll also have to adjust the buttonhole spacing.
Top and bottom buttonholes are usually 1⁄2" to 1" from the beginning of neck shaping and from the lower edge. If you are adding a neck border after the button border, take into consideration the width of the neck border; you may need to place the top buttonhole in the neck border and space the others evenly between. Most published patterns include this information.
Of course, buttons don’t have to match in an evenly spaced, tidy line down the front of your sweater. You can use a single button at the neck, or put groups of 2 or 3 down the front. Use your imagination.
Q: How do I space buttonholes evenly?
A: Start by determining the placement of your top and bottom buttonholes. If you are adding the buttonhole band, mark the side that will hold it. If you are working buttonholes as you work the piece, mark the opposite side and add buttons to correspond to the markers as you crochet. Mark these places with a stitch marker, coiless safety pin, or piece of thread. You now have a couple of options for figuring the spacing for the remaining buttonhole placement:
This method works if you have an odd number of buttonholes. I always try to have an odd number of buttonholes so I can use this method!

marking buttonholes by folding
Q: How do I make a chain-and-skip buttonhole?
A: This is a most popular buttonhole. It works well for single and half double crochet bands but may be too loose for double crochet or taller stitches. It’s easy to adjust the size of the buttonhole for different size buttons: Just skip additional stitches and work additional chains. Start with a base row of single crochet.

Q: Are there other buttonhole techniques?
A: Of course! Here are two more to try.

simple chain loop buttonhole

covered chain loop buttonhole
Q: How do I know which buttonhole method to use?
A: Remember that swatch? When you are checking the button band or edging pattern on the edge of the swatch, go ahead and practice some buttonholes at the same time. You can try making different-sized buttonholes on it until you get one that looks pleasing, is stable, and exactly fits your button. If possible, it’s best to buy your buttons before making the buttonholes. Then you can choose the method that works best for your garment/button combination.
Q: I have rather large buttons and I’m having trouble aligning the buttonholes. Any tips?
A: Keep in mind that the marker indicates the center of the buttonhole. If you are using a chain-and-skip buttonhole, start a stitch or two before the marker. You may want to try a loop-style buttonhole that extends out from the edge of the fabric.
Another alternative is to use backward-buttoning buttonholes for large buttons. Sew the large button on the front of the band, with a smaller button on the wrong side of the band, creating a button shank between the two buttons. Make buttonholes to fit the smaller buttons, and button them backwards (from right side to wrong side) into the buttonholes.

See also: Button shank
Q: Can I fix a button band that seems too heavy for my sweater?
A: Try using a larger hook and correspondingly fewer stitches. If you aren’t happy with the results using a single crochet band, you might try the following:
Row 1: Single crochet evenly across, ending with an odd number of stitches.
Row 2: Ch 1, sc in first stitch, *ch 1, skip next stitch, sc in next stitch; repeat from * across row, turn.
Row 3: Ch 1, sc in first stitch, *sc in next chain space, ch 1, skip 1 sc; repeat from * across, ending sc in ch-1 space, sc in last sc.
Repeat Rows 2 and 3 as many times as desired, adding buttonholes as desired.

seed stitch
Q: Is it possible to crochet buttons?
A: There are several ways to make a crocheted button. Here are three:


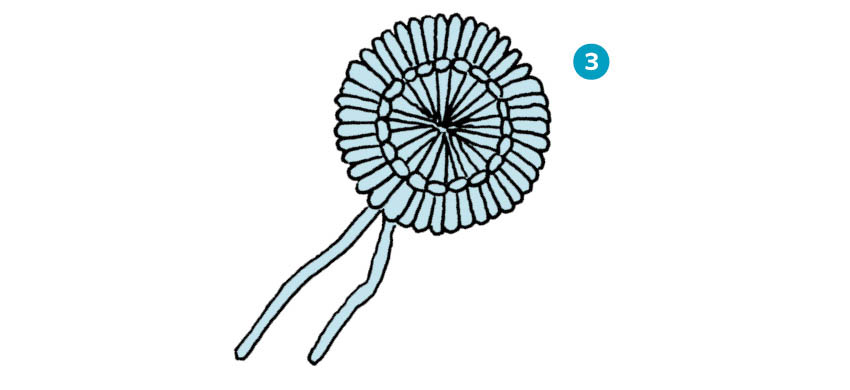
Leaving an 8" tail, ch 3, join with slip stitch to first chain (or use an alternate beginning for a tiny center (see Good Beginnings).
Round 1:. Ch 1, 8 sc in ring, join with slip stitch to first sc.

Round 2:. Ch 1, sc in first stitch, *2 sc in next stitch, sc in next stitch; repeat from * around, omitting last sc, join with slip stitch to first sc. [12 sc]
Round 3:. Ch 1, sc in each sc, join with slip st to first sc.
Round 4:. Ch 1, *pull up a loop in next 2 sc, yo and pull through all loops on hook (dec made); repeat from * around, stuffing ball with a length of the same yarn before finishing round. Fasten off and cut yarn, leaving a 10" tail.

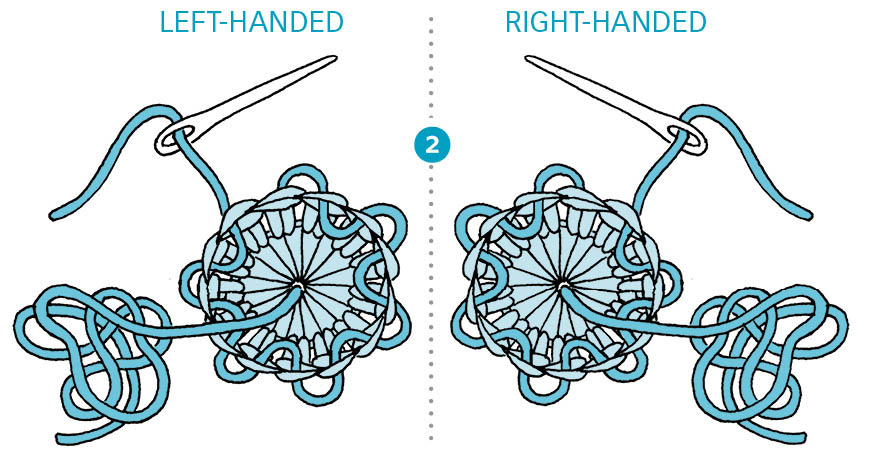
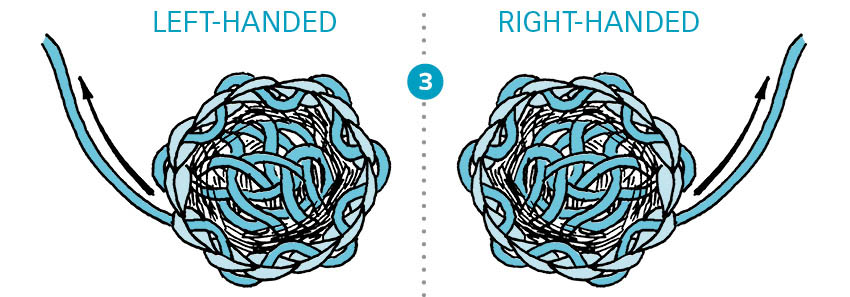
Thread tail through tops of all stitches on last round and pull tight. Thread the 8" tail down through center of button, and use both ends to sew button to fabric.


Q: What’s the best way to sew on a button?
A: Sew it on just the way you would any button, using sewing thread in a color to match your yarn or your button. You can also use colored embroidery floss. Insert the needle from the back of the fabric to the front, up through the button and back down, then back into the fabric. At this point, if you put the needle through the loop made by the beginning knot, you’ll prevent the knot from slipping up through the fabric. Make sure the threads are smooth and snug against the button, then continue sewing. When you have made several passes through the button, take a couple of small stitches on the back of the button band and cut the thread.
If your fabric is flimsy or your button will get hard use, you may want to reinforce the stitching by adding a backing, such as another button or a piece of fabric or felt on the wrong side of the fabric. Stitch through the reinforcing button on the wrong side of the fabric as you sew the button on the right side. Thicker fabrics require that you use a button with a shank, or make your own sewn button shank (see next question).

using a reinforcing button
Q: How do I sew a button shank?
A: A button shank allows space between the button and the fabric to which it is attached. To create a shank, put a toothpick or small crochet hook between the button and the button band to create a space, and begin to sew on the button in the usual way. Before you finish it off, remove your spacer, bring the thread up through the button band, around the loose threads between the button and the band, and back to the wrong side; take a couple of small stitches on the back of the button band, and cut the thread.
Q: Can I put a crocheted border on my knit sweater?
A: Absolutely! Crocheted edges can enhance knit garments. Because crocheted borders are firm and flat, they can serve as a good substitute for knitted edgings, which may curl or stretch out of shape. Crocheted buttonholes are usually an improvement over knit ones, as well.
Start with a crochet hook in a size larger than the needle size you used for knitting. For example, if you used a U.S. size 7 (4.5 mm) knitting needle, use a 5.0 mm crochet hook. Follow the instructions here for picking up edge stitches along a crocheted fabric, practicing first on your knit swatch if possible. Crochet stitches usually are wider than their knit cousins, so chances are you won’t be picking up one crochet stitch for every knit stitch or row.