

Crocheting back and forth in rows is not the only way to go! Many crocheted pieces are worked from the center out, in rounds rather than rows. This method produces flat motifs and larger pieces, as well as seamless three-dimensional items. The questions and answers in this chapter cover the basics of in-the-round crochet. For a more in-depth look at motif-based crochet, refer to Beyond the Square Crochet Motifs and Connect the Shapes Crochet Motifs.
Q: What is a motif?
A: For our purposes, a motif (pronounced moh-TEEF) is an individual unit of crochet that can be used on its own but is more often combined with others to form a fabric. A granny square is the most common crocheted motif. Making motifs is fun and portable, because they are usually quick and easy to do, and there is an endless variety of shape and color that can be used in every one. Each is its own tiny work of art.
Q: How do I start a flat piece in the round?
A: The technique for working a flat piece in the round is the same whether you want your finished piece to be a circle, square, triangle, or other shape:


Q: Is there a trick to making the chain ring for the center?
A: You’ll need to chain at least three stitches to actually create the circle, but you’ll probably only need to chain four to five stitches in all, just enough to get the required number of stitches into the ring on the first round, but no more. In general, a joined chain-4 ring easily holds eight stitches. A chain-5 or -6 ring holds a dozen or more stitches. This type of center ring creates a fixed-diameter center; the center ring can be quite large, if desired.
Q: Is there a way to prevent the lump that occurs when I slip stitch in the first chain to form a ring?
A: Instead of using the end attached to the ball when working the initial slip stitch, try using the tail end of the yarn. Or use one of the knot-less methods described on pages 173–77.
Q: Are there other ways to make a starting ring?
A: Another option is to work all the stitches into an extra (central) chain stitch. This makes a smaller center hole but is somewhat limited in the number of stitches it can accommodate. Two other excellent options are adjustable ring (or magic ring) and the sliding loop (or double magic loop). Both of these options can accommodate a large number of stitches but can also be cinched down to create an almost invisible center opening. Instructions for all three follow.
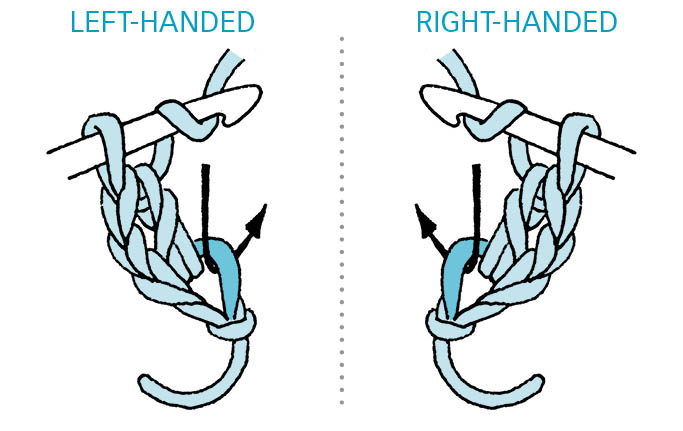
working into extra chain
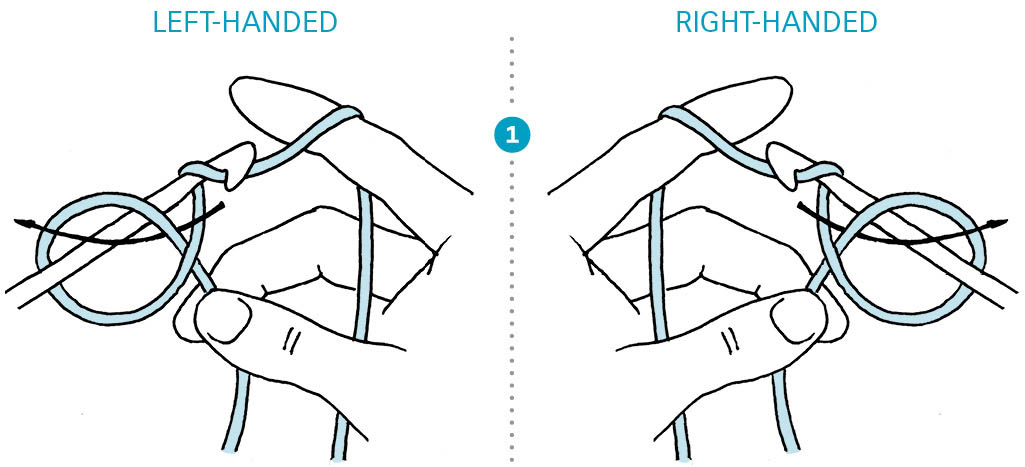
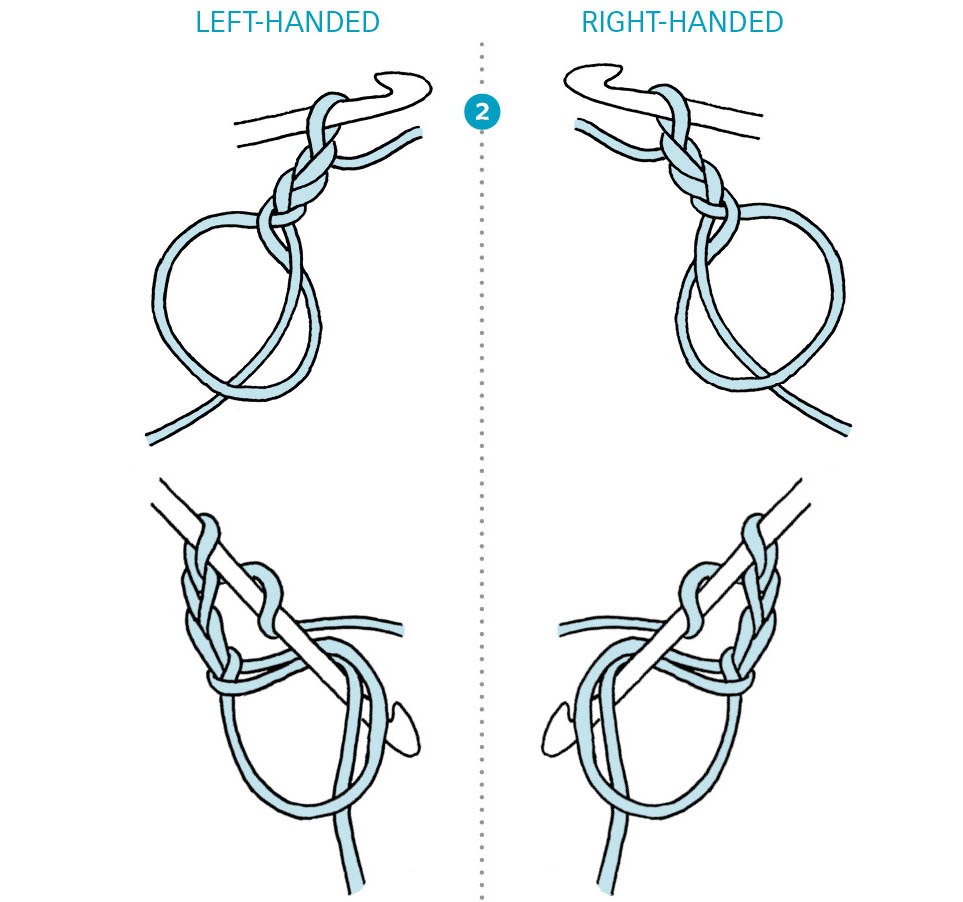

adjustable/magic ring
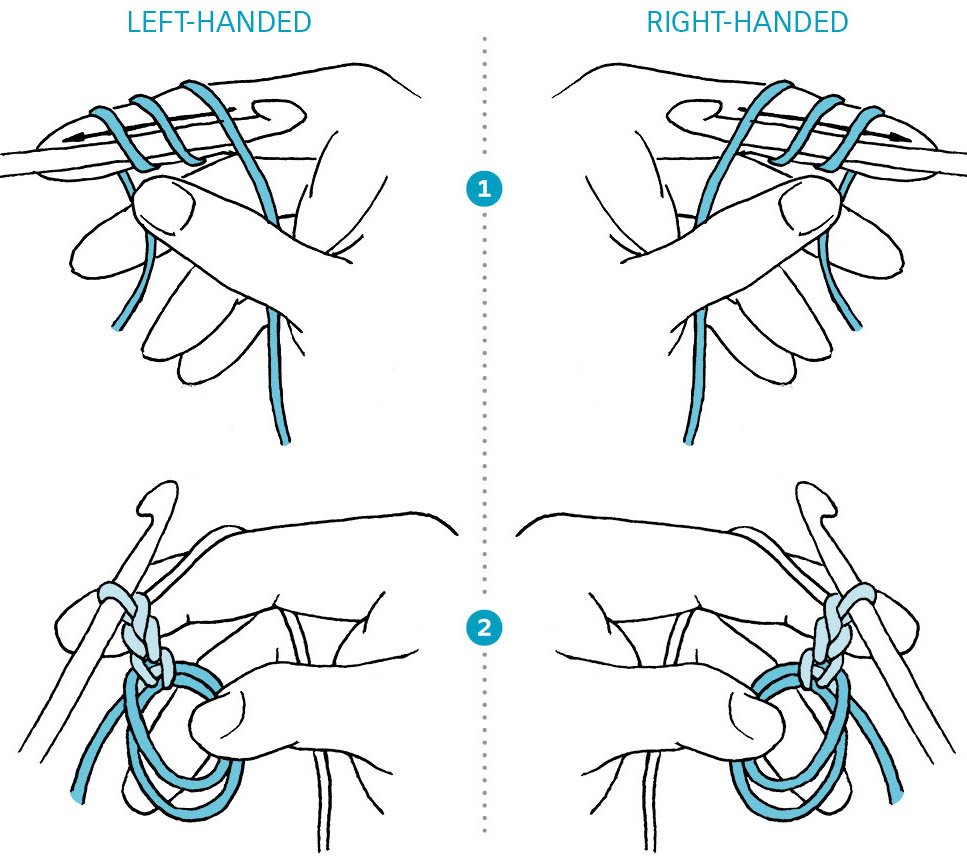

Q: Can I make a larger hole in the center of the piece?
A: Of course. If you are using one of the adjustable methods, just don’t tighten the center hole. If you are beginning with a chain ring (and if you want a really big hole, this is what you should use) just start with a longer chain and put more stitches into the ring on the first round. Feel free to experiment with different numbers of chains in your starting ring.
Q: What does it mean to work into the ring?
A: Instead of putting your hook into an individual stitch in your chain ring, put the hook into the center of the ring and pull up a loop around the chain. As you work the stitches, hold the yarn tail near the ring and work around it as well, to secure the tail. If you are using one of the adjustable-ring methods, insert the hook into the center of the ring and work around one or two strands of that ring.
See also: How do I start a flat piece in the round?
Q: How many stitches go into the first round?
A: That depends on both what you want your final shape to be and the height of your stitches. The taller the stitch, the more stitches need to go into the first round. Here’s why: The larger a circle’s diameter, the longer its circumference. The circumference of the circle is measured at the top of the stitches. Because taller stitches create a wider circle as compared to smaller stitches, more stitches are required to make a longer circumference. You’ll note that the taller stitches may be crowded together at their bases but spread out at their tops to form a circle.
See also: Basic Formula for a Circle and Basic Formula for a Square
Q: How do I get in all the stitches I need in the first round?
A: Don’t be afraid to squeeze the base of the stitches together. Work three or four stitches, then slide them around on your ring toward the first stitch; you should be able to snug their little feet right up next to each other. Continue to adjust the stitches as needed, but don’t wait to do it until your ring is almost filled. Don’t let the bases of the stitches overlap one another, or you won’t be able to slide them around the ring easily. If they aren’t overlapping, yet there still is not room for them all, rip out the first round and add one more chain to your beginning round, or try one of the adjustable-ring methods described on pages 173–77.
Q: What happens at the end of the first round?
A: You have two choices: either closing the round or working in a spiral. When you close the round, you join the last stitch in the round to the first stitch with a slip stitch.
You may also keep working in a continuous spiral without closing the round. Be sure to place a marker in the first stitch of the round and move it out on each subsequent round so that you know where the beginning of the round is. You still have to work increases on each round of the spiral in order to keep the piece flat.
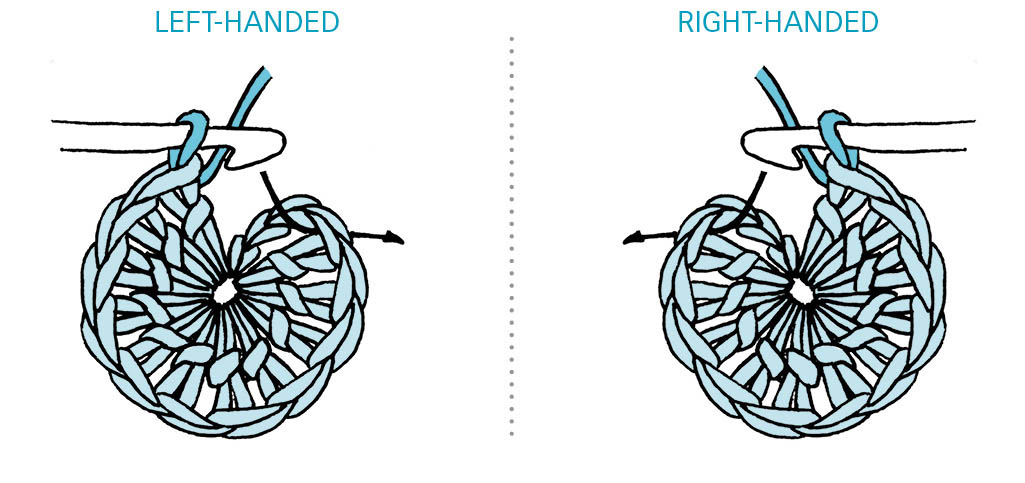
closing the round

working in a spiral
See also: Invisible (Tapestry Needle) Join; pages 66–68 for join with dc.
Q: What can I do to improve the slip stitch join at the end of a round?
A: If you think the join is sloppy, try this alternate method of joining: Work to the end of the round, but before joining with a slip stitch, remove the hook from the loop. Insert the hook into the spot you want to join as if to make a stitch, pull up the loop you just dropped, and continue. If you still don’t like the way it looks, try it again, inserting the hook into the stitch from back to front and pulling through the loop.
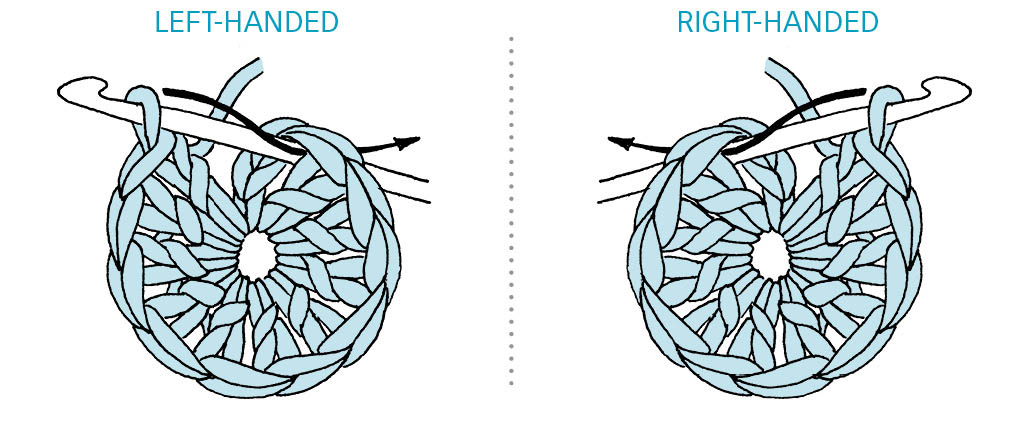
pulling loop through back to front
Q: Can I join a round invisibly?
A: Yes, this is a terrific way to join a round, especially the final round. Done correctly, it is impossible to see where the round ends, and if used with standing stitches at the beginning of rounds, the beginning of the round is totally obscured.
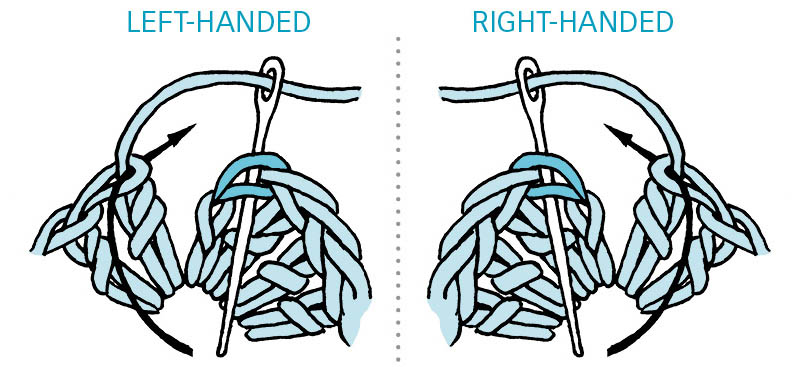
invisible tapestry needle join
Q: Do I have to use both a joining stitch and a beginning chain when working rounds?
A: In crochet, you don’t have to do anything! Some circularly made items, both flat and cylindrical, are worked in continuous flat spirals. When working in spiral, there’s no need to use a build-up chain at the beginning of each round. Be sure to place a marker to help you identify the end of the round.
See also: working a spiral
Q: How do I find the end of the round?
A: If you are joining rounds, put a stitch marker in the top loop of the chain that begins the round. If you are working without joining rounds, slip the marker onto the first stitch of the first round. The next time around, when you work a stitch into the marked stitch, move the marker into the new stitch, and continue to move the marker on each subsequent round.
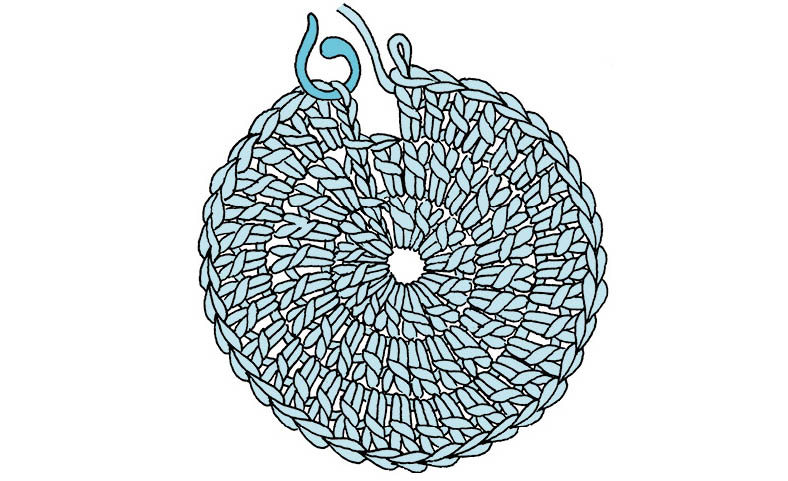
placing a marker on a joined round
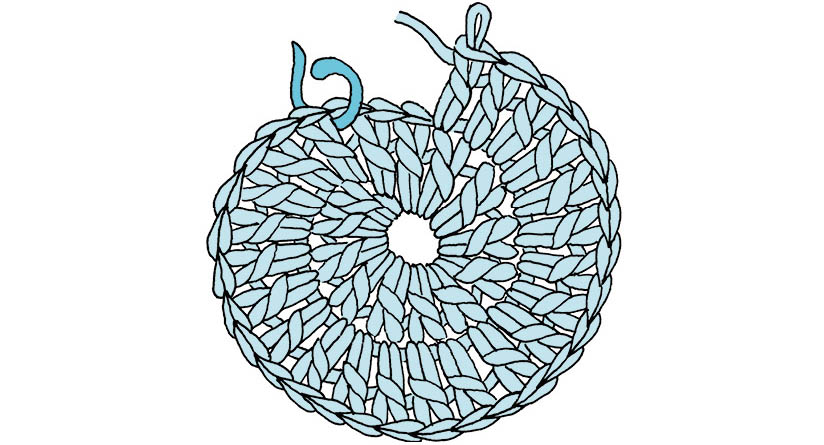
placing a marker on a spiral round
Q: How do I keep my motif flat?
A: Each subsequent round requires a number of increases in order to keep the piece flat, because as a circle gets larger, more stitches are needed to fill the widening circumference.
Q: How do I determine how many stitches to increase each round?
A: The height of the stitches determines the number of the stitches to increase on each round. The taller the stitches, the more increases you need to make.
See also: Basic Formula for a Circle and Basic Formula for a Square
Q: Where do I put the increases?
A: The placement of the increases determines the shape of the motif. Evenly spaced increases create a circle. If you group the increases at four equidistant positions, you tend to create a square. You can make other shapes by placing increases at other points.
See also: Pages 171–86 for circles; pages 187 for squares, Granny Squares; pages 187–93 for other shapes.
Q: What kind of increase should I make?
A: Any kind you want. You may work multiple stitches into the same base stitch, make one or more chain stitches, or use a combination of stitches and chains.
Q: How do I make a flat circle?
A: If you start with the correct number of stitches in the first round, it is fairly simple to keep up with the required increases. Increase in every stitch on round 2, every other stitch on round 3, every third stitch on round 4, and so on.

Note: In double and treble crochet, the beginning-of-the-round chain is counted as a stitch; in single crochet it is not. In half double crochet, there’s no clear standard, but in this instance the chain is counted as a stitch.
Q: How do I make a flat square?
A: Begin with a center ring as for a circle, but instead of spreading out the increases evenly, group all the increases at just four locations evenly spaced around the ring.
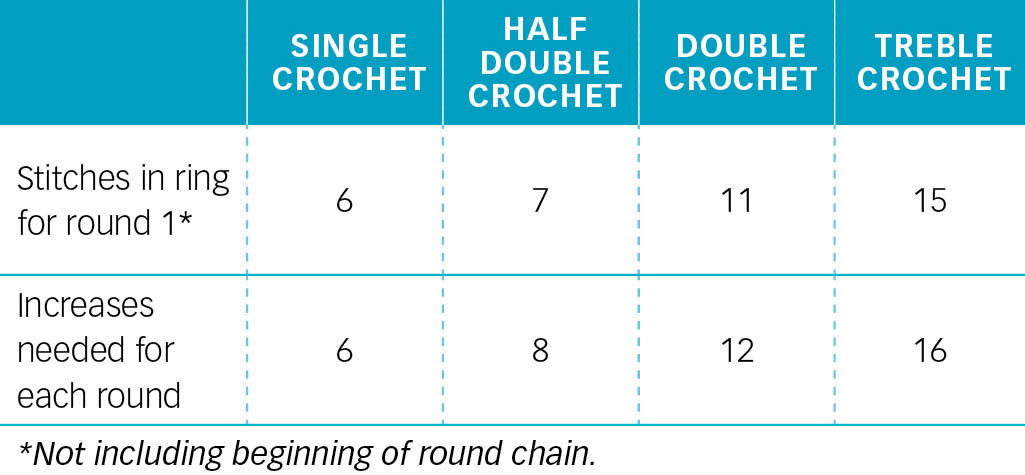
Note: A single crochet square offers special challenges, since you must space six increases evenly at four locations. You can play with the math until it works out for your design: Put 12 increases evenly spaced every other round or increase 6 every round, alternating the corners where you put double increases.
Q: How do I make other flat shapes?
A: You can make triangles, hexagons, and other flat shapes following the same system as for a square. Begin with a center ring, and group all the increases together: in three spots for a triangle, six for a hexagon, and so on. You may need to change the number of stitches in your starting ring or your first round in order to make the stitch counts work out evenly.
Work through Round 1 of a single crochet flat circle.
Rnd 2:. Ch 1, *3 sc in next sc, sc in next sc; repeat from * two more times, join.
Rnd 3:. Ch 1, sc in next sc, *3 sc in next sc, sc in next 3 sc; repeat from * one more time, 3 sc in next sc, sc in next 2 sc, join.
Rnd 4:. Ch 1, sc in next 2 sc, *3 sc in next sc, sc in next 5 sc; repeat from * one more time, 3 sc in next sc, sc in next 3 sc, join.
Rnd 5:. Ch 1, sc in next 3 sc, *3 sc in next sc, sc in next 7 sc; repeat from * one more time, 3 sc in next sc, sc in next 4 sc,join.
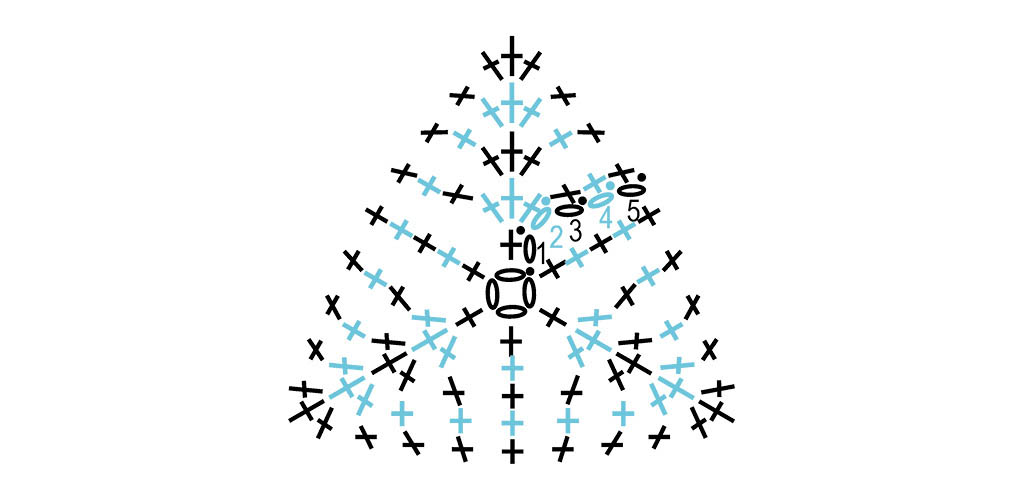
single crochet triangle symbol chart

double crochet triangle symbol chart
Ch 4, join with slip stitch to form ring.
Rnd 1:. Ch 3 (counts as dc), 11 dc in ring, join. [12 dc]
Rnd 2:. Ch 3, dc in next 2 dc, *5 dc in next dc, dc in next 3 dc; repeat from * one more time, 5 dc in next dc, join. [24 dc]
Rnd 3:. Ch 3, dc in next 4 dc, *5 dc in next dc, dc in next 7 dc; repeat from * one more time, 5 dc in next dc, dc in next 2 dc, join.
Rnd 4:. Ch 3, dc in next 6 dc, *5 dc in next dc, dc in next 11 dc; repeat from * one more time, 5 dc in next dc, dc in next 4 dc, join.

variation on double crochet triangle
Q: How do I make an oval?
A: An oval or oblong shape uses elements of both back-and-forth and circular stitching. Essentially, you are making two semicircles at either end of a straight piece of crochet; the increases are grouped at the ends. The number of increases you need depends on the stitch pattern that you are working. For example, single crochet requires six increases every round to remain flat, so 6 ÷ 2 = 3 increases at each end.
From here on out, you get to eyeball it. Keep an increase at the very end of each curve, and make the other two increases evenly spaced at increasingly wider distances from the center of the curve. It’s not rocket science: As long as the oval lies flat, you’re doing it right.
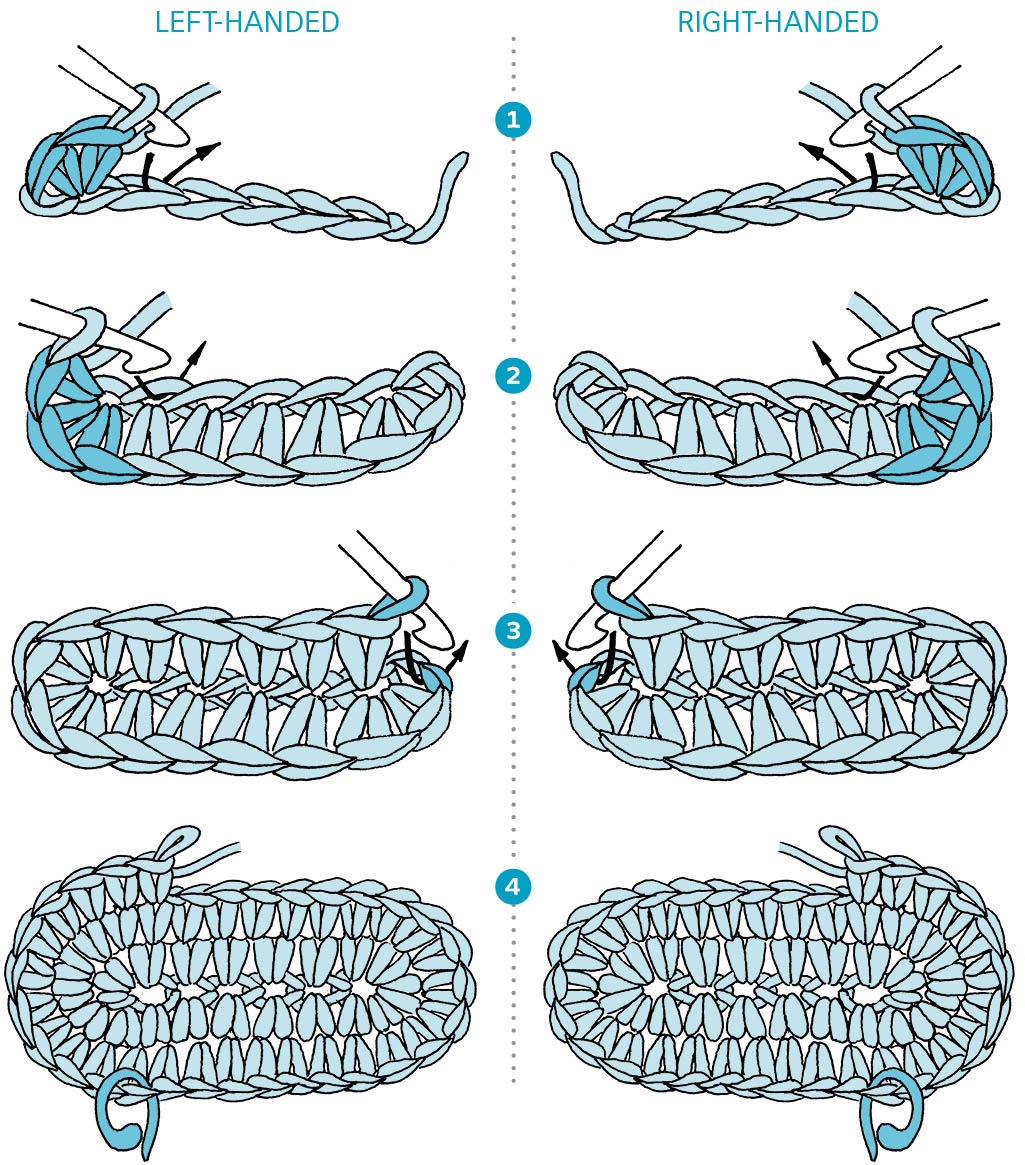
Q: I’d like to work an oval in double crochet. How many increases do I need?
A: A double crochet oval requires 12 increases every round (6 increases at each end).
Q: I tried making a semicircle by working back and forth and adding half the number of increases per round needed for a circle, but the straight edge wasn’t straight. Why?
A: The tops of the stitches have room to spread out when you work this way, whereas in a full circle, they are crowded together and thus forced to stay in place. To solve the problem, make sure your increases are not at the edges of the semicircle, and use fewer than half the increases you would use for a circle in that stitch. For a double crocheted semicircle, crochet as follows:
Row 1:. Beginning with one of the closed-center starts described above, ch 3 (counts as dc), 5 dc in ring, turn. [6 dc] (This is one-half the number of stitches required for round 1 of a double crochet circle.)
Row 2:. Ch 3, 2 dc in next dc and in each dc across, turn. [11 dc] (This is one less increase than you make for a dc circle, resulting in fewer than half the stitches required for Round 2 of a dc circle.)
Row 3:. Ch 3, (1 dc in next dc, 2 dc in next dc) 5 times, turn. [16 dc]
Row 4:. Ch 3, (1 dc in next 2 dc, 2 dc in next dc) 5 times, turn. [21 dc]
Q: Can I use more than one kind of stitch when I’m working a flat motif?
A: You can certainly mix stitch heights on your motifs. Just remember to change the number of increases accordingly. For example, you start a circle using double crochet stitches, increasing 12 stitches each round. If on one round you want to use treble crochet, you must increase 18 times in that round in order to maintain a flat circle. Special stitches such as popcorns and clusters may take up a different amount of space than the standard stitches. Adjust your rate of increase to accommodate the difference.
Q: I followed the instructions, but my piece isn’t flat. What did I do wrong?
A: This is a common problem, and one that blocking won’t entirely solve. It’s better to get the structure right in the first place. Here are some things you can check:
If your crochet is curling into a bowl shape:
If the motif is ruffling:
See also: Specialty Stitches for extended crochet.
While the charts give general guidelines for working a flat motif, you may find you have to bend the rules a bit based on your crocheting style and personal preferences. Be assured that it is okay to add or subtract increases as you work in order to have the piece lie perfectly flat. This is especially true on the longer rounds when working larger pieces.
Q: Why isn’t my circle exactly round?
A: You may be stacking the increases on top of each other on each round. Try moving the increases so that they land at different places on each round.
Q: Why does my circle look like a spiral instead of separate rounds?
A: When you work the rounds, you may be failing to join the last stitch of the round to the top of the chain at the beginning of the round. Although you sometimes may want to crochet a spiral, if not, be sure that you start each round with a beginning chain in order to raise the hook to the correct height. Unless it’s a single crochet, this beginning chain usually counts as a stitch. When you’ve reached the end of the round and made the appropriate increases, join the round with a slip stitch to the top of the beginning chain.
See also: Stitch heights and Stitches at a Glance*
Q: Is there another way to keep my pieces flat when I’m working in the round?
A: If you prefer to be more relaxed about your stitching, you can be. Keeping in mind the guidelines above, experiment with doubling the increases every other round, or in some other arrangement. Remember that you can use a combination of chains and stitches for your increases, and that you can use a chain space in place of a stitch, as for a granny square. Just be sure to stop at the end of every round, place your piece flat on a table, look at the outside edge, and check to see that it remains flat. Be honest with yourself! Turning a blind eye won’t help: If your piece is not flat on round 3, it won’t correct itself on round 6.
If you notice that the last round you worked is not quite right, sometimes it’s possible to make adjustments on the following round without ripping out the problem round. If you aren’t happy with the adjustment round, stop! Rip out both rounds, and get it right before continuing. (Voice of Experience, from someone who abhors ripping out stitches: Sometimes it just has to be done.)
Q: Where do I put my hook when working in rounds?
A: When you work back and forth, turning the work at the end of each row, you put your hook into loops lying sideways just slightly to the left of the next stitch (or for Lefties, to the right of the next stitch). On the other hand, when working in rounds without turning, your hook goes into loops lying sideways just slightly to the right (left) of the next stitch.
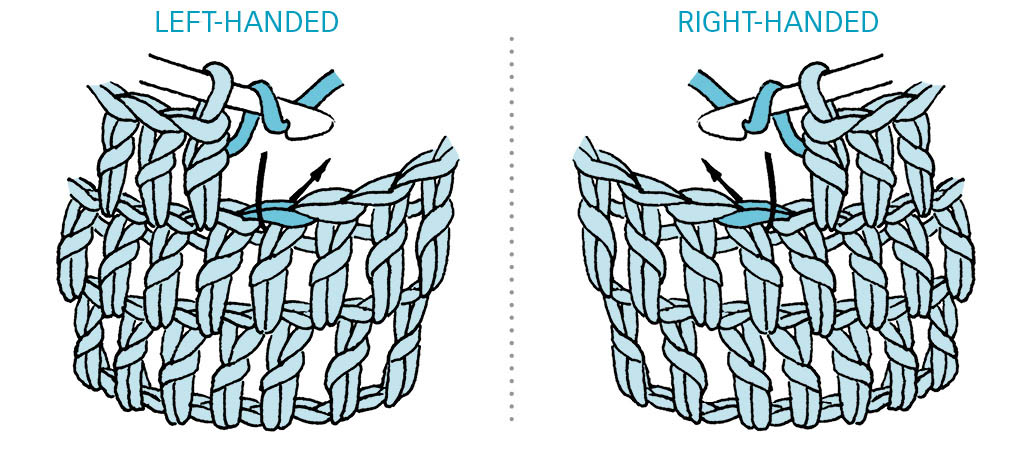
placement of hook when working in the round
Note: If you turn your work to the other side, you’ll see this is the same spot you’ve been putting it in when working back and forth. The difference is that you are always seeing the right side of the fabric when you work in rounds.
See also: Pages 104–11 for placing the hook and turning chains.
Q: I thought I was supposed to work in rounds without turning. Why does my pattern call this chain a “turning chain”?
A: Turning chain is a generic term used to refer to the beginning-of-row or -round chain that brings your hook up to the level of the row you are about to work. Although you aren’t turning your work, it serves the same purpose as a turning chain and so some patterns call it that. Other names for this are build-up chain or beginning chain.
Q: My pattern says to “join with dc in top of turning chain.” How do I do that?
A: A typical slip stitch join brings the hook just above the first stitch of a round, ready to chain and begin the next round, but there may be times when a round ends with a chain space, and it would be really handy to have the first stitch of the next round begin just above that chain space. When the last stitch(es) before the join is a chain, you can shift the beginning of the next round by using a single crochet, half double, or double crochet as a joining stitch.

ending round with dc symbol
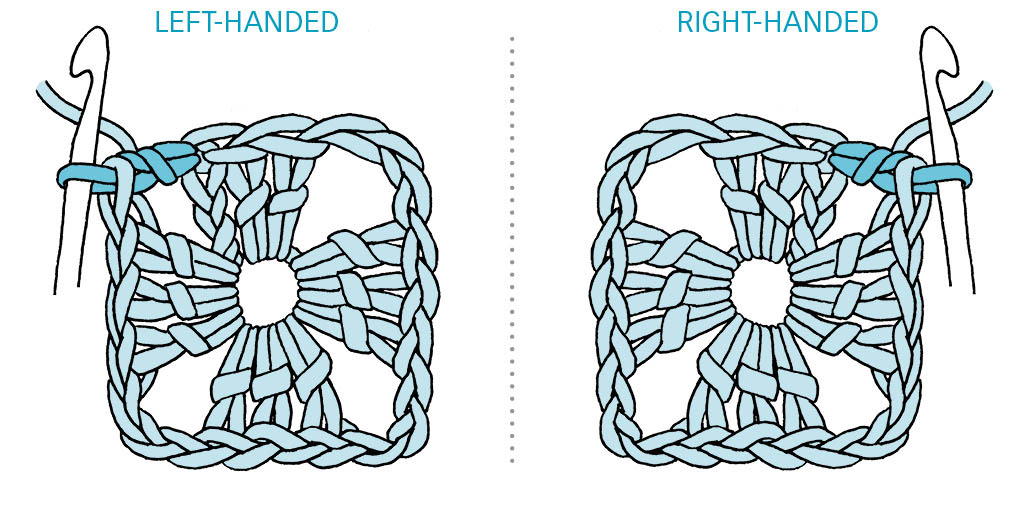
ending round with dc
See also: pages 66–68 for join with dc.
Q: How can I make my motifs crisp and neat?
A: There are a couple of refinements you can make for tidier motifs:
See also: Endings and Beginnings for joining a new yarn; Invisible (Tapestry Needle) Join
Q: How can I get more pronounced points at the corners of my motif?
A: Try placing a taller stitch in each corner stitch of the motif. In other words, if you are making a double crochet square, place a treble crochet in place of the center double crochet in each of the four corners. If the corner is made with a chain, make one extra chain. Try putting a picot in the corner of the final round. Experiment, as you may not need to make these adjustments on every round to get the look you want.
Q: What’s the difference between any old crocheted square and a granny square?
A: Although many people call any crocheted square a “granny square,” the familiar granny square is a special form of square motif. Although there are many variations on the granny square, the traditional one is a double-crocheted square made with a series of chains and double-crocheted blocks.
Granny squares can be worked with any number of colors. They are a great way to use up scraps. They can be made with any size yarn and hook and can be made with any number of rounds. Make a single granny square big enough and you have an afghan!
Q: How do I make a granny square?
A: There are many variations on the traditional granny square. The pattern below is for a classic granny with chain-2 corners. While most instructions include a chain-3 build-up chain on every round, using standing stitches as described here makes for a much cleaner look.
With A, ch 4, join with slip stitch to form ring.
Rnd 1: Ch 3 (counts as dc), 2 dc in ring, *ch 2, 3 dc in ring; repeat from * two more times, ch 2, join with slip st to top of the beginning ch-3. Cut A and fasten off.
Rnd 2: With B, (standing dc, 2 dc, ch 2, 3 dc) in any chain space, ch 1, *(3 dc, ch 2, 3 dc) in next space, ch 1; repeat from * two more times, join with slip st to top of first dc. Cut A and fasten off.
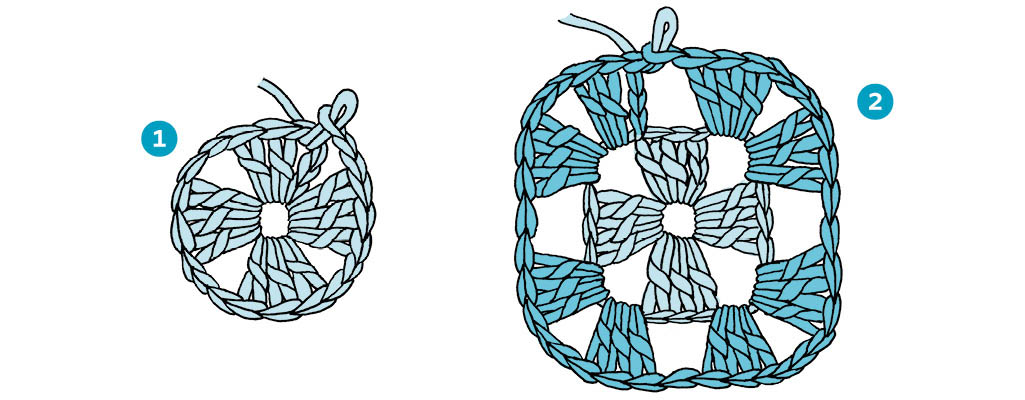
Rnd 3: With A, (standing dc, 2 dc, ch 2, 3 dc) in any corner space, ch 1, *3 dc in next space, ch 1, (3 dc, ch 2, 3 dc) in next corner space, ch 1; repeat from * two more times, 3 dc in next space, ch 1, join with slip stitch to top of first dc. Break MC.

See how you are placing (3 dc, ch 2, 3 dc) in each corner ch-2 space, 1 group of 3 dc in each side ch-1 space, and 1 chain over each group of 3 dc? Once you understand that concept, you can continue making your granny square, ad infinitum.
See also: Standing stitches

granny square symbol chart
Q: Are there other kinds of squares?
A: There are hundreds of variations of square motifs, as well as circles and hexagons. Entire books have been written on the subject. (For more variations on classic granny squares, hexagons, and other shapes, look for the books Connect the Shapes Crochet Motifs and Beyond the Square Crochet Motifs.) Once you are familiar with the concept of making flat motifs, you’ll want to design your own.
Q: I want to work a three-dimensional shape in the round. Is it possible to crochet a tube?
A: Certainly! Crochet a foundation chain with as many stitches as you need for the circumference you desire. Making sure the chain is not twisted, insert the hook into the first stitch of the chain and work a slip stitch to form a ring. Work a build-up chain (turning chain) to raise the hook to the appropriate height, then work into each stitch around. At the end of the round, join with a slip stitch to the top of the beginning chain. Repeat this round for as many times as required to get the desired length.
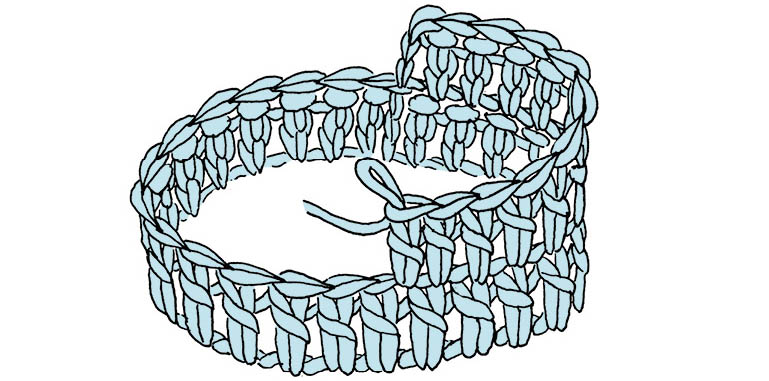
crocheting a tube
Q: My tube isn’t straight. What makes it skew?
A: This is a common problem, inherent in the stitching. It happens because the stitches are not exactly on top of each other. Because you are working in the same direction all the time, there is no opposite pull on the stitches to straighten them out. You can prevent the skewing by turning your work after joining at the end of each round.
Q: What is amigurumi?
A: Amigurumi is the Japanese word for knitted or crocheted stuffed doll, but as the word is used today, it means any three-dimensional crocheted (or knitted) stuffed creature: person, animal, monster, or other imaginary persona, even food! Common amigurumi techniques include working single crochet in rounds without joining and making separate shaped pieces that are typically stuffed and sewn together. Use a smaller hook than normal to make tight stitches that will prevent the stuffing from showing through to the right side. Use purchased plastic eyes, or create facial and other features with embroidery. Creative amigurumi designers use many innovative decorative, shaping, and construction techniques in their work.
Q: What is tapestry crochet?
A: Tapestry crochet is a multicolor crochet technique that uses tight, single crochet stitches to create a strong, sturdy fabric. It is most often used for baskets, bags, and other useful and decorative items. The color not in use is carried and caught by the working color, adding to the strength of the fabric and preventing yarn floats that could snag.
See also: Working with Color