

Our final app will be a multitouch Android version of BubbleDraw that enables the user to draw bubbles with the touch of a finger—or all 10 fingers!
The processors in Android devices are usually much smaller and slower than desktop CPUs. If you’ve ever gotten an “App Not Responding” error, you’ve seen what happens when an app consumes too much of a device’s processing power. So, instead of a timer, this version of the app will use a new approach to animation called threading, which will make the app use less processing power. Threading is what makes it possible for us to run multiple apps at the same time, or multitask.
The new BubbleDraw app will also make use of multitouch. Take a look at Figure 11-1, which shows bubbles pouring out of several different locations, where my younger son Max touched his fingers to the screen.
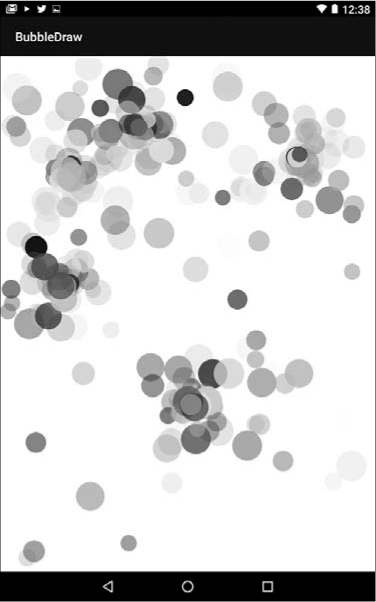
Figure 11-1: The Android version of the BubbleDraw app will use multitouch so that the user can draw bubbles on multiple locations of the screen at once.
The mobile BubbleDraw app will reuse a lot of the features from the desktop and GUI versions, such as the source code from the Bubble class we finished building in Chapter 10. There are a couple of differences in how we draw graphics on Android, however, and since we’re also adding threading and multitouch, you’ll need to learn some new app-building techniques. You’ll develop these new skills using the BubbleDraw app as a foundation.
Open Android Studio, close any open projects, and click Start a new Android Studio project. In the Create New Project window, enter BubbleDraw in the Application Name field, leave Company Domain the same (example.com or your website name), and then click Next.
This time, we want to choose a newer API level than we used for our previous apps. Both the Hi-Lo guessing game and Secret Messages apps used GUI interfaces that would work on older Android devices. In this app, however, we’ll need the drawOval() method to draw the bubbles, which requires API level 21 or higher. Select API 21: Android 5.0 (Lollipop) as the Minimum SDK.
An additional difference is that instead of the basic activity we used in the Hi-Lo guessing game and Secret Messages apps, in this app we’ll use an empty activity because we don’t need a basic GUI interface. Instead of a regular GUI app layout, we’re going to create an interactive, touch-enabled drawing canvas. On the Add an Activity to Mobile screen, choose Empty Activity and click Next.
We’ll keep MainActivity as the Activity Name, as we did in our previous apps, but uncheck the Backwards Compatibility checkbox and click Finish. Turning off backward compatibility will keep our code simpler.
As in the previous two desktop versions of the BubbleDraw app, we’re going to use two Java files to keep our bubble code separate from the main app code. Once your project opens, click the Project tab along the left edge of the screen to display the Project Explorer pane, if it’s not already visible. Then, select the Android tab at the top of the Project Explorer pane. Under app ▸ java, find the main BubbleDraw package (don’t select the androidTest or test packages). Right-click your BubbleDraw package in the Project Explorer and select New ▸ Java Class, as shown in Figure 11-2.
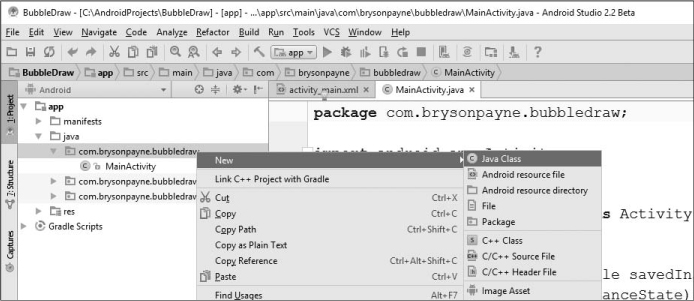
Figure 11-2: Add a new Java class to your main BubbleDraw package for the bubble code.
In the Create New Class pop-up window, name the new class BubbleView. In Android, a View is any GUI component. The BubbleView class serves the same function as the BubblePanel class did in the desktop app. All our bubble drawing code will go in this class.
Android Studio’s Create New Class window allows us to set the superclass and interfaces easily. First, we’ll make our new BubbleView class inherit the ability to draw graphics easily. In the Superclass text field, begin typing ImageView and then click ImageView (android.widget) in the autocomplete drop-down list to make the new class’s parent class ImageView. This will display as android.widget.ImageView after you click it.
Next we’ll implement an OnTouchListener interface to enable our app to handle touch events, similar to the mouse events we used in the previous versions of the app. In the Interface(s) text field, begin typing OnTouchListener and then click OnTouchListener (android.view.View) in the autocomplete drop-down list. Once you click it, it will display as android.view.View.OnTouchListener.
Click OK. You should now see the BubbleView class inside your com.<yourdomain>.bubbledraw package. Double-click the BubbleView class in the Project Explorer to begin editing the file. The BubbleView class may be underlined in red to let you know it’s missing some code, but we’ll fill in those required pieces as we code the app in the next few sections.
Double-click the BubbleView.java tab to expand it to fullscreen in the app for easier editing. Let’s begin building the BubbleView class by adding variables similar to those in the BubblePanel class. Just as in our desktop and GUI versions of the app, we’ll need a random number generator and an ArrayList for the bubbles the user has drawn, as well as some integer variables for the default bubble size and the animation delay in milliseconds.
We’ll want random colors and speeds for our bubbles, so inside the opening brace for the BubbleView class, begin typing private Random and then click Random (java.util) in the autocomplete drop-down list.
We’ll click the automatic code completion list items every time we add a new type of object in our code. Remember, Android Studio’s code completion feature not only helps you code faster, it reduces errors from mistyped or misspelled class names and import statements.
Finish declaring your private Random rand = new Random();. Then, add each of the variables shown in the following code. Check your import statements afterward to make sure they match the ones here:
package com.yourdomain.bubbledraw; // Note: your package name may differ
import android.widget.ImageView;
import android.view.View;
import java.util.ArrayList;
import java.util.Random;
public class BubbleView extends ImageView implements View.OnTouchListener {
➊ private Random rand = new Random();
➋ private ArrayList<Bubble> bubbleList;
➌ private int size = 50;
➍ private int delay = 33;
}
These four lines are similar to the variables we declared at the top of the BubblePanel class in Chapters 9 and 10, with a few changes for the Android version of the app. The declaration for a random number generator at ➊ is identical to our old version, because both use java.util.Random. The same goes for the line at ➋, where we declare an ArrayList of Bubble objects called bubbleList. This will again be where we store the bubbles created by the user. The Bubble type specifier should show up in red, letting us know we haven’t defined a Bubble class yet.
At ➌, we’re declaring an integer variable for the default bubble size, but we’ve made it bigger for the Android app because of the smaller pixel size on mobile devices. Your mobile phone or tablet often has a much smaller screen size and denser resolution than your desktop computer, so we’ll set our default bubble size to 50 to make the bubbles easier to see in the app. You can edit this line later to make your bubbles bigger or smaller depending on how you want them to look on your device.
At ➍, we’re keeping the animation speed at 30 fps by setting the delay between frames to 33 milliseconds. Remember, to get the animation speed, we divide 1,000 milliseconds by the number of frames per second, 30 fps, to get the number of milliseconds per frame, 1,000 ÷ 30 = 33.
Both the graphics and animation will be slightly different on Android than they were on desktops, so we’ll need to add two new variables:
public class BubbleView extends ImageView implements View.OnTouchListener {
private Random rand = new Random();
private ArrayList<Bubble> bubbleList;
private int size = 50;
private int delay = 33;
➊ private Paint myPaint = new Paint();
➋ private Handler h = new Handler();
}
The line at ➊ declares an android.graphics.Paint object called myPaint. Think of this as a paintbrush for drawing bubbles on the Android screen. You must have a Paint object to be able to draw shapes on an Android Canvas. Press ENTER after typing Paint to accept the code completion suggestion, or click Paint after typing it and press ALT-ENTER (or OPTION-ENTER) to automatically import the android.graphics.Paint class.
The line at ➋ declares another new type of variable, an android.os .Handler named h. Make sure you import the android.os version of the Handler class since there are other classes with similar names. This Handler object will enable us to work with threading to accomplish the animation, and you can think of it as analogous to the Timer in the desktop app. Unlike a Timer, however, the Handler will allow us to communicate with a thread, which is an individual process in a multitasking environment where we might be running several apps at once. A Handler won’t keep the CPU busy counting off the time between events as a Timer would; instead, it will release the CPU and allow other tasks to run until it’s time to redraw another frame of animation.
Next, let’s add a constructor to the app and start drawing bubbles.
The next step will be writing the constructor for the BubbleView class. Below the variables we just declared, enter the constructor code as follows:
public class BubbleView extends ImageView implements View.OnTouchListener {
private Random rand = new Random();
private ArrayList<Bubble> bubbleList;
private int size = 50;
private int delay = 33;
private Paint myPaint = new Paint();
private Handler h = new Handler();
public BubbleView(Context context, AttributeSet attributeSet) {
super(context, attributeSet);
}
}
Use automatic code completion to import android.content.Context and android.util.AttributeSet. Android uses these two classes to store information about the current application, and we need to import them to be able to call the super() method. The super() method sets up the app and drawing screen by calling the constructor of the parent class, ImageView.
For now, the only statement we’ll add to the constructor is a line to initialize the bubbleList:
public BubbleView(Context context, AttributeSet attributeSet) {
super(context, attributeSet);
bubbleList = new ArrayList<Bubble>();
}
Initializing the bubbleList by setting it equal to a new, empty ArrayList of Bubble objects works the same way here as it did in the previous versions of the app. We’ll be able to store new bubbles in bubbleList as the user touches the screen.
Now that we’ve begun building the BubbleView class, it’s time to tell our GUI layout file to display BubbleView when the app runs. In the Project Explorer, open app ▸ res ▸ layout ▸ activity_main.xml and switch to the Text tab at the bottom of the window.
Replace the contents of the activity_main.xml file with the following, substituting your app’s package name in place of mine:
<?xml version="1.0" encoding="utf-8"?>
➊ <RelativeLayout xmlns:android="http://schemas.android.com/apk/res/android"
xmlns:tools="http://schemas.android.com/tools"
android:layout_width="match_parent"
android:layout_height="match_parent"
➋ android:background="#000000"
➌ tools:context="com.yourdomain.bubbledraw.BubbleView">
➍ <com.yourdomain.bubbledraw.BubbleView
➎ android:layout_width="match_parent"
➏ android:layout_height="match_parent"
/>
</RelativeLayout>
This app uses the default RelativeLayout ➊, which will allow us to easily place other GUI components later. Much of the RelativeLayout properties are the same as the default, but we’ve added a background color of #000000 ➋, or black.
When you replace the package name com.yourdomain.bubbledraw at ➌ and ➍ with your package name, Android helps you by making a code completion suggestion at ➍.
The line at ➍ places the BubbleView into the layout, and the lines at ➎ and ➏ tell the program to match the width and height of the activity_main .xml window, which is the parent object of BubbleView.
The activity_main.xml file is the default GUI layout view that your app loads when it runs. Telling activity_main.xml to load BubbleView as the only item in the layout and match the layout’s width and height results in the BubbleView app taking up the full screen. So, with these changes, the activity_main.xml file now knows to call on BubbleView to show our bubble drawing canvas.
Speaking of bubbles, let’s reuse the Bubble class from the desktop version of this app.
Open the BubbleDrawGUI project from Chapter 10 in Eclipse to access the old Bubble class. Open the BubblePanel.java class and scroll to the bottom of the file where we defined the Bubble class. Copy the class’s entire source code, from private class Bubble all the way down to the next-to-last closing brace. The final brace in the file is the closing brace for BubblePanel, so make sure you copy only the closing braces for update() and the Bubble class.
Now that you’ve copied the Bubble class, switch back to Android Studio and place the cursor directly after the closing brace for the BubbleView() constructor. Press ENTER to insert a blank line before the final closing brace at the bottom of the file.
Most of the code from the desktop version of Bubble will work, but we’ll need to make a few changes to account for differences in the way Android draws graphics. Let’s start near the top of the Bubble class. In Android graphics, color values are stored as integers instead of Color objects, so change private Color color to private int color as shown here:
private class Bubble {
private int x;
private int y;
private int size;
private int color;
private int xspeed, yspeed;
private final int MAX_SPEED = 5;
All the other variables remain the same.
We’ll also need to change the color entry in the Bubble() constructor. Delete new Color and replace it with Color.argb, as shown here:
public Bubble(int newX, int newY, int newSize) {
x = newX;
y = newY;
size = newSize;
color = Color.argb(rand.nextInt(256),
rand.nextInt(256),
rand.nextInt(256),
rand.nextInt(256) );
xspeed = rand.nextInt(MAX_SPEED * 2) - MAX_SPEED;
yspeed = rand.nextInt(MAX_SPEED * 2) - MAX_SPEED;
}
Be sure to remove the keyword new, since Color.argb() doesn’t create a new object. Instead, the Color.argb() method will convert four ARGB values (alpha, red, green, and blue) into a single color integer that can be used to change paint colors in Android.
This is the first time we’ve used the Color class in this app, so it will show up in red in the Android Studio text editor. You can either manually add import android.graphics.Color; to the import statements at the top of the file, or you can click the word Color and press ALT-ENTER (or OPTION-ENTER) to have Android Studio perform the import for you. Pressing ALT-ENTER is similar to accepting a code completion suggestion, except that you can use ALT-ENTER to import a class even after you’ve typed your code.
Next, we’ll need to change the entire draw() method in the Bubble class. Replace the draw() method we copied with the following:
xspeed = rand.nextInt(MAX_SPEED * 2) - MAX_SPEED;
yspeed = rand.nextInt(MAX_SPEED * 2) - MAX_SPEED;
}
➊ public void draw(Canvas canvas) {
➋ myPaint.setColor(color);
➌ canvas.drawOval(x - size/2, y - size/2,
x + size/2, y + size/2, myPaint);
}
public void update() {
At ➊, the draw() method accepts a parameter of type android.graphics .Canvas instead of java.awt.Graphics. Be sure to import the Canvas class either as you type or by clicking it and pressing ALT-ENTER (or OPTION-ENTER) afterward.
At ➋, we set the color for the myPaint object to use this bubble’s color value.
The line at ➌ differs from the desktop version in several places. First, the command to draw an oval on an Android Canvas is drawOval() instead of fillOval(). Second, we specify the bounding box that will hold the oval using its left, top, right, bottom values instead of left, top, width, height. The left and top remain the same, at x - size/2 and y - size/2. (Remember, we subtract half the width and height of the bubble to center it on the (x, y) location where the user touched the screen.) The right side of the bubble’s bounding box is x + size/2, and the bottom of the bubble is y + size/2, as shown in Figure 11-3. Instead of using the width and height to calculate the bottom-right corner of the bounding box for the oval, as we did in the desktop version, Android requires us to specify the x- and y-coordinates of the bottom-right corner, or x + size/2, y + size/2. Finally, the drawOval() method requires a Paint object, so we pass it myPaint.

Figure 11-3: Android’s drawOval() method takes the top-left and bottom-right coordinates of an imaginary bounding box instead of the top, left, width, and height values we saw in the desktop Swing toolkit.
Those are the only changes needed to port the Bubble class from desktop to Android. Save your file after making these changes. Next, we’ll draw all the bubbles on the screen.
We want to test the app’s ability to draw bubbles on the screen, so next we’ll add an onDraw() method to our BubbleView class. The onDraw() method in a View class is similar to the paintComponent() method in a JPanel: it tells Java what to draw whenever the screen is refreshed.
We want to draw the list of bubbles, so add the following code below the BubbleView() constructor in BubbleView.java and above the Bubble class:
public BubbleView(Context context, AttributeSet attributeSet) {
super(context, attributeSet);
bubbleList = new ArrayList<Bubble>();
}
➊ protected void onDraw(Canvas canvas) {
➋ for (Bubble b : bubbleList)
b.draw(canvas);
}
private class Bubble {
At ➊, the onDraw() method must be declared as protected with one parameter, a Canvas object, to work because it must exactly match the default View.onDraw() method that we’re overriding. We need this method because it’s required in all View subclasses and BubbleView is a child class of ImageView, which is a subclass of View. The onDraw() method will be called anytime the screen containing our BubbleView needs to be refreshed.
The inside of the onDraw() method reuses the for-each loop at ➋ that calls each bubble’s draw() function. The line at ➋ could be read as follows: “For each Bubble b in bubbleList, draw b on the Android Canvas.”
There are just a couple of steps left before we can test our app’s ability to draw colorful bubbles. Let’s knock those out to see an early beta test of the Android BubbleDraw app.
We wrote a short method called testBubbles() in the first version of the BubbleDraw desktop app. It looked like the following:
public void testBubbles() {
for(int n = 0; n < 100; n++) {
int x = rand.nextInt(600);
int y = rand.nextInt(400);
int size = rand.nextInt(50);
bubbleList.add( new Bubble(x, y, size) );
}
repaint();
}
The purpose of testBubbles() was to see whether we could draw bubbles on the screen before we had implemented the mouse and timer event handlers. Let’s do the same for the Android version of the app.
First, let’s add a slightly modified version of the testBubbles() function just below the onDraw() method in BubbleView.java:
protected void onDraw(Canvas canvas) {
for (Bubble b : bubbleList)
b.draw(canvas);
}
public void testBubbles() {
for(int n = 0; n < 100; n++) {
➊ int x = rand.nextInt(600);
➋ int y = rand.nextInt(600);
➌ int s = rand.nextInt(size) + size;
➍ bubbleList.add( new Bubble(x, y, s) );
}
➎ invalidate();
}
private class Bubble {
The first two lines are identical to the Eclipse version of testBubbles(). These lines declare the function and set up a for loop to run 100 times. At ➊, we keep the range of x values the same and set it to 600, but you can make this larger if you know the resolution of your device. At ➋, we change the range for the random y value to 600 for the bubble’s vertical location.
At ➌, we generate larger bubbles by adding a random number between 0 and size to the default value size. In this case, we’ll have bubbles ranging from 50 to 100 pixels in diameter.
At ➍, we create a new Bubble object using the three random values we just created and add it to the bubbleList.
Finally, at ➎ we’re using a new function, invalidate(), which works similarly to the repaint() function in the desktop version of BubbleDraw. It tells Java that the screen needs to be updated, or refreshed. The invalidate() function clears the screen and calls the onDraw() method, which will draw all the bubbles in bubbleList.
Now that we’ve defined the testBubbles() method, we just need to call that method from the BubbleView() constructor to try it out:
public BubbleView(Context context, AttributeSet attributeSet) {
super(context, attributeSet);
bubbleList = new ArrayList<Bubble>();
testBubbles();
}
Now, when the app loads, the testBubbles() method will be called to populate the bubbleList with 100 random bubbles.
There’s only one issue left to fix before we can test our app: the BubbleView class is still underlined in red to let us know there’s a possible compile error. Mouse over the line public class BubbleView, and you’ll see an error that tells us we’re missing an onTouch() method for the OnTouchListener. In other words, this error reminds us that we’ve defined the BubbleView class as implementing an OnTouchListener, but we haven’t yet added an onTouch() method to handle touch events.
To fix this error, mouse over it and click the red lightbulb warning icon. In the drop-down menu under the red lightbulb, click Implement methods. A pop-up window will appear, asking you to select which methods to implement, as shown in Figure 11-4.
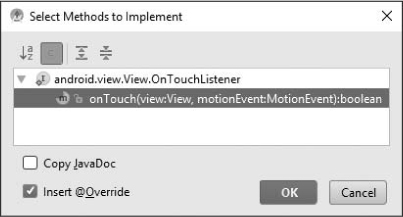
Figure 11-4: Android Studio implements the onTouch() method to complete the OnTouchListener.
Click OK, and Android Studio will insert an onTouch() method into your code to clear the error:
@Override
public boolean onTouch(View view, MotionEvent motionEvent) {
return false;
}
If the code Android Studio inserted doesn’t match what you see here, correct the parameter names in your code to match view and motionEvent as shown. This is the method that we’ll modify to handle touch events later, but for now let’s give our app a test run to see it draw 100 bubbles!
Press the green run button to test your app. In the Select Deployment Target window, choose your emulator or device, as we did in “Running the App on the Android Emulator” on page 94. I’m selecting my Nexus 6P emulator, shown in Figure 11-5.
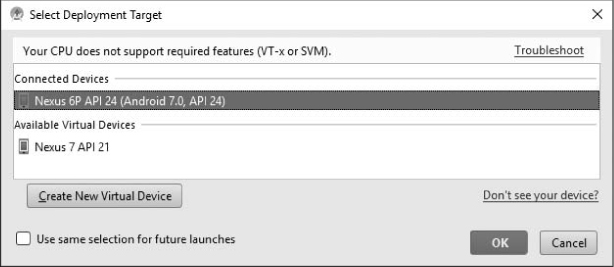
Figure 11-5: Press the run button to compile and run your app. Then select your emulator or device and click OK.
Click OK to start your device and deploy the BubbleDraw app we’ve developed to this point. You should see bubbles fill the upper-left portion of your screen, as shown in Figure 11-6. The bubbles appear in the upper left because we only generated x- and y-coordinates between 0 and 600 and most Android devices can display 1,000 or more pixels in each direction. Remember, in Java, the (0,0) coordinate is in the upper left.
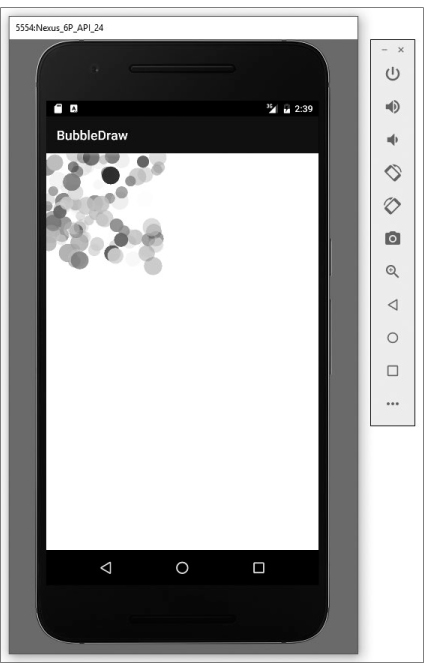
Figure 11-6: A successful test run of the BubbleDraw app to this point; 100 bubbles appear in the upper left of the screen.
Similar to the first test run of the desktop version of the app, there’s no animation or touch interaction, because we haven’t added them yet. But our app runs on the emulator and draws our bubbles correctly on the screen.
Next, let’s add animation to make the bubbles move. And then we’ll add the final touch—touch!
The threading we’ll use to achieve smooth animation in the BubbleDraw Android app is just like the threading you’d add to any multitasking app in Java. We mentioned earlier that one advantage of using threading for animation is that it doesn’t tie up the processor while it waits between redrawing each frame. But threading can also be used in any other apps you develop that run multiple processes at once, such as apps that query a database or upload a file in the background. Using threading allows your app to do background tasks without freezing up the GUI interface while it waits for a process to finish.
Threading is especially important on devices such as phones and tablets that have limited processing power. Unresponsive apps are especially annoying, and threading will help prevent the BubbleDraw app from becoming one.
The Handler h object that we created earlier in the chapter is what lets us communicate with a thread. In this app, we’ll create a thread that executes the animation by updating the positions of all the bubbles. Then, we’ll use our handler, h, to tell the thread when to run. This will allow the handler and thread to function like our Timer animation in the previous chapters, but without hogging the CPU between frames.
There are two ways to add threading to your applications in Java: by extending the Thread class or by implementing the Runnable interface. We’ll choose the Runnable approach.
A class that implements Runnable() needs a run() method that tells the thread what to do when the thread is running. For BubbleDraw, we want the run() method to perform the animation by moving the bubbles and redrawing the screen.
Let’s create a Runnable object called r and place it right below the BubbleView() constructor:
public BubbleView(Context context, AttributeSet attributeSet) {
super(context, attributeSet);
bubbleList = new ArrayList<Bubble>();
testBubbles();
}
➊ private Runnable r = new Runnable() {
@Override
➋ public void run() {
}
➌ };
protected void onDraw(Canvas canvas) {
As you type the second half of the declaration at ➊, a code completion suggestion will pop up to complete the new Runnable() object. Accept the java.lang.Runnable code completion, and Android Studio will automatically add the public void run() method stub for you ➋. Notice the semicolon after the closing brace for the Runnable object ➌—this is required because we’re defining r and assigning it to a new Runnable object all at the same time. The semicolon at ➌ actually completes the statement we started back at ➊. The automatic code completion doesn’t add the semicolon after the closing brace at ➌, though, so make sure you’ve added it to avoid a compiler error.
Now we need to add the code inside the run() method to tell Java what we want to happen every time our Runnable thread r is called:
private Runnable r = new Runnable() {
@Override
public void run() {
➊ for(Bubble b : bubbleList)
➋ b.update();
➌ invalidate();
}
};
protected void onDraw(Canvas canvas) {
for (Bubble b : bubbleList)
b.draw(canvas);
}
At ➊, we use the for-each statement again to loop through every Bubble b in bubbleList. At each iteration of the loop, we call b.update() ➋ to update the location of each bubble for the next frame of animation.
At ➌, we call the invalidate() function after the loop has finished running to clear the screen and tell Java to redraw the view by calling the onDraw() method.
The final step to adding thread-based animation is to connect the Handler h to the Runnable thread r. We’ll do this at the end of the onDraw() method:
protected void onDraw(Canvas canvas) {
for (Bubble b : bubbleList)
b.draw(canvas);
h.postDelayed(r, delay);
}
The postDelayed() method sends a message from the handler to our thread r, telling it to run again after a delay of 33 milliseconds, the value of delay.
Save these changes and run the app again. You’ll see the 100 test bubbles slowly spread out to fill the screen, as shown in Figure 11-7.
Even at a rate of 30 frames per second, your fastest bubbles probably seem quite slow. This is because of the larger number of pixels on your Android device or emulator. You may recall that we set a MAX_SPEED in the Bubble class of just 5 pixels per frame. The Nexus 6P phone that we’re emulating has a screen resolution of 1,440 × 2,560, meaning it would take more than 500 frames, or more than 15 seconds, for the fastest bubbles to travel the full length of the screen.
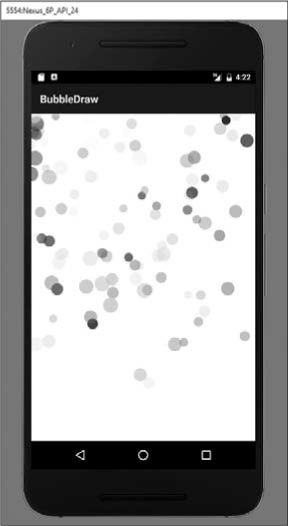
Figure 11-7: We have liftoff! Our bubbles are finally animated, courtesy of threaded animation.
Let’s speed that up just a bit by changing MAX_SPEED to a higher value, like 15 pixels per frame:
private class Bubble {
private int x;
private int y;
private int size;
private int color;
private int xspeed, yspeed;
private final int MAX_SPEED = 15;
Save the file and run it again. Your bubbles will move around the screen more fluidly now. Feel free to increase or decrease the value to suit your taste.
Now that we’ve implemented the animation, it’s time to add touch to make the app respond to the user.
One feature that made the desktop BubbleDraw app so much fun was the fact that we could click and drag the mouse to draw bubbles anywhere we wanted. We’re going to bring that same level of enjoyment to the Android app, and then we’ll turn it up to 11 when we add multitouch!
You’ve already seen where we need to add the touch event handler code—in the onTouch() function we added earlier.
To handle touch events, first we need to determine the location of the user’s touch. Then we’ll add a bubble at that location.
To find out the x- and y-coordinates of the user’s touch, we can use motionEvent.getX() and motionEvent.getY(). Let’s add the full onTouch() method and then break it down:
public boolean onTouch(View view, MotionEvent motionEvent) {
➊ int x = (int) motionEvent.getX();
➋ int y = (int) motionEvent.getY();
➌ int s = rand.nextInt(size) + size;
➍ bubbleList.add( new Bubble(x, y, s) );
➎ return true;
}
At ➊, we get the x-location of the user’s touch with the method motionEvent.getX(). Notice, however, that we have to cast the value to an integer—the motionEvent.getX() returns a floating-point value in Android, so we cast it with (int). The y-location ➋ works the same way, and at ➌, we generate a random size as we did in testBubbles() and store it in s.
At ➍, we create a Bubble object with the given x, y, and s values and add it to bubbleList.
The last line, at ➎, requires a bit of explanation. Notice that the return type of the onTouch() method is a boolean. This means that the onTouch() method must return a true or false value. In Android, the onTouch() method should return true if you’ve fully handled the touch event. If you want Android to handle a touch event, such as scrolling or zooming, after your onTouch() event handler is finished, return false.
For the drawing app, we don’t need Android to scroll the screen when the user swipes—we’ve handled the touch event completely for our app by adding a bubble where the user touched, so we return the value true.
The last step is similar to the steps for the mouse listener in the desktop versions of BubbleDraw: we need to add the listener in the constructor. Scroll up to the BubbleView() constructor, comment out the testBubbles() function, and add the line of code shown here:
public BubbleView(Context context, AttributeSet attributeSet) {
super(context, attributeSet);
bubbleList = new ArrayList<Bubble>();
// testBubbles();
setOnTouchListener(this);
}
We comment out the call to testBubbles() because we don’t need the 100 test bubbles anymore. We’re going to add bubbles by touching the screen on our Android device or by clicking and dragging the mouse to simulate a touch on the Android emulator. The setOnTouchListener(this) statement adds a listener for touch events, telling Java that this, an object of the BubbleView class, will handle the touch events.
With these changes, we’re ready to try out our app. Save your code and run the app on your emulator. Click and drag on the emulator window to simulate dragging your finger across the screen. You’ll see bubbles flow from the location you touch, as shown in Figure 11-8.
You can also run this on your physical Android device. We’ll review how to do that in the next section, after adding the ability to handle multiple touch events on the screen at the same time.
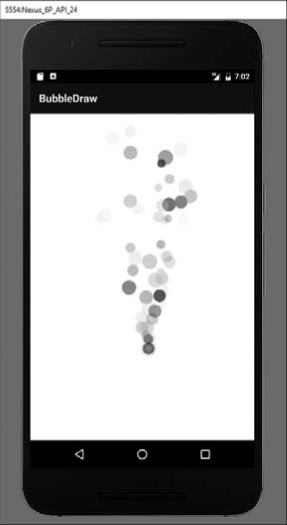
Figure 11-8: Click and drag the mouse to simulate a one-finger touch on the emulator, and a stream of bubbles will flow out.
You may have played an app that makes use of multitouch, like a two-player game in which you control objects on one side of the screen with one or more fingers, while your friend controls objects on the other side of the screen. If you have, you understand the awesome power that multitouch brings to apps and games.
The great news is that the code to handle multiple touch events in Android is almost as simple as the code to handle a single touch! In fact, we’ll just add a statement and modify a couple of lines in onTouch(), and our app will handle multitouch events.
The method that tells us how many touch events are happening at the same time is getPointerCount(). It returns how many pointers—touch events or fingers—are on the screen in the current MotionEvent.
We can add a for loop to add bubbles for every pointer in the current touch event:
public boolean onTouch(View view, MotionEvent motionEvent) {
➊ for (int n = 0; n < motionEvent.getPointerCount(); n++) {
➋ int x = (int) motionEvent.getX(n);
➌ int y = (int) motionEvent.getY(n);
int s = rand.nextInt(size) + size;
bubbleList.add(new Bubble(x, y, s));
➍ }
return true;
}
At ➊, we add a for loop that increments the variable n from 0 up to the number of pointers in the current touch event. The function motionEvent .getPointerCount() returns the number of pointers. If there is only one touch event, getPointerCount() will return 1, and the loop will run only once, for n = 0. For two touch events, n will get the values 0 and 1, and so on.
At ➋, we modify the motionEvent.getX() method by inserting an n in the parentheses after getX(). Pointers are numbered in touch events, so passing the variable n as an argument to motionEvent.getX() will get the x-location of the nth touch pointer in the current touch event. So, getX(0) will return the x-location of the first touch, getX(1) will return the x-coordinate of the second touch, and so on. At ➌, we do the same for the y-coordinates of each touch with getY(n). Finally, don’t forget to close the brace of the for loop at ➍.
That’s all it takes! Java and Android make processing multitouch events easy.
Save your code so that we can run the app again. This time, we’re going to run the app on a physical Android device. Unfortunately, we can’t easily simulate multitouch events with a single mouse on the Android emulator, so you’ll need to run the app on a real phone or tablet.
First, plug your Android device into the computer running Android Studio using a USB cable. Allow USB debugging from the computer on the device (see “Running the App on a Real Android Device” on page 100). Close the BubbleDraw app in your emulator, if it’s running. Then, press the run button or go to Run ▸ Run ‘app’.
In the Select Deployment Target window, find and select your device—mine is the Asus Nexus 7—and click OK. Android Studio will recompile the app and deploy it to your device.
When the app starts, it looks like a black screen with “BubbleDraw” in the title bar. Once you place one or more fingers on the screen, though, things get much more interesting, as shown in Figure 11-9.

Figure 11-9: Touching the screen of my Android device with two (left), three (center), or four fingers (right) creates multiple streams of colorful, bouncing bubbles.
As you drag your fingers across the screen, bubbles seem to flow from your fingertips, whether you use one finger, two, five, or even ten!
There’s one other cool feature we didn’t mention yet: to clear the screen, just turn your device sideways (make sure your device’s orientation lock is set to Auto-rotate, not Portrait view). The change in orientation forces the app to reinitialize the BubbleView, which resets the bubbleList and clears the screen. It’s a cool effect, and it makes the app feel even more tactile and interactive.
There’s just one more customization we’ll make to our final BubbleDraw app. We’ll replace the default Android app icon with an icon of our own.
All our apps so far have used the default Android app launcher icons, which feature Android’s friendly green droid. But what if you wanted to use your own, custom icon for the BubbleDraw app—for example, your company’s logo or a screenshot from the app like the one shown in Figure 11-10?
In order to give your app its own custom icon, you’ll need to create your own ic_launcher.png file, paste it into the app ▸ src ▸ main ▸ res ▸ drawable folder, and then modify the AndroidManifest.xml file to use your new icon as the app launcher icon for your app.
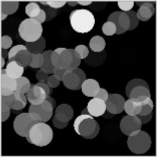
Figure 11-10: A custom image cut from a BubbleDraw screenshot
By default, Android names the launcher icon for your app ic_launcher.png. If you open the app ▸ src ▸ main ▸ res ▸ mipmap folder, you’ll see several ic_launcher.png files of various sizes—stored inside folders labeled mipmap _mdpi, mipmap_xxhdpi, and so on—that correlate to the various screen sizes of different phones and tablets.
We’ll call our new image ic_launcher.png as well, just for convenience. Using your favorite image-editing program, create a PNG file with the image you want to use for your app launcher icon. (The site http://www.gimp.org/ has a great, free image editor, and https://www.pixlr.com/editor/ is also free over the web.) It’s best to use a square image, but Android can also work with files that aren’t perfectly square. My image measures 156 × 156 pixels, but anything between 64 × 64 and 256 × 256 should work fine.
NOTE
If you want to use a screenshot of the app like I did, taking a screenshot is easy: press and hold your Android device’s sleep/wake button and the volume-down button at the same time until the screen flashes to let you know the image is saved. In your Photos app, find Screenshots, and you should see the image. You can edit the image to be 256 × 256 pixels or smaller by emailing it to yourself so you can access it on your regular computer, or by cropping the image directly on your Android device and then emailing it to yourself.
Save or export your file from the image editor as ic_launcher.png. In the next step, we’ll copy this image and paste it into the BubbleDraw project in Android Studio.
Once you’ve created your own ic_launcher.png app icon file, open the folder you saved it into and copy the file.
In Android Studio, under the Project Explorer pane for your BubbleDraw app, find the app ▸ res ▸ drawable or app ▸ src ▸ main ▸ res ▸ drawable folder and paste your new ic_launcher.png image into it, as shown in Figure 11-11.
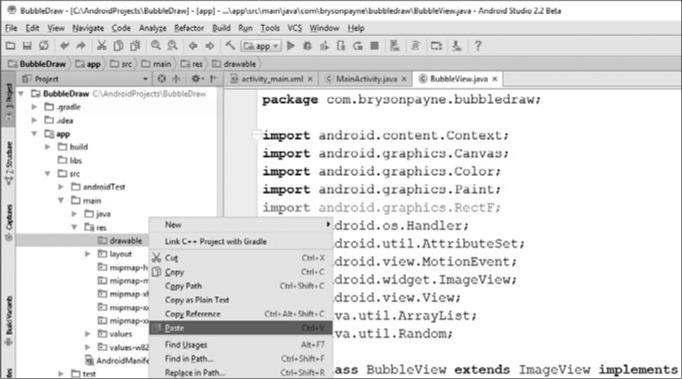
Figure 11-11: Paste your new, custom app icon into the app ▸ src ▸ main ▸ res ▸ drawable folder.
You’ll see an Android Copy window verifying the location of the file. Click OK.
When the icon copies into your drawable folder, you’ll be able to open the folder and double-click ic_launcher.png to preview it in Android Studio.
We now have the new icon we created in the BubbleDraw project’s structure, so we can tell Android to use this image as the app icon.
For this last step, we’ll edit the AndroidManifest.xml file for your app. The AndroidManifest.xml file describes some of the basic structure, properties, and functionality of your app to the Android operating system.
Under app ▸ src ▸ main (or app ▸ manifests), open AndroidManifest.xml. Near the top of the file, find the entry for android:icon, and change it to the new file you just placed in the drawable folder:
<application
android:allowBackup="true"
android:icon="@drawable/ic_launcher"
We’re telling Android to look inside this project’s drawable folder and find an image file named ic_launcher. We leave the .png extension off in the manifest.
Now, save the AndroidManifest.xml file and press the run button to compile and deploy the app with the new icon. Once the app updates on your emulator or Android device, you’ll see the new icon for BubbleDraw, as shown in Figure 11-12.
The custom PNG image we created is now the icon for the app in Android!
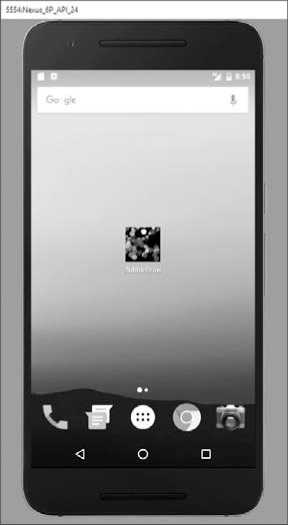
Figure 11-12: We’ve customized the app launcher icon for the BubbleDraw app.
You can also customize the app’s name as it appears on both the app icon and the title bar inside the app. In your Project Explorer tab on the left, under app ▸ src ▸ main ▸ res ▸ values, open strings.xml. The strings.xml file stores the app_name string that’s used both on the launcher icon, as shown in Figure 11-12, and in the title bar of the app while it’s running.
Since BubbleDraw without a space between the words is a bit strange, we’ll add a space between the words in the line of XML that defines the app_name variable in strings.xml:
<resources>
<string name="app_name">Bubble Draw</string>
</resources>
Of course, you can make this app name anything you want, like Your Name\'s Bubble Draw App, but only about 11 or 12 characters will fit below the app icon, so you’d see something like Your Name's... on your home screen. You also would need to escape any special characters in the app name, including the single quote, with the backslash character.
Now that you know how, go back and customize your Hi-Lo guessing game and Secret Messages apps with their own icons as well. Keep refining your apps and trying new things—it’s the best way to keep learning as you code.
You’ve come a long way since Chapter 1. After building three complete mobile and desktop apps, you’ve gained significant computing skills and put those newfound abilities to use. Perhaps most importantly of all, you learned how to improve the apps step-by-step by adding more and more functionality until each app does exactly what you want it to do.
In this chapter, you reinforced several skills and added the following abilities to your coding tool chest:
• Drawing graphics in Android
• Adding a new class to an Android Studio project
• Setting up variables and importing classes
• Building a class constructor from scratch
• Converting Java AWT graphics to Android Canvas graphics
• Drawing on an ImageView using the onDraw() method
• Creating a Runnable object to implement threading in Java
• Using a Handler to communicate with a separate thread in Java
• Using threading to improve animation efficiency
• Handling multiple touch events and using MotionEvent methods to locate touch events onscreen
• Customizing the app launcher icon and app name
Try these programming challenge exercises to review and practice what you’ve learned, as well as to expand your programming skills. Visit the book’s website at https://www.nostarch.com/learnjava/ for sample solutions.
In this chapter, we learned to handle a single-touch event and multiple-touch events. In this challenge, your task is to tell the difference between a single-touch and a multitouch event. You’ll change the logic inside the onTouch() method to draw bigger bubbles when one finger is touching the screen and smaller bubbles when more fingers touch the screen.
Remember, you can find out the number of touch events using the getPointerCount() on your MotionEvent object inside the onTouch() method.
For extra practice, code your app so that more fingers will result in smaller and smaller bubbles.
Once you’ve mastered Programming Challenge #1, give this one a try. Modify both the Bubble class and the onTouch() listener to group bubbles when you draw with one finger by giving them all the same xspeed and yspeed values, but still allow multitouch to blow bubbles in every direction.
This will require changes to the onTouch() listener similar to those in Programming Challenge #1. But, to group the bubbles, you’ll need a way to draw some bubbles with fixed speeds and other bubbles with random speeds. The bubbles drawn during a single-touch event should all move at the same fixed speed so that they appear grouped, and bubbles drawn with multitouch should continue to be assigned random speed values.
To accomplish this, you can create a second Bubble() constructor. It will be similar to the Bubble(x, y, size) constructor that we created for the Bubble class originally, but it will have a different number of parameters.
For example, you could create a second Bubble() constructor that takes the five parameters x, y, size, xspeed, and yspeed. Then, you could use that constructor whenever the user touches the screen with just one finger to give all the bubbles the same speed values. You’d use the original constructor whenever the user touches more than one finger to the screen so the bubbles flow in random directions.