Chapter 6
Digging into Advanced Theme Development
IN THIS CHAPTER
 Customizing themes
Creating new templates
Activating custom menus
Exploring Custom Post Types
Using Post Thumbnails for feature images
Building a theme options page
The previous chapters of this minibook describe WordPress themes and using their structure to build your site. Delving into deeper topics can help you create flexible themes that offer users options to control the theme.
Whether you’re building a theme for a client, the WordPress.org theme directory, or yourself, adding advanced theme features can make theme development easier and faster with a high-quality result. With these advanced theme concepts and tools, you can build robust, dynamic themes that allow for easier design customization and offer a variety of layout options.
Beyond tools and methods of advanced theme development, this chapter provides some development practices that help projects succeed.
Getting Started with Advanced Theming
Before themes were added to WordPress, customizing the design of the site meant modifying the main WordPress index.php file and the default print.css file. Way back in 2005, Version 1.5 added the first theme support and rudimentary child theme support. Over time, WordPress began to support other features, such as custom headers, custom backgrounds, and featured images.
Additionally, the capabilities of themes have grown steadily. Incremental improvement — beginning with a small, simple starting point and improving it over time — works very well in theme development. By developing incrementally, you can build a theme from start to completion from an existing, well-tested theme (most themes are part of a larger incremental improvement process) and maximize your development time. I can't think of a single theme I’ve developed that wasn’t built on another theme.
 You don’t need to develop each theme from scratch. Choosing a good starting point makes a big difference in how quickly you can get your project off the ground.
Finding a good starting point
Choosing a solid starting point to build your latest and greatest theme design on can be time-consuming. Although exploring all the available themes in detail is tempting, I find that exhaustive searches waste more time than they save.
Begin with the most current theme unless a more suitable one is available. Because the design and capabilities of the theme were recently implemented, modifying it to meet your current project’s needs is faster than rediscovering all the nuances of an older, unfamiliar theme.
You may wonder whether I ever build themes from other designers’ themes. I have. These days, if a new theme comes out that shows how to integrate some new feature, I play around with the theme to understand the concept but always go back to one of my themes to implement the modification. The reason is simple: If I can implement the feature into my own design, I have a much better appreciation of how it works. Allowing someone else’s code or design to do the heavy lifting can limit how I use that feature.
If you’re new to theme development and haven’t produced a theme of your own, start with the WordPress default theme, Twenty Nineteen. (See Book 6, Chapter 1 for a full analysis of the Twenty Nineteen theme.) The WordPress development team includes a default theme in every installation of the platform to give new site owners a theme to use right away but also to give new theme developers the ability to discover how themes work.
All the examples in this chapter are built off the WordPress default Twenty Nineteen theme unless noted otherwise.
Customizing the theme to your needs
After you select a theme for your project, you should create a copy of the theme. This way, you can look at the unmodified version in case you accidentally remove something that causes the theme or design to break.
When you find code and styling that you don’t need anymore, comment it out rather than delete it. This action removes the functionality but still allows you to add it back if you change your mind.
You comment out a line of PHP code by adding // in front of it, as in this example:
// add_editor_style();
Comment out CSS by wrapping a section in /* and */, as follows:
/* CSS Comment
#content {
. margin: 0 280px 0 20px;
}
*/
Comment out HTML by using brackets starting with <!-- and ending with --> surrounding the code, as in this example:
<!--<div id="content">this is a content area</div>-->
When you start finalizing the theme, go through the files to remove any blocks of commented styling and code to clean up your files.
Adding New Template Files
Book 6, Chapter 3 introduces the concept of template files and gives you an overview of the template files available to you. Book 6, Chapter 5 explains the idea of overriding template files with child themes. The following sections explore some advanced uses of template files.
Although you rarely need to use all these techniques, being fluent in your options gives you the flexibility to address specific needs quickly when they come up.
Creating named templates
WordPress recognizes three special areas of a theme: header, footer, and sidebar. The get_header, get_footer, and get_sidebar functions default to loading header.php, footer.php, and sidebar.php, respectively. Each of these functions also supports a name argument to allow you to load an alternative version of the file. Running get_header('main'), for example, causes WordPress to load header-main.php.
You may wonder why you'd use a name argument when you could create a template file named whatever you like and load it directly. The reasons for using the get_header, get_footer, or get_sidebar functions with a name argument are
- Holding to a standard naming convention that other WordPress developers can easily understand
- Automatically providing support for child themes to override the parent theme's template file
- Offering a fallback that loads the unnamed template file if the named one doesn’t exist
 In short, use the name-argument feature if you have multiple, specialized header, footer, or sidebar template files.
You can use this named template feature along with the Theme Options (discussed in “Exploring Theme Options in the Customizer” later in this chapter) to allow users to easily switch among header, footer, and sidebar styles. On the Theme Options page, you can enable the user to choose the specific header, footer, or sidebar template file he or she wants, providing an easy way to change the layout or design of the site. For a good example of content you can add to a different sidebar file, see the nearby sidebar “WP_Query posts for category content,” which discusses displaying a list of recent posts and filing them in a specific category on the sidebar of your site.
Creating and using template parts
A template part is similar to the header, footer, and sidebar templates except it isn’t limited to the header, footer, and sidebar.
The get_header, get_footer, and get_sidebar functions allow code that's duplicated in many of the template files to be placed in a single file and loaded by using a standard process. The purpose of template parts is to offer a standardized function that can be used to load sections of code specific to an individual theme. Sections of code that add a specialized section of header widgets or display a block of ads can be placed in individual files and easily loaded as a template part.
You load template parts by using the get_template_part function. The get_template_part function accepts two arguments: slug and name. The slug argument is required and describes the generic type of template part to be loaded, such as loop. The name argument is optional and selects a specialized template part, such as post.
A call to get_template_part with just the slug argument tries to load a template file with a filename of slug.php. Thus, a call to get_template_part('loop') tries to load loop.php, and a call to get_template_part('header-widgets') tries to load header-widgets.php. See a pattern here? Slug refers to the name of the template file, minus the .php extension, because WordPress already assumes that it's a PHP file.
A call to get_template_part with both the slug and name arguments tries to load a template file with a filename of slug-name.php. If a template file with a filename of slug-name.php doesn't exist, WordPress tries to load a template file with a filename of slug.php. Thus, a call to get_template_part('loop', 'post ') first tries to load loop-post.php followed by loop.php if loop-post.php doesn't exist; a call to get_template_part('header-widgets', 'post') first tries to load header-widgets-post.php followed by header-widgets.php if header-widgets-post.php doesn't exist.
The Twenty Nineteen theme offers a good example of the template part feature in use. Look in the theme folder, and you see a folder called /template-parts. Inside that folder are different folders. Opening the /content folder reveals multiple templates that use the slug and name convention and can be called into any template file by using get_template_part();, as in content-excerpt.php, content-page.php, and content-single.php.
The Loop is the section of code in most theme template files that uses a PHP while loop to loop through post, page, and archive content (to name a few types) and display it. The presence of The Loop in a template file is crucial for a theme to function properly. Book 6, Chapter 3 examines The Loop in detail.
Twenty Nineteen's index.php template file shows a template part for the content template part in action:
<?php
  if (have_posts() ) {
    // Load posts loop.
    while ( have_posts() ) {
      the_post();
      get_template_part( 'template-parts/content/content' );
  }
Loading the content by using a template part, Twenty Nineteen cleans up the index.php code considerably compared with other themes. This cleanup of the template file code is the icing on the cake. The true benefits are the improvements in theme development.
A child theme (child themes are discussed at length in Book 6, Chapter 5) could supply a content.php file to customize only The Loop for index.php. A child theme can do this without having to supply a customized index.php file because Twenty Nineteen uses template parts and uses both arguments of the get_template_part function.
When a theme's code for the header, The Loop, the sidebar, and the footer are placed in separate files, the template files become much easier to customize for specific uses. You can see the difference by comparing the following two blocks of code. The first block includes a sidebar through the use of the get_sidebar(); function; the second block doesn’t.
This page template includes a sidebar:
<?php get_header(); ?>
. <div id="primary" class="site-content">
.   <div id="content" role="main">
.     <?php while ( have_posts() ) : the_post(); ?>
        <?php get_template_part( 'content', 'page' ); ?>
        <?php comments_template( '', true); ?>
.     <?php endwhile; // end of the loop. ?>
.   </div><!-- #content -->
. </div><!-- #primary -->
<?php
  get_sidebar();
  get_footer();
?>
This page template doesn’t include a sidebar:
<?php get_header(); ?>
. <div id="primary" class="site-content">
.   <div id="content" role="main">
.     <?php while (have_posts() ) : the_post(); ?>
        <?php get_template_part( 'content', 'page'); ?>
        <?php comments_template( '', true); ?>
.     <?php endwhile; // end of the loop.?>
.   </div><!-- #content -->
. </div><!-- #primary -->
<?php get_footer();?>
The only difference between these two blocks of code is that the first block contains the get_sidebar function call and the second one doesn't. With just this modification and a few styling rules added to the CSS, your theme now has a page template that doesn’t have a sidebar.
You may wonder how the preceding example shows the value of template parts if it’s really about the get_sidebar function. Although the get_sidebar function is the feature of the previous example, the unsung hero is the get_template_part function.
Using a template part means that a modification to a template that displays the same data needs to be made only one time. Both example blocks of code use the get_template_part call, which allows you to create as many customized page templates as you need without having to duplicate The Loop code. Without the duplicate code, the code for The Loop can be easily modified in one place.
When you start duplicating sections of code in numerous template files, place the code in a separate file, and use the get_template_part function to load it where needed.
Exploring content-specific standard templates
The template files I've discussed so far span a wide scope of site views specific to the view, not the content. The category.php template file, for example, applies to all category archive views but not to a specific category, and the page.php template file applies to all page views but not to a specific page. You can create template files for specific content and not the view, however.
Four content-specific template types are available: author, category, page, and tag. Each one allows you to refer to specific content by the term's ID (an individual author’s ID, for example) or by the slug.
The slug discussed in this section differs from the slug argument of the get_template_part function described earlier in this chapter. In this section, slug refers to a post, page, or category slug (to name a few), such as a Press Releases category with a slug of press-releases or a post titled “Hello World” with a slug of hello-world.
Suppose that you have an About Us page with an id of 138 and a slug of about-us. You can create a template for this page by creating a file named page-138.php or page-about-us.php. In the same way, if you want to create a template specific to an awesome author named Lisa with an id of 7 and a slug of lisa, you can create a file named author-7.php or author-lisa.php.
Creating a template by using the slug can be extremely helpful for making templates for sites that you don't manage. If you want to share a theme that you created, you could create a category-featured.php template, and this template would automatically apply to any category view that has a slug of featured. This practice is better than using the category ID, for example, because the ID number of a particular category is going to vary from site to site.
Using categories as the example, the file-naming convention is as follows:
- A template with the filename
category.phpis a catch-all (default) for the display for all categories. (Alternatively, a template with the filename ofarchives.phpdisplays categories if acategory.phpdoesn't exist.) - Add a dash and the category ID number to the end of the filename (as shown in Table 6-1) to specify a template for an individual category.
- Alternatively, you can add a dash and the category slug to the end of the filename (as shown in Table 6-1) to define it as a template for that particular category. If you have a category called Books, the category slug is
books; the individual category template file would be namedcategory-books.php. - If you don't have a
category.php, anarchives.php, orcategory-#.phpfile, the category display pulls from the Main Index template (index.php).
TABLE 6-1 Category Template File-Naming Conventions
If the Category ID or Slug Is … |
The Category Template Filename Is … |
|
|
|
|
|
|
|
|
|
|
|
|
Table 6-1 gives you some examples of file-naming conventions for category templates.
Because creating a template by using slugs is so useful (and because an ID is relevant only to a specific site), you may wonder why the id option exists. The short answer is that the id option is legacy support for a time in WordPress before the slug option existed, but it's still valuable in specific instances. You can use the id option for a content-specific template without worrying about the customization breaking if the slug changes, for example. This technique is especially helpful if you set up the site for someone and can’t trust that he won’t edit category slugs (such as changing a category with a slug of news to press-releases). He can change the slug of a category all day long, but doing so will still maintain the same ID for that category, even when the slug is modified, so using the ID in a template, such as category-1.php, will not disrupt the global theme.
Using page templates
Although the page-slug.php feature is very helpful, requiring the theme's user to use the name you choose for a specific feature sometimes is too difficult or unnecessary. Page templates allow you to create a stand-alone template (like page.php or single.php) that the user can selectively use on any page he or she chooses. As opposed to the page-slug.php feature, a page template can be used on more than one page. The combined features of user selection and multiple uses make page templates much more powerful theme tools than page-slug.php templates.
For more on page templates, see Book 6, chapters 1, 3, and 5.
To make a template a page template, add Template Name: Descriptive Name to a comment section at the top of the template file. The following code would be at the beginning of a page template that removes a sidebar:
<?php
/**
 * Template Name: Full-width Page Template, No Sidebar
 *
 * Description: Use this page template to remove the sidebar from any page.
 *
*/
This code registers the template file as a page template and adds Full-width Page Template, No Sidebar to the Page Attributes module's Template drop-down menu, as shown in Figure 6-1. (Check out Book 4, chapters 1 and 2 for information on publishing pages.) Using a template on a static page is a two-step process: Upload the template, and tell WordPress to use the template by tweaking the page’s code.

FIGURE 6-1: The Dashboard showing page attributes.
By providing a robust set of page templates, you can offer users of your theme an easy-to-use set of options for formatting their pages. These options can be used only for pages, but named header, footer, sidebar, and template parts can be used to offer users options on other site views.
Adding Theme Support for Built-In Features
The WordPress core offers several great tools that can easily be added to a theme to give the theme more customization options. WordPress provides several built-in features that enable you to enhance your site and theme. This section covers four of the most popular features:
- Custom navigation menus
- Custom post types
- Custom taxonomies
- Featured images
These features are part of the WordPress core, but they aren’t activated by default. When you add theme support, you’re activating a built-in feature in your theme. Therefore, when you’re traveling around the WordPress community, whether it’s in a support forum or at a WordCamp event, and you hear someone say that the theme supports a certain feature, you can smile because you know exactly what she’s talking about.
Activating support for these features in the theme you’re using involves a few steps:
- Core function: Add support for the feature to your theme by including the core function in your theme’s Theme Functions template file (
functions.php). - Template function: Add the necessary function tags in your theme template(s) to display the features on your website.
- Templates: In some cases, create feature-specific templates to create enhancements to your site.
The following sections take you through these feature. You add the core function to your theme, add the function tags to your templates, and (if indicated) create a feature-specific template in your theme to handle the added features.
Adding support for custom menus
The WordPress menu-building feature is a great tool that WordPress offers to users and theme developers. Before the addition of this tool, theme developers implemented their own menu solution, creating a huge number of themes with navigation customization requiring coding and a small set of themes with very different ways of handling navigation. Creating complex, multilevel menus on your WordPress site takes just a few steps, as outlined in this section.
A navigation menu is a listing of links that displays on your site. These links can be links to pages, posts, or categories within your site, or they can be links to other sites. Either way, you can define navigation menus on your site with the built-in Custom Menus feature in WordPress.
It’s to your advantage to provide at least one navigation menu on your site so that readers can see everything your site has to offer. Providing visitors a link, or several links, is in keeping with the point-and-click spirit of the web.
The Twenty Nineteen theme already supports menus. Looking at Twenty Nineteen’s functions.php file, you see that the following lines of code handle registering the theme's menu:
// This theme uses wp_nav_menu() in two locations.
  register_nav_menus(
    array(
      'menu-1' => __( 'Primary', 'twentynineteen' ),
      'footer' => __( 'Footer Menu', 'twentynineteen' ),
      'social' => __( 'Social Links Menu', 'twentynineteen'),
    )
  );
This code registers three navigation areas with theme location names menu-1, footer and social and human-readable names of Primary, Footer Menu, and Social Links Menu. With the Twenty Nineteen theme active, click the Menus link on the Appearance menu to load the Menus page in the Dashboard, and view the different menu locations.
Core menu function and template tags
The Custom Menu feature is built into the default Twenty Nineteen WordPress theme, so you don't have to worry about preparing your theme for it. If you’re using a different theme, however, adding this functionality is easy:
- Open the Header template (
header.php) in a text editor. - Add the following template tag by typing it on a new line in the Header template (
header.php):<?php wp_nav_menu(); ?>This template tag is needed so that the menu you build by using the Custom Menu feature displays at the top of your website. Table 6-2 gives details on the parameters you can use with the
wp_nav_menu();template tag to further customize the display to suit your needs. - Save the Header template file.
TABLE 6-2 Common Tag Parameters for wp_nav_menu();
Parameter |
Information |
Default |
Tag Example |
|
The unique ID of the menu (because you can create several menus, each with a unique ID number) |
Blank |
|
|
The menu name in slug form (such as |
Blank |
|
|
The menu name |
Blank |
or
|
|
The CSS class used to style the menu list |
Menu |
|
|
The HTML markup used to style the list (an unordered list [ |
|
|
|
The parameter that creates a fallback if a custom menu doesn't exist |
|
|
|
The text that displays before the link text |
None |
|
|
The text that displays after the link text |
None |
|
Figure 6-2 shows the default Twenty Nineteen theme with a navigation menu (Home, Blog, About Me) below the website’s name.

FIGURE 6-2: The Twenty Nineteen theme with a navigation menu below the header.
Create a menu called Main on the Menus page of the WordPress Dashboard. (See Book 6, Chapter 1 for details on creating menus in the WordPress Dashboard.) The template tag used in the theme to display the menu looks like this:
<?php wp_nav_menu( 'Main' ); ?>
The HTML markup for the menu is generated as an unordered list by default and looks like this:
<ul id="menu-main" class="main-menu" tabindex="0">
. <li id="menu-item-412" class="menu-item menu-item-type-custom menu-item-object-custom current-menu-item current_page_item menu-item-home menu-item-412"><a href="https://wpfd.local">Home</a></li>
. <li id="menu-item-414" class="menu-item menu-item-type-post_type menu-item-object-page menu-item-414"><a href="https://wpfd.local/blog/">Blog</a></li>
. <li id="menu-item-413" class="menu-item menu-item-type-post_type menu-item-object-page menu-item-413"><a href="https://wpfd.local/about-me/">About Me</a></li>
</ul>
Notice in the HTML markup that the <ul id="menu-main" class="main-menu"> line defines the CSS ID and class.
The ID reflects the name that you give your menu. Because the menu is named Main, the CSS ID is menu-main. If the menu were named Foo, the ID would be menu-foo. By assigning menu names in the CSS and HTML markup, WordPress allows you to use CSS to create different styles and formats for your menus.
When developing themes for yourself or others to use, make sure that the CSS you define for the menus can do things like account for subpages by creating drop-down menus. You can accomplish this task in several ways. You can review the CSS for the navigation menu in the Twenty Nineteen theme by viewing it in a text editor. The CSS file for the navigation menu is in the theme folder here: /twentynineteen/sass/navigation/_menu-main-navigation.scss.
 Notice that the navigation CSS file has the
 .scss file extension instead of the standard .css extension that I've used throughout this book. .scss is the extension of a special CSS format called Sass (Syntactically awesome style sheets). Sass is an advanced stylesheet or scripting language that developers use to create variables, nested rules, inline imports, and more to make creating stylesheets easier. Covering Sass would take an entirely new book, so I don’t get into that topic in this book at all. After you’ve become comfortable with standard CSS, however, you may want to check out https://sass-lang.com to begin learning about Sass.
The CSS you use to customize the display of your menus will differ; the example in the preceding section is only an example. After you get the hang of using CSS, you can try different methods, colors, and styling to create a custom look. (You can find additional information about Basic HTML and CSS in Book 6, Chapter 4.)
Displaying custom menus using widgets
You don’t have to use the wp_nav_menu(); template tag to display the menus on your site, because WordPress also provides a Custom Menu widget that you can add to your theme, allowing you to use widgets instead of template tags to display the navigation menus on your site. This widget is especially helpful if you've created multiple menus for use in and around your site in various places. Book 6, Chapter 4 provides more information on using WordPress widgets.
Your first step is registering a special widget area for your theme to handle the Custom Menu widget display. Open your theme’s functions.php file, and add the following lines of code:
function my_widgets_init() {
  register_sidebar(array (
    'name'          => __( 'Menu' ),
    'id'            => 'widget-name',
    'description'   => __( 'A new widget area for my menu' ),
    'before_widget' => '<li id="%1$s" class="widget-container %2$s">',
    'after_widget'  => "</li>",
    'before_title'  => '<h3 class="widget-title">',
    'after_title'   => '</h3>',
    ) );
  }
add_action('widgets_init', 'my_widgets_init' );
These few lines of code create a new Menu widget area on the Widgets page of your Dashboard. You can drag the Custom Menu widget into the Menu widget to indicate that you want to display a custom menu in that area. Figure 6-3 shows the Menu widget area with the Custom Menu widget added.

FIGURE 6-3: Widgets page displaying a Menu widget area with a Navigation Menu widget.
To add the widget area to your theme, open the Theme Editor (click the Editor link on the Appearance menu), open the header.php file, and add these lines of code in the area in which you want to display the Menu widget:
<ul>
<?php if ( !function_exists( 'dynamic_sidebar' ) || !dynamic_sidebar( 'Menu' ) ) : ?>
<?php endif; ?>
</ul>
These lines of code tell WordPress that you want information contained in the Menu widget area to display on your site.
Adding support for custom post types
Custom post types and custom taxonomies have expanded the content management system (CMS) capabilities of WordPress and are likely to become a big part of plugin and theme features as more developers become familiar with their use. Custom post types allow you to create new content types separate from posts and pages, such as movie reviews or recipes. Custom taxonomies allow you to create new types of content groups separate from categories and tags, such as genres for movie reviews or seasons for recipes.
Posts and pages are nice generic containers of content. A page is timeless content that has a hierarchal structure; a page can have a parent (forming a nested, or hierarchal, structure of pages). A post is content that is listed in linear (not hierarchal) order based on when it was published and organized into categories and tags. What happens when you want a hybrid of these features? What if you want content that doesn't show up in the post listings, displays the posting date, and doesn’t have either categories or tags? Custom post types are created to satisfy this desire to customize content types.
By default, WordPress has different post types built into the software, ready for you to use. The default post types include
- Blog posts
- Pages
- Menus
- Attachments
- Revisions
Custom post types give you the ability to create new, useful types of content on your website, including a smart, easy way to publish those content types to your site.
The possibilities for the use of custom post types are endless. To kick-start your imagination, here are some of the most popular and useful ideas that developers have implemented on sites:
- Photo gallery
- Podcast or video
- Book reviews
- Coupons and special offers
- Events calendar
Core custom post type function
To create and use Custom Post Types on your site, you need to be sure that your WordPress theme contains the correct code and functions. In the following steps, I create a basic Custom Post Type called Generic Content. Follow these steps to create the Generic Content basic Custom Post Type:
Log in to your web server via Secure File Transfer Protocol (SFTP).
To see how to connect to your website via SFTP, refer to Book 2, Chapter 2.
Navigate to the Twenty Nineteen theme folder.
On your web server, that folder is
/wp-content/themes/twentynineteen/.- Locate the
functions.phptemplate file. - Download the
functions.phptemplate file to your computer. Open the
functions.phpfile in a text editor.Use Notepad if you're on a PC or TextEdit if you’re using a Mac.
Add the Custom Post Types code to the bottom of the Theme Functions template file.
Scroll to the bottom of the
functions.phpfile, and include the following code to add a Generic Content Custom Post Type to your site:// Add a Custom Post Type called: Generic Content
add_action( 'init', 'create_my_post_types' );
. function create_my_post_types() {
. register_post_type( 'generic_content', array(
. 'label' => __( 'Generic Content' ),
. 'singular_label' => __( 'Generic Content' ),
. 'description' => __( 'Description of the Generic Content type' ),
. 'public' => true,
. )
. );
}- Save the Functions file, and re-upload it to your web server.
Figure 6-4 shows you the WordPress Dashboard screen with a new menu item on the left menu; below the Comments link, you see a link for Generic Content. This link is the sample Custom Post Type that you added to WordPress in the preceding steps. You can see that the Generic Content post type has been successfully registered in my installation of WordPress and is ready to use.

FIGURE 6-4: The new Generic Content post type.
The function register_post_type can accept several arguments and parameters, which are detailed in Table 6-3. You can use a variety and combination of arguments and parameters to create a specific post type. You can find more information on Custom Post Types and using the register_post_type function in the official WordPress Codex at https://codex.wordpress.org/Function_Reference/register_post_type.
TABLE 6-3 Arguments and Parameters for register_post_type();
Parameter |
Information |
Default |
Example |
|
The name of the post type. |
None |
|
|
Same as |
None |
|
|
The description of the post type; displayed in the Dashboard to represent the post type. |
None |
|
|
Sets whether the post type is public. There are three other arguments:
|
Default is value of public argument |
|
|
Sets the position of the post type menu item on the Dashboard navigation menu. |
Default: null By default, appears after the Comments menu on the Dashboard Set integer in intervals of 5 (5, 10, 15, 20, and so on) |
|
|
Defines a custom icon (graphic) to the post type menu item on the Dashboard navigation menu. Creates and uploads the image to the |
Posts icon |
|
|
Tells WordPress whether to display the post type content list in a hierarchical manner. |
Default is |
|
|
Controls whether this post type can be used with a query variable such as |
Default is |
|
|
Defines permissions for users to edit, create, or read the Custom Post Type. |
Gives the same capabilities for those users who can edit, create, and read blog posts |
|
|
Defines what meta boxes, or modules, are available for this post type in the Dashboard. |
|
|
|
Rewrites the permalink structure for the post type. |
Two other arguments are available:
|
|
|
Uses existing WordPress taxonomies (category and tag). |
Category
|
|
After you add a Generic Content Custom Post Type to your site, a new post type labeled Generic appears on the left navigation menu of the Dashboard.
You can add and publish new content by using the new Custom Post Type, just as you do when you write and publish posts or pages. (See Book 4, Chapter 1.) The published content isn't added to the chronological listing of posts; rather, it’s treated like separate content from your blog (just like static pages).
View the permalink for the published content, and you see that it adopts the custom post type name Generic Content and uses it as part of the permalink structure, creating a permalink that looks like https://yourdomain.com/generic-content/new-article.
A very helpful plugin for building Custom Post Types quickly in WordPress is one called Custom Post Type UI. Written by my team at WebDevStudios, this plugin (https://wordpress.org/plugins/custom-post-type-ui) gives you a clean interface within your WordPress Dashboard that can help you easily and quickly build Custom Post Types on your website. It eliminates the need to add the code to your functions.php file by giving you options and settings so that you can configure and build the Custom Post Type that you want. Figure 6-5 shows the Custom Post Type UI options page on the Dashboard.
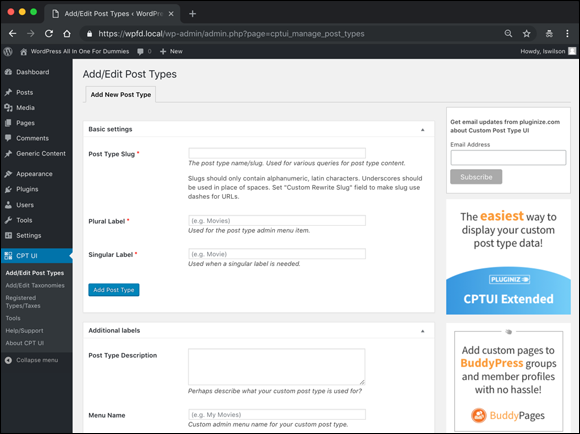
FIGURE 6-5: The options page for the Custom Post Type UI plugin.
Custom post type templates
By default, custom post types use the single.php template in your theme — that is, they do unless you create a specific template for your custom post type if you find the regular WordPress single.php template too limiting for your post type.
The preceding section has the code to build a simple Generic Content custom post. After you add that code, a Generic Content menu appears on the WordPress Dashboard. Click the Add New link on the Generic Content menu and publish a new post to add some content for testing. In this example, a new Generic Content type with a title of Test and a slug of test is added. Because the Generic Content type doesn't have a specific template, it uses the single.php template, and resulting posts look no different from a standard one.
If you get a Not Found page when you try to go to a new custom post type entry, reset your permalink settings. Click the Permalinks link on the Settings menu on the WordPress Dashboard and then click the Save Changes button. This action causes WordPress to reset the permalinks, which adds the new custom post type link formats in the process.
To build a template specific for the Generic Content post type, add a new template named single-posttype.php, where posttype is the first argument passed to the register_post_type function from the preceding section. For this example, the single template file specific to Sample Post Type is single-generic-content.php. Any modifications made in this template file are applied only to instances of the Generic Content post type.
Tying this material together with the section on template parts from earlier in this chapter, a basic structure for single-generic-content.php for the Twenty Nineteen theme is
<?php get_header(); ?>
  <section id="primary" class="content-area">
    <main id="main" class="site-main">

    <?php if ( have_posts()) {

      // Load posts loop.
      while (have_posts() ) {
        the_post();
        get_template_part( 'loop' , 'generic-content' );
        // Previous/next page navigation.
        twentynineteen_the_posts_navigation();

      } else {

        // If no content, include the "No posts found" template.
        get_template_part( 'template-parts/content/content', 'none' );

      }
    ?>

    </main><!-- .site-main -->
  </section><!-- .content-area -->
<?php get_footer(); ?>
When you use the template part, creating a file called loop-generic-content.php allows for easy customization of The Loop for the Generic Content post type entry.
Adding support for custom taxonomies
One of my engineers at work asks this question of every candidate who's interviewing for an engineering job: “If you were asked to design a class system for a virtual zoo, how would you architect the animal kingdom?”
There’s no wrong or right answer to this question, but the answer the candidate gives tells the interviewer his or her thought process on architecting data. Does the candidate group the animals by color, for example, or by breed? One candidate started by grouping the animals based on location within the zoo; another started by grouping animals by species. These answers provide helpful insight into how a candidate would use WordPress to categorize complex data. Sometimes, though, using the built-in categories and tags aren’t enough to accomplish a complex task such as architecting a virtual zoo.
On a website where content about different types of zoo animals is published, the zoo content might need a variety of new taxonomies or grouping options. Organizing zoo animals by color, breed, species, location in the zoo, and size allows visitors to the site to view different groups of animals that might interest them.
To register this new taxonomy, use the register_taxonomy function. Adding the following code to the bottom of your theme’s functions.php file registers the Color taxonomy that you could use to categorize the zoo animals by color:
register_taxonomy( 'color', 'post', array(
  'label' => 'Color' )
);
This function call gives the new custom taxonomy an internal name of color, assigns the new taxonomy to Posts, and gives the taxonomy a human-readable name of Color. When you've successfully registered the new taxonomy, you see a link for it on the Posts menu of the Dashboard. In Figure 6-6, you see the Color taxonomy screen of the Dashboard, where you can add new terms in the same manner that you add Categories on the Category screen.
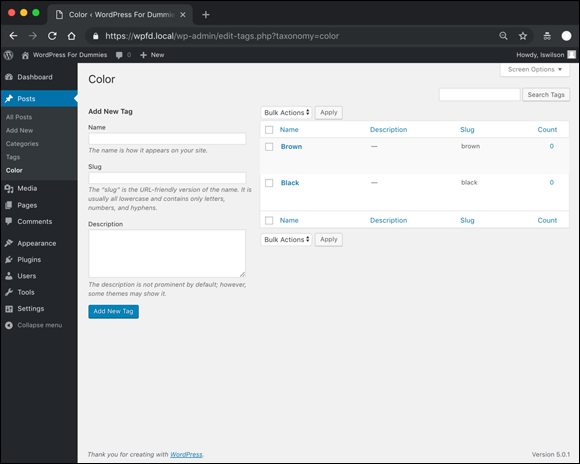
FIGURE 6-6: A new taxonomy registered in WordPress.
After adding this code to your theme, you can create and assign Colors when creating a new post or editing an existing post. For this example, you could add a color with a name of Brown to a post about a brown animal in the zoo.
With this new taxonomy (Color) added with the new term (Brown), you can visit example.com/color/brown to get the archive page for the new sample taxonomy.
If you get a Not Found page or don't get an archive listing when you try to go to a specific taxonomy entry’s archive, resave your permalink settings. Click the Permalinks link on the Settings menu on the WordPress Dashboard and then click Save Changes. This action forces WordPress to reset the permalinks, which adds the new custom taxonomy link formats in the process.
Adding a new template file called taxonomy-color.php allows you to add a template specific to this new custom taxonomy. As you can with categories and tags, you can add a template that’s specific to a single custom taxonomy entry. Therefore, a template specific to the Color taxonomy with a slug of brown would have a filename of taxonomy-color-brown.php.
Custom taxonomies are a feature that appeals only to developers of specific types of sites that deal mainly in niche areas of content — sites that want to drill down navigation and grouping options for their content. You can find more about custom taxonomies in the WordPress Codex at https://codex.wordpress.org/Function_Reference/register_taxonomy.
Adding support for Post Thumbnails
The WordPress feature called Post Thumbnails (also known as Featured Images) takes a lot of the work out of associating an image with a post and using the correct size each time. A popular way to display content in WordPress themes includes a thumbnail image with a short snippet (excerpt) of text; the thumbnail images are consistent in size and placement within your theme. Before the inclusion of Post Thumbnails in WordPress, users had to open their images in an image-editing program (such as Adobe Photoshop) and crop and resize their image to the desired size, or use fancy scripts (which tend to be resource-intensive on web server)s to resize images on the fly, so those solutions weren't optimal. How about a content management system that crops and resizes your images for you to the exact dimensions that you specify? Yep, WordPress does that for you with just a few adjustments.
By default, when you upload an image, WordPress creates three versions of your image based on dimensions that are set on your Dashboard (click the Media link on the Settings menu):
- Thumbnail size: Default dimensions are 150px × 150px
- Medium size: Default dimensions are 300px × 300px
- Large size: Default dimensions are 1024px × 1024px
Therefore, when you upload an image, you end up with four sizes of that image stored on your web server: thumbnail, medium, large, and the original image. Images are cropped and resized proportionally, and when you use them in your posts, you can typically designate which size you want to use in the image options of the Image Block in the WordPress Block Editor. (See Book 4, Chapter 3 details on uploading images in WordPress.)
Within the WordPress settings panel for a post, you can designate a particular image as the featured image of the post; then, using the Featured Images function that you add to your theme, you can include template tags to display your chosen featured image with your post. This technique is helpful for creating the magazine- or news-style themes that are popular on WordPress sites. Figure 6-7 shows Post Thumbnails and featured images on my business website’s blog at https://webdevstudios.com/blog.
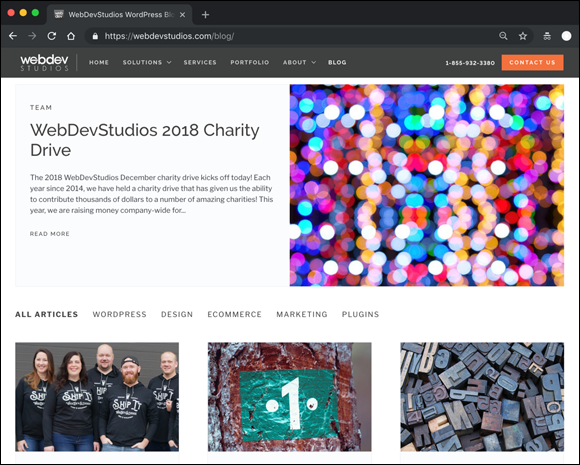
FIGURE 6-7: Post Thumbnails in use at webdevstudios.com/blog.
Also covered in the following sections is adding support for image sizes other than the default image sizes that are set on the Media Settings page of your Dashboard. This support is helpful when you have sections of your site where you want to display a much smaller thumbnail or a slightly larger version of the medium-size thumbnail. In Figure 6-7, you see two different image sizes in place: one at the top and the images along the bottom.
Core Post Thumbnails function and template tag
Adding support for Post Thumbnails includes adding one line of code to your Theme Functions template file (functions.php):
add_theme_support( 'post-thumbnails' );
After you add this line of code to your Theme Functions template file, you can use the Post Thumbnails feature for your posts. You can designate featured images in the Featured Image section of the settings panel on the Edit Post screen.
After you add featured images to your post, make sure that you add the correct tag in your template(s) so that the featured images display on your site in the area where you want them to display. Open your index.php template, and add the following line of code to include the default thumbnail-size version of your chosen featured image in your posts:
<?php if ( has_post_thumbnail() ) { the_post_thumbnail( 'thumbnail' ); } ?>
The first part of that line of code (if (has_post_thumbnail()) checks whether a featured image is associated with the post. If so, the image is attached to the post. The second part of that code snippet (the_post_thumbnail('thumbnail')) displays the thumbnail-size version of the image. If a featured image doesn't exist for the post, the second part of the code snippet is ignored, and the code returns nothing. You also can include the other default image sizes (set in the Media Settings screen of the Dashboard, as shown in Figure 6-8) for medium, large, and full-size images by using these tags:
<?php if ( has_post_thumbnail() ) { the_post_thumbnail( 'medium' ); } ?>
<?php if ( has_post_thumbnail() ) { the_post_thumbnail( 'large' ); } ?>
<?php if ( has_post_thumbnail() ) { the_post_thumbnail( 'full' ); } ?>
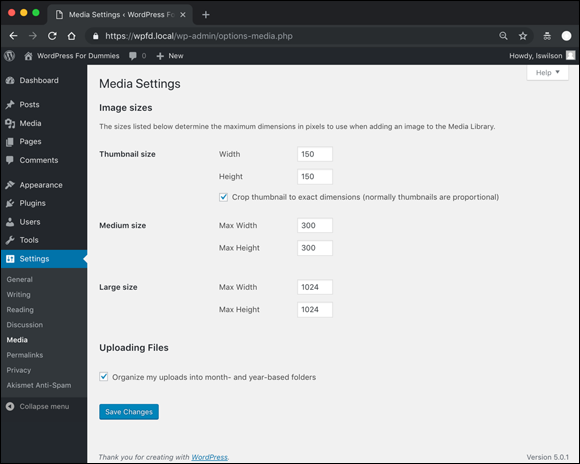
FIGURE 6-8: The Media Settings screen of the Dashboard.
Adding custom image sizes for Post Thumbnails
If the predefined, default image sizes in WordPress (thumbnail, medium, large, and full) don’t satisfy you, and there’s an area on your site where you want to display images with dimensions that vary from the default, WordPress makes it relatively easy to extend the functionality of the post thumbnail feature by defining custom image sizes for your images in your Theme Functions template file. Then you use the the_post_thumbnail function to display it in your theme.
There’s no limit to what sizes you can use for your images. The following example shows how to add a new image size of 600px × 300px. Add this line to your Theme Functions template file (functions.php) below the add_theme_support('post-thumbnails’) function:
add_image_size( 'custom', 600, 300, true );
This code tells WordPress that it needs to create an additional version of the images you upload and to crop and resize it to 600px × 300px. Notice the four parameters in the add_image_size function:
- Name (
$name): Gives the image size a unique name that you can use in your template tag. The image size in this example uses the name'custom'. - Width (
$width): Gives the image size a width dimension in numbers. In this example, the width is defined as'600'. - Height (
$height): Gives the image size a height dimension in numbers. In this example, the height is defined as'300'. - Crop (
$crop): This parameter is optional and tells WordPress whether it should crop the image to exact dimensions or do a soft proportional resizing of the image. In this example, the parameter is set to'true'(accepted arguments:trueorfalse).
Adding the custom image size to your template to display the featured image is the same as adding default image sizes. The only difference is the name of the image set in the parentheses of the template tag. The custom image size in this example uses the following tag:
<?php if ( has_post_thumbnail() ) { the_post_thumbnail( 'custom' ); } ?>
Exploring Theme Options in the Customizer
One key feature of an advanced theme adds theme options to the Customizer panel in WordPress. Theme options allow the theme user to set configurations for the theme without having to modify the theme files. Although a single-use theme could have this information hard-coded into it, this solution is inelegant. If the theme is used more than once or is managed by a nondeveloper, having an easy-to-change setting in the Customizer allows changes to be made quickly and easily. I cover the WordPress Customizer in various chapters of Book 6.
Click the Customize link on the Appearance menu to view the Customizer for the Twenty Nineteen theme, as shown in Figure 6-9.
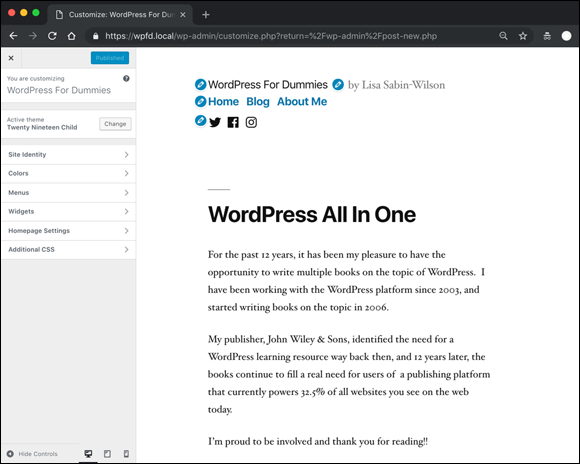
FIGURE 6-9: The Customizer panel.
The Twenty Nineteen theme uses the Customizer to allow its users to adjust several areas of the theme without having to touch any of the code within the template files. The Customizer options for the Twenty Nineteen theme include
- Site Identity: This section allows the user to upload a logo, set the website title, set the website tagline, and upload an icon for display on the browser tab.
- Colors: This section allows the user to set the color of design elements such as links and button colors.
- Menus: This section allows the user to configure the three navigation menus available in the theme.
- Widgets: This section allows the user to configure the widgets for the theme.
- Home page Settings: This section allows the user to configure the page(s) used for the home page and blog.
- Additional CSS: This section allows the user to add styles to the theme by using CSS.
Provide options in the Customizer when the information is specific to the website, not to the theme design. Web analytics code (such as visitor-tracking JavaScript from Google Analytics) is a good example of this user-specific information. Because hundreds of analytics providers exist, most analytics providers require the JavaScript code to be customized for the specific site and then added to the header or footer of the website, which requires a user to edit theme files to add the code for analytics. When you provide an option in the Customizer for the user of your theme to enter the analytics code snippet in a text field, you make the process of adding the analytics code much easier for the user.
Early in the design process, consider what a user may want to modify. Advanced uses of theme options in the Customizer vary widely and include design editors, color pickers, font options, and settings to modify the theme layout (switch a sidebar from one side of the theme to another, for example). The options offered depend on the project and the design.
Before jumping into the code, you should understand some basic concepts of theme options.
To allow the user to access the theme options, you have to offer some form of input, which means adding options to the Customizer via the WordPress Customize API. WordPress provides this API to allow developers to use the Customizer for theme options; it provides a framework for allowing users to live-preview their websites as they make changes in the Customizer.
Four types of objects can be added to the Customizer:
- Panels: Contain the sections and allow multiple sections to be grouped
- Sections: Contained within panels and control the navigation within the Customizer
- Settings: Handle the live preview, saving, and sanitizing of the Customizer data
- Controls: Contained within sections and have design inputs for the settings, such as text fields and check boxes
The Twenty Nineteen theme has already started this process for you. You can view the code in the theme folder in /twentynineteen/inc/customizer.php.
The hook, or function, that you use to initiate the Customizer option is on line 15 of the customizer.php file in the Twenty Nineteen theme:
function twentynineteen_customize_register( $wp_customize ) {
For any theme for which you're creating Customizer options, it’s important to note that the theme folder name needs to be included in the function name. In the preceding code snippet, notice the function name: twentynineteen_customize_register. The twentynineteen part of that function corresponds with the theme folder, and it has to so that WordPress knows which theme to apply the options to. If the name of your theme folder is mytheme, the function to initiate the Customizer would be mytheme_customize_register.
Farther down in the customizer.php file, on line 104, you see the following line of code:
add_action( 'customize_register', 'twentynineteen_customize_register' );
Everything that exists between lines 15 and 104 in the customizer.php file represents the panels, sections, settings, and controls for the theme. Line 15 defines the function, and line 104 adds it to the theme Customizer. Panels, sections, settings, and controls can be added in this format, where mytheme is the name of my theme folder:
function mytheme_customize_register( $wp_customize ) {
 $wp_customize->add_panel();
 $wp_customize->get_panel();
 $wp_customize->remove_panel();

 $wp_customize->add_section();
 $wp_customize->get_section();
 $wp_customize->remove_section();

 $wp_customize->add_setting();
 $wp_customize->get_setting();
 $wp_customize->remove_setting();

 $wp_customize->add_control();
 $wp_customize->get_control();
 $wp_customize->remove_control();
}
add_action('customize_register','mytheme_customize_register');
In this code snippet, you notice a theme of add, get, and remove. The WordPress Customize API allows you to add, get, and remove panels, sections, settings, and controls as needed.
For the most part, when you're creating a theme with Customizer support, you don’t need to add new panels because WordPress already has several default panels to which you can add sections. These panels are available for you to add your sections and controls to by adding the ID for the panel to the functions code. The available panels and panel IDs are
- Site Identity:
title_tagline - Colors:
colors - Header Image:
header_image - Background Image:
background_image - Menus:
nav_menus - Widgets:
widgets - Static Front Page:
static_front_page - Additional CSS:
custom_css
As a rule, in the WordPress Customizer, a panel must contain at least one section, and a section must contain at least one control to be displayed in the Customizer.
In the Twenty Nineteen customizer.php, you can see the color-picker settings starting on line 40:
$wp_customize->add_setting(
  'primary_color',
    array(
      'default'           => 'default',
      'transport'         => 'postMessage',
      'sanitize_callback' => 'twentynineteen_sanitize_color_option',
    )
  );
Line 49 adds the controls for the color picker, which in this case are radio buttons for two choices: Default and Custom. Figure 6-10 shows the Color options, showing the settings and controls outlined in these code examples.
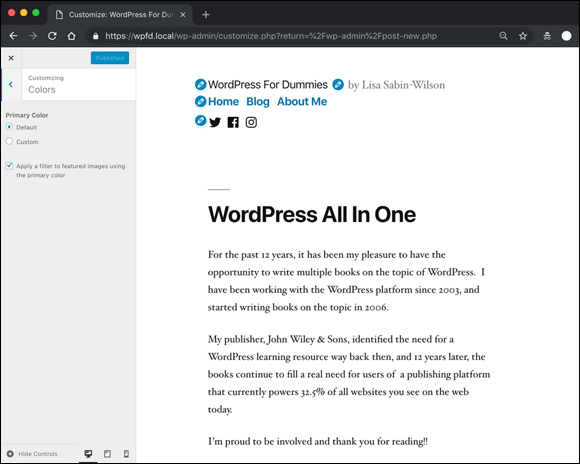
FIGURE 6-10: Twenty Nineteen theme color options in the Customizer.
$wp_customize->add_control(
  'primary_color',
    array(
      'type'       => 'radio',
      'label'      => __( 'Primary Color', 'twentynineteen' ),
      'choices'    => array(
        'default'  => _x( 'Default', 'primary color', 'twentynineteen' ),
        'custom'   => _x( 'Custom', 'primary color', 'twentynineteen' ),
      ),
      'section'    => 'colors',
      'priority'   => 5,
    )
);
The part of the code snippet that says 'section' => 'colors' is where the theme author tells WordPress that he wants the Primary Color section to appear in the Colors panel. (See the list of panels and panel IDs earlier in this section.)
The Customize API is extensive, and it's a powerful tool for providing extra design and theme functionality to users of the theme, allowing them to do things like change a background color or include a custom logo without having to edit any theme files or stylesheets.
This section gives you a brief introduction to the Customizer. If you want to dig into the Customize API, you can find full documentation, including code samples and advanced practices and techniques, at https://developer.wordpress.org/themes/customize-api.