
Most high-quality hubs need to be checked and adjusted only twice a year. Unsealed hubs need an overhaul at least every other year. Put in more than 3,000 miles a year? Overhaul annually. Ride a lot during particularly nasty weather? Overhaul! Rust can ruin bearings.
If you have sealed cartridge bearings, the above rules don’t apply—you can go much longer between overhauls. That said, we’ve still got advice for you here.
Read on to learn how to keep your hubs spinning smoothly.
• HUB BASICS
• ADJUST CONE-AND-LOCKNUT HUBS
• IS THAT A CARTRIDGE BEARING?
• OVERHAUL CONE-AND-LOCKNUT HUBS
• OVERHAUL AND ADJUST A CAMPAGNOLO HUB EQUIPPED WITH AN OVERSIZE AXLE
• LUBRICATE SEALED CARTRIDGE BEARINGS
• TROUBLESHOOTING HUBS
With the wheel off, grasp one end of the axle with the thumb and index finger of your dominant hand. Turn the axle slowly through a few revolutions. Does it feel rough and seem to catch in pits? If so, it’s too tight or the hub is full of dirt or corrosion.
If your hub doesn’t feel tight or gritty, check it for looseness. Wiggle the axle up and down and from side to side. If it moves in these directions, causing a slight knocking feeling, it’s too loose.
Continuing to ride with the hub in any of these conditions will cause unnecessary wear and limit how well the bike can perform. Read on for how to adjust them perfectly.
In a cone-and-locknut hub, ball bearings ride between a hardened steel cup fitted into the hub shell and a hardened steel cone threaded onto the axle. The adjustment is maintained by a locknut that threads against the cone so it doesn’t spin out of place.
All cone-and-locknut hubs adjust in the same basic manner, though rear hubs might require a few additional steps.
1. Remove the wheel from the bike. Lay the wheel flat on a workbench. Remove the axle nuts or quick-release. Grab the axle with your fingers and turn it back and forth to see if it’s too tight. Then move the axle back and forth to see if it’s too loose. If the wheel has a quick-release mechanism, remember that it compresses things a bit—a hub that feels a little loose off the bike might feel okay on the bike. Remount the wheel, then check to see if the axle still seems loose.
2. Before adjusting any hub, one set of cone and locknut must be locked in place on the axle. On front hubs, this can be done on either side, while on rear hubs, it should be done on the right (drive) side. Always check that this is tight. It will save you the frustration of an adjustment that won’t keep.

Step 2
First, remove the cassette (see this page) to expose the right-side cone and locknut. Now remove the left-side locknut, lock washer, spacers (if there are any), and cone, and push the axle to the right to expose the right-side cone. (Be careful around the bearings. If you dislodge any, poke them back into place.)
3. With the axle pushed to the right, hold the cone with a wrench, grip the right locknut with another wrench, and tighten the two against each other to secure them in place.
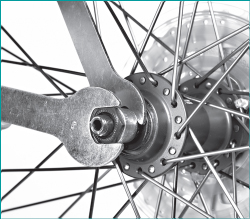
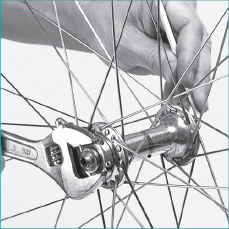
4. Push the axle back into the hub and screw on the left-side cone by hand until it rests against the bearings. Then add the spacers, lock washer, and locknut, and snug the pieces in place by turning the cone counterclockwise while turning the locknut clockwise with the wrenches. Twirl the axle between your fingers to check the adjustment. If it binds, the adjustment is too tight. Loosen it slightly by holding the right-side locknut with a wrench and the left-side cone with a cone wrench (see photo).

Step 4
If the hub is too loose, hold the right-side locknut with a wrench while turning the left cone clockwise until the play disappears. Still holding the right locknut with a wrench, snug the left locknut against the left cone. Secure the left side by placing wrenches on the cone and locknut and tightening them against each other.
It may take a few tries to get a perfect adjustment. Keep at it. If it’s difficult to make a good adjustment, the hub might be damaged or full of dirt. Time for an overhaul.

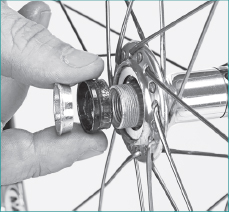
If, after you’ve removed the locknut and cone, you see a flat plastic seal (see photo), your hub has cartridge bearings. The bearing assembly is a pre-manufactured unit and is fitted into the hub shell with the bearing adjustment preset. You may need to take these hubs to your local shop for maintenance. Consult your dealer before attempting to service them. Or turn to this page for info on how to lube the bearings.

1. If your hub is equipped with a quick-release mechanism, thread the adjusting nut off the end of the quick-release skewer and pull the skewer out of the axle. Put the cone-shaped spring back on the skewer so you don’t lose it, and then partially thread on the nut. Set the quick-release assembly aside before doing the hub overhaul.
Step 1
2. Hold the wheel vertically and remove the locknut, spacers, and cone from one side of the axle, keeping them in order. The axle can now be slid out the other side: Hold the wheel horizontally over a rag while removing the axle from the top to ensure that bearings don’t bounce away if they fall out. Leave the cone and locknut on the other end of the axle in place to simplify hub reassembly. You’ll automatically have the proper amount of axle on each side of your hub.
3. Remove the bearings from the cups and set them aside. They’re a good initial indicator of the condition of the hub’s bearing cups as well as the number and size of replacement bearings you’ll need.
Spray a light solvent or degreaser into the cups, and wipe them clean with a rag. Rinse the cups with rubbing alcohol and let them air-dry. Visually inspect for pits, cracks, or irregular wear. Pitted cups on inexpensive hubs are a cue to replace the hubs or wheels altogether. Some higher-quality hubs can be saved by installing replacement cups. Check with your local shop about this solution.
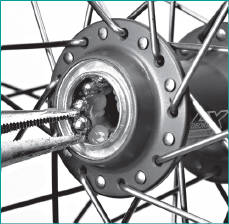
4. If there is a significant amount of dirt inside the hub, pry the dust seals out of the shell before cleaning. These seals are delicate, so proceed carefully. Gently pry at the cover from several angles using a flat-blade screwdriver. Once the covers are out, clean and inspect the cups and covers as described above.

Step 4
5. If you’re replacing a Shimano freehub, this is the time to do it. Insert a 10-millimeter hex key inside the freehub body, and turn it counterclockwise to remove the retaining bolt. The retaining bolt may be very tight. You might want to clamp your hex key in a bench vise and use the wheel for leverage to ease removal.

Step 5
Fit a new freehub body onto the hub shell’s splines. Clean and grease the threads of the retaining bolt, and reinstall it in the freehub body and hub shell.
6. Clean the axle and roll it on a level surface. If it wobbles, it’s bent and needs to be replaced. Take the axle to the bike shop to get the proper replacement.
If the cones are excessively worn and need to be replaced, you must remove the one still on the axle. Before loosening the locknut, measure and record the position of the cone on the axle so the new one can be threaded to the same location.
If all is well, use your cone wrenches to ensure that the cone and locknut are tight against one another.
7. Grease the axle well. If both cones came off the axle, put one of them back on and carefully thread it down to its proper position. Replace the lock washer and locknut, and lock the nut against the cone as previously explained.
8. Got all your parts? Time to reassemble the hub. Fit the dust seals back on the hub shell, seating them properly so the cones can be correctly adjusted. Some metal dust seals fit so loosely that they won’t stay in place. An easy fix is to gently grip the edge with the jaws of a diagonal cutter, and pull it out very slightly. Repeat at two other spots so that there are three points, each about one-third of the way around the seal, that are slightly pulled out. The seal will be a tight fit and stay put.
Step 8
Apply a thick bead of fresh grease inside each of the bearing cups. Insert the correct number and size of new ball bearings into each side of the hub. Typically, a rear hub will hold nine ¼-inch bearings per side and a front will hold ten 3⁄16-inch bearings per side. The grease will hold the bearings in place for the moment.
Slide the axle partway into the hub to secure the bearings in the cup. Insert the new bearings into the other cup. Once they are all in place, slide the axle completely through the hub.
9. Thread the cone onto the axle until it makes contact with the bearings. Twirl the axle to seat the bearings, and then adjust the cone until there’s no tightness or play in the hub.
10. When the adjustment is right, slide on the spacers in the correct order, followed by the locknut. Hold the adjustable cone with a cone wrench while you tighten the locknut against it. Slide the quick-release skewer back through the axle, and thread on its nut. Remount the wheel on the bike.
Campagnolo has devised a simple method for overhauling and adjusting its oversize-axle hubs. Note that the freehub body stays in place. This design uses cartridge bearings that don’t require regular maintenance.
1. Lay two rags or paper towels on your workbench (you’ll need them later). Remove the quick-release skewer, and set it and its springs aside. If you have an older Campy wheel, the left side of the hub may have a pinch bolt on the adjusting ring; loosen it with a 2.5-millimeter hex key.
Step 1
2. Remove the left-side axle cap using a pair of 5-millimeter hex keys, one in each axle end. Turn them counterclockwise to remove the axle cap. Keep track of the thin washer that’s between the axle cap and axle.

Step 2
3. The adjusting ring will now thread off the axle. It may require a wrench to start.
4. Lightly tap the end of the axle with a plastic or rubber hammer to free the axle from the collet that holds the cone in place. The axle is made of aluminum, so don’t use a metal hammer for this step. Pull the axle out from the right side and remove the collet and cone from the left. On rear hubs, you may need to slowly rotate the freehub body counterclockwise as you pull it out, in order to let the ratchet pawls snap free.
Step 4
5. Carefully pry the white seals out of the hub using a pick or small flat-blade screwdriver. Be gentle! Too much force can deform the seals, rendering them unusable. Remove the bearings and retainers from the hub shell. Pay attention to the orientation of the retainers in the hub; you’ll need to reinstall them facing the same way. You can discard the retainers if you have a complete new set. If not, pop the old bearings out, clean the retainers thoroughly with degreaser and then rubbing alcohol, and press new bearings into place.
6. Clean everything. Do this first with degreaser and a rag. After degreasing, use rubbing alcohol and a clean rag or paper towel to rinse everything. Lay all the cleaned parts out onto a clean rag. Cover both cups in the hub shell with a bead of fresh grease; then put the bearing retainers in place with the retainers facing in and the exposed bearings facing out.

Step 6
7. Press the seals back over the bearing retainers in their cups. They should pop easily into place. Slide the axle in from the right, then slip on the left-side cone and collet. On rear hubs, you may need to slowly rotate the freehub body counterclockwise to allow the ratchet pawls to slip into place. Thread the adjusting ring into position, but don’t tighten it yet. Use two 5-millimeter hex keys to tighten the axle cap and washer back on the axle end.

Step 7
8. Bearing adjustment of this system is independent of quick-release tension. Thread the adjusting ring down by hand until you feel the cone make contact with the bearings. Use an adjustable wrench to turn the adjusting ring down just a fraction of a turn to properly preload the bearings. Turn and wiggle the axle with your fingers. It should spin smoothly and not bind, with none of the looseness you want with conventional quick-release hubs. If your adjustment is too tight, back the adjusting ring off, and tap the axle end with a plastic hammer to release the collet’s grip on the axle. Then start the adjustment again. When the adjustment feels right, tighten the pinch bolt on the adjusting ring.
Step 8
9. Put the quick-release skewer back through the axle, and you’re ready to roll.
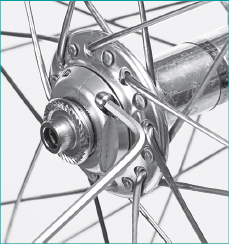
1. A cartridge bearing’s seal protects the bearings, but it also allows moisture to be trapped inside, which is why it’s important to regrease the bearings occasionally. To service this type of hub, first wipe off any dirt that has accumulated on the seal. Gently slide the tip of a sharp utility knife under the edge of the plastic seal, and pry the seal off the bearing cartridge (see photo). Be careful! Don’t cut or bend the seal.

Step 1
2. Once you’ve removed the seal, you’ll see the bearings beneath. Charge them with fresh grease by squeezing in enough to cover all the balls (see photo). Then simply press the seal back into place with your fingers until you feel it seat in the cartridge. Repeat for the other bearing, and reassemble the axle.
To adjust bearings, screw in the cone until it rests against the bearing (or dust cap); snug the locknut against it; and, using two wrenches—one on the cone and another on the locknut—turn the parts against each other to lock the adjustment. When done, there should be no play in the axle, and the hub bearings should feel smooth and not tight when you turn the axle.

Step 2
Some hubs employ clever axle designs that seem impossible to disassemble. It might take some detective work to find the secret, but if you can figure out how to get the hub apart, regreasing the bearings is easy. If it’s a particularly challenging design, contact a shop or the manufacturer for advice.
WATCH THIS FIX:
FIND A STEP-BY-STEP VIDEO OF SERVICING A CARTRIDGE BEARING AT
6 COMMON PROBLEMS, SOLVED!
PROBLEM: The wheel pulls out of the frame when you’re climbing hills.
SOLUTION: Loosen the axle nuts or quick-release, center the wheel in the frame, and tighten the axle nuts or quick-release tighter than before.
PROBLEM: You clamp the quick-release, but it doesn’t hold the wheel tight in the frame.
SOLUTION: The axle has to be the right length for the quick-release to work. Leave the wheel in the frame or fork and remove the quick-release. Look at the axle ends. Do they protrude past the outside faces of the dropouts? If so, remove the wheel, file the axle down until the ends are within the dropouts, and reattach the quick-release.
PROBLEM: You’ve reassembled the hub, and you can’t get the adjustment right. It’s either too tight or too loose.
SOLUTION: You may have put too many or too few bearings, or the wrong-size bearings, in the hub race. There are usually nine ¼-inch bearings in each side of the rear hub and ten 3⁄16-inch bearings in each of the two front races.
PROBLEM: Your sealed cartridge bearing hub has developed lateral play that you feel when pushing sideways on the rim.
SOLUTION: A little lateral play is normal. A lot is a sign that the bearing cartridges may be worn. Replace them if possible, or have the hub checked by an expert or the manufacturer.
PROBLEM: It’s harder than usual to close and open the quick-release.
SOLUTION: Remove the quick-release, and lubricate it with a penetrating oil. If this doesn’t help, the quick-release may be worn out. Replace it.
PROBLEM: After a hub overhaul, the wheel won’t sit straight in the bike.
SOLUTION: Make sure that the springs on the quick-release are installed correctly. The narrow end should always face in.
