Roasted Purple Yam with Coconut, Lime, and Tahini
Roasted Sweet Potatoes with Black Honey Tahini, Dukkah, and Dill
Miso-Almond cookies with Date Caramel Glaze
Matcha Cookies with Cardamom, Orange, and Toasted Pistachios
Chamomile Milk Tea Pudding with Fennel and Pistachios
Fudgy Pronuts with Spiced Coffee-Cacao Glaze
Raw-Cacao–Banana “Ice Cream” with Almond-Macadamia Crumble
Kiwi–Passion Fruit Vegan Cheesecake Bars
Whether you’re in the mood for seaweed crackers or energy-boosting frozen chai-spiced coconut cups, this chapter is where you’ll find both sweet and savory “snacky” things.
There’s a nutty Medicine Bread that you could transform into a sandwich, or eat with a smear of Matcha Honey Butter or Strawberry–Vanilla Bean Chia Jam in the morning or afternoon. Many of the recipes herein, such as the Roasted Purple Yam with Coconut, Lime, and Tahini, are versatile in the sense that you can eat them at different points of the day—that’s even true for the “desserts,” which incorporate small amounts of natural sweeteners.
About those sweet treats: As I mentioned in the introduction, I’ve omitted white sugar from this book because it’s an empty source of sweetness with zero nutritional value—I figure if you’re going to have sugar, at least take it from natural sources, and in the most minimally refined form possible. While sugar is sugar regardless of the source, if you’re eating fruit sugar, or an unprocessed sweetener like raw honey, you’re at least getting additional vitamins, minerals, and other health benefits with your dose of sweet. The dessert-like snacks within this chapter, from Strawberry–Pink Peppercorn “Ice Cream” Sticks to Matcha Cookies with Cardamom, Orange, and Toasted Pistachios, only call for fruit and other less manipulated sweeteners to create uniquely flavored, satiating foods. Each will curb a sugar craving—with added nutrients to boot!
When broccoli meets avocado . . . broccomole is born! I remember trying a great version of “healthier” guac cut with peas at a spa in Tijuana, Mexico, called Rancho La Puerta. Which made me think . . . what else could you mix into guacamole? Broccoli, a vegetable that I love, quickly came to mind. Here, you’re still getting the classic guac flavors in a dip that’s a bit lighter than what you’d typically expect. I’ve also added a red chile for heat, but if you prefer not to make this dish spicy, you can leave it out. Thai basil contributes an extra flavor dimension, but you can easily swap in Italian basil or omit it entirely.
Note that you’ll want to eat this right after you make it as it doesn’t keep well.
3 cups cooked broccoli florets (from about 2 small heads)
1 avocado, pitted, flesh scooped out
¼ cup fresh lime juice
3 tablespoons coarsely chopped, packed fresh cilantro leaves
1 scallion, trimmed
1 tablespoon coarsely chopped red onion
1 tablespoon filtered water
1 tablespoon coarsely chopped freah Thai basil leaves (optional)
1 teaspoon fine sea salt
¾ medium fresh red chile, stemmed and halved (seeds removed for less heat if desired; optional)
¼ teaspoon freshly ground black pepper
Combine the broccoli, avocado, lime juice, cilantro, scallion, red onion, filtered water, basil, salt, chile (if using), and black pepper in a food processor and puree until the ingredients are fully broken down and the broccomole is light and smooth, about 3 minutes. Serve immediately.

I’m sort of obsessed with this hummus. Right off the bat, I am going to tell you there’s way more acid in this recipe than in traditional hummus; the extra lemon juice makes sense because it brightens the savory tahini, as does the salt. Serve this beside a beautiful crudité assortment fresh from the market.
makes about 1¾ cups
1 cup canned chickpeas
1 peeled, cooked red beet (about 4 ounces), coarsely chopped (to equal ½ cup)
¼ cup fresh lemon juice
1 garlic clove, peeled
½ cup tahini (sesame paste)
¼ cup extra-virgin olive oil
1 tablespoon filtered water
3 teaspoons ground coriander
¾ teaspoon fine sea salt, plus extra as needed
Black sesame seeds, for garnish (optional)
Combine the chickpeas, beet, lemon juice, garlic, tahini, olive oil, filtered water, coriander, and salt in a food processor or blender and process until the mixture is smooth and bright pink, about 2 minutes. Season to taste with salt. Scrape the hummus into a bowl and sprinkle with black sesame seeds if desired.
Beet Hummus will keep, in an airtight container in the refrigerator, for 2 days.

roasted purple yam with coconut, lime, and tahini
I love the slightly tropical flavor of this simple dish. You’ve got the natural sweet caramel flavor from the yam, mixed with coconut for an extra exotic note and acidity to brighten. Tahini mellows the potato’s sweetness with an additional creamy note.
serves 2 to 4
2 medium purple yams
2 tablespoons coconut oil
2 teaspoons tahini (sesame paste)
½ lime, plus extra for serving
1 teaspoon bee pollen
¼ teaspoon fine sea salt
1. Preheat the oven to 350°F. Line a rimmed baking sheet with parchment paper.
2. Prick the yams all over with a fork, place them on the baking sheet, and roast in the oven until soft when pierced in the middle with a fork, about 25 minutes. Set the yams aside to cool slightly.
3. Using a paring knife, carefully peel the yams while they’re still hot; discard the skins. Slice the yams in half lengthwise and transfer them to a platter (or individual plates). Using a fork, gently press the yam halves into the plate(s), mashing them slightly.
4. Add 1½ teaspoons of the coconut oil to each yam half, distributing the oil evenly with a knife to coat the yam. Drizzle each yam half with ½ teaspoon of tahini, then squeeze the lime half evenly over each and grate the lime zest atop. Finally, top each with ¼teaspoon of the bee pollen and a pinch of salt. Serve immediately with the remaining lime alongside.
roasted sweet potatoes with black honey tahini, dukkah, and dill
Both sweet and savory, with a spark of freshness from the dill, this warming potato dish could be consumed for lunch or as an afternoon snack. The black honey tahini offers a rich, creamy texture, while the dukkah—an Egyptian spice blend—adds a hit of umami and spice thanks to its toasted medley of ingredients. While I call for homemade tahini and dukkah, you can purchase both in supermarkets and specialty stores. So if you don’t want to make your own (which I’d still encourage you do), then you can simplify this recipe by subbing in store-bought.
serves 2 to 4
2 medium sweet potatoes, scrubbed
2 teaspoons olive oil
1 to 2 tablespoons Black Honey Tahini
1 tablespoon Dukkah
4½ teaspoons chopped fresh dill
Fine sea salt and freshly ground black pepper
1. Preheat the oven to 400°F. Line a rimmed bakng sheet with parchment paper.
2. Prick the sweet potatoes all over with a fork, place them on the baking sheet, and roast in the oven until soft when pierced in the middle with a fork, about 1 hour.
3. Carefully transfer the sweet potatoes to a cutting board and use a paring knife to halve them lengthwise. Transfer them to a platter (or individual plates) and drizzle each half with ½ teaspoon of the olive oil and a quarter of the black honey tahini. Sprinkle the potatoes evenly with the dukkah, dill, and salt and pepper to taste. Serve hot.

Nori is the Japanese name for a type of dried seaweed that’s pressed into sheets and is commonly used in sushi. It’s also becoming increasingly popular as a healthy snack food, one that contains B vitamins, trace minerals, and unsaturated fatty acids—and a box of which you can hoover through in a matter of seconds. Thanks to a layer of seeds, these nori crisps are a bit more substantial. Try them as a daytime snack (they’re great), or bring them on a flight as a healthier answer to typical airplane food. For a dinner party appetizer, serve them beside the Beet Hummus.
makes four 8 × 7-inch sheets
Coconut oil, for greasing the baking sheet
1 cup filtered water
1 cup flaxseeds
3 tablespoons chia seeds
3 tablespoons raw, unsalted sunflower seeds
3 tablespoons pumpkin seeds
3 tablespoons sesame seeds
1½ teaspoons fine sea salt
4 sheets dried nori (see Note)
1. Preheat the oven to 250°F. Line a rimmed baking sheet with parchment paper and grease the paper lightly with coconut oil.
2. Combine the filtered water, flaxseeds, and chia seeds in a large bowl and stir together. Let stand, stirring every 5 minutes or so, to hydrate the seeds, about 20 minutes.
3. Add the sunflower seeds, pumpkin seeds, sesame seeds, and salt to the hydrated seeds and stir to blend.
4. Arrange the nori on the prepared baking sheet. Divide the seed mixture among the four sheets of nori, using a spoon to smooth it evenly so that there’s about ⅛ inch of the mixture completely covering the nori.
5. Bake until the seeds are crispy, about 45 minutes. Using a spatula, flip the nori carefully, and continue baking until it is almost completely dry and the edges curl upward, about 45 minutes more.
Seeded Nori Crisps will keep, in an airtight container at room temperature, for up to 1 week.
Note: Dried nori sheets can be found at Asian and health food markets.

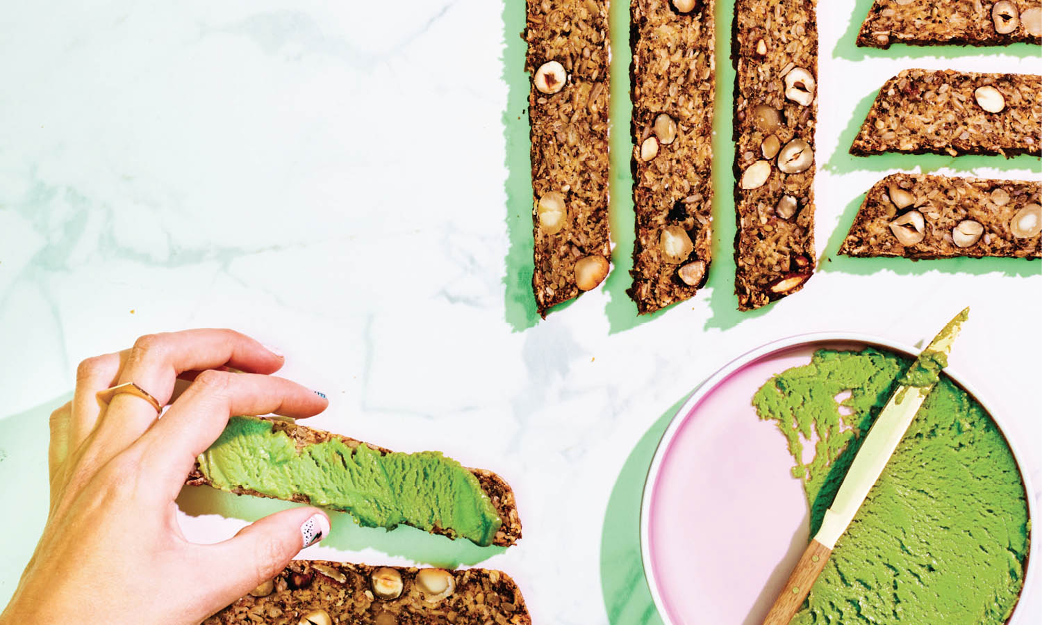
After returning from a trip to Copenhagen, where dense, seed-studded rye bread is a staple, I wanted to create a version that was absent flour and heavy on nuts and seeds. This bread is it—inspired by an amazing recipe from the blog My New Roots, which I tweaked to add extra umami. If you want a sweeter version, try adding eight diced, pitted dates or two extra-soft bananas to the dough.
This makes for an awesome breakfast, especially with a smear of Matcha Honey Butter.
makes one 10 × 7-inch loaf
3 tablespoons melted coconut oil, plus extra for greasing the pan
1½ cups old-fashioned rolled oats
¾ cup raw, unsalted sunflower seeds
½ cup flax meal
½ cup raw hazelnuts
¼ cup raw almonds
¼ cup raw whole macadamia nuts
¼ cup psyllium husks
3 tablespoons chia seeds
1½ teaspoons fine sea salt
1 tablespoon pure maple syrup
1½ cups filtered water
Matcha Honey Butter, for serving (optional but recommended!)
1. Preheat the oven to 375°F. Grease a loaf pan with coconut oil.
2. Place the oats, sunflower seeds, flax meal, hazelnuts, almonds, macadamia nuts, psyllium husks, chia seeds, and salt in a large bowl and stir to combine.
3. Place the maple syrup, coconut oil, and filtered water in a medium bowl and stir to combine.
4. Add the wet ingredients to the dry ingredients and stir to blend until a thick, dense dough forms. Scrape the dough into the prepared pan, lay a sheet of waxed paper on top, and press down on the paper to spread the dough into the pan. Remove the waxed paper and let the dough rest on the counter for 20 minutes.
5. Bake until the bread is light brown on top, about 20 minutes. Remove the bread from the oven and let it cool. Run a paring knife around the edges to loosen it from the pan. Wearing oven mitts, place a baking sheet over the bread and carefully flip the bread over onto the baking sheet. Return the bread to the oven and bake until lightly brown, 35 minutes more.
6. Let the bread cool to the touch (it will still be warm)before slicing. Serve warm or at room temperature, slathered with matcha honey butter if you wish.
Medicine Bread will keep, covered in plastic wrap in the refrigerator, for up to 1 week, or wrapped in aluminum foil and frozen in a ziplock bag for up to 2 months. Toast the chilled or frozen bread before serving.
miso-almond cookies with date caramel glaze
Miso paste is an amazing ingredient that adds umami to sweet and savory dishes. When I see a miso dessert on any menu—anywhere, anytime—I will absolutely order it. These cookies call for a sweet-style white miso, which adds a unique savory element. However, these rounds still taste like a dessert since they incorporate coconut palm sugar and almond extract, which complement the miso’s subtle nutty quality. A final glaze made from maple syrup and dates further enhances the cookies’ nuttiness and depth of flavor.
makes 16 cookies
½ cup melted coconut oil or vegetable oil, plus extra for greasing the baking sheet
½ cup coconut palm sugar
2 tablespoons white miso paste (see Note)
¼ teaspoon pure almond extract
1 Chia Egg
¾ cup brown rice flour
¾ cup almond flour
½ teaspoon baking soda
7 pitted dates
⅓ cup pure maple syrup
⅓ cup filtered water
Sesame seeds, for garnish
1. Preheat the oven to 325°F. Grease a rimmed baking sheet with coconut oil.
2. Combine the coconut oil, coconut palm sugar, miso paste, and almond extract in the bowl of a stand mixer fitted with the paddle attachment (or in a large bowl if using a handheld electric mixer) and blend at high speed until a light brown batter forms. Add the chia egg and stir with a wooden spoon to combine. Stir in the flours and baking soda until a thick, light brown dough forms.
3. Using a tablespoon, scoop mounds of the dough onto the prepared baking sheet, spacing them evenly, about 1½ inches apart. Bake until the cookies are lightly browned, 12 to 14 minutes. Let cool on the baking sheet.
4. Meanwhile, make the date caramel: Combine the dates and maple syrup in a small saucepan over medium-low heat and cook, stirring occasionally, until the dates are tender, about 4 minutes. Transfer the mixture to a high-powered blender or a food processor, add the filtered water, and process until a smooth glaze forms, about 30 seconds.
5. Place the cookies on a plate and brush half of each cookie with the date caramel, then sprinkle sesame seeds on top of the glaze.
Miso-Almond Cookies with Date Caramel Glaze will keep, in an airtight container at room temperature, for 3 days.
Note: White miso, also called shiro miso in Japanese, is made from fermented soy beans and rice. Its mild flavor and sweetness come from a shorter fermentation period than that for other types of miso, which can have strong, funky flavor profiles.
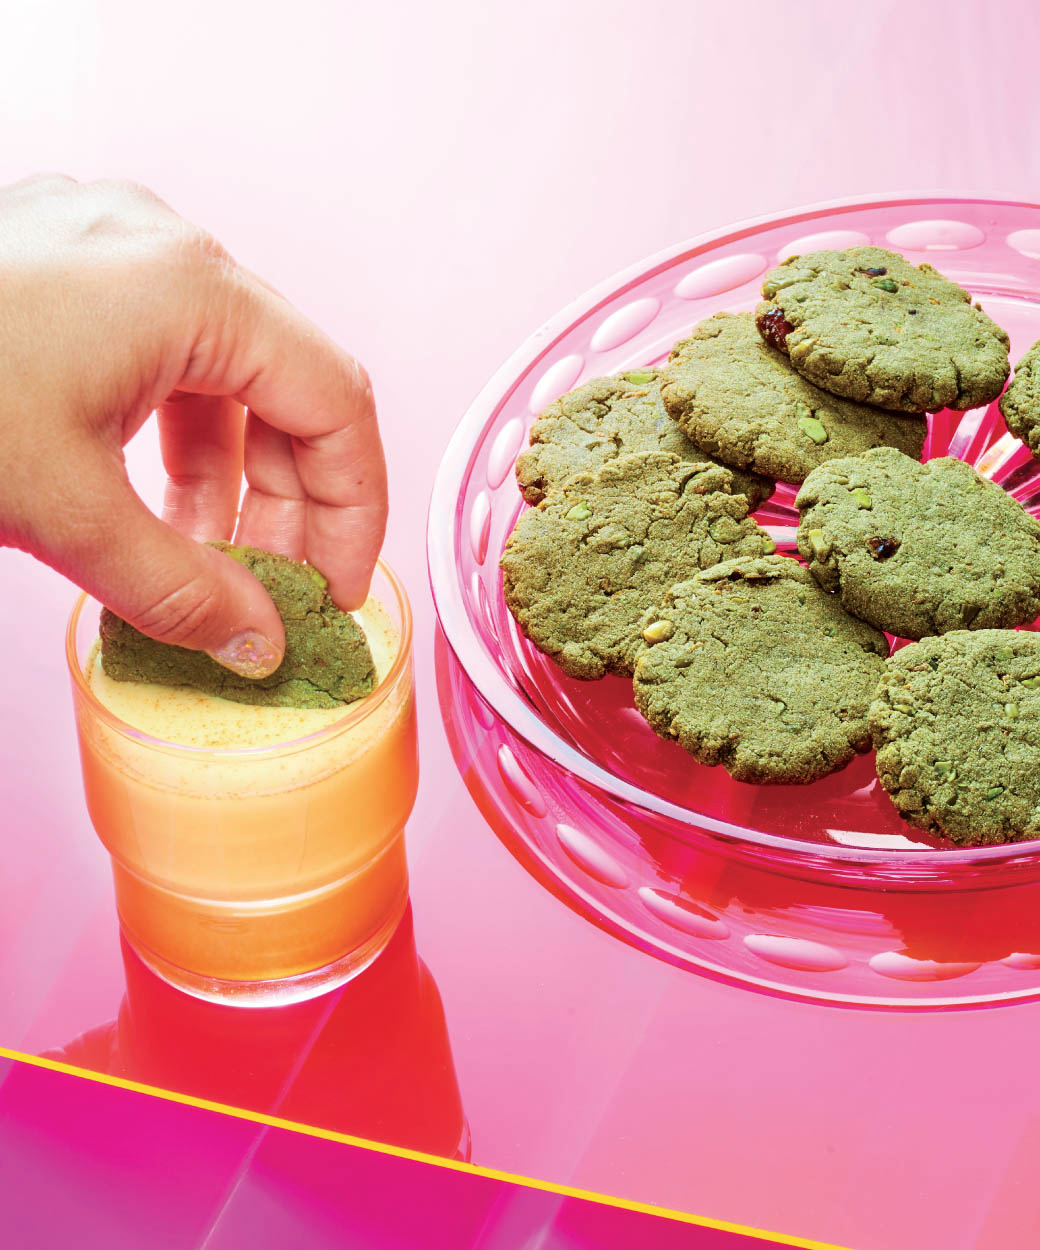
matcha cookies with cardamom, orange, and toasted pistachios
I’ve been addicted to matcha ever since I discovered the sweet grassy tea at New York tea parlor Cha-An over a decade ago. Now, beyond drinking the tea, I add it to different types of sweet and savory foods. In this recipe, I take inspiration from Middle Eastern flavors like cardamom, orange, and pistachio, and marry them with the subtle vegetal flavor of matcha.
makes 25 cookies
¾ cup sweet rice flour (see Notes)
¾ cup almond flour
½ cup chestnut flour (see Notes)
2½ teaspoons matcha powder
1 teaspoon kosher salt
¾ teaspoon baking soda
1¼ teaspoons ground cardamom
¼ teaspoon ground cinnamon
½ cup coconut palm sugar
⅓ cup mashed avocado (½ medium avocado or about 2 ounces)
⅓ cup vegetable or olive oil
1 teaspoon pure vanilla extract
1 tablespoon freshly grated orange zest, plus extra for garnish
¼ cup chopped pitted dates (about 4 dates)
½ cup shelled pistachios, toasted (see here) and chopped
1. Preheat the oven to 375°F and line a rimmed baking sheet with parchment paper.
2. Whisk together the flours, matcha, salt, baking soda, cardamom, and cinnamon in a medium bowl and set aside.
3. Combine the coconut palm sugar, mashed avocado, oil, and vanilla in a large bowl, and beat with an electric mixer on high speed until creamy and smooth, about 2 minutes. Add the orange zest and dates and beat just to incorporate.
4. Beat the flour mixture into the sugar mixture in 2 additions. Stir in the pistachios. The dough will appear shiny, thick, and tacky, almost like marzipan.
5. Using a tablespoon, scoop a portion of the dough into your hand and roll it between your palms to form a compact ball. Press each ball against your other palm and flatten it into a ¼-inch-thick disk. Place the disks onto the prepared baking sheet, spacing them evenly apart. (The cookies won’t spread during baking.)
6. Bake, rotating the pan halfway through the baking time, until the cookies show subtle cracks on top (they may brown just slightly), 8 to 10 minutes. Let cool on the baking sheet for about 5 minutes. I like to sprinkle or grate a bit of fresh orange zest atop before serving.
Pro tip: When these cookies first come out of the oven, they are soft and delicate. But leave them out overnight, loosely covered with plastic wrap, and they will firm up into a chewy texture. And after three days, they are awesome dipped in coffee or tea as an afternoon snack.
Matcha Cookies with Cardamom, Orange, and Toasted Pistachios will keep, in a covered or uncovered container at room temperature, for 5 days.
Notes: Sweet rice flour, commonly used in sweet and savory Japanese dishes, is made from glutinous rice aka “sticky rice.” When used in large quantities, this flour adds a chewy texture (it’s what mochi is made from) and can help thicken and bind ingredients.
Chestnut flour, sometimes used in Italian desserts, is a soft white flour made from roasted, ground chestnuts. You can buy it at some Italian markets and online at Amazon.com.

chamomile milk tea pudding with fennel and pistachios
Here the subtle flavor of chamomile is infused into a simple pudding and enhanced by hazelnut and orange. While the fennel and pistachio garnish is totally optional, it does make for a pretty presentation. If you want your fennel to sport an ombré look, drop a bit of beet juice or dehydrated beet powder atop the slices before baking (see Variation).
serves 4
2 cups Hazelnut Milk or other nut milk
⅓ cup cornstarch
¾ cup coconut cream (see here)
3 tablespoons dry chamomile tea
2 medium oranges, zested and juiced
6 tablespoons raw honey
¼ teaspoon fine sea salt
⅛ teaspoon freshly ground black pepper
¼ fennel bulb, fronds removed, bulb trimmed (optional)
2 tablespoons chopped toasted pistachios (see here), for garnish (optional)
1. Combine 1 cup of the hazelnut milk and the cornstarch in a medium bowl and whisk to incorporate. Set aside.
2. Place the remaining 1 cup of hazelnut milk, the coconut cream, and chamomile in a medium saucepan over medium heat and cook, stirring often (the mixture should not come to a boil), until it is thick and coats the back of a spoon, about 10 minutes.
3. Position a fine-mesh strainer over a heat-resistant bowl and pour the heated milk mixture through it, straining out and discarding the tea. Return the milk mixture to the saucepan. Add half of the orange zest, half of the orange juice, 4 tablespoons of the honey, salt, and pepper and cook, stirring constantly, over medium-high heat until the mixture thickens enough to coat the back of a spoon, about 5 minutes. Pour the pudding into a large bowl, cover it with plastic wrap touching the surface to prevent a skin from forming, and refrigerate until chilled, at least 2 hours (or up to 1 day if you wish to make it ahead).
4. Meanwhile, to make the fennel garnish (if using), preheat the oven to 350°F. Line a rimmed baking sheet with parchment paper. Using a mandoline, thinly shave the fennel lengthwise into 4 pieces about ⅛ inch thick. (Reserve the rest of the fennel for another use.) Combine the remaining orange juice and zest and 2 tablespoons of honey in a small bowl and stir to mix. Dip the fennel slices into the juice mixture to coat on both sides, then place them on the prepared baking sheet. Bake until the fennel looks slightly shriveled and dry, about 10 minutes. Let cool on the baking sheet.
5. To serve, spoon the pudding into four individual bowls. Sprinkle each with pistachios (if desired) and decorate with 1 slice of the fennel.
Chamomile Milk Tea pudding will keep, ungarnished, in an airtight container in the refrigerator, for 1 day.
Variation
Tie-Dyed Fennel: It’s simple to tint the fennel pink, and that can be achieved one of two ways. You can make a magenta beet dye (see here) and, using a pastry brush, coat the tips of the fennel slices with the dye before baking. Or, again before baking, simply sprinkle ⅛ teaspoon of dehydrated beet powder atop the tips of each fennel slice and massage it in with your fingers. Regardless of which method you use, the magenta color will fade slightly in the oven, but still maintain a pretty soft pink hue.
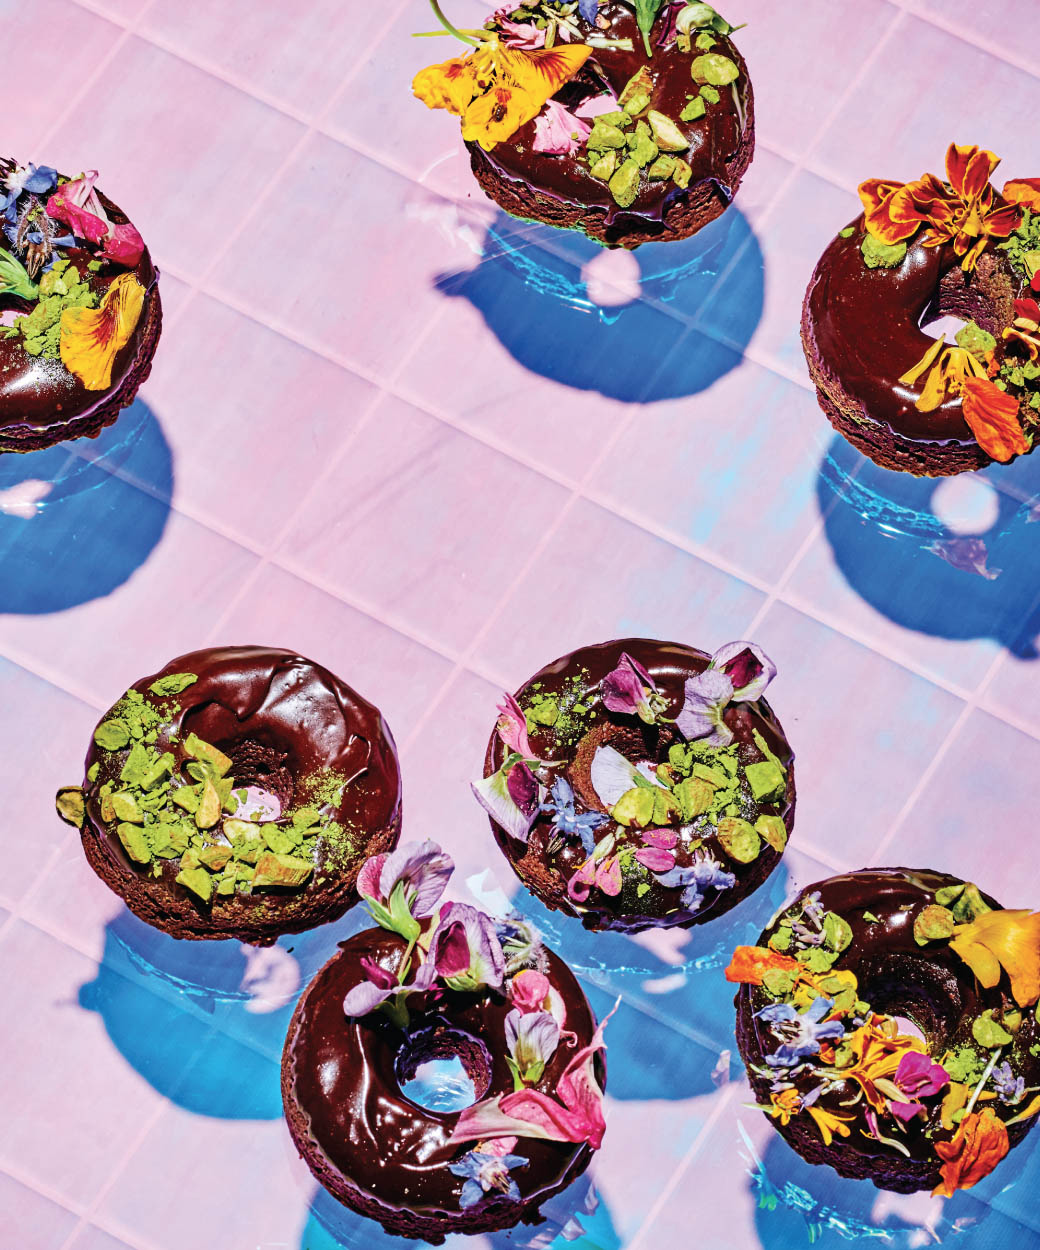
fudgy pronuts with spiced coffee-cacao glaze
Pronut is a portmanteau of “protein” and “donut,” and in addition to incorporating actual protein powder, it also packs protein-rich ingredients such as chia seeds and almonds. I like the chocolate-almond flavor that these rich, fudgy pronuts offer, which is enhanced with a chocolatey, subtly cinnamon-y donut glaze and toasted, chopped almonds. For a pop of color, try tossing the almonds in matcha powder, or topping the pronuts with colorful blossoms—or both. I use a silicone donut mold with wells that are about 2¾ inches in diameter.
makes 12 small pronuts
For the Pronuts
¾ cup coconut palm sugar
½ cup coconut oil, melted
6 tablespoons almond butter
2 teaspoons pure vanilla extract
¾ teaspoon baking powder
½ teaspoon fine sea salt
½ cup raw cacao powder
¼ cup protein powder
¼ cup oat flour
¼ cup coconut flour
For the Glaze and Garnish
3 ounces raw chocolate
6 tablespoons strong brewed coffee, at room temperature
3 teaspoons almond butter
2 tablespoons coconut butter
2 teaspoons pure vanilla extract
2 teaspoons pure maple syrup
¼ teaspoon ground cinnamon
Pinch of fine sea salt
1 tablespoon chopped toasted almonds (see here; toss with ¼ teaspoon matcha powder, if desired), for garnish
Edible flowers, for garnish (optional)
1. Make the pronuts: Preheat the oven to 350°F.
2. Stir together the coconut palm sugar, coconut oil, chia eggs, almond butter, vanilla, baking powder, salt, and cacao powder in a large bowl to combine. Stir in the protein powder, oat flour, and coconut flour; the mixture will be thick and shiny. Using a spoon, divide the dough among the wells of the donut mold.
3. Bake the pronuts until they are light brown and cooked through (you’ll need to cut into one with the tip of a knife to test), about 15 minutes. Let cool in the molds, then transfer to a plate or cutting board to decorate.
4. Make the glaze: Melt the chocolate in a double boiler over low heat. Whisk in the coffee, almond butter, coconut butter, vanilla, maple syrup, cinnamon, and salt until a smooth glaze forms. Remove from the heat.
5. Using a large spoon, spoon the glaze evenly over the pronuts to cover the tops. Sprinkle on the nuts or edible flowers before the glaze sets. Serve immediately.
Fudgy Pronuts with Spiced Coffee-Cacao Glaze will keep, wrapped in plastic and refrigerated, for 2 days; let the glaze set before wrapping them.
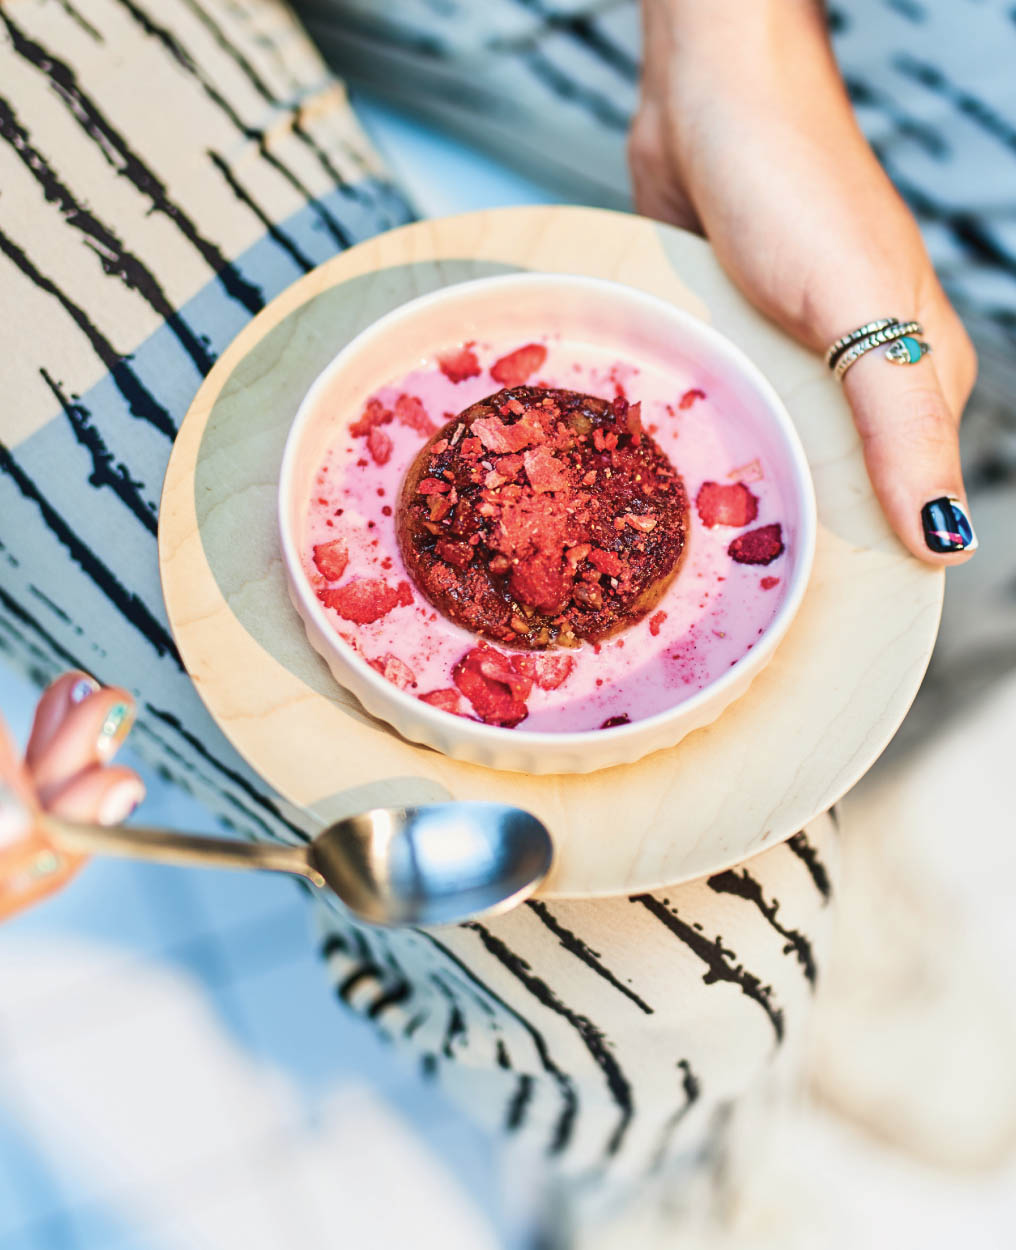
I’ve already mentioned that Axe was one of my favorite restaurants when I lived in Venice, California, though sadly it’s now shuttered. During my time in Venice, I could be found having brunch there every Saturday or Sunday morning, and I loved the place so much I’d sometimes go for dinner, too. Axe used to serve a thick, fudgy brownie dessert presented in a bowl surrounded by a shallow pool of milk—the dairy’s creaminess helping to balance out the chocolate’s richness. I love the idea of serving sweets in a pool of milk, and that inspired my use of almond milk here. While these Morning Cakes are not fudgy (since there’s no chocolate involved), they’re rich in a different way. Both the berries and chopped almonds add moisture and a buttery quality to the vanilla bean–flavored cake. You can serve this dish as dessert, but it’s also amazing for breakfast. Since the cakes are delicate, they break apart easily, absorbing whatever is around them. Think of this as the freshest form of cereal and fruit you’ll find.
makes 12 cakes
⅔ cup solid coconut oil, plus extra for greasing the pan
¾ cup diced strawberries
½ cup raspberries
16 organic raw almonds, finely chopped
¾ cup plus 3 tablespoons coconut palm sugar
½ vanilla bean, seeds scraped out (pod reserved for another use)
½ teaspoon fine sea salt
1¼ cups gluten-free all-purpose flour
1 teaspoon baking powder
Vanilla Bean–Almond Milk, for serving (optional)
Crumbled freeze-dried strawberries, for garnish (optional)
1. Preheat the oven to 375°F. Grease a muffin tin with coconut oil.
2. Prepare the fruit topping: Place the strawberries, raspberries, chopped almonds, 3 tablespoons of coconut palm sugar, and vanilla seeds in a medium bowl and stir to combine. Divide the fruit mixture evenly among the wells of the muffin tin.
3. Prepare the batter: Combine the remaining ¾ cup of coconut palm sugar and the coconut oil in the bowl of a stand mixer fitted with the whisk attachment (or in a large bowl, if using a handheld electric mixer) and whisk until creamy, about 1 minute. Add the chia eggs and salt and whisk to incorporate. In a separate medium bowl, combine the gluten-free flour and baking powder and whisk together. Pour the flour mixture into the coconut palm sugar mixture and whisk to combine.
4. Divide the batter evenly among the wells of the muffin tin.
5. Bake until the cakes are light brown and cooked through (they will still be moist), about 28 minutes. Allow the cakes to cool a bit in the tin.
6. Using a large spoon, carefully scoop out the cakes from the pan (only remove as many as you plan to serve; they begin to lose their shape once removed from the pan). Place each cake, fruit side up, in the center of a small bowl (note that the cakes will be crumbly and delicate). Drizzle 4½ teaspoons of almond milk atop each. The almond milk will soak the cake and form a pool around it. Serve immediately garnished with freeze-dried strawberries, if desired.
Vanilla Berry Morning Cakes will keep (without the almond milk), wrapped individually in plastic wrap and stored in an airtight container, in the refrigerator for 3 days, or in the freezer for 1 month. Unwrap them and reheat them in the oven before serving.

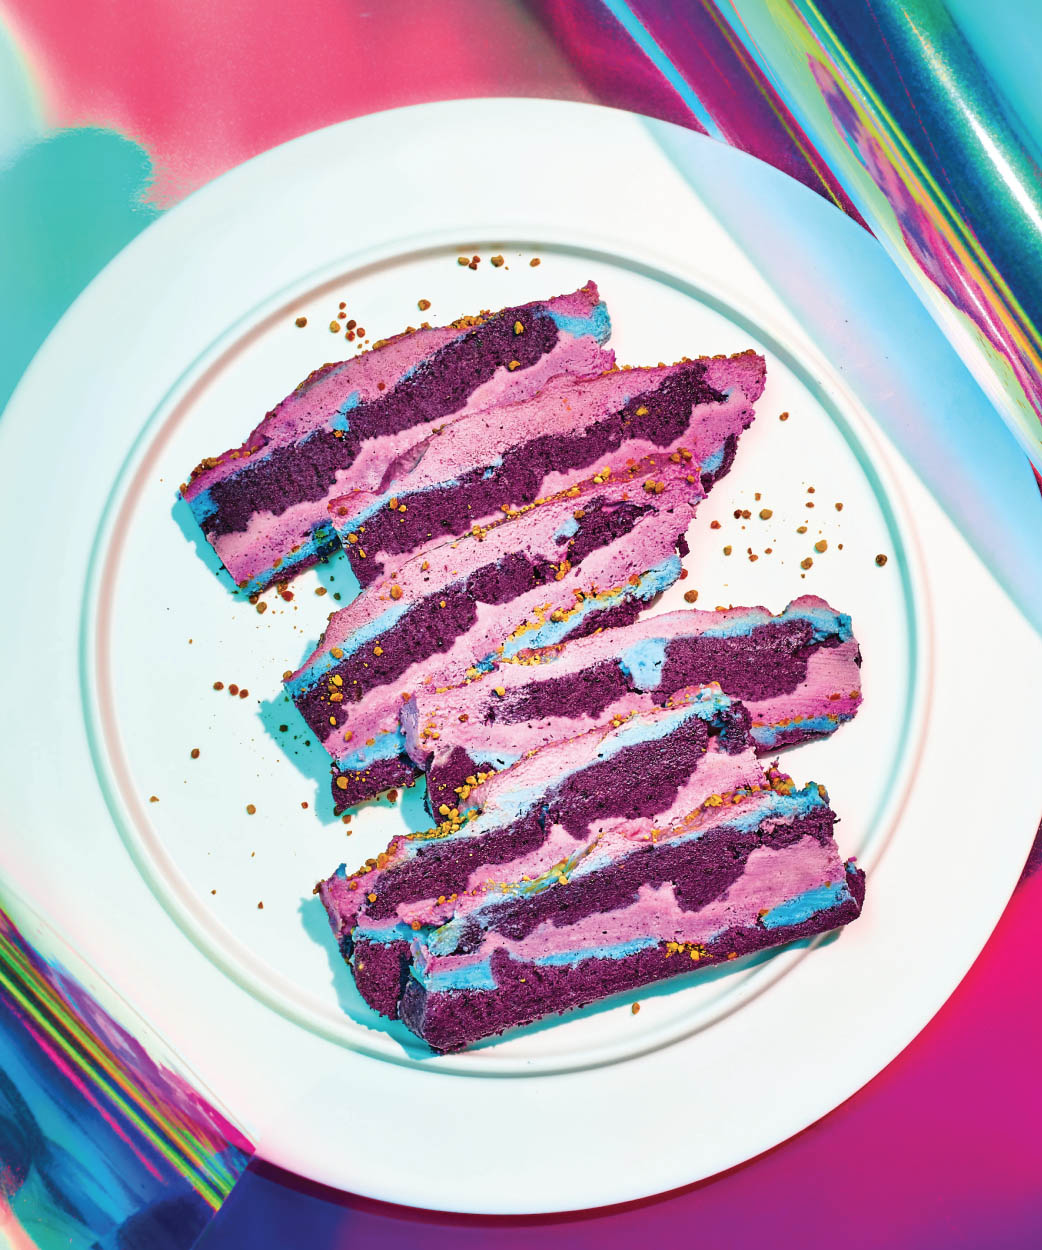
This recipe was born from an experiment. I woke up one morning, wildly hungover, craving something cold and sweet. Scanning my kitchen, I noticed I had cashews and some almond milk lying around, in addition to a few bags of frozen fruit. I threw a bunch of ingredients together in an effort to create a layer cake, but before I actually created the layers, I decided to color them in various hues. I didn’t expect this cake to be anything special, and when it came out of the freezer it looked like a mess. But after slicing it, I realized all the colors had created a pretty mountain effect, and both the look and palette reminded me of Lisa Frank, the vibrantly hued brand of rainbow and unicorn illustrations that colored my folders and notebooks in middle school. In addition to its eye-catching design, this cake is lusciously cool and creamy and comes with an added bonus: It’s filled with wellness-promoting ingredients!
I should note that this cake will look slightly different every time you make it. That’s because the peaks and valleys of the mountain layers depend on where you drop the different colors of cream. But I’d love to see how yours comes out, so tag me on The Gram: @kat_odell and @unicornfoods.
makes one 7 × 10-inch cake; serves 20
For the Cake
Coconut oil, for greasing the baking dish
1 cup packed pitted dates
Filtered water (optional)
⅓ cup coconut butter
2 tablespoons fresh lemon juice
2 teaspoons pure vanilla extract
¼ teaspoon fine sea salt
1 cup frozen blueberries
2 cups almond flour
For the Cream
1 cup raw/organic cashews, soaked in water to cover for at least 4 hours or overnight, drained
1 cup coconut milk or nut milk of your choice
2 tablespoons raw honey
1 tablespoon fresh lemon juice
⅛ teaspoon fine sea salt
2 tablespoons coconut butter
2 tablespoons coconut flour
¼ teaspoon Blue Majik
½ teaspoon freeze-dried pitaya powder
1 teaspoon freeze-dried beet powder
1½ teaspoons bee pollen, plus extra for garnish
1. Grease a 10 × 7-inch baking dish with coconut oil.
2. Make the cake: Place the dates in a food processor and blend until they become a smooth paste, adding a few teaspoons of the filtered water if necessary, about 1 minute. Add the coconut butter, lemon juice, vanilla, and salt. Blend until smooth, scraping down the side of the bowl as needed, about 30 seconds. Add the blueberries and blend, pausing to scrape down the side of the bowl, until incorporated, about 1 minute. Add the almond flour and blend until incorporated, about 20 seconds.
3. Scoop half of the dough into a bowl and set it aside. Scoop out and press the remaining dough into the prepared pan using dampened hands or the back of a spoon. Leave the surface of the dough uneven to create mountainous peaks and valleys. Transfer the dough to the freezer to set while you assemble the cream.
4. Make the cream: Wash and dry the bowl of the food processor. Combine the cashews, coconut milk, honey, lemon juice, and salt in the bowl and blend until smooth, about 30 seconds. Add the coconut butter and coconut flour and blend until smooth, about 15 seconds. Divide the cream among three small bowls. Stir the Blue Majik into one bowl, stir the pitaya powder into the second bowl, and stir the beet powder into the third bowl.
5. Remove the chilled dough from the freezer. Using a spoon, drop the Blue Majik cream, 1 to 2 tablespoons at a time, randomly over the cake, leaving about one third of the Blue Majik cream remaining in the bowl. Sprinkle half of the bee pollen atop. Dollop on the pitaya cream and then the beet cream in the same fashion, reserving one third of each in its respective bowl. Sprinkle the remaining bee pollen atop the cake. Transfer the layer cake to the freezer and freeze until set, about 30 minutes.
6. Remove the cake from the freezer and spread the reserved blueberry dough atop. Return to the freezer for 30 minutes. Remove the cake again and decorate the top with the remaining creams, dropping them by the tablespoonful in any pattern you like. Return to the freezer and freeze until solid, about 4 hours.
7. When ready to serve, remove the cake from the freezer and let it thaw slightly, about 10 minutes. Using a small knife, carefully cut around the sides of the pan to loosen the cake. Then, carefully slide a spatula around and under the bottom of the cake and invert it onto a cutting board. Using a sharp knife, cut the cake crosswise into ¼-inch-thick slices. Serve immediately, sprinkle with extra bee pollen.
Lisa Frank Mountain Cake will keep, wrapped in plastic wrap and then in aluminum foil, in the freezer for about 3 months.
raw-cacao–banana “ice cream” with almond-macadamia crumble
This banana ice cream is a D R E A M. You can essentially make it from one ingredient alone, and because of banana’s pectin content, when you break down the frozen fruit and then whip it, you get a silky smooth and creamy texture. You can really add whatever other ingredients you like, such as almond butter or other types of fruit. I also love to blend in 2 tablespoons of Condensed Coconut Milk and ½ teaspoon cinnamon for a refreshing treat! Meanwhile, my boyfriend, Mike, who is a 3-Michelin–star chef, likes to emulsify 3 to 4 tablespoons of melted coconut oil per banana.
While I often top the ice cream with honey and crunchy-sweet almond-macadamia crumble, for a more playful presentation, I scoop it into a gluten-free cone (skipping the honey) and dust it liberally with Natural Rainbow Sprinkles.
serves 4
4 bananas, peeled, frozen, and cut into ½-inch rounds
3 tablespoons raw cacao powder
Pinch of fine sea salt
2 tablespoons raw honey, for serving
Almond-Macadamia Crumble, for serving
1. Place the frozen banana rounds in a food processor or high-powered blender and process, scraping down the side of the bowl as needed, until the banana has broken down into a creamy, thick, and shiny cream, about 3 minutes. Add the cacao powder and salt and process to blend.
2. Scoop the ice cream into four individual bowls and top each with 1½ teaspoons of the honey and a generous sprinkling of almond-macadamia crumble. Serve immediately.

kiwi–passion fruit Vegan cheesecake bars
Although these pretty green bars are devoid of dairy, you’d have no problem convincing someone otherwise! Using cashews and coconut oil for their creamy base, these delicious chilly sweets are reminiscent of the Italian dessert semifreddo, which is made from frozen cream. To balance out their richness, I’ve added lime juice and fresh passion fruit for a hit of acidity.
makes about 14 bars
For the Base
10 pitted dates
6 medium to large dried figs
⅔ cup raw organic almonds
1 tablespoon coconut oil, melted
2 tablespoons unsweetened coconut flakes
For the Filling
3 cups raw/organic cashews, soaked in water to cover overnight, drained
¾ cup coconut oil, melted
¼ cup fresh lime juice
2 passion fruits, halved and pulp scooped out (discard the shells)
2 tablespoons filtered water
½ cup yacon syrup, raw honey, or pure maple syrup
1 vanilla bean, split in half lengthwise and seeds scraped out (reserve the pod for another use)
¼ teaspoon fine sea salt
¼ cup packed fresh baby spinach leaves
4 kiwis, peeled
¼ teaspoon spirulina powder
1. Line a 10 × 7-inch baking pan with parchment paper, extending the paper up and over the sides.
2. Make the base: Combine the dates, figs, almonds, coconut oil, and coconut flakes in a food processor and blend until the mixture is broken down and sticks together, about 1 minute. Transfer the mixture to the prepared pan and, using the back of a spoon, press the mixture firmly into the bottom of the pan.
3. Make the filling: Combine the cashews, coconut oil, lime juice, passion fruit pulp, filtered water, yacon syrup, vanilla seeds, and salt in a blender and process until the mixture is thick and smooth, scraping down the sides as needed, about 30 seconds. Spoon half of the filling into the pan and spread it out with a spoon to coat the base layer. Cover with plastic wrap and transfer to the freezer to set, about 30 minutes.
4. Meanwhile, add the spinach, 2 of the kiwis, and the spirulina to the remaining cashew cream in the blender and process until the spinach leaves are fully broken down and the mixture is light green, about 30 seconds.
5. Remove the baking pan from the freezer, unwrap it, and scoop the kiwi cream atop the cashew cream, using the back of a spoon to smooth the top. Cover the cheesecake again and return it to the freezer until the mixture is set, at least 2 hours.
6. Remove the cheesecake from the freezer and uncover it. Slice the remaining kiwis crosswise into ¼-inch-thick slices and decorate the top of the cheesecake with the fruit by laying the slices side by side. Cover the cheesecake (with a fresh piece of plastic wrap, if needed) and return it to the freezer to set the kiwi slices, 1 hour.
7. Remove the baking pan from the freezer, uncover it, and let the cheesecake defrost to soften slightly, about 10 minutes. Slice the cheesecake into 14 bars and serve.
Kiwi–Passion Fruit Vegan Cheesecake Bars will keep, wrapped well in plastic wrap, and then aluminum foil, in the refrigerator for 1 week, or in the freezer for 1 month.


strawberry–pink peppercorn “ice cream” sticks
Made from a medley of nuts and fruit, these gluten-free and refined sugar–free “ice cream” sticks will convince you there’s life beyond dairy, thanks to a rich cashew cream base. I have a mild obsession with matcha, and therefore thought to add the powdered tea to the base, which serves as both a flavor and color complement to the strawberry. Pink peppercorns add a fun crunch (remember those ice cream cakes with the chocolate crunchies from back in the day?), but if you don’t have any, feel free to omit. Note that you’ll need to start this recipe a day before you plan to serve it, to give the cashews sufficient time to soak.
makes about 44 small bars
For the Base
½ cup gluten-free oat flour (see Note)
¼ cup almond flour
¼ cup raw whole almonds
½ cup sliced pitted dates
1 tablespoon filtered water
1 teaspoon pure vanilla extract
1 teaspoon matcha powder
¼ teaspoon fine sea salt
For the Filling
1 cup raw cashews, soaked in tap water to cover overnight
6 tablespoons coconut oil, melted
3 tablespoons fresh lime juice
½ cup raw honey
1 teaspoon pure vanilla extract
¼ teaspoon fine sea salt
1 cup fresh or frozen whole strawberries (about 8 ounces), hulled if fresh
2 tablespoons plus 1½ teaspoons pink peppercorns
Freshly grated zest of 1 orange
1. Make the base: Line an 11 × 7-inch baking pan with parchment paper, extending the paper up and over the sides.
2. Combine the oat flour, almond flour, almonds, dates, filtered water, vanilla extract, matcha powder, and salt in a food processor and process until the mixture is finely ground and begins to stick together and form a dough, about 1 minute. Using your hands or the back of a spoon, press the dough mixture into the prepared pan to form a firmly packed, even layer.
3. Make the filling: Drain the cashews and transfer them to a food processor, along with the coconut oil, lime juice, honey, vanilla extract, and salt. Process until the mixture is smooth and creamy, about 30 seconds. Scoop out half of the cashew mixture and place it in a medium bowl; set it aside.
4. Add ¼cup of the strawberries (about 2 ounces) to the mixture in the food processor and process until smooth, about 10 seconds. Pour this mixture over the base and use a spatula to smooth it into an even layer. Sprinkle 2 tablespoons of the pink peppercorns atop. Cover with plastic wrap and transfer to the freezer to firm up, about 30 minutes or up to 1 day.
5. Meanwhile, pour the reserved cashew mixture back into the food processor (no need to wipe it out first), add the remaining ¾ cup of strawberries, and the orange zest, and process until smooth and creamy, about 20 seconds.
6. Remove the pan from the freezer and pour the strawberry mixture over the frozen layer, smoothing it into an even layer with a spatula. Sprinkle the remaining 1½ teaspoons of pink peppercorns evenly on top.
7. Cover again and return the “ice cream” to the freezer to set, at least 4 hours and up to 1 day. Remove the ice cream from the freezer and use the parchment paper to lift the whole frozen slab out of the pan. Using a chef’s knife, slice the slab into sticks about 3 ½ inches long by ½ inch thick. Serve immediately.
Strawberry–Pink Peppercorn “Ice Cream” Sticks will keep, in an airtight container in the freezer, for up to 3 months.
Note: If you can’t find gluten-free oat flour, you can make your own. Simply put 2 cups gluten-free old-fashioned rolled oats in a food processor and blend until pulverized. You may have some leftover; store it in an airtight container at room temperature for up to 6 months.
Remember when you were a kid and you’d eat those ice pops in narrow plastic tubes? You’d rip off the top and push the pop from the bottom up, nibbling at it until it was done. I’m bringing them back for these spicy fudgy pops, because they’re fun to use and easy to find—simply look for the brand Zipzicles online. (If you’d rather use conventional pop molds that come with plastic or wooden sticks, they’ll work, too.)
Now, a few notes on this recipe. Depending on how much you like the tingly flavors of fresh ginger and wasabi, you’ll want to adjust the quantities to meet your own palate. I tend to like a bit more zing, so if you’re less keen on wasabi or ginger, feel free to reduce the amount of either or both.
makes seven 9 × 2-inch Pops
2½ cups coconut milk
2 tablespoons tapioca starch
5 tablespoons raw cacao powder
5 tablespoons coconut palm sugar
1½-inch piece (2 ounces) fresh ginger, peeled and diced
½ teaspoon pure vanilla extract
Pinch of fine sea salt
4 teaspoons wasabi powder, or to taste (see Note)
1 banana, peeled
1. Whisk together ½ cup of the coconut milk and the tapioca starch in a small bowl to make a slurry. Set aside.
2. Heat the remaining 2 cups of coconut milk, the cacao powder, coconut palm sugar, ginger, vanilla, and salt in a medium pot over medium-high heat. When the cacao mixture reaches a boil, whisk in the reserved coconut-tapioca mixture and the wasabi; the mixture will immediately thicken.
3. Remove the mixture from the heat and carefully pour it into a blender. Add the banana and blend until smooth, about 15 seconds.
4. Divide the banana mixture between seven Zipzicle bags and freeze until solid, about 4 hours.
Wasabi Fudge Pops will keep, in the freezer, for up to 4 months.
Note: While fresh wasabi root is rife in Japan, here in the United States it’s hard to source the stuff; most of what’s available comes either as a powder or a paste. The thing is, many of those products contain flavor boosters like mustard, and artificial colors and other ingredients. So, whatever form you use, make sure to read the label: It should contain only wasabi. I buy pure wasabi powder online from a website called The Spice House.

With their sweet-savory flavor and creamy richness, these tahini cups are insanely addictive. I keep these guys in the freezer because the mix of frozen coconut oil and tahini paste offers a pleasing bite, which contrasts with the softer date center, flavored with coffee and warming chai spices. It’s also that sweet date-based center that balances the savory sesame flavor in the tahini shell.
Note: This dessert is very indulgent! I like to take one cup and cut it into 4 or even 8 slices and serve them, still frozen, at the end of a meal for a sweet finish.
makes 9 tahini cups
⅔ cup tahini (sesame paste)
⅔ cup coconut oil, melted
½ cup pitted dates (about 8 whole dates)
1 teaspoon pure vanilla extract
Scant ½ teaspoon ground cardamom
¼ teaspoon ground cinnamon
⅛ teaspoon fine sea salt
¼ cup strong hot brewed coffee
1. Place the tahini and coconut oil in a medium bowl and whisk to combine. Divide a little bit less than half the mixture among nine silicone cupcake molds, pouring in just enough to cover the bottom of each mold. Transfer the cupcake molds to the freezer to set, about 15 minutes. Reserve the remaining tahini mixture.
2. Meanwhile, place the dates, vanilla extract, cardamom, cinnamon, and salt in a food processor. Add 1 tablespoon of the coffee and blend for about 10 seconds, then scrape down the side of the bowl. Repeat, adding coffee by the tablespoon, until all the coffee is incorporated and the mixture forms a smooth, thick paste.
3. Remove the cupcake molds from the freezer and add 1 teaspoon of the date paste to the center of each, using your fingers or the back of a spoon to press the mixture into a thin layer atop the frozen tahini layer. Divide the reserved tahini mixture among the cups, pouring it on top of the date paste to cover. Return the cupcake molds to the freezer to set, about 20 minutes. Store in the freezer until ready to eat.
4 When ready to serve, remove the cup(s) to a plate and slice into bite-size pieces with a paring knife. Enjoy cold!
Dirty Chai Tahini Cups will keep, in an airtight container in the freezer, for up to 6 months.
Make It Magical
For an extra vitamin and immunity boost, add 1 tablespoon medicinal mushrooms, such as reishi and/or cordyceps, and/or 1 tablespoon tocos when you add the spices in Step 2.