
Strawberry–Vanilla Bean Chia Jam
Pineapple, Clove, and Black Pepper Jam
Don’t underestimate the power of condiments. From hot sauce to jam, condiments have the ability to quickly elevate basic dishes.
Some of the recipes in the previous chapters rely on condiments and spice blends for an extra boost of flavor and texture, and many of these can be quickly assembled, and stay fresh for an extended period of time. Some of my favorite super-versatile recipes include the Pastrami Spice, which is delicious atop avocado toast or sprinkled on roasted veggies, and the Condensed Coconut Milk, which works as a dairy replacement in coffee, can be slathered atop Medicine Bread, and also forms the base for my dairy-free Not-ella. Then there’s my protein-packed Pineapple, Clove, and Black Pepper Jam, which binds thanks to the addition of chia seeds and works beautifully atop muffins or mixed into overnight oats (see here).
Like all condiments, the recipes in this chapter are multipurpose components that easily amplify—or modify—a dish’s flavor. You should feel free to get creative and use them in any way that appeals to you. Want to turn your banana smoothie into a berry number? Just stir in some Strawberry–Vanilla Bean Chia Jam!

Power Trio (clockwise from bottom): Pineapple, Clove, and Black Pepper Jam, Strawberry–Vanilla Bean Chia Jam, and Medicine Bread
strawberry–vanilla bean chia jam
I’ve made this jam in various iterations for years. Sometimes I use it atop a biscuit in strawberry shortcake, and sometimes I use these base flavors in a strawberry pie. More recently, I’ve started to thicken the jam with chia seeds, then keep it in my fridge to put on puddings and cereal and toast. It’s delicious as breakfast, dessert, or an afternoon snack sandwiched with almond butter.
The idea here is to cook some of the strawberries to concentrate their flavor, and to add fresh strawberries for texture and acid. While this recipe calls for lemon juice, I’ve used lime juice and orange juice to great effect. This is one of those recipes that’s better the next day, after flavors have time to settle and meld. While you can eat it right away, I suggest prepping it a day ahead.
makes about ⅔ cup
2 cups large strawberries (preferably organic), hulled and cut into 6 pieces each
2 teaspoons raw honey
1 teaspoon fresh lemon juice
½ vanilla bean, seeds scraped out and pod reserved
Pinch of fine sea salt
1 tablespoon chia seeds
1. Heat 1 cup of the strawberries and the honey in a medium pot over medium heat. Cook, stirring frequently, until the strawberries begin to release their juice and look shiny, about 2 minutes. Add the lemon juice and cook until the strawberries are slightly softened, 2 minutes more. Add another ½ cup of the strawberries and stir to combine.
2. Add the vanilla seeds to the strawberry mixture, then toss in the pod. Reduce the heat to medium-low and cook, stirring frequently, until the strawberries look soft and syrupy, about 4 minutes.
3. Stir in the remaining ½ cup of strawberries, plus the salt and chia seeds. Remove from the heat and let cool. If the jam is too clumpy, remove the vanilla bean pod (but do not discard it), transfer the jam to a blender, and blend it to break down the berries further, 10 seconds (it will still have some lumps). Transfer the jam and the vanilla bean pod to a glass jar with a lid and chill.
Strawberry–Vanilla Bean Chia Jam will keep, in an airtight container in the refrigerator, for about 1 week.

pineapple, clove, and black pepper jam
Sweet and tropical with a savory edge—try spooning this jam atop chia pudding, or even adding it to a smoothie.
makes 1¼ cups
½ fresh pineapple, peeled (remove any eyes), cored, and cut into 1-inch chunks
½ cup filtered water
3 tablespoons raw honey
½ vanilla bean, seeds scraped out and pod reserved
⅛ teaspoon ground cloves
⅛ teaspoon fine sea salt
Pinch of freshly ground black pepper
1 tablespoon fresh orange juice
½ teaspoon fresh lemon juice
1. Place the pineapple chunks in a blender and process until smooth.
2. Pour 2 cups of the pineapple puree (reserve any leftovers for another use) into a medium skillet and add the filtered water, honey, vanilla seeds and pod, cloves, salt, and pepper. Bring to a simmer over medium-low heat, stirring occasionally, until the jam thickens and reduces by half, about 30 minutes.
3. Stir in the orange and lemon juices. Let cool. Transfer the jam to a glass jar with a lid and chill in the refrigerator.
Pineapple, Clove, and Black Pepper Jam will keep, in an airtight container in the refrigerator, for 1 week.
Thanks to the addition of oils, this Middle Eastern–inspired tahini—which takes its unusual hue from black sesame seeds—is a bit lighter than the thick paste you find in jars. It’s easier to drizzle atop bananas or baked sweet potatoes (see here), and is straight-up delicious.
makes ⅓ cup
¼ cup plus 2 tablespoons black sesame seeds, toasted
3 tablespoons canola oil
1 tablespoon toasted sesame oil
1½ teaspoons raw honey
⅛ teaspoon fine sea salt
1. Place the black sesame seeds in a food processor and blend until the seeds begin to break down, about 45 seconds.
2. Add the oils and blend, scraping down side of the bowl with a rubber spatula as needed, until a smooth paste forms, about 3 minutes.
3. Add the honey and salt and blend again to combine.
Black Honey Tahini will keep, in an airtight container in the refrigerator, for about 3 months.
Toasting raw nuts and seeds deepens their flavor and gives them a toothsome crunch. There are a few simple ways to do it. No matter which method you use, the toasting will happen quickly, in a matter of minutes depending on the size of the nut or seed, so keep a close eye on them to make sure they don’t burn!
On the stovetop: Place the seeds or nuts in a dry frying pan over medium-low heat and cook, stirring frequently, until the seeds or nuts are fragrant and starting to brown (or darken in the case of black sesame seeds). Remove from the heat and let cool completely.
In the oven or toaster oven: Spread the nuts or seeds in a single layer on a parchment paper—or aluminum foil–lined baking sheet and toast at 350°F until fragrant and darker in color.
Sweet and savory with a hint of salt, this matcha butter is awesome in so many ways. Add a dollop atop pancakes or waffles, swipe it across Medicine Bread, or drop a bit into your a.m. smoothie.
makes ½ cup
½ cup coconut butter
2 teaspoons raw honey
1 teaspoon matcha powder (the highest quality you can find, see here)
½ teaspoon fine sea salt
Stir together all of the ingredients in a small bowl until they are thoroughly combined and the mixture is bright green.
Matcha Honey Butter will keep, in an airtight container in the refrigerator, for about 3 months. Bring it to room temperature before serving.
Make It Magical
Add ½ teaspoon of spirulina.

I’ve developed a habit of adding about a half teaspoon of coconut oil to my morning coffee when I am out of nut milk—it adds a richness and serves to balance a cup’s acidic nature. When I first made this recipe, it was autumn, and one morning when I realized I was out of almond milk and was reaching for the coconut oil, I noticed a jar of this butter I had just made. One scoop later and I felt like I was drinking a healthier version of those horrifically sweet, chemical-laced beverages the coffee chains shill. This pumpkin butter—delicious in a drink or smeared atop a muffin or toast—delivers a taste of fall temps via clean ingredients.
makes ½ cup
½ cup canned organic pumpkin puree
¼ cup plus 2 tablespoons coconut oil
2 tablespoons pure maple syrup
1½ teaspoons ground cinnamon
½ teaspoon ground ginger
½ teaspoon ground nutmeg
½ teaspoon ground allspice
¼ teaspoon ground cloves
⅛ teaspoon fine sea salt, plus extra as needed
Pinch of freshly ground black pepper
1. Combine all of the ingredients in a medium pot over medium heat and cook, whisking occasionally, until incorporated, about 5 minutes.
2. If the oil and pumpkin have not combined, while the mixture is still warm, transfer it to a blender and blend until fully emulsified, about 30 seconds. Let cool before using.
Spiced Pumpkin Butter will keep, in an airtight container in the refrigerator, for about 1 week. Bring to room temperature before serving.
Like so many people, I am a huge fan of Nutella, the beloved spread made from chocolate and hazelnuts. But I’m less a fan of some of the spread’s ingredients—namely dairy and tons of sugar! This recipe sidesteps milk with coconut as the base, yielding a less sweet spread that’s shockingly similar to the original.
If you read the headnote to the Condensed Coconut Milk recipe, you’ll see I talk about the differences between coconut milk made with and without stabilizers. If you make the condensed milk recipe with a coconut milk containing a stabilizer, just be aware that it will take on a slightly firm, fudgelike quality; using coconut milk without a stabilizer will yield a softer spread.
makes 1½ cups
2 cups raw hazelnuts, preferably organic
1 recipe Condensed Coconut Milk
5 tablespoons raw cacao powder
2 teaspoons pure vanilla extract
¾ teaspoon fine sea salt
1. Preheat the oven to 350°F.
2. Place the hazelnuts on a rimmed baking sheet and toast until light brown and fragrant and the skins begin to split, about 10 minutes. While the nuts are still hot, wrap them loosely in a clean kitchen towel and rub them together in the towel to remove the skins. Let cool.
3. Place the toasted, skinned hazelnuts in a food processor and blend, pausing occasionally to scrape down the side of the bowl with a rubber spatula, until the nuts turn into a paste and become oily, about 5 minutes.
4. Add the condensed coconut milk, cacao powder, vanilla, and salt and blend until thick and smooth.
Not-ella will keep, in an airtight container in the refrigerator, for up to 2 weeks.
I love the flavor, acidity, and slickness of tomatillo salsa. It is great on avocado pizza, and it’s also a perfect friend to tortilla chips (natch). You can also serve it atop steamed vegetables, or even as a salad dressing.
makes about 1 cup
4 medium tomatillos, husks removed, fruits washed to remove sticky residue
1 fresh serrano chile (about 3 inches long)
2 tablespoons coarsely chopped fresh cilantro
2 tablespoons chopped white onion
2 tablespoons fresh lime juice
2 garlic cloves, peeled
½ teaspoon fine sea salt, plus extra as needed
¼ -inch-thick slice jalapeño (seeds removed for less heat if desired)
1. Preheat the oven to broil.
2. Place the tomatillos and serrano on a rimmed baking sheet and broil until the tomatillos start to speckle with brown spots, about 7 minutes. Remove the baking sheet from the oven and, using a spatula, flip the tomatillos and serrano over. Return to the oven and broil until brown spots form on the opposite side, about 7 minutes.
3. Transfer the tomatillos to a food processor and the serrano to a cutting board. Let the serrano cool to the touch. Cut off and discard the stem of the serrano and add the chile to the food processor, along with the cilantro, onion, lime juice, garlic, the ½ teaspoon of salt, and the jalapeño. Process until the salsa takes on a texture a bit thicker than hot sauce, about 1 minute. Season to taste with salt.
Tomatillo Salsa will keep, in an airtight container in the refrigerator, for about 4 days.
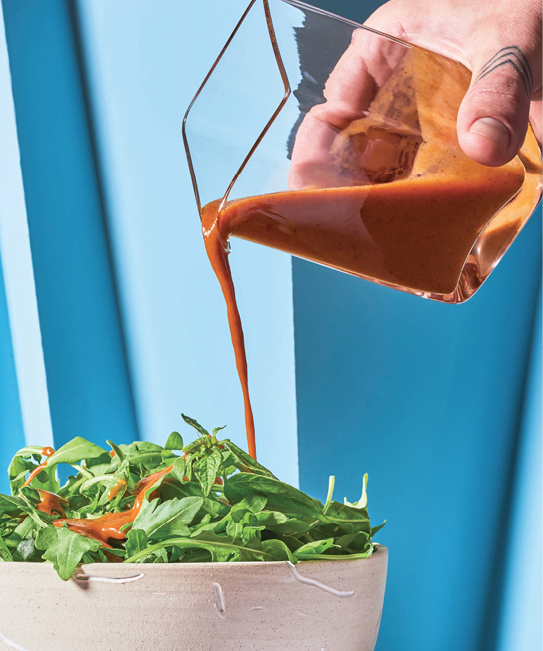
This spicy seaweed dressing gets its kick from fresh garlic, ginger, and a bit of rice wine vinegar. The nori adds a savory umami flavor, while orange and honey offer balance. Try this as a salad dressing, or even as a dip for crudités.
makes about 1 cup
3 tablespoons rice wine vinegar
3 tablespoons fresh orange juice
2 garlic cloves, peeled
1½ sheets nori, toasted
½ large shallot, peeled
⅓ ounce fresh ginger, peeled
1½ teaspoons raw honey
½ teaspoon fine sea salt
½ cup vegetable oil
About 2 tablespoons filtered water
1. Combine the vinegar, orange juice, garlic, nori, shallot, ginger, honey, and salt in a food processor and blend to incorporate, pausing to scrape down the side of the bowl as needed, about 2 minutes.
2. With the motor running, slowly add the oil in increments to emulsify. Blend in the filtered water, beginning with 2 tablespoons and adding a bit more if desired, to lighten the vinaigrette.
Nori Vinaigrette will keep, in an airtight container in the refrigerator, for about 3 days.
Hot and fermented, this super-versatile chile sauce—which is equal parts hot sauce and dressing—uses kimchi as its base flavor. Additional heat and fermented notes come from a Korean condiment called gochujang, which is made from chiles, glutinous rice (which, for the record, is gluten-free!), fermented soybeans, and salt—it’s sort of like a spicy take on miso paste. This kimchi sauce is salty, sour, and sweet, and offers a huge burst of flavor that enhances raw or roasted veggies. Add it to a salad for a touch of heat, or dash it atop avocado toast.
makes about ⅔ cup
¼ cup kimchi juice (from a jar of kimchi)
¼ cup gluten-free soy sauce
¼ cup gochujang (see Note)
4 teaspoons coconut palm sugar
2 tablespoons rice vinegar
2 tablespoons canola oil
1 teaspoon fresh lime juice
Combine all of the ingredients in a blender and puree until they are fully incorporated and the sauce has a thick but pourable texture, about 20 seconds.
Kimchi Dressing will keep, in an airtight container in the refrigerator, for about 3 days.
Note: Gochujang is sold at some supermarkets and Asian markets, and is widely available online.
Traditional condensed milk is a canned product that’s for sale at most markets, and it’s made from cow’s milk that has been cooked down to a thick, syrupy consistency and spiked with sugar. It makes delicious—if sweet—coffee drinks, and it’s the dairy component in Thai iced tea. It’s also used as a topping for some Asian desserts. As a fan of the product, I set out to create a less-sweet, dairy-free option based on canned coconut milk.
It’s important to note that not all canned coconut milk is made with the same ingredients. There’s more on this in Chapter 1 (see here), but I look for brands that don’t have any added stabilizers like guar gum, which is often an extra ingredient alongside coconut and sometimes water. You can make this recipe with either type of canned coconut milk: with or without added stabilizers. If you use one containing a stabilizer, the condensed milk will take on a slightly more gel-like texture; an additive-free coconut milk will yield a condensed milk that’s more pastelike. The latter version also separates a bit when cooked—you can either mix the separated oil back in, or refrigerate the condensed coconut milk until the oil solidifies at the top and you can easily remove it.
makes 1 cup
2 cups coconut milk
1 cup coconut palm sugar
⅛ teaspoon fine sea salt
Combine all of the ingredients in a medium pot over medium-low heat and simmer, stirring frequently, until the mixture is syrupy and reduced by half, about 45 minutes. Remove from the heat and let cool.
Condensed Coconut Milk will keep, in an airtight container in the refrigerator, for 2 weeks.
Think of this multipurpose coconut whip as you would whipped cream, though one made from a plant-based source. Use it anywhere you’d use traditional whipped cream—atop beverages, on ice cream, and spooned over desserts for an extra creamy touch. As I mentioned here, coconut milk without stabilizers separates better—for this recipe, look for the 100% pure stuff.
makes about ¾ cup
1 can (14 ounces) full-fat coconut milk, refrigerated unopened and unshaken overnight
1 teaspoon pure vanilla extract
1 teaspoon coconut palm sugar
Pinch of salt (I like pink Himalayan salt)
Open the can of coconut milk; the thick coconut cream sits at the top and the coconut water below it. Using a spoon, scoop out the cream and transfer it to the bowl of a stand mixer fitted with the whisk attachment (or into a large bowl, if using an electric hand mixer); reserve the coconut water for another use. Add the vanilla, coconut palm sugar, and salt, and whisk together on high speed until the mixture resembles whipped cream, about 1 minute. Serve immediately.
Avocado-grapefruit “hollandaise”
Think about this sauce as a replacement for mayo. It’s thick, creamy—just like mayo—with a hit of citrus and mild bitterness from the grapefruit. You can use it in a veggie or grain bowl, atop proteins, in a sandwich or wrap, or as a dip for crudités.
makes ¾ cup
1 avocado, peeled and pitted
Juice and finely grated zest of 1 grapefruit
3 tablespoons olive oil
1 tablespoon filtered water
2 teaspoons apple cider vinegar
2 teaspoons raw honey
¼ teaspoon cayenne pepper
½ teaspoon fine sea salt
Combine all of the ingredients in a food processor or blender and process until they are fully incorporated and the sauce is pale green and velvety, about 1 minute. Transfer to a bowl and serve immediately.
This simple, delicious pixie dust is excellent on waffles (see here). And pancakes. And custards (see here). And cereal. And smoothie bowls. It makes pretty much everything better.
makes 4½ teaspoons
¼ cup freeze-dried strawberries
¼ cup freeze-dried bananas
Combine the freeze-dried fruit in a ziplock bag and seal the bag. Roll a wine bottle, jar, or even a rolling pin (!) over the bag to coarsely crush the fruit. The dust should be mostly powder, with some larger chunks.
Tutti-Frutti Dust will keep, in an airtight container at room temperature, for 1 month.
Dukkah is a crunchy Egyptian nut, spice, and (sometimes) herb mixture that’s traditionally served as an accompaniment to bread. I’ve also seen dukkah used as a garnish for yogurt and various proteins, but it’s equally delicious atop roasted veggies, or adding a savory spin to morning oatmeal. Try sprinkling it on hummus (and Beet Hummus), avocado, or even a grain bowl. It’s spicy, earthy, and nutty all in one!
makes ¼ cup
½ cup raw hazelnuts, preferably organic
4 teaspoons white sesame seeds
1 teaspoon coriander seeds
1 teaspoon cumin seeds
½ teaspoon fine sea salt, plus extra as needed
½ teaspoon freshly ground black pepper
1. Preheat the oven to 350°F.
2. Place the hazelnuts on a rimmed baking sheet and toast until light brown and fragrant, about 7 minutes. While the nuts are still hot, wrap them loosely in a clean kitchen towel and rub them together in the towel to remove the skins. Let cool.
3. Place the sesame seeds in a small, dry skillet and toast over medium heat, stirring frequently, until golden, about 4 minutes. Pour the seeds into a medium bowl.
4. Using the same skillet, toast the coriander and cumin seeds over medium heat until they become fragrant, about 1 minute. Remove from the heat and pour the hot seeds into a food processor. Process the seeds until finely ground, about 5 minutes, then add them to the sesame seeds.
5. Place the cooled hazelnuts in the food processor and process until finely ground, about 30 seconds. Add the ground hazelnuts to the sesame seed mixture and stir to blend. Stir in the salt and pepper, taste and add more salt if needed.
Dukkah will keep, in an airtight container at room temperature, for about 1 month.

Togarashi, also known as shichimi togarashi, is a common Japanese spice blend made from seven ingredients. While those ingredients and their quantities can vary, the base players are usually sesame seeds (white and/or black), seaweed, dried ginger, chiles, Sichuan peppercorns, poppy seeds, and dried orange peel. Try sprinkling togarashi on roasted veggies, avocado toast, or salad.
makes ⅔ cup
4 garlic cloves, peeled
2 sheets nori, torn into small pieces
2 tablespoons raw, unsalted sunflower seeds
2 teaspoons white or black sesame seeds, or a combination
2 teaspoons freshly grated orange zest
½ teaspoon fine sea salt
½ teaspoon freshly ground black pepper
½ teaspoon crushed red pepper flakes
1. Preheat the oven to 350°F.
2. Combine all of the ingredients in a food processor and pulse until broken down and incorporated, about 1 minute. Transfer the mixture to a rimmed baking sheet and bake until the mixture is dry and crispy, about 5 minutes. Let cool on the baking sheet; as the mixture cools, it will dry out even more.
Seeded Togarashi will keep, in an airtight container at room temperature, for 1 day, or in the refrigerator for 5 days. Retoast it in a 350°F oven for a few minutes before using.
Inspired by the classic spice blend used to coat pastrami beef, this savory mélange of seeds and spices is equally delicious rubbed onto the outside of beets, sprinkled atop other veggies like roasted cauliflower, or added to avocado toast for a burst of flavor. While pastrami spice is often made with paprika, here I’ve subbed in garam masala, which is itself an Indian spice blend of chile and warm spices such as cinnamon, cardamom, cloves, and nutmeg. The garam masala adds an exotic twist to this traditional American rub.
makes about ⅓ cup
1 teaspoon mustard seeds
1 teaspoon coriander seeds
1 tablespoon coconut palm sugar
1 tablespoon garlic powder
1 tablespoon onion powder
1 teaspoon garam masala
1 teaspoon freshly ground black pepper
Using a mortar and pestle or a food processor, blend all of the ingredients together until the spices are coarsely ground and combined (they should not be completely broken down into a fine dust).
Pastrami Spice will keep, in an airtight container at room temperature, for 3 months.