RICE
Basmati Rice Pilaf with Peas, Scallion, and Lemon
Basmati Rice Pilaf with Currants and Toasted Almonds
Coconut Rice with Bok Choy and Lime
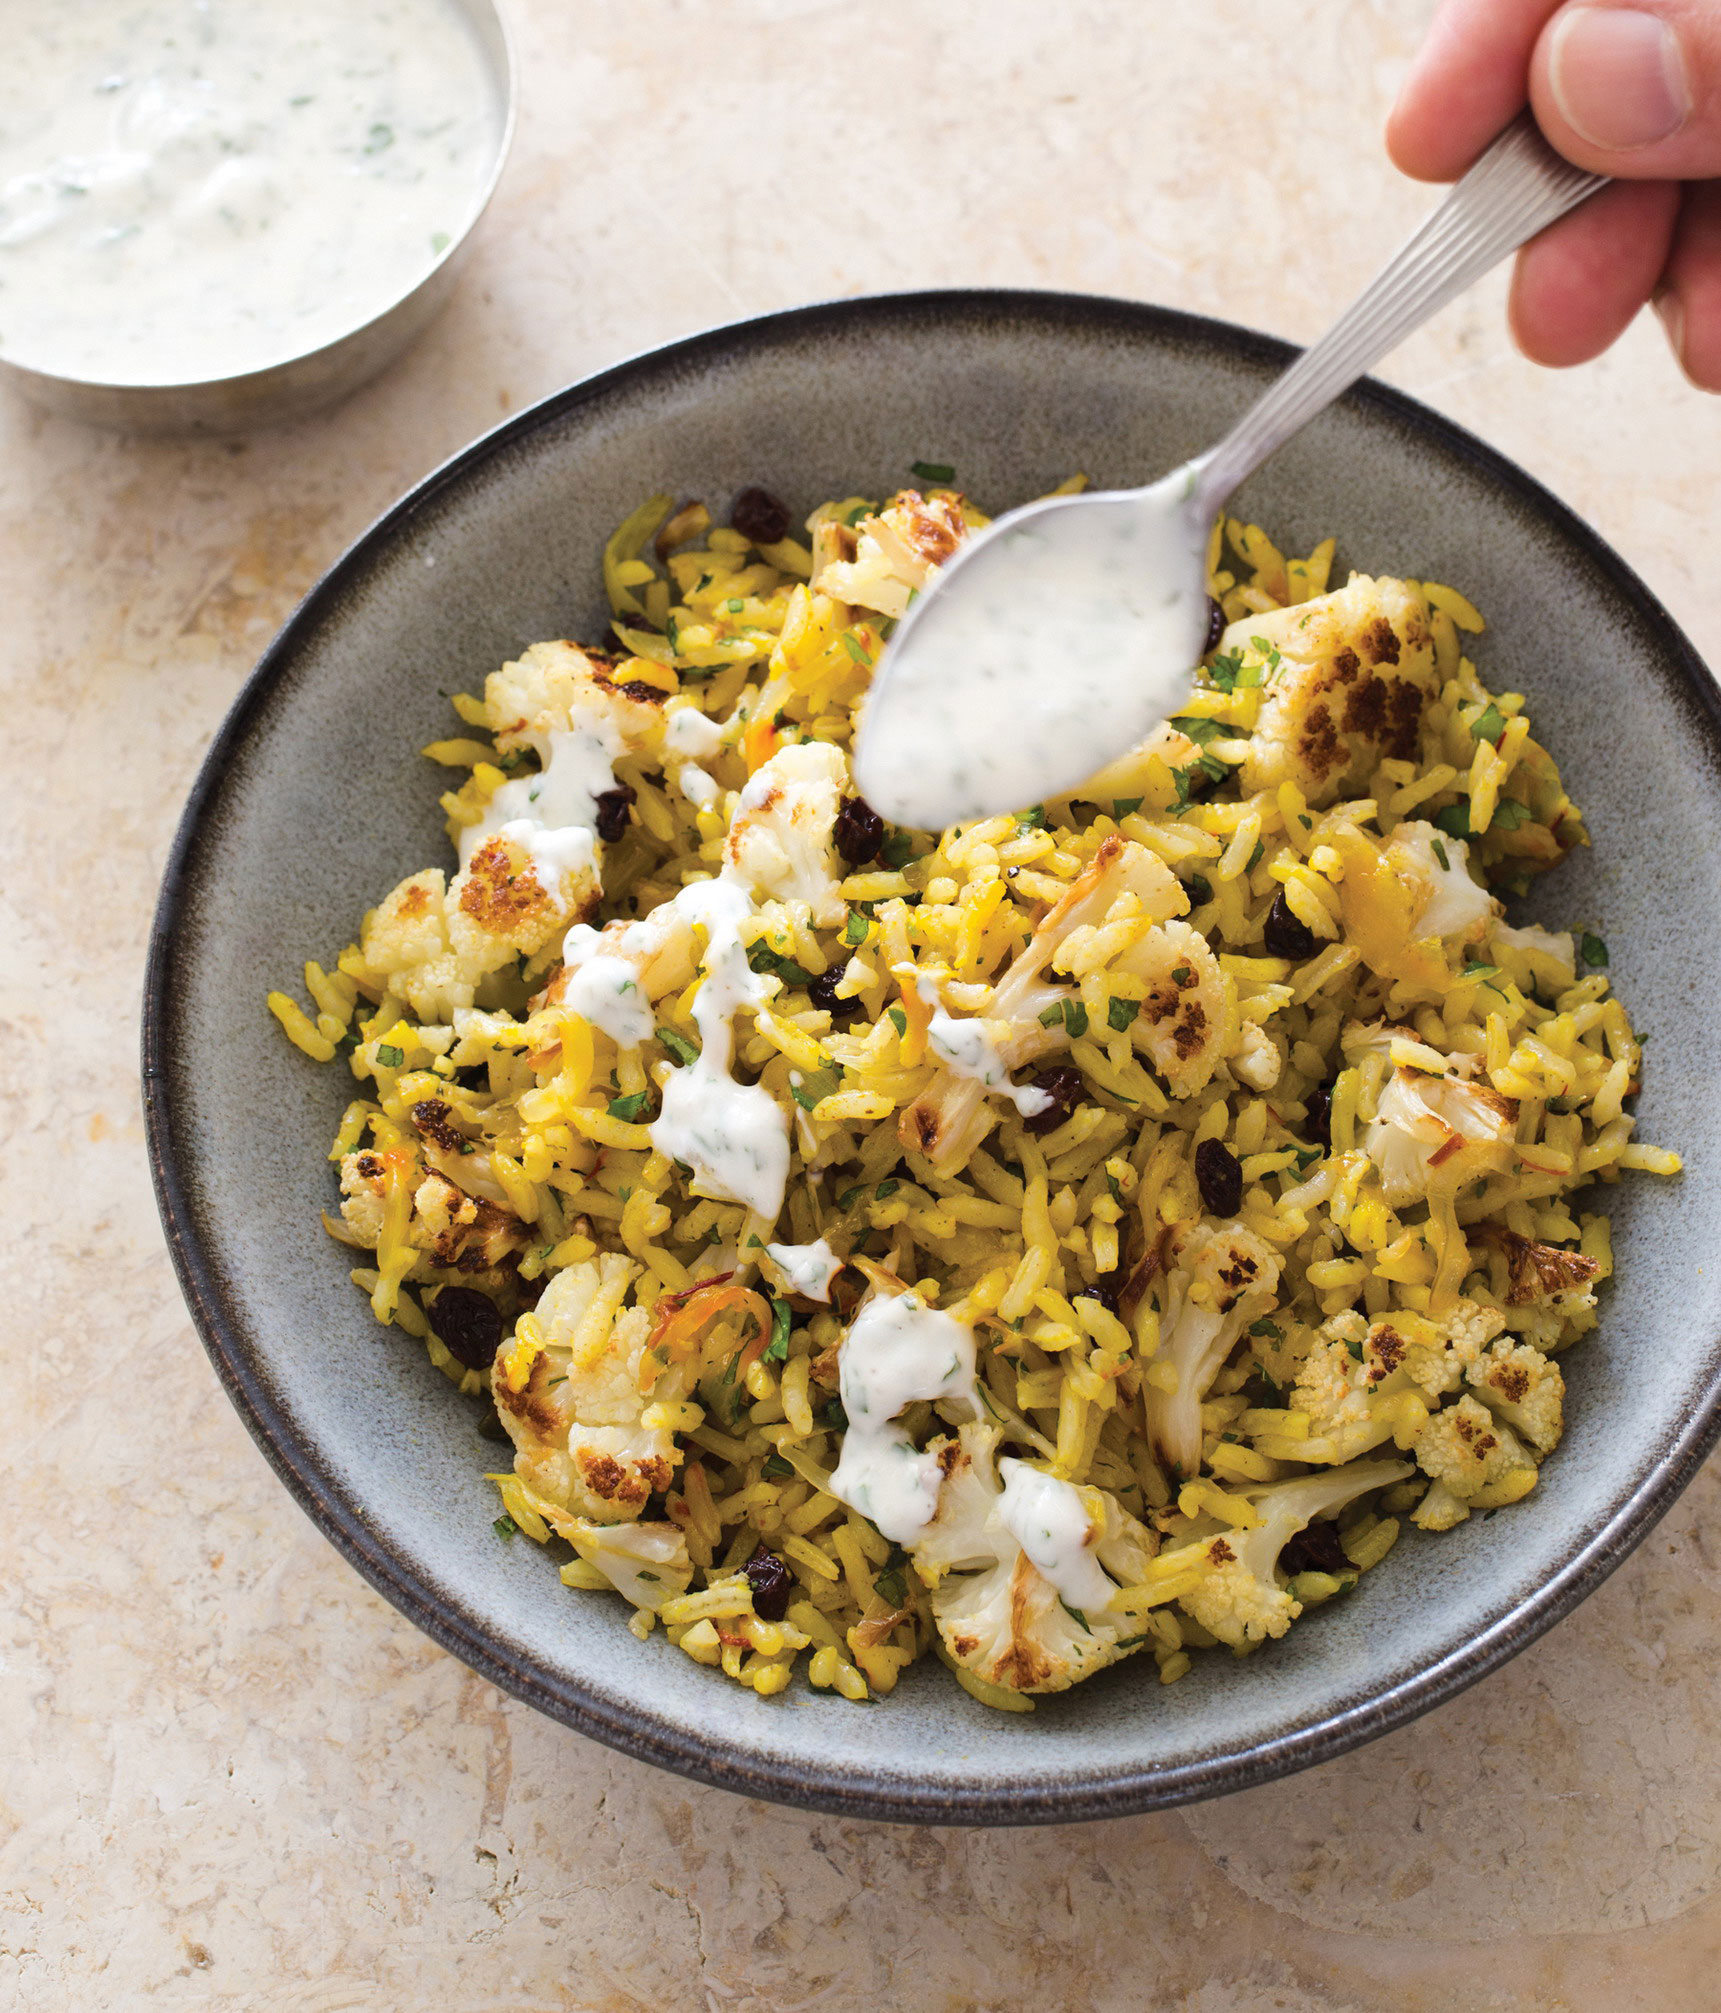
Spiced Basmati Rice with Cauliflower and Pomegranate
Spiced Baked Rice with Roasted Sweet Potatoes and Fennel
Rice Salad with Oranges, Olives, and Almonds
Rice Salad with Pineapple, Jícama, and Pepitas
Vegetable Fried Rice with Broccoli and Shiitake Mushrooms 
Vegetable Fried Rice with Broccoli, Shiitake Mushrooms, and Eggs
Almost Hands-Free Mushroom Risotto
Almost Hands-Free Fennel Risotto
Baked Brown Rice with Roasted Red Peppers and Onions
Baked Brown Rice with Black Beans and Cilantro
Baked Brown Rice with Peas, Mint, and Feta
Brown Sushi Rice Bowl with Tofu and Vegetables
Brown Rice Salad with Asparagus and Lemon
Brown Rice Salad with Jalapeño, Tomatoes, and Avocado
Brown Rice Salad with Fennel, Mushrooms, and Walnuts
Brown Rice Onigiri with Spinach, Edamame, and Sesame
Vegetable Paella in a Paella Pan
Wild Rice Pilaf with Pecans and Cranberries
Wild Rice Pilaf with Scallions, Cilantro, and Almonds
Black Rice Salad with Snap Peas and Ginger-Sesame Vinaigrette
GRAINS
Barley Bowl with Roasted Carrots and Snow Peas
Barley with Lentils, Mushrooms, and Tahini-Yogurt Sauce
Bulgur Salad with Carrots and Almonds
Bulgur with Chickpeas, Spinach, and Za’atar
Warm Farro with Lemon and Herbs
Warm Farro with Mushrooms and Thyme
Farro Salad with Asparagus, Snap Peas, and Tomatoes
Farro Salad with Cucumber, Yogurt, and Mint
Farro Risotto with Fennel and Radicchio
Farro and Broccoli Rabe Gratin
Freekeh Pilaf with Dates and Cauliflower
Freekeh Salad with Butternut Squash, Walnuts, and Raisins
Easy Baked Quinoa with Curry, Cauliflower, and Cilantro
Easy Baked Quinoa with Lemon, Garlic, and Parsley
Quinoa Salad with Red Bell Pepper and Cilantro
Baked Quinoa with Roasted Kale and Chickpeas
Warm Wheat Berries with Zucchini, Red Pepper, and Oregano
Wheat Berry Salad with Figs and Pine Nuts
Wheat Berry Salad with Blueberries and Endive
SAUCES
RECIPE EXTRAS
Sautéed Mushrooms with Red Wine–Miso Reduction
FAST (45 minutes or less total time)
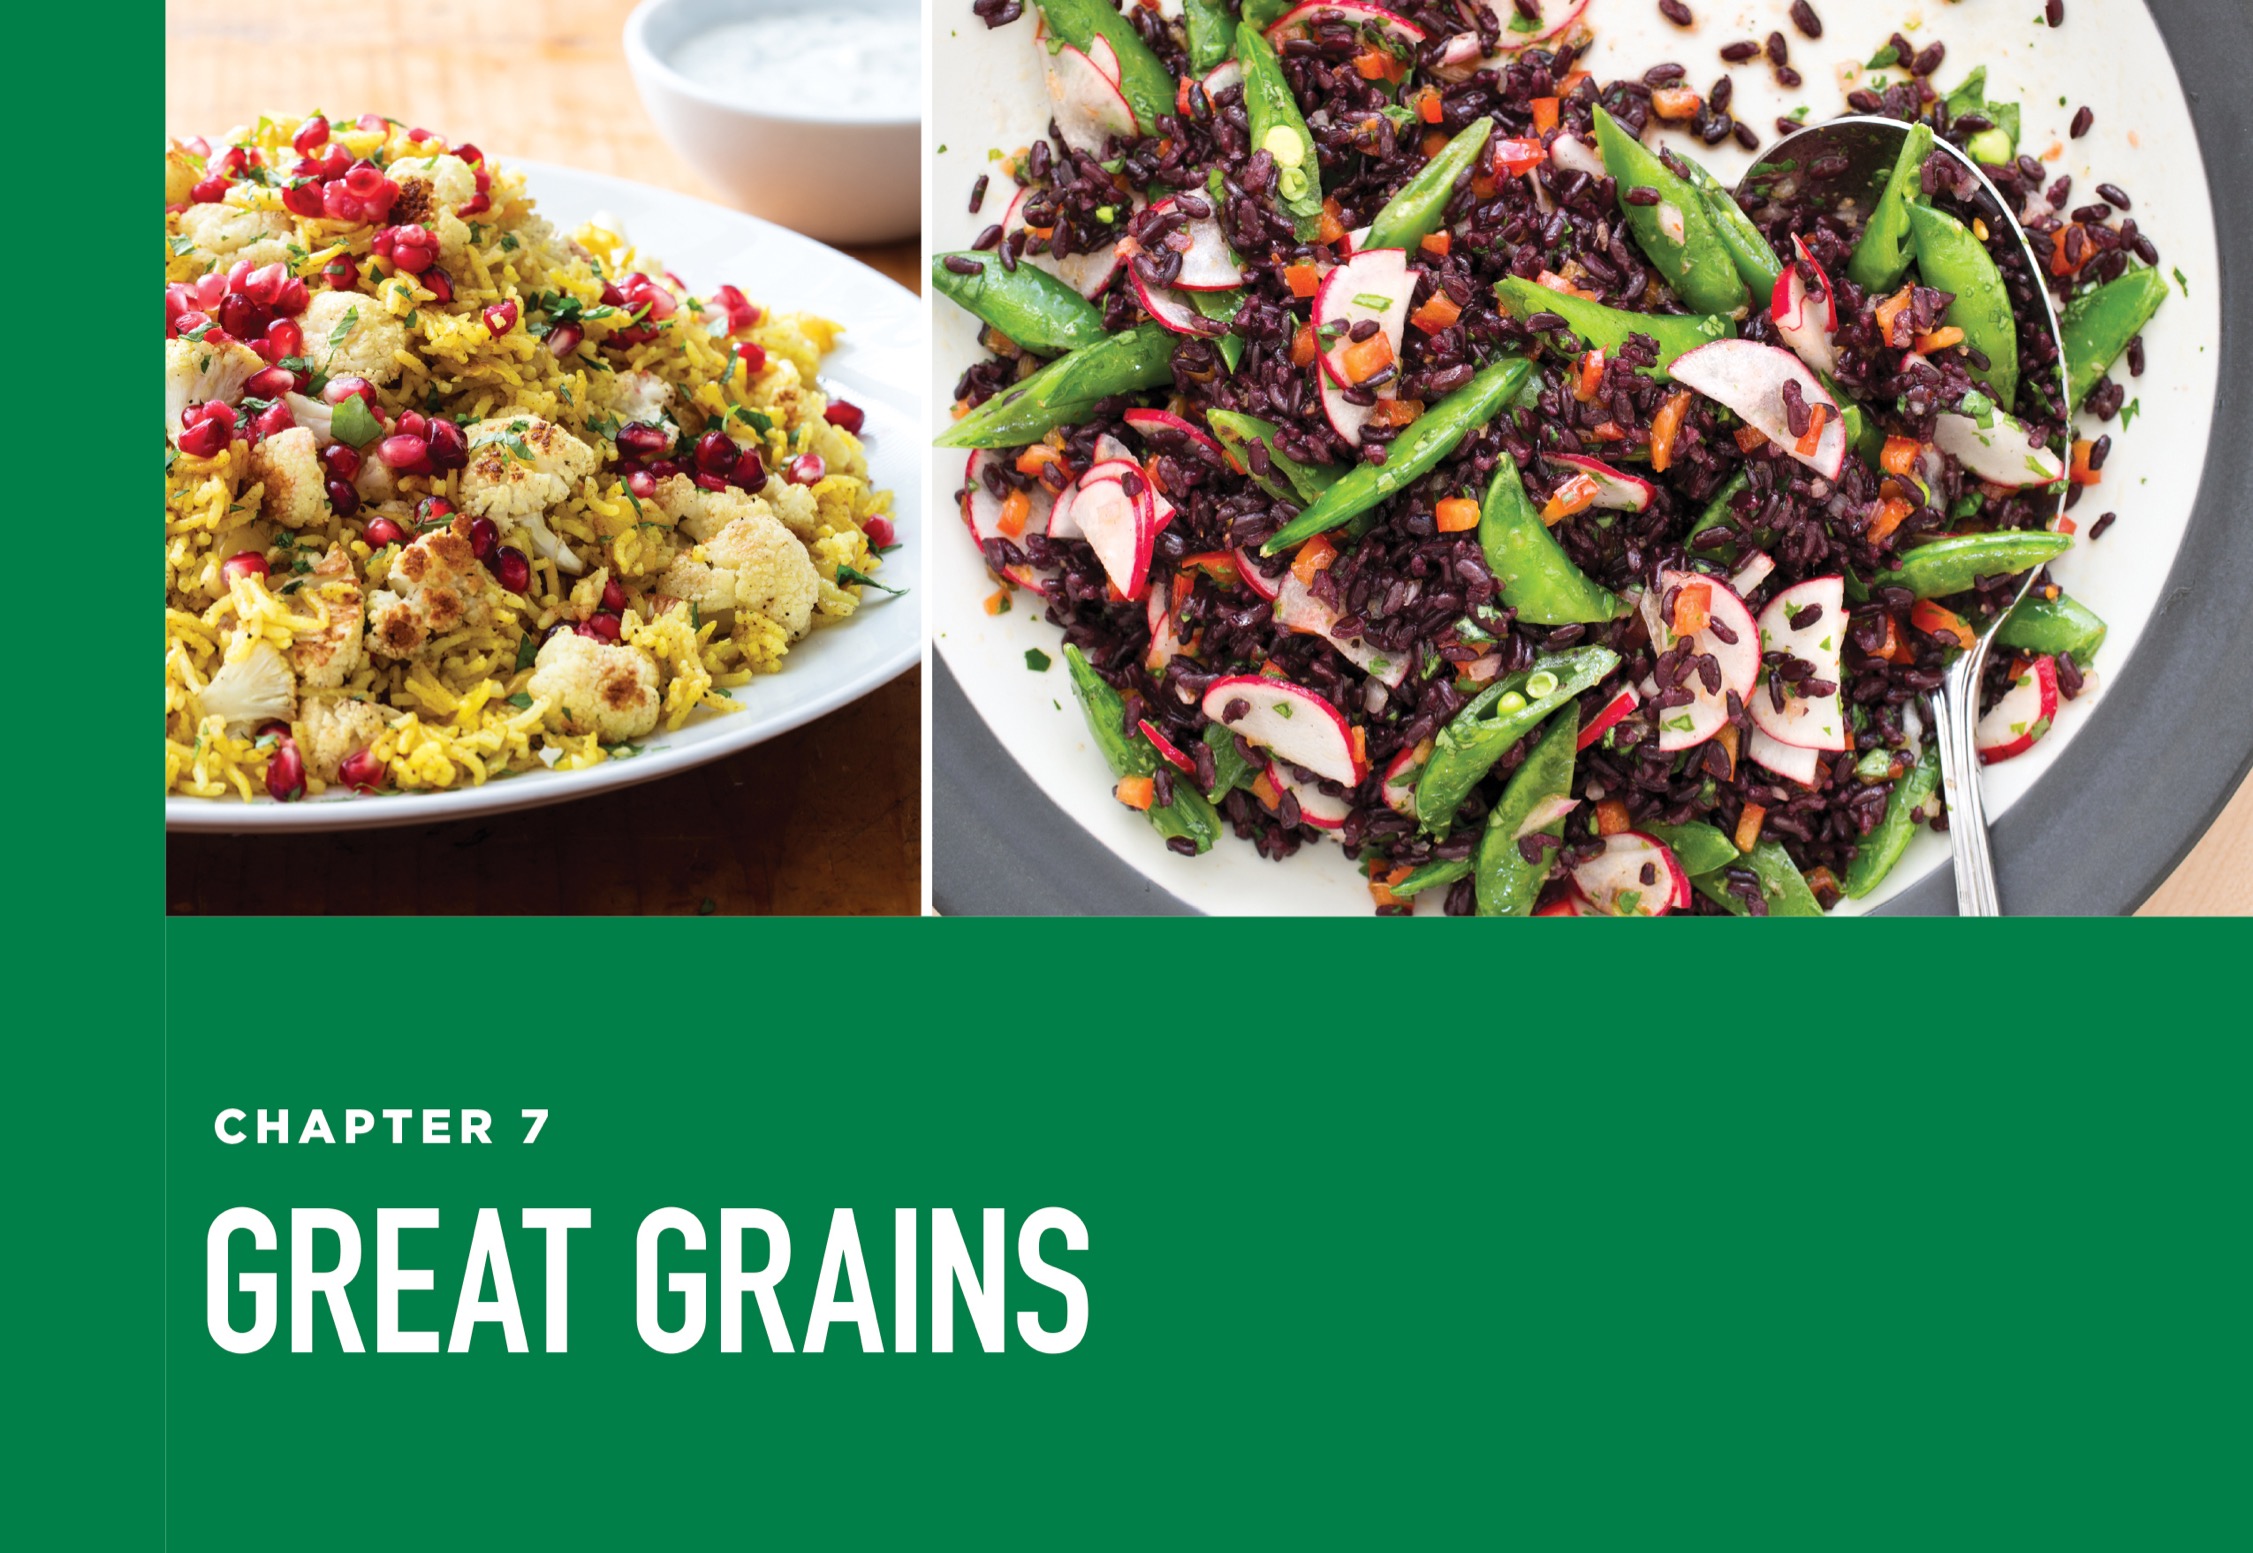
Photos: Cauliflower Biryani; Black Rice Salad with Snap Peas and Ginger-Sesame Vinaigrette
Serves 4 to 6
Why This Recipe Works White rice makes a great base for a plant-based meal that pleases everyone at the table. But it can be temperamental, foiling the efforts of even the best cooks by turning into a pot of true grit or dissolving into a gummy mess. To prevent these mishaps, we often turn to the pilaf method for cooking long-grain white rice, which relies on using less water and an even, gentle heat to produce distinct grains. Many rice pilaf recipes call for soaking the rice overnight, but we found this unnecessary; simply rinsing the rice before cooking removed excess starch and ensured the fluffy, rather than clumpy, grains that we were after. We sautéed an onion in the saucepan first for an easy flavor boost and then we added the rice. Toasting the rice for a few minutes in the pan deepened its flavor. Instead of following the traditional ratio of 1 cup of rice to 2 cups of water, we found using a little less liquid delivered better results. A dish towel under the lid while the rice finished steaming off the heat absorbed excess moisture in the pan and guaranteed our rice was perfectly fluffy, light, and tender. Long-grain white, jasmine, or Texmati rice can be substituted for the basmati.
1 tablespoon extra-virgin olive oil
1 small onion, chopped fine
¼ teaspoon table salt
1½ cups basmati rice, rinsed
2¼ cups water
1. Heat oil in large saucepan over medium heat until shimmering. Add onion and salt and cook until onion is softened, about 5 minutes. Stir in rice and cook, stirring often, until grain edges begin to turn translucent, about 3 minutes.
2. Stir in water and bring to simmer. Reduce heat to low, cover, and continue to simmer until rice is tender and water is absorbed, 16 to 18 minutes.
3. Remove pot from heat and lay clean folded dish towel underneath lid. Let sit for 10 minutes. Fluff rice with fork, season with salt and pepper to taste, and serve.
VARIATIONS
Basmati Rice Pilaf with Peas, Scallions, and Lemon
Add 2 minced garlic cloves, 1 teaspoon grated lemon zest, and ⅛ teaspoon red pepper flakes to pot with rice. Before covering rice with dish towel in step 3, sprinkle ½ cup thawed frozen peas over top. When fluffing cooked rice, stir in 2 thinly sliced scallions and 1 tablespoon lemon juice.
Basmati Rice Pilaf with Currants and Toasted Almonds
Add 2 minced garlic cloves, ½ teaspoon ground turmeric, and ¼ teaspoon ground cinnamon to pot with rice. Before covering rice with dish towel in step 3, sprinkle ¼ cup currants over top. When fluffing cooked rice, stir in ¼ cup toasted sliced almonds.
Serves 4
Why This Recipe Works Another great method for making foolproof long-grain white rice involves, surprisingly, the oven. For a basic everyday rice that was fast, hands-off, and didn’t take up space on the stovetop, we baked it. After a few tests, we uncovered a couple of tricks that ensured perfect rice every time. First, be sure to rinse the rice before combining it with the water for cooking, or the excess starch clinging to the rice will make everything taste gluey. Second, use boiling water, or the rice will take forever to cook through in the oven. This recipe is a blank canvas ready to be paired with anything; the variations add in some seasonings to take the rice in different flavor directions. Basmati, jasmine, or Texmati rice can be substituted for the long-grain white rice. For an accurate measurement of boiling water, bring a full kettle of water to a boil and then measure out the desired amount.
2¾ cups boiling water
1⅓ cups long-grain white rice, rinsed
1 tablespoon extra-virgin olive oil
½ teaspoon table salt
1. Adjust oven rack to middle position and heat oven to 450 degrees. Combine all ingredients in 8-inch square baking dish. Cover dish tightly with double layer of aluminum foil. Bake rice until tender and no water remains, about 20 minutes.
2. Remove dish from oven, uncover, and fluff rice with fork, scraping up any rice that has stuck to bottom. Re-cover dish with foil and let sit for 10 minutes. Season with salt and pepper to taste, and serve.
VARIATIONS
Substitute 2 cups water, ¾ cup coconut milk, and ⅛ teaspoon ground cardamom for boiling water; microwave in covered bowl until hot, about 2 minutes. When fluffing cooked rice, stir in 1 tablespoon minced fresh cilantro.
Stir 1 teaspoon curry powder into boiling water before adding to baking dish. When fluffing cooked rice, stir in ¼ cup raisins.
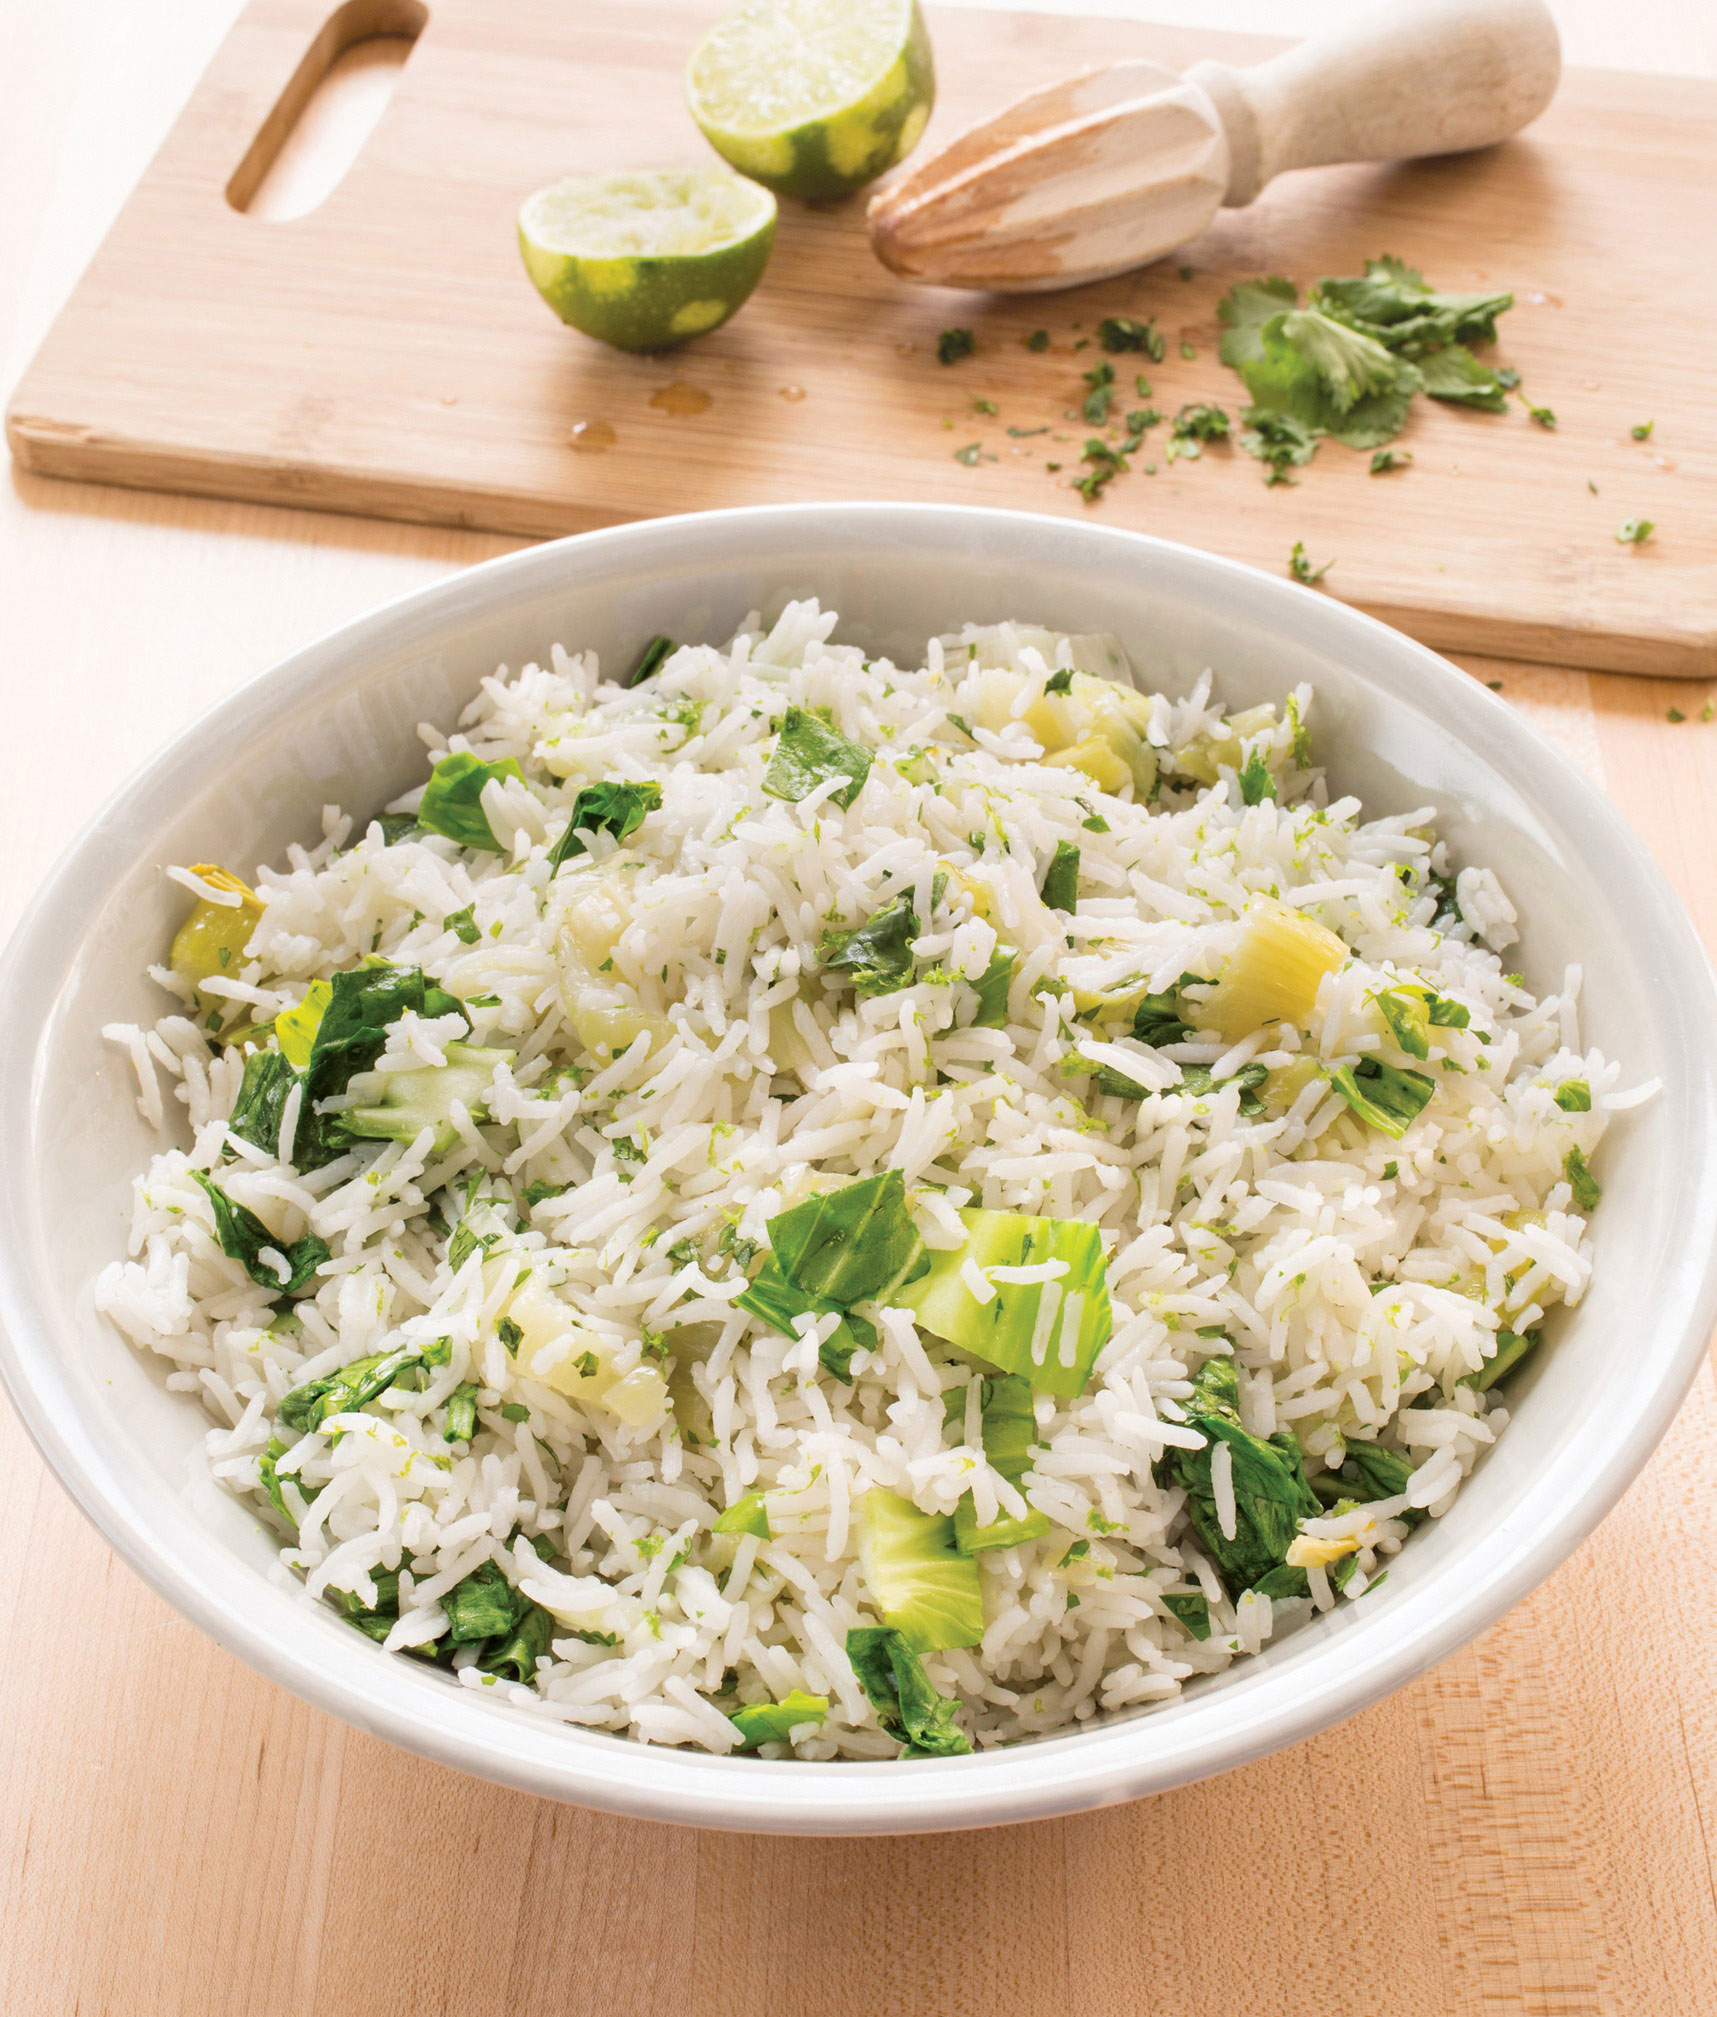
Serves 4 to 6
Why This Recipe Works Variations on rich, creamy coconut rice are served in diverse countries around the globe as a cooling accompaniment to spicy foods. This dressed-up Thai version features baby bok choy, aromatic lemongrass, lime, and cilantro. We chose basmati rice and followed the traditional method of cooking the rice in coconut milk along with the lemongrass, which steeped in the liquid as the rice simmered. To ensure that the bok choy stalks would turn tender by the time the rice was cooked, we sautéed them in the pan before adding the rice. To finish, we stirred in lime zest and juice and cilantro along with the bok choy greens. Long-grain white, jasmine, or Texmati rice can be substituted for the basmati.
2 teaspoons vegetable oil
2 heads baby bok choy (4 ounces each), stalks sliced ½ inch thick, greens chopped
1 shallot, minced
1½ cups basmati rice, rinsed
1½ cups water
¾ cup canned coconut milk
1 lemongrass stalk, trimmed to bottom 6 inches and smashed
2 teaspoons table salt
2 tablespoons minced fresh cilantro
1 teaspoon grated lime zest plus 2 teaspoons juice
1. Heat oil in large saucepan over medium-high heat until shimmering. Add bok choy stalks and shallot and cook, stirring occasionally, until softened, about 2 minutes.
2. Stir in rice, water, coconut milk, lemongrass, and salt and bring to boil. Reduce heat to low, cover, and simmer gently until liquid is absorbed, 18 to 20 minutes.
3. Fold in cilantro, lime zest and juice, and bok choy greens, cover, and cook until rice is tender, about 3 minutes. Discard lemongrass. Season with salt and pepper to taste, and serve.

1. Trim dry top (this part is usually green) and tough bottom of each stalk.

2. Peel and discard dry outer layer until moist, tender inner stalk is exposed.
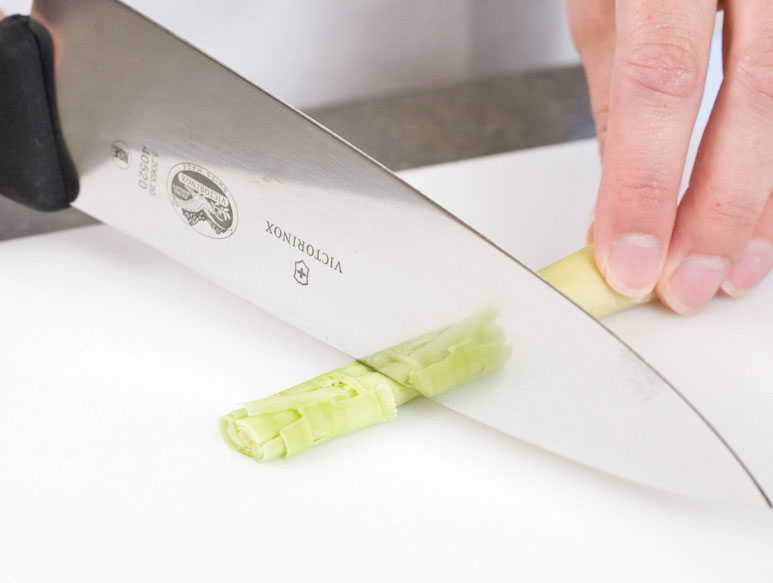
3. Smash peeled stalk with back of chef’s knife or meat pounder to release maximum flavor.
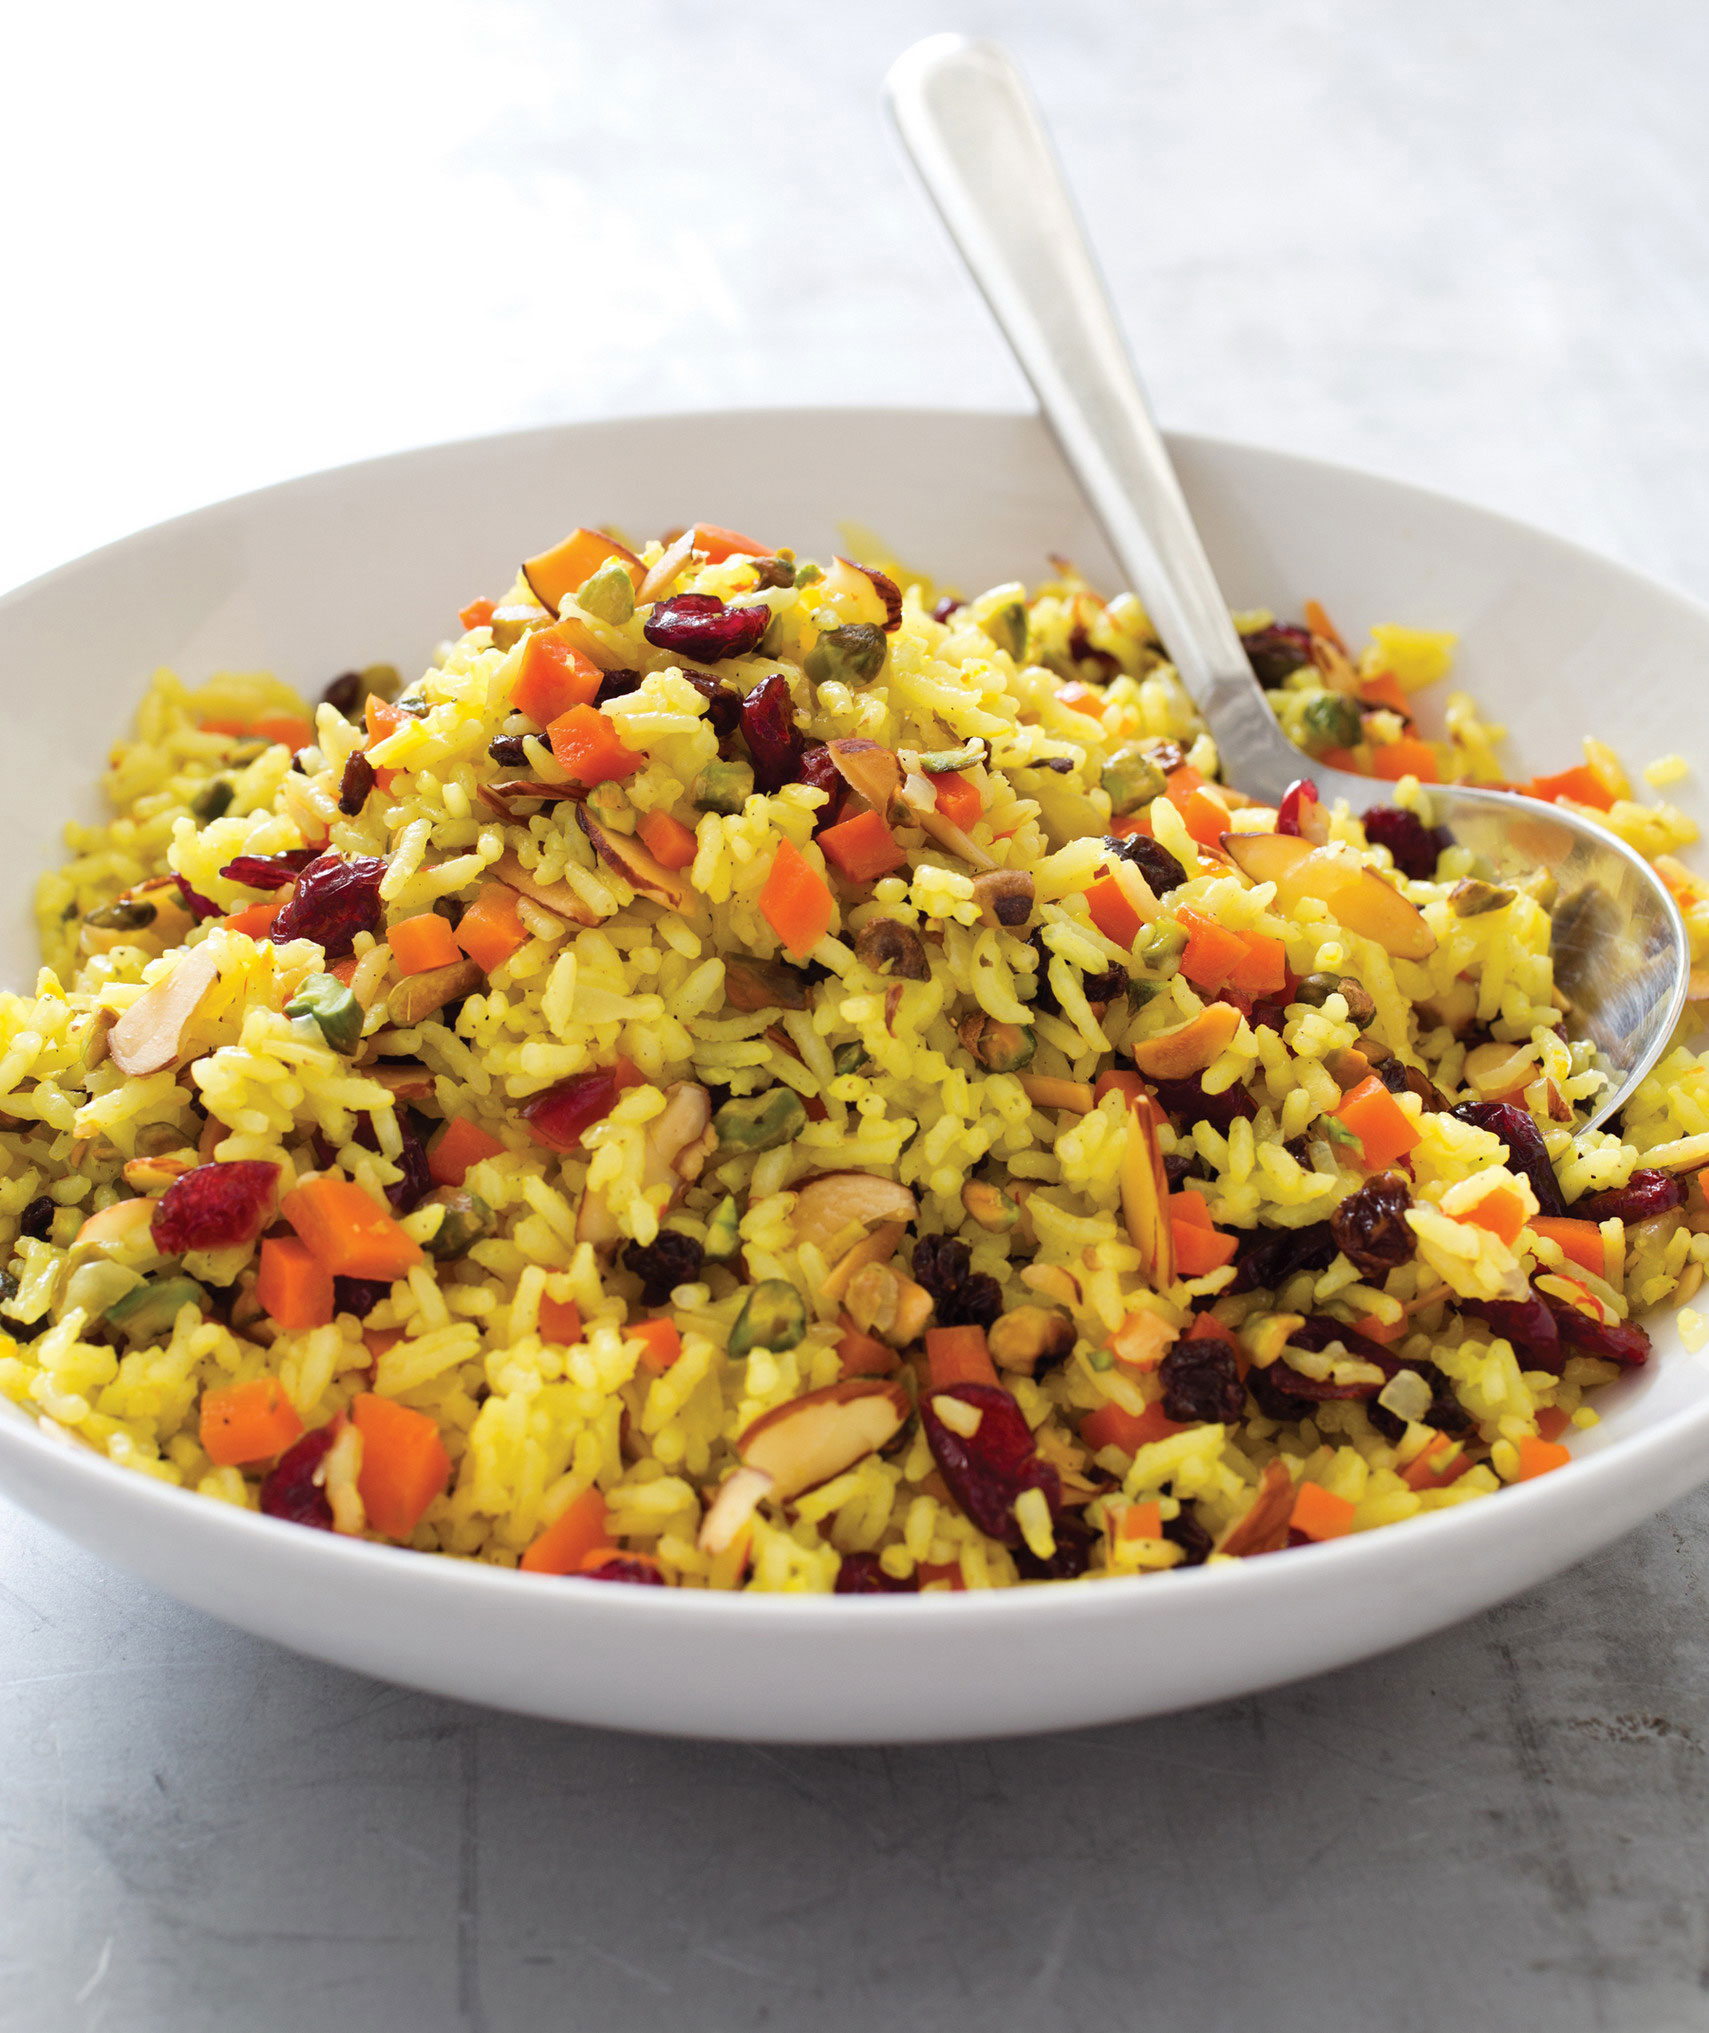
Serves 4 to 6
Why This Recipe Works Jeweled rice, a staple in Persian cuisine, features basmati rice perfumed with candied carrots, saffron, and cardamom; its name comes from the colorful dried fruit and nuts that traditionally stud its appealingly golden surface. We love the dish’s subtle balance between sweet and savory, and we were inspired to re-create it while making it simpler and easier. With ingredients that are soaked, bloomed, parcooked, layered, and steamed, this dish typically uses almost every pot in the kitchen, but we streamlined this version by cooking the rice using an easy pilaf method, adding the spices and some sautéed onion to the water to infuse the rice with rich flavor. While it simmered, we candied the carrots and orange zest. Once the rice was done, we sprinkled our candied mixture and some dried fruit on top and let it plump up while the rice rested off the heat. Finally, we stirred in the almonds and pistachios just before serving so they would retain their crunch. Long-grain white, jasmine, or Texmati rice can be substituted for the basmati.
1 cup sugar
6 (2-inch) strips orange zest, sliced thin lengthwise
2 carrots, peeled and cut into ¼-inch pieces
2 tablespoons extra-virgin olive oil
1 onion, chopped fine
1½ teaspoons table salt
¾ teaspoon saffron threads, crumbled
½ teaspoon ground cardamom
1½ cups basmati rice, rinsed
½ cup currants
½ cup dried cranberries
¼ cup sliced almonds, toasted
¼ cup pistachios, toasted and chopped
1. Bring 2 cups water and sugar to boil in small saucepan over medium-high heat. Stir in orange zest and carrots, reduce heat to medium-low, and simmer until carrots are tender, 10 to 15 minutes. Drain well, transfer to plate, and let cool.
2. Meanwhile, heat oil in large saucepan over medium heat until shimmering. Add onion and salt and cook until onion is softened, about 5 minutes. Stir in saffron and cardamom and cook until fragrant, about 30 seconds. Stir in rice and cook, stirring often, until grain edges begin to turn translucent, about 3 minutes. Stir in 2¼ cups water and bring to simmer. Reduce heat to low, cover, and simmer gently until liquid is absorbed and rice is tender, 16 to 18 minutes.
3. Remove pot from heat and sprinkle candied carrots and orange zest, currants, and cranberries over rice. Cover, laying clean folded dish towel underneath lid, and let sit for 10 minutes. Add almonds and pistachios and fluff gently with fork to combine. Season with salt and pepper to taste, and serve.
SLICING ORANGE ZEST THIN

1. Using vegetable peeler, remove 2-inch-long strip orange zest from orange, avoiding bitter white pith just beneath.
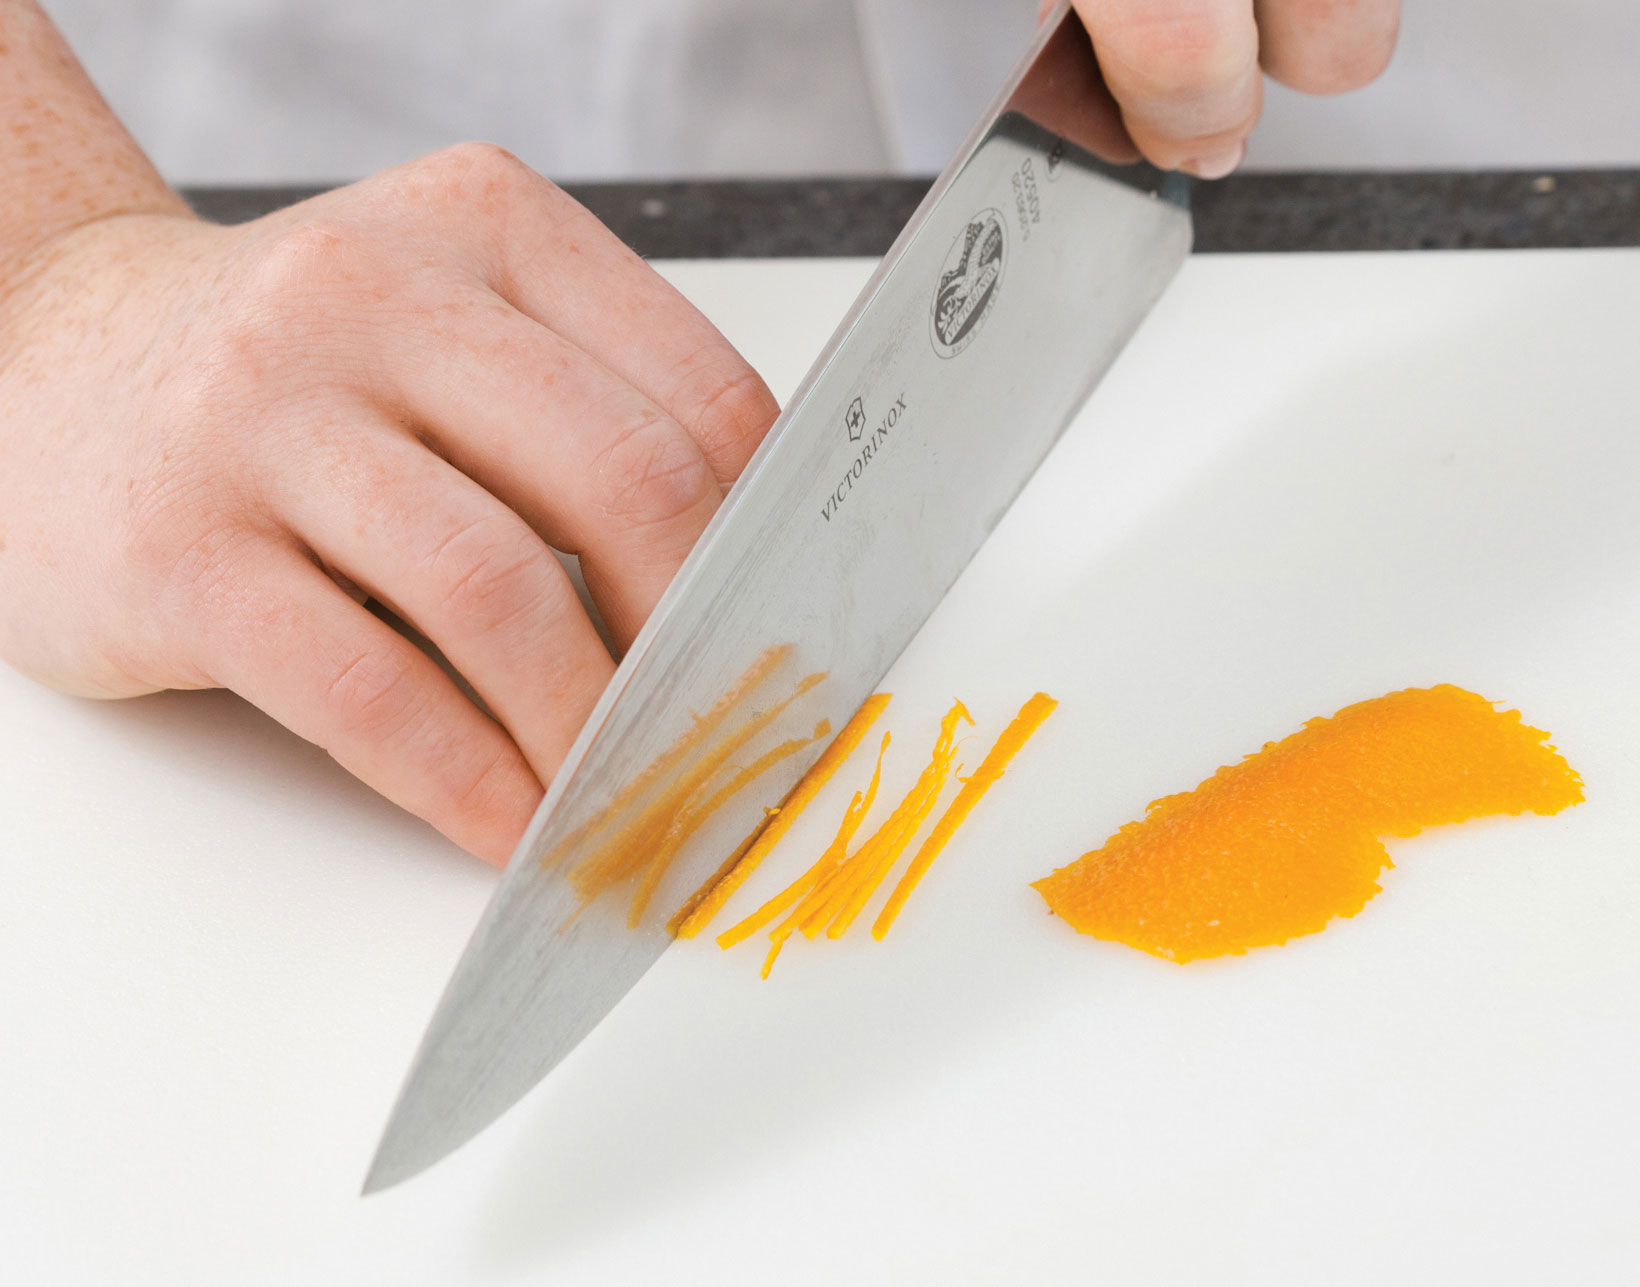
2. Using chef’s knife, cut zest strips lengthwise into long, thin pieces.
Serves 8 to 10
Why This Recipe Works Rice dishes from North Africa were our inspiration for this fragrant, warmly spiced pilaf-style dish. We paired basmati rice with sweet, earthy roasted cauliflower tossed with a generous amount of black pepper for heat and cumin for a deep, warm flavor. Roasting the cauliflower at a high temperature for a short time caramelized and crisped the florets without rendering them limp and mushy. We added the rice to a flavorful mixture of sautéed onion, garlic, and more spices, simmered it until tender, then added the cauliflower and finished the dish with a burst of sweet, juicy pomegranate seeds and a mix of fresh herbs. Long-grain white, jasmine, or Texmati rice can be substituted for the basmati.
1 head cauliflower (2 pounds), cored and cut into ¾-inch florets
¼ cup extra-virgin olive oil, divided
¾ teaspoons table salt, divided
½ teaspoon pepper
½ teaspoon ground cumin, divided
1 onion, chopped coarse
1½ cups basmati rice, rinsed
4 garlic cloves, minced
½ teaspoon ground cinnamon
½ teaspoon ground turmeric
2¼ cups water
½ cup pomegranate seeds
2 tablespoons chopped fresh cilantro
2 tablespoons chopped fresh mint
1. Adjust oven rack to lowest position and heat oven to 475 degrees. Toss cauliflower with 2 tablespoons oil, ½ teaspoon salt, pepper, and ¼ teaspoon cumin. Arrange cauliflower in single layer in rimmed baking sheet and roast until just tender, 10 to 15 minutes; set aside.
2. Heat remaining 2 tablespoons oil in large saucepan over medium heat until shimmering. Add onion and remaining ¼ teaspoon salt and cook until softened and lightly browned, 5 to 7 minutes. Add rice, garlic, cinnamon, turmeric, and remaining ¼ teaspoon cumin and cook, stirring frequently, until grain edges begin to turn translucent, about 3 minutes.
3. Stir in water and bring to simmer. Reduce heat to low, cover, and simmer gently until rice is tender and water is absorbed, 16 to 18 minutes.
4. Off heat, lay clean folded dish towel underneath lid and let pilaf sit for 10 minutes. Add roasted cauliflower to pilaf and fluff gently with fork to combine. Season with salt and pepper to taste. Transfer to serving platter and sprinkle with pomegranate seeds, cilantro, and mint. Serve.
Serves 6 to 8
Why This Recipe Works This hearty baked rice dish combines several flavorful elements of North African cuisine—sweet potatoes, green olives, and fennel—along with the distinctive warmth of the spice blend ras el hanout. Roasting yielded sweet potatoes with firm, caramelized exteriors and soft, creamy interiors. We prepared the aromatic base on the stovetop, stirring in the ras el hanout with the rice to ensure that the flavors melded and bloomed. We added enough broth to ensure that our long-grain rice came out tender and not too crunchy and then transferred the pot to the oven. When the rice was cooked, we gently stirred in the potatoes and finished with bright cilantro and lime. Basmati, jasmine, or Texmati rice can be substituted for the long-grain white rice.
1½ pounds sweet potatoes, peeled and cut into 1-inch pieces
¼ cup extra-virgin olive oil, divided
½ teaspoon table salt
1 fennel bulb, stalks discarded, bulb halved, cored, and chopped fine
1 small onion, chopped fine
1½ cups long-grain white rice, rinsed
4 garlic cloves, minced
2 teaspoons ras el hanout
2¾ cups vegetable broth
¾ cup large pitted brine-cured green olives, halved
2 tablespoons minced fresh cilantro
Lime wedges
1. Adjust oven rack to middle position and heat oven to 400 degrees. Toss potatoes with 2 tablespoons oil and salt. Arrange potatoes in single layer in rimmed baking sheet and roast until tender and browned, 25 to 30 minutes, stirring potatoes halfway through roasting. Remove potatoes from oven and reduce oven temperature to 350 degrees.
2. Heat remaining 2 tablespoons oil in Dutch oven over medium heat until shimmering. Add fennel and onion and cook until softened, 5 to 7 minutes. Stir in rice, garlic, and ras el hanout and cook, stirring frequently, until grain edges begin to turn translucent, about 3 minutes.
3. Stir in broth and olives and bring to boil. Cover, transfer pot to oven, and bake until rice is tender and liquid is absorbed, 12 to 15 minutes.
4. Remove pot from oven and let sit for 10 minutes. Add potatoes to rice and fluff gently with fork to combine. Season with salt and pepper to taste. Sprinkle with cilantro and serve with lime wedges.
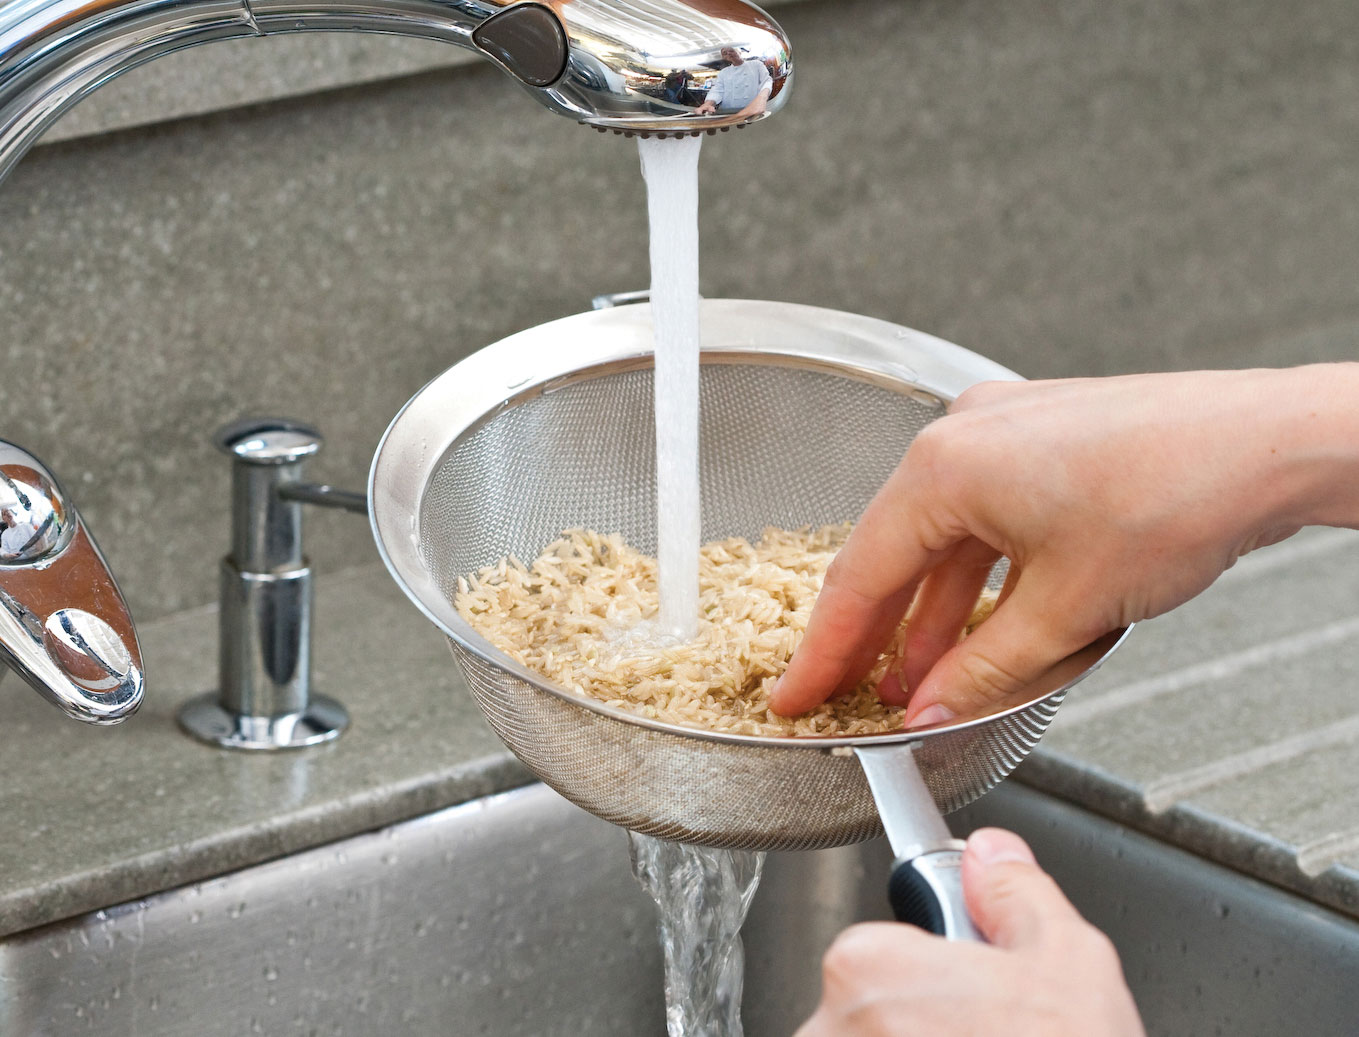
Place rice or grains in fine-mesh strainer and rinse under cool water until water runs clear, occasionally stirring lightly with your hand. Let drain briefly.

Serves 4 to 6
Why This Recipe Works Briny green olives and sweet oranges are a beloved combination in both Greek and Italian cooking. For a rice salad that could stand up to these bold mix-ins along with a bright vinaigrette, we sought out a method for cooking long-grain rice that would preserve its fresh-from-the-pan tender texture once cooled. Toasting the rice brought out its nutty flavor and helped to keep the grains distinct and separate even when cool. Rather than cooking it pilaf-style, in a small amount of water, we boiled the rice pasta-style, in plenty of water, which washed away excess starch and staved off stickiness. Spreading the cooked rice on a baking sheet allowed it to cool quickly and evenly. We tossed the cooled rice with a simple orange vinaigrette and fresh orange segments, chopped green olives, and crunchy toasted almonds. Our variation takes it in a Mexican direction. We let the salad sit for a short time before serving to give the flavors time to meld. Basmati, jasmine, or Texmati rice can be substituted for the long-grain white rice. Taste the rice as it nears the end of its cooking time; it should be cooked through and still firm, but not crunchy.
1½ cups long-grain white rice
1 teaspoon table salt, plus salt for cooking rice
2 oranges, plus ¼ teaspoon grated orange zest plus 1 tablespoon juice
2 tablespoons extra-virgin olive oil
2 teaspoons sherry vinegar
1 small garlic clove, minced
½ teaspoon pepper
⅓ cup large pitted brine-cured green olives, chopped
⅓ cup slivered almonds, toasted
2 tablespoons minced fresh oregano
1. Bring 4 quarts water to boil in Dutch oven. Meanwhile, toast rice in 12-inch skillet over medium heat until faintly fragrant and some grains turn opaque, 5 to 8 minutes. Add rice and 1½ teaspoons salt to boiling water and cook, stirring occasionally, until rice is tender but not soft, about 9 minutes. Drain rice, spread onto rimmed baking sheet, and let cool completely, about 15 minutes.
2. Cut away peel and pith from oranges. Holding fruit over bowl, use paring knife to slice between membranes to release segments. Whisk oil, vinegar, garlic, orange zest and juice, salt, and pepper together in large bowl. Add rice, orange segments, olives, almonds, and oregano, gently toss to combine, and let sit for 20 minutes. Serve.
VARIATION
Rice Salad with Pineapple, Jícama, and Pepitas
1½ cups long-grain white rice
1 teaspoon table salt, plus salt for cooking rice
2 tablespoons vegetable oil
1 jalapeño chile, stemmed, seeded, and minced
½ teaspoon grated lime zest plus 1 tablespoon juice
1 small garlic clove, minced
½ teaspoon pepper
1 cup finely diced fresh pineapple
1 cup peeled and finely diced jícama
⅓ cup roasted pepitas
2 scallions, sliced thin
3 tablespoons minced fresh cilantro
1. Bring 4 quarts water to boil in Dutch oven. Meanwhile, toast rice in 12-inch skillet over medium heat until faintly fragrant and some grains turn opaque, 5 to 8 minutes. Stir 1½ teaspoons salt and toasted rice into boiling water and cook, stirring occasionally, until rice is tender but not soft, about 9 minutes. Drain rice, spread onto rimmed baking sheet, and let cool completely, about 15 minutes; transfer to large bowl.
2. Whisk oil, jalapeño, lime zest and juice, garlic, salt, and pepper together in separate bowl, then drizzle over cooled rice. Add pineapple, jícama, pepitas, scallions, and cilantro and toss to combine. Let sit for 20 minutes before serving.
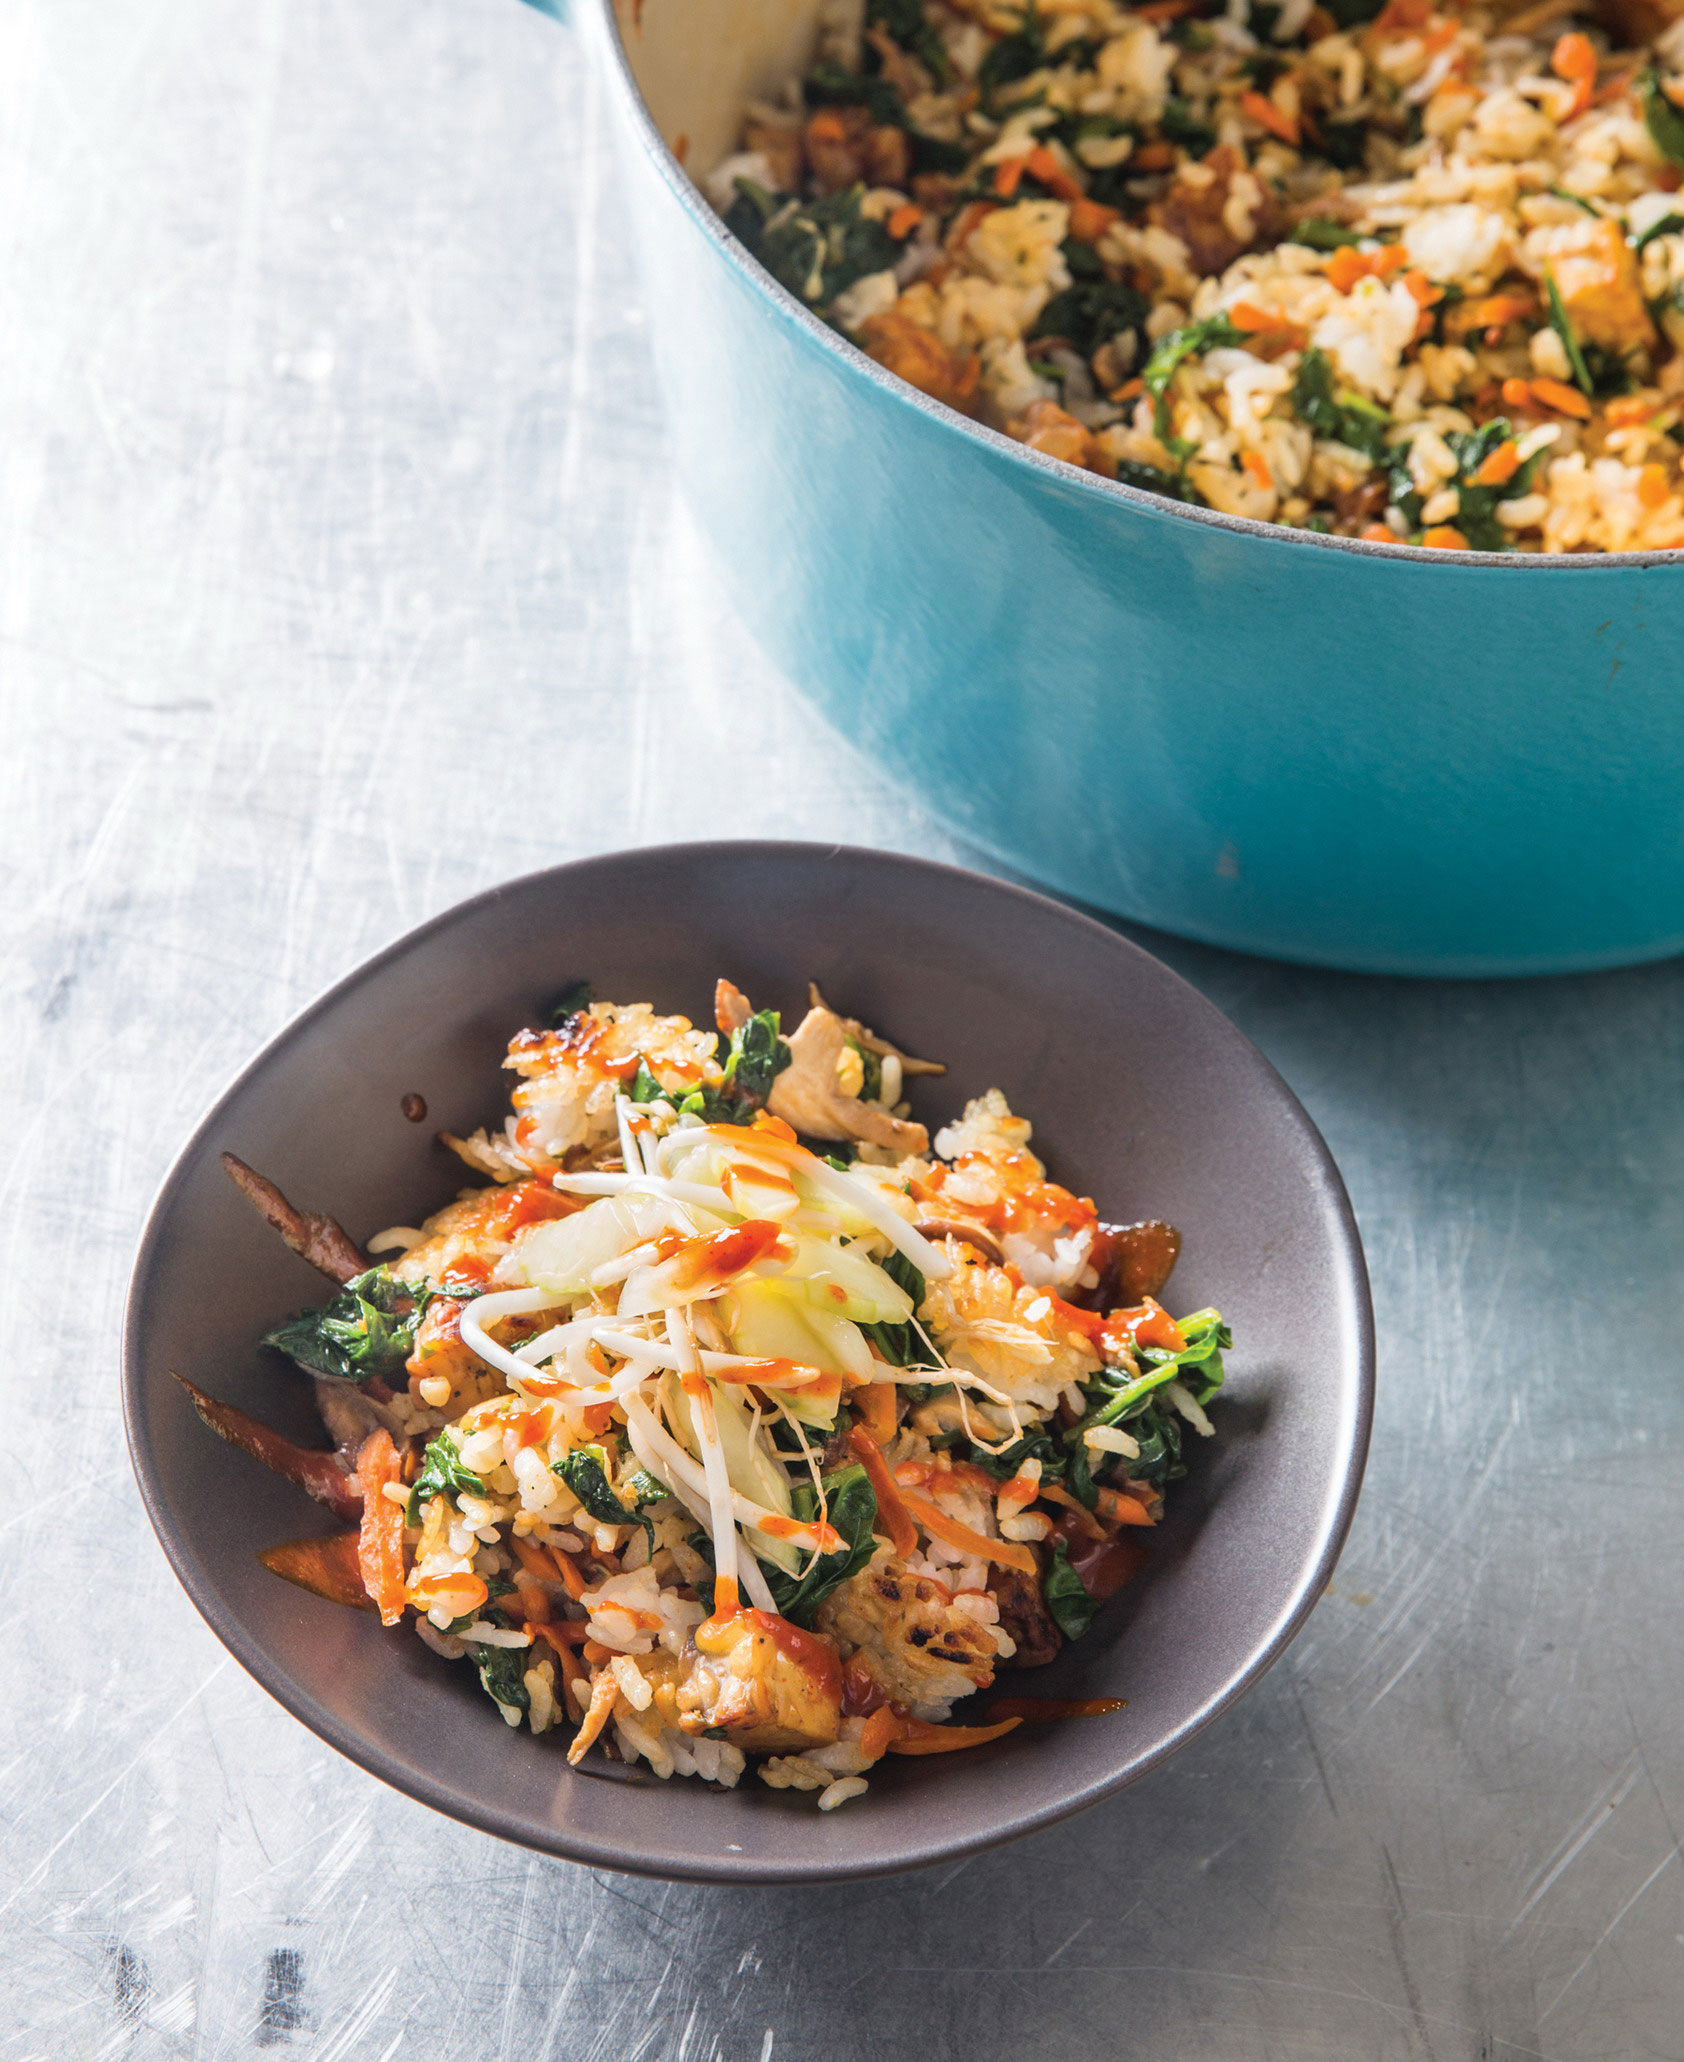
Serves 6
Why This Recipe Works Korean dolsot bibimbap might just be the ultimate rice bowl. It features a crispy rice crust and a variety of lively toppings—some savory, some acidic, some spicy. (“Bibim” means “mixed,” “bap” means “rice,” and “dolsot” is the heavy stone bowl in which the dish is assembled.) We learned through testing that a Dutch oven held heat well enough to create the desired crust. Some recipes include eggs and meat, but with all of the intriguing, fresh ingredients in this dish, we didn’t miss them one bit in our plant-based version. We did, however, want to add some heft, so we incorporated tempeh; the tempeh’s nutty and pleasantly bitter notes played nicely with the dish’s parade of sweet and sour flavors. The ingredient list is long, but don’t be intimidated. Prepare the pickles, chile sauce, and vegetables a day ahead and warm the vegetables to room temperature in the microwave before adding them to the rice. You can also substitute store-bought kimchi for the pickles. For a true bibimbap experience, bring the pot to the table before stirring the vegetables and tempeh into the rice in step 8.
Pickles
1 cup cider vinegar
2 tablespoons sugar
1½ teaspoons table salt
1 cucumber, peeled, quartered lengthwise, seeded, and sliced thin on bias
4 ounces (2 cups) bean sprouts
Rice
2½ cups short-grain white rice
2½ cups water
¾ teaspoon table salt
Vegetables and Tempeh
2 tablespoons vegetable oil, divided
8 ounces tempeh, cut into ½-inch pieces
¼ cup soy sauce, divided
¼ teaspoon table salt
¼ teaspoon pepper
½ cup water
3 scallions, minced
3 garlic cloves, minced
1 tablespoon sugar
3 carrots, peeled and shredded (2 cups)
8 ounces shiitake mushrooms, stemmed and sliced thin
10 ounces curly-leaf spinach, stemmed and chopped coarse
Bibimbap
2 tablespoons vegetable oil
1 tablespoon toasted sesame oil
1 recipe Chile Sauce (this page)
1. For the pickles Whisk vinegar, sugar, and salt together in bowl. Add cucumber and bean sprouts and toss to combine. Press vegetables to submerge, cover, and refrigerate for at least 30 minutes or up to 24 hours.
2. For the rice Bring rice, water, and salt to boil in medium saucepan over high heat. Cover, reduce heat to low, and cook for 7 minutes. Remove saucepan from heat and let sit, covered, until rice is tender, about 15 minutes.
3. For the vegetables and tempeh While rice cooks, heat 1 tablespoon oil in 12-inch nonstick skillet over medium-high heat until just smoking. Add tempeh, 1 tablespoon soy sauce, salt, and pepper and cook until well browned, 4 to 6 minutes. Remove from heat and cover to keep warm.
4. Combine water, scallions, garlic, sugar, and remaining 3 tablespoons soy sauce in bowl. Heat 1 teaspoon oil in Dutch oven over high heat until shimmering. Add carrots, stirring to coat. Stir in ⅓ cup scallion mixture and cook until carrots are slightly softened and liquid has evaporated, about 1 minute; transfer to bowl.
5. Heat 1 teaspoon oil in now-empty pot until shimmering. Add mushrooms, stirring to coat. Stir in ⅓ cup scallion mixture and cook until mushrooms are tender and liquid has evaporated, about 3 minutes; transfer to second bowl.
6. Heat remaining 1 teaspoon oil in now-empty Dutch oven until shimmering. Stir in spinach and remaining scallion mixture and cook until spinach is just wilted, about 1 minute. Transfer spinach to third bowl, discard any remaining liquid, and wipe out pot with paper towel.
7. For the bibimbap Heat vegetable oil and sesame oil in now-empty pot over high heat until shimmering. Carefully add cooked rice and press into even layer. Cook, without stirring, until rice begins to form crust on bottom of pot, about 2 minutes. Transfer tempeh, carrots, mushrooms, and spinach to pot and arrange in piles to cover surface of rice. Reduce heat to low and cook until golden brown crust forms on bottom of rice, about 5 minutes.
8. Drizzle 2 tablespoons chile sauce over top. Without disturbing crust, stir rice, vegetables, and tempeh until combined. Scrape large pieces of crust from bottom of pot and stir into rice. Serve in individual bowls, passing pickles and remaining chile sauce separately.
PLANT POWER
We prefer sushi rice (sometimes labeled Calrose or japonica rice) in our dolsot bibimbap. Sushi rice has short, squat grains and a distinctive stickiness when cooked, which comes from a relatively high amount of a starch component called amylopectin, which gelatinizes during cooking and results in a creamy, tender texture and subtle chewiness.
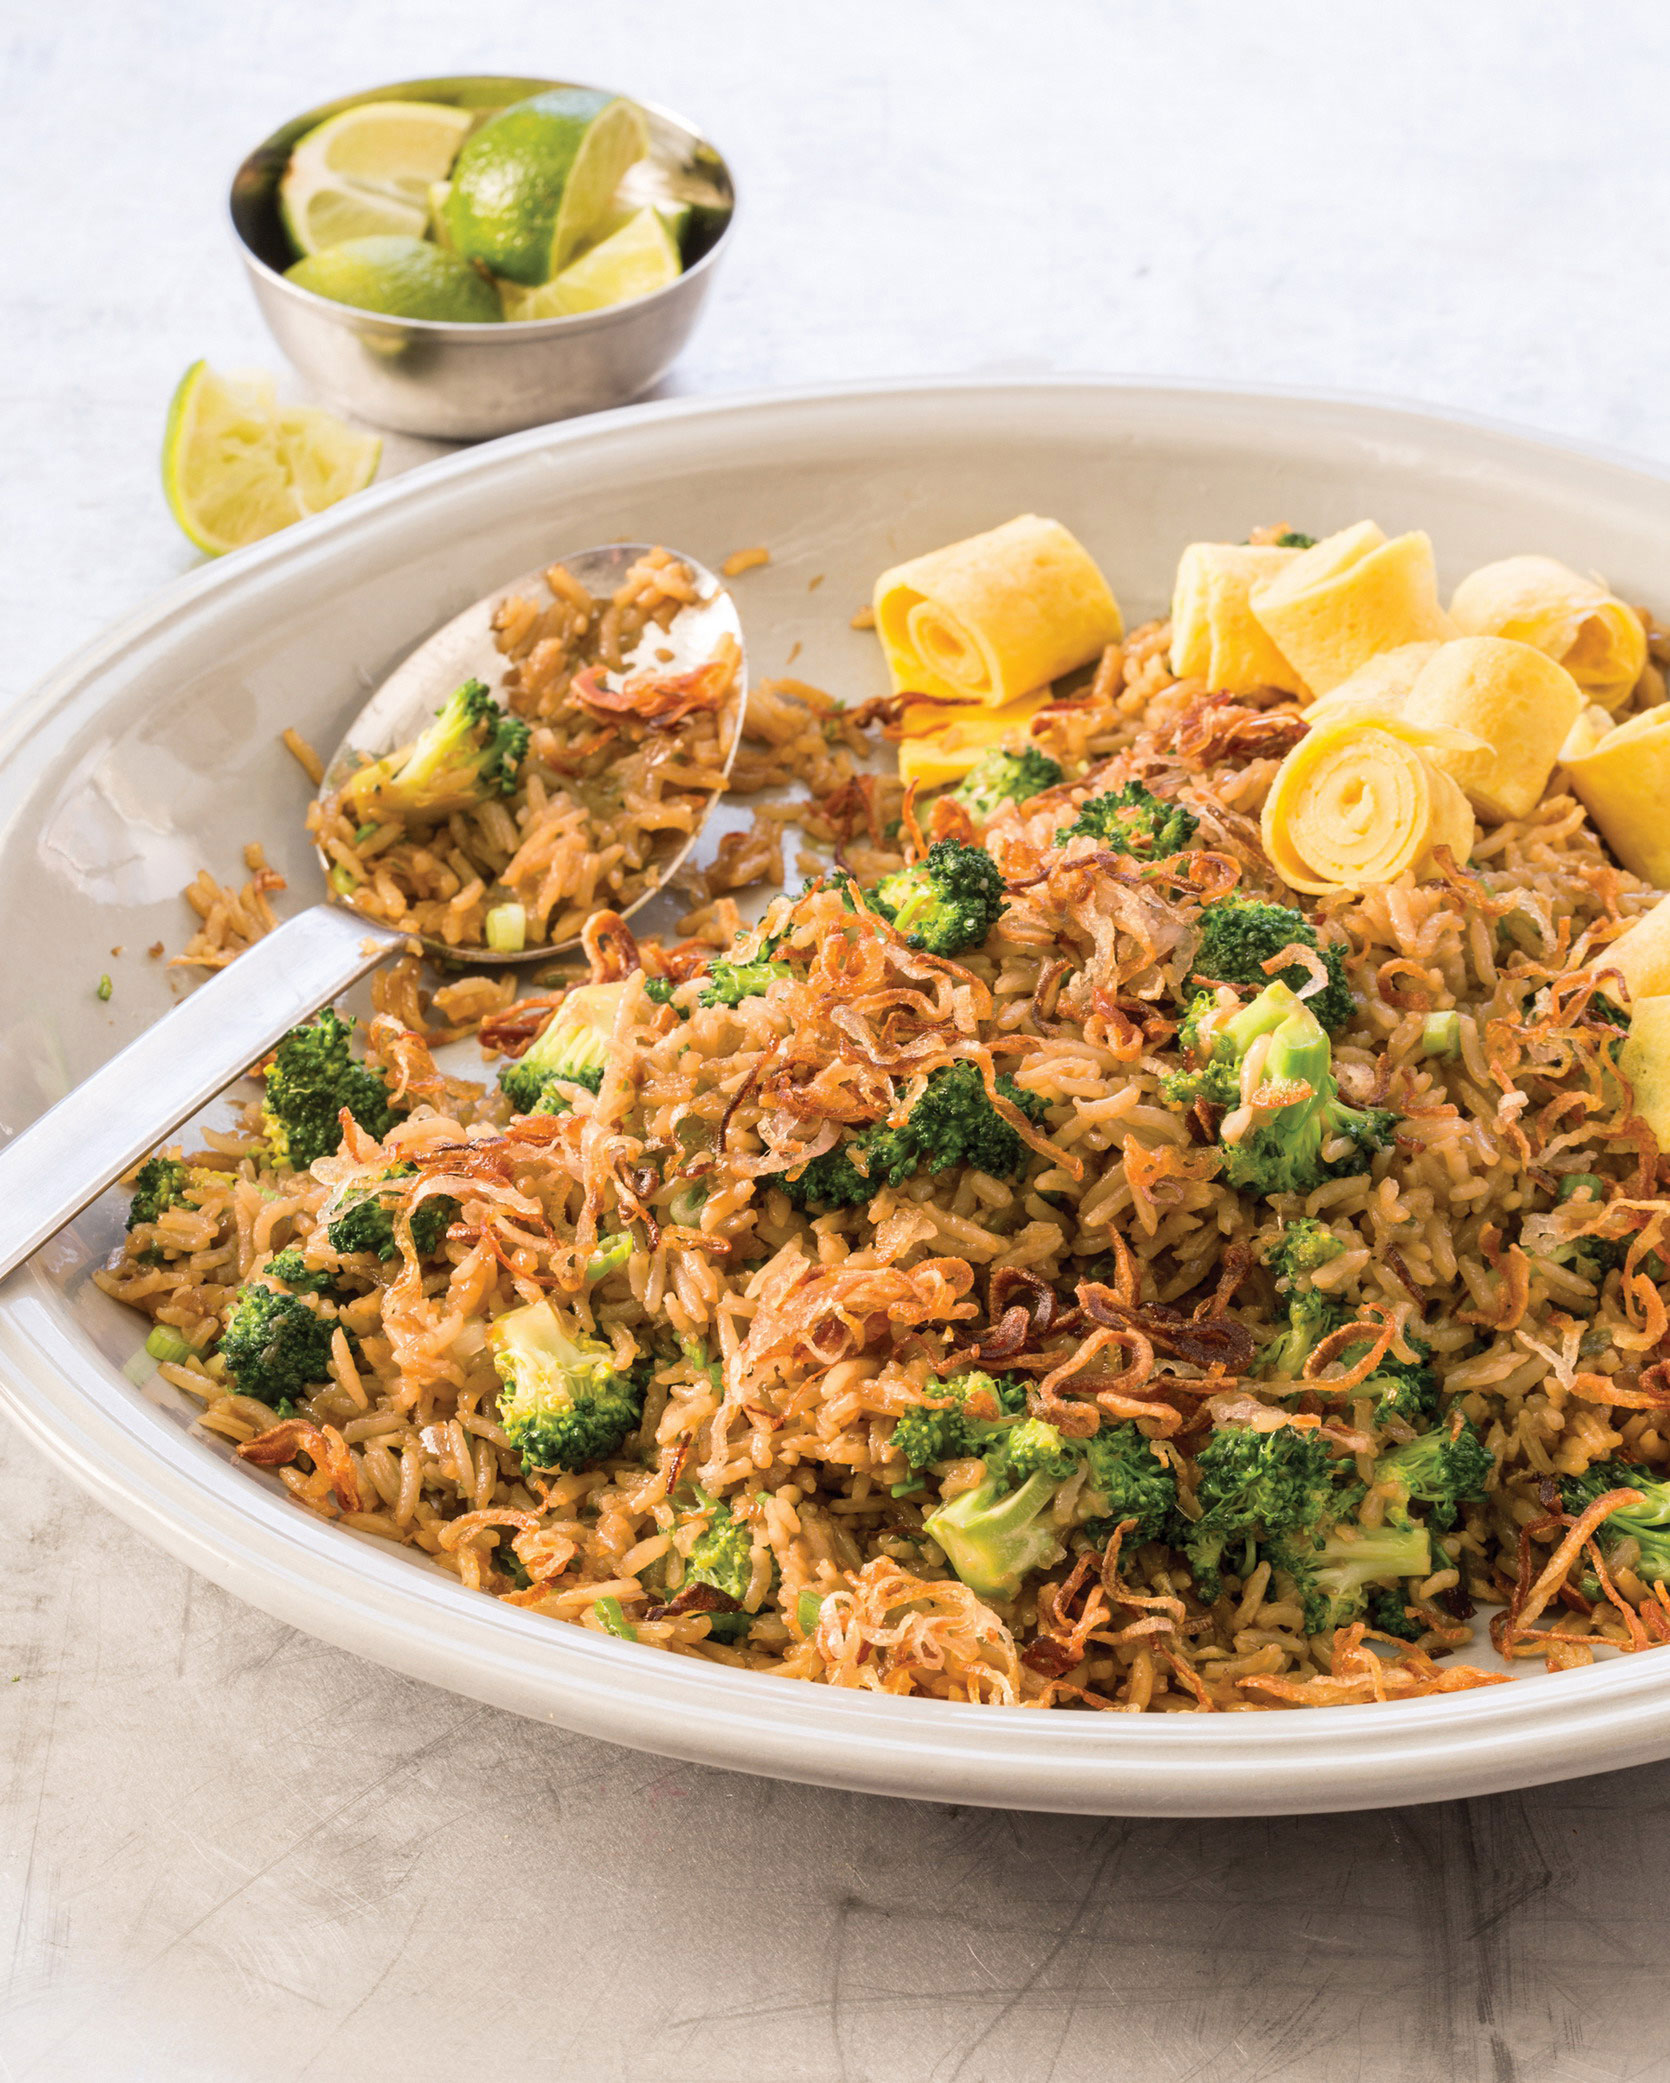
Serves 4 to 6
Why This Recipe Works This Indonesian-style fried rice is typically seasoned with chile paste, shrimp paste, and kecap manis (sweet soy sauce) and garnished with golden fried shallots. The kecap manis can be hard to find, but we discovered that a sauce of molasses, dark brown sugar, soy sauce, and fish sauce substitute was a workable alternative. The fish sauce substitute also helped stand in for the shrimp paste. We created our chile paste by pureeing garlic, shallots, and Thai chiles. To get distinct grains of rice, this dish is traditionally made with day-old rice, but we successfully used our Faux Leftover Rice. We also added broccoli florets, steamed until crisp-tender. If Thai chiles are unavailable, substitute two serranos or two medium jalapeños. This dish is fairly spicy; to reduce the spiciness, remove the ribs and seeds from the chiles or use fewer chiles. You will need a 12-inch nonstick skillet with a tight-fitting lid for this recipe.
7 large shallots, peeled (4 quartered, 3 sliced thin)
5 green or red Thai chiles, stemmed
4 large garlic cloves, peeled
3 packed tablespoons dark brown sugar
3 tablespoons molasses
3 tablespoons soy sauce
3 tablespoons Fish Sauce Substitute (this page)
1¼ teaspoons table salt
½ cup vegetable oil
1 recipe Faux Leftover Rice (recipe follows)
1 pound broccoli florets, cut into 1-inch pieces
¼ cup water
4 large scallions, sliced thin
Lime wedges
1. Pulse quartered shallots, Thai chiles, and garlic in food processor until coarse paste forms, about 15 pulses, scraping down sides of bowl as needed; transfer to bowl. In separate bowl, whisk together sugar, molasses, soy sauce, fish sauce substitute, and salt.
2. Cook oil and sliced shallots in 12-inch nonstick skillet over medium heat, stirring constantly, until shallots are golden and crisp, 5 to 10 minutes. Using slotted spoon, transfer shallots to paper towel–lined plate and season with salt to taste. Pour off and reserve oil. Wipe pan with paper towels.
3. Break up any large clumps of rice with your fingers. Combine broccoli and water in now-empty skillet, cover, and cook over medium-high heat until broccoli is crisp-tender and water is absorbed, 4 to 6 minutes; transfer to bowl.
4. Heat 3 tablespoons reserved oil in again-empty skillet over medium heat until just shimmering. Add shallot-chile mixture and cook, mashing mixture into skillet, until golden, 3 to 5 minutes. Whisk molasses mixture to recombine, then add to skillet along with rice and broccoli. Cook, tossing constantly, until mixture is evenly coated and warmed through, and broccoli is tender, about 3 minutes. Off heat, stir in scallions. Transfer to serving platter and garnish with fried shallots. Serve with lime wedges.
Nasi Goreng with Eggs
After wiping out skillet in step 2, heat 1 teaspoon vegetable oil in now-empty skillet over medium heat until shimmering. Add 2 large eggs and ¼ teaspoon table salt and scramble quickly using rubber spatula. Tilt pan to coat bottom of pan, cover, and cook until bottom of omelet is spotty golden brown and top is just set, about 1½ minutes. Slide omelet onto cutting board, roll up into tight log, and cut crosswise into 1-inch-wide segments; leave segments rolled. Repeat with 1 teaspoon vegetable oil and 2 large eggs. Serve with rice.
Makes 6 cups
Long-grain white, basmati, or Texmati rice can be substituted for the jasmine rice.
2 cups jasmine rice
2 tablespoons vegetable oil
1. Rinse rice in fine-mesh strainer or colander under cold running water until water runs clear. Place strainer over bowl and set aside.
2. Heat oil in large saucepan over medium heat until shimmering. Add rice and stir to coat grains with oil, about 30 seconds. Add 2⅔ cups water, increase heat to high, and bring to boil. Reduce heat to low, cover, and simmer until all liquid is absorbed, about 18 minutes.
3. Off heat, remove lid and place dish towel folded in half over saucepan; replace lid. Let stand until rice is just tender, about 8 minutes. Spread cooked rice onto rimmed baking sheet and let cool on wire rack for 10 minutes. Transfer sheet to refrigerator and let rice chill for 20 minutes.
Serves 4 to 6 
Why This Recipe Works We’ll admit it—fried rice is always part of our takeout order from the local Chinese place. But you can make a far more flavorful and healthful plant-based Chinese fried rice at home, with less effort than you think. Just make sure not to use freshly cooked rice, or you’ll end up with a gummy mess. Since we don’t often have a lot of leftover rice chilling in our fridge, we developed our “faux” leftover rice, which speeds up the process dramatically. Quickly sautéing the vegetables, then the cooked rice, and then combining them with the sauce in the skillet produced such a flavorful dish that it made us rethink our takeout habits. If Chinese broccoli (also called gai lan) is unavailable, you can substitute broccolini. Cut broccolini tops (leaves and florets) from stems, then cut tops into 1-inch pieces. Halve stalks thicker than ½ inch and keep separate from tops. White pepper lends a unique flavor to this dish; black pepper is not a good substitute. Chinese black vinegar is an aged rice-based vinegar. You will need a 12-inch nonstick skillet with a tight-fitting lid for this recipe.
2 tablespoon Chinese black vinegar or sherry vinegar
4 teaspoons soy sauce
1 tablespoon Shaoxing wine or dry sherry
1 tablespoon hoisin sauce
1 tablespoon packed brown sugar
1 teaspoon table salt
¼ teaspoon white pepper
6 scallions, white and green parts separated and sliced thin
¼ cup vegetable oil, divided
2 garlic cloves, minced
12 ounces Chinese broccoli, trimmed
¼ cup water
8 ounces shiitake mushrooms, stemmed and sliced ¼ inch thick
1 recipe Faux Leftover Rice (this page)
3 tablespoons chopped fresh cilantro
1. Whisk vinegar, soy sauce, Shaoxing wine, hoisin sauce, sugar, salt, and pepper in small bowl until sugar has dissolved; set aside. Combine scallion whites, 2 tablespoons oil, and garlic in second small bowl; set aside.
2. Trim leaves from bottom 3 inches of broccoli stalks and reserve. Cut tops (leaves and florets) from stalks, then cut reserved leaves and tops into 1-inch pieces. Set aside. Quarter stalks lengthwise if more than 1 inch in diameter and halve stalks lengthwise if less than 1 inch in diameter. Keep broccoli stalks separate from leaves and tops.
3. Heat 1 tablespoon oil in 12-inch nonstick skillet over medium heat until just smoking. Add broccoli stalks and water (water will sputter), cover, and cook until broccoli is bright green, about 5 minutes. Uncover, increase heat to high, and continue to cook, tossing slowly but constantly, until all water has evaporated and stalks are crisp-tender, 1 to 3 minutes; transfer to medium bowl.
4. Heat 1 tablespoon oil in now-empty skillet over high heat until just smoking. Add mushrooms and broccoli leaves and tops. Cook, tossing vegetables slowly but constantly, until mushrooms are softened and broccoli tops and leaves are completely wilted, about 5 minutes; transfer to bowl with broccoli stalks.
5. Break up any large clumps of rice with your fingers. Add scallion mixture to again-empty skillet and cook over medium heat, mashing mixture into skillet, until fragrant, about 30 seconds. Add rice, vinegar mixture, vegetable mixture, and scallion greens and increase heat to high. Cook, tossing rice constantly, until mixture is thoroughly combined and heated through, about 3 minutes. Off heat, stir in cilantro. Serve.
VARIATION
Vegetable Fried Rice with Broccoli, Shiitake Mushrooms, and Eggs
After cooking broccoli tops and leaves and mushrooms in step 4, heat 1 tablespoon oil in again-empty skillet over high heat until shimmering. Add 2 large eggs and scramble quickly using rubber spatula. Continue to cook, scraping slowly but constantly along bottom and sides of pan, until eggs just form cohesive mass, 15 to 30 seconds (eggs will not be completely dry). Transfer to bowl with vegetables and break up any large egg curds. Add eggs to scallion mixture with rice, vinegar mixture, vegetable mixture, and scallion greens in step 5.
Serves 4 to 6
Why This Recipe Works Biryani places fragrant long-grain basmati center stage, enriching it with saffron and a variety of fresh herbs and pungent spices. However, traditional recipes take a long time to develop deep flavor by steeping whole spices and cooking each component on its own before marrying them. We decided to deconstruct this dish to make it easier and faster, while staying true to its warmth and home-style appeal. We decided to pair our rice with sweet, earthy roasted cauliflower, so we cut the cauliflower into small florets to speed up roasting and tossed it with warm spices to give it deep flavor. While it roasted, we sautéed an onion until golden, then cooked jalapeño, garlic, and more spices until fragrant. We added the rice to this flavorful mixture and simmered it until tender. Once the rice finished cooking, we let the residual heat plump the currants and bloom the saffron while the rice rested. Last, we stirred in lots of bright mint and cilantro and our roasted cauliflower. Biryani is traditionally served with a cooling yogurt sauce; ideally, you should make it before starting the biryani to allow the flavors in the sauce to meld. Long-grain white, jasmine, or Texmati rice can be substituted for the basmati.
1 head cauliflower (2 pounds), cored and cut into ½-inch florets
¼ cup extra-virgin olive oil, divided
1 teaspoon table salt, divided
¼ teaspoon pepper
¼ teaspoon ground cardamom, divided
¼ teaspoon ground cumin, divided
1 onion, sliced thin
4 garlic cloves, minced
1 jalapeño chile, stemmed, seeded, and minced
⅛ teaspoon ground cinnamon
⅛ teaspoon ground ginger
1½ cups basmati rice, rinsed
2¼ cups water
¼ cup dried currants or raisins
½ teaspoon saffron threads, lightly crumbled
2 tablespoons chopped fresh cilantro
2 tablespoons chopped fresh mint
1 recipe Herbed Yogurt Sauce (this page)
1. Adjust oven rack to middle position and heat oven to 425 degrees. Toss cauliflower, 2 tablespoons oil, ½ teaspoon salt, pepper, ⅛ teaspoon cardamom, and ⅛ teaspoon cumin together in bowl. Spread cauliflower onto rimmed baking sheet and roast until tender, 15 to 20 minutes.
2. Meanwhile, heat remaining 2 tablespoons oil in large saucepan over medium-high heat until shimmering. Add onion and cook, stirring often, until soft and dark brown around edges, 10 to 12 minutes.
3. Stir in garlic, jalapeño, cinnamon, ginger, remaining ⅛ teaspoon cardamom, and remaining ⅛ teaspoon cumin and cook until fragrant, about 1 minute. Stir in rice and cook until well coated, about 1 minute. Add water and remaining ½ teaspoon salt and bring to simmer. Reduce heat to low, cover, and simmer until all liquid is absorbed, 16 to 18 minutes.
4. Remove pot from heat and sprinkle currants and saffron over rice. Cover, laying clean folded dish towel underneath lid, and let sit for 10 minutes. Fold in cilantro, mint, and roasted cauliflower. Season with salt and pepper to taste and serve with yogurt sauce.
FLAVOR BOOSTER
SAFFRON
Sometimes known as “red gold,” saffron is the world’s most expensive spice. It’s made from the dried stigmas of Crocus sativus flowers; the stigmas are so delicate they must be painstakingly harvested by hand. (It takes about 200 hours to pick enough stigmas to produce 1 pound of saffron, which typically sells for thousands of dollars.) Luckily, a little saffron goes a long way, adding a distinct reddish-gold color and flavor notes of honey and grass to dishes including this one. You can find it as powder or, more commonly, as threads.
These sauces are great with grains, including the Brown Rice Burrito Bowl (this page) and the Barley Bowl with Roasted Carrots and Snow Peas (this page), but they are versatile enough to serve as drizzles, dollops, or dips for plenty of other dishes. Drizzle over grilled vegetables, use as salad dressings or dips for crudités, or jazz up a plain bowl of grains.
Makes ⅔ cup
¼ cup soy sauce
2 tablespoons rice vinegar
2 tablespoons mirin
2 tablespoons water
1 scallion, sliced thin
½ teaspoon toasted sesame oil
Combine all ingredients in small bowl. (Sauce can be refrigerated for up to 3 days.)
Makes 1 cup
Different za’atar blends include varying salt amounts, so be sure to adjust seasoning to taste.
1 cup plain plant-based yogurt or dairy yogurt
1 tablespoon za’tar
1 garlic clove, minced
1 teaspoon grated lemon zest plus 1 tablespoon juice
Whisk yogurt, za’atar, garlic, and lemon zest and juice together in bowl and season with salt and pepper to taste. Cover and refrigerate for about 30 minutes before serving. (Sauce can be refrigerated for up to 4 days.)
Makes ½ cup
If you can’t find the Korean chile paste gochujang, substitute an equal amount of sriracha and omit the water.
¼ cup gochujang
3 tablespoons water
2 tablespoons toasted sesame oil
1 teaspoon sugar
Whisk all ingredients in bowl until well combined. (Sauce can be refrigerated for up to 3 days.)
Makes ½ cup
Different plant-based sour creams have varying textures, so you may need to adjust the consistency with water.
¼ cup plant-based mayonnaise or egg-based mayonnaise
¼ cup plant-based sour cream or dairy sour cream
1 tablespoon lime juice
1 tablespoon minced canned chipotle chile in adobo sauce
1 garlic clove, minced
Combine all ingredients in small bowl. (Sauce can be refrigerated for up to 4 days.)
Makes ½ cup
3 tablespoons rice vinegar
2 tablespoons mirin
½ teaspoon sugar
3 tablespoons soy sauce
1 teaspoon grated fresh ginger
½ teaspoon grated orange zest plus 1 tablespoon juice
½ teaspoon grated lime zest plus 1 tablespoon juice
Bring vinegar, mirin, and sugar to boil in small saucepan, then remove from heat. Whisk in soy sauce, ginger, orange zest and juice, and lime zest and juice. Transfer sauce to bowl. (Sauce can be refrigerated for up to 1 day.)
Makes 1¼ cup
½ cup tahini
½ cup water
¼ cup lemon juice
2 garlic cloves, minced
Whisk all ingredients in bowl until smooth. Season with salt to taste. (Sauce can be refrigerated for up to 4 days.)
Makes 1 cup
⅓ cup tahini
⅓ cup plain plant-based yogurt or dairy yogurt
¼ cup water
3 tablespoons lemon juice
1 garlic clove, minced
¾ teaspoon table salt
Whisk all ingredients in bowl until combined. Season with salt and pepper to taste. Let sit until flavors meld, about 30 minutes. (Sauce can be refrigerated for up to 4 days.)
Serves 6 to 8
Why This Recipe Works Traditional Mexican rice is a cornerstone of that country’s cuisine. The rice is usually fried until golden, which gives it its signature nutty flavor; tomatoes, onions, garlic, and broth add savory complexity. This versatile side can accompany any number of Mexican dishes, from Pinto Bean and Swiss Chard Enchiladas (this page) to Baja-Style Cauliflower Tacos (this page). But many versions we tried turned out soupy, oily, or one-note. We wanted a version with clean, balanced flavor and tender rice that was neither greasy nor watery. Traditionally, the liquid component in this dish is a mix of chicken broth and pureed fresh tomatoes; we swapped in vegetable broth for chicken broth and settled on equal parts of each for the most balanced flavor. For an appealing red color, we added tomato paste, which, although nontraditional, boosted the umami flavor. Sautéing the rice in a small amount of oil before cooking it until golden helped develop the desired toasty notes. Moving the cooking from the stovetop to the oven also ensured that the rice cooked uniformly. A bit of fresh cilantro, fresh minced jalapeños, and a squeeze of lime juice provided brightness and complemented the rich rice. Basmati, jasmine, or Texmati rice can be substituted for the long-grain white rice.
2 tomatoes, cored and quartered
1 onion, chopped coarse
3 jalapeño chiles, stemmed, divided
⅓ cup vegetable oil
2 cups long-grain white rice, rinsed
4 garlic cloves, minced
2 cups vegetable broth
1 tablespoon tomato paste
1½ teaspoons table salt
½ cup minced fresh cilantro
Lime wedges
1. Adjust oven rack to middle position and heat oven to 350 degrees. Process tomatoes and onion in food processor until smooth, about 15 seconds. Transfer mixture to 4-cup liquid measuring cup and spoon off excess as needed until mixture measures 2 cups. Remove ribs and seeds from 2 jalapeños and discard; mince flesh and set aside. Mince remaining 1 jalapeño, including ribs and seeds; set aside.
2. Heat oil in Dutch oven over medium-high heat for 1 to 2 minutes. Drop 3 or 4 grains of rice into oil; if grains sizzle, oil is ready. Add rice and cook, stirring frequently, until light golden and translucent, 6 to 8 minutes.
3. Reduce heat to medium. Add garlic and reserved seeded jalapeños and cook, stirring constantly, until fragrant, about 1½ minutes. Stir in pureed tomato-onion mixture, broth, tomato paste, and salt and bring to boil. Cover, transfer pot to oven, and bake until liquid is absorbed and rice is tender, 30 to 35 minutes, stirring well after 15 minutes.
4. Remove pot from oven and fold in cilantro and reserved jalapeño with seeds to taste. Serve with lime wedges.

Serves 6
Why This Recipe Works Risotto is beloved for its plush creaminess—which is derived in no small part from copious amounts of butter and Parmesan. So our challenge was to replicate the test kitchen’s classic Almost Hands-Free Risotto without the dairy. Our starting point, cashew cheese, turned the risotto sticky and pasty. Some vegan risotto recipes call for chia seeds, but we found that they speckled the rice with unappealing globules. Simply stirring in olive oil made the risotto too greasy, and store-bought vegan Parm imparted an unpleasant plasticky sheen. We started thinking that creamy vegan risotto wasn’t meant to be—until we had an “aha” moment with miso. We like miso for its savory notes, but here it also acted as a thickener, giving the risotto a satiny, creamy gloss. To make our risotto a meal, we added fresh cremini mushrooms and dried porcini. Garnish with Vegan Parmesan Substitute (this page), if you like. This more hands-off method requires precise timing, so we highly recommend using a timer.
4 cups vegetable broth
3 cups water
⅓ cup white miso
¼ cup extra-virgin olive oil, divided
1 pound cremini mushrooms, trimmed and sliced ¼ inch thick
½ teaspoon table salt, divided
1 onion, chopped fine
4 garlic cloves, minced
1 ounce dried porcini mushrooms, rinsed and minced
2 cups Arborio rice
½ cup dry white wine
¼ cup chopped fresh parsley
1. Bring broth, water, and miso to boil in large saucepan over high heat; reduce heat to medium-low and simmer, whisking occasionally, until miso is dissolved, about 5 minutes. Cover and keep warm over low heat.
2. Meanwhile, heat 1 tablespoon oil in Dutch oven over medium heat until shimmering. Add cremini mushrooms and ¼ teaspoon salt, cover, and cook until mushrooms have released their liquid, about 5 minutes. Uncover and continue to cook until well browned, 10 to 12 minutes longer; transfer to bowl.
3. Heat 2 tablespoons oil in now-empty pot over medium heat until shimmering. Stir in onion and remaining ¼ teaspoon salt and cook until softened, about 5 minutes. Add garlic and porcini mushrooms and cook until fragrant, about 30 seconds. Add rice and cook, stirring frequently, until grains are translucent around edges, about 3 minutes. Add wine and cook, stirring constantly, until fully absorbed, about 2 minutes. Stir in 5 cups hot broth mixture; reduce heat to medium-low, cover, and simmer until almost all liquid has been absorbed and rice is just al dente, 16 to 19 minutes, stirring twice during cooking.
4. Add ¾ cup hot broth mixture and browned cremini mushrooms, and stir gently and constantly until risotto becomes creamy, about 3 minutes. Remove pot from heat, cover, and let sit for 5 minutes. Stir in parsley and remaining 1 tablespoon oil and season with salt and pepper to taste. Before serving, adjust consistency with additional broth mixture as needed.
VARIATION
Almost Hands-Free Fennel Risotto
Omit porcini mushrooms. Substitute 1 large fennel bulb, stalks discarded, bulb halved, cored, and chopped, for cremini mushrooms. In step 2, reduce uncovered cooking time to 7 to 10 minutes, then add 1 tablespoon Pernod and continue to cook until completely evaporated, about 1 minute, before transferring to bowl.
Serves 4 to 6
Why This Recipe Works Foolproof and hands-off, baked brown rice is a healthy building-block recipe for plant-based meals. But with just a little extra prep time, you can bulk it up with vegetable add-ins that complement the hearty flavor and texture of the rice. Here, a combination of aromatic browned onions and sweet roasted red peppers made for a simple plant-powered upgrade. To be sure that the aromatics fully penetrated the rice, we sautéed chopped onions until well browned before adding the rice and water to the pot. After bringing the rice to a boil, we transferred the pot to the oven for even cooking. Once the rice was tender, we stirred in chopped roasted red peppers (jarred, for convenience) and let them warm through as the rice rested off the heat. Minced parsley added color and herbal freshness, and we served the dish with a sprinkling of our Vegan Parmesan Substitute and a squeeze of fresh lemon juice. Medium-grain or short-grain brown rice can be substituted for the long-grain rice.
4 teaspoons extra-virgin olive oil
2 onions, chopped fine
1 teaspoon table salt
2¼ cups water
1 cup vegetable broth
1½ cups long-grain brown rice, rinsed
¾ cup jarred roasted red peppers, rinsed, patted dry, and chopped
½ cup minced fresh parsley
Vegan Parmesan Substitute (this page) or grated dairy Parmesan
Lemon wedges
1. Adjust oven rack to middle position and heat oven to 375 degrees. Heat oil in Dutch oven over medium heat until shimmering. Add onions and salt and cook, stirring occasionally, until softened and well browned, 12 to 14 minutes.
2. Stir in water and broth and bring to boil. Stir in rice, cover, and transfer pot to oven. Bake until rice is tender and liquid is absorbed, 1 hour 5 minutes to 1 hour 10 minutes.
3. Remove pot from oven. Sprinkle red peppers over rice, cover, and let sit for 5 minutes. Add parsley and fluff gently with fork to combine. Season with salt and pepper to taste. Serve with vegan Parmesan substitute and lemon wedges.
VARIATIONS
Baked Brown Rice with Black Beans and Cilantro
Omit 1 onion and Parmesan. Substitute 1 (15-ounce) can black beans, rinsed, for roasted red peppers, ¼ cup minced cilantro for parsley, and lime wedges for lemon wedges. Add 1 stemmed, seeded, and finely chopped green bell pepper to onion in step 1. After softening onion mixture in step 1 add 3 minced garlic cloves to Dutch oven and cook until fragrant, about 30 seconds. Add ¼ teaspoon black pepper to rice mixture with cilantro in step 3.
Baked Brown Rice with Peas, Mint, and Feta
Omit 1 onion and Parmesan. Substitute 1 cup thawed frozen peas for red peppers and ½ cup crumbled feta cheese, ¼ cup minced fresh mint, and ½ teaspoon grated lemon zest for parsley.
Serves 4 to 6
Why This Recipe Works Since a great burrito is really all about the filling—layers of spicy, smoky flavors working together in a cohesive whole—we decided to take the burrito out of its wrapper and put the filling in a bowl so that each of its elements could really shine. We chose brown rice as the base, for its nutty flavor, hearty texture, and nutritional value. While the rice boiled away on the stove, we seared our vegetables in batches in a skillet to get just the right color and char, building flavor in the pan with each batch. Fresh corn provided sweetness and pops of crunch, and poblano peppers offered a subtle background heat. Black beans, cooked with sautéed aromatics, gave our bowl plenty of protein. Seasoning the cooked rice with lime, cumin, and coriander brought classic burrito flavors center stage, and finishing the dish with chipotle sauce lent it creamy, smoky richness. With this warm, hearty bowl, we may never wrap burritos again. Serve with avocado, red onion, pico de gallo, and/or lime wedges.
1½ cups long-grain brown rice, rinsed
¾ teaspoon table salt, divided, plus salt for cooking rice
5 tablespoons extra-virgin olive oil, divided
1 tablespoon lime juice
1½ teaspoons ground cumin, divided
1½ teaspoons ground coriander, divided
½ teaspoon pepper, divided
2 ears corn, kernels cut from cobs
3 garlic cloves, minced, divided
3 poblano chiles, stemmed, seeded, and cut into ½-inch pieces
1 onion, chopped
1 (15-ounce) can black beans, rinsed
1 recipe Creamy Chipotle Sauce (this page)
¼ cup chopped fresh cilantro
1. Bring 4 quarts water to boil in large pot. Add rice and 1 tablespoon salt, return to boil, and cook, stirring occasionally, until rice is tender, 25 to 30 minutes. Drain rice. Meanwhile, whisk 2 tablespoons oil, lime juice, ½ teaspoon cumin, ½ teaspoon coriander, ¼ teaspoon pepper, and ¼ teaspoon salt together in large bowl. Stir in hot rice and toss to coat. Cover to keep warm.
2. While rice cooks, heat 1 tablespoon oil in 12-inch nonstick skillet over medium-high heat until shimmering. Stir in corn, ¼ teaspoon salt, and remaining ¼ teaspoon pepper and cook until spotty brown, about 3 minutes. Transfer to second bowl and cover to keep warm.
3. Heat 1 tablespoon oil in now-empty skillet over medium-high heat until shimmering. Stir in 2 teaspoons garlic, remaining 1 teaspoon cumin, and remaining 1 teaspoon coriander and cook until fragrant, about 30 seconds. Stir in poblanos and cook until charred and tender, 6 to 8 minutes. Transfer to third bowl and cover to keep warm.
4. Heat remaining 1 tablespoon oil in now-empty skillet over medium heat until shimmering. Add onion and cook until softened and just beginning to brown, 5 to 7 minutes. Stir in remaining garlic and cook until fragrant, about 30 seconds. Stir in beans, ¼ cup water, and remaining ¼ teaspoon salt and bring to simmer. Reduce heat to medium-low and simmer, stirring occasionally, until beans are warmed through and most of liquid has evaporated, about 2 minutes.
5. Divide rice among individual bowls, then top with poblanos, corn, and beans. Drizzle with chipotle sauce, sprinkle with cilantro, and serve.

Serves 6
Why This Recipe Works Sushi bowls are far easier to prepare than sushi rolls, and—like rolls—they don’t have to contain seafood. This healthful bowl overflows with Japanese-inspired vegetable flavors. We started with sticky short-grain brown rice. To infuse the cooked rice with a flavor akin to sushi rice, we tossed it with mirin and rice vinegar. For protein, in place of fish, we dredged soft tofu in a mixture of cornstarch and crunchy cornmeal and cooked it in a skillet. By cutting the tofu into fingers prior to dredging, we were rewarded with four ultracrispy sides that gave way to an appealingly creamy interior. We garnished the bowls with crumbled nori, spicy sliced radishes, rich avocado, cool cucumber, and scallions and dressed the bowls with a potent sauce of soy, ginger, orange, and lime. To save time, prep the tofu and vegetables while the rice cooks. We prefer the creamier texture of soft tofu here, but firm or extra-firm will work. You can find nori in the international foods aisle of the supermarket. Garnish with pickled ginger, if you like.
3½ cups water
2⅓ cups short-grain brown rice, rinsed
¼ cup mirin
3 tablespoons rice vinegar
28 ounces soft tofu, patted dry and cut into 3-inch-long by ½-inch-thick fingers
½ teaspoon table salt
¼ teaspoon pepper
¾ cup cornstarch
¼ cup cornmeal
2 tablespoons vegetable oil, divided
1 (8 by 7½-inch) sheet nori, crumbled (optional)
6 radishes, sliced thin
1 avocado, halved, pitted, and sliced thin
1 cucumber, peeled, halved lengthwise, seeded, and sliced thin
1 recipe Citrus Sauce (this page)
4 scallions, sliced thin
1. Bring water and rice to simmer in large saucepan over high heat. Reduce heat to low, cover, and continue to simmer until rice is tender and water is absorbed, 45 to 50 minutes. Remove pot from heat, lay clean folded dish towel underneath lid, and let sit for 10 minutes. Transfer rice to large bowl. Drizzle with mirin and vinegar, then let cool for 20 minutes, gently tossing with wooden paddle or spoon occasionally.
2. While rice cooks, spread tofu over paper towel–lined baking sheet and let drain for 20 minutes. Gently press tofu dry with paper towels and sprinkle with salt and pepper.
3. Adjust oven rack to middle position, place paper towel–lined plate on rack, and heat oven to 200 degrees. Whisk cornstarch and cornmeal together in shallow dish. Working with several pieces of tofu at a time, coat thoroughly with cornstarch mixture, pressing to help coating adhere, and transfer to wire rack set in rimmed baking sheet.
4. Heat 1 tablespoon oil in 12-inch nonstick skillet over medium-high heat until shimmering. Carefully add half of tofu and cook until crisp and lightly golden on all sides, 10 to 12 minutes; transfer to plate in oven. Repeat with remaining 1 tablespoon oil and remaining tofu.
5. Divide rice among individual bowls, then sprinkle with half of nori, if using. Top with browned tofu, radishes, avocado, and cucumber. Drizzle with citrus sauce, sprinkle with scallions, and serve, passing remaining nori separately.
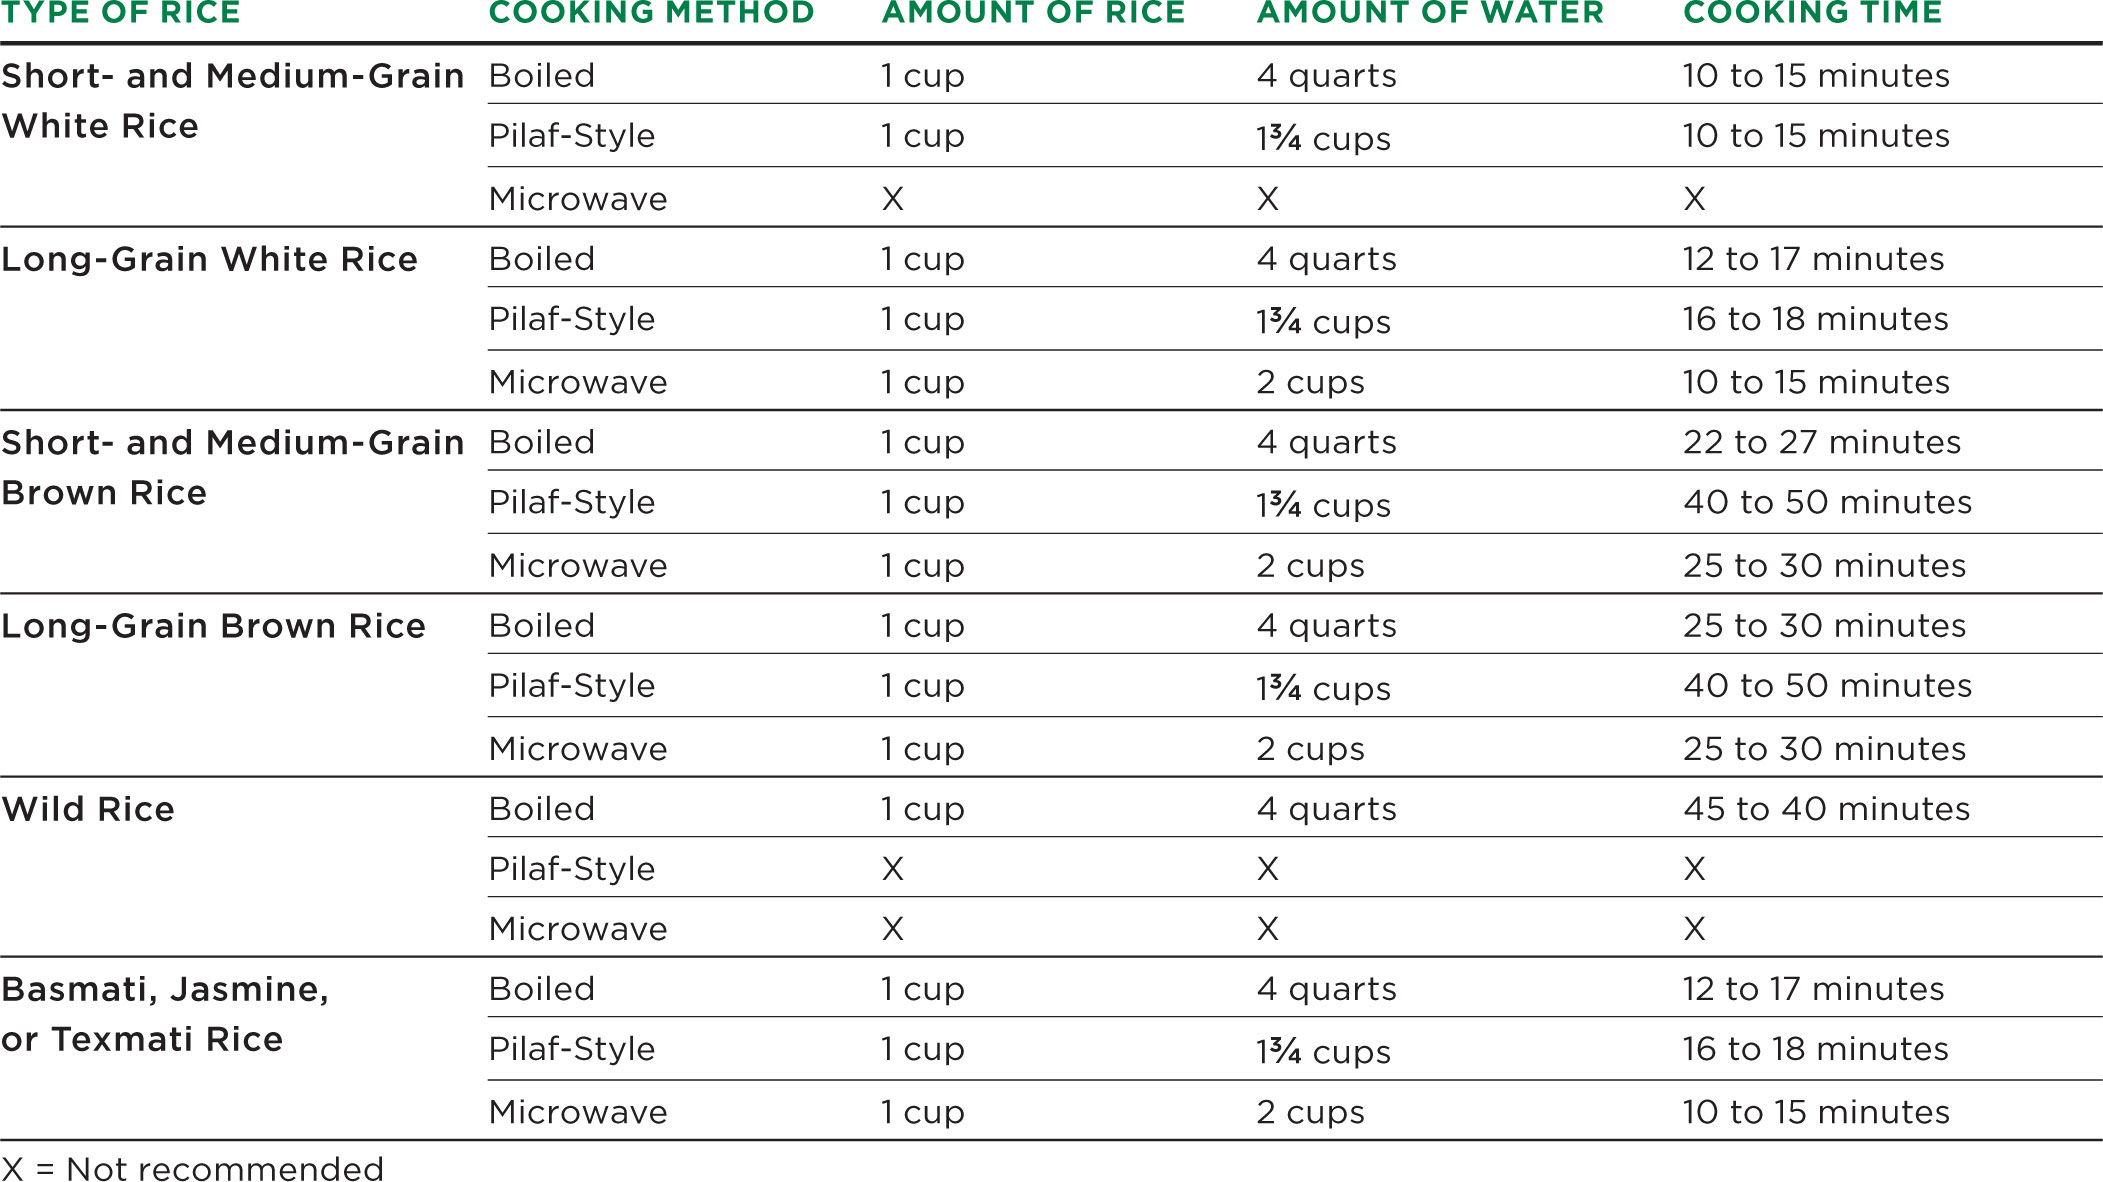
Here are three simple methods for basic rice cooking: boiling, pilaf-style, and microwaving. Pilaf-style cooking is our favorite (though boiling rice in ample amounts of water is a great easy method when you want rice to round out a meal or fill a burrito). And after working on it for a while in the test kitchen, we can say that not only does the microwave work for rice, it works really well. Plus you can cook the rice right in the serving bowl. To make rice for a crowd, use the boiling method and double the amount of rice (don’t add more water or salt).
Boiling Directions Bring the water to a boil in a large saucepan. Stir in the rice and 2½ teaspoons salt. Return to a boil, then reduce to a simmer and cook until the rice is tender, following the cooking times below. Drain.
Pilaf-Style Directions Rinse the rice. Heat 1 tablespoon oil in a medium saucepan (preferably nonstick) over medium-high heat until shimmering. Stir in the rice and cook until the edges of the grains begin to turn translucent, about 3 minutes. Stir in the water and ¼ teaspoon salt. Bring the mixture to a simmer, then reduce the heat to low, cover, and continue to simmer until the rice is tender and has absorbed all the water, following the cooking times below. Off the heat, place a clean folded dish towel under the lid and let the rice sit for 10 minutes. Fluff the rice with a fork.
Microwave Directions Rinse the rice. Combine the water, the rice, 1 tablespoon oil, and ¼ teaspoon salt in a bowl. Cover and microwave on high (full power) until the water begins to boil, 5 to 10 minutes. Reduce the microwave heat to medium (50 percent power) and continue to cook until the rice is just tender, following the cooking times below. Remove from the microwave and fluff with a fork. Cover the bowl with plastic wrap, poke several vent holes in the plastic with the tip of a knife, and let sit until completely tender, about 5 minutes.
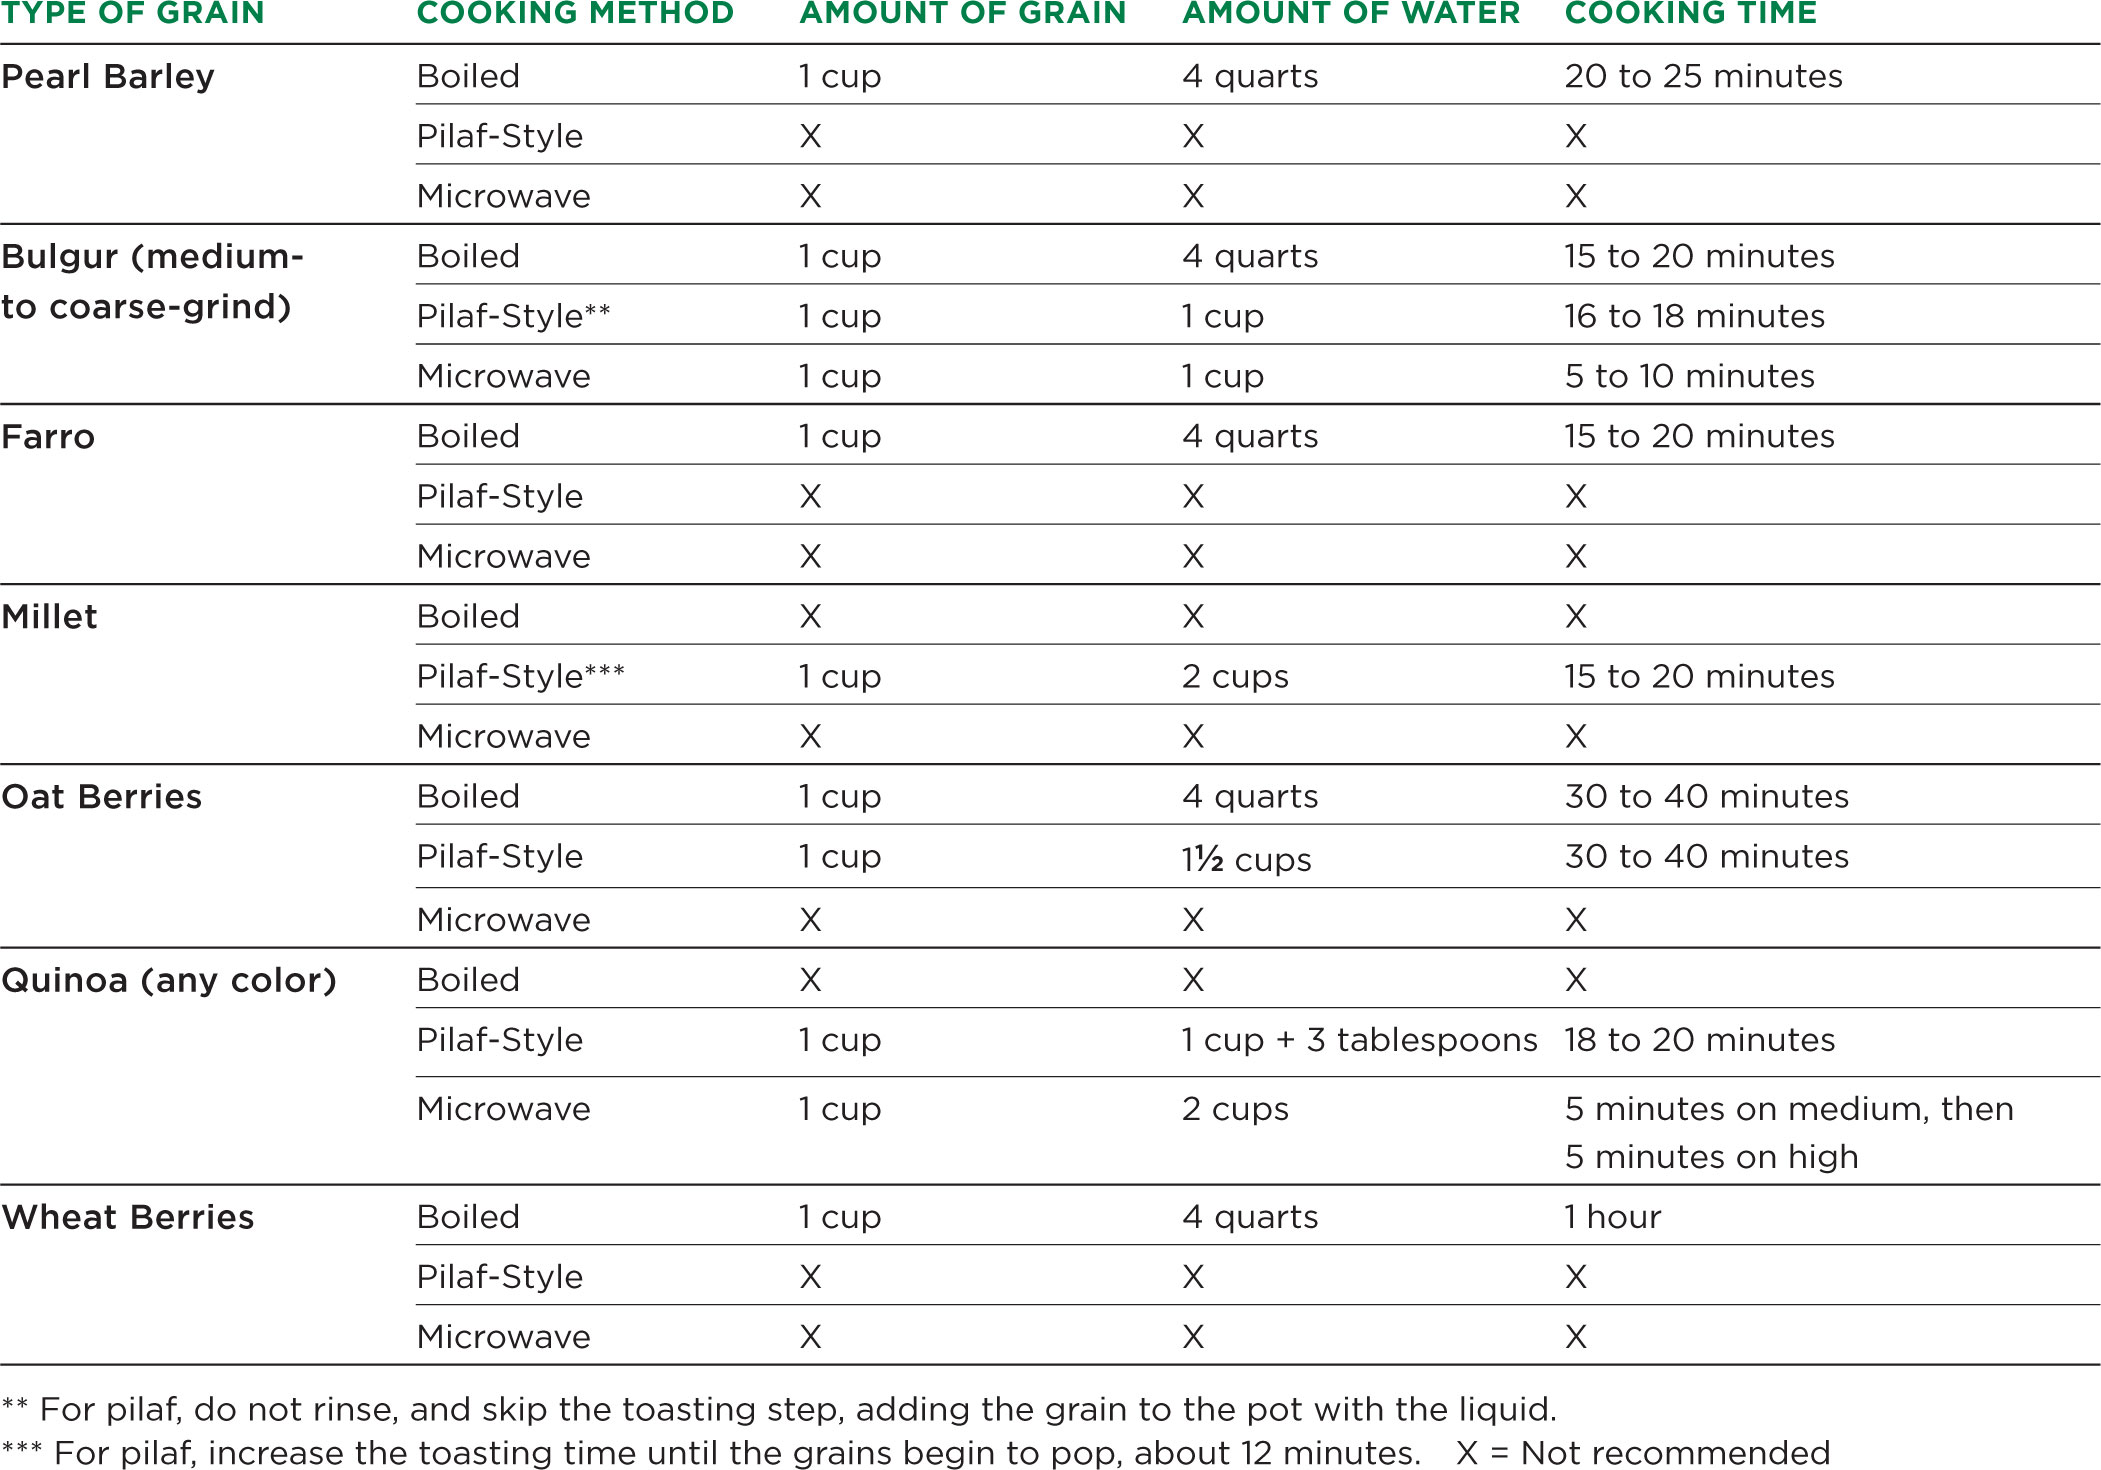
Some grains, such as bulgur, cook in minutes, while others, such as barley, take much longer. We have perfected three basic methods for cooking grains. Pilaf-style is our favorite option because it produces grains with a light and fluffy texture and a slightly toasted flavor.
Boiling Directions Bring the water to a boil in a large saucepan. Stir in the grain and ½ teaspoon salt. Return to a boil, then reduce to a simmer and cook until the grain is tender, following the cooking times below. Drain.
Pilaf-Style Directions Rinse and then dry the grains on a towel. Heat 1 tablespoon oil in a medium saucepan (preferably nonstick) over medium-high heat until shimmering. Stir in the grain and toast until lightly golden and fragrant, 2 to 3 minutes. Stir in the water and ¼ teaspoon salt. Bring the mixture to a simmer, then reduce the heat to low, cover, and continue to simmer until the grain is tender and has absorbed all of the water, following the cooking times below. Off the heat, let the grain stand for 10 minutes, then fluff with a fork.
Microwave Directions Rinse the grain. Combine the water, the grain, 1 tablespoon oil, and ¼ teaspoon salt in a bowl. Cover and cook following the times and temperatures below. Remove from the microwave and fluff with a fork. Cover the bowl with plastic wrap, poke several vent holes with the tip of a knife, and let sit until completely tender, about 5 minutes.

Serves 4 to 6
Why This Recipe Works Although we often prefer to bake brown rice, we discovered that it doesn’t work in rice salads. Once cooled and drizzled with dressing, the baked rice turned gummy. So instead, we cooked the rice pasta-style, by boiling it in a large pot of water, which washed away its excess starches. Then we spread it out on a baking sheet to cool rapidly, preventing it from overcooking as it sat. To give the rice bright flavor, we drizzled it with lemon juice while it was still warm. While the rice cooled and absorbed the juice, we cooked asparagus pieces in olive oil until browned and tender. For a zesty but simple dressing to highlight the rustic rice and bright asparagus, we whisked together olive oil, minced shallot, and fresh lemon juice and zest. After dressing the rice and asparagus, we let the dressing’s flavors permeate the salad. With a sprinkling of toasted almonds and parsley, our salad was loaded with fresh, vibrant flavors and contrasting textures. The optional goat cheese adds a creamy tang. Look for asparagus spears no thicker than ½ inch.
1½ cups long-grain brown rice
¾ teaspoon table salt, plus salt for cooking rice
1 teaspoon grated lemon zest plus 3 tablespoons juice, divided
3½ tablespoons extra-virgin olive oil, divided
1 pound asparagus, trimmed and cut into 1-inch lengths
¾ teaspoon pepper, divided
1 shallot, minced
2 ounces goat cheese, crumbled (½ cup), divided (optional)
¼ cup slivered almonds, toasted, divided
¼ cup minced fresh parsley, divided
1. Bring 4 quarts water to boil in large pot. Add rice and 2 teaspoons salt and cook, stirring occasionally, until rice is tender, 22 to 25 minutes. Drain rice, spread onto rimmed baking sheet, and drizzle with 1 tablespoon lemon juice. Let rice cool completely, about 10 minutes; transfer to large bowl.
2. Heat 1 tablespoon oil in 12-inch skillet over high heat until just smoking. Add asparagus, ¼ teaspoon pepper, and ¼ teaspoon salt and cook, stirring occasionally, until asparagus is browned and crisp-tender, about 4 minutes; transfer to plate and let cool slightly.
3. Whisk shallot, remaining ½ teaspoon salt, lemon zest and remaining 2 tablespoons juice, remaining 2½ tablespoons oil, and remaining ½ teaspoon pepper together in large bowl. Add rice; asparagus;¼ cup goat cheese, if using; 3 tablespoons almonds; and 3 tablespoons parsley. Gently toss to combine and let sit for 10 minutes. Season with salt and pepper to taste. Transfer to serving platter and sprinkle with remaining ¼ cup goat cheese, if using; remaining 1 tablespoon almonds; and remaining 1 tablespoon parsley. Serve.
Brown Rice Salad with Jalapeño, Tomatoes, and Avocado
To make this salad spicier, add the chile seeds.
1½ cups long-grain brown rice
½ teaspoon table salt, plus salt for cooking rice
1 teaspoon grated lime zest plus 3 tablespoons juice (2 limes), divided
2½ tablespoons extra-virgin olive oil
2 teaspoons agave syrup or honey
2 garlic cloves, minced
½ teaspoon ground cumin
½ teaspoon pepper
10 ounces cherry tomatoes, halved
1 avocado, halved, pitted, and cut into ½-inch pieces
1 jalapeño chile, stemmed, seeded, and minced
5 scallions, sliced thin, divided
¼ cup minced fresh cilantro
1. Bring 4 quarts water to boil in large pot. Add rice and 2 teaspoons salt and cook, stirring occasionally, until rice is tender, 22 to 25 minutes. Drain rice, spread onto rimmed baking sheet, and drizzle with 1 tablespoon lime juice. Let rice cool completely, about 10 minutes; transfer to large bowl.
2. Whisk oil, agave, garlic, cumin, pepper, salt, and lime zest and remaining 2 tablespoons juice together in small bowl, then drizzle over cooled rice. Add tomatoes, avocado, and jalapeño and toss to combine. Let sit for 10 minutes.
3. Add ¼ cup scallions and cilantro and toss to combine. Season with salt and pepper to taste. Sprinkle with remaining scallions and serve.
Brown Rice Salad with Fennel, Mushrooms, and Walnuts
Cremini mushrooms can be substituted for the white mushrooms.
1½ cups long-grain brown rice
1¼ teaspoons table salt, divided, plus salt for cooking rice
3 tablespoons white wine vinegar, divided
¼ cup extra-virgin olive oil, divided
1 pound white mushrooms, trimmed and quartered
1 large fennel bulb, stalks discarded, bulb halved, cored, and sliced thin
1 shallot, minced
½ teaspoon pepper
⅔ cup walnuts, toasted and chopped coarse, divided
2 tablespoons minced fresh tarragon
2 tablespoons minced fresh parsley, divided
1. Bring 4 quarts water to boil in large pot. Add rice and 2 teaspoons salt and cook, stirring occasionally, until rice is tender, 22 to 25 minutes. Drain rice, spread onto rimmed baking sheet, and drizzle with 1 tablespoon vinegar. Let rice cool completely, about 10 minutes; transfer to large bowl.
2. Heat 1 tablespoon oil in 12-inch skillet over medium-high heat until shimmering. Add mushrooms and ½ teaspoon salt and cook, stirring occasionally, until pan is dry and mushrooms are browned, 6 to 8 minutes; transfer to plate and let cool.
3. Heat 1 tablespoon oil in now-empty skillet over medium-high heat until shimmering. Add fennel and ¼ teaspoon salt and cook, stirring occasionally, until just browned and crisp-tender, 3 to 4 minutes; transfer to plate with mushrooms and let cool.
4. Whisk shallot, pepper, remaining ½ teaspoon salt, remaining 2 tablespoons vinegar, and remaining 2 tablespoons oil together in small bowl, then drizzle over cooled rice. Add mushroom-fennel mixture and toss to combine. Let sit for 10 minutes.
5. Add ½ cup walnuts, tarragon, and 1 tablespoon parsley and toss to combine. Season with salt and pepper to taste. Sprinkle with remaining walnuts and remaining 1 tablespoon parsley and serve.
COOLING RICE FOR SALAD
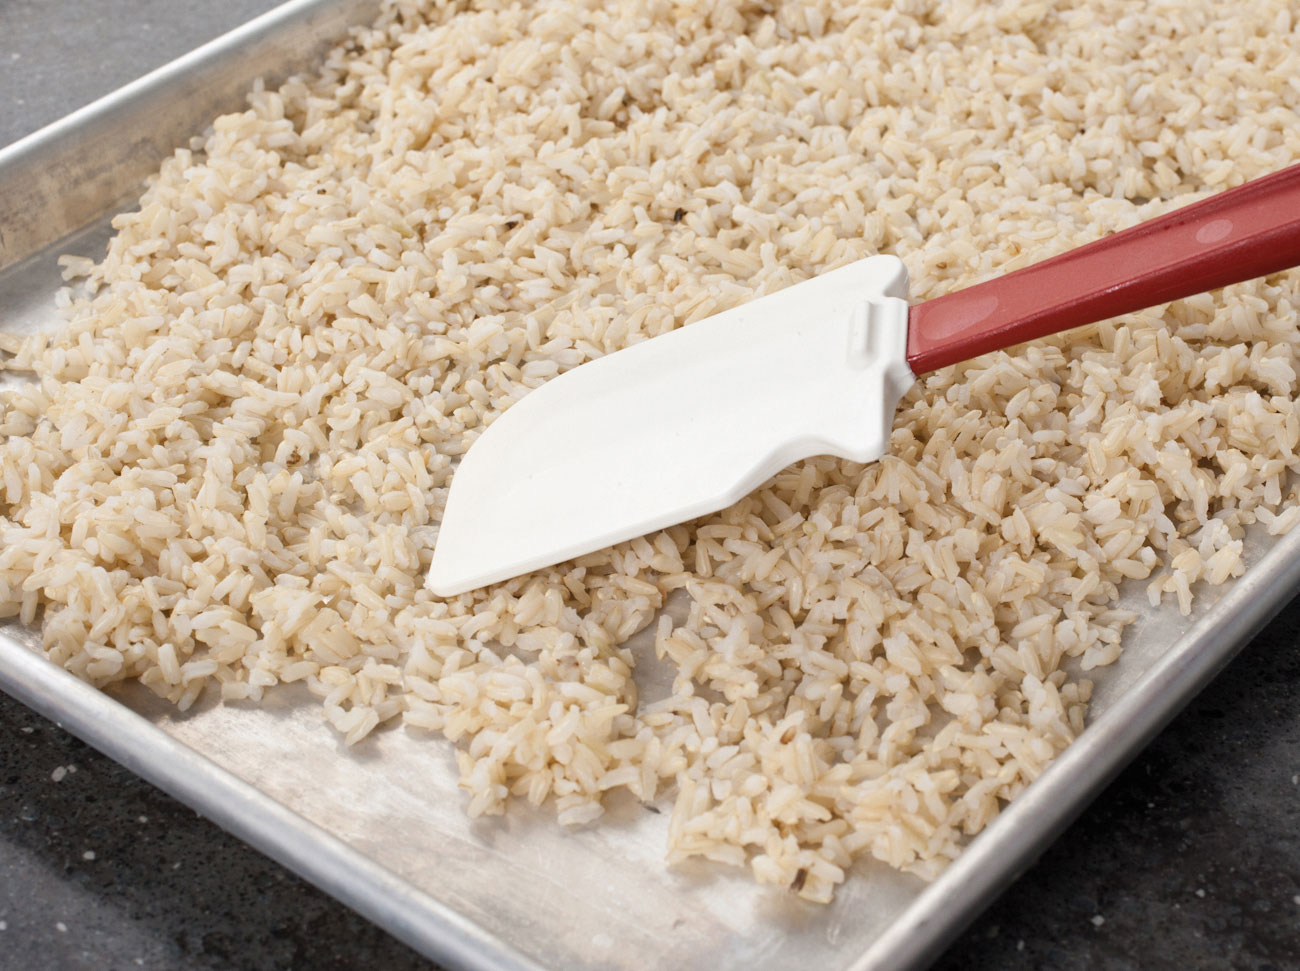
After cooking and draining rice, spread onto rimmed baking sheet and drizzle with 1 tablespoon citrus juice or vinegar. Let rice cool completely, about 10 minutes; transfer to large bowl.
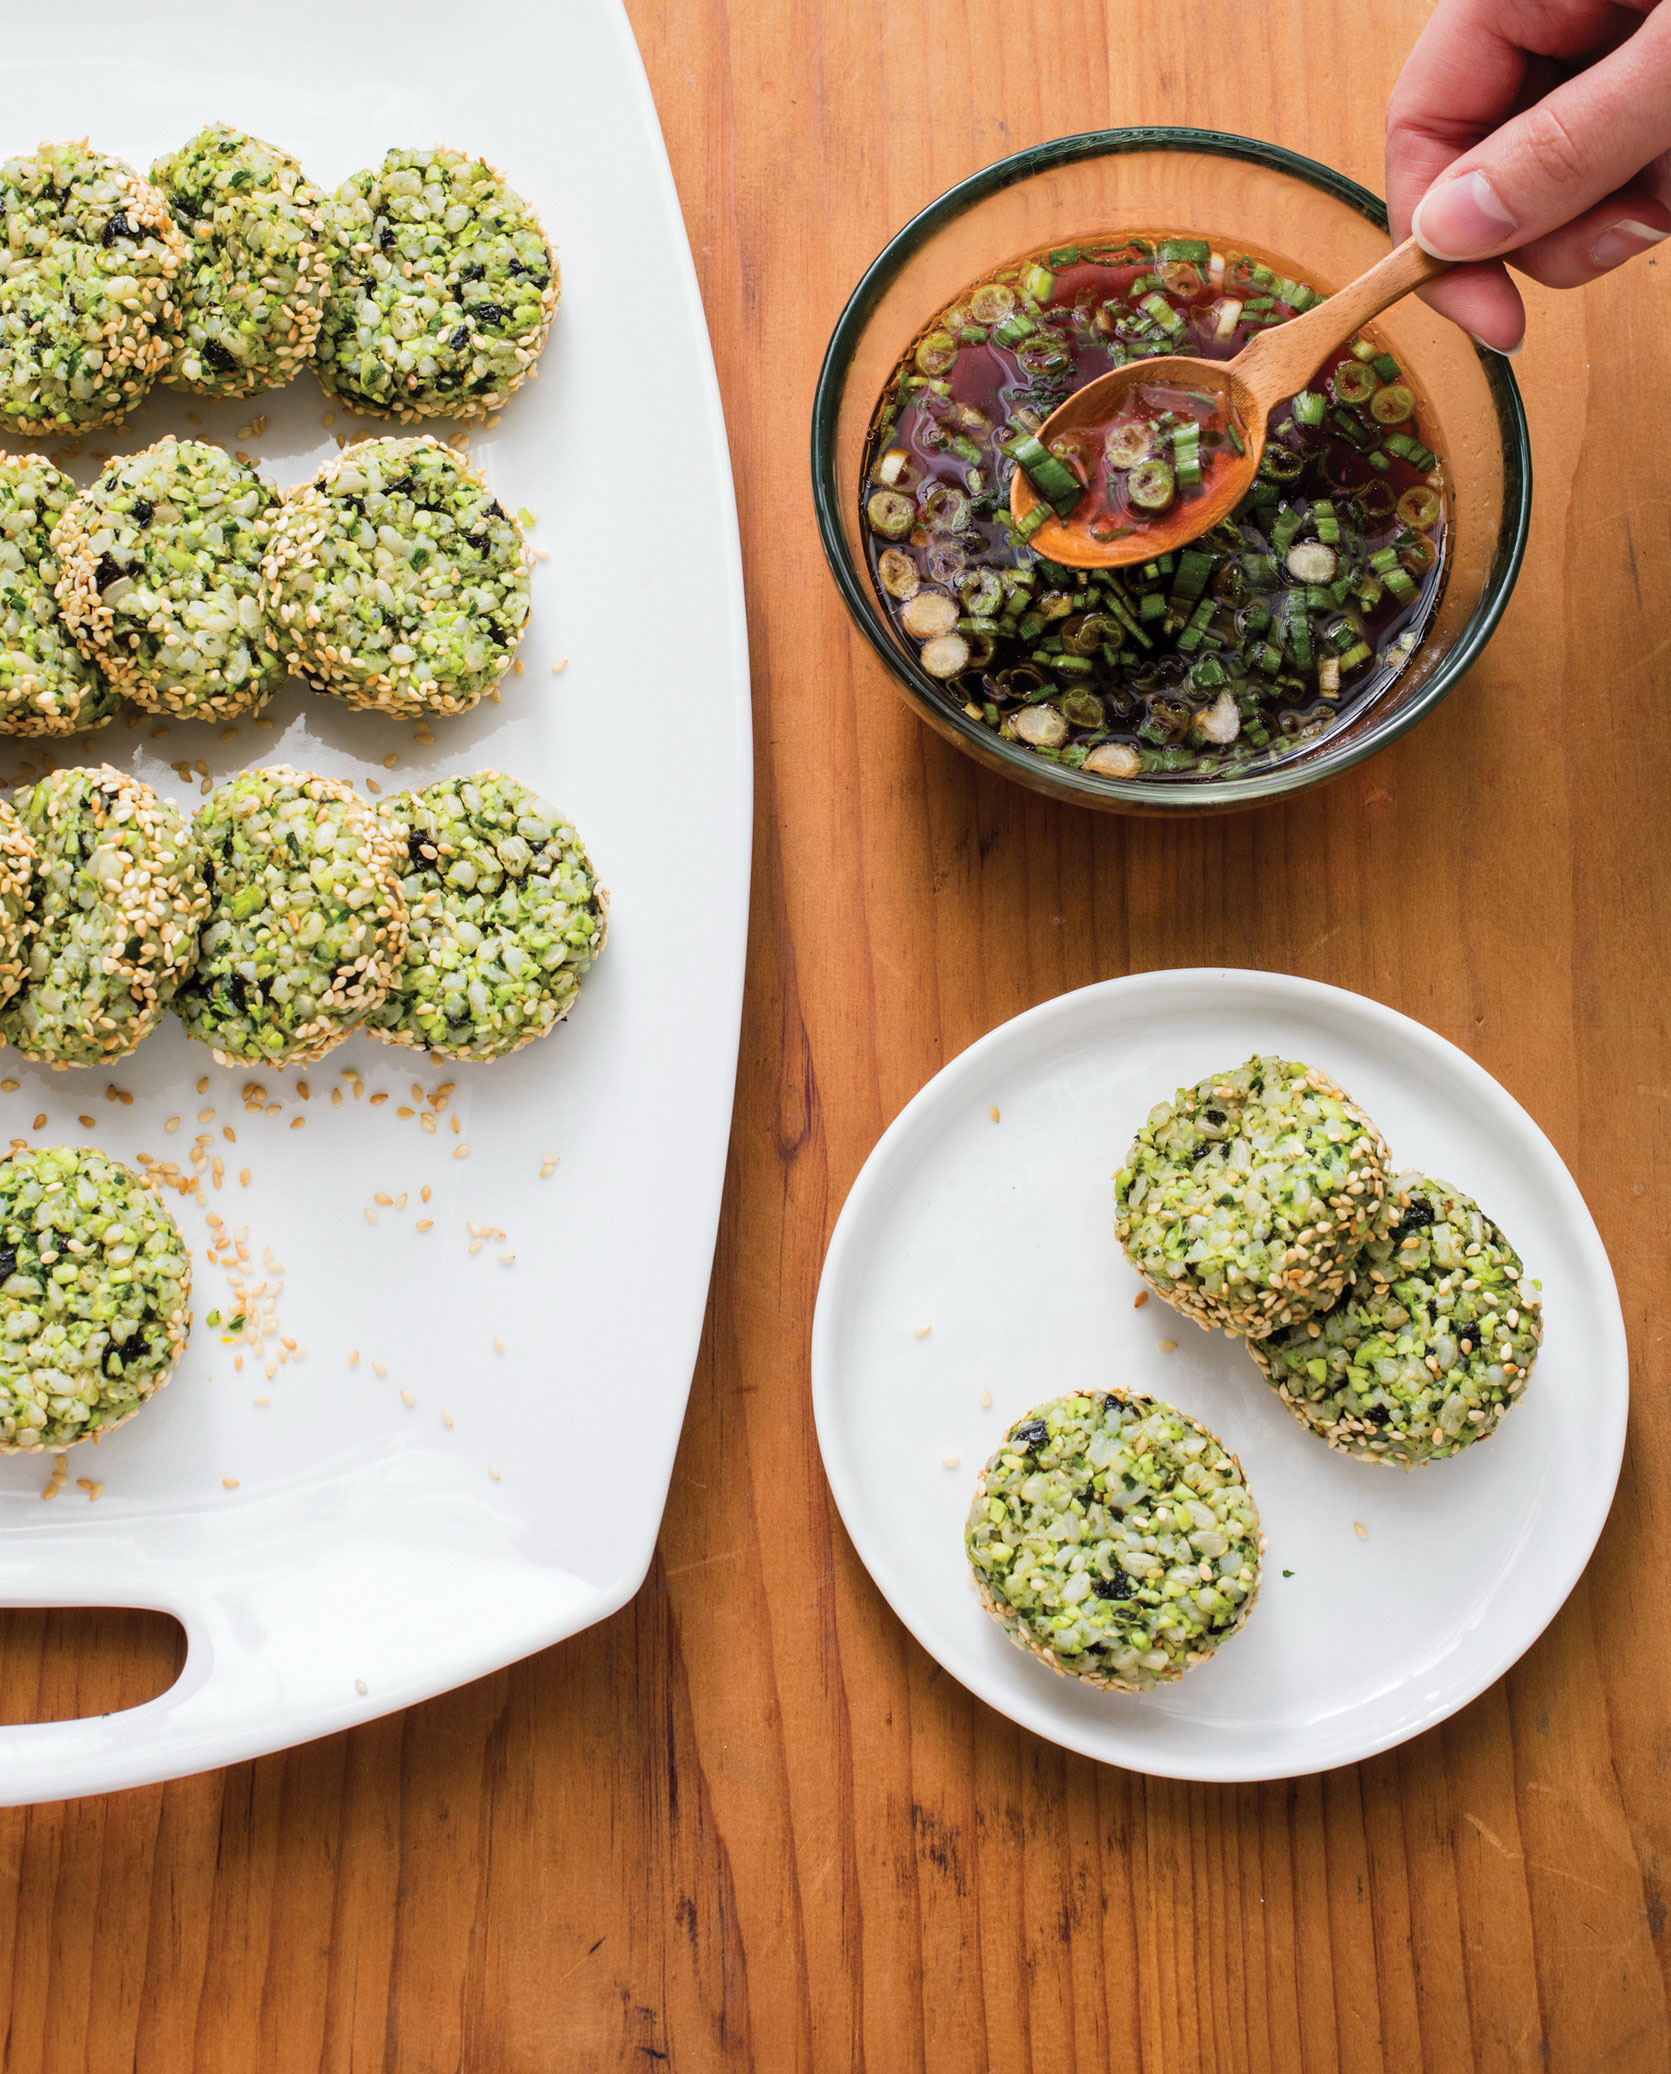
Serves 4 to 6 (Makes 24 onigiri)
Why This Recipe Works Onigiri are a Japanese bento box staple: adorable little bundles of white sushi rice stuffed with morsels of fish, pickled plums, sea vegetables, or other ingredients. To rework them so they’d pack a greater plant-based punch, we first swapped out white rice for short-grain brown rice. But, since brown rice is less sticky than white rice, we skipped the standard rinsing to preserve as much starch as possible. Our next change was more dramatic: Instead of stuffing tidbits of our spinach and edamame filling into balls of rice, we pulsed the filling ingredients along with the rice in the food processor. This enabled us to incorporate far more vegetable “filling” into each onigiri. Plus, slightly processing the rice released more starch, making the mixture easier to shape. We scooped out portions of the rice mixture and, with lightly moistened hands, pressed each into a petite disk, which we found sturdier than the traditional ball shape. Rolling the edges in toasted sesame seeds added a crunchy, nutty contrast, and a simple soy dipping sauce made a tasty accompaniment.
1¾ cups water
1 cup short-grain brown rice
1 cup baby spinach
¾ cup frozen shelled edamame beans, thawed and patted dry
2 (8 by 7½-inch) sheets nori, crumbled
¼ cup sesame seeds, toasted, divided
2 teaspoons grated fresh ginger
½ teaspoon table salt
2 scallions, sliced thin
2 teaspoons toasted sesame oil
Soy Dipping Sauce (this page)
1. Bring water and rice to simmer in large saucepan over high heat. Reduce heat to low, cover, and simmer gently until rice is tender and water is absorbed, 40 to 45 minutes. Off heat, lay clean dish towel underneath lid, and let sit for 10 minutes. Fluff rice with fork and cover.
2. Pulse spinach, edamame, nori, 2 tablespoons sesame seeds, ginger, salt, scallions, and sesame oil in food processor until mixture is finely ground (it should not be smooth), about 10 pulses. Add rice and pulse until rice is coarsely chopped and mixture is well combined, about 8 pulses.
3. Divide rice mixture into 24 portions (about 1½ tablespoons each) and arrange on parchment-lined baking sheet. Using your lightly moistened hands, roll each portion into ball, then press into disk about 1½ inches wide and ¾ inch thick. Spread remaining 2 tablespoons sesame seeds onto plate. Gently roll sides of disks in sesame seeds, pressing lightly to adhere, and transfer to serving platter. Serve with soy dipping sauce.

Serves 6
Why This Recipe Works Though traditional paella centers on a variety of meat and seafood, our vegetable-focused version highlights an array of hearty vegetables common in Spanish cuisine. We gave the artichokes and peppers deeper flavor by first roasting them and then tossing them with a lemony sauce. We sautéed the fennel with onion to give it a rich caramelized flavor. Kalamata olives brought a briny, umami quality. To give the rice complexity, we bloomed the paprika with garlic and browned diced tomatoes to give them savory depth. We coated the rice with this potent mixture before adding broth, wine, and saffron. For perfectly even cooking, we transferred the paella to the oven. While we prefer the flavor and texture of jarred whole baby artichokes, you can substitute 18 ounces frozen artichoke hearts, thawed and patted dry. Bomba rice is traditional for paella, but you can also use Arborio. Socarrat, a layer of crusty browned rice that forms on the bottom of the pan, is a traditional part of paella. In this version, socarrat does not develop because most of the cooking is done in the oven; if desired, there are directions on how to make a socarrat before serving in step 5.
3 cups jarred whole baby artichokes packed in water, quartered, rinsed, and patted dry
2 red bell peppers, stemmed, seeded, and chopped coarse
½ cup pitted kalamata olives, chopped
9 garlic cloves, peeled (3 whole, 6 minced)
6 tablespoons extra-virgin olive oil, divided
1½ teaspoons table salt, divided
¼ teaspoon pepper
3 tablespoons chopped fresh parsley, divided
2 tablespoons lemon juice
1 onion, chopped fine
1 fennel bulb, stalks discarded, bulb halved, cored, and sliced thin
½ teaspoon smoked paprika
1 (14.5-ounce) can diced tomatoes, drained, minced, and drained again
2 cups Bomba or Arborio rice
3 cups vegetable broth
⅓ cup dry white wine
½ teaspoon saffron threads, crumbled
½ cup frozen peas, thawed
1. Adjust oven rack to lower-middle position, place rimmed baking sheet on rack, and heat oven to 450 degrees. Toss artichokes and peppers with olives, whole garlic cloves, 2 tablespoons oil, ½ teaspoon salt, and pepper in bowl. Spread vegetables in hot sheet and roast until artichokes are browned around edges and peppers are browned, 20 to 25 minutes; let cool slightly.
2. Mince roasted garlic. In large bowl, whisk 2 tablespoons oil, 2 tablespoons parsley, lemon juice, and minced roasted garlic together. Add roasted vegetables and toss to combine. Season with salt and pepper to taste.
3. Reduce oven temperature to 350 degrees. Heat remaining 2 tablespoons oil in Dutch oven over medium heat until shimmering. Add onion and fennel and cook until softened, 8 to 10 minutes.
4. Stir in minced raw garlic and paprika and cook until fragrant, about 30 seconds. Stir in tomatoes and cook until mixture darkens and thickens slightly, about 3 minutes. Stir in rice and cook until grains are well coated with tomato mixture, about 2 minutes. Stir in broth, wine, saffron, and remaining 1 teaspoon salt. Increase heat to medium-high and bring to boil, stirring occasionally. Cover, transfer pot to oven, and bake until liquid is absorbed and rice is tender, 25 to 35 minutes.
5. For optional socarrat, transfer pot to stovetop and remove lid. Cook over medium-high heat for about 5 minutes, rotating pot as needed, until bottom layer of rice is well browned and crisp.
6. Sprinkle roasted vegetables and peas over rice, cover, and let paella sit for 5 minutes. Sprinkle with remaining 1 tablespoon parsley and serve.
Vegetable Paella in a Paella Pan
Substitute 14- to 15-inch paella pan for Dutch oven, increase broth to 3¼ cups, and increase wine to ½ cup. Before placing pan in oven, cover tightly with aluminum foil.
Serves 6 to 8
Why This Recipe Works Properly cooked wild rice is tender yet chewy and pleasingly rustic—never crunchy or gluey. Simmering the wild rice in flavorful liquid and then draining off excess proved to be the most foolproof way to produce fluffy wild rice every time. A combination of vegetable broth and water enhanced the rice’s nutty earthiness. We also added some white rice to our pilaf to balance the wild rice’s assertive flavor and finished our dish with nuts and dried fruit. Cooking times for wild rice vary, so start checking for doneness after 35 minutes. For an accurate measurement of boiling water, bring a full kettle of water to a boil, then measure out the desired amount.
1¾ cups vegetable broth
¼ cup water plus 2¼ cups boiling water
2 bay leaves
8 sprigs fresh thyme, divided into 2 bundles, each tied together with kitchen twine
1 cup wild rice, picked over and rinsed
2 tablespoons extra-virgin olive oil
1 onion, chopped fine
1 large carrot, peeled and chopped fine
1 teaspoon table salt
1½ cups long-grain white rice, rinsed
¾ cup dried cranberries
¾ cup pecans, toasted and chopped coarse
2 tablespoons minced fresh parsley
1. Bring broth, ¼ cup water, bay leaves, and 1 bundle thyme to boil in medium saucepan over medium-high heat. Add wild rice, cover, and reduce heat to low. Simmer until rice is plump and tender and most of liquid has been absorbed, 35 to 45 minutes. Drain rice through fine-mesh strainer, discarding liquid. Discard bay leaves and thyme. Return rice to now-empty saucepan; cover and set aside.
2. Meanwhile, heat oil in medium saucepan over medium-high heat until shimmering. Add onion, carrot, and salt and cook until vegetables are softened, about 4 minutes. Stir in white rice and cook, stirring often, until grain edges begin to turn translucent, about 3 minutes.
3. Stir in 2¼ cups boiling water and second thyme bundle and bring to simmer. Reduce heat to low, cover, and continue to simmer until white rice is tender and water is absorbed, 16 to 18 minutes. Off heat, discard thyme, fluff rice with fork, and stir in cranberries.
4. Gently toss wild rice, white rice mixture, pecans, and parsley together in bowl. Season with salt and pepper to taste, and serve.
VARIATION
Wild Rice Pilaf with Scallions, Cilantro, and Almonds
Omit dried cranberries. Substitute toasted sliced almonds for pecans and cilantro for parsley. Add 2 thinly sliced scallions and 1 teaspoon lime juice to pilaf before serving.
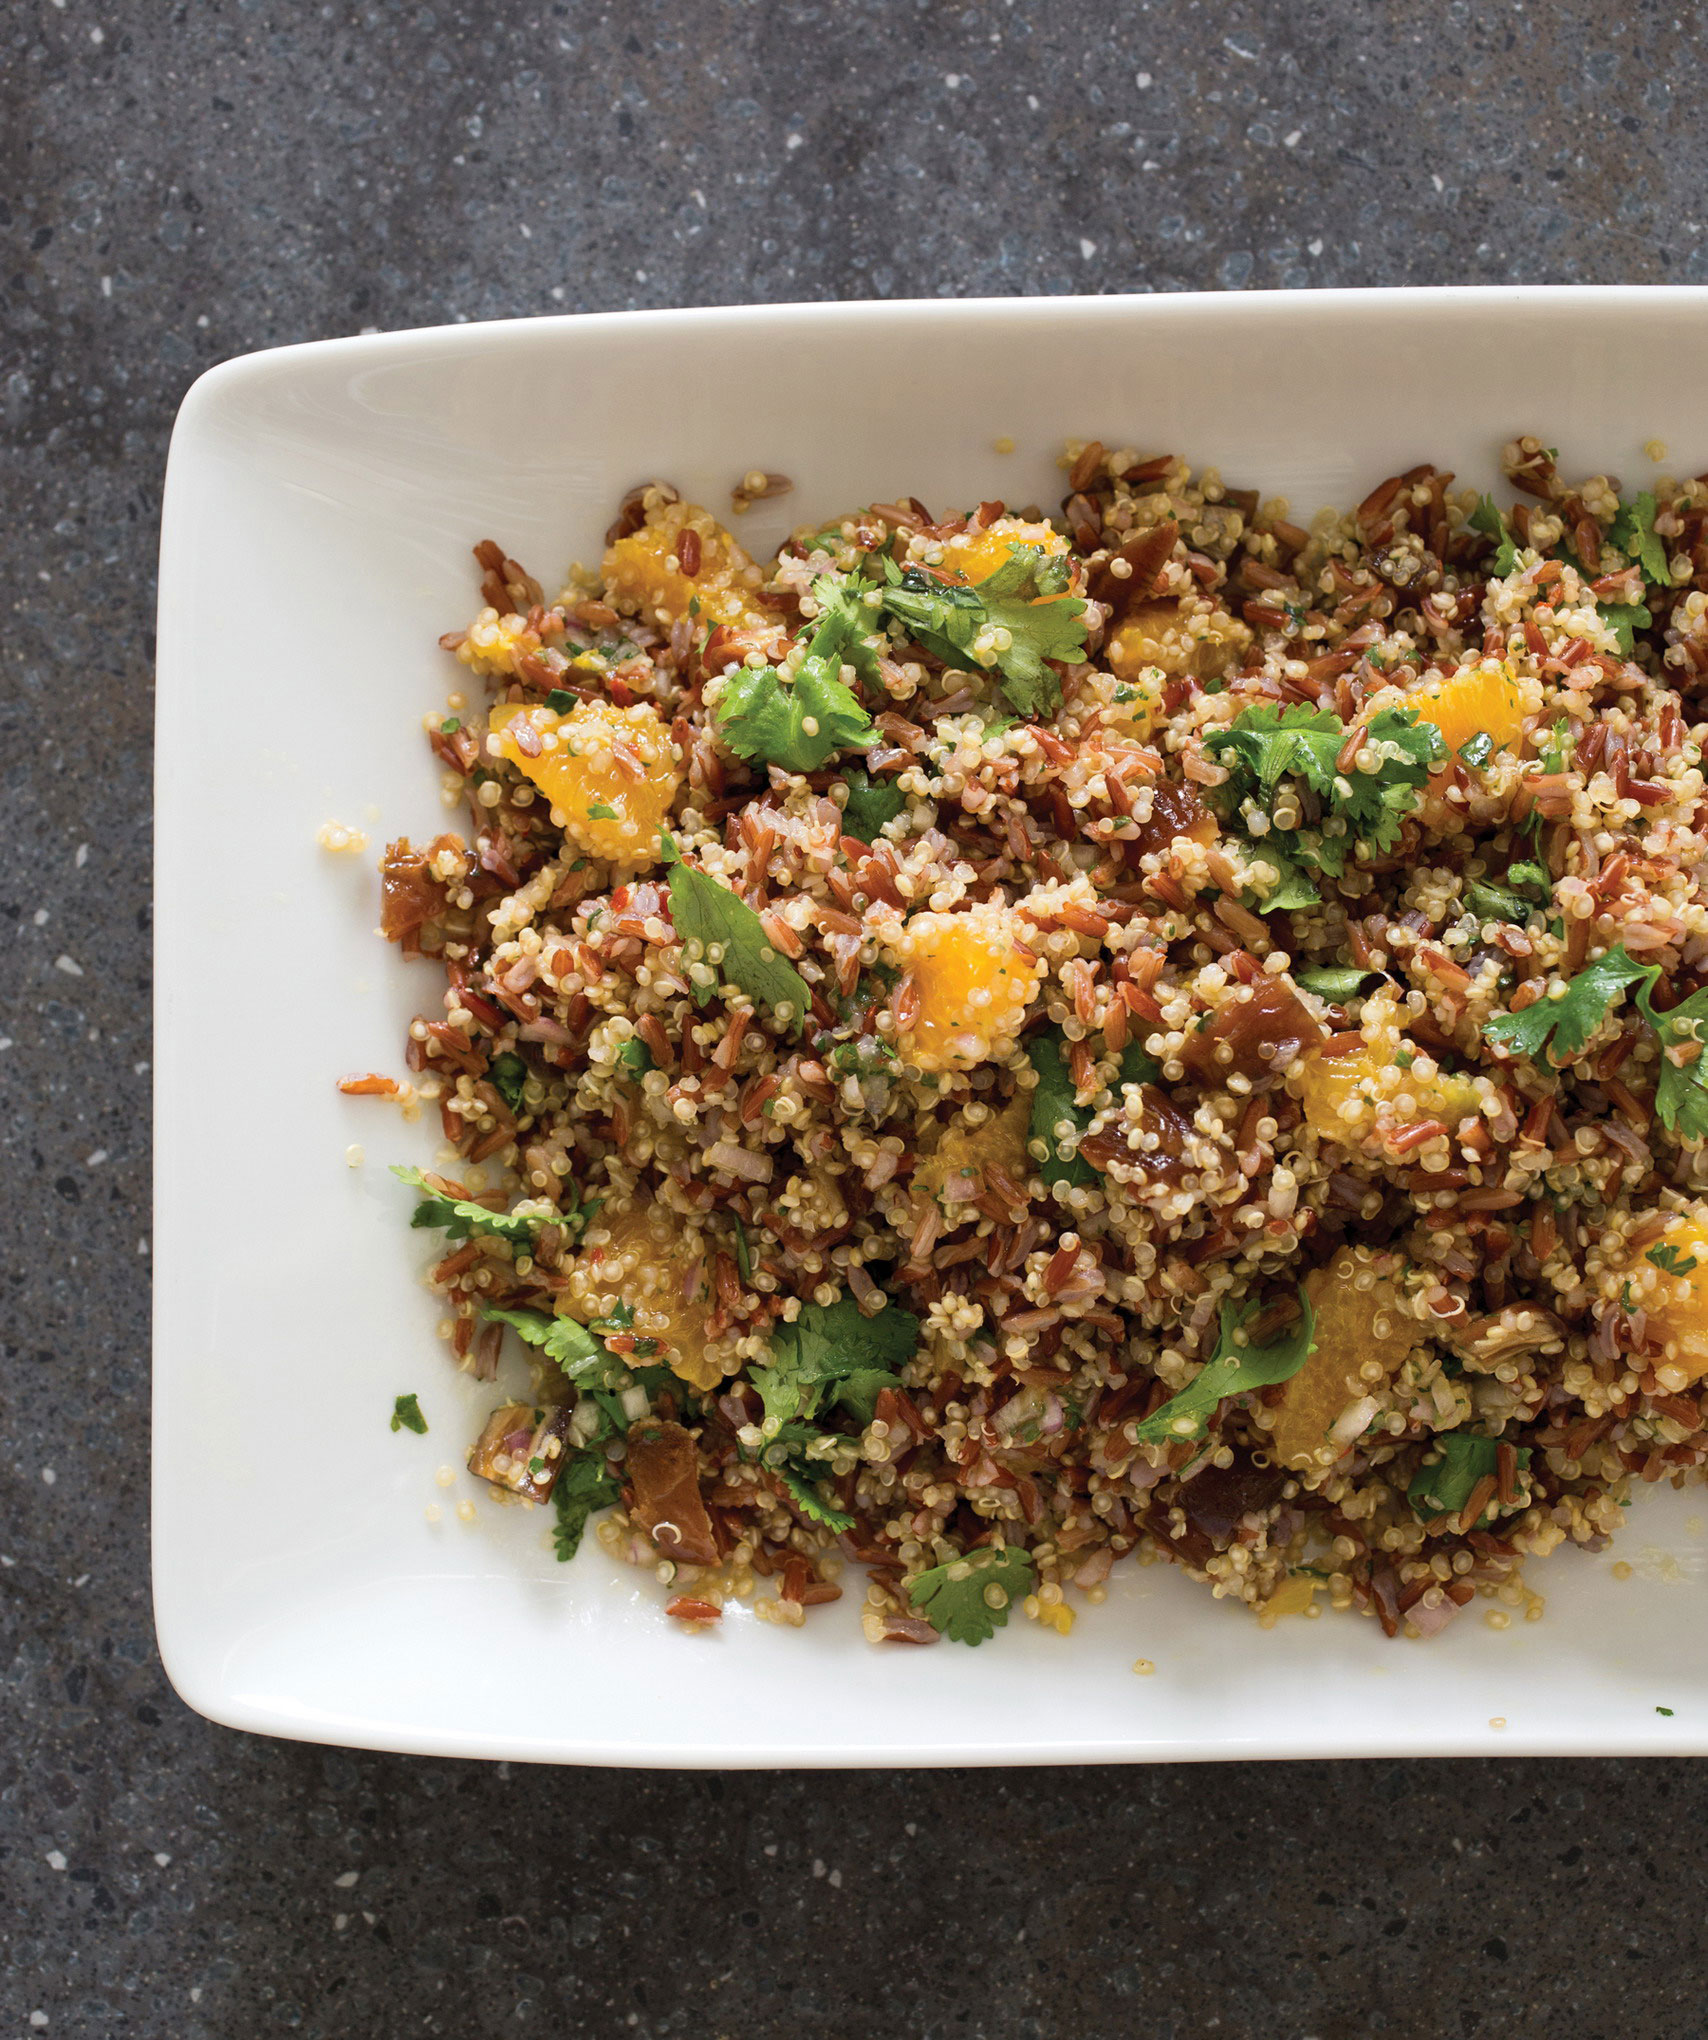
Serves 4 to 6
Why This Recipe Works One rice variety that doesn’t get enough play is red rice. Nutty in flavor and highly nutritious, red rice sports—surprise—a husk that is red from the anthocyanins it contains (the same beneficial compounds that make blueberries blue). For a pretty salad, we mixed this rice with nutty white quinoa, cooking them together using the pasta method and giving the rice a head start to ensure that both grains were done at the same time. Then we drained them, drizzled them with lime juice to add bright flavor, and let them cool. Next, to make this salad fresh and a little sweet, we chose dates and orange segments (and used some of the orange juice in our dressing). Cilantro and red pepper flakes added a fresh bite and a bit of spiciness to round it out. We like the convenience of prewashed quinoa; rinsing removes the quinoa’s bitter protective coating (called saponin). If you buy unwashed quinoa, rinse it and then spread it out on a clean dish towel to dry for 15 minutes.
¾ cup red rice
Table salt for cooking rice and quinoa
¾ cup prewashed white quinoa
3 tablespoons lime juice (2 limes), divided
2 oranges
1 small shallot, minced
1 tablespoon minced fresh cilantro plus 1 cup leaves
¼ teaspoon red pepper flakes
¼ cup extra-virgin olive oil
6 ounces pitted dates, chopped (1 cup)
1. Bring 4 quarts water to boil in large pot over high heat. Add rice and 1 tablespoon salt and cook, stirring occasionally, for 15 minutes. Add quinoa to pot and continue to cook until grains are tender, 12 to 14 minutes. Drain rice-quinoa mixture, spread over rimmed baking sheet, drizzle with 2 tablespoons lime juice, and let cool completely, about 15 minutes.
2. Meanwhile, cut away peel and pith from oranges. Holding fruit over bowl, use paring knife to slice between membranes to release segments. Cut segments in half crosswise. If needed, squeeze orange membranes to equal 2 tablespoons juice in bowl.
3. Whisk 2 tablespoons orange juice, shallot, minced cilantro, pepper flakes, and remaining 1 tablespoon lime juice together in large bowl. Whisking constantly, slowly drizzle in oil. Add rice-quinoa mixture, dates, orange segments, and cilantro leaves and toss to combine. Season with salt and pepper to taste, and serve.
Serves 4 to 6
Why This Recipe Works Also known as purple or forbidden rice, black rice is another less common but delicious rice choice. This ancient grain, which once was reserved exclusively for the emperors of China, has a deliciously roasted, nutty taste and can be used in anything from salads to dessert puddings. We stayed true to the rice’s geographic roots in creating this colorful rice salad. The emerald green snap peas, red-and-white radishes, and red bell peppers are like jewels against the dramatic-looking black rice. The only drawback of black rice is that it is easy to overcook, so as with other rices, the best approach was to cook it like pasta, in lots of boiling water, giving it space to move around. Then we drained it, drizzled it with a little vinegar for a flavor boost, and let it cool completely on a baking sheet. This ensured perfectly cooked grains that had the expected chew of black rice without any mushiness. We mixed up a vinaigrette with sesame oil, ginger, and chili-garlic sauce, and stirred in some cilantro, and our simple salad was complete.
1½ cups black rice
¼ teaspoon table salt, plus salt for cooking rice
1 teaspoon plus 3 tablespoons rice vinegar, divided
¼ cup extra-virgin olive oil
1 tablespoon toasted sesame oil
2 teaspoons minced shallot
2 teaspoons Asian chili-garlic sauce
1 teaspoon grated fresh ginger
⅛ teaspoon pepper
6 ounces sugar snap peas, strings removed, halved
5 radishes, trimmed, halved, and sliced thin
1 red bell pepper, stemmed, seeded, and chopped fine
¼ cup minced fresh cilantro
1. Bring 4 quarts water to boil in Dutch oven over medium-high heat. Add rice and 1 teaspoon salt and cook until rice is tender, 20 to 25 minutes. Drain rice, spread onto rimmed baking sheet, and drizzle with 1 teaspoon vinegar. Let rice cool completely, about 15 minutes.
2. Whisk remaining 3 tablespoons vinegar, olive oil, sesame oil, shallot, chili-garlic sauce, ginger, pepper, and salt in large bowl until combined. Add rice, snap peas, radishes, bell pepper, and cilantro and toss to combine. Season with salt and pepper to taste. Serve.
Serves 4 to 6
Why This Recipe Works Hearty, nutrient-rich barley has a firm texture that makes it well suited to accompany anything from simple Grilled Onions with Balsamic Vinaigrette (this page) to robust Sicilian White Beans and Escarole (this page), so for this dish we chose a fairly simple flavor profile to keep it versatile. Cooking an onion and then toasting the barley before adding a measured amount of water enhanced the barley’s inherent nuttiness. But during our testing, we uncovered a major inconsistency: One batch of barley was fully tender in 35 minutes, another in 20, and the next in 40. We realized that the extent to which the barley was pearled, or polished to remove the outer bran, was affecting the cooking time—but since there is often no way to tell by the label, the only way to account for the differences was to put a 20-minute range in the cooking time. After the grains were fully cooked and had absorbed the water, we stirred in a handful of fresh, bold herbs and a bit of lemon juice for a vibrant finish. Do not substitute hulled, hull-less, quick-cooking, or presteamed barley (read the ingredient list on the package to determine this) in this recipe.
3 tablespoons extra-virgin olive oil
1 small onion, chopped fine
½ teaspoon table salt
1½ cups pearl barley, rinsed
2 garlic cloves, minced
1½ teaspoons minced fresh thyme or ½ teaspoon dried
2½ cups water
¼ cup minced fresh parsley
2 tablespoons minced fresh chives
1½ teaspoons lemon juice
1. Heat oil in large saucepan over medium heat until shimmering. Add onion and salt and cook until softened, about 5 minutes. Stir in barley, garlic, and thyme and cook, stirring frequently, until barley is lightly toasted and fragrant, about 3 minutes.
2. Stir in water and bring to simmer. Reduce heat to low, cover, and simmer until barley is tender and water is absorbed, 20 to 40 minutes.
3. Off heat, lay clean dish towel underneath lid and let pilaf sit for 10 minutes. Add parsley, chives, and lemon juice to pilaf and fluff gently with fork to combine. Season with salt and pepper to taste. Serve.
Serves 4 to 6
Why This Recipe Works Barley is the star of this hearty bowl that’s full of contrasting—and surprising—textures and Middle Eastern flavors, with its warm spices and colorful vegetables. To keep the cooking method easy, we simply boiled the barley and then tossed it with a bright lemon-mint dressing so the warm grains would readily soak it up. While the barley cooked, we pan-roasted coriander-dusted spears of carrots until charred, sweet, and tender. We then threw in crisp snow peas and cooked them until just blistered, so they would retain their green freshness. Toasting sunflower seeds with cumin, cardamom, and a little more coriander gave the dish a warm, aromatic finish. We piled a mound of the dressed barley and vegetables into our bowls, followed by our crunchy seed topping. Finally, a drizzle of our Tahini Sauce pulled all the components of the bowl together. Do not substitute hulled or hull-less barley (read the ingredient list on the package to determine this) in this recipe. If using quick-cooking or presteamed barley, you will need to reduce the cooking time in step 1. We also like this bowl topped with avocado.
¼ cup extra-virgin olive oil, divided
3 tablespoons minced fresh mint, divided
1 teaspoon grated lemon zest plus 2 tablespoons juice
1½ cups pearl barley, rinsed
¼ teaspoon table salt, plus salt for cooking barley
5 carrots, peeled
¾ teaspoon ground coriander, divided
8 ounces snow peas, strings removed, halved lengthwise
⅔ cup raw sunflower seeds
½ teaspoon ground cumin
⅛ teaspoon ground cardamom
½ cup Tahini Sauce (this page)
1. Whisk 2½ tablespoons oil, 2 tablespoons mint, and lemon zest and juice together in large bowl, set aside. Bring 4 quarts water to boil in large pot. Add barley and 1 tablespoon salt, return to boil, and cook until tender, 20 to 40 minutes. Drain barley, transfer to bowl with lemon-mint mixture, and toss to combine. Season with salt and pepper to taste, and cover to keep warm.
2. While barley cooks, halve carrots crosswise, then halve or quarter lengthwise to create uniformly sized pieces. Heat 1 tablespoon oil in 12-inch nonstick skillet over medium-high heat until just smoking. Add carrots and ½ teaspoon coriander and cook, stirring occasionally, until lightly charred and just tender, 5 to 7 minutes. Stir in snow peas and cook until spotty brown, 3 to 5 minutes; transfer to second bowl.
3. Heat remaining 1½ teaspoons oil in now-empty skillet over medium heat until shimmering. Add sunflower seeds, cumin, cardamom, remaining ¼ teaspoon coriander, and salt. Cook, stirring constantly, until seeds are toasted, about 2 minutes; transfer to third bowl.
4. Divide barley among individual bowls, then top with carrot–snow pea mixture and sunflower seeds. Drizzle with tahini sauce, sprinkle with remaining 1 tablespoon mint, and serve.
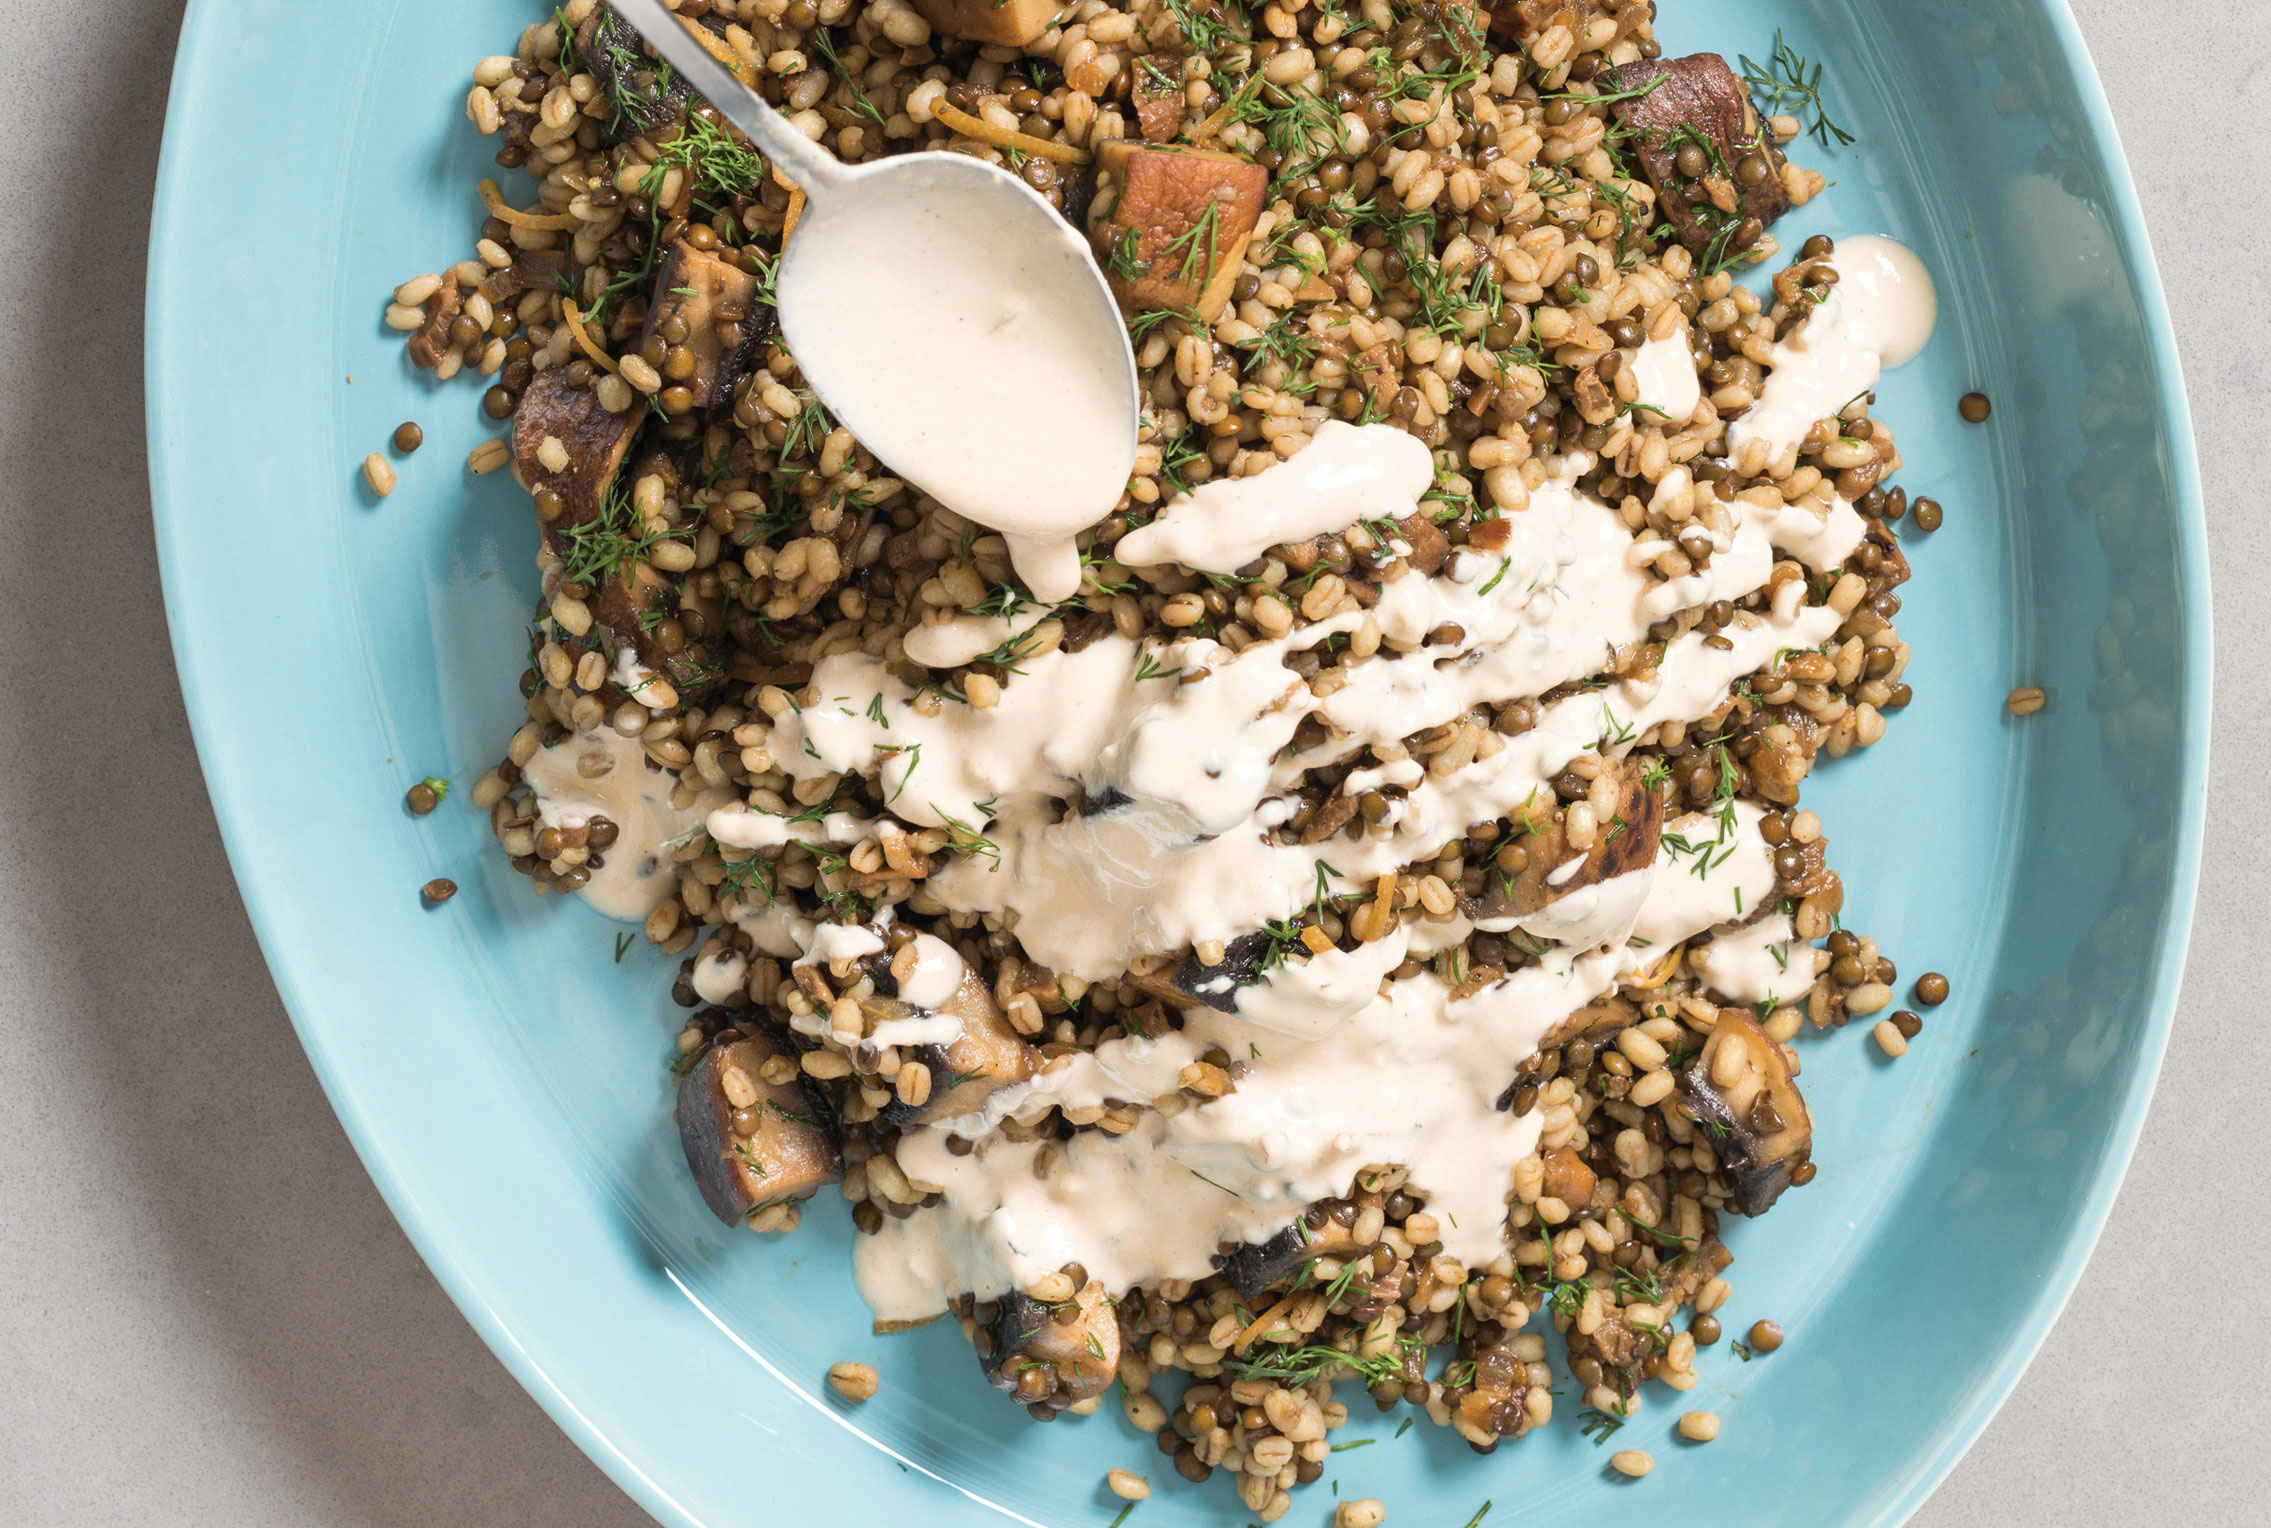
Serves 4
Why This Recipe Works Tasters particularly favored black lentils in this hearty dish, for their nutty, robust flavor and ability to hold their shape once cooked. We were happy to find that we could cook the sturdy lentils in the same pot as the barley. Hoping to streamline things even more, we set the cooked barley and lentils aside and attempted to brown the mushrooms in the same saucepan. But the mushrooms were too crowded in the pot, which caused them to steam. Switching to a large nonstick skillet to cook the meaty portobellos and umami-rich porcini resulted in more browning and faster cooking. Our tangy Tahini-Yogurt Sauce balanced all the hearty flavors, and fresh dill and strips of lemon peel brightened the earthy notes. Do not substitute hulled, hull-less, quick-cooking, or presteamed barley (read the package label to determine this) in this recipe. Green or brown lentils can be substituted for the black lentils.
½ ounce dried porcini mushrooms, rinsed
1 cup pearl barley, rinsed
½ cup black lentils, picked over and rinsed
½ teaspoon table salt, plus salt for cooking barley and lentils
2 tablespoons extra-virgin olive oil
1 onion, chopped fine
2 large portobello mushroom caps, cut into 1-inch pieces
3 (2-inch) strips lemon zest, sliced thin lengthwise
¾ teaspoon ground coriander
¼ teaspoon pepper
2 tablespoons chopped fresh dill
½ cup Tahini-Yogurt Sauce (this page)
1. Microwave 1½ cups water and porcini mushrooms in covered bowl until steaming, about 1 minute. Let sit until softened, about 5 minutes. Drain mushrooms in fine-mesh strainer lined with coffee filter, reserving soaking liquid, and chop mushrooms.
2. Bring 4 quarts water to boil in Dutch oven. Add barley, lentils, and 1 tablespoon salt, return to boil, and cook until tender, 20 to 40 minutes. Drain barley and lentils, return to now-empty pot, and cover to keep warm.
3. Meanwhile, heat oil in 12-inch nonstick skillet over medium heat until shimmering. Add onion and cook until softened, about 5 minutes. Stir in portobello mushrooms, cover, and cook until portobellos have released their liquid and begin to brown, about 4 minutes.
4. Uncover, stir in lemon zest, coriander, salt, and pepper, and cook until fragrant, about 30 seconds. Stir in porcini and porcini soaking liquid, bring to boil, and cook, stirring occasionally, until liquid is thickened slightly and reduced to ½ cup, about 5 minutes. Stir mushroom mixture and dill into barley-lentil mixture and season with salt and pepper to taste. Serve, drizzling individual portions with tahini-yogurt sauce.
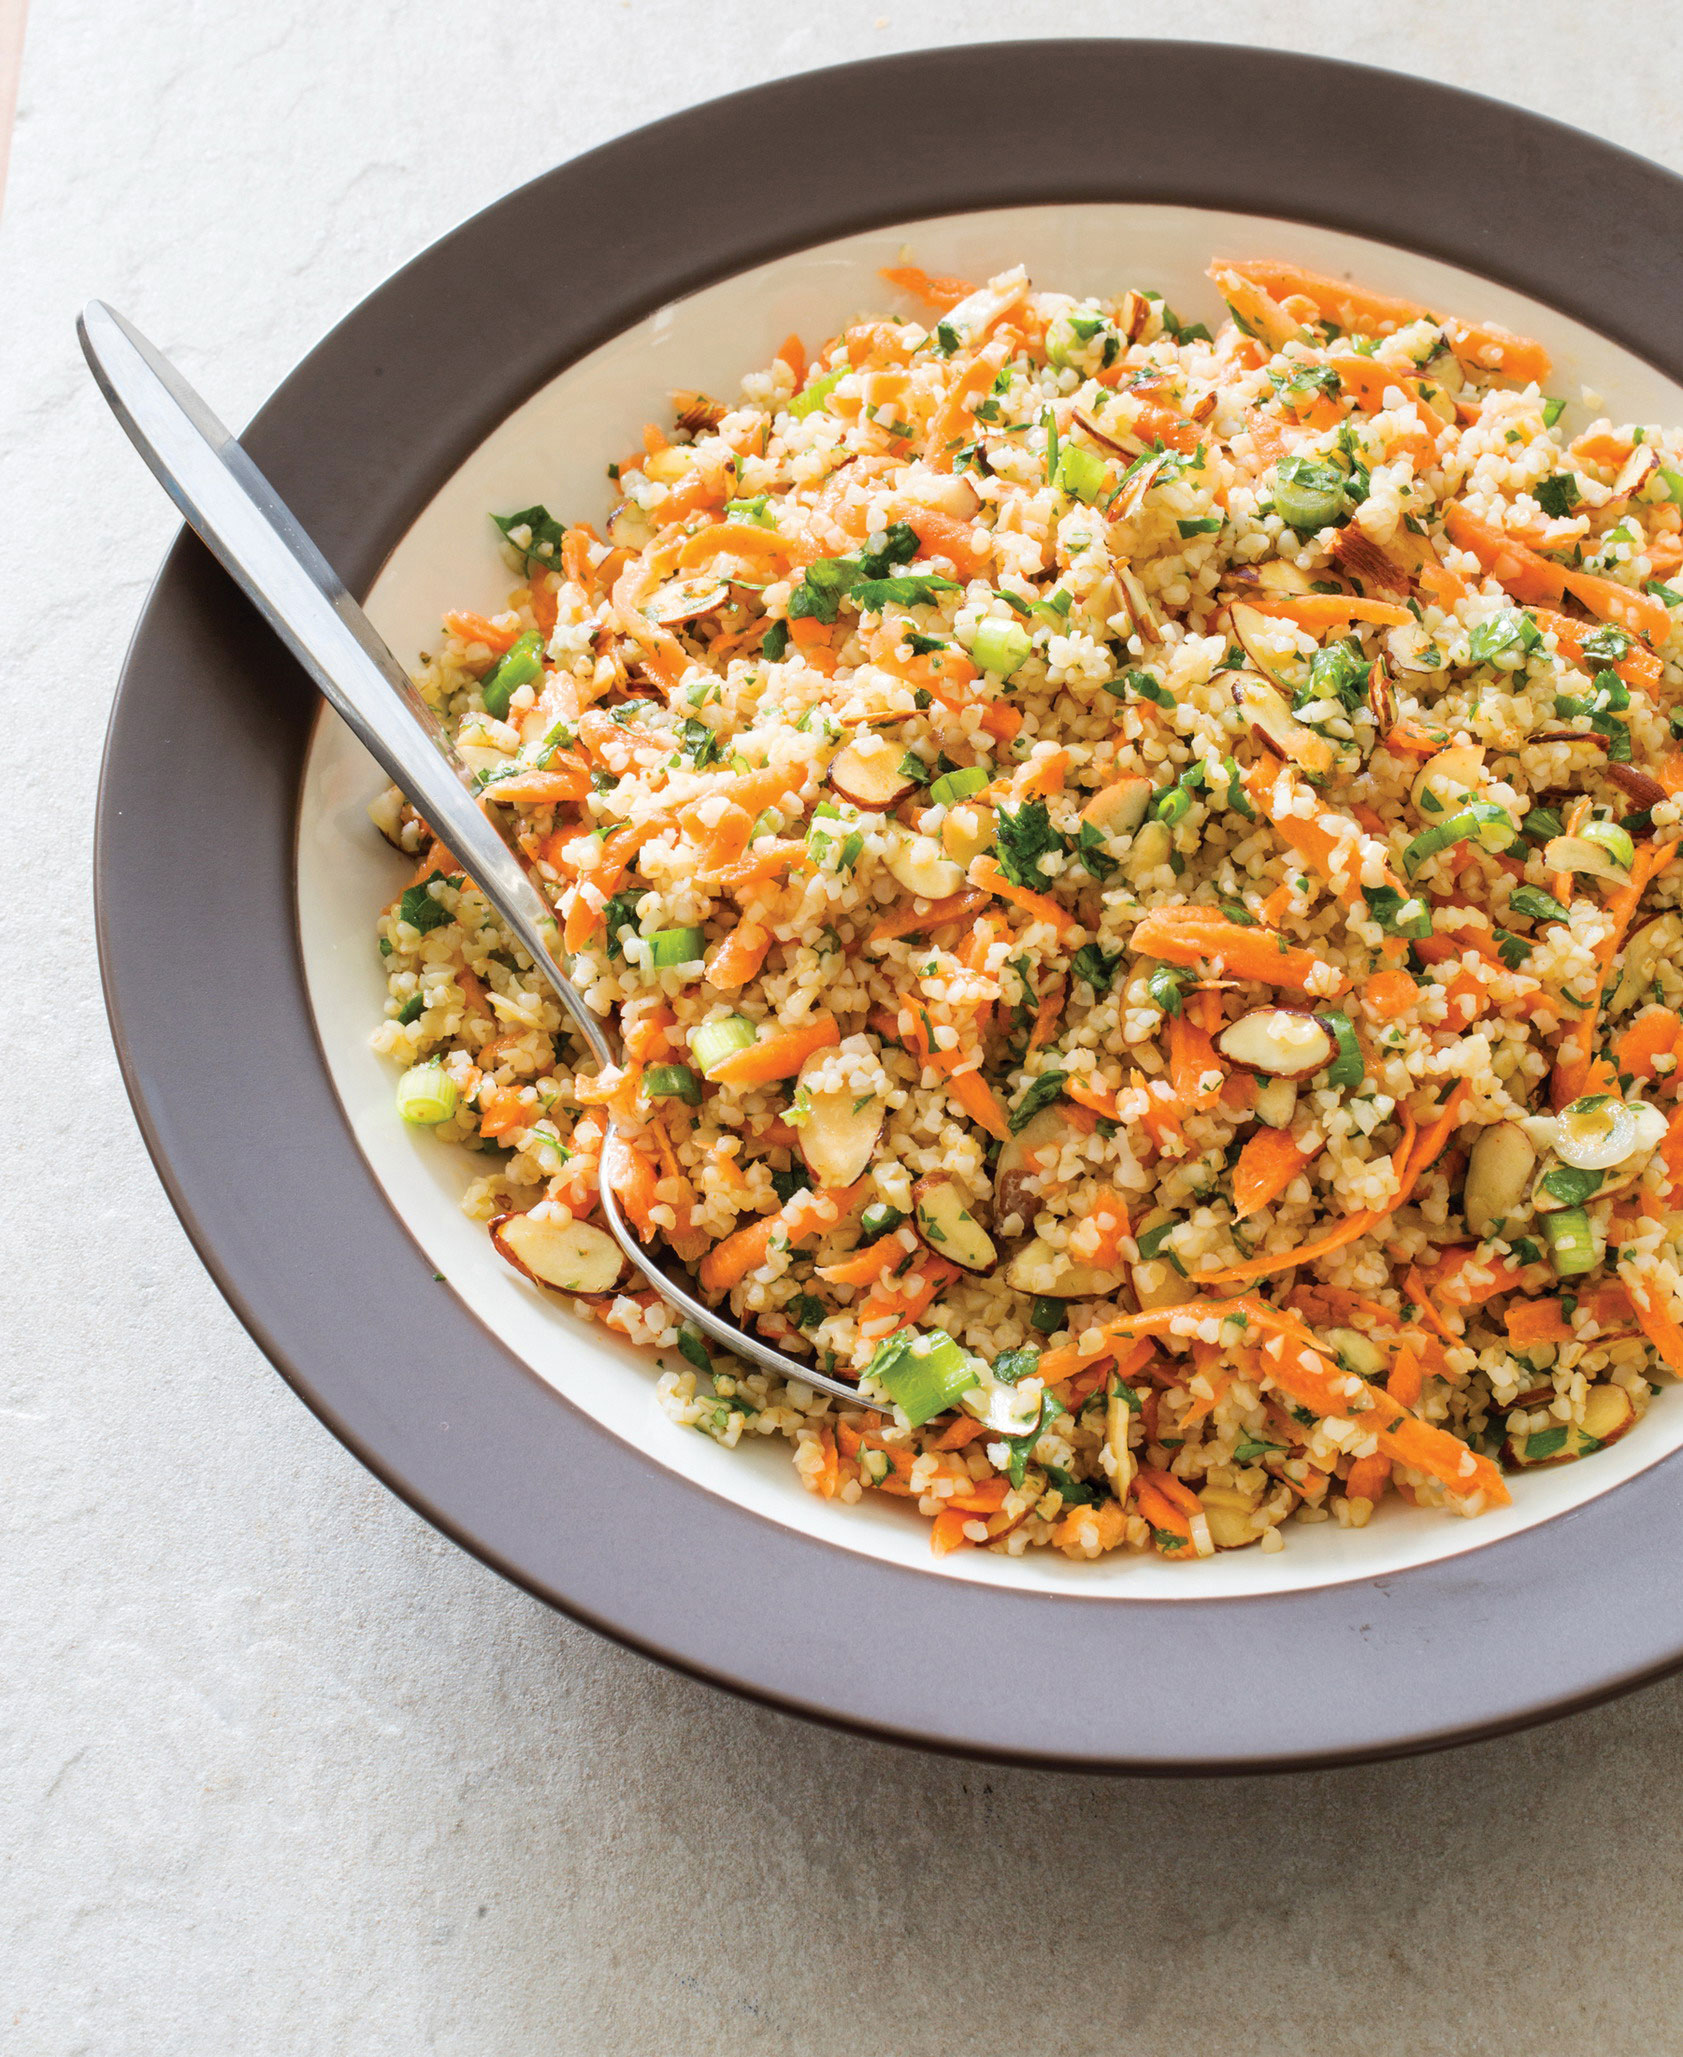
Serves 4 to 6
Why This Recipe Works As versatile as it is nutritious, bulgur is a great medium for delivering big, bold flavor in hearty salads. To bulk up this simple cereal grain into a satisfying no-cook salad, we started by softening the bulgur in a mixture of water, lemon juice, and salt for an hour and a half, until it had the perfect chew and was thoroughly seasoned. Fresh mint, cilantro, and scallions made our salad crisp and bright, and cumin and cayenne added depth of flavor to our simple lemon vinaigrette. Sweet shredded carrots nicely accented the rich, nutty taste of the bulgur, and toasted almonds provided complementary crunch. When shopping, don’t confuse bulgur with cracked wheat, which has a much longer cooking time and will not work in this recipe.
1½ cups medium-grind bulgur, rinsed
1 cup water
6 tablespoons lemon juice (2 lemons), divided
¾ teaspoon table salt, divided
⅓ cup extra-virgin olive oil
½ teaspoon ground cumin
⅛ teaspoon cayenne pepper
4 carrots, peeled and shredded
3 scallions, sliced thin
½ cup sliced almonds, toasted
⅓ cup chopped fresh mint
⅓ cup chopped fresh cilantro
1. Combine bulgur, water, ¼ cup lemon juice, and ¼ teaspoon salt in bowl. Cover and let sit at room temperature until grains are softened and liquid is fully absorbed, about 1½ hours.
2. Whisk oil, cumin, cayenne, remaining 2 tablespoons lemon juice, and remaining ½ teaspoon salt together in large bowl. Add bulgur, carrots, scallions, almonds, mint, and cilantro and gently toss to combine. Season with salt and pepper to taste. Serve.
Serves 4
Why This Recipe Works This robust and very simple main dish combines creamy, nutty chickpeas and hearty bulgur with the clean, vegetal punch of fresh spinach. The aromatic eastern Mediterranean spice blend za’atar, with its fragrant wild herbs, toasted sesame seeds, and tangy sumac, elevates the flavors with little effort. We found that incorporating the za’atar at two points in the cooking process brought out its complexity. First, to release its deep earthiness, we bloomed half of the za’atar in an aromatic base of onion and garlic before adding the bulgur, chickpeas, and cooking liquid. We added the remainder of the za’atar, along with the fresh baby spinach, off the heat; the residual heat in the bulgur was enough to perfectly soften the spinach and to highlight the za’atar’s more delicate aromas. When shopping, don’t confuse bulgur with cracked wheat, which has a much longer cooking time and will not work in this recipe.
3 tablespoons extra-virgin olive oil, divided
1 onion, chopped fine
½ teaspoon table salt
3 garlic cloves, minced
2 tablespoons za’atar, divided
1 cup medium-grind bulgur, rinsed
1 (15-ounce) can chickpeas, rinsed
¾ cup vegetable broth
¾ cup water
3 ounces (3 cups) baby spinach, chopped
1 tablespoon lemon juice
1. Heat 2 tablespoons oil in large saucepan over medium heat until shimmering. Add onion and salt and cook until softened, about 5 minutes. Stir in garlic and 1 tablespoon za’atar and cook until fragrant, about 30 seconds.
2. Stir in bulgur, chickpeas, broth, and water and bring to simmer. Reduce heat to low, cover, and simmer gently until bulgur is tender, 16 to 18 minutes.
3. Off heat, lay clean dish towel underneath lid and let bulgur sit for 10 minutes. Add spinach, lemon juice, remaining 1 tablespoon oil, and remaining 1 tablespoon za’atar and fluff gently with fork to combine. Season with salt and pepper to taste. Serve.

Serves 4 to 6
Why This Recipe Works Tabbouleh, originally from the Middle East, has become a “global salad” found in different iterations around the world. By definition it includes bulgur, parsley, tomato, and onion in a penetrating mint and lemon dressing. In America, we think of it as a grain-based dish, but its original version features parsley first and foremost, so we wanted to be sure to include plenty of that herb. We started by salting and draining the tomatoes to rid them of excess moisture that would make our tabbouleh soggy. Soaking the bulgur in lemon juice and some of the drained tomato liquid, rather than in water, allowed it to absorb loads of flavor as it softened. Tasters felt that chopped raw onion was too strong but that milder scallions added just the right level of flavor. Mint and a bit of cayenne pepper rounded out the dish. Adding the herbs and vegetables to the bulgur while it was still soaking gave all the components time to mingle, resulting in a cohesively flavored dish. Make a meal of this with hummus and pita. Or try the variation with tofu, which is a meal in itself. Don’t confuse bulgur with cracked wheat, which has a much longer cooking time and will not work in this recipe.
3 tomatoes, cored and cut into ½-inch pieces
½ teaspoon table salt, divided
½ cup medium-grind bulgur, rinsed
¼ cup lemon juice (2 lemons), divided
6 tablespoons extra-virgin olive oil
⅛ teaspoon cayenne pepper
1½ cups minced fresh parsley
½ cup minced fresh mint
2 scallions, sliced thin
1. Toss tomatoes with ¼ teaspoon salt in fine-mesh strainer set over bowl and let drain, tossing occasionally, for 30 minutes; reserve 2 tablespoons drained tomato juice. Toss bulgur with 2 tablespoons lemon juice and reserved tomato juice in bowl and let sit until grains begin to soften, 30 to 40 minutes.
2. Whisk remaining 2 tablespoons lemon juice, oil, cayenne, and remaining ¼ teaspoon salt together in large bowl. Add tomatoes, bulgur, parsley, mint, and scallions and toss gently to combine. Cover and let sit at room temperature until flavors meld and bulgur is tender, about 1 hour. Before serving, toss salad to recombine and season with salt and pepper to taste.
Don’t confuse bulgur with cracked wheat, which has a much longer cooking time and will not work in this recipe. You can substitute firm tofu for the extra-firm in this recipe.
3 tomatoes, cored and cut into ½-inch pieces
1 teaspoon table salt, divided
½ cup medium-grind bulgur, rinsed
¼ cup lemon juice (2 lemons), divided
14 ounces extra-firm tofu, cut into 2-inch pieces
⅛ teaspoon pepper
¼ cup extra-virgin olive oil, divided
3 garlic cloves, minced
⅛ teaspoon cayenne pepper
1½ cups minced fresh parsley
½ cup minced fresh mint
2 scallions, sliced thin
1. Toss tomatoes with ¼ teaspoon salt in fine-mesh strainer set over bowl and let drain, tossing occasionally, for 30 minutes; reserve 2 tablespoons drained tomato juice. Toss bulgur with 2 tablespoons lemon juice and reserved tomato juice in bowl and let sit until grains begin to soften, 30 to 40 minutes.
2. Meanwhile, spread tofu on paper towel–lined baking sheet and let drain for 20 minutes. Gently press dry with paper towels and sprinkle with ¼ teaspoon salt and pepper. Pulse tofu in food processor until coarsely chopped, 3 to 4 pulses. Line baking sheet with clean paper towels. Spread processed tofu over prepared sheet and press gently with paper towels to dry.
3. Heat 2 teaspoons oil in 12-inch nonstick skillet over medium-high heat until shimmering. Add tofu and cook, stirring occasionally, until tofu is lightly browned, 10 to 12 minutes. (Tofu should start to sizzle after about 1½ minutes; adjust heat as needed.) Push tofu to sides of skillet. Add 1 teaspoon oil and garlic to center and cook, mashing garlic into skillet, until fragrant, about 1 minute. Stir mixture into tofu. Transfer to bowl and let cool for 10 minutes.
4. Whisk cayenne, remaining ½ teaspoon salt, remaining 2 tablespoons lemon juice, and remaining 3 tablespoons oil together in large bowl. Add drained tomatoes, soaked bulgur, cooled tofu, parsley, mint, and scallions and toss to combine. Cover and let sit until bulgur is tender, about 1 hour. Toss to recombine and season with salt and pepper to taste before serving.
Serves 4 to 6
Why This Recipe Works Nutty, chewy farro is an ancient grain that’s been extremely popular in Italian cuisine for centuries. Typically the whole grains are soaked overnight and then cooked gradually for more than an hour, but we wondered if we could streamline this and find a simpler, quicker method. After testing out a few cooking techniques, we learned that boiling the grains in plenty of salted water, pasta-style, and then draining them yielded nicely firm but tender farro—no soaking necessary. For this simple side that showcases the farro, sautéed onion and garlic gave the dish savory backbone, and bright lemon and herbs lent it freshness. Do not substitute quick-cooking or presteamed farro (read the ingredient list on the package to determine this) in this recipe. If using pearled farro, you will need to reduce the cooking time in step 1.
½ cup whole farro
¼ teaspoon table salt, plus salt for cooking farro
3 tablespoons extra-virgin olive oil, divided
1 onion, chopped fine
1 garlic clove, minced
¼ cup chopped fresh parsley
¼ cup chopped fresh mint
1 tablespoon lemon juice
1. Bring 4 quarts water to boil in Dutch oven. Add farro and 1 tablespoon salt, return to boil, and cook until grains are tender with slight chew, 15 to 30 minutes. Drain farro, return to now-empty pot, and cover to keep warm.
2. Heat 2 tablespoons oil in 12-inch skillet over medium heat until shimmering. Add onion and salt and cook until softened, about 5 minutes. Stir in garlic and cook until fragrant, about 30 seconds.
3. Add remaining 1 tablespoon oil and farro and cook, stirring frequently, until heated through, about 2 minutes. Off heat, stir in parsley, mint, and lemon juice. Season with salt and pepper to taste. Serve.
VARIATION
Warm Farro with Mushrooms and Thyme
Do not substitute quick-cooking or presteamed farro (read the ingredient list on the package to determine this) in this recipe. If using pearled farro, you will need to reduce the cooking time in step 1.
1½ cups whole farro
¼ teaspoon table salt, plus salt for cooking farro
3 tablespoons extra-virgin olive oil, divided
12 ounces cremini mushrooms, trimmed and chopped coarse
1 shallot, minced
1½ teaspoons minced fresh thyme or ½ teaspoon dried
3 tablespoons dry sherry
3 tablespoons minced fresh parsley
1½ teaspoons sherry vinegar, plus extra for serving
1. Bring 4 quarts water to boil in Dutch oven. Add farro and 1 tablespoon salt, return to boil, and cook until grains are tender with slight chew, 15 to 30 minutes. Drain farro, return to now-empty pot, and cover to keep warm.
2. Heat 2 tablespoons oil in 12-inch skillet over medium heat until shimmering. Add mushrooms, shallot, thyme, and ¼ teaspoon salt and cook, stirring occasionally, until moisture has evaporated and vegetables start to brown, 8 to 10 minutes. Stir in sherry and cook, scraping up any browned bits, until skillet is almost dry.
3. Add remaining 1 tablespoon oil and farro and cook, stirring frequently, until heated through, about 2 minutes. Off heat, stir in parsley and vinegar. Season with salt, pepper, and extra vinegar to taste, and serve.
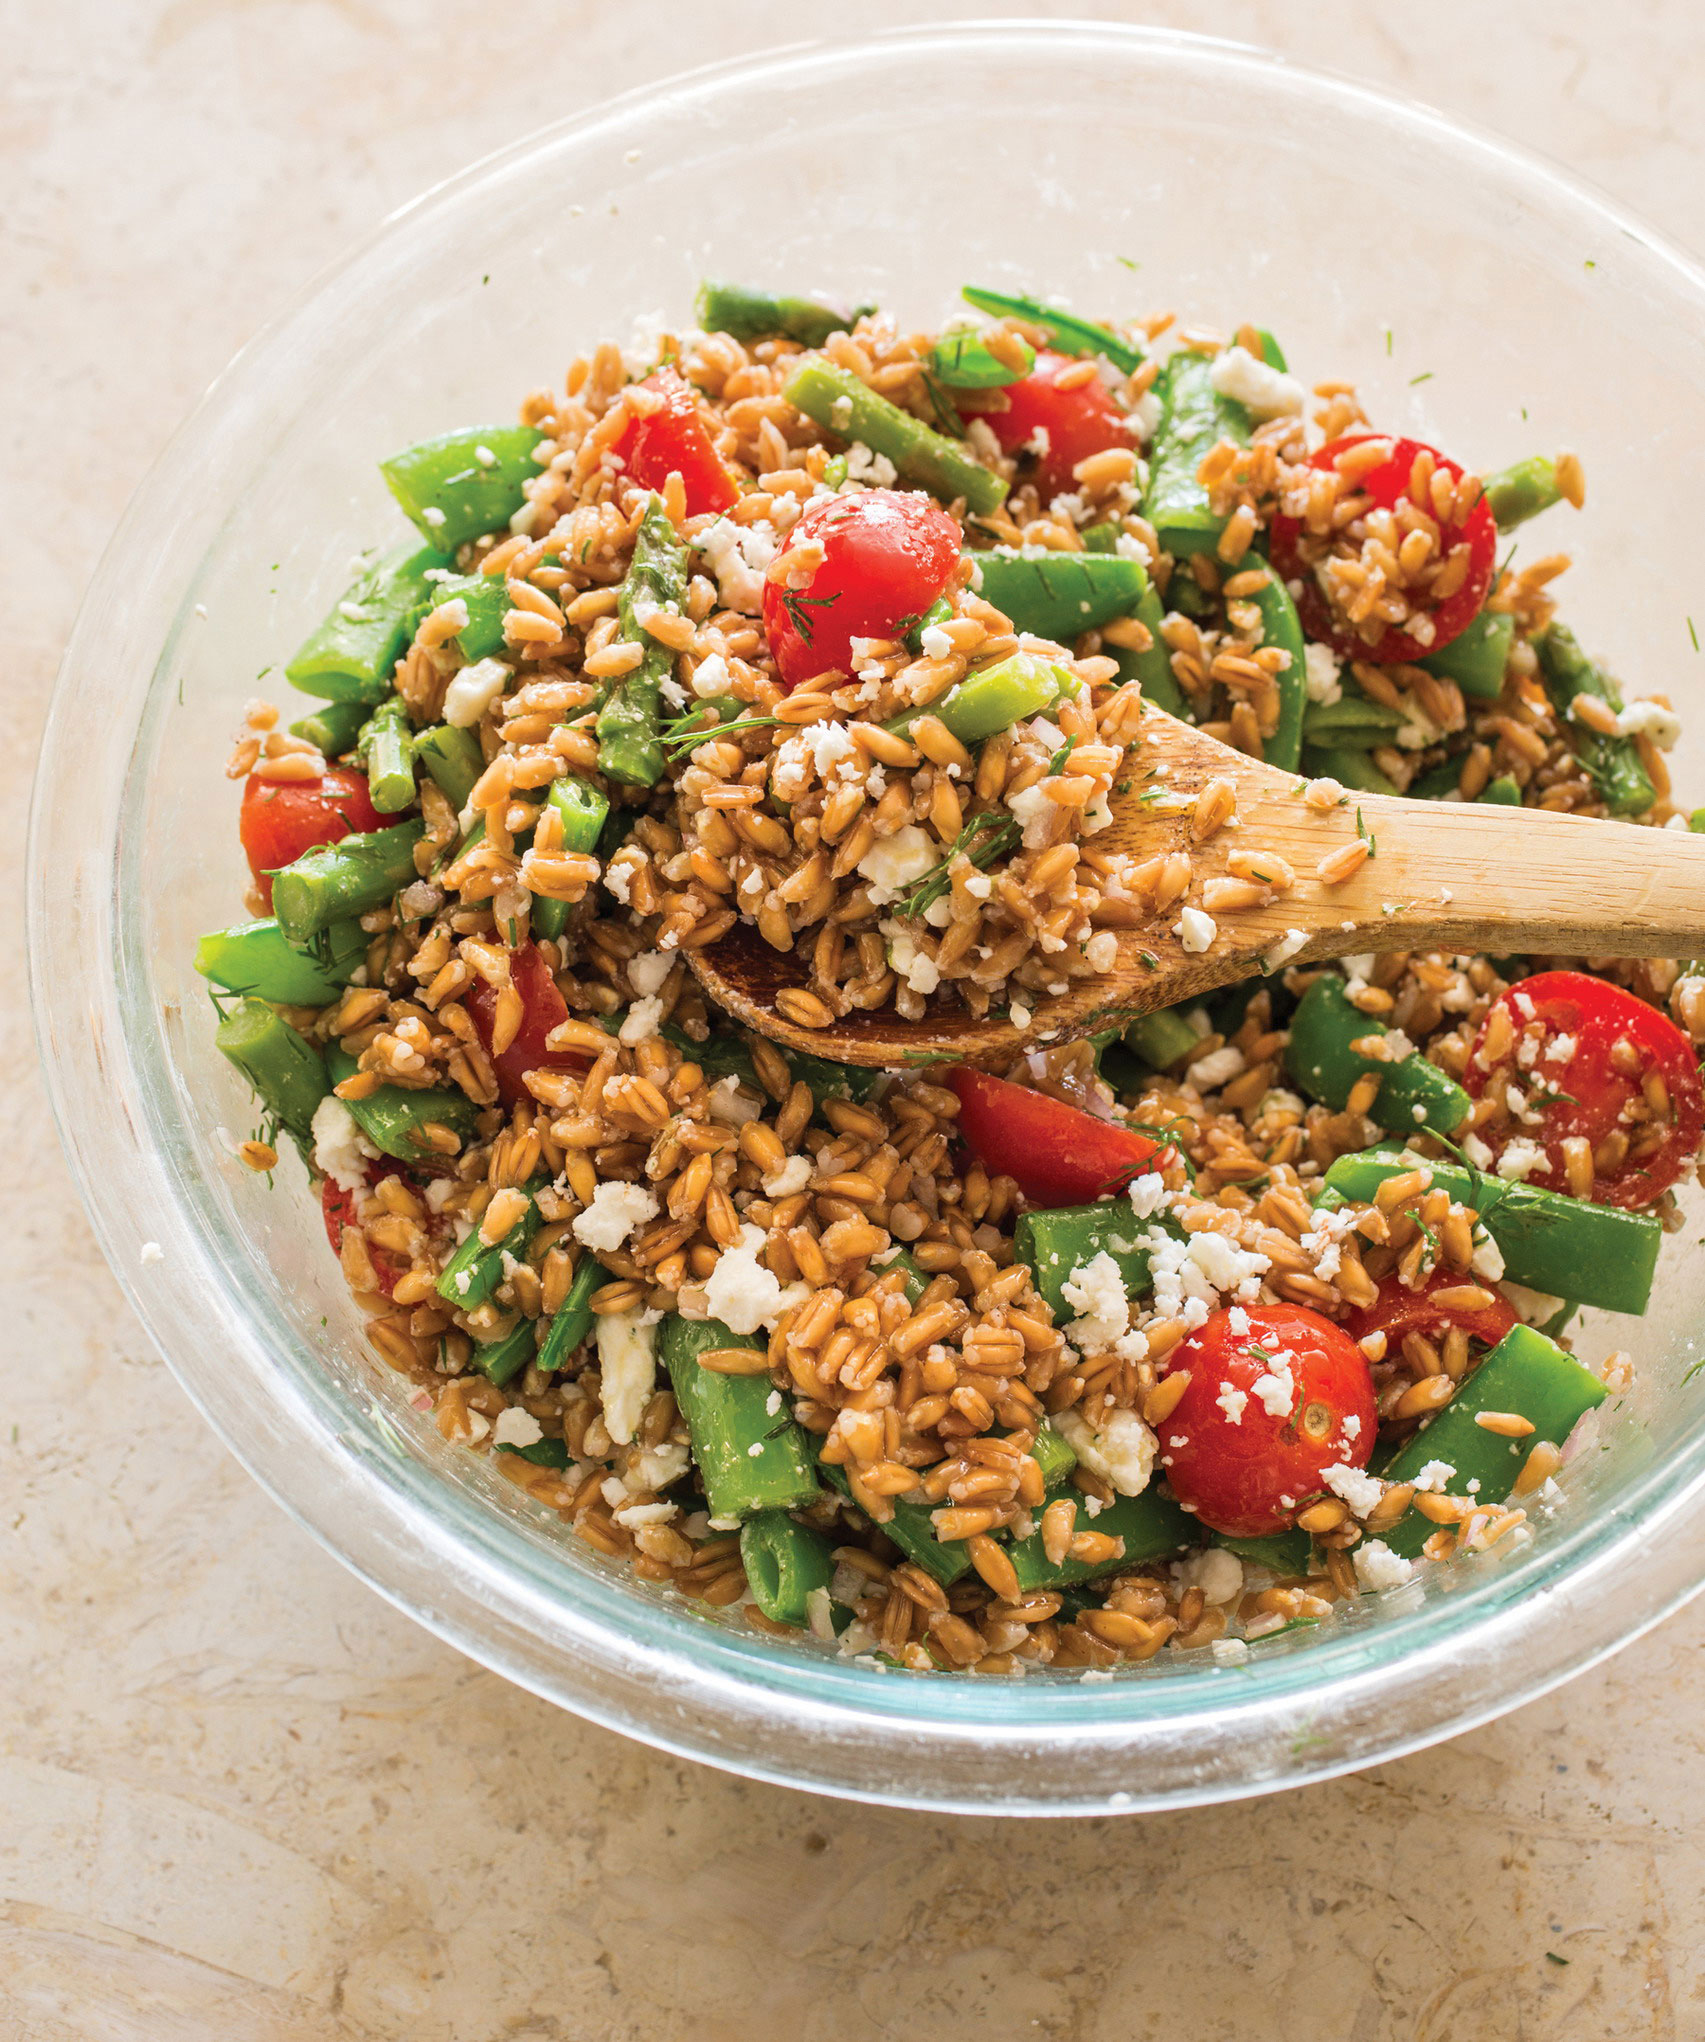
Serves 4 to 6
Why This Recipe Works This fresh yet hearty salad looks as good as it tastes, with vibrant green and red vegetables against a pale golden grain. Using the pasta method to cook the farro ensured that the grains cooked evenly and quickly. We briefly boiled bite-size pieces of asparagus and snap peas to enhance their color and retain their crisp-tender bite. A lemon-dill dressing served as a citrusy, herbal complement to the earthy farro. Cherry tomatoes and a generous amount of dill offered a fresh finish. The optional feta added a creamy note. For a simple variation, we also created a version with cucumber, yogurt, and mint. Do not substitute quick-cooking or presteamed farro (read the ingredient list on the package to determine this) in this recipe. If using pearled farro, you will need to reduce the cooking time in step 2.
6 ounces asparagus, trimmed and cut into 1-inch lengths
6 ounces sugar snap peas, strings removed, cut into 1-inch lengths
¼ teaspoon table salt, plus salt for cooking vegetables and farro
1½ cups whole farro
3 tablespoons extra-virgin olive oil
2 tablespoons lemon juice
2 tablespoons minced shallot
1 teaspoon Dijon mustard
¼ teaspoon pepper
6 ounces cherry tomatoes, halved
3 tablespoons chopped fresh dill
2 ounces feta cheese, crumbled (½ cup), divided (optional)
1. Bring 4 quarts water to boil in Dutch oven. Add asparagus, snap peas, and 1 tablespoon salt and cook until crisp-tender, about 3 minutes. Using slotted spoon, transfer vegetables to large plate and let cool completely, about 15 minutes.
2. Add farro to water, return to boil, and cook until grains are tender with slight chew, 15 to 30 minutes. Drain farro, spread in rimmed baking sheet, and let cool completely, about 15 minutes.
3. Whisk oil, lemon juice, shallot, mustard, pepper, and salt together in large bowl. Add vegetables; farro; tomatoes; dill; and ¼ cup feta, if using, and toss gently to combine. Season with salt and pepper to taste. Transfer to serving platter; sprinkle with remaining ¼ cup feta, if using; and serve.
VARIATION
Farro Salad with Cucumber, Yogurt, and Mint
Do not substitute quick-cooking or presteamed farro (read the ingredient list on the package to determine this) in this recipe. If using pearled farro, you will need to reduce the cooking time in step 2.
1½ cups whole farro
¼ teaspoon table salt, plus salt for cooking farro
3 tablespoons extra-virgin olive oil
2 tablespoons lemon juice
2 tablespoons minced shallot
2 tablespoons plain plant-based yogurt or dairy yogurt
¼ teaspoon pepper
1 English cucumber, halved lengthwise, seeded, and cut into ¼-inch pieces
6 ounces cherry tomatoes, halved
1 cup baby arugula
3 tablespoons chopped fresh mint
1. Bring 4 quarts water to boil in Dutch oven. Add farro and 1 tablespoon salt, return to boil, and cook until grains are tender with slight chew, 15 to 30 minutes. Drain farro, spread in rimmed baking sheet, and let cool completely, about 15 minutes.
2. Whisk oil, lemon juice, shallot, yogurt, pepper, and salt together in large bowl. Add farro, cucumber, tomatoes, arugula, and mint and toss gently to combine. Season with salt and pepper to taste. Serve.
Serves 4 to 6
Why This Recipe Works Italians often prepare farro in a similar way as they cook rice for risotto to make a rich, creamy dish called farrotto. Here we adapted our almost hands-free risotto method, with a few modifications. Farro required more frequent stirring to ensure even cooking. We also found that we didn’t need to warm the broth before adding it to the pot—the farro cooked through just fine without this extra step. Onion, garlic, thyme, and fennel flavored our farrotto. While it’s traditional to finish risotto with butter and Parmesan, these masked the nutty flavors of this grain; we preferred fresh parsley and balsamic vinegar. Stirring in the radicchio at the end preserved its assertive flavor. Be sure to stir the farro often in step 2. Do not substitute pearled, quick-cooking, or presteamed farro (check the ingredient list on the package) for the whole farro.
1 tablespoon extra-virgin olive oil
1 onion, chopped fine
1 fennel bulb, halved, cored, and chopped fine
¼ teaspoon table salt
3 garlic cloves, minced
1 teaspoon minced fresh thyme
1½ cups whole farro
2 cups vegetable broth
1½ cups water
½ small head radicchio, sliced thin
2 tablespoons minced fresh parsley
2 teaspoons balsamic vinegar
1. Combine oil, onion, fennel, and salt in large saucepan. Cover and cook over medium-low heat, stirring occasionally, until vegetables are softened, 8 to 10 minutes. Stir in garlic and thyme and cook until fragrant, about 30 seconds.
2. Stir in farro and cook until lightly toasted, about 2 minutes. Stir in broth and water and bring to simmer. Reduce heat to low and continue to simmer, stirring often, until farro is tender, 20 to 25 minutes.
3. Stir in radicchio, parsley, and vinegar. Season with salt and pepper to taste, and serve.

Serves 4 to 6
Why This Recipe Works Setting out to create a fresh, modern gratin, we chose Italian flavors, accenting nutty farro with creamy white beans and slightly bitter broccoli rabe. Toasting the farro first gave it extra nuttiness and jump-started the cooking process, making the end result more evenly cooked. Small white beans blended in nicely with the farro while adding creaminess and protein. Blanching the broccoli rabe in salted water tamed its bitterness. We then tossed it with garlic- and red pepper flake–infused olive oil for extra flavor. Sun-dried tomatoes gave us the extra pop of umami we were after in this dish, with their sweetness a counterpoint to the assertive broccoli rabe. Cheese is typically used to bind a gratin filling into a cohesive whole, but we found that miso paste created a supercreamy sauce when mixed with cooked grains, while adding a subtle backbone of flavor. A combo of bread crumbs and our own vegan Parm transformed into a burnished, crunchy topping after a quick spell under the broiler. Do not substitute pearled, quick-cooking, or presteamed farro (read the ingredient list on the package to determine this) for the whole farro in this recipe.
3 tablespoons extra-virgin olive oil, divided
1 onion, chopped fine
¼ teaspoon table salt, plus salt for cooking vegetables
1½ cups whole farro
2 cups vegetable broth
2 tablespoons white miso
½ cup panko bread crumbs
¼ cup Vegan Parmesan Substitute (this page) or grated dairy Parmesan
1 pound broccoli rabe, trimmed and cut into 2-inch pieces
6 garlic cloves, minced
⅛ teaspoon red pepper flakes
1 (15-ounce) can small white beans or navy beans, rinsed
¾ cup oil-packed sun-dried tomatoes, chopped
1. Heat 1 tablespoon oil in large saucepan over medium heat until shimmering. Add onion and salt and cook until softened and lightly browned, 5 to 7 minutes. Stir in farro and cook until lightly toasted, about 2 minutes. Stir in 2½ cups water, broth, and miso; bring to simmer; and cook, stirring often, until farro is just tender and remaining liquid is thickened and creamy, 25 to 35 minutes.
2. Meanwhile, toss panko with 1 tablespoon oil in bowl and microwave, stirring occasionally, until golden brown, 1 to 2 minutes. Stir in vegan Parmesan substitute and set aside.
3. Bring 4 quarts water to boil in Dutch oven. Add broccoli rabe and 1 tablespoon salt and cook until just tender, about 2 minutes. Drain broccoli rabe and set aside. Combine remaining 1 tablespoon oil, garlic, and pepper flakes in now-empty pot and cook over medium heat until fragrant and sizzling, 1 to 2 minutes. Stir in broccoli rabe and cook until well coated, about 2 minutes. Off heat, stir in beans, sun-dried tomatoes, and farro. Season with salt and pepper to taste.
4. Adjust oven rack 10 inches from broiler element and heat broiler. Transfer bean-farro mixture to broiler-safe 3-quart gratin dish (or broiler-safe 13 by 9-inch baking dish) and sprinkle with panko mixture. Broil until lightly browned and hot, 1 to 2 minutes. Serve.
Serves 4 to 6
Why This Recipe Works Freekeh, a traditional grain popular in eastern Mediterranean and North African cuisines, is made from roasted durum wheat that’s been harvested while the grains are still young and green. The grains are polished (“freekeh” is a colloquialization of “farik,” which means “rubbed” in Arabic) and sold whole as well as cracked into smaller pieces. For a pilaf that accentuated freekeh’s unique flavor and chew, we paired it with pan-roasted cauliflower, sweet dates, and warm spices and aromatics. We found that simply boiling the grain like pasta was the most foolproof cooking method to achieve an evenly chewy, firm texture. Allowing the cauliflower to soften and brown slightly before adding the remaining ingredients to the pan was essential. Finished with toasted pistachios and refreshing mint, our pilaf was a satisfying meal. We prefer the texture of whole, uncracked freekeh; cracked freekeh can be substituted, but you will need to decrease the freekeh cooking time in step 1.
1½ cups whole freekeh
½ teaspoon table salt, plus salt for cooking freekeh
¼ cup extra-virgin olive oil, divided, plus extra for serving
1 head cauliflower (2 pounds), cored and cut into ½-inch florets
¼ teaspoon pepper
3 ounces pitted dates, chopped (½ cup)
1 shallot, minced
1½ teaspoons grated fresh ginger
¼ teaspoon ground coriander
¼ teaspoon ground cumin
¼ cup shelled pistachios, toasted and chopped coarse
¼ cup chopped fresh mint
1½ tablespoons lemon juice
1. Bring 4 quarts water to boil in Dutch oven. Add freekeh and 1 tablespoon salt, return to boil, and cook until grains are tender, 30 to 45 minutes. Drain freekeh, return to now-empty pot, and cover to keep warm.
2. Heat 2 tablespoons oil in 12-inch nonstick skillet over medium-high heat until shimmering. Add cauliflower, salt, and pepper; cover; and cook until florets are softened and start to brown, about 5 minutes.
3. Remove lid and continue to cook, stirring occasionally, until florets turn spotty brown, about 10 minutes. Add remaining 2 tablespoons oil, dates, shallot, ginger, coriander, and cumin and cook, stirring frequently, until dates and shallot are softened and fragrant, about 3 minutes.
4. Reduce heat to low, add freekeh, and cook, stirring frequently, until heated through, about 1 minute. Off heat, stir in pistachios, mint, and lemon juice. Season with salt and pepper to taste, and drizzle with extra oil. Serve.
Serves 4 to 6
Why This Recipe Works Freekeh has a grassy, slightly smoky flavor that deserves more recognition in America. Here, we pair it with subtly sweet butternut squash in a satisfying salad. Roasting the squash resulted in lightly charred, beautifully caramelized edges; to give the squash more dimension, we paired it with fenugreek, a nutty seed with a unique maple-like flavor. To bring the two elements together, we stirred in a rich yet bright tahini-lemon dressing. A little extra sweetness came in the form of plumped raisins. Toasted walnuts offered complementary crunch, and a generous amount—a whole cup—of chopped cilantro gave the salad freshness in spades. We prefer the texture of whole, uncracked freekeh; cracked freekeh can be substituted, but you will need to decrease the freekeh cooking time in step 1.
1½ cups whole freekeh
¾ teaspoon table salt, divided, plus salt for cooking freekeh
1½ pounds butternut squash, peeled, seeded, and cut into ½-inch pieces (4 cups)
5 tablespoons extra-virgin olive oil, divided
½ teaspoon ground fenugreek
¼ teaspoon pepper, divided
⅓ cup golden raisins
2½ tablespoons lemon juice
2 tablespoons tahini
1 garlic clove, minced
1 cup coarsely chopped cilantro
⅓ cup walnuts, toasted and chopped
1. Adjust oven rack to lowest position and heat oven to 450 degrees. Bring 4 quarts water to boil in Dutch oven. Add freekeh and 1 tablespoon salt, return to boil, and cook until grains are tender, 30 to 45 minutes. Drain freekeh, spread over rimmed baking sheet, and let cool completely, about 15 minutes.
2. Meanwhile, toss squash with 1 tablespoon oil, fenugreek, ⅛ teaspoon pepper, and ¼ teaspoon salt. Spread on rimmed baking sheet and roast until well browned and tender, 30 to 35 minutes, stirring halfway through roasting; let cool completely, about 15 minutes.
3. Combine raisins and ¼ cup hot tap water in small bowl and let sit until softened, about 5 minutes; drain.
4. Whisk lemon juice, tahini, 1 tablespoon water, garlic, remaining ½ teaspoon salt, and remaining ⅛ teaspoon pepper in large bowl until smooth. Whisking constantly, slowly drizzle in remaining ¼ cup oil. Add cooled freekeh, squash, plumped raisins, cilantro, and walnuts and toss to combine. Season with salt and pepper to taste, and serve.
Serves 4 to 6
Why This Recipe Works Polenta makes a sturdy canvas for many meals. We tried various plant-based ingredients to enrich it instead of the typical butter and Parmesan, including miso, vegetable oil, olive oil, and plant-based creamers and butters, but we were unimpressed by the flavors and textures they imparted. Coconut oil was a surprising but excellent fix, easily emulsifying into the polenta and giving it a glossy sheen and a rich depth. A little nutritional yeast gave us just the right level of umami savoriness while keeping the polenta neutral enough to work with different toppings. We love this with Sautéed Mushrooms with Red Wine–Miso Reduction (recipe follows) or with Broccoli Rabe and Spicy Tomato Sauce (this page). Coarse-ground degerminated cornmeal such as yellow grits (with couscous-size grains) works best here. Avoid instant and quick-cooking products. Do not omit the baking soda—it reduces the cooking time and makes for a creamier polenta. The polenta should do little more than release wisps of steam. If it bubbles or sputters even slightly after the first 10 minutes, the heat is too high and you may need a flame tamer, available at most kitchen supply stores.
5 cups water
1 teaspoon table salt
Pinch baking soda
1 cup coarse-ground cornmeal
3 tablespoons refined coconut oil
4 teaspoons nutritional yeast
1. Bring water to boil in large saucepan over medium-high heat. Stir in salt and baking soda. Slowly pour cornmeal into water in steady stream while stirring back and forth. Bring mixture to boil, stirring constantly, about 1 minute. Reduce heat to lowest possible setting and cover saucepan.
2. After 5 minutes, whisk polenta to smooth out any lumps, about 15 seconds. (Make sure to scrape down sides and bottom of saucepan.) Cover and continue to cook, without stirring, until grains of polenta are tender but slightly al dente, about 25 minutes longer. (Polenta should be loose and barely hold its shape but will continue to thicken as it cools.)
3. Off heat, stir in oil and nutritional yeast and season with pepper to taste. Let polenta stand, covered, for 5 minutes. Serve.
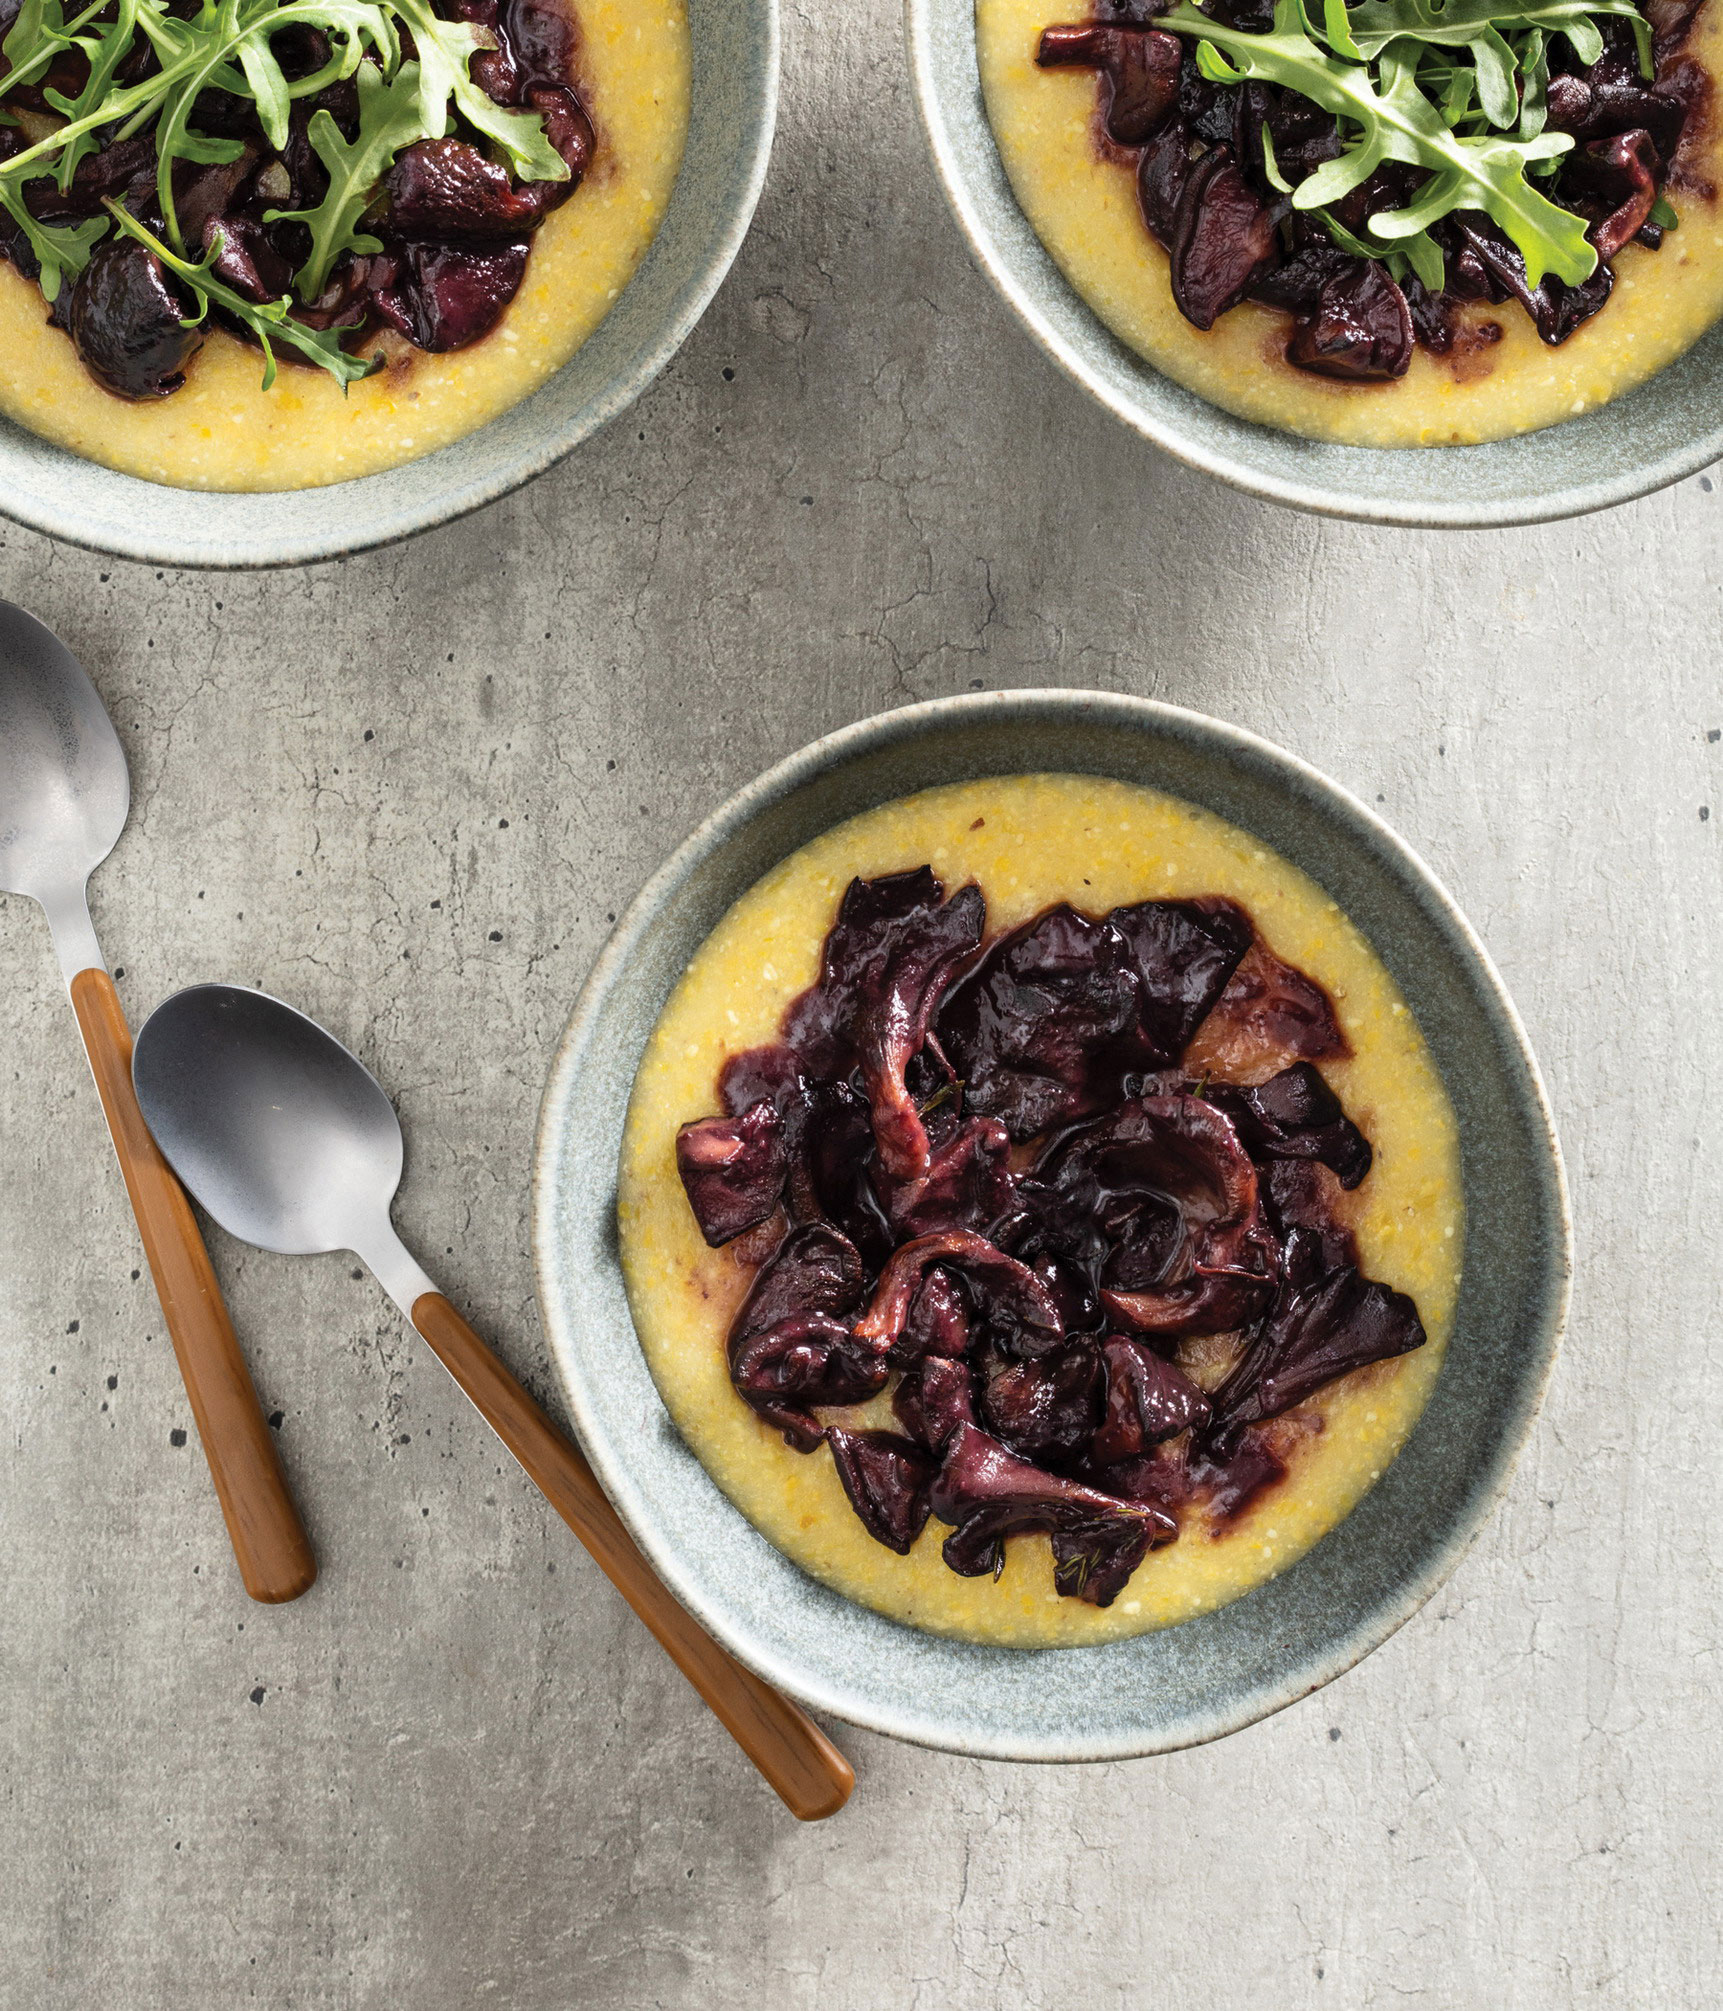
Sautéed Mushrooms with Red Wine–Miso Reduction over Creamy Polenta
Serves 4
Deeply luscious, winey mushrooms sprinkled with peppery baby arugula elevate any grain from homey to sophisticated. Soy and miso boosted the umami power of the mushrooms even higher, and some sugar balanced the acidity of the wine. A touch of cornstarch thickened the reduction to a velvety consistency. We prefer a mix of mushrooms, including some wild ones. Stem portobellos and slice ¼ inch thick. Trim white or cremini; quarter them if large or medium or halve them if small. Tear trimmed oyster or maitake mushrooms into 1½-inch pieces. Stem shiitakes; quarter large caps and halve small caps.
2 tablespoons extra-virgin olive oil
1½ pounds mixed mushrooms
¼ teaspoon table salt
2 cups dry red wine
1 cup vegetable broth
1 tablespoon sugar
1 teaspoon soy sauce
2 tablespoons white miso
1 tablespoon water
¾ teaspoon cornstarch
2 teaspoons fresh thyme leaves
1 cup baby arugula
1. Heat oil in 12-inch nonstick skillet over medium-high heat until shimmering. Add mushrooms and salt, cover, and cook, stirring occasionally, until mushrooms have released their liquid, 5 to 7 minutes. Uncover and continue to cook, stirring occasionally, until well browned, 10 to 12 minutes longer; transfer to bowl.
2. Bring wine, broth, sugar, and soy sauce to simmer in now-empty skillet over medium heat and cook until reduced to ¾ cup, 10 to 12 minutes. Off heat, whisk miso into wine reduction until combined. Whisk water and cornstarch together in small bowl, then whisk into sauce. Bring to simmer over medium heat, and cook until thickened, about 1 minute. Stir in cooked mushrooms and thyme and cook until heated through, about 1 minute. Garnish with arugula before serving.
Serves 4
Why This Recipe Works There are many ways to prepare quinoa, but this simple hands-off method delivers perfectly cooked grains—plus, its simplicity makes it easy to incorporate flavorful add-ins to turn it into a meal. For the cooking liquid, we chose vegetable broth, which we microwaved with curry powder until just boiling; we poured the hot liquid over the quinoa, which we had combined with olive oil and garlic in a baking dish, added the cauliflower, then covered the dish with foil and placed it in the oven. Lemon juice and cilantro stirred in before serving lent bright notes to this main dish. We like the convenience of prewashed quinoa; rinsing removes the quinoa’s bitter protective coating (called saponin). If you buy unwashed quinoa, rinse it and then spread it out on a clean dish towel to dry for 15 minutes.
1½ cups prewashed white quinoa
2 tablespoons extra-virgin olive oil
2 garlic cloves, minced
1½ cups vegetable broth
2 teaspoons curry powder
¼ teaspoon table salt
2 cups small cauliflower florets
2 tablespoons minced fresh cilantro
1 teaspoon lemon juice
1. Adjust oven rack to middle position and heat oven to 450 degrees. Combine quinoa, oil, and garlic in 8-inch square baking dish.
2. Microwave broth, curry powder, and salt in covered bowl until just boiling, about 5 minutes. Pour hot broth over quinoa mixture, sprinkle with cauliflower florets, and cover dish tightly with double layer of aluminum foil. Bake quinoa until tender and no liquid remains, about 25 minutes.
3. Remove dish from oven, uncover, and fluff quinoa with fork, scraping up any quinoa that has stuck to bottom. Re-cover dish with foil and let sit for 10 minutes. Fold in cilantro and lemon juice and season with salt and pepper to taste. Serve.
VARIATION
Easy Baked Quinoa with Lemon, Garlic, and Parsley
Omit cauliflower. Substitute 1 teaspoon grated lemon zest for curry powder and fresh parsley for cilantro.
Serves 4
Why This Recipe Works Bell peppers work especially well in room-temperature grain salads, lending a burst of crunchy, juicy sweetness and a pop of bright color. Here we chose red bell pepper, along with jalapeño and red onion for a spicy counterpoint and fresh cilantro for a bright herbal note. All these ingredients both tasted and looked great paired with the hearty, chewy quinoa (which happens to be high in protein). Before serving, we tossed the salad mixture with a bright dressing flavored with lime juice, mustard, garlic, and cumin. We like the convenience of prewashed quinoa; rinsing removes the quinoa’s bitter protective coating (called saponin). If you buy unwashed quinoa, rinse it and then spread it out on a clean dish towel to dry for 15 minutes. To make this dish spicier, add the chile seeds.
1 cup prewashed white quinoa
1½ cups water
¼ teaspoon table salt
½ red bell pepper, chopped fine
½ jalapeño chile, minced
2 tablespoons finely chopped red onion
1 tablespoon minced fresh cilantro
2 tablespoons fresh lime juice
1 tablespoon extra-virgin olive oil
2 teaspoons Dijon mustard
1 garlic clove, minced
½ teaspoon ground cumin
1. Toast quinoa in large saucepan over medium heat, stirring frequently, until quinoa is lightly toasted and aromatic, about 5 minutes. Stir in water and salt and bring to simmer. Cover, reduce heat to low, and cook until water is mostly absorbed and quinoa is nearly tender, about 12 minutes. Spread quinoa out on rimmed baking sheet and set aside until tender and cool, about 20 minutes.
2. Transfer cooled quinoa to large bowl. Stir in bell pepper, jalapeño, onion, and cilantro. In separate bowl, whisk lime juice, oil, mustard, garlic, and cumin together, then pour over quinoa mixture and toss to coat. Season with salt and pepper to taste, and serve.

Serves 4
Why This Recipe Works Here’s a taco salad for the 21st century. We’ve replaced the usual beef with protein-rich quinoa, which gets simmered in a flavorful vegetable broth doctored with chipotle chile in adobo, tomato paste, and cumin to give it deeply spiced flavor. We also added a riot of vegetables to our salad: corn sautéed until it deepened in flavor and browned, along with tomatoes, avocado, and scallions. Romaine lettuce made a perfect addition to give our rich plant-based taco salad plenty of crunch. A quick dressing of olive oil and lime juice brought everything together. We like the convenience of prewashed quinoa; rinsing removes the quinoa’s bitter protective coating (called saponin). If you buy unwashed quinoa, rinse it and then spread it out on a clean dish towel to dry for 15 minutes. To make this dish spicier, add the chile seeds. Garnish with a little queso fresco, if you like.
¾ cup prewashed white quinoa
¼ cup extra-virgin olive oil, divided
1 small onion, chopped fine
½ teaspoon table salt, divided
2 teaspoons minced canned chipotle chile in adobo sauce
2 teaspoons tomato paste
½ teaspoon ground cumin
1¼ cups vegetable broth
1½ cups fresh or frozen corn
2 tablespoons lime juice
¼ teaspoon pepper
1 large head romaine lettuce (14 ounces), torn into bite-size pieces
1 (15-ounce) can black beans, rinsed
8 ounces cherry or grape tomatoes, quartered
1 ripe avocado, halved, pitted, and chopped
2 scallions, sliced thin
½ cup chopped fresh cilantro, divided
1. Toast quinoa in medium saucepan over medium-high heat, stirring frequently, until quinoa is very fragrant and makes continuous popping sound, 5 to 7 minutes; transfer to bowl. Heat 1 tablespoon oil in now-empty saucepan over medium heat until shimmering. Add onion and ¼ teaspoon salt and cook until onion is softened and lightly browned, 5 to 7 minutes.
2. Stir in chipotle, tomato paste, and cumin and cook until fragrant, about 30 seconds. Stir in broth and toasted quinoa, increase heat to medium-high, and bring to simmer. Cover, reduce heat to low, and simmer until quinoa is tender and liquid has been absorbed, about 25 minutes, stirring once halfway through cooking. Remove pan from heat and let sit, covered, for 10 minutes. Spread quinoa onto rimmed baking sheet and let cool for 20 minutes.
3. Meanwhile, heat 1 tablespoon oil in 12-inch nonstick skillet over medium-high heat until shimmering. Add corn and cook, stirring occasionally, until kernels begin to brown and pop, 6 to 8 minutes. Transfer corn to bowl and season with salt and pepper to taste.
4. Whisk lime juice, pepper, remaining 2 tablespoons oil, and remaining ¼ teaspoon salt together in large bowl. Add romaine, beans, tomatoes, avocado, scallions, and ¼ cup cilantro and toss to combine. Transfer to serving platter and top with cooled quinoa, corn, and remaining ¼ cup cilantro. Serve.
Serves 4
Why This Recipe Works When developing this flavorful main-course casserole, we initially baked a simple mixture of quinoa, chickpeas, lemon zest, and scallions. Tasters liked the flavors but wanted more texture and vegetable volume. Kale was the perfect solution, and by roasting it briefly with olive oil before baking it with the quinoa, we boosted its earthy flavor and eliminated excess moisture to keep the casserole from becoming too heavy. Fresh tomatoes and a squirt of lemon juice, folded in toward the end of baking, ensured brightness. If you would like to incorporate cheese, sprinkling feta on top for the last few minutes of baking adds a warm, creamy element. We like the convenience of prewashed quinoa; rinsing removes the quinoa’s bitter protective coating (called saponin). If you buy unwashed quinoa, rinse it and then spread it out on a clean dish towel to dry for 15 minutes.
6 ounces kale, stemmed and chopped
3 tablespoons extra-virgin olive oil, divided
1 (15-ounce) can chickpeas, rinsed
1 cup prewashed white quinoa
½ teaspoon table salt
¼ teaspoon dried oregano
¼ teaspoon pepper
Pinch pepper flakes
1½ cups water
2 teaspoons grated lemon zest, divided, plus 1 tablespoon juice
2 plum tomatoes, cored and chopped fine
6 ounces feta cheese, crumbled (1½ cups) (optional)
1. Adjust oven rack to middle position and heat oven to 450 degrees. Toss kale with 1 tablespoon oil, spread in even layer on aluminum foil–lined rimmed baking sheet, and roast until crisp and lightly browned at edges, 6 to 8 minutes.
2. Toss roasted kale with chickpeas, quinoa, salt, oregano, pepper, pepper flakes, and 1 tablespoon oil and transfer to 8-inch square baking dish. Microwave water and 1 teaspoon lemon zest in covered bowl until just boiling, about 2 minutes. Pour hot water over quinoa mixture and cover dish tightly with foil. Bake until quinoa is tender and no liquid remains, 20 to 25 minutes.
3. Remove dish from oven and fluff quinoa with fork. Gently fold in tomatoes, lemon juice, remaining 1 tablespoon oil, and remaining 1 teaspoon lemon zest. Sprinkle with feta, if using, and continue to bake, uncovered, until warmed through, 6 to 8 minutes. Serve.

Serves 4 to 6
Why This Recipe Works Since wheat represents new life and a bountiful harvest in Greek culture, we seized on that idea to create this Greek-inspired salad that capitalizes on summer vegetables. We cooked the wheat berries using the pasta method to ensure even cooking, but our standard ratio of salt to water (1 tablespoon to 4 quarts) prevented the grains from properly absorbing the water; they stayed crunchy no matter how long we cooked them. Reducing the amount of salt was a simple fix. Sautéing zucchini, red pepper, and red onion in batches was essential to achieving the deep sear we were after. We allowed the warm wheat berries to soak in our bold vinaigrette while the vegetables were cooking. Do not add more than 1½ teaspoons of salt when cooking the wheat berries; adding more will prevent the grains from softening. If using quick-cooking or presteamed wheat berries (read the ingredient list on the package to determine this), you will need to decrease the cooking time in step 1.
1½ cups wheat berries
½ teaspoon table salt, divided, plus salt for cooking wheat berries
3 tablespoons red wine vinegar
2 tablespoons extra-virgin olive oil, divided
1 tablespoon grated lemon zest
1 tablespoon minced fresh oregano or 1½ teaspoons dried
1 garlic clove, minced
1 zucchini, cut into ½-inch pieces
1 red onion, chopped
1 red bell pepper, stemmed, seeded, and cut into ½-inch pieces
1. Bring 4 quarts water to boil in Dutch oven. Add wheat berries and 1½ teaspoons salt, return to boil, and cook until tender but still chewy, 1 hour to 1 hour 10 minutes.
2. Meanwhile, whisk vinegar, 1 tablespoon oil, lemon zest, oregano, and garlic together in large bowl. Drain wheat berries, add to bowl with dressing, and toss gently to coat.
3. Heat 2 teaspoons oil in 12-inch nonstick skillet over medium-high heat until just smoking. Add zucchini and ¼ teaspoon salt and cook, stirring occasionally, until deep golden brown and beginning to char in spots, 6 to 8 minutes; transfer to bowl with wheat berries.
4. Return now-empty skillet to medium-high heat and add remaining 1 teaspoon oil, onion, bell pepper, and remaining ¼ teaspoon salt. Cook, stirring occasionally, until onion is charred at edges and pepper skin is charred and blistered, 8 to 10 minutes. Add wheat berry–zucchini mixture and cook, stirring frequently, until heated through, about 2 minutes. Season with salt and pepper to taste. Serve.
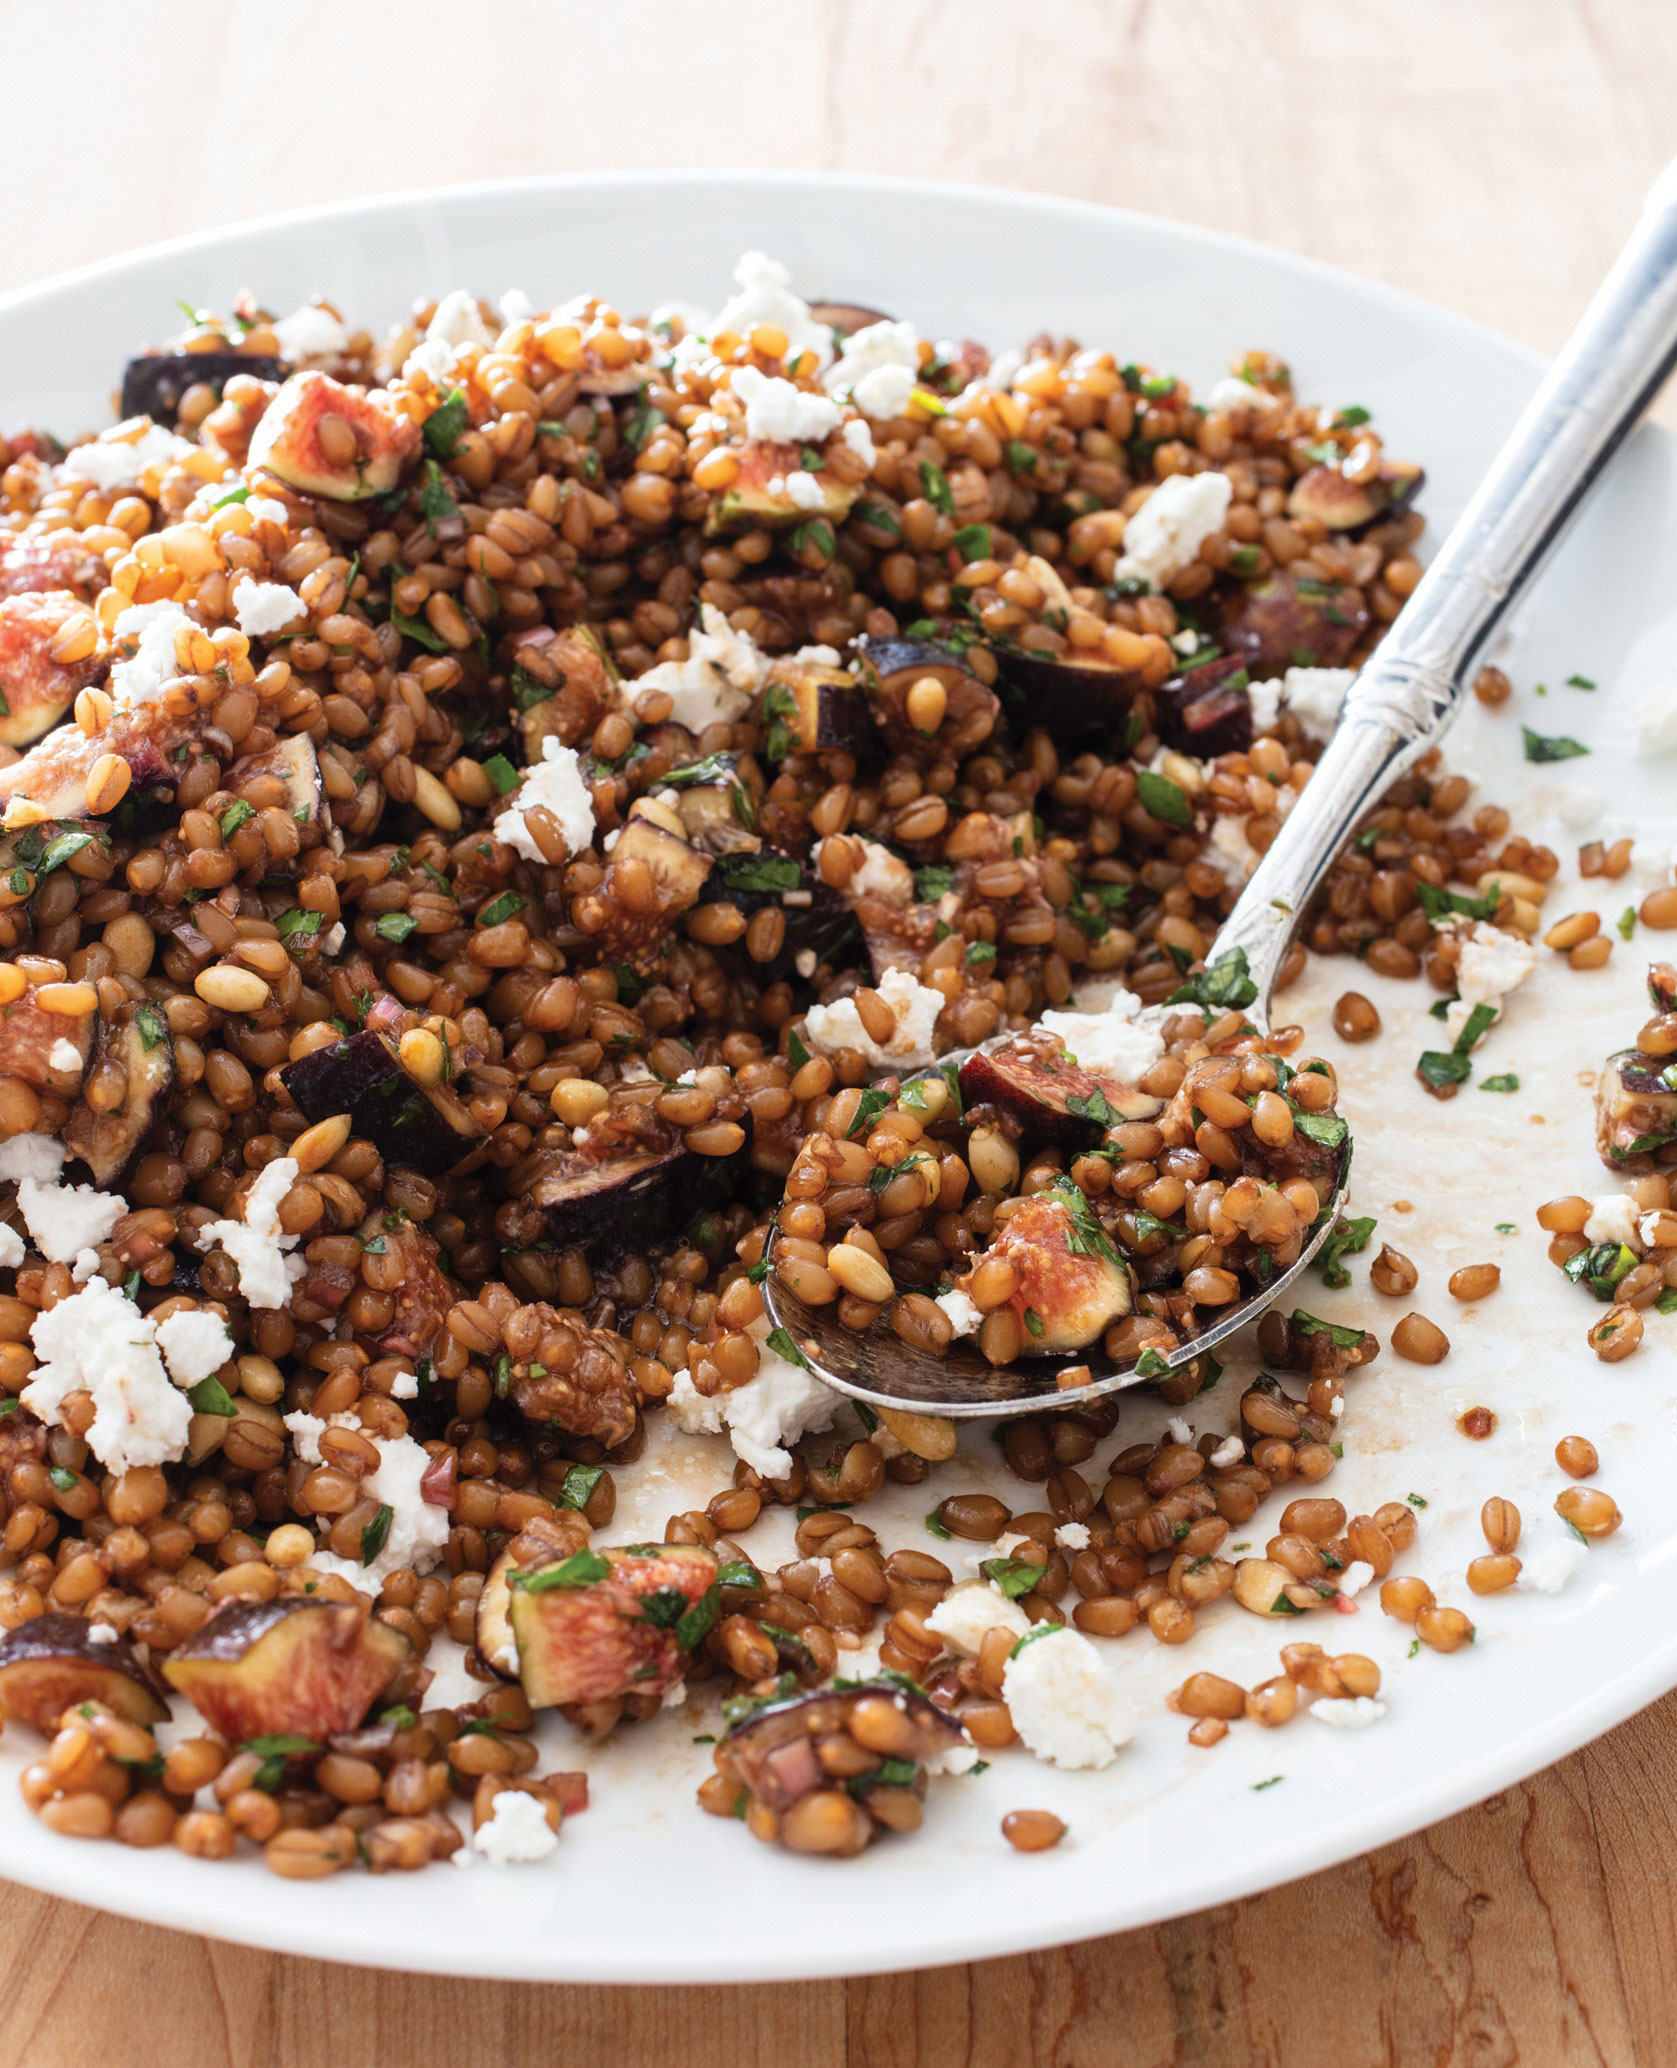
Serves 4 to 6
Why This Recipe Works Delicately sweet and lightly juicy, fresh figs make a wonderful addition to a summery Mediterranean grain salad. Wheat berries provided the perfect nutty base, while toasted pine nuts and parsley leaves lent crunch and herbal fragrance. For the dressing, we made a zippy vinaigrette with balsamic vinegar, shallot, and mustard. If you would like to incorporate cheese, goat cheese will contribute a pleasantly tangy element. Do not add more than 1½ teaspoons of salt when cooking the wheat berries; adding more will prevent the grains from softening. If using quick-cooking or presteamed wheat berries (read the ingredient list on the package to determine this), you will need to decrease the cooking time in step 1.
1½ cups wheat berries
¼ teaspoon table salt, plus salt for cooking wheat berries
3 tablespoons balsamic vinegar
1 small shallot, minced
1 teaspoon Dijon mustard
¼ teaspoon pepper
3 tablespoons extra-virgin olive oil
8 ounces fresh figs, cut into ½-inch pieces
½ cup fresh parsley leaves
¼ cup pine nuts, toasted
2 ounces goat cheese, crumbled (½ cup) (optional)
1. Bring 4 quarts water to boil in Dutch oven. Add wheat berries and 1½ teaspoons salt, return to boil, and cook until tender but still chewy, 1 hour to 1 hour 10 minutes. Drain wheat berries, spread onto rimmed baking sheet, and let cool completely, about 15 minutes. (Cooled wheat berries can be refrigerated for up to 3 days.)
2. Whisk vinegar, shallot, mustard, pepper, and salt together in large bowl. Whisking constantly, slowly drizzle in oil. Add wheat berries, figs, parsley, and pine nuts and toss gently to combine. Season with salt and pepper to taste; sprinkle with goat cheese, if using; and serve.
Serves 4 to 6
Why This Recipe Works Here’s another hearty summer salad that pairs earthy, nutty, pleasingly chewy wheat berries with fruit and nuts—in this case, plump blueberries and buttery pecans. We found it easiest to cook the wheat berry kernels like pasta, simply simmering them in a large pot of water until they were tender but still chewy. For the dressing, we chose a simple bright vinaigrette made with white wine vinegar, shallot, chives, and mustard. Juicy fresh blueberries added the perfect amount of sweetness and tang to our chewy grains. Endive provided an interesting slightly bitter note. If you would like to add cheese, we found that goat cheese was the perfect rich complement to finish off this summery salad. Do not add more than 1½ teaspoons of salt when cooking the wheat berries; adding more will prevent the grains from softening. If using quick-cooking or presteamed wheat berries (read the ingredient list on the package to determine this), you will need to decrease the cooking time in step 1.
1½ cups wheat berries
½ teaspoon table salt, plus salt for cooking wheat berries
2 tablespoons white wine vinegar
1 tablespoon minced shallot
1 tablespoon minced fresh chives
1 teaspoon Dijon mustard
¼ teaspoon pepper
6 tablespoons extra-virgin olive oil
2 heads Belgian endive (4 ounces each), halved, cored, and sliced crosswise ¼ inch thick
7½ ounces (1½ cups) blueberries
¾ cup pecans, toasted and chopped coarse
4 ounces goat cheese, crumbled (1 cup) (optional)
1. Bring 4 quarts water to boil in Dutch oven. Add wheat berries and 1½ teaspoons salt, return to boil, and cook until tender but still chewy, 1 hour to 1 hour 10 minutes. Drain wheat berries, spread onto rimmed baking sheet, and let cool completely, about 15 minutes. (Cooled wheat berries can be refrigerated for up to 3 days.)
2. Whisk vinegar, shallot, chives, mustard, pepper, and salt together in large bowl. Whisking constantly, drizzle in oil. Add wheat berries, endive, blueberries, and pecans and toss to combine. Season with salt and pepper to taste; sprinkle with goat cheese, if using; and serve.