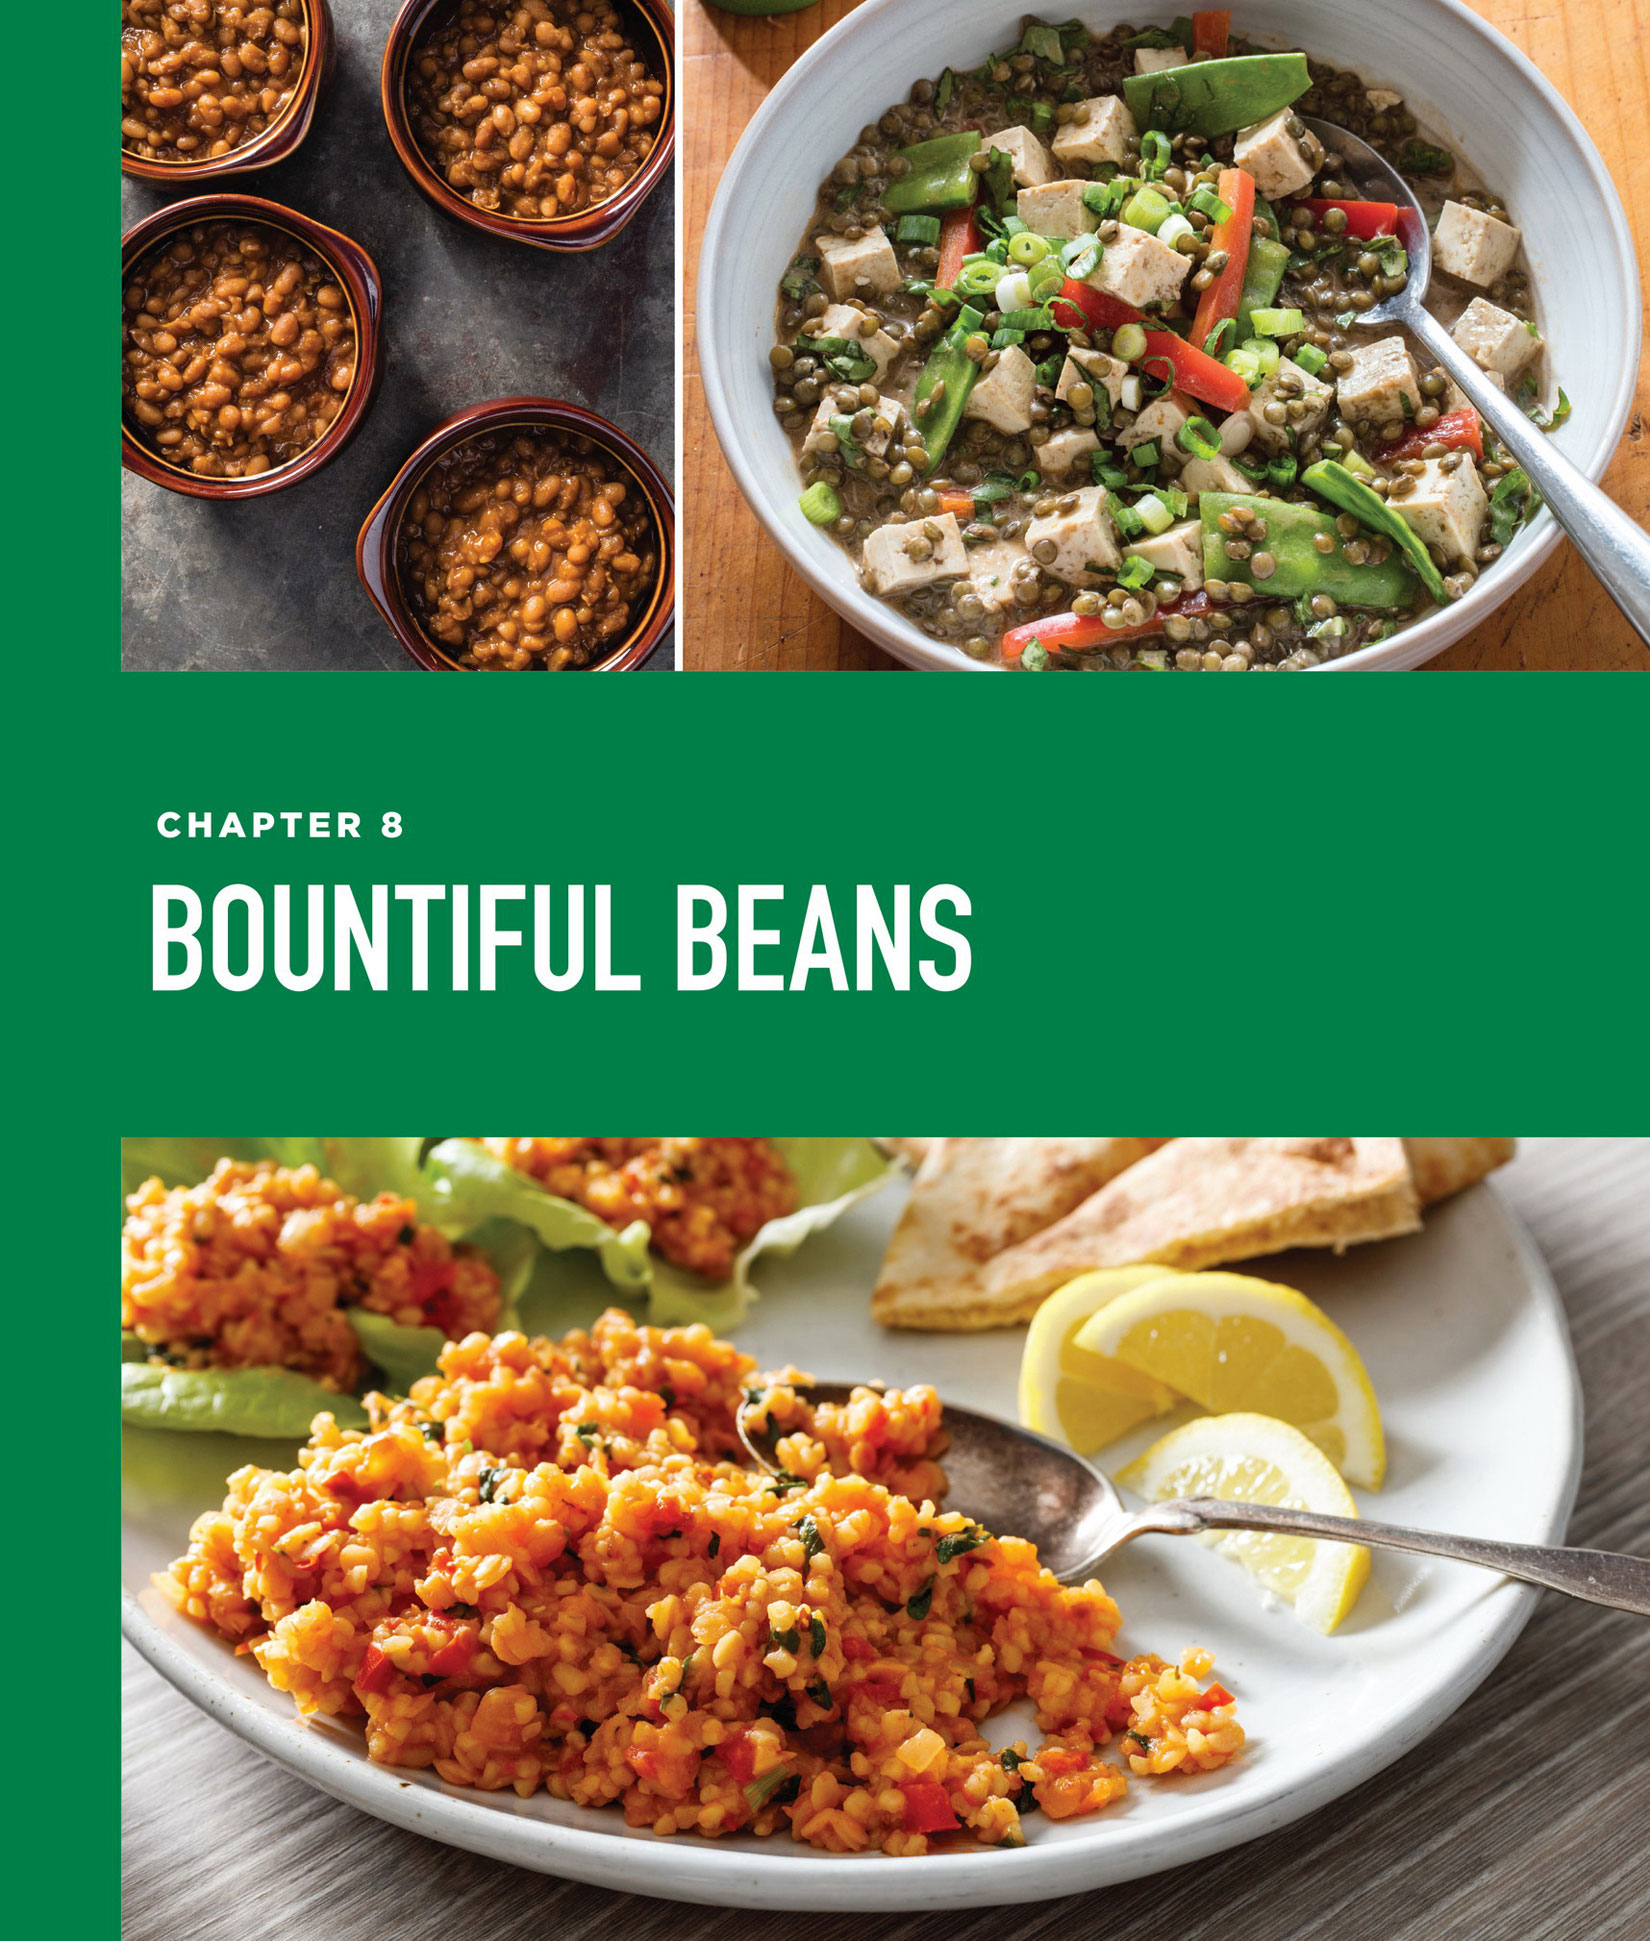
BEANS
Cuban-Style Black Beans and Rice
Black-Eyed Pea Salad with Peaches and Pecans 
Cannellini Beans with Roasted Red Peppers and Kale
Chickpea Salad with Carrots Arugula, and Olives
Chickpea Salad with Fennel and Arugula
Chickpea Salad with Carrots, Raisins, and Mint
Chickpeas with Garlic and Parsley
Chickpeas with Bell Pepper, Scallions, and Basil
Chickpeas with Smoked Paprika and Cilantro
Spicy Braised Chickpeas and Turnips with Couscous
Cranberry Beans with Fennel, Grapes, and Pine Nuts
Cranberry Beans with Tequila, Green Chiles, and Pepitas
Pinto Bean and Swiss Chard Enchiladas
Pinto Bean, Swiss Chard, and Monterey Jack Enchiladas
Red Beans and Rice with Okra and Tomatoes
Tuscan White Bean and Fresh Corn Salad
Sicilian White Beans and Escarole
White Beans with Broccoli Rabe
White Bean and Mushroom Gratin
LENTILS
Lentil Salad with Olives and Mint
Lentil Salad with Spinach and Walnuts
French Lentils with Carrots and Parsley
Curried French Lentils with Golden Raisins
Lentils with Roasted Broccoli and Lemony Bread Crumbs
Masoor Dal with Cauliflower and Cilantro
Thai Red Curry with Lentils and Tofu
TEMPEH AND TOFU
Stir-Fried Tempeh with Orange Sauce
Crispy Tempeh with Sambal Sauce
Pan-Seared Tempeh Steaks with Chimichurri Sauce
Pan-Seared Tempeh Steaks with Chermoula Sauce
Indian Curried Tempeh with Cauliflower and Peas
Grilled Soy-Ginger Glazed Tofu
Thai-Style Tofu and Basil Lettuce Cups
Stir-Fried Tofu, Shiitakes, and Green Beans
Thai Red Curry with Sweet Potatoes and Tofu
RECIPE EXTRAS
Quick Pickled Shallots and Radishes
FAST (45 minutes or less total time)
Photos: Baked Navy Beans; Thai Red Curry with Lentils and Tofu; Red Lentil Kibbeh
Serves 4 to 6 
Why This Recipe Works Bean salads make for hearty and delicious quick meals anytime, especially when you take advantage of convenient canned beans. Although the ingredients are infinitely variable, it can be easy to fall into the trap of just piling on an endless array of ingredients. We’ve found that, generally, less is more. For this boldly flavored but balanced black bean salad, a judicious mixture of black beans, corn, avocado, tomato, and cilantro gave us just the right combination of varied textures and Southwestern flavors. Sautéing the corn (both fresh and frozen worked well in this recipe) until it was toasty and just starting to brown added a pleasant nuttiness to the kernels. We wanted a dressing with plenty of kick, so we made a concentrated mixture with lots of lime juice plus spicy chipotle chile. Raw onion was too harsh, but thinly sliced scallions lent a mild onion flavor. You will need three to four ears of corn in order to yield 2 cups of fresh kernels. If using frozen corn, be sure to thaw and drain it before cooking.
¼ cup extra-virgin olive oil, divided
2 cups fresh or thawed frozen corn
4 scallions, sliced thin
⅓ cup lime juice (3 limes)
1 tablespoon minced canned chipotle chile in adobo sauce
½ teaspoon table salt
½ teaspoon pepper
2 (15-ounce) cans black beans, rinsed
2 ripe avocados, halved, pitted, and chopped
2 tomatoes, cored and chopped
¼ cup minced fresh cilantro
1. Heat 2 tablespoons oil in 12-inch skillet over medium-high heat until shimmering. Add corn and cook until spotty brown, about 5 minutes; let cool slightly.
2. Whisk scallions, lime juice, chipotle, salt, and pepper together in large bowl. Slowly whisk in remaining 2 tablespoons oil until incorporated. Add toasted corn, beans, avocados, tomatoes, and cilantro and toss to combine. Season with salt and pepper to taste, and serve.
Serves 4
Why This Recipe Works Nothing says Mexican comfort food quite like chilaquiles. Comprised of fried tortilla wedges tossed in a deeply flavored chile sauce, this dish is jam-packed with bright flavor and varying textures—and loaded with veggies. We started with the chips: Store-bought tortilla chips became instantly soggy after being tossed in our sauce, but by baking—not frying—our own, we got chips that gave us an irresistible “crunchewy” result. Rather than going down the classic red chile sauce route, we decided to go green with a salsa verde. To build a flavorful sauce base, we went heavy on aromatics: onions, mild poblanos, spicier jalapeño, and lots of garlic. Fresh tomatillos are delicious but not always easy to find, so we simplified the whole dish by using canned. In order to really up the “verde” factor, we added a hefty ½ cup of cilantro leaves. Shredded meat is a common addition, but for a plant-based protein boost we opted for black beans. (You could use whatever beans you have on hand.) We kept texture, aesthetics, and vegetables in mind when considering toppings: crispy radishes, creamy avocado, fresh cilantro, crunchy onions, and thinly sliced jalapeño. A final drizzle of yogurt (plant-based or dairy) woke everything up. To make this dish less spicy, remove the ribs and seeds from your jalapeño.
¼ cup plain plant-based yogurt or dairy yogurt
1 teaspoon grated lime zest
1 tablespoon plus 1 cup water, divided
12 (6-inch) corn tortillas, each cut into 8 wedges
3 tablespoons vegetable oil, divided
2 poblano chiles, stemmed, seeded, and chopped coarse
2 jalapeño chiles, stemmed (1 chopped coarse, 1 sliced thin)
1 onion, chopped fine, divided
½ teaspoon table salt
6 garlic cloves, minced
1½ teaspoons ground cumin
1 (26-ounce) can whole tomatillos, drained
¾ cup fresh cilantro leaves, divided
2 (15-ounce) cans black beans, rinsed
1 avocado, halved, pitted, and cut into ½-inch pieces
4 radishes, trimmed and sliced thin
1. Adjust oven racks to upper-middle and lower-middle positions and heat oven to 350 degrees. Combine yogurt, lime zest, and 1 tablespoon water together in small bowl; set aside until ready to serve.
2. Toss tortillas with 2 tablespoons oil, then spread over 2 rimmed baking sheets. Bake until brown and dried, 16 to 25 minutes, flipping tortillas halfway through baking; set aside to cool.
3. While tortillas bake, heat remaining 1 tablespoon oil in Dutch oven over medium heat until shimmering. Add poblanos, coarsely chopped jalapeño, ¾ cup onion, and salt and cook until vegetables are softened and lightly browned, 6 to 8 minutes.
4. Stir in garlic and cumin and cook until fragrant, about 30 seconds. Stir in canned tomatillos and remaining 1 cup water and cook until sauce is slightly thickened, about 10 minutes. Carefully transfer pepper mixture to blender, along with ½ cup cilantro, and process until smooth, about 1 minute.
5. Return sauce to now-empty pot and bring to simmer over medium heat. Add beans and cook, stirring frequently, until beans are warmed through, about 5 minutes. Stir in cooled tortillas and cook until they begin to soften, about 2 minutes. Season with salt and pepper to taste. Drizzle yogurt mixture over top and sprinkle with avocado, radishes, thinly sliced jalapeño, remaining ¼ cup onion, and remaining ¼ cup cilantro. Serve.

Serves 6 to 8
Why This Recipe Works Beans and rice is a familiar combination the world over, with good reason: It’s healthful, inexpensive, and flavorful. Cuban black beans and rice is unique in that the rice is cooked in the inky, concentrated liquid left over from cooking the dried black beans. For our own version, we brined the beans overnight before cooking. We reserved half of our sofrito ingredients (a combination of sautéed garlic, bell pepper, and onion) and added them to the cooking liquid to infuse the beans with aromatic flavor. Lightly browning the remaining sofrito vegetables along with spices and tomato paste added complex flavor to this simple dish. Once the beans were soft, we combined them with the sofrito and rice to finish cooking. Baking the rice and beans eliminated the crusty bottom that can form when the dish is cooked on the stovetop. You will need a Dutch oven with a tight-fitting lid for this recipe.
1½ tablespoons table salt for brining
1 cup dried black beans, picked over and rinsed
2 large green bell peppers, halved, stemmed, and seeded, divided
1 large onion, halved crosswise and peeled, root end left intact, divided
1 garlic head, 5 cloves minced, rest of head halved crosswise with skin left intact, divided
2 bay leaves
2½ teaspoons table salt, divided
2 tablespoons vegetable oil
4 teaspoons ground cumin
1 tablespoon minced fresh oregano or 1 teaspoon dried
1 tablespoon tomato paste
1½ cups long-grain white rice
2 tablespoons red wine vinegar
2 scallions, sliced thin
Lime wedges
1. Dissolve 1½ tablespoons salt in 2 quarts cold water in large bowl or container. Add beans and soak at room temperature for at least 8 hours or up to 24 hours. Drain and rinse well.
2. In Dutch oven, combine drained beans, 4 cups water, 1 bell pepper half, 1 onion half (with root end), halved garlic head, bay leaves, and 1 teaspoon salt. Bring to simmer over medium-high heat, cover, and reduce heat to low. Cook until beans are just soft, 30 to 40 minutes.
3. Discard pepper, onion, garlic, and bay leaves. Drain beans in colander set over large bowl, reserving 2½ cups bean cooking liquid. (If you don’t have enough cooking liquid, add water as needed to measure 2½ cups.) Do not wash pot.
4. Adjust oven rack to middle position and heat oven to 350 degrees. Cut remaining bell peppers and onion into 2-inch pieces and pulse in food processor until chopped into rough ¼-inch pieces, about 8 pulses, scraping down bowl as needed.
5. Add oil to now-empty pot and heat over medium heat until shimmering. Add processed peppers and onion, cumin, oregano, and tomato paste and cook, stirring often, until vegetables are softened and beginning to brown, 10 to 15 minutes. Stir in minced garlic and cook until fragrant, about 1 minute. Stir in rice and cook for 30 seconds.
6. Stir in beans, reserved bean cooking liquid, vinegar, and remaining 1½ teaspoons salt. Increase heat to medium-high and bring to simmer. Cover, transfer to oven, and cook until liquid is absorbed and rice is tender, about 30 minutes. Fluff rice with fork and let rest, uncovered, for 5 minutes. Serve with scallions and lime wedges.
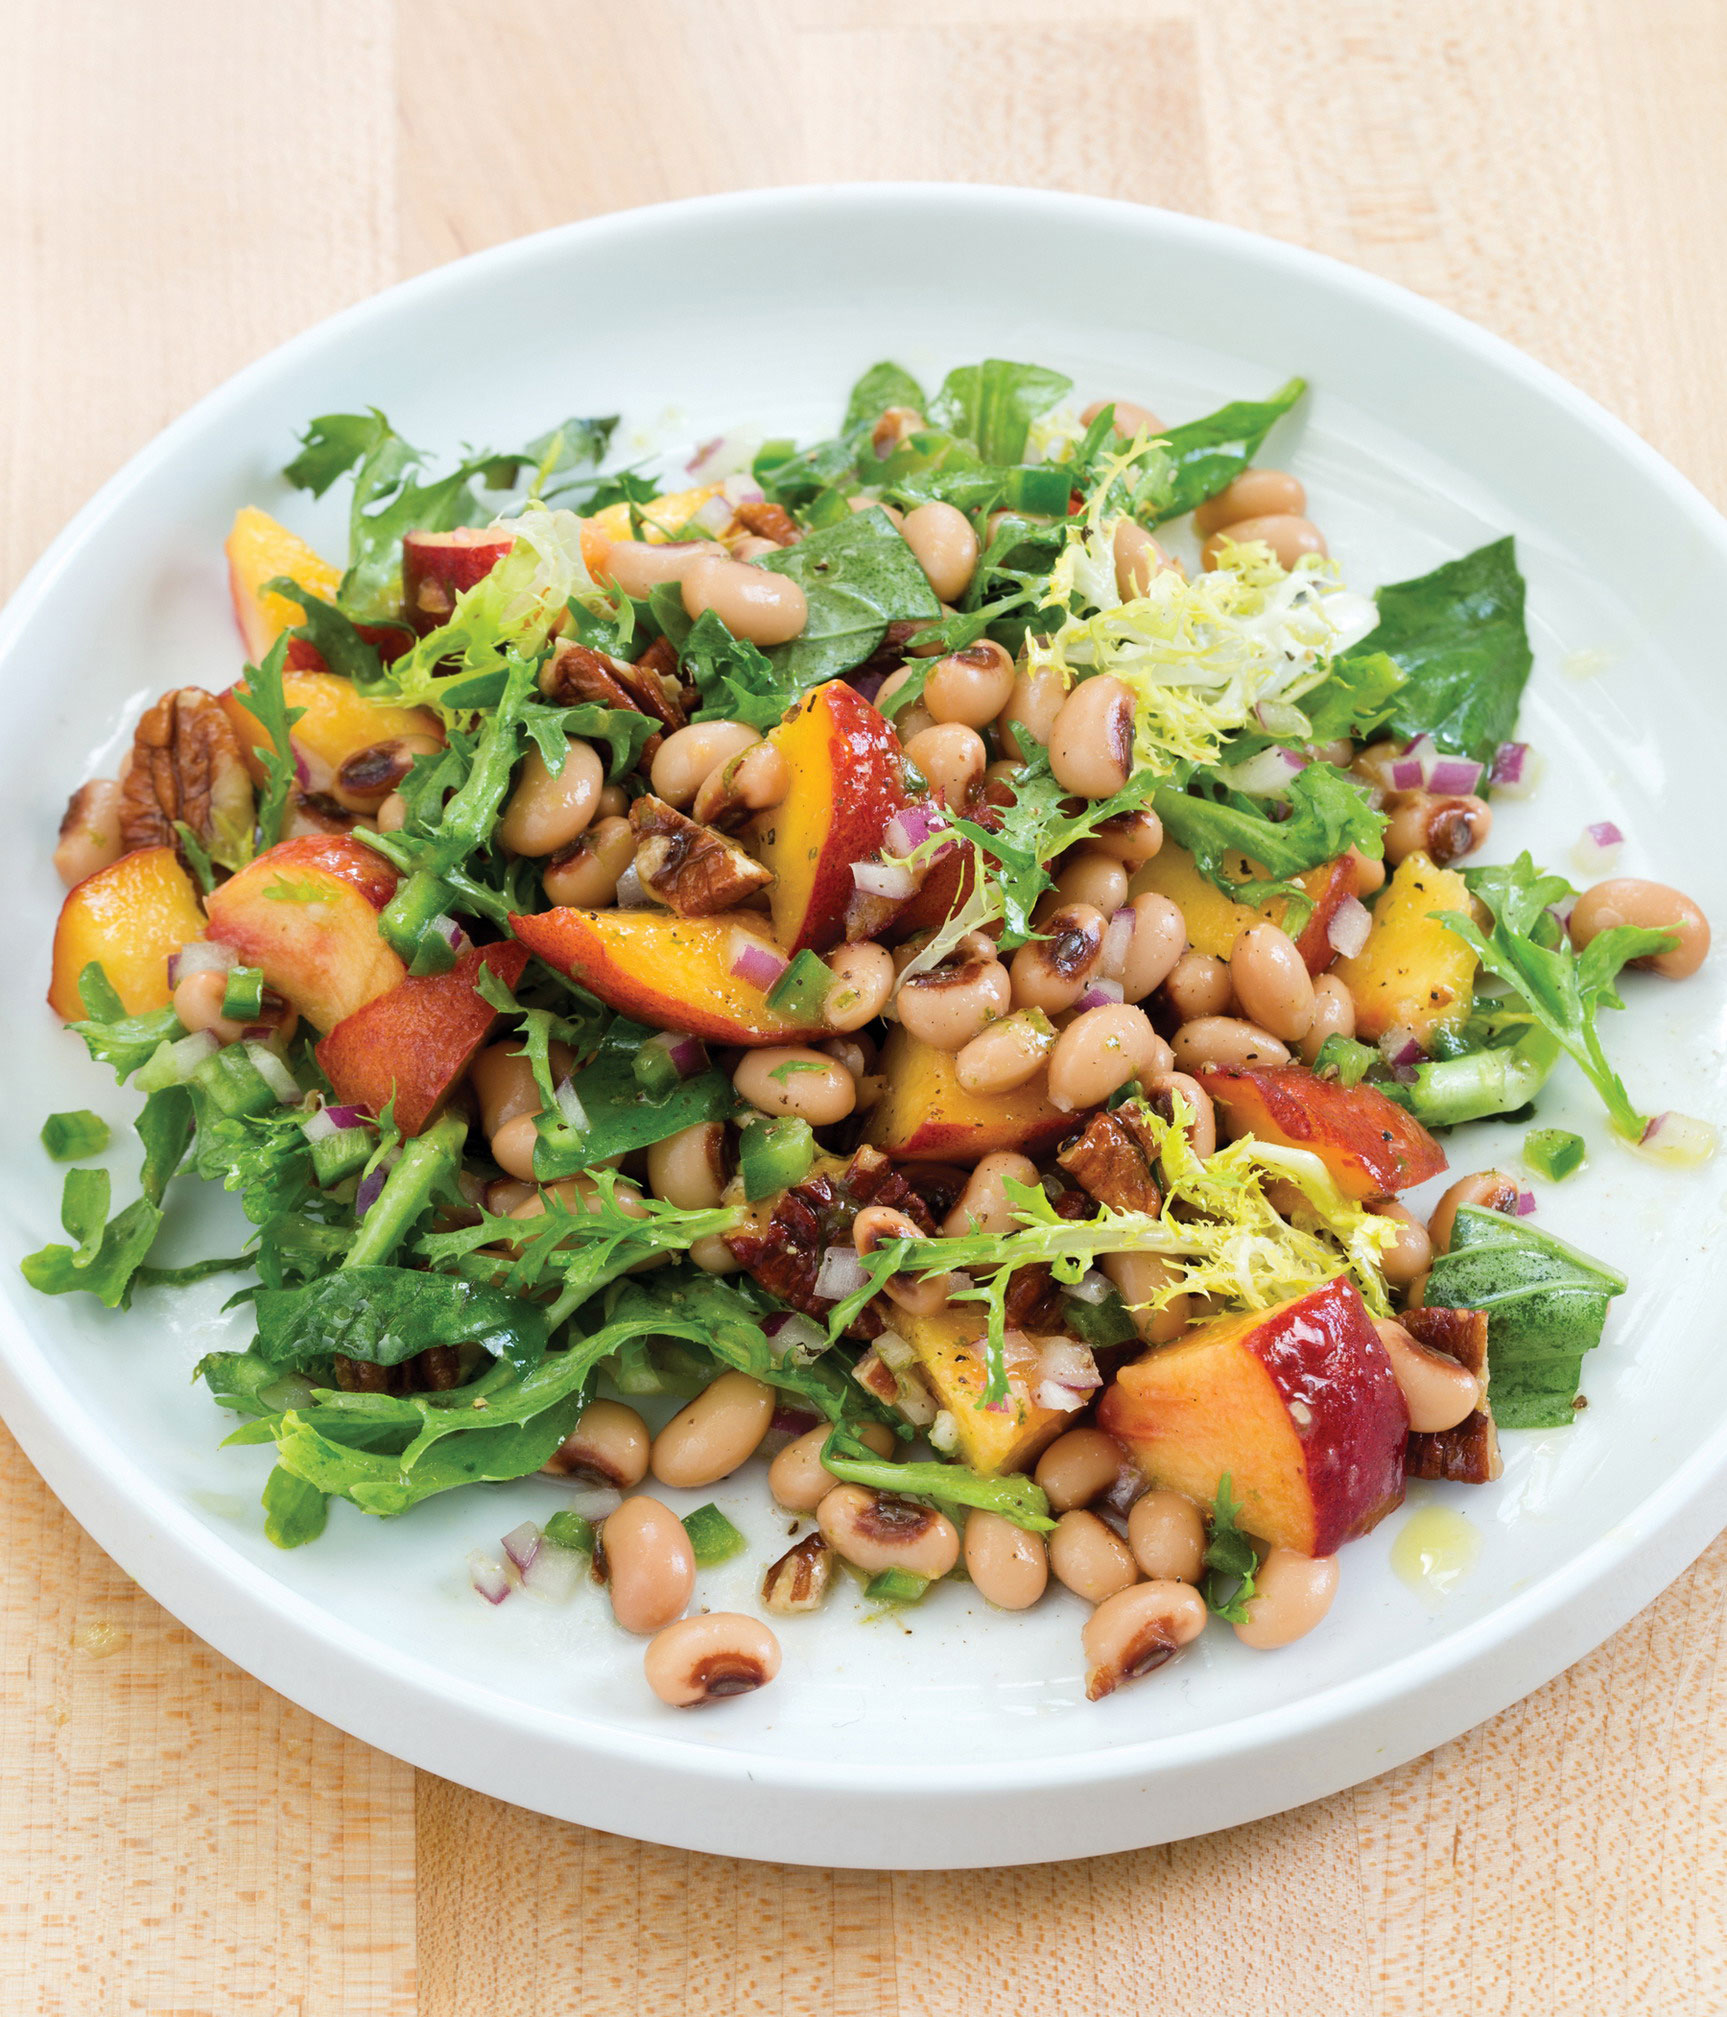
Serves 4 to 6
Why This Recipe Works With their delicate skins and creamy interiors, black-eyed peas are great in salads and are especially popular in the South, so we looked to Southern cuisine for inspiration for this ultrasimple salad. We used canned black-eyed peas, which are convenient and have great flavor and texture. Peaches added sweet juiciness, while pecans lent crunch and richness. For a little spice, we chopped a jalapeño, removing its seeds to mellow its fruity heat. We felt greens were necessary, but we weren’t interested in humdrum romaine. Instead, we turned to frisée, a delicate but slightly bitter-tasting lettuce. Finely chopped red onion added a nice bite, and basil added freshness. The tartness of our lime vinaigrette nicely counterbalanced the sweet peaches. If you can’t find good ripe peaches, you can substitute 1 orange, peeled and chopped into ½-inch pieces.
1 teaspoon grated lime zest plus 2½ tablespoons juice (2 limes)
1 small garlic clove, minced
¾ teaspoon table salt
2 tablespoons extra-virgin olive oil
2 (15-ounce) cans black-eyed peas, rinsed
2 peaches, halved, pitted, and chopped coarse
3 ounces frisée, trimmed and chopped into 2-inch pieces
¼ cup red onion, chopped fine
¼ cup pecans, toasted and chopped
¼ cup fresh basil leaves, torn into ½-inch pieces
1 jalapeño chile, stemmed, seeded, and chopped fine
Whisk lime zest and juice, garlic, and salt together in large bowl. Slowly whisk in oil until incorporated. Add beans, peaches, frisée, onion, pecans, basil, and jalapeño and toss to combine. Season with salt and pepper to taste, and serve.
Serves 6 to 8
Why This Recipe Works Southern tradition holds that if on New Year’s Day you eat collards and black-eyed peas stewed with tomatoes, spices, and a hambone, you will experience greater wealth and prosperity in the coming year. With all respect to Southern tradition, we think this hambone-free version is lucky, too—and downright delicious. To get the jump on acquiring said prosperity, we decided to speed up this one-pot dish to make it more accessible on a regular basis. We swapped the more time-consuming dried legumes for a couple of convenient cans of black-eyed peas, and then gave the collards a 15-minute head start on the stove before adding the peas. For maximum good luck, be careful not to crush those black-eyed peas—stir them gently.
2 tablespoons extra-virgin olive oil
1 onion, halved and sliced thin
1¼ teaspoons table salt
4 garlic cloves, minced
½ teaspoon ground cumin
½ teaspoon pepper
¼ teaspoon red pepper flakes
1½ cups vegetable broth
1 (14.5-ounce) can diced tomatoes
1 pound collard greens, stemmed and cut into 2-inch pieces
2 (15-ounce) cans black-eyed peas, rinsed
1 tablespoon cider vinegar
1 teaspoon sugar
1. Heat oil in large Dutch oven over medium heat until shimmering. Add onion and salt and cook, stirring frequently, until golden brown, about 10 minutes. Stir in garlic, cumin, pepper, and pepper flakes and cook until fragrant, about 30 seconds.
2. Stir in broth and tomatoes and their juice and bring to boil. Add collard greens, cover, and reduce heat to medium-low. Simmer until greens are tender, about 15 minutes.
3. Add black-eyed peas and cook, covered, stirring occasionally, until greens are silky and completely tender, about 15 minutes. Uncover, increase heat to medium-high, and cook until liquid is reduced by one-quarter, about 5 minutes. Stir in vinegar and sugar and serve.
Serves 4 to 6
Why This Recipe Works Some particularly inspired beans-and-greens dishes come from Italy, so for this full-flavored one-pot take on the classic combination, we chose Italian flavors, pairing cannellini beans and kale with roasted red peppers. Choosing canned beans and jarred red peppers meant this dish could come together quickly for a great weeknight meal. We sautéed garlic and onion with some hot red pepper flakes; the subtle spiciness balanced the sweetness of the beans and roasted peppers. Slicing the kale into thin ribbons and adding it to the skillet a handful at a time allowed it to wilt evenly. For the cooking liquid, we used equal parts water and white wine to add light body and acidity to the dish. We served it all with lemon wedges for squeezing over the top and a drizzle of extra-virgin olive oil. Swiss chard can be substituted for the kale, if you prefer.
¼ cup extra-virgin olive oil, plus extra for serving
4 garlic cloves, minced
¼ teaspoon red pepper flakes
1 small red onion, halved and sliced thin
¼ teaspoon table salt
1 cup jarred roasted red peppers, sliced thin lengthwise
1 pound kale, stemmed and sliced thin crosswise
2 (15-ounce) cans cannellini beans, rinsed
½ cup dry white wine
½ cup water
Lemon wedges
1. Cook oil, garlic, and pepper flakes in 12-inch skillet over medium-high heat until garlic turns golden brown, about 2 minutes. Stir in onion and salt, reduce heat to medium, and cook until onion is softened, about 5 minutes. Stir in red peppers and cook until softened and glossy, about 3 minutes.
2. Stir in kale, 1 handful at a time, and cook until wilted, about 3 minutes. Stir in beans, wine, and water and bring to simmer. Reduce heat to medium-low, cover, and cook until flavors meld and kale is tender, 15 to 20 minutes. Season with salt and pepper to taste. Serve with lemon wedges and extra oil.
Serves 4 to 6
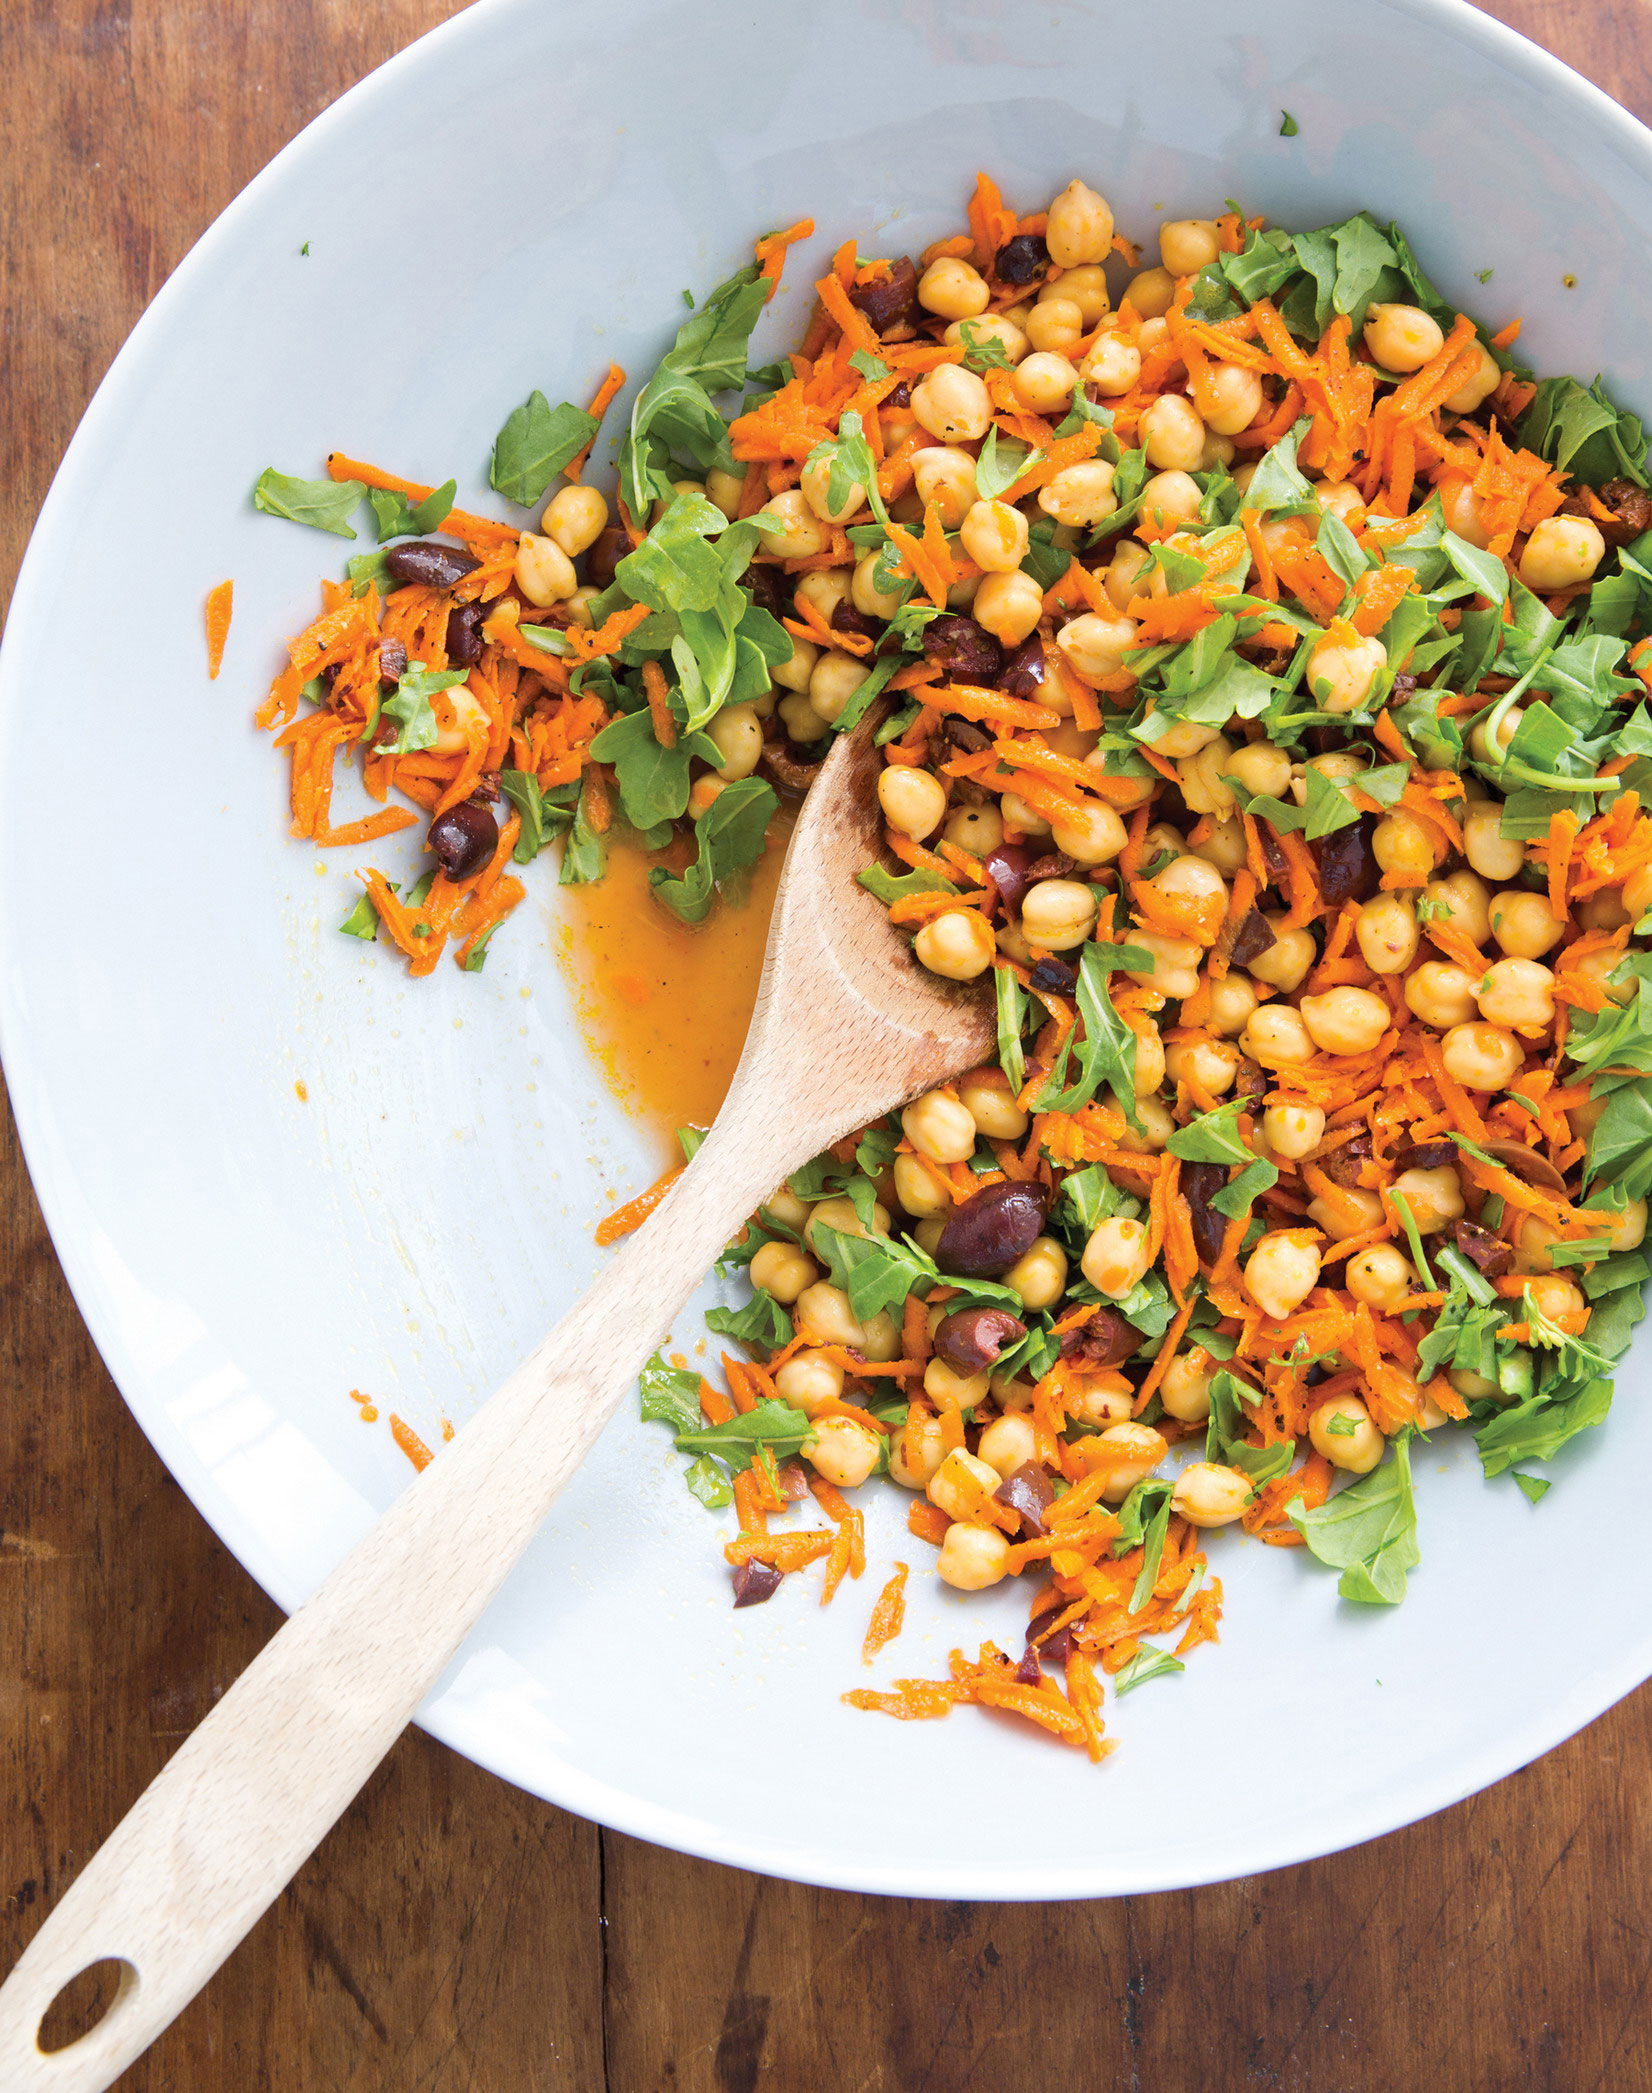
Why This Recipe Works Chickpeas are a no-brainer when it comes to making satisfying salads. For this rendition, we wanted to infuse each bean with bold flavor to the core. We discovered that the key was to warm the chickpeas before mixing them with our lemony and slightly spicy dressing ingredients. The seed coats that cover chickpeas are rich in pectin, which breaks down when exposed to heat and moisture, creating a more porous inner surface that a dressing could easily penetrate. Further, letting the dressed chickpeas rest for 30 minutes put the flavor over the top while allowing the chickpeas to cool. For complementary add-ins, chopped arugula offset the mild chickpeas with peppery bite. A combination of sweet carrots and briny olives added more contrasting texture and flavor. And a variation featuring crunchy, anise-flavored fennel kept things interesting.
2 (15-ounce) cans chickpeas, rinsed
¼ cup extra-virgin olive oil
2 tablespoons lemon juice
¾ teaspoon table salt
½ teaspoon pepper
Pinch cayenne pepper
3 carrots, peeled and shredded
1 cup baby arugula, chopped coarse
½ cup pitted kalamata olives, chopped coarse
1. Microwave chickpeas in medium bowl until hot, about 2 minutes. Stir in oil, lemon juice, salt, pepper, and cayenne and let sit for 30 minutes.
2. Add carrots, arugula, and olives and toss to combine. Season with salt and pepper to taste, and serve.
VARIATION
Chickpea Salad with Fennel and Arugula
Substitute 1 fennel bulb, stalks discarded, bulb halved, cored, and cut into ¼-inch pieces, for carrots and olives.
Serves 4 to 6
Why This Recipe Works This simple salad comes together in a flash using canned chickpeas. Often when a salad features a carrot-raisin combo, the dressing seems to be mayonnaise-based. But here, to enhance those two ingredients rather than mute them, we looked to flavor combinations used in North Africa, whisking up a simple lemony vinaigrette with cumin, paprika, and garlic. The mint adds an unexpected but uplifting fresh herbal element. Try this served over a bed of greens with pita wedges or pita chips.
1½ tablespoons lemon juice
1 small garlic clove, minced
½ teaspoon ground cumin
½ teaspoon paprika
2 tablespoons extra-virgin olive oil
2 (15-ounce) cans chickpeas, rinsed
1 carrot, peeled and shredded
½ cup raisins
2 tablespoons minced fresh mint
Whisk lemon juice, garlic, cumin, and paprika together in large bowl. Slowly whisk in oil until incorporated. Add chickpeas, carrot, raisins, and mint and toss to combine. Season with salt and pepper to taste, and serve.
Serves 4 to 6
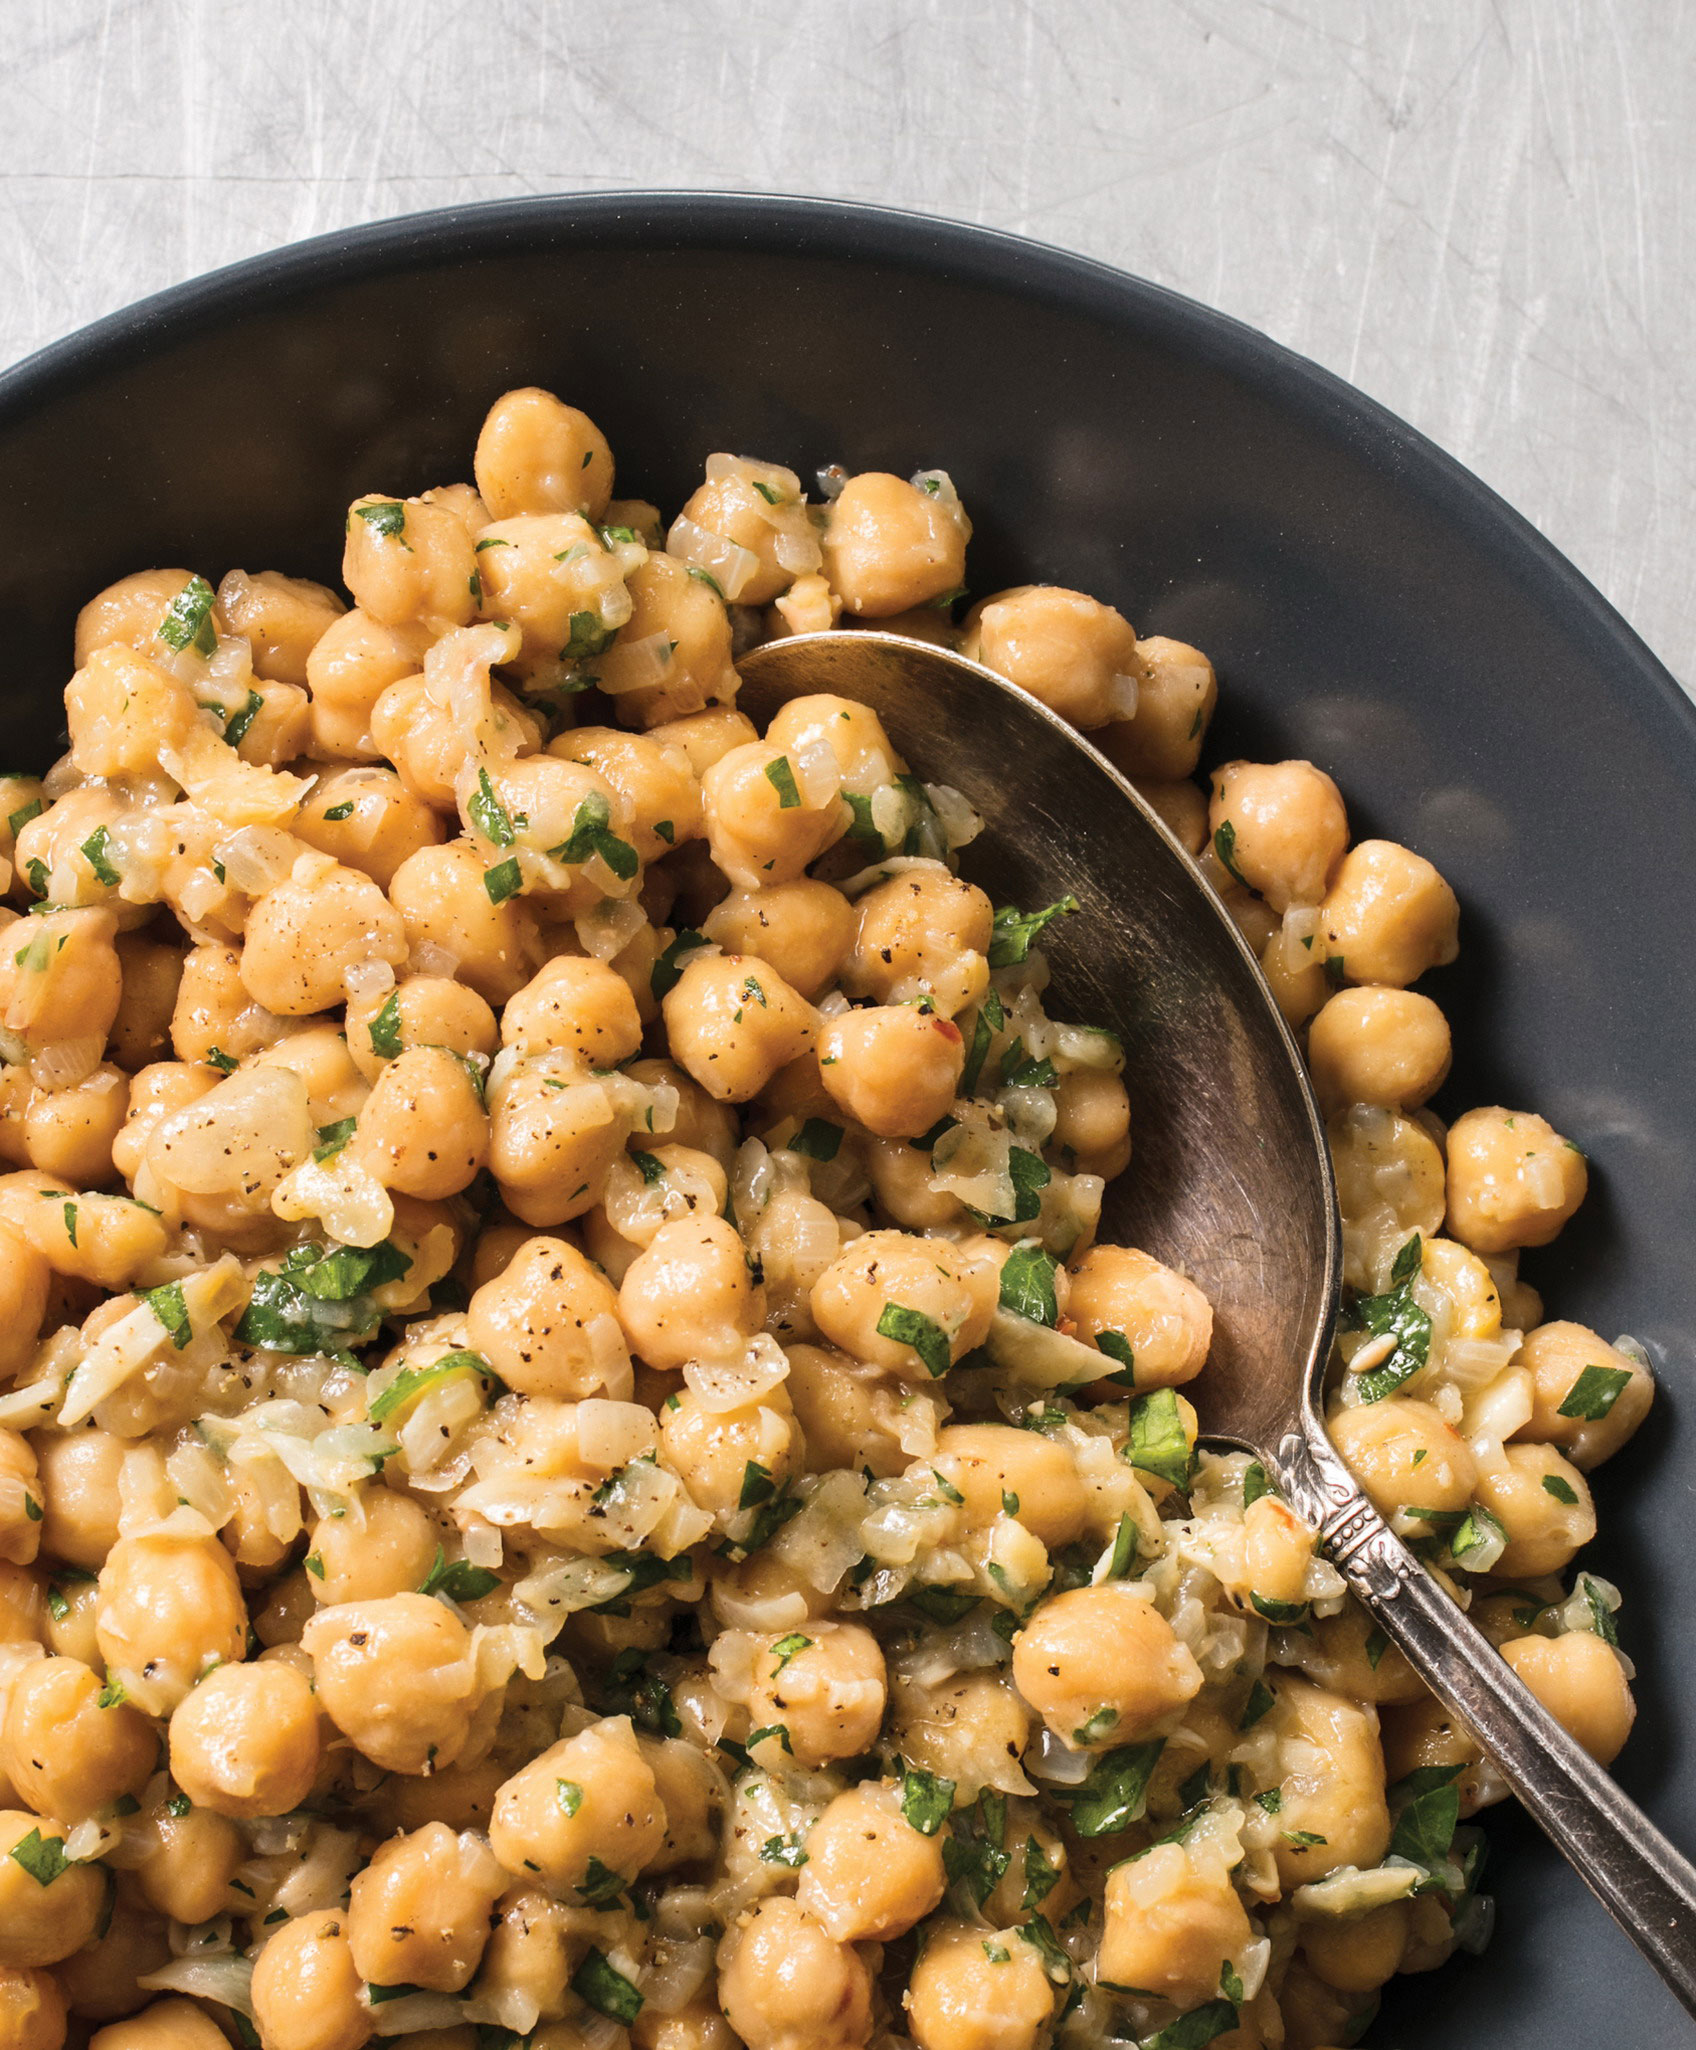
Why This Recipe Works Sautéed with just a few flavorful ingredients, chickpeas become ultraversatile as a main dish served over grains or noodles or as part of a plate-sharing arrangement with any number of vegetables. In search of Mediterranean flavors that would easily transform our canned chickpeas, we reached for garlic and red pepper flakes. Instead of mincing the garlic, we cut it into thin slices and sautéed them in extra-virgin olive oil to mellow their flavor. The thin slivers nicely maintained their presence in the finished dish. We softened an onion along with this aromatic base, then added the chickpeas with vegetable broth, which imparted a rich, savory backbone to the dish. As final touches, parsley and lemon juice gave our warm chickpeas a burst of freshness.
¼ cup extra-virgin olive oil, divided
4 garlic cloves, sliced thin
⅛ teaspoon red pepper flakes
1 onion, chopped fine
¼ teaspoon table salt
2 (15-ounce) cans chickpeas, rinsed
1 cup vegetable broth
2 tablespoons minced fresh parsley
2 teaspoons lemon juice
1. Cook 3 tablespoons oil, garlic, and pepper flakes in 12-inch skillet over medium heat, stirring frequently, until garlic turns golden but not brown, about 3 minutes. Stir in onion and salt and cook until softened and lightly browned, 5 to 7 minutes. Stir in chickpeas and broth and bring to simmer. Reduce heat to medium-low, cover, and cook until chickpeas are heated through and flavors meld, about 7 minutes.
2. Uncover, increase heat to high, and continue to cook until nearly all liquid has evaporated, about 3 minutes. Off heat, stir in parsley and lemon juice. Season with salt and pepper to taste and drizzle with remaining 1 tablespoon oil. Serve.
VARIATIONS
Chickpeas with Bell Pepper, Scallions, and Basil
Add 1 chopped red bell pepper to skillet with onion. Substitute 2 tablespoons chopped fresh basil for parsley and stir in 2 thinly sliced scallions before serving.
Chickpeas with Smoked Paprika and Cilantro
Omit red pepper flakes. Add ½ teaspoon smoked paprika to skillet before chickpeas and cook until fragrant, about 30 seconds. Substitute 2 tablespoons minced fresh cilantro for parsley and 2 teaspoons sherry vinegar for lemon juice.
Serves 4 to 6
Why This Recipe Works The flavors in this dish were inspired by Tunisian cuisine, which is known for being quite hot and spicy. While the combination of chickpeas and braised turnips may sound unfamiliar, these two earthy ingredients actually work very well together. Turnips have a peppery bite akin to radishes when raw (they add great crunch to salads), but when cooked, their spiciness mellows and they develop a dense, creamy texture similar to potatoes but with less starch. Including the aquafaba—the starchy, seasoned liquid from the cans of chickpeas—in the dish instead of draining it away gave the braising liquid that became the sauce good body and flavor. Finally, a base of fluffy couscous allowed all of our ingredients along with our punchy sauce to shine through.
3 tablespoons extra-virgin olive oil, divided
2 onions, chopped
2 red bell peppers, stemmed, seeded, and chopped
¾ teaspoon table salt, divided
¼ teaspoon pepper
¼ cup tomato paste
1 jalapeño chile, stemmed, seeded, and chopped
5 garlic cloves, minced
¾ teaspoon ground cumin
¼ teaspoon cayenne pepper
2 (15-ounce) cans chickpeas
12 ounces turnips, peeled and cut into ½-inch pieces
2¼ cups water, divided, plus extra hot water as needed
1½ cups couscous
¼ cup chopped fresh parsley
2 tablespoons lemon juice, plus lemon wedges for serving
1. Heat 2 tablespoons oil in Dutch oven over medium heat until shimmering. Add onions, bell peppers, ½ teaspoon salt, and pepper and cook until softened and lightly browned, 5 to 7 minutes. Stir in tomato paste, jalapeno, garlic, cumin, and cayenne and cook until fragrant, about 30 seconds.
2. Stir in chickpeas and their liquid, turnips, and ¾ cup water. Bring to simmer and cook until turnips are tender and sauce has thickened, 25 to 35 minutes.
3. Meanwhile, heat remaining 1 tablespoon oil in medium saucepan over medium-high heat until shimmering. Add couscous and cook, stirring frequently, until grains are just beginning to brown, 3 to 5 minutes. Stir in remaining 1½ cups water and remaining ¼ teaspoon salt. Cover, remove saucepan from heat, and let sit until couscous is tender, about 7 minutes. Fluff couscous with fork.
4. Stir parsley and lemon juice into braised turnips. Season with salt and pepper to taste. Adjust consistency with hot water as needed. Serve chickpeas over couscous with lemon wedges.

Serves 6 to 8
Why This Recipe Works “Agrodolce” refers to an Italian sweet-and-sour sauce made by reducing vinegar and sugar. This boldly flavored condiment can accompany anything from pasta to beans to vegetables. Here we use this classic sauce in a flavorful cranberry bean dish. Since canned cranberry beans are difficult to find, we used dried, brining the beans overnight to ensure creamy texture and fewer blowouts before rinsing and simmering them until tender. Next, we sautéed chopped fennel until it softened and added fennel seeds to reinforce the fresh fennel’s flavor. We reduced red wine vinegar and sugar until they thickened into the signature agrodolce glaze, which beautifully coated the beans. Grapes and pine nuts provided pops of sweetness and crunch. A sprinkling of fennel fronds underscored the fennel flavor. If cranberry beans are unavailable, you can substitute pinto beans.
3 tablespoons table salt for brining
1 pound (2½ cups) dried cranberry beans, picked over and rinsed
1¼ teaspoons table salt, divided
3 tablespoons extra-virgin olive oil
½ fennel bulb, 2 tablespoons fronds chopped, stalks discarded, bulb cored and chopped
¼ teaspoon pepper
1 cup plus 2 tablespoons red wine vinegar, divided
½ cup sugar
1 teaspoon fennel seeds
6 ounces seedless red grapes, halved (1 cup)
½ cup pine nuts, toasted
1. Dissolve 3 tablespoons salt in 4 quarts cold water in large container. Add beans and soak at room temperature for at least 8 hours or up to 24 hours. Drain and rinse well.
2. Bring beans, 4 quarts water, and 1 teaspoon salt to boil in Dutch oven. Reduce to simmer and cook, stirring occasionally, until beans are tender, 1 to 1½ hours. Drain beans and set aside.
3. Wipe Dutch oven clean with paper towels. Heat oil in now-empty pot over medium heat until shimmering. Add fennel bulb, pepper, and remaining ¼ teaspoon salt and cook until softened, about 5 minutes. Stir in 1 cup vinegar, sugar, and fennel seeds until sugar is dissolved. Bring to simmer and cook until liquid is thickened to syrupy glaze and edges of fennel are beginning to brown, about 10 minutes.
4. Add beans to vinegar-fennel mixture and toss to coat. Transfer to large bowl and let cool to room temperature. Add grapes, pine nuts, fennel fronds, and remaining 2 tablespoons vinegar and toss to combine. Season with salt and pepper to taste, and serve.
Canned beans are undeniably convenient, and in many cases they work as well as or even better than dried beans. However, there are instances when dried beans are central to a recipe’s success because their long cooking time adds thickness and body (and some beans, such as cranberry beans, are far more readily available dried).
When shopping, check packages for dates to select “fresh” dried beans. Buy those that are uniform in size and have a smooth exterior. Uncooked beans should be stored in a cool, dry place in a sealed plastic or glass container. Dried beans are less susceptible than rice and grains to pests and spoilage, but it is still best to use them within a month or two. When “fresh” dried beans are fully hydrated and cooked, they should be plump, with taut skins, and have creamy insides; spent beans will have wrinkled skins and a dry, almost gritty texture.
Before cooking dried beans, you should pick them over for any small stones or debris and then rinse them in a colander to wash away any dust. The easiest way to check for small stones is to spread the beans out over a large plate or rimmed baking sheet.
Brining dried beans means you need to plan ahead, since we suggest at least an 8-hour brine. But when you soak dried beans in salted water, they cook up with softer skins and are less likely to blow out and disintegrate during cooking. It has to do with how the sodium ions in salt interact with the cells of the bean skins. As the beans soak, the sodium ions replace some of the calcium and magnesium ions in the skins. Because sodium ions are more weakly charged than calcium and magnesium ions, they allow more water to penetrate into the skins, leading to a softer texture. During soaking, the sodium ions will filter only partway into the beans, so their greatest effect is on the cells in the outermost part of the beans. Softening the skins also makes them less likely to split as the beans cook, keeping the beans intact.
For a Regular Brine
For 1 pound of dried beans, dissolve 3 tablespoons table salt in 4 quarts cold water. Soak the beans at room temperature for 8 to 24 hours. Drain and rinse them well before using.
For a Quick Brine
If you are pressed for time, you can “quick-brine” your dried beans. Simply combine 3 tablespoons table salt with 4 quarts cold water and 1 pound beans in a large Dutch oven and bring to a boil over high heat. Remove the pot from the heat, cover, and let stand for 1 hour. Drain and rinse them well before using.
Most recipes that call for dried beans require the beans to cook slowly with the other ingredients so that they release their starches and thicken the dish. When you replace the dried beans with canned beans and shorten the cooking time (canned beans are fully cooked and need to cook only long enough to warm through and soak up flavor), you sacrifice both the flavor and the texture of the finished dish. But if you’re short on time and want to swap in canned beans for convenience, a general rule is that 1 cup dried beans equals 3 cups canned beans.
Canned beans are made by pressure-cooking dried beans directly in the can with water, salt, and preservatives. As the beans cook, starches and proteins leach into the liquid, thickening it. To find out whether rinsing away this starchy liquid mattered, we did side-by-side taste tests of both chickpea salad and bean chili made with rinsed and unrinsed beans. In the salad, tasters detected differences; the salad with rinsed chickpeas was noticeably brighter in flavor and less pasty than the one with unrinsed chickpeas. However, in the chili, which was stewy and had lots of bold flavors, rinsing the beans didn’t make a difference. And in some recipes, like Spicy Braised Chickpeas and Turnips with Couscous (this page), retaining the aquafaba (the chickpeas’ starchy seasoned bean liquid) contributes additional flavor and body to the finished dish. Bottom line: Follow the recipe directions for whether or not to rinse the beans.
Serves 6 to 8
Why This Recipe Works Though they are found in many cuisines the world over, cranberry beans originated in South America. Since they have become popular in Mexico as well, we decided to pair them here with bold Mexican flavors—including tequila! Cranberry beans are rarely found canned, so we started with dried beans, soaking them overnight in salt water to help them cook up evenly tender and creamy. Then we sautéed some onion and garlic with lots of paprika, some cumin seeds, and dried oregano. Once the mixture was fragrant, we added a little tequila to the pot to give the beans some kick. (Cooking it until evaporated prevented the dish from tasting boozy.) Next we stirred in the brined beans and water and transferred the pot to the oven, where the beans cooked gently without the need for monitoring. Once the beans were tender, we stirred in some convenient canned chiles to give the dish great spice and some brightness and then we cooked the beans uncovered for 15 minutes more to allow the sauce to thicken. A garnish of rich plant-based (or dairy) sour cream, crunchy pepitas, and pickled shallots and radishes nicely balanced the rich, warm flavors of the cranberry beans. You may use plant-based or dairy yogurt in place of the sour cream, if you prefer. If cranberry beans are unavailable, substitute pinto beans.
3 tablespoons table salt for brining
1 pound (2½ cups) dried cranberry beans, picked over and rinsed
¼ cup extra-virgin olive oil
1 onion, chopped fine
1 teaspoon table salt
6 garlic cloves, minced
1 tablespoon paprika
½ teaspoon cumin seeds
½ teaspoon dried oregano
¼ cup tequila
1 tablespoon packed brown sugar
1 bay leaf
½ cup canned chopped green chiles
½ cup roasted pepitas
½ cup plant-based sour cream or dairy sour cream
1 recipe Quick Pickled Shallots and Radishes (recipe follows)
1. Dissolve 3 tablespoons salt in 4 quarts cold water in large container. Add beans and soak at room temperature for at least 8 hours or up to 24 hours. Drain and rinse well.
2. Adjust oven rack to middle position and heat oven to 325 degrees. Heat oil in Dutch oven over medium heat until shimmering. Add onion and salt and cook until onion is softened, about 5 minutes. Stir in garlic, paprika, cumin, and oregano and cook until fragrant, about 1 minute. Stir in tequila and cook until evaporated, about 30 seconds. Stir in 5 cups water, sugar, bay leaf, and cranberry beans; bring to simmer. Cover, transfer pot to oven, and cook until beans are tender, stirring once halfway through cooking, about 1¼ hours.
3. Add green chiles, stirring vigorously. Return pot to oven uncovered, and cook until sauce is thickened slightly, about 15 minutes. Season with salt and pepper to taste, and serve with pepitas, sour cream, and pickles.
Makes about 1 cup
¼ cup lime juice (2 limes)
1 teaspoon sugar
¼ teaspoon table salt
6 large radishes, trimmed and sliced thin
1 shallot, sliced thin
Whisk lime juice, sugar, and salt in medium bowl until sugar and salt have dissolved. Stir in radishes and shallot and let sit for 15 minutes for flavors to blend (or refrigerate for up to 1 hour). Drain vegetables before serving.
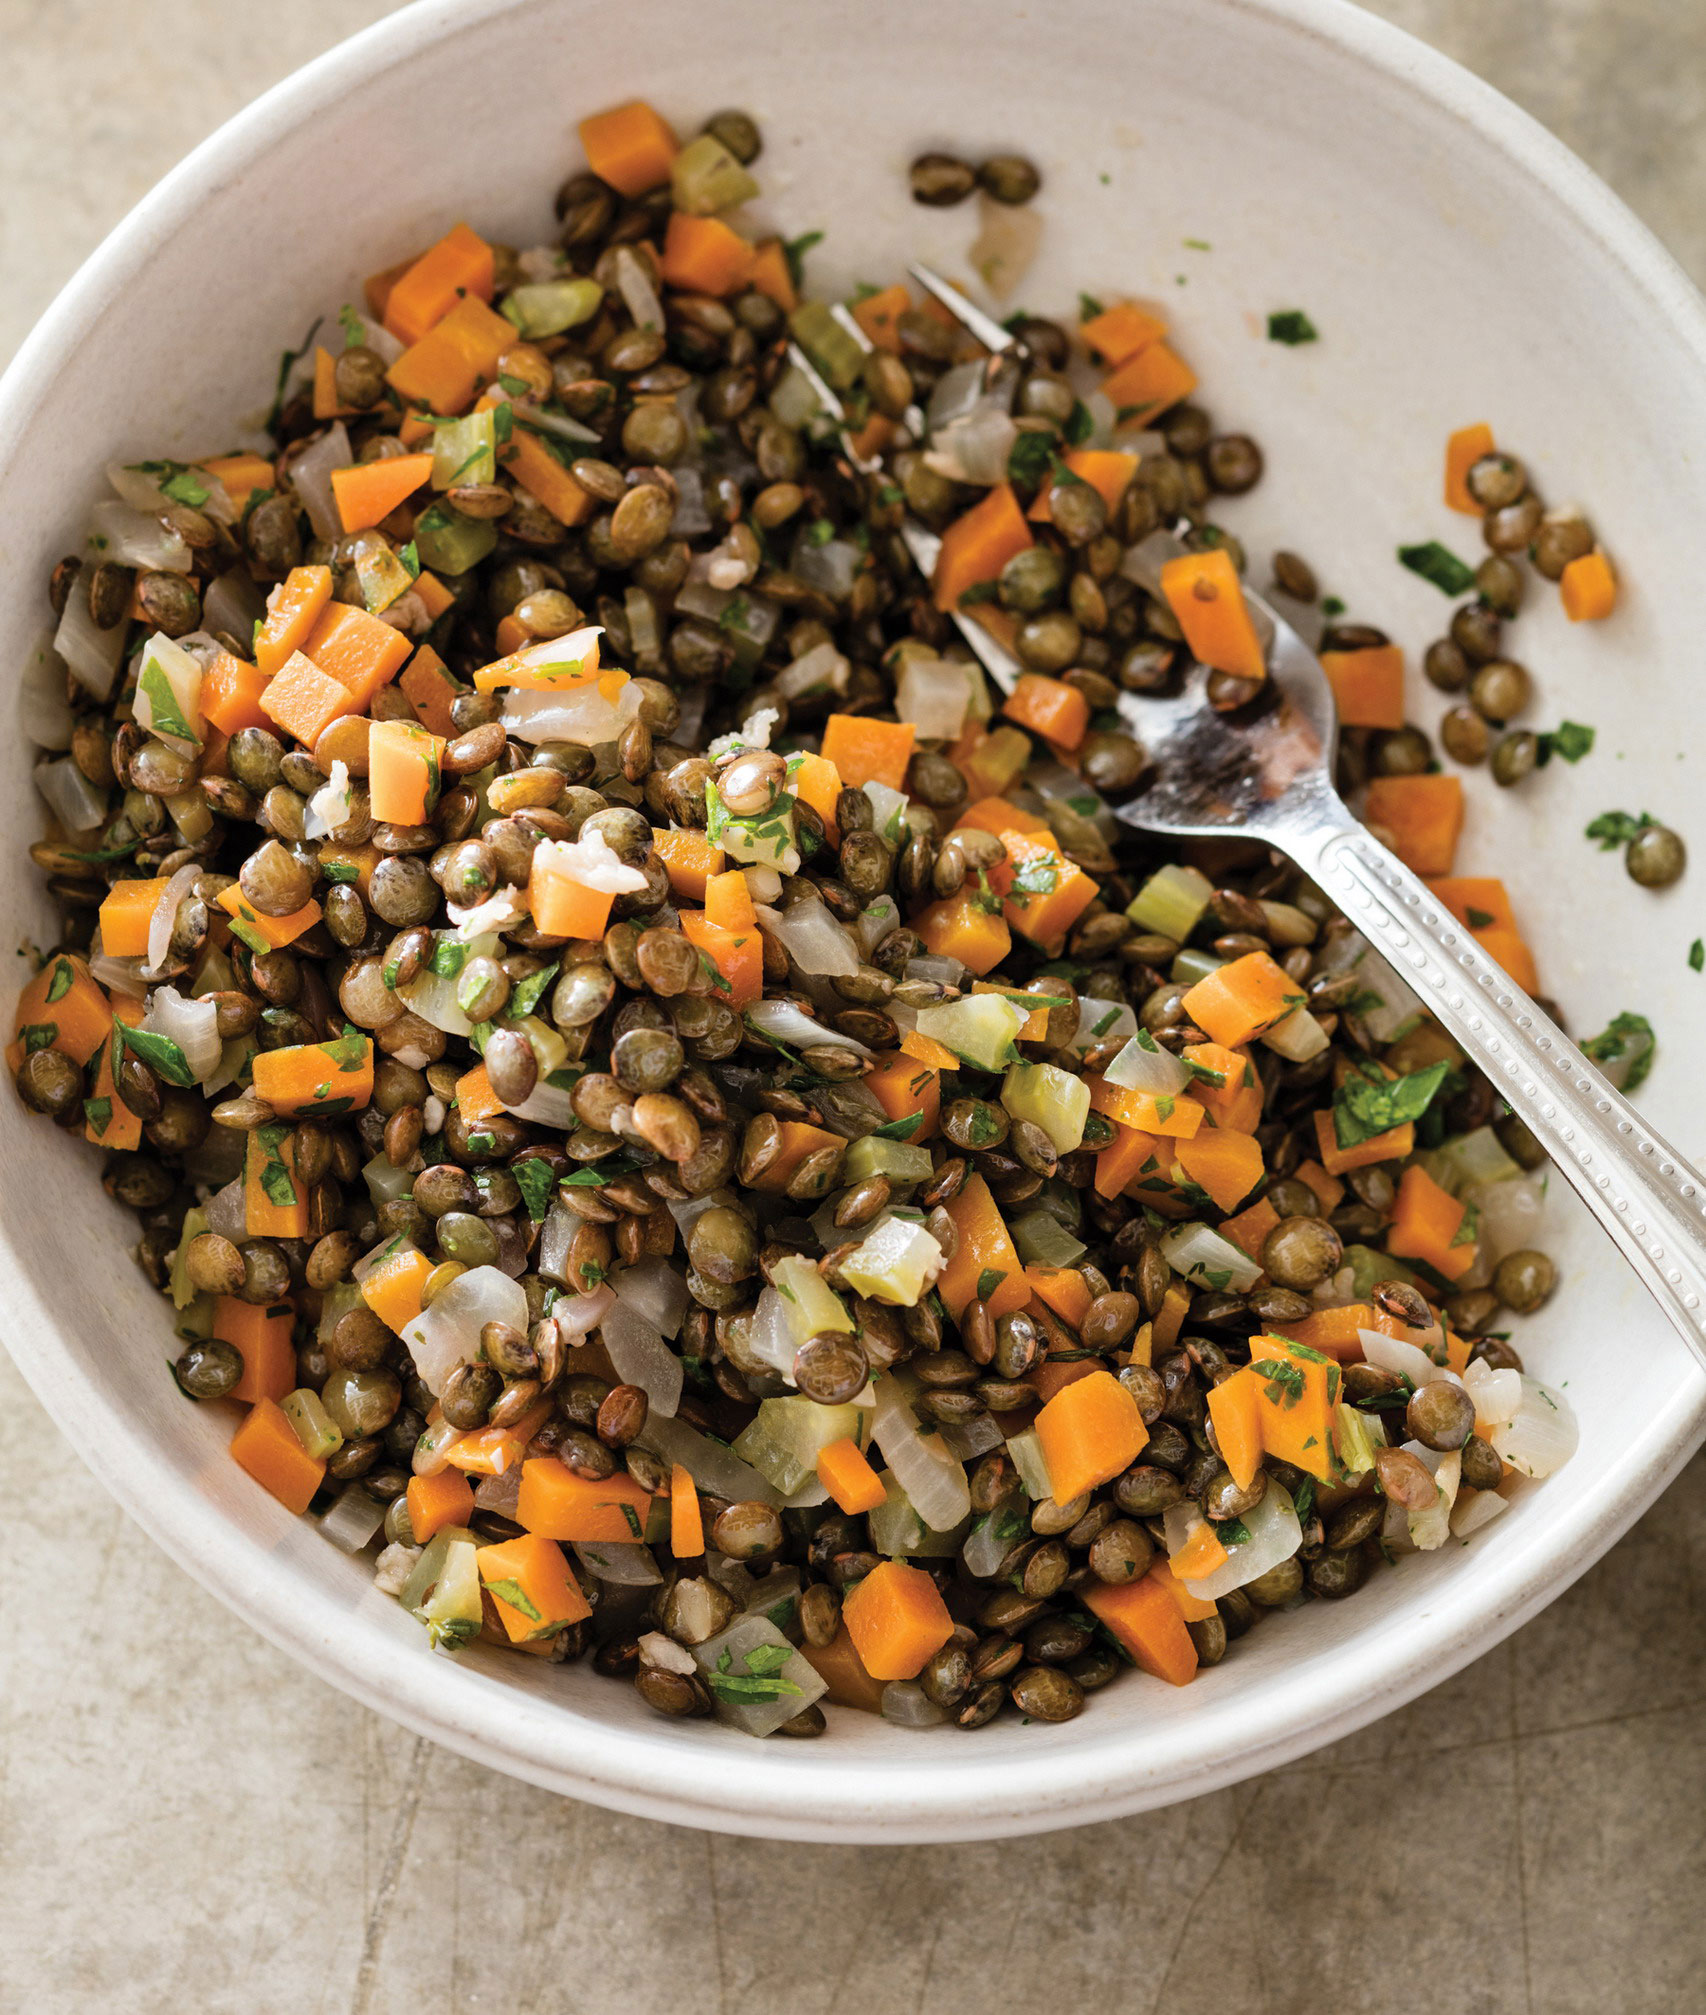
Serves 4 to 6
Why This Recipe Works We love tiny French green lentils in salads, since they are small and firm and hold their shape better than standard green or brown lentils. A quick soak in salt water softened their skins before cooking, leading to fewer lentil blowouts and resulting in a faster cooking time. We then simmered them until tender, easily boosting their flavor by simply adding some crushed cloves of garlic and a bay leaf to the pot. With our cooked lentils in hand, we turned to the other ingredients. A simple, tart vinaigrette worked perfectly to balance the lentils. We chose several boldly flavored mix-ins to bring our salad to life: fresh mint, minced shallot, and chopped kalamata olives. If you would like to incorporate cheese, we like the richness of feta here. Lentilles du Puy, also called French green lentils, are our first choice for this recipe, but brown, black, or regular green lentils are fine, too (note that cooking times will vary depending on the type used).
1 teaspoon table salt for brining
1 cup dried lentilles du Puy (French green lentils), picked over and rinsed
5 garlic cloves, lightly crushed and peeled
1 bay leaf
½ teaspoon table salt
5 tablespoons extra-virgin olive oil
3 tablespoons white wine vinegar
½ cup pitted kalamata olives, chopped coarse
½ cup chopped fresh mint
1 large shallot, minced
1 ounce feta cheese, crumbled (¼ cup) (optional)
1. Dissolve 1 teaspoon salt in 1 quart warm water (about 110 degrees) in bowl. Add lentils and soak at room temperature for 1 hour. Drain well.
2. Bring lentils, garlic, bay leaf, salt, and 1 quart water to boil in medium saucepan. Reduce heat to medium-low and simmer until the lentils are tender but still hold their shape, 8 to 10 minutes.
3. Drain lentils well; discard garlic and bay leaf. Whisk oil and vinegar together in large bowl. Add drained lentils, olives, mint, and shallot to dressing and toss to combine. Season with salt and pepper to taste, and sprinkle with feta, if using. Serve warm or at room temperature.
VARIATION
Lentil Salad with Spinach and Walnuts
Substitute 3 tablespoons sherry vinegar for white wine vinegar. Place 4 cups baby spinach and 2 tablespoons water in bowl. Cover and microwave until spinach is wilted to half its original volume, about 4 minutes. Remove bowl from microwave and keep covered for 1 minute. Transfer spinach to colander and gently press to release liquid. Transfer spinach to cutting board and chop coarse. Return to colander and press again. Substitute chopped spinach for olives and mint and ¼ cup Vegan Parmesan Substitute (this page) or coarsely grated Parmesan cheese for feta, if using. Sprinkle salad with ¼ cup walnuts, toasted and chopped coarse, before serving.
Serves 4 to 6
Why This Recipe Works For a simple, versatile dish that would highlight the sweet-earthy flavors of lentilles du Puy, we took inspiration from their namesake and looked to France, slowly cooking the small, firm lentils with carrots, onion, and celery (a classic French combination called a mirepoix). We wanted a low, slow simmer so that the lentils could be infused with the aromatics, so we skipped the soaking step; they still held their shape nicely through cooking. Garlic and thyme added more aromatic flavors that complemented the lentils. Using water rather than broth let the pure flavors come through. Lentilles du Puy, also called French green lentils, are our first choice for this recipe, but brown, black, or regular green lentils are fine, too (note that cooking times will vary depending on the type used).
2 carrots, peeled and chopped fine
1 onion, chopped fine
1 celery rib, chopped fine
2 tablespoons extra-virgin olive oil, divided
½ teaspoon table salt
2 garlic cloves, minced
1 teaspoon minced fresh thyme or ¼ teaspoon dried
2½ cups water
1 cup dried lentilles du Puy (French green lentils), picked over and rinsed
2 tablespoons minced fresh parsley
2 teaspoons lemon juice
1. Combine carrots, onion, celery, 1 tablespoon oil, and salt in large saucepan. Cover and cook over medium-low heat, stirring occasionally, until vegetables are softened, 8 to 10 minutes. Stir in garlic and thyme and cook until fragrant, about 30 seconds.
2. Stir in water and lentils and bring to simmer. Reduce heat to low, cover, and simmer gently, stirring occasionally, until lentils are mostly tender, 40 to 50 minutes.
3. Uncover and continue to cook, stirring occasionally, until lentils are completely tender, about 8 minutes. Stir in remaining 1 tablespoon oil, parsley, and lemon juice. Season with salt and pepper to taste, and serve.
VARIATION
Curried French Lentils with Golden Raisins
Add 1 teaspoon curry powder to pot with onion. Stir ½ cup golden raisins into pot after uncovering in step 3. Substitute minced fresh cilantro for parsley.
Serves 4 to 6
Why This Recipe Works This supersavory dish elevates earthy French green lentils and humble broccoli to a whole new level. And although it’s company-worthy, this comes together in less than an hour, making it achievable any day of the week. We opted for classic aromatics to create our flavorful base: onions, garlic, and herbaceous thyme. By preheating the sheet pan in a 500-degree oven and laying the broccoli on it in a single layer, we were able to impart deep, flavorful browning to the stalks and florets in a short amount of time. While the lentils cooked, we quickly made a bright, crispy, lemony bread crumb topping in a skillet. Using the same skillet, we reduced some balsamic vinegar, transforming its flavor from sharp and assertive to luxurious and sweet. We then assembled our bowls: lentils topped with broccoli and bread crumbs, all drizzled with balsamic reduction. Lentilles du Puy (or French green lentils) hold their shape quite well during cooking; we do not recommend substituting other types of lentils in this dish.
6 tablespoons extra-virgin olive oil, divided, plus extra for drizzling
1 onion, chopped fine
¾ teaspoon table salt, divided
2 garlic cloves, minced
1 teaspoon minced fresh thyme or ½ teaspoon dried
12 ounces (1¾ cups) dried lentilles du Puy (French green lentils), picked over and rinsed
3¾ cups water
½ cup panko bread crumbs
2 teaspoons grated lemon zest
½ cup balsamic vinegar
2 pounds broccoli, florets cut into 1-inch pieces, stalks peeled and sliced lengthwise into ½-inch thick planks
1. Adjust oven rack to lowest position, place aluminum foil–lined rimmed baking sheet on rack, and heat oven to 500 degrees. Heat 1 tablespoon oil in large saucepan over medium heat until shimmering. Add onion and ¼ teaspoon salt and cook until softened, about 5 minutes. Stir in garlic and thyme and cook until fragrant, about 30 seconds.
2. Stir in lentils and water and bring to simmer over high heat. Reduce heat to low, cover, and simmer, stirring occasionally, until lentils are just tender, about 25 minutes. Uncover, increase heat to medium and continue to cook until lentils are completely tender and most of liquid has evaporated, 10 to 15 minutes. Season with salt and pepper to taste, cover to keep warm, and set aside.
3. While lentils cook, combine panko and 2 tablespoons oil in 8-inch skillet, stirring to coat. Cook over medium-low heat, stirring frequently, until light golden brown, 5 to 7 minutes; transfer to bowl and stir in lemon zest. Wipe skillet clean with paper towels. Cook vinegar in now-empty skillet, scraping bottom of skillet with rubber spatula, until thickened and reduced to 2 tablespoons, about 5 minutes.
4. Toss broccoli with remaining 3 tablespoons oil and remaining ½ teaspoon salt in bowl. Working quickly, lay broccoli in single layer, flat sides down, on preheated sheet. Roast until florets are browned, 9 to 11 minutes. Divide lentils among individual serving bowls and top with broccoli mixture. Sprinkle with panko mixture, drizzle with balsamic reduction, and serve, drizzling with extra oil.
Serves 4 to 6
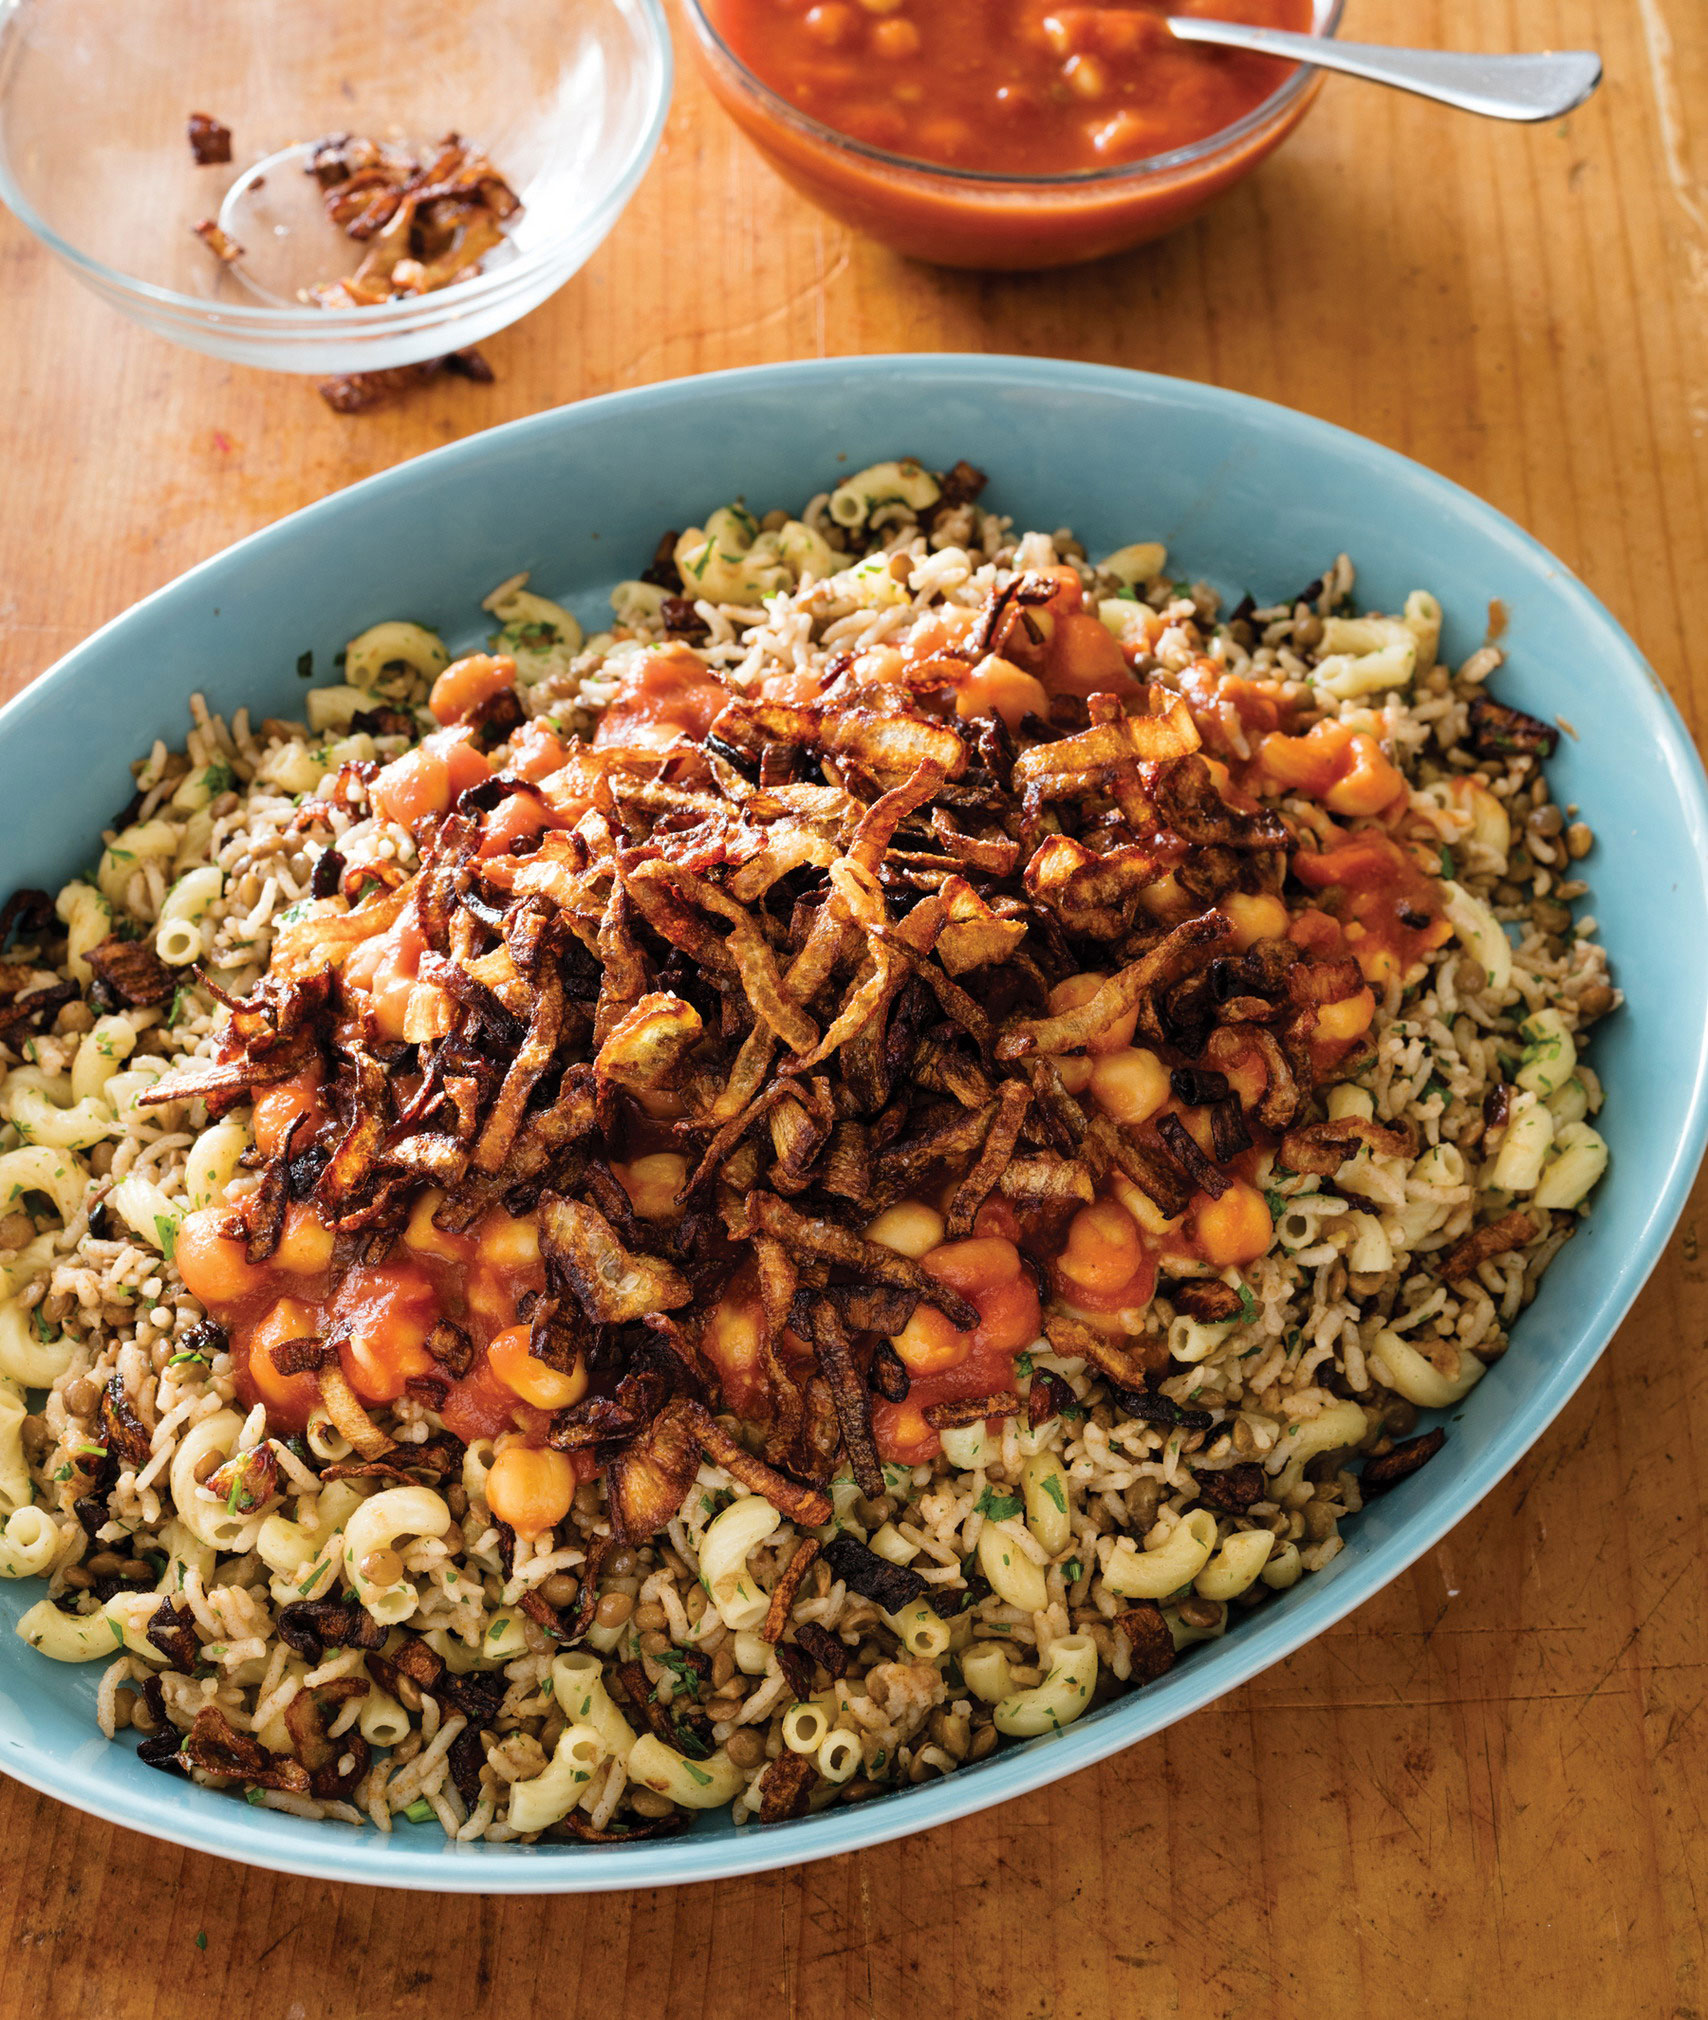
Why This Recipe Works Considered the national dish of Egypt, koshari evolved as a way to use up leftovers and became a popular street food. This hearty dish usually features lentils, rice, pasta, and chickpeas smothered in a spiced tomato sauce and topped with crispy fried onions. Our tasters couldn’t get enough of this comforting combination, and although the dish took some time to put together, each element was fairly simple. We cooked the lentils and the pasta in boiling water and drained them, then set them aside while we prepared the rice and sauce. Soaking the rice in hot water before cooking eliminated excess starch so it didn’t clump. Tasters preferred a tomato sauce spiked with vinegar over spicier options. Using the same spices (coriander, cumin, cinnamon, nutmeg, and cayenne) in the sauce and the rice built a layered flavor profile. Adding the chickpeas directly to the sauce to simmer infused them with flavor. The finishing touch: a generous amount of ultrasavory, crunchy fried onions. Large green or brown lentils both work well in this recipe; do not use French green lentils, or lentilles du Puy. Long-grain white, jasmine, or Texmati rice can be substituted for the basmati.
1 cup elbow macaroni
1 teaspoon table salt, divided, plus salt for cooking pasta and lentils
1 cup dried green or brown lentils, picked over and rinsed
1 recipe Crispy Onions, plus ¼ cup reserved oil, divided (this page)
4 garlic cloves, minced, divided
1½ teaspoons ground coriander, divided
1½ teaspoons ground cumin, divided
¾ teaspoon ground cinnamon, divided
¼ teaspoon ground nutmeg, divided
¼ teaspoon cayenne pepper, divided
1 (28-ounce) can tomato sauce
1 (15-ounce) can chickpeas, rinsed
1 cup basmati rice
1 tablespoon red wine vinegar
3 tablespoons minced fresh parsley
1. Bring 2 quarts water to boil in Dutch oven. Add pasta and 1½ teaspoons salt and cook, stirring often, until al dente. Drain pasta, rinse with water, then drain again. Transfer to bowl and set aside.
2. Meanwhile, bring lentils, 4 cups water, and 1 teaspoon salt to boil in medium saucepan over high heat. Reduce heat to low and cook until lentils are just tender, 15 to 17 minutes. Drain and set aside.
3. Cook 1 tablespoon reserved onion oil, 1 teaspoon garlic, ½ teaspoon coriander, ½ teaspoon cumin, ¼ teaspoon cinnamon, ⅛ teaspoon nutmeg, ⅛ teaspoon cayenne, and ½ teaspoon salt in now-empty saucepan over medium heat until fragrant, about 1 minute. Stir in tomato sauce and chickpeas, bring to simmer, and cook until slightly thickened, about 10 minutes. Cover and keep warm.
4. While sauce cooks, place rice in medium bowl, cover with hot tap water by 2 inches, and let sit for 15 minutes. Using your hands, gently swish grains to release excess starch. Carefully pour off water, leaving rice in bowl. Repeat adding and pouring off cold water 4 or 5 times, until water runs almost clear. Drain rice in fine-mesh strainer.
5. Cook remaining 3 tablespoons reserved onion oil, remaining garlic, remaining 1 teaspoon coriander, remaining 1 teaspoon cumin, remaining ½ teaspoon cinnamon, remaining ⅛ teaspoon nutmeg, and remaining ⅛ teaspoon cayenne in now-empty pot over medium heat until fragrant, about 2 minutes. Add rice and cook, stirring occasionally, until grain edges begin to turn translucent, about 3 minutes. Stir in 2 cups water and remaining ½ teaspoon salt and bring to boil. Stir in lentils, reduce heat to low, cover, and simmer gently until all liquid is absorbed, about 12 minutes.
6. Off heat, sprinkle pasta over rice mixture. Cover, laying clean dish towel underneath lid, and let sit for 10 minutes.
7. Return sauce to simmer over medium heat. Stir in vinegar and season with salt and pepper to taste. Fluff rice and lentils with fork and stir in parsley and half of onions. Transfer to serving platter and top with half of sauce and remaining onions. Serve, passing remaining sauce separately.
Makes 1½ cups
It is crucial to thoroughly dry the microwaved onions after rinsing. Be sure to reserve enough oil to use in the Mujaddara or Koshari. The remaining oil may be refrigerated in an airtight container for up to four weeks; it tastes great in salad dressings, sautéed vegetables, and pasta sauces.
2 pounds onions, halved and sliced crosswise into ¼-inch-thick pieces
2 teaspoons table salt
1½ cups vegetable oil
1. Toss onions and salt together in large bowl. Microwave for 5 minutes. Rinse thoroughly, transfer to paper towel–lined baking sheet, and dry well.
2. Heat onions and oil in Dutch oven over high heat, stirring frequently, until onions are golden brown, 25 to 30 minutes. Drain onions in colander set in large bowl. Transfer onions to paper towel–lined baking sheet to drain. Serve.

Serves 4 to 6
Why This Recipe Works Essentially the “rice and beans” of the eastern Mediterranean, this classic Levantine dish is a spectacular example of how a few humble ingredients can add up to something that’s satisfying and complex. Traditional versions consist of tender basmati rice and lentils seasoned with warm spices and minced garlic and topped with deeply savory fried onions. To give the onions the best crispy texture, we microwaved them to remove some of their liquid and then fried them in oil to a deep golden brown. To ensure that the rice and lentils were done at the same time, we parcooked the lentils and then set them aside while we prepared the rice. We soaked the rice in hot water to ensure that it turned out fluffy, not sticky, and then toasted it along with the spices in some of the flavorful frying oil from the onions. Finished with a bracing garlicky yogurt sauce (equally delicious with plant-based or dairy yogurt), this pilaf is comfort food at its best. Large green or brown lentils both work well in this recipe; do not use French green lentils, or lentilles du Puy. Long-grain white, jasmine, or Texmati rice can be substituted for the basmati.
Yogurt Sauce
1 cup plain plant-based yogurt or dairy yogurt
2 tablespoons lemon juice
½ teaspoon minced garlic
½ teaspoon table salt
Rice and Lentils
8¾ ounces (1¼ cups) dried green or brown lentils, picked over and rinsed
1 teaspoon table salt, plus salt for cooking lentils
1¼ cups basmati rice
1 recipe Crispy Onions, plus 3 tablespoons reserved oil
3 garlic cloves, minced
1 teaspoon ground coriander
1 teaspoon ground cumin
½ teaspoon ground cinnamon
½ teaspoon ground allspice
¼ teaspoon pepper
⅛ teaspoon cayenne pepper
1 teaspoon sugar
3 tablespoons minced fresh cilantro
1. For the yogurt sauce Whisk all ingredients together in bowl and refrigerate until ready to serve.
2. For the rice and lentils Bring lentils, 4 cups water, and 1 teaspoon salt to boil in medium saucepan over high heat. Reduce heat to low and cook until lentils are just tender, 15 to 17 minutes. Drain and set aside.
3. Meanwhile, place rice in medium bowl, cover with hot tap water by 2 inches, and let sit for 15 minutes. Using your hands, gently swish grains to release excess starch. Carefully pour off water, leaving rice in bowl. Repeat adding and pouring off cold water 4 or 5 times, until water runs almost clear. Drain rice in fine-mesh strainer.
4. Cook reserved onion oil, garlic, coriander, cumin, cinnamon, allspice, pepper, and cayenne in Dutch oven over medium heat until fragrant, about 2 minutes. Add rice and cook, stirring occasionally, until grain edges begin to turn translucent, about 3 minutes. Stir in 2¼ cups water, sugar, and salt and bring to boil. Stir in lentils, reduce heat to low, cover, and simmer gently until all liquid is absorbed, about 12 minutes.
5. Off heat, cover, laying clean dish towel underneath lid, and let sit for 10 minutes. Fluff rice and lentils with fork and stir in cilantro and half of onions. Transfer to serving platter and top with remaining onions. Serve with yogurt sauce.
Serves 4 to 6
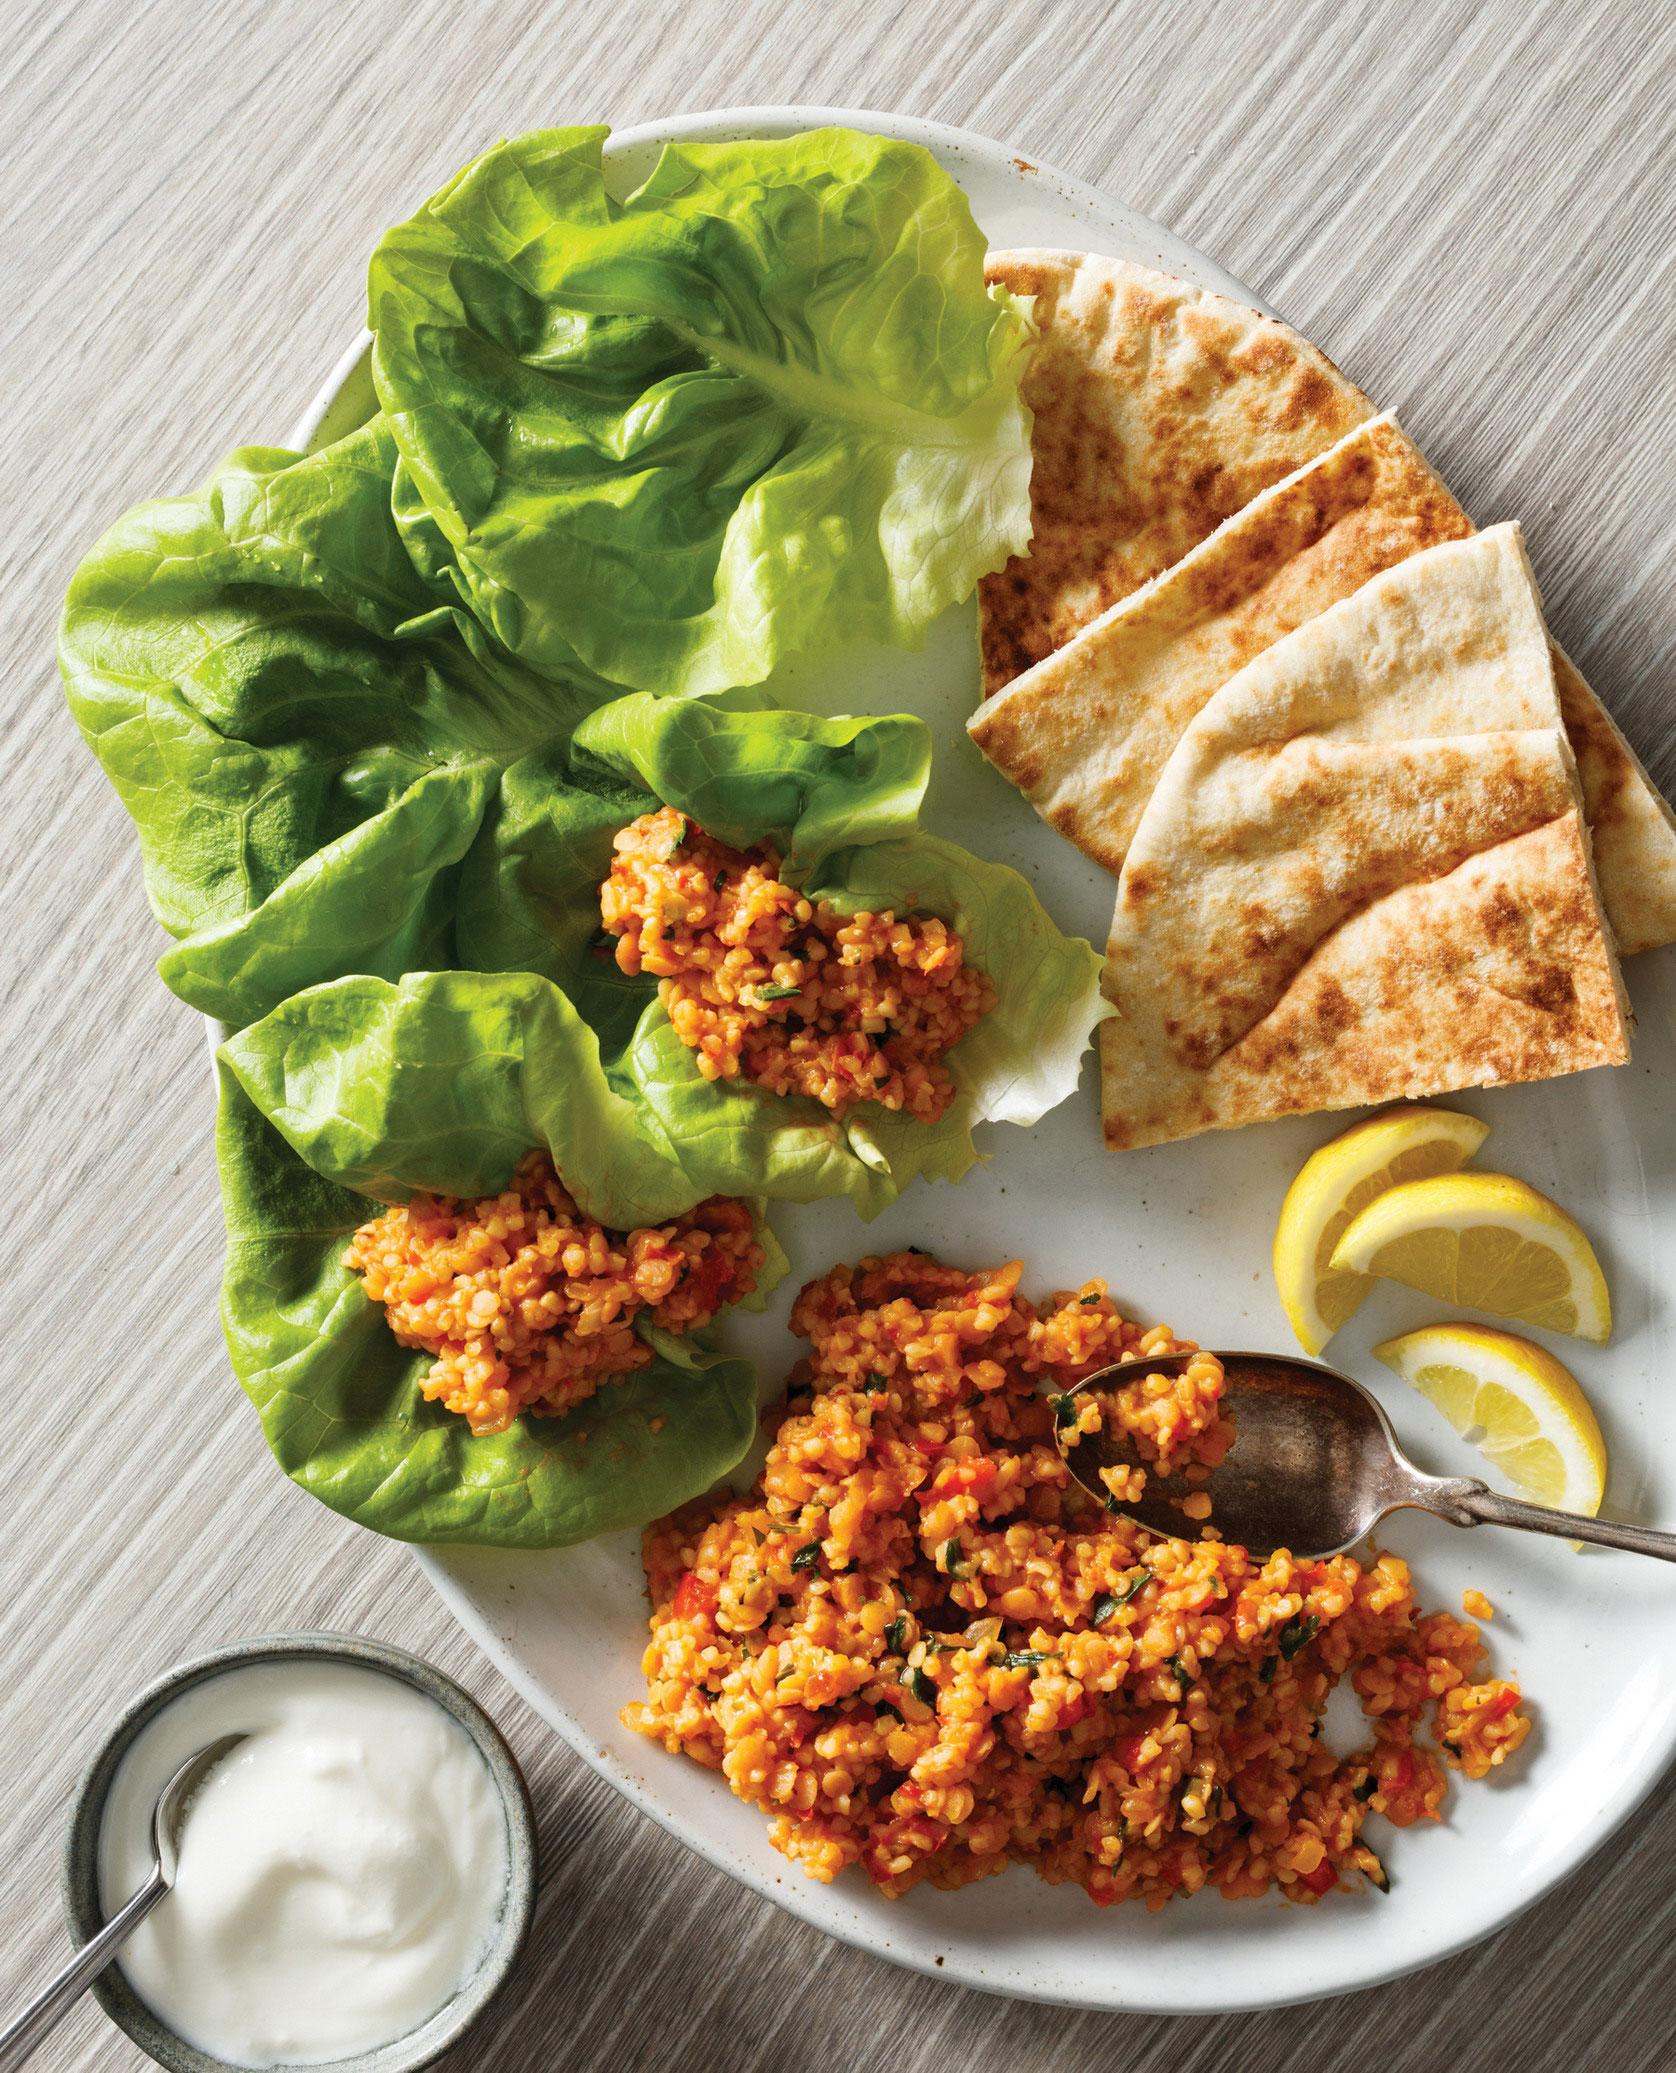
Why This Recipe Works Kibbeh is a popular Middle Eastern dish made from bulgur, minced onions, varying spices, and (traditionally) ground meat. During Lent, however, this common meal is often prepared with lentils in lieu of meat, as the texture of the two is similar. We wanted to take advantage of this flavor-packed plant-based mixture and develop it as something that could be served either on its own with some Bibb lettuce and yogurt or as a showstopping addition to a larger spread. We chose red lentils for their vibrant hue and enhanced both their color and flavor with two red pastes. Tomato paste brought sweetness and an umami quality, and harissa, a smoky, spicy chili paste, added complexity. We gave the bulgur a head start before adding the quick-cooking lentils to the same saucepan, which allowed both components to finish cooking at the same time. To balance the deep flavors from the aromatics and pastes, we stirred in lemon juice and fresh parsley at the end. This spoonable, delicious mixture would go great on a mezze platter alongside Whipped Cashew Dip with Roasted Red Peppers and Olives (this page), Baba Ghanoush (this page) or hummus, Spiced Roasted Chickpeas (this page) or nuts, pickled radishes, and pita. You can use our Harissa or store-bought harissa, though spiciness can vary greatly by brand. If your harissa is spicy, omit the cayenne.
3 tablespoons extra-virgin olive oil, divided
1 onion, chopped fine
1 red bell pepper, stemmed, seeded, and chopped fine
1 teaspoon table salt
2 tablespoons Harissa (this page)
2 tablespoons tomato paste
½ teaspoon cayenne pepper (optional)
1 cup medium-grind bulgur
4 cups water
¾ cup dried red lentils, picked over and rinsed
½ cup chopped fresh parsley
2 tablespoons lemon juice
1 head Bibb lettuce (8 ounces), leaves separated
½ cup plain plant-based yogurt or dairy yogurt
Lemon wedges
1. Heat 1 tablespoon oil in large saucepan over medium heat until shimmering. Add onion, bell pepper, and salt and cook until softened, about 5 minutes. Stir in harissa; tomato paste; and cayenne, if using, and cook, stirring frequently, until fragrant, about 1 minute.
2. Stir in bulgur and water and bring to simmer. Reduce heat to low, cover, and simmer gently until bulgur is barely tender, about 8 minutes. Stir in lentils, cover, and continue to cook, stirring occasionally, until lentils and bulgur are tender, 8 to 10 minutes.
3. Off heat, lay clean dish towel underneath lid and let mixture sit for 10 minutes. Stir in 1 tablespoon oil, parsley, and lemon juice and stir vigorously until mixture is cohesive. Season with salt and pepper to taste. Transfer to platter and drizzle with remaining 1 tablespoon oil. Spoon kibbeh into lettuce leaves and drizzle with yogurt. Serve with lemon wedges.
Makes ½ cup
This traditional North African condiment is great for flavoring soups, sauces, and dressings or dolloping on hummus, sandwiches, and eggs. If you can’t find Aleppo pepper, you can substitute ¾ teaspoon paprika and ¾ teaspoon finely chopped red pepper flakes.
6 tablespoons extra-virgin olive oil
6 garlic cloves, minced
2 tablespoons paprika
1 tablespoon ground coriander
1 tablespoon ground dried Aleppo pepper
1 teaspoon ground cumin
¾ teaspoon caraway seeds
½ teaspoon table salt
Combine all ingredients in bowl and microwave until bubbling and very fragrant, about 1 minute, stirring halfway through microwaving; let cool to room temperature. (Harissa can be refrigerated for up to 4 days.)

Serves 4 to 6
Why This Recipe Works Dals are heavily spiced lentil stews common throughout India. Split red lentils give this dal a mild, slightly nutty taste, and as the stew slowly simmers, they break down to a smooth consistency. We wanted our red lentil dal to be simple yet still embody the complex flavors of Indian cuisine, so we started with the spices. We created a balanced blend of warm spices with just a subtle layer of heat. Blooming the spices in oil until they were fragrant boosted and deepened their flavors. Onion, garlic, and ginger rounded out the aromatics. Authentic dal should have a porridge-like consistency, bordering on a puree (without the need for a blender). Getting this consistency required cooking the lentils with just the right amount of water: We finally settled on 4 cups water to 1¼ cups lentils for a dal that was smooth but not thin. Before serving, we added cilantro for color and freshness and diced raw tomato for sweetness and acidity. A bit of coconut oil stirred in before serving added a rich finish. You cannot substitute other types of lentils for the red lentils here; they have a very different texture. Serve over rice or with pita bread.
3 tablespoons refined coconut oil, divided
½ teaspoon ground coriander
½ teaspoon ground cumin
½ teaspoon ground cinnamon
½ teaspoon ground turmeric
⅛ teaspoon ground cardamom
⅛ teaspoon red pepper flakes
1 onion, chopped fine
¾ teaspoon table salt
3 garlic cloves, minced
1½ teaspoons grated fresh ginger
4 cups water
8½ ounces (1¼ cups) dried red lentils, picked over and rinsed
1 pound plum tomatoes, cored, seeded, and chopped
½ cup minced fresh cilantro
Lemon wedges
1. Melt 1 tablespoon oil in large saucepan over medium-high heat. Add coriander, cumin, cinnamon, turmeric, cardamom, and pepper flakes and cook until fragrant, about 10 seconds. Stir in onion and salt and cook until softened, about 5 minutes. Stir in garlic and ginger and cook until fragrant, about 30 seconds.
2. Stir in water and lentils and bring to boil. Reduce heat to low and simmer, uncovered, until lentils are tender and resemble coarse puree, 20 to 25 minutes.
3. Stir in tomatoes, cilantro, and remaining 2 tablespoons oil and season with salt and pepper to taste. Serve with lemon wedges.
VARIATION
Masoor Dal with Cauliflower and Cilantro
Omit tomatoes. Substitute 1 teaspoon garam masala for coriander, cumin, turmeric, cardamom, and pepper flakes. Substitute lime wedges for lemon wedges. While lentils cool, toss 1 head cauliflower, cut into 8 equal wedges, with 2 tablespoons extra-virgin olive oil and ¼ teaspoon salt. Place wedges cut side down on parchment paper–lined rimmed baking sheet. Cover tightly with aluminum foil and cook for 10 minutes. Remove foil. Continue to cook until bottoms of wedges are golden, 8 to 12 minutes. Remove from oven, flip wedges using spatula, and continue to cook until golden all over, 8 to 12 minutes. Serve cauliflower with lentils.
Serves 4
Why This Recipe Works One of Ethiopia’s most famous vegetarian dishes, misir wot is a deeply flavored lentil dish traditionally seasoned with the spice blend berbere. This unique blend delivers intense warmth followed by sweet and citrusy notes. Since it’s not always easy to find in the grocery store, we made it ourselves. Pre-made berbere often contains powdered ginger, which has a strong peppery bite. However, we wanted to bring out the floral sweetness that comes with fresh ginger. To start, we incorporated lots of aromatics: red onion, umami-rich tomato paste, plus fresh ginger and garlic. Then we got to blooming our berbere blend: paprika, coriander, cardamom, cumin, and cayenne. Next came our quick-cooking red lentils and some plum tomatoes, which brought a necessary freshness and almost cooling effect to this complex dish. Finally, we finished with a drizzle of red wine vinegar, the acidity of which helped to cut through the many layers of delicious heat. Do not substitute other types of lentils for the red lentils here; they have a very different texture. Adjust the cayenne amount according to your taste. Be sure to bloom the spices for the full minute; otherwise, you’ll be left with a raw, dusty texture in the dish.
3 tablespoons extra-virgin olive oil
1 red onion, chopped fine
2 tablespoons tomato paste
4 teaspoons grated fresh ginger
3 garlic cloves, minced
2½ teaspoons paprika
1¼ teaspoons ground coriander
¾ teaspoon ground cardamom
¾ teaspoon ground cumin
½–1 teaspoon cayenne pepper
2 cups water
1 cup dried red lentils, picked over and rinsed
4 plum tomatoes, cored and chopped fine
1 teaspoon table salt
Red wine vinegar
1. Heat oil in large saucepan over medium-high heat until shimmering. Add onion and cook, stirring occasionally, until softened and lightly browned, 5 to 7 minutes. Add tomato paste, ginger, garlic, paprika, coriander, cardamom, cumin, and cayenne and cook until fragrant, about 1 minute.
2. Stir in water, lentils, tomatoes, and salt and bring to a simmer. Reduce heat to low and simmer, stirring occasionally, until lentils are tender and beginning to break down, 15 to 25 minutes. Season with salt, pepper, and vinegar to taste. Serve.
Serves 4 to 6
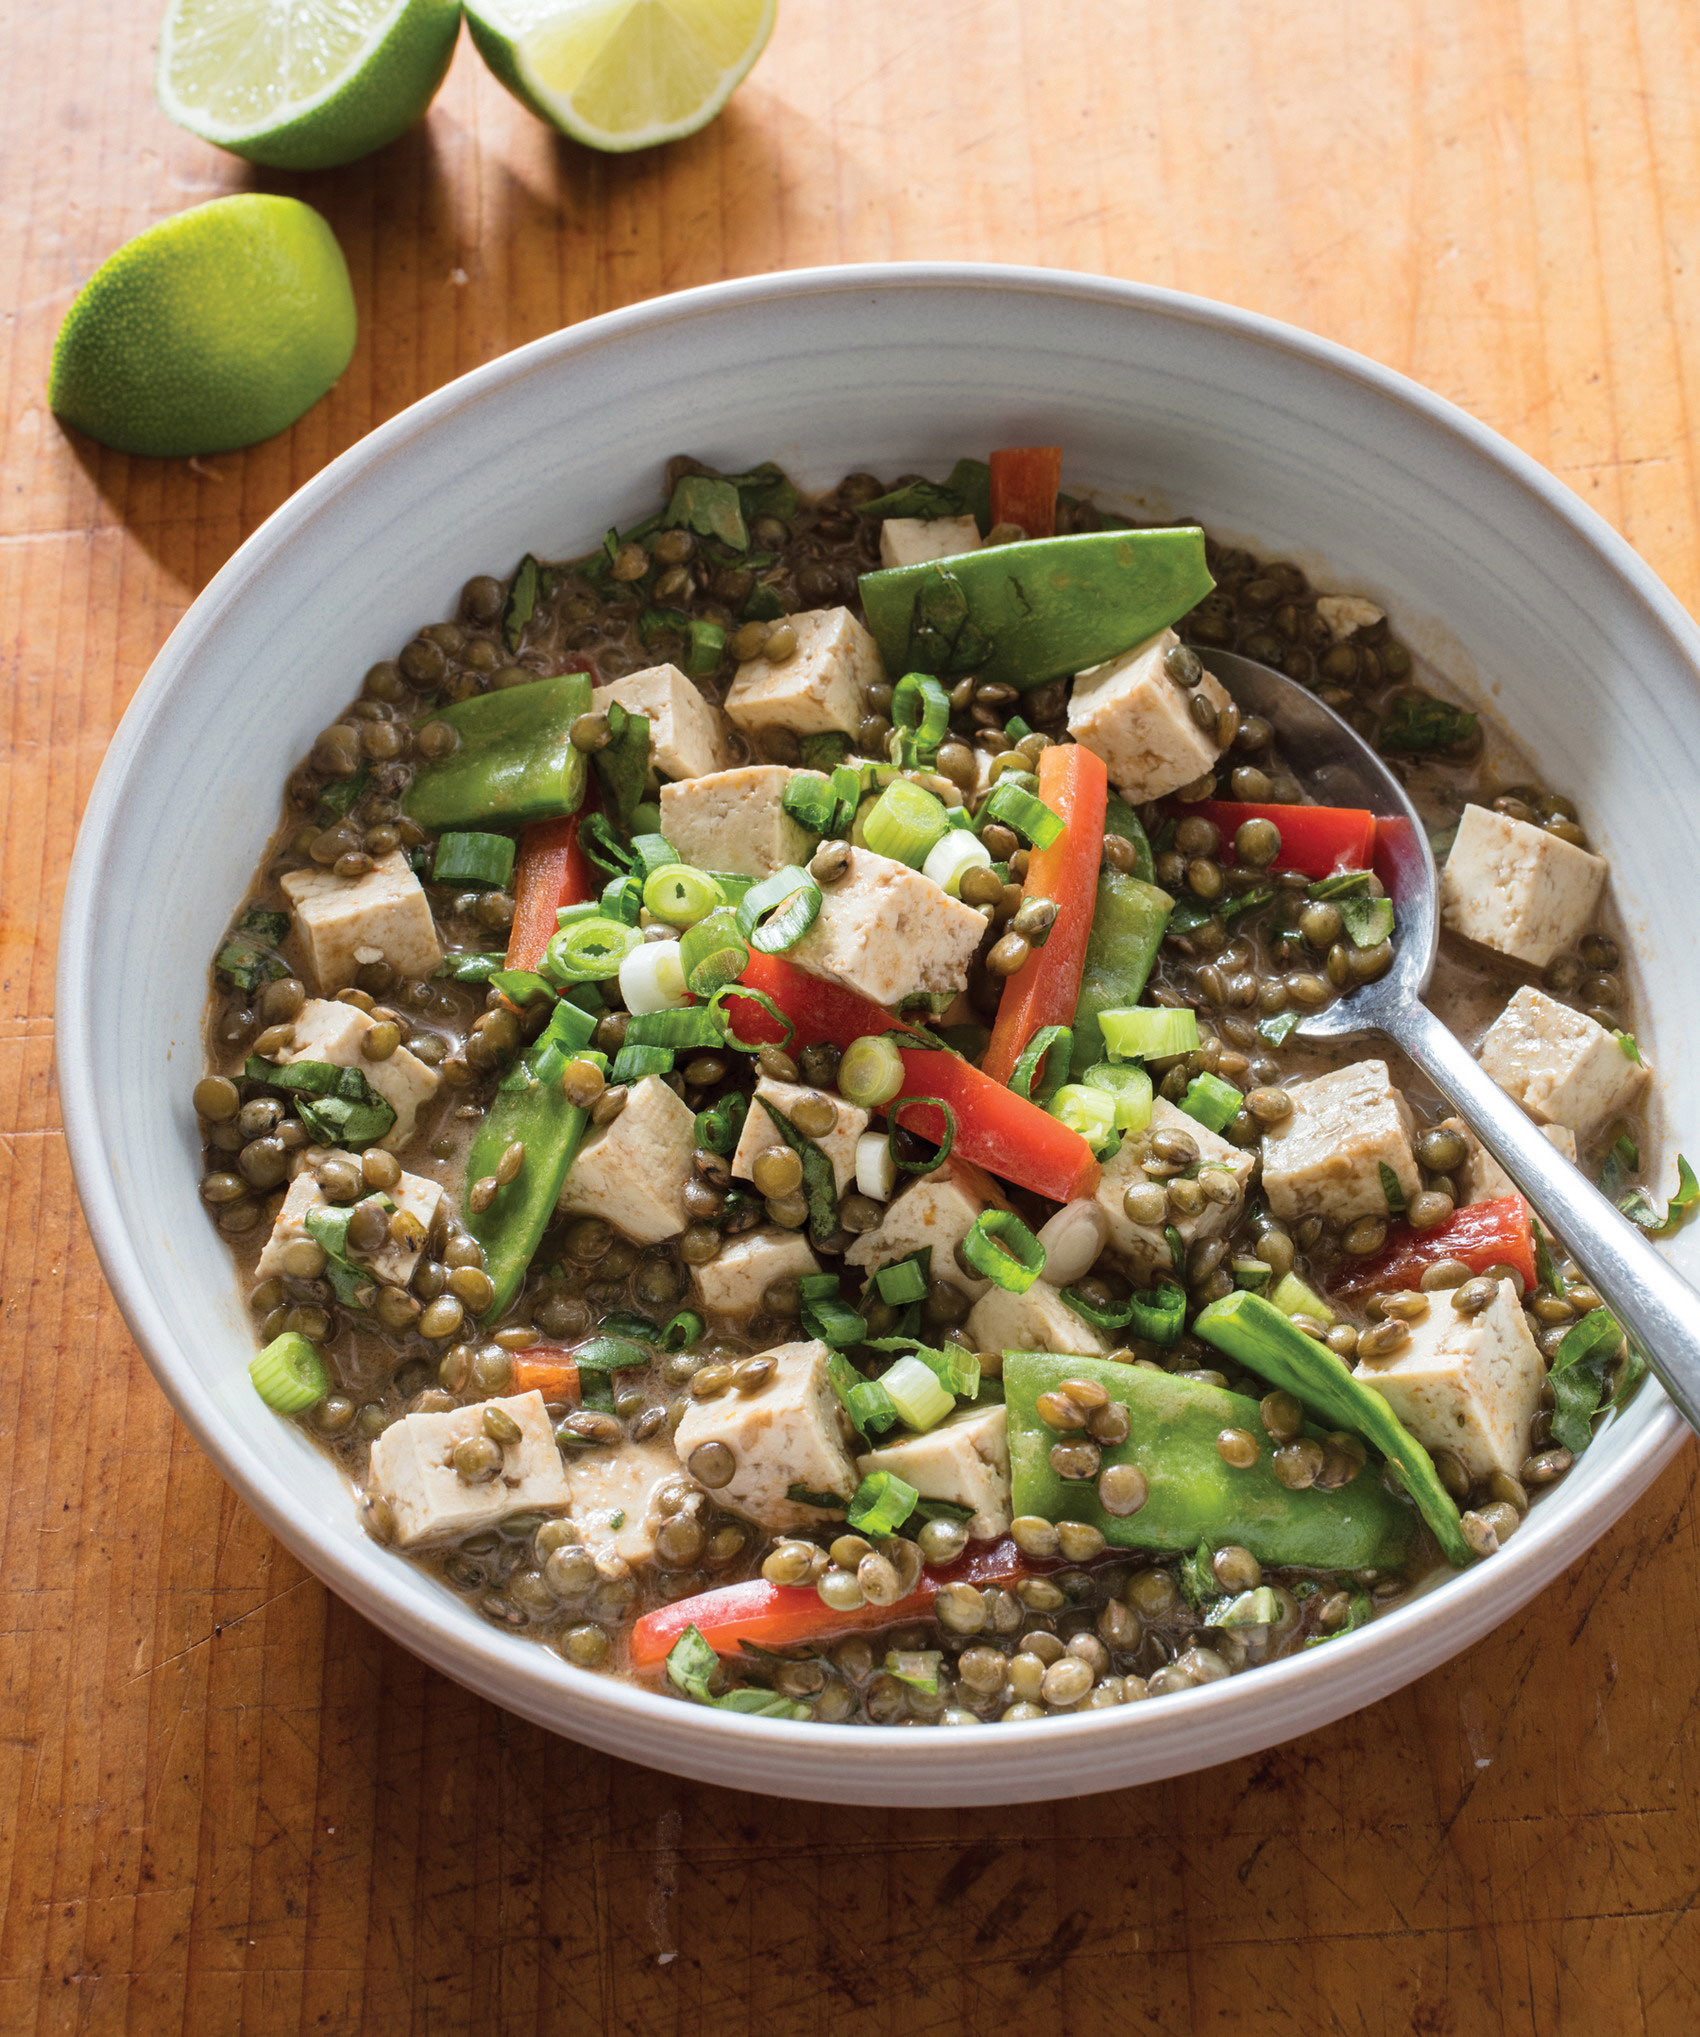
Why This Recipe Works Thai curries embrace a delicate balance of flavors, textures, temperatures, and colors to produce lively, satisfying meals. Our Thai-style red curry features lentils and tofu for plenty of protein. We started by cooking the lentils in an aromatic red curry broth. When the lentils were tender but still slightly al dente and had absorbed most of the liquid, we incorporated a bit of coconut milk to create a rich, fragrant sauce. To contrast the nutty earthiness of the lentils, we added vibrant red bell pepper slices, snow peas, and cubes of tofu at the very end, simply warming them through to maintain the vegetables’ color and crisp-fresh texture. A generous handful of fresh basil and a sprinkle of scallions gave the dish a brisk, heady finish. Lentilles du Puy, also called French green lentils, are our first choice, but brown, black, or regular green lentils are fine, too (cooking times will vary depending on the type used). Do not use light coconut milk. Not all Thai curry pastes are vegan, so check the labels carefully. You will need a 12-inch skillet with a tight-fitting lid.
14 ounces extra-firm tofu, cut into ½-inch pieces
⅛ teaspoon table salt
Pinch pepper
1 tablespoon vegetable oil
1 tablespoon Thai red curry paste
2½ cups water
2 tablespoons Fish Sauce Substitute (this page)
1 cup dried lentilles du Puy (French green lentils), picked over and rinsed
½ cup canned coconut milk
1 red bell pepper, stemmed, seeded, and cut into ¼-inch strips
4 ounces snow peas, strings removed and halved crosswise
½ cup coarsely chopped fresh basil
1 tablespoon lime juice
2 scallions, sliced thin
1. Spread tofu on paper towel–lined baking sheet and let drain for 20 minutes. Gently press dry with paper towels and sprinkle with salt and pepper.
2. Heat oil in 12-inch skillet over medium heat until shimmering. Add curry paste and cook, stirring constantly, until fragrant, about 1 minute. Stir in water, fish sauce substitute, and lentils and bring to simmer. Cover, reduce heat to low, and simmer gently, stirring occasionally, until lentils are tender and two-thirds of liquid has been absorbed, 30 to 35 minutes.
3. Stir in coconut milk until well combined. Add bell pepper, snow peas, and tofu and increase heat to medium-high. Cover and cook, stirring occasionally, until tofu is warmed through and vegetables are crisp-tender, about 2 minutes.
4. Off heat, stir in basil and lime juice. Season with salt to taste, and sprinkle with scallions. Serve.
Serves 6 to 8
Why This Recipe Works Authentic Boston baked beans are always a hit, but classic versions aren’t exactly vegan-friendly fare: Salt pork, and sometimes bacon as well, is often the first ingredient in the pot. To get the same creamy-textured beans in a meatless version, and in a lot less time to boot, we first simmered dried navy beans with a little baking soda. The alkaline baking soda weakened the cell structure of the beans, helping them to become tender more quickly and allowing us to shave the baking time down to 2 hours from the normal 5 to 6 hours. We started out by adding the usual traditional flavorings—molasses, brown sugar, mustard, and cider vinegar—but tasters still wanted more. To deepen the flavor and amp up the meatiness of the dish, we added soy sauce and smoked paprika; the umami-rich soy sauce gave the dish more deeply savory flavor, and the paprika added great smoky depth to our baked beans.
1 pound (2½ cups) dried navy beans, picked over and rinsed
1 tablespoon baking soda
1 tablespoon vegetable oil
1 onion, chopped fine
¼ cup molasses
2 tablespoons packed dark brown sugar
2 tablespoons soy sauce
4 teaspoons Dijon mustard, divided
2 teaspoons smoked paprika
¾ teaspoon table salt
¼ teaspoon pepper
2 teaspoons cider vinegar
1. Adjust oven rack to middle position and heat oven to 350 degrees. Bring 3 quarts water, beans, and baking soda to boil in Dutch oven over high heat. Reduce heat to medium-high and simmer vigorously for 20 minutes. Drain and rinse beans and pot. Dry pot.
2. Heat oil in now-empty pot over medium heat until shimmering. Add onion and cook until softened, about 5 minutes. Stir in 4½ cups water, rinsed beans, molasses, sugar, soy sauce, 1 tablespoon mustard, paprika, salt, and pepper and bring to boil. Cover pot, transfer to oven, and cook until beans are nearly tender, about 1½ hours.
3. Uncover and continue to bake until beans are completely tender, about 30 minutes. Stir in vinegar and remaining 1 teaspoon mustard. Season with salt and pepper to taste. Serve.
Serves 4 to 6
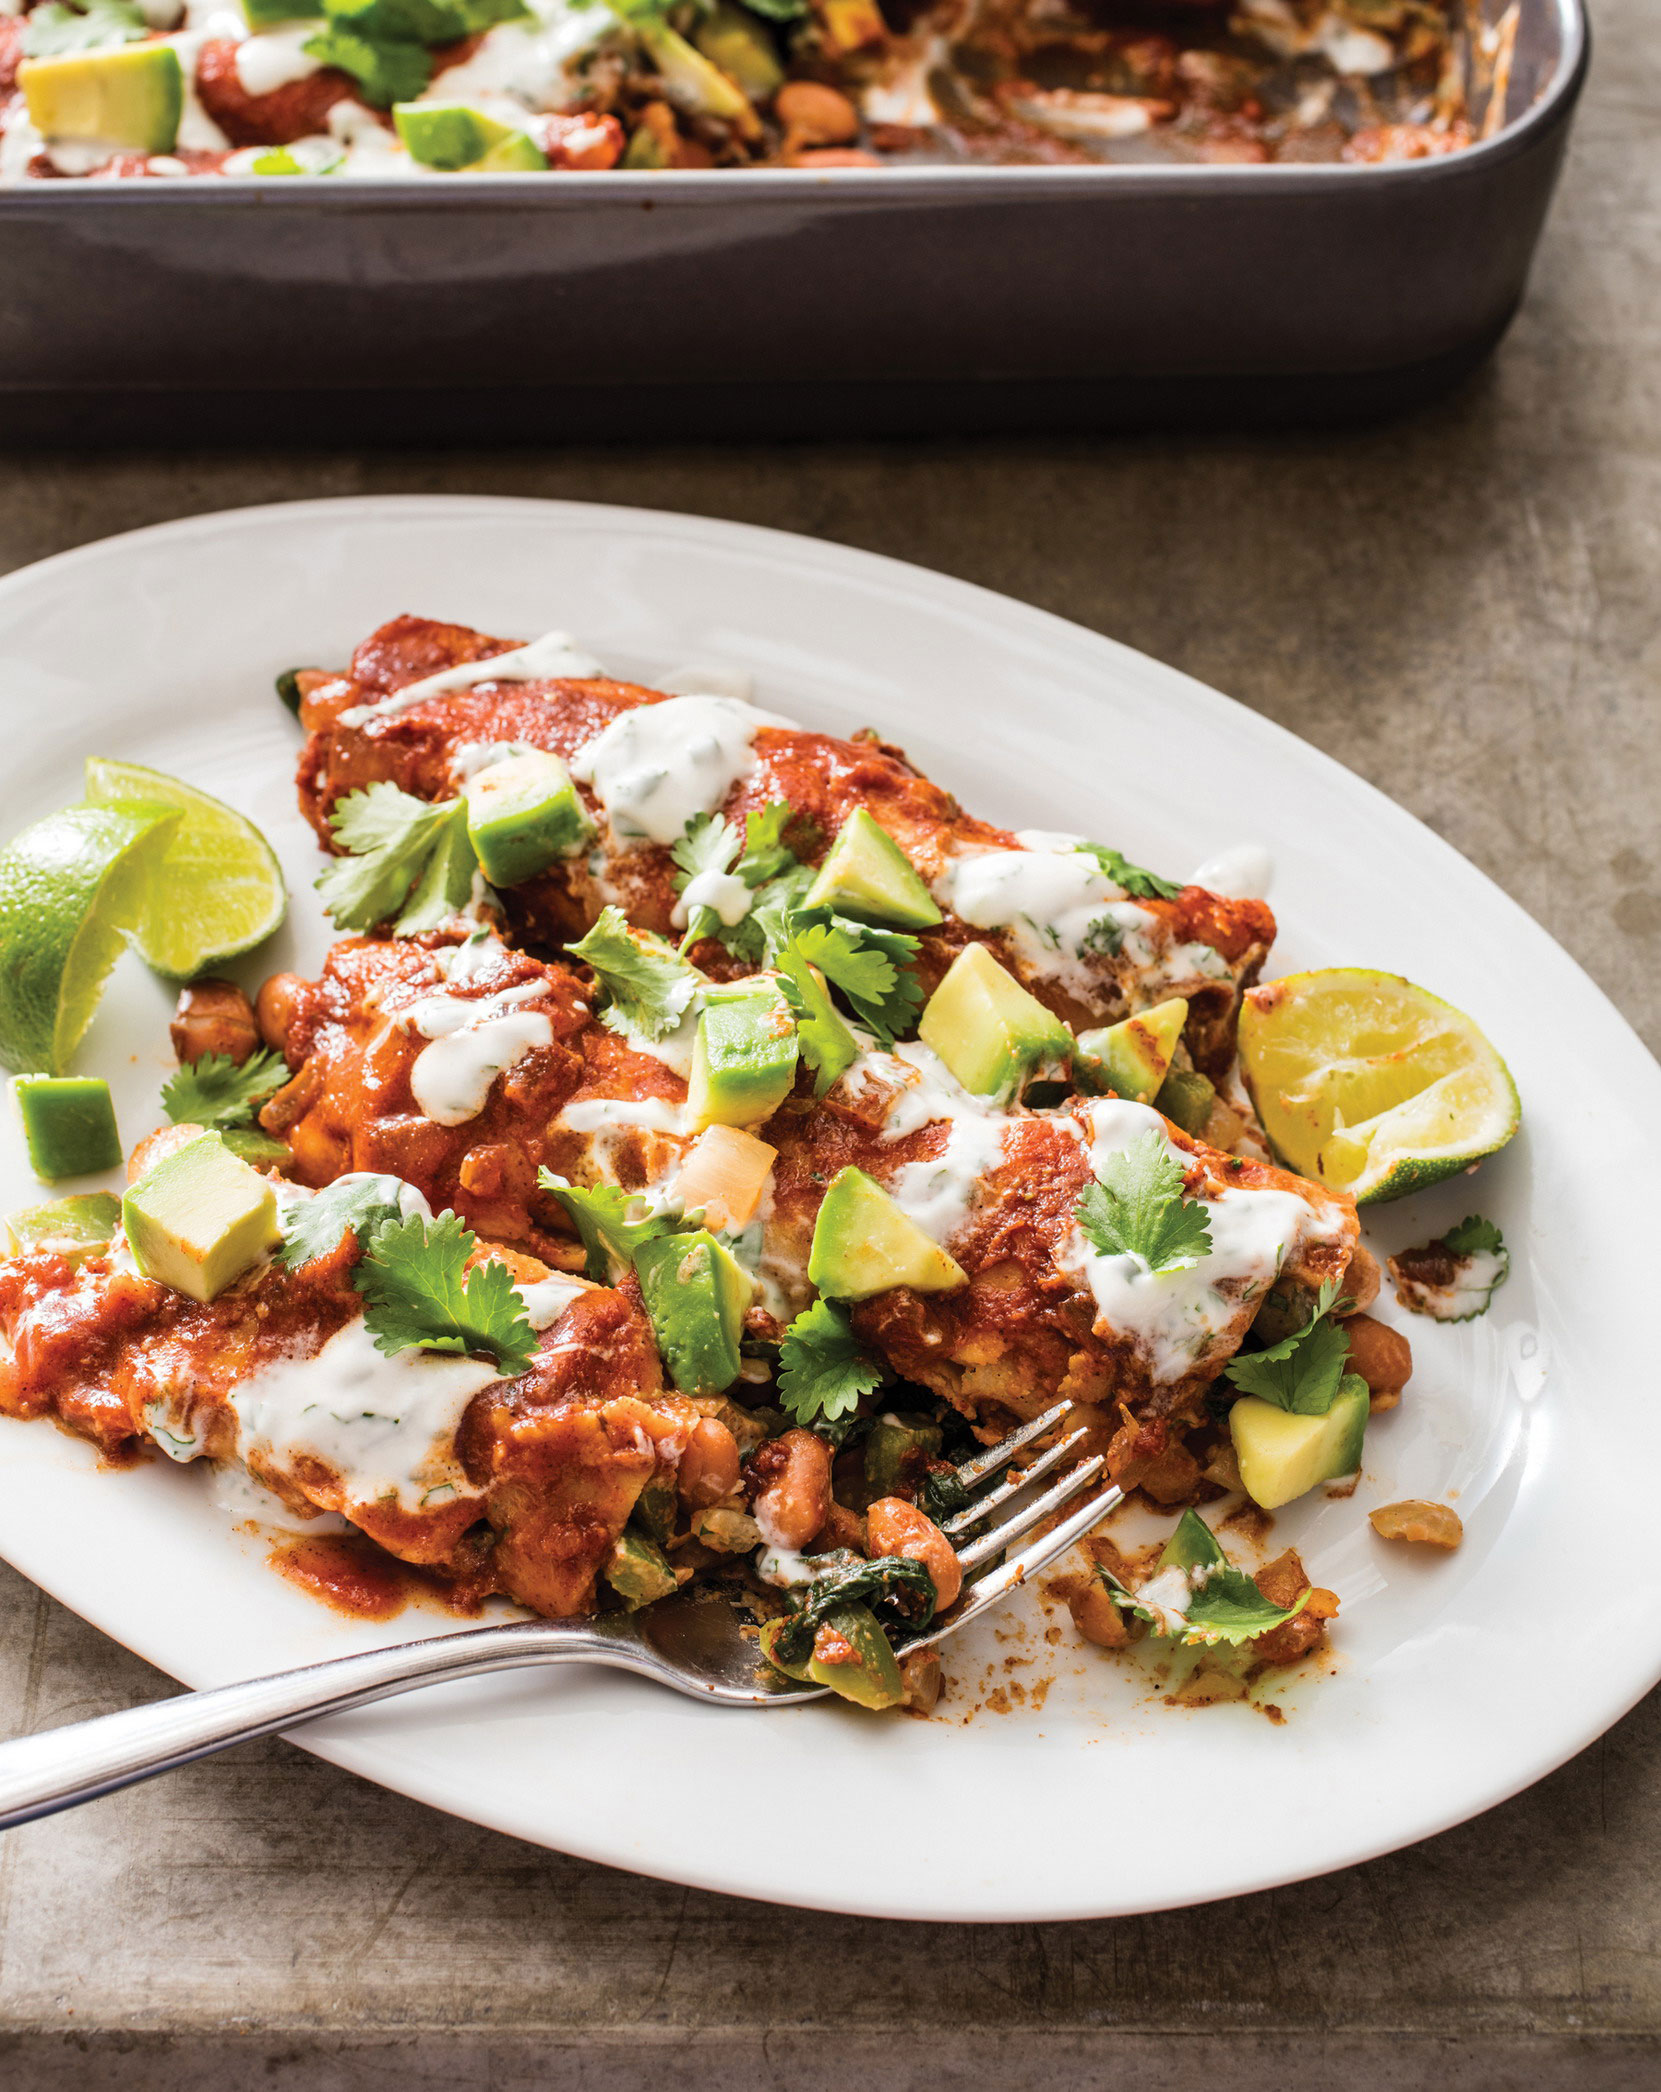
Why This Recipe Works Cheesy, meaty fillings are pretty typical for enchiladas, but this hearty, plant-forward version uses neither, while still delivering tons of flavor. We kept things green by wilting flavorsome Swiss chard and crisp, slightly bitter green peppers with garlic and onions. To add creamy cohesiveness and protein heft, we mashed half a can of pinto beans and mixed in our greens; we then stirred in the rest of the beans whole for contrasting texture. This clean-tasting filling needed a robust sauce to round out the flavors; a quick simmer of convenient canned tomato sauce with aromatics and spices did the trick. Traditional recipes call for frying the tortillas one at a time, but we found that brushing them with oil and microwaving worked just as well—and without the mess of frying. If you would like to incorporate cheese, see the variation. A topping of a crema cilantro sauce (made from either plant-based or dairy mayo and sour cream) and chopped avocado was ideal: tangy, creamy, fresh-tasting, and rich.
Cilantro Sauce
¼ cup plant-based mayonnaise or egg-based mayonnaise
¼ cup plant-based sour cream or dairy sour cream
3 tablespoons water
3 tablespoons minced fresh cilantro
¼ teaspoon table salt
Enchiladas
¼ cup vegetable oil, divided
2 onions, chopped fine, divided
¾ teaspoon table salt, divided
3 tablespoons chili powder
2 teaspoons ground cumin
2 teaspoons sugar
6 garlic cloves, minced, divided
2 (8-ounce) cans tomato sauce
½ cup water
1 pound Swiss chard, stemmed and sliced into ½-inch-wide strips
2 green bell peppers, stemmed, seeded, and cut into ½-inch pieces
1 (15-ounce) can pinto beans, rinsed, divided
12 (6-inch) corn tortillas
1 avocado, halved, pitted, and cut into ½-inch pieces
¼ cup fresh cilantro leaves
Lime wedges
1. For the cilantro sauce Whisk all ingredients together in bowl. Cover and refrigerate until ready to serve.
2. For the enchiladas Adjust oven rack to middle position and heat oven to 450 degrees. Heat 1 tablespoon oil in large saucepan over medium heat until shimmering. Add half of onions and ½ teaspoon salt and cook until softened, about 5 minutes. Stir in chili powder, cumin, sugar, and half of garlic and cook until fragrant, about 30 seconds. Stir in tomato sauce and water, bring to simmer, and cook until slightly thickened, about 7 minutes. Season with salt and pepper to taste; set aside.
3. Heat 1 tablespoon oil in Dutch oven over medium heat until shimmering. Add remaining onions and remaining ¼ teaspoon salt and cook until softened and lightly browned, 5 to 7 minutes. Add remaining garlic and cook until fragrant, about 30 seconds. Add chard and bell peppers, cover, and cook until chard is tender, 6 to 8 minutes. Using potato masher, coarsely mash half of beans in large bowl. Stir in chard-pepper mixture, ¼ cup sauce, and remaining whole beans.
4. Grease 13 by 9-inch baking dish. Spread ½ cup sauce over bottom of prepared dish. Brush both sides of tortillas with remaining 2 tablespoons oil. Stack tortillas, wrap in damp dish towel, and place on plate. Microwave until warm and pliable, about 1 minute. Working with 1 warm tortilla at a time, spread ¼ cup chard filling across center. Roll tortilla tightly around filling and place seam side down in dish, arranging enchiladas in 2 columns across width of dish. Cover completely with remaining sauce.
5. Cover dish tightly with greased aluminum foil and bake until enchiladas are heated through, 15 to 20 minutes. Let enchiladas cool for 10 minutes. Drizzle with cilantro sauce and sprinkle with avocado and cilantro. Serve with lime wedges .
VARIATION
Pinto Bean, Swiss Chard, and Monterey Jack Enchiladas
At end of step 4, sprinkle 1 cup shredded Monterey Jack over top of sauce.
Serves 4 to 6 (Makes 2½ cups)
Why This Recipe Works Authentic refried beans, or frijoles refritos, are leftover stewed beans cooked in a generous amount of lard until they are softened enough to mash. We wanted to achieve the same lush texture and rich, savory flavor without the lard. While we were at it, we figured we’d make them fast enough to prepare any night of the week. To start, we found that dried beans weren’t essential—canned pinto beans worked just fine and saved us the time of cooking beans from scratch. For authentic flavor, we reached for smoky chipotle chile powder, cumin, oregano, and several cloves of garlic. Two tablespoons of umami-rich tomato paste added even more savory depth. Processing a portion of the beans with some water in the food processor created the silky, creamy “refried” texture we were after, and pulsing the remaining beans ensured some chunky bites remained in the final dish. Adding cilantro and lime juice at the end gave our beans some brightness.
2 (15-ounce) cans pinto beans, rinsed, divided
1 cup water, plus extra as needed
1 tablespoon vegetable oil
1 onion, chopped fine
½ teaspoon table salt
2 tablespoons tomato paste
3 garlic cloves, minced
1 teaspoon ground cumin
½ teaspoon chipotle chile powder
½ teaspoon dried oregano
1 tablespoon minced fresh cilantro
2 teaspoons lime juice
1. Process all but 1 cup of beans with water in food processor until smooth, about 30 seconds, scraping down sides of bowl as needed. Add remaining beans and pulse until coarsely ground, about 5 pulses.
2. Heat oil in 12-inch nonstick skillet over medium heat until shimmering. Add onion and salt and cook until onion is softened, about 5 minutes. Stir in tomato paste, garlic, cumin, chile powder, and oregano and cook until fragrant, about 1 minute. Stir in bean mixture and cook, stirring constantly, until well combined and thickened slightly, about 3 minutes. Off heat, stir in cilantro and lime juice and season with salt and pepper to taste. Add additional hot water as needed to adjust consistency and serve.
Serves 6 to 8
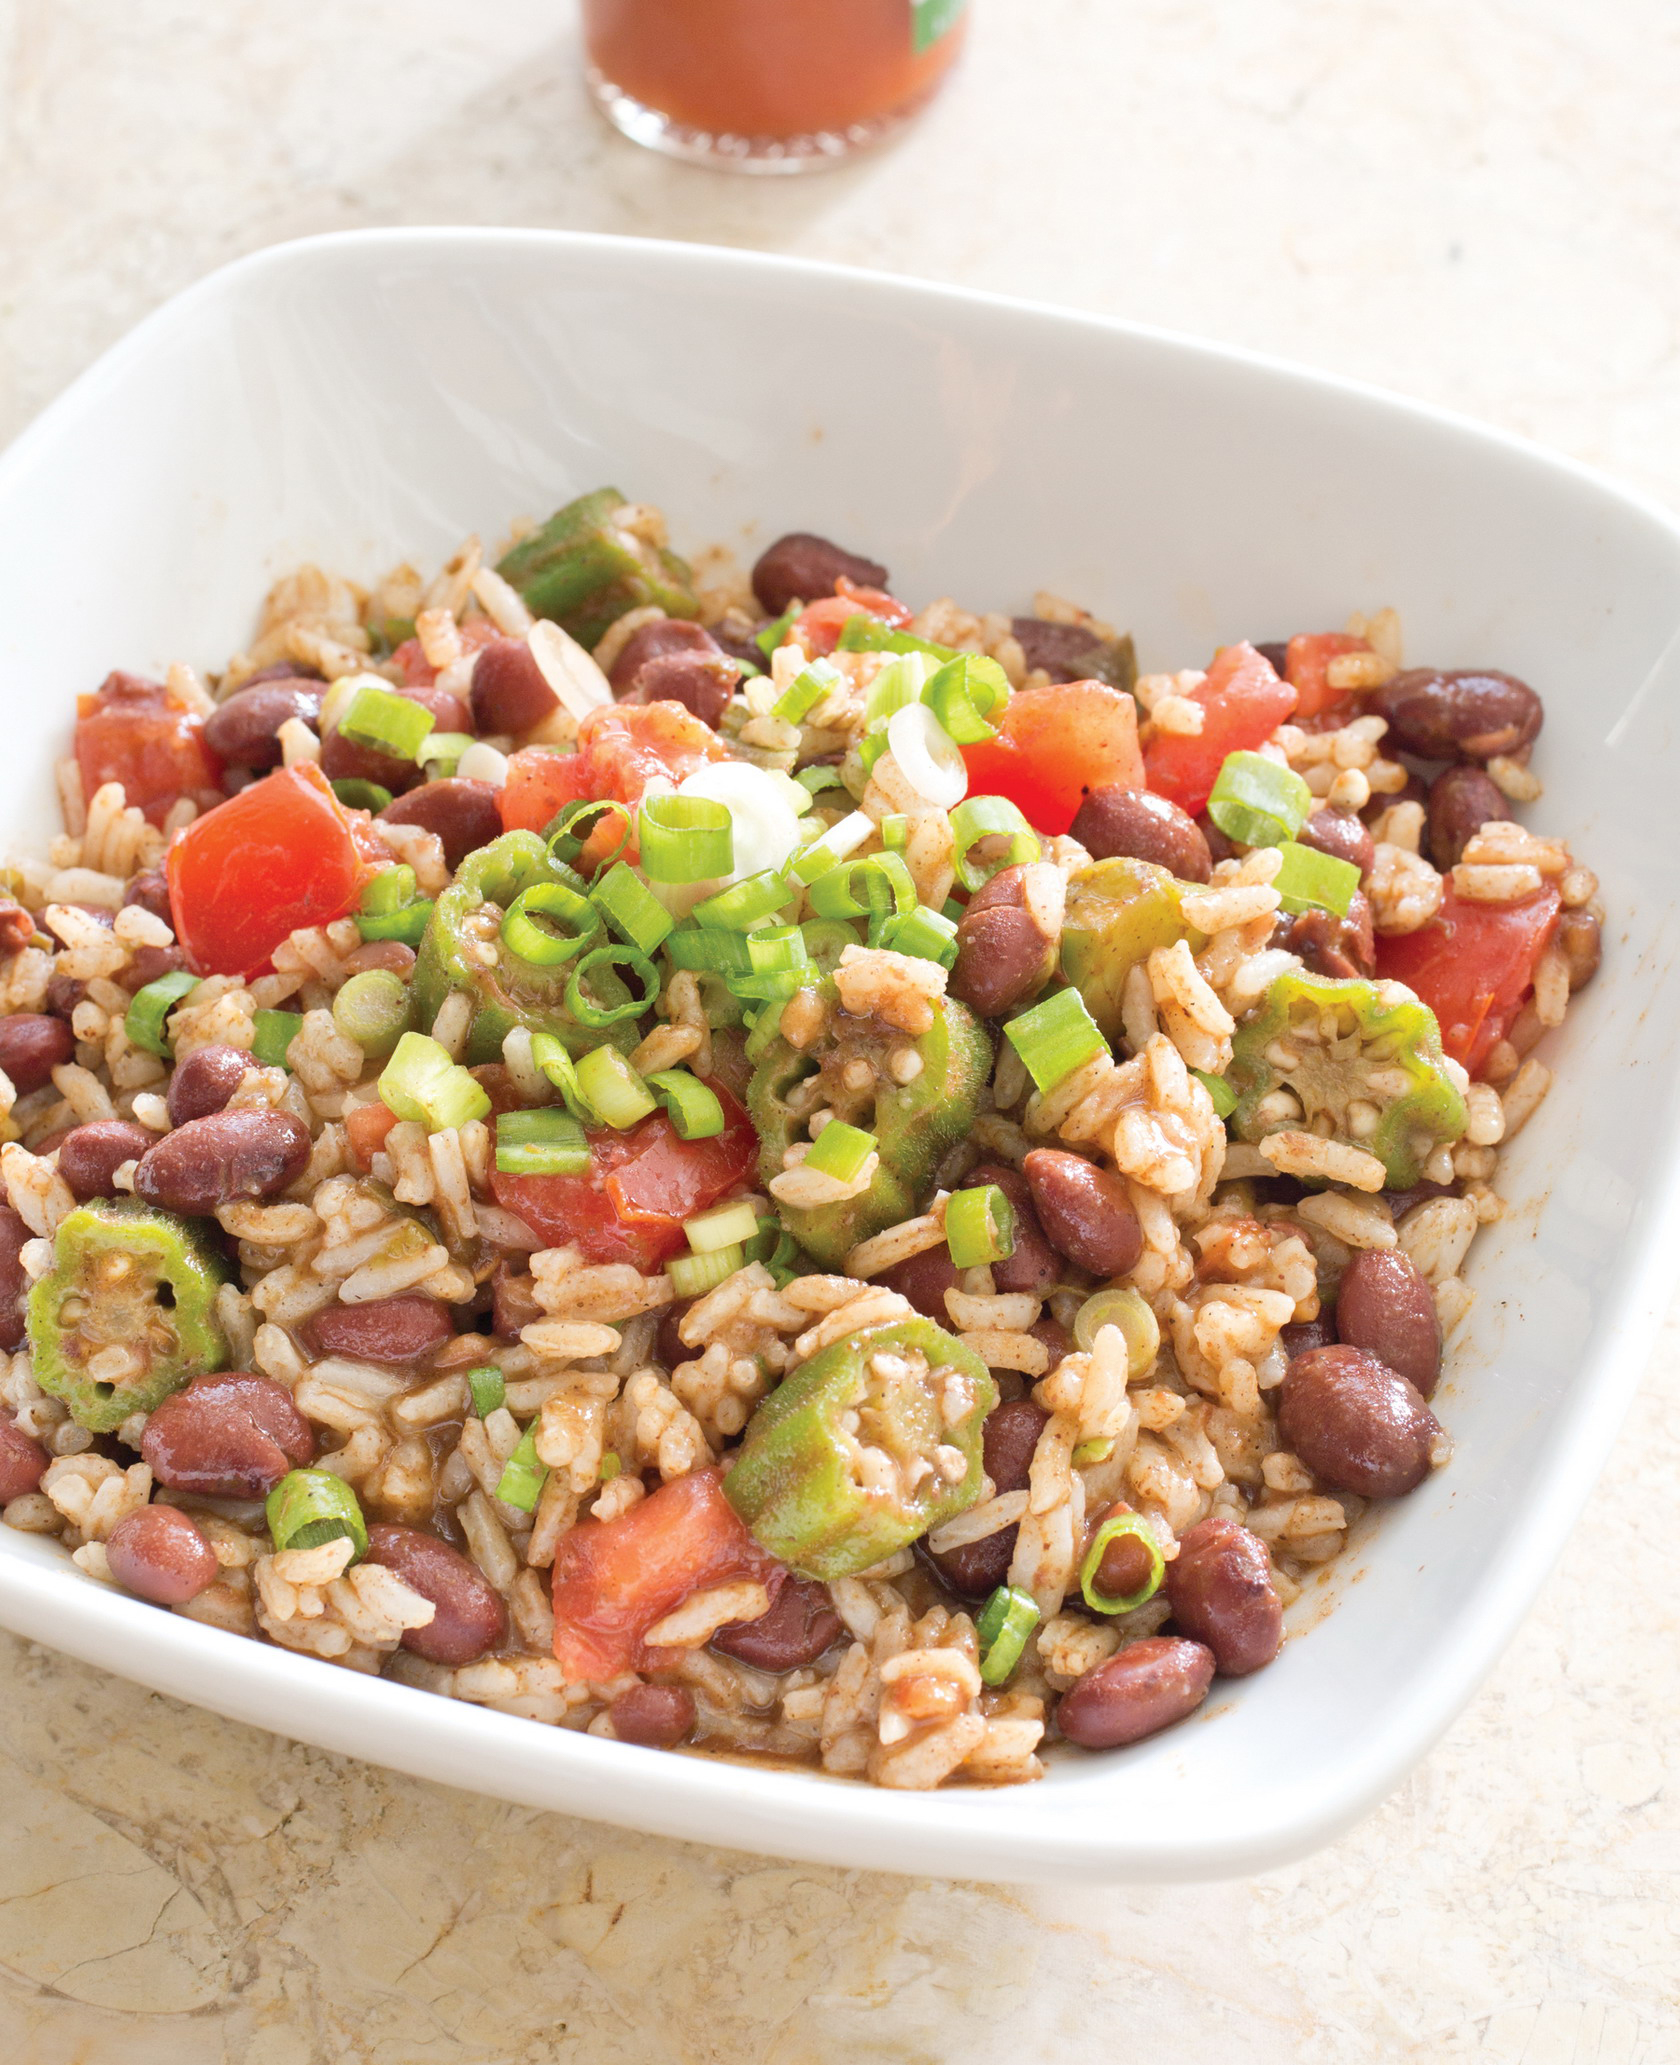
Why This Recipe Works Boosting the flavor profile of classic New Orleans red beans and rice by adding okra and tomatoes creates a hearty, vegetable-packed meal. This Cajun dish traditionally calls for Camellia-brand dried red beans and tasso ham. An easy switch to a more readily available ingredient was to use small dried red beans, which we brined overnight. And naturally we skipped the tasso ham, but fine-tuning the proportions of sautéed green peppers, onions, and celery gave this dish flavor balance without the need for meat. To ensure that the okra retains some of its crunchy bite in the finished dish, toss the whole okra pods in salt and let sit for an hour before rinsing, cutting, and adding them to the beans and tomatoes for the final half hour of cooking. While we prefer the flavor and texture of fresh okra in this recipe, you can substitute frozen cut okra, thawed and thoroughly patted dry, for fresh. If using frozen, skip step 2.
Red Beans
3 tablespoons plus 1 teaspoon table salt, divided, for brining and salting
1 pound small red beans (2 cups), picked over and rinsed
1 pound okra, stemmed
1 tablespoon vegetable oil
1 onion, chopped fine
1 green bell pepper, stemmed, seeded, and chopped fine
1 celery rib, minced
3 garlic cloves, minced
1 teaspoon minced fresh thyme or ¼ teaspoon dried
1 teaspoon smoked sweet paprika
2 bay leaves
¼ teaspoon cayenne pepper
¼ teaspoon pepper
3 cups vegetable broth
2 (14.5-ounce) cans diced tomatoes, drained
1 tablespoon red wine vinegar, plus extra for seasoning
3 scallions, sliced thin
Hot sauce
Rice
1 tablespoon vegetable oil
2 cups long-grain white rice, rinsed
3 cups water
1 teaspoon table salt
1. For the red beans Dissolve 3 tablespoons salt in 4 quarts cold water in large bowl or container. Add beans and soak at room temperature for at least 8 hours or up to 24 hours. Drain and rinse well; set aside.
2. Toss okra with 1 teaspoon salt, and let sit for 1 hour, stirring halfway through. Rinse well, then cut into 1-inch pieces; set aside.
3. Heat oil in large Dutch oven over medium heat until shimmering. Add onion, bell pepper, and celery and cook until vegetables are softened, 5 to 7 minutes. Stir in garlic, thyme, paprika, bay leaves, cayenne, and pepper and cook until fragrant, about 30 seconds.
4. Stir in beans, 5 cups water, and broth and bring to boil over high heat. Reduce to vigorous simmer and cook, stirring occasionally, until beans are just softened and liquid begins to thicken, 45 minutes to 1 hour.
5. Stir in okra, tomatoes, and vinegar and cook until liquid is thickened and beans are fully tender and creamy, about 30 minutes.
6. For the rice Meanwhile, heat oil in large saucepan over medium heat until shimmering. Add rice and cook, stirring often, until edges begin to turn translucent, about 2 minutes. Stir in water and salt and bring to boil. Cover, reduce heat to low, and simmer until liquid is absorbed and rice is tender, about 20 minutes. Remove pot from heat, lay clean folded dish towel underneath lid, and let rice sit for 10 minutes. Fluff rice with fork.
7. Discard bay leaves from beans. Season with salt, pepper, and extra vinegar to taste. Top individual portions of rice with beans and sprinkle with scallions. Serve with hot sauce.
Serves 4 to 6
Why This Recipe Works Fresh corn salad is a summery addition to a picnic or backyard-barbecue table. We wanted to turn this favorite side dish into a vegan meal option, so we added convenient canned cannellini beans. The most typical preparation method for preparing the fresh corn—stripping kernels off the cob, adding vegetables (usually tomatoes, onions, and/or peppers), and tossing with dressing—produced rather wan salads. Instead, we discovered that browning the kernels lightly in a skillet for a few minutes gave even inferior, out-of-season corn a complex, nutty flavor dimension. As for the dressing, it took equal parts oil and vinegar to create a piquant dressing that balanced the creamy beans and sweet corn. Be sure to let the toasted corn cool before adding the tomatoes, as otherwise the heat from the corn will partially cook them.
2 tomatoes, cored and cut into ½-inch pieces
1¼ teaspoons table salt, divided
2½ tablespoons extra-virgin olive oil, divided
5 ears corn, kernels cut from cobs (about 5 cups)
2 scallions, sliced thin
1½ tablespoons red wine vinegar
½ teaspoon pepper
1 (15-ounce) can cannellini beans, rinsed
2 tablespoons chopped fresh basil
1. Toss tomatoes with ½ teaspoon salt in bowl, then transfer to colander. Set colander over bowl and let drain for 30 minutes.
2. Meanwhile, heat 1 tablespoon oil in 12-inch nonstick skillet over medium-high heat until shimmering. Add corn and cook, stirring occasionally, until spotty brown, 5 to 7 minutes. Transfer to large bowl and stir in scallions, vinegar, pepper, remaining ¾ teaspoon salt, and remaining 1½ tablespoons oil; let cool to room temperature, about 20 minutes.
3. Stir in drained tomatoes, beans, and basil. Let sit until flavors meld, about 30 minutes. Season with salt and pepper to taste. Serve.
CUTTING CORN KERNELS FROM THE COB

1. Using sharp chef’s knife, cut cobs in half crosswise.
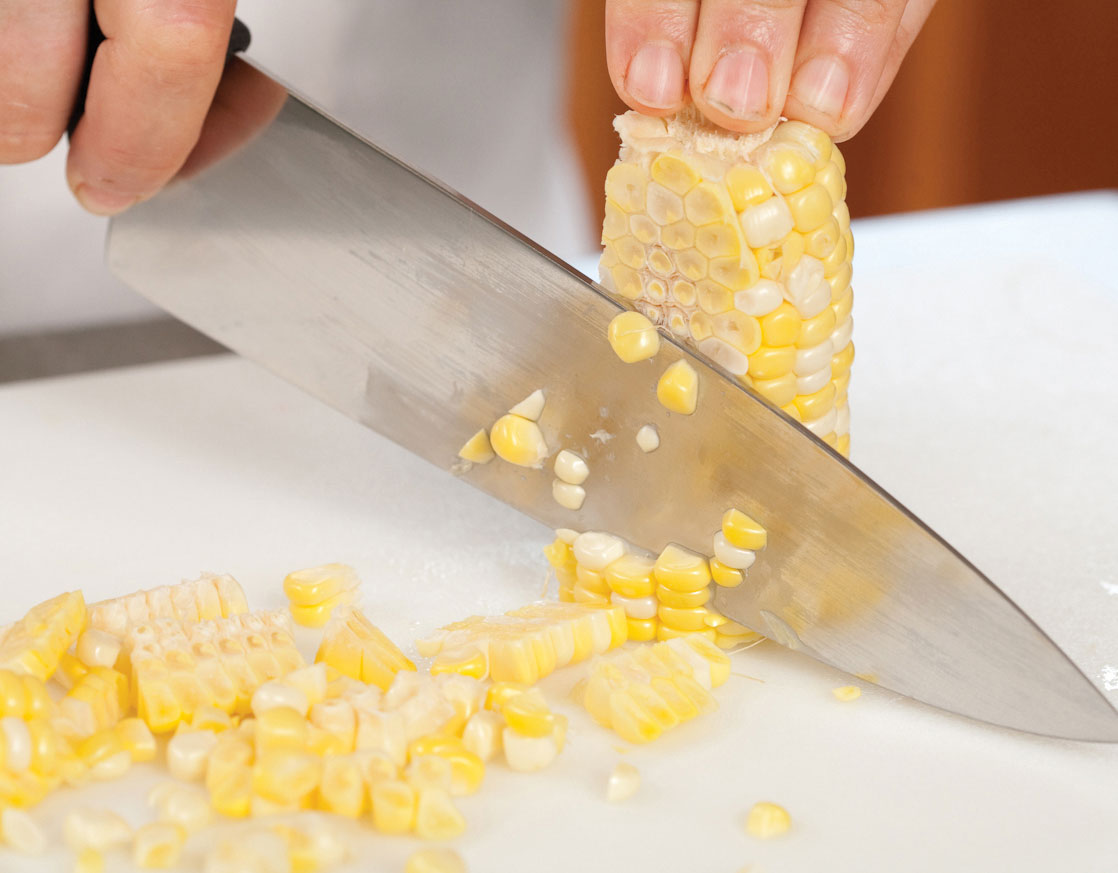
2. Stand cob halves on cut ends to stabilize, then slice kernels from cob halves.
Serves 4
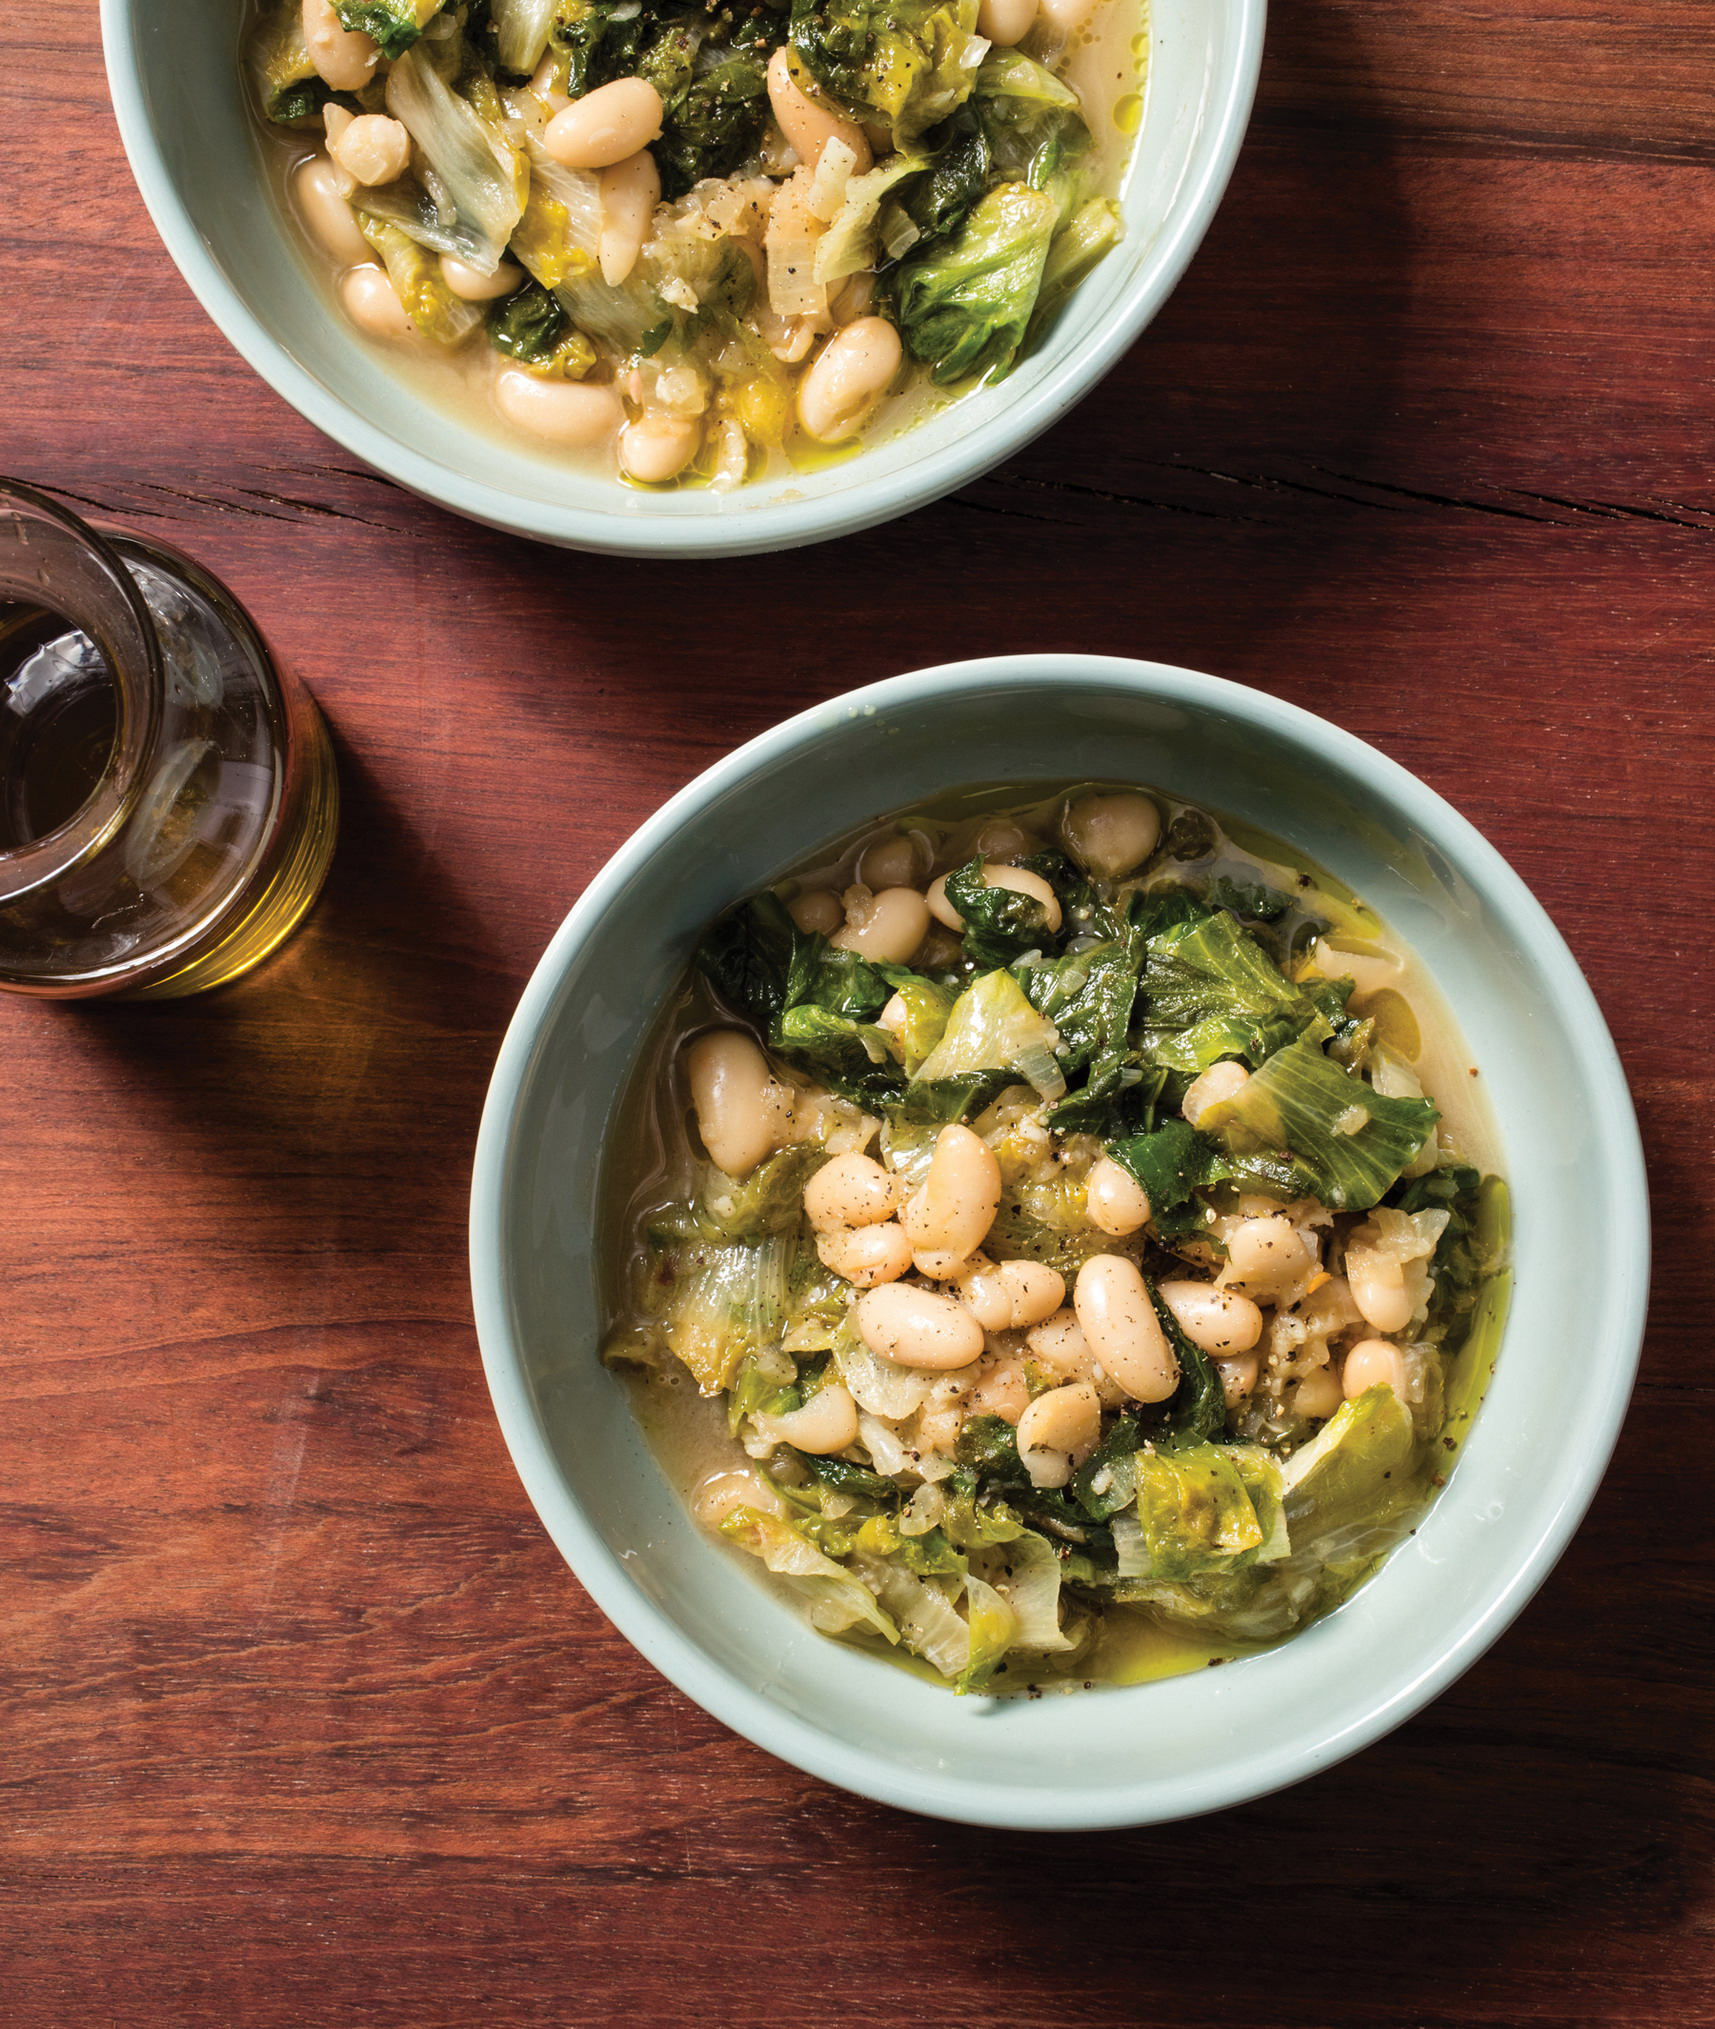
Why This Recipe Works White beans and escarole are a classic pairing in Italian cooking: Combining the buttery texture of cannellini beans with tender, slightly bitter escarole results in a simple but well-balanced dish. Canned beans made this dish speedy and convenient, and their creamy texture was a perfect counterpoint to the greens. Sautéed onions gave the dish a rich, deep flavor base without requiring too much time at the stove. Red pepper flakes lent a slight heat, and a combination of broth and water for cooking provided a flavorful backbone. We added the escarole and beans along with the liquid and then cooked the greens just until the leaves were wilted before cranking up the heat so the liquid would quickly evaporate. This short stint on the heat prevented the beans from breaking down and becoming mushy. Once we took the pot off the heat, we stirred in lemon juice for a bright finish and drizzled on some extra olive oil for richness. Chicory can be substituted for the escarole; however, its flavor is stronger.
1 tablespoon extra-virgin olive oil, plus extra for serving
2 onions, chopped fine
½ teaspoon table salt
4 garlic cloves, minced
⅛ teaspoon red pepper flakes
1 head escarole (1 pound), trimmed and sliced 1 inch thick
1 (15-ounce) can cannellini beans, rinsed
1 cup vegetable broth
1 cup water
2 teaspoons lemon juice
1. Heat oil in Dutch oven over medium heat until shimmering. Add onions and salt and cook until softened and lightly browned, 5 to 7 minutes. Stir in garlic and pepper flakes and cook until fragrant, about 30 seconds.
2. Stir in escarole, beans, broth, and water and bring to simmer. Cook, stirring occasionally, until escarole is wilted, about 5 minutes. Increase heat to high and cook until liquid is nearly evaporated, 10 to 15 minutes. Stir in lemon juice and season with salt and pepper to taste. Drizzle with extra oil and serve.
Serves 4
Why This Recipe Works Broccoli rabe has a big personality, with its spiky leaves and baby florets, but what makes this vegetable really stand out is its bright, faintly bitter flavor that shocks the palate awake. Italian cuisine often pairs cannellini beans with broccoli rabe, since the mellow, creamy, sweet beans complement the pleasantly sharp greens incredibly well. Our quick version of this Italian favorite can be on the table in less than half an hour. Cutting the broccoli rabe into 1-inch pieces meant that the pieces cooked evenly when quickly sautéed. Canned beans were the obvious choice to make this an easy weeknight meal. Adding the beans early in the cooking process gave them a little time to absorb the flavors of the garlic-infused olive oil. A shot of savory vegetable broth rounded out the dish.
¼ cup extra-virgin olive oil, divided
3 garlic cloves, sliced thin
¼ teaspoon red pepper flakes
1 pound broccoli rabe, trimmed and cut into 1-inch pieces
1 (15-ounce) can cannellini beans, rinsed
¼ cup vegetable broth
½ teaspoon table salt
Lemon wedges
Cook 2 tablespoons oil, garlic, and pepper flakes in Dutch oven over medium heat until garlic is golden brown, 2 to 4 minutes. Stir in broccoli rabe, beans, broth, and salt and cook, stirring occasionally, until broccoli rabe is tender, 4 to 6 minutes. Off heat, stir in remaining 2 tablespoons oil and season with salt and pepper to taste. Serve, passing lemon wedges separately.
Serves 4 to 6
Why This Recipe Works Gratins don’t need cheese or dairy to qualify as elevated comfort food. This rendition features creamy white beans, meaty cremini mushrooms, tender carrots, and a crisp, toasty bread layer. We got great flavor from the fond we developed by sautéing mushrooms and aromatics and deglazing the skillet with nutty dry sherry. A combination of flour and starchy bean liquid thickened the sauce. We baked the gratin in a low oven after topping it with seasoned bread cubes. As it baked, the lower portion of the bread merged with the beans, creating a lovely texture, while the upper portion dried out. Then, by flipping on the broiler for a few minutes, we browned and crisped the top. We prefer a round rustic loaf (also known as a boule) with a chewy, open crumb and a sturdy crust for this recipe. Cannellini or navy beans can be used in place of great Northern beans, if desired.
½ cup extra-virgin olive oil, divided
10 ounces cremini mushrooms, trimmed and sliced ½ inch thick
¾ teaspoon table salt
½ teaspoon pepper, divided
4–5 slices country-style bread, cut into ½-inch cubes (5 cups)
¼ cup minced fresh parsley, divided
1 cup water
1 tablespoon all-purpose flour
1 small onion, chopped fine
5 garlic cloves, minced
1 tablespoon tomato paste
1½ teaspoons minced fresh thyme
⅓ cup dry sherry
2 (15-ounce) cans great Northern beans
3 carrots, peeled, halved lengthwise, and cut into ¾-inch pieces
1. Adjust oven rack to middle position and heat oven to 300 degrees. Heat ¼ cup oil in 12-inch ovensafe skillet over medium-high heat until shimmering. Add mushrooms, salt, and ¼ teaspoon pepper and cook, stirring occasionally, until mushrooms are well browned, 8 to 12 minutes.
2. While mushrooms cook, toss bread, 3 tablespoons parsley, remaining ¼ cup oil, and remaining ¼ teaspoon pepper together in bowl. Set aside. Stir water and flour in second bowl until no lumps of flour remain. Set aside.
3. Reduce heat to medium, add onion to skillet, and continue to cook, stirring frequently, until onion is translucent, 4 to 6 minutes. Reduce heat to medium-low; add garlic, tomato paste, and thyme; and cook, stirring constantly, until bottom of skillet is dark brown, 2 to 3 minutes. Add sherry and cook, scraping up any browned bits.
4. Add beans and their liquid, carrots, and flour mixture. Bring to boil over high heat. Off heat, arrange bread mixture over surface in even layer. Transfer skillet to oven and bake for 40 minutes. (Liquid should have consistency of thin gravy.
5. Leave skillet in oven and turn on broiler. Broil until crumbs are golden brown, 4 to 7 minutes. Remove gratin from oven and let sit for 20 minutes. Sprinkle with remaining 1 tablespoon parsley and serve.
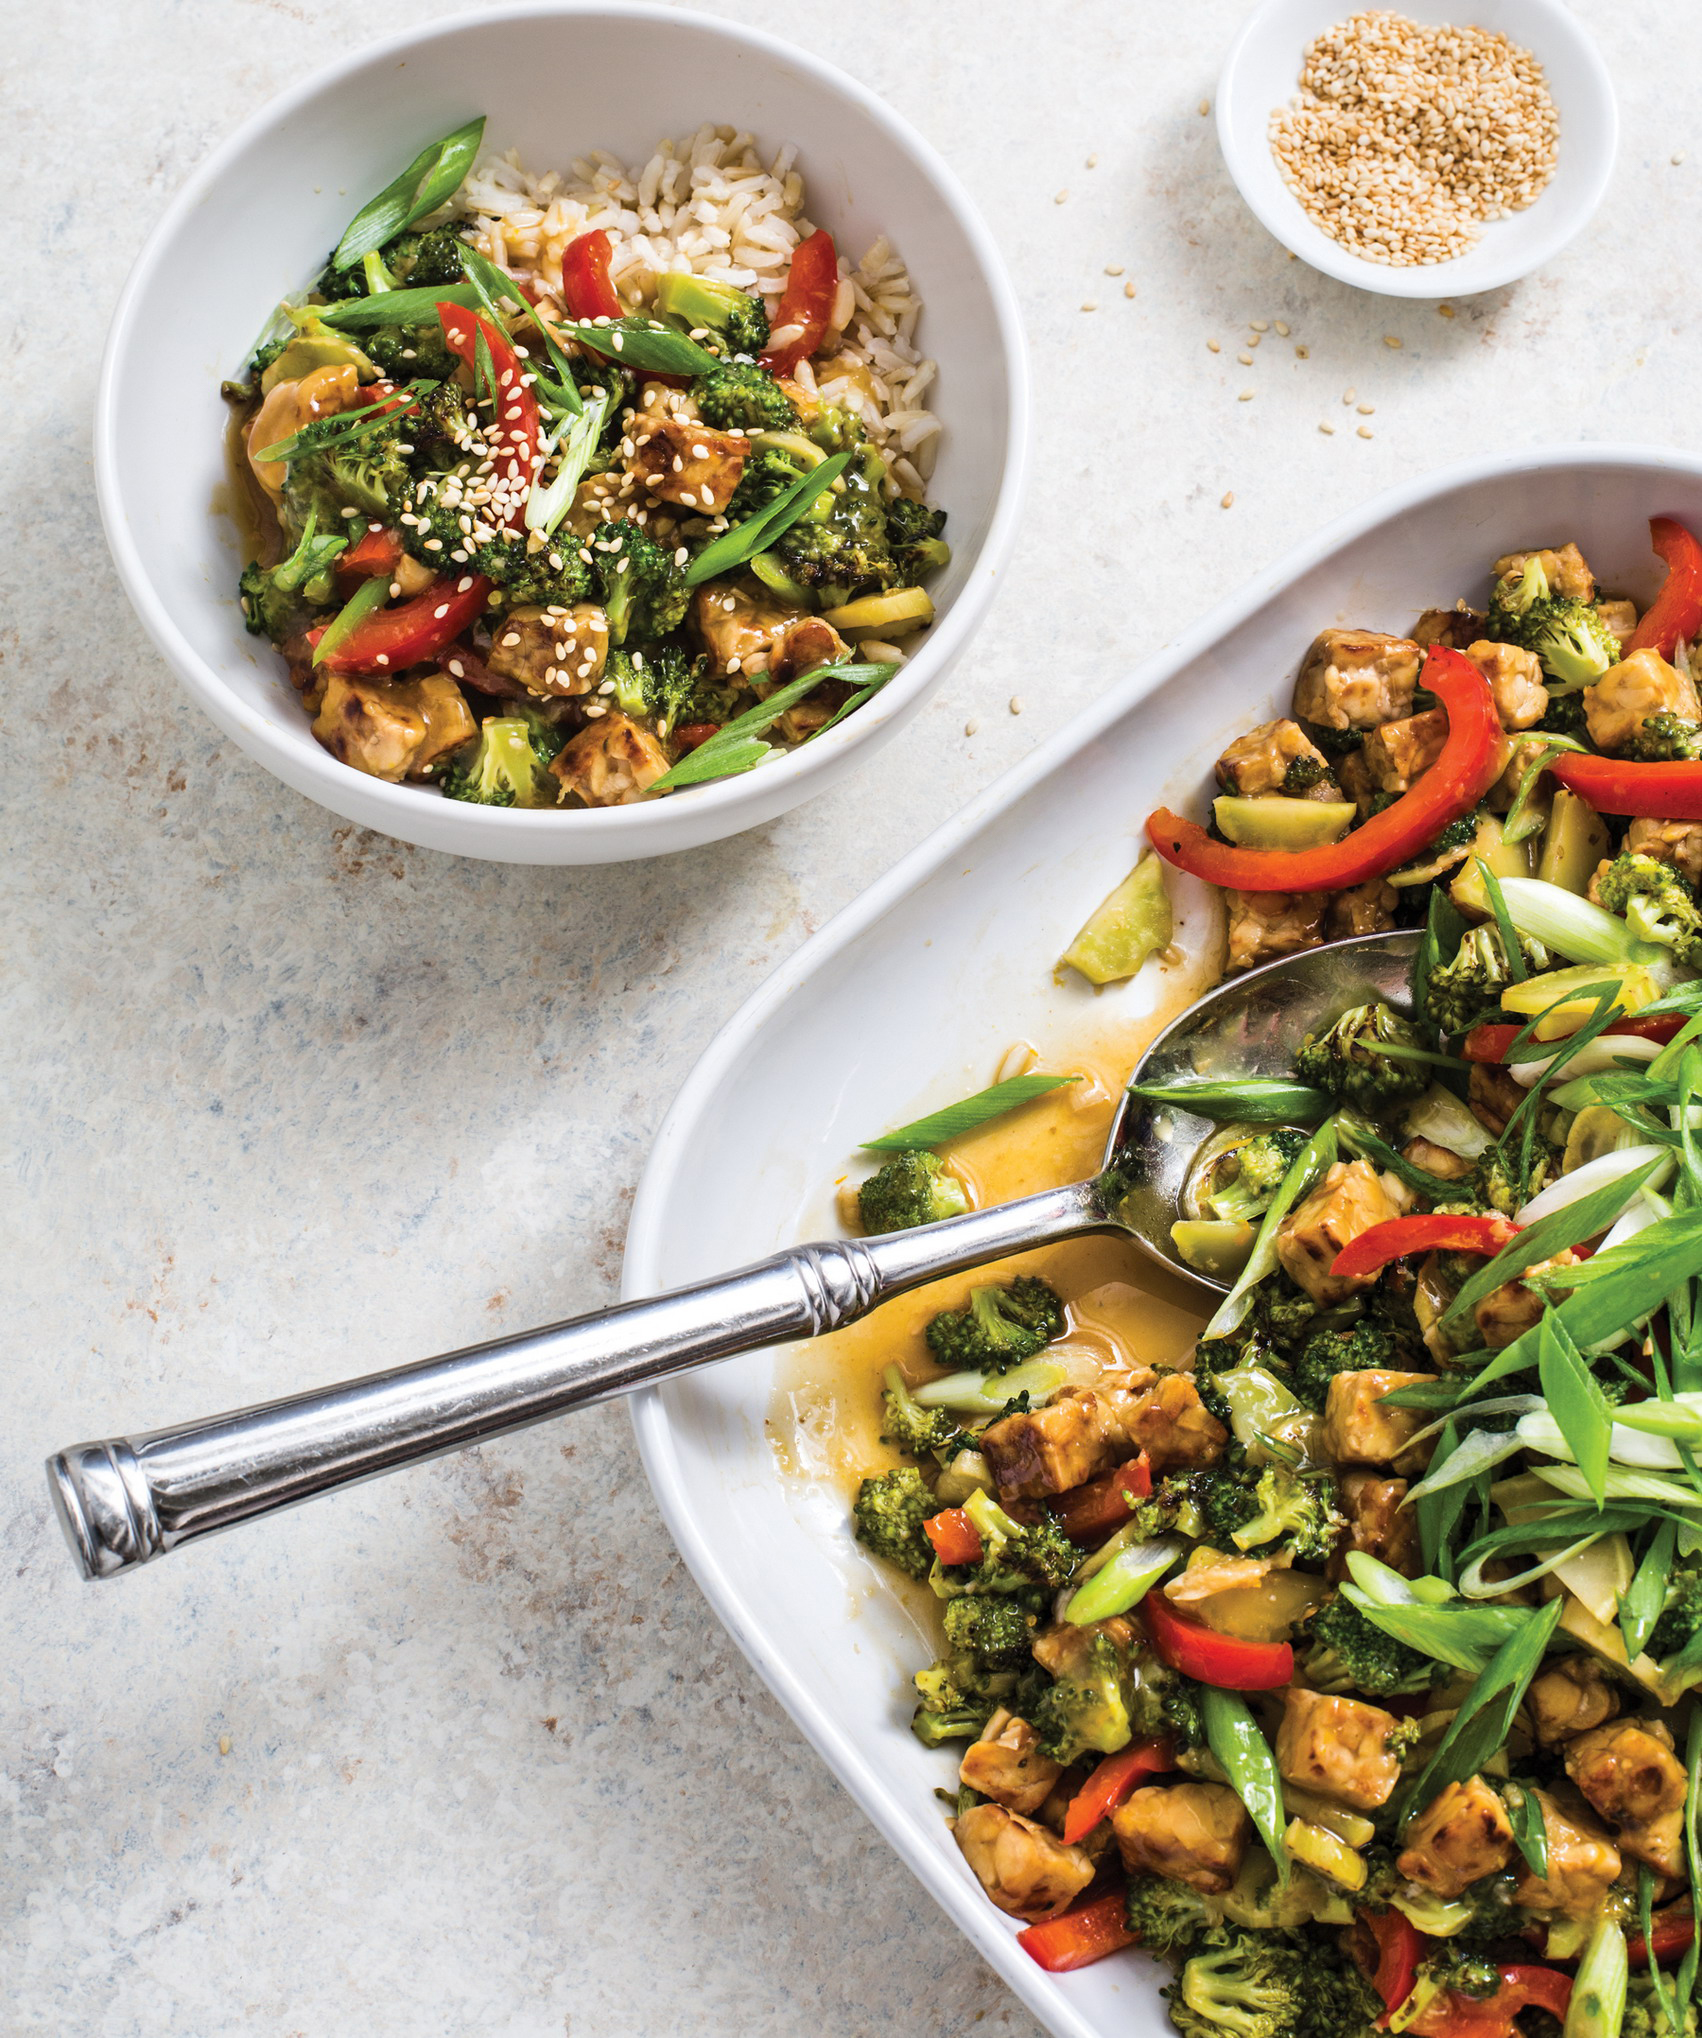
Serves 4
Why This Recipe Works Because it is a firm, dense cake, tempeh is better at holding its shape when cooked than tofu, so we especially like it for stir-fries. And like tofu, it absorbs flavors easily. For this recipe, we had visions of golden-brown tempeh and crisp vegetables in a sweet-and-sour orange sauce. First we perfected the tempeh, searing it in a hot skillet with soy sauce to give it an umami flavor boost and a crisp brown crust. We added red bell pepper for sweetness and crunch. Broccoli florets also stood up well to the quick, high heat. As for the sauce, we knew we needed a sweeter sauce to stand up to the slightly bitter tempeh but were wary of adding sugar. A tangy, full-bodied sauce made with orange juice tamed the tempeh and contributed just enough sweetness. Sliced scallions gave our stir-fry a mild bite. Serve with rice and garnish with toasted sesame seeds.
Sauce
¼ cup Shaoxing wine or dry sherry
¼ cup water
2 tablespoons soy sauce
1 tablespoon cornstarch
1 tablespoon grated fresh ginger
3 garlic cloves, minced
1½ teaspoons toasted sesame oil
¼ teaspoon grated orange zest, plus ¾ cup juice (2 oranges)
Stir-Fry
2 tablespoons vegetable oil, divided
12 ounces tempeh, cut into ½-inch pieces
2 tablespoons soy sauce
1 pound broccoli, florets cut into ½-inch pieces, stalks peeled, halved, and sliced thin
1 red bell pepper, stemmed, seeded, and cut into ¼-inch-wide strips
6 scallions, sliced thin on bias
1. For the sauce Whisk all ingredients together in bowl.
2. For the stir-fry Heat 1 tablespoon oil in 12-inch nonstick skillet over high heat until just smoking. Add tempeh and soy sauce, and cook, stirring occasionally, until well browned, 4 to 6 minutes; transfer to plate.
3. Return now-empty skillet to high heat, add remaining 1 tablespoon oil, and heat until just smoking. Add broccoli and bell pepper, and cook, stirring occasionally, until vegetables are spotty brown and crisp-tender, about 4 minutes.
4. Stir in browned tempeh. Whisk sauce to recombine, then add to skillet and cook, stirring constantly, until sauce is thickened, about 30 seconds. Off heat, sprinkle with scallions and serve.
Serves 4
Why This Recipe Works Sambals are hugely popular throughout Indonesia. These condiment sauces, which can be served cooked or raw, are typically made from chiles, aromatics such as onion, fresh herbs, and spices. Shrimp paste or fish sauce is frequently included, but we found our Anchovy Substitute to be just right for adding a savory, funky umami depth to this vegan version. Here we cooked a mouth-warming but not-too-hot sambal and tossed it with cubes of tempeh, which we fried until they were golden brown and slightly crispy on the outside but still meaty-textured on the inside. Tempeh is often deep-fried for this preparation, but we found that a shallow fry in a cup of oil gave us similar results. We used a small portion of the remaining oil from frying the tempeh to cook the sambal, which partially tamed the fruity heat of the Fresno chiles and rendered the onion and garlic sweet and melting. Before cooking, we used a food processor to quickly combine all the sambal ingredients while maintaining a pleasingly coarse texture. Then it was just a matter of tossing the crispy tempeh in the sambal sauce and stirring in plenty of fresh basil. Lemon basil is traditional in Indonesia, but Thai and Italian basil are both excellent substitutes. It’s worth seeking out kecap manis (Indonesian sweet soy sauce). If you can’t find it, you can substitute a combination of 1½ tablespoons dark brown sugar and 1 teaspoon soy sauce. You will need a 12-inch nonstick skillet for this recipe. Serve with rice, if desired.
12 ounces Fresno chiles, stemmed, seeded, and chopped coarse
1 small onion, chopped coarse
5 garlic cloves, peeled
2 teaspoons Anchovy Substitute (this page)
½ teaspoon table salt
1 cup vegetable oil
1 pound tempeh, cut into ½-inch pieces
½ cup water
2 tablespoons kecap manis
1½ cups fresh Thai or Italian basil leaves
1. Process chiles, onion, garlic, anchovy substitute, and salt in food processor until finely chopped, about 30 seconds, scraping down sides of bowl as needed; transfer to bowl.
2. Adjust oven rack to middle position and heat oven to 200 degrees. Set wire rack in rimmed baking sheet and line rack with triple layer of paper towels. Heat oil in nonstick skillet over medium-high heat to 375 degrees. Carefully add half of tempeh to hot oil and increase heat to high. Cook, turning as needed, until golden brown, 3 to 5 minutes. Adjust burner, if necessary, to maintain oil temperature between 350 and 375 degrees. Off heat, transfer tempeh to prepared rack and keep warm in oven. Return oil to 375 degrees over medium-high heat and repeat with remaining tempeh; transfer to rack.
3. Carefully pour off all but 2 tablespoons oil from skillet. Add chile mixture to oil left in skillet and cook over medium-high heat, tossing slowly but constantly, until darkened in color and completely dry, 7 to 10 minutes. Off heat, stir in water and kecap manis until combined. Add tempeh and basil and toss until well coated. Serve.

Serves 4
Why This Recipe Works Since tempeh has such a concentration of protein and is so good at absorbing flavor, we went all in and prepared it as a “meaty” steak with a classic serving condiment. Marinating the tempeh in a seasoned vinegar-and-water base infused it with flavor. Patting the marinated tempeh dry and pan-searing it created a delectably crisp edge and made the interior texture more cohesive. The tempeh’s earthy flavor is well balanced by the bright herb sauce. Chimichurri sauce is a traditional steak sauce that combines parsley, wine vinegar, oil, lots of garlic, oregano, and a good dose of red pepper flakes. It paired perfectly with our tempeh, lending bright flavor and richness to the impressive seared steaks. Our variation uses chermoula, which employs cilantro, lemon, and lots of warm spices.
5 tablespoons red wine vinegar, divided
¼ cup water
4 garlic cloves, minced, divided
1½ teaspoons dried oregano, divided
½ teaspoon red pepper flakes, divided
1 pound tempeh, cut into 3½-inch-long by ⅜-inch-thick slabs
1 cup fresh parsley leaves
½ cup extra-virgin olive oil, divided
½ teaspoon table salt
1. Combine ¼ cup vinegar, water, half of garlic, 1 teaspoon oregano, and ¼ teaspoon pepper flakes in 1-gallon zipper-lock bag. Add tempeh, press out air, seal, and toss to coat. Refrigerate tempeh for at least 1 hour or up to 24 hours, flipping bag occasionally.
2. Pulse parsley, ¼ cup oil, salt, remaining 1 tablespoon vinegar, remaining garlic, remaining ½ teaspoon oregano, and remaining ¼ teaspoon pepper flakes in food processor until coarsely chopped, about 10 pulses, scraping down sides of bowl as needed. Transfer to bowl and season with salt and pepper to taste.
3. Remove tempeh from marinade and pat dry with paper towels. Heat 2 tablespoons oil in 12-inch nonstick skillet over medium heat until shimmering. Add 4 pieces tempeh and cook until golden brown on first side, 2 to 4 minutes.
4. Flip tempeh, reduce heat to medium-low, and continue to cook until golden brown on second side, 2 to 4 minutes; transfer to platter. Wipe out skillet with paper towels and repeat with remaining 2 tablespoons oil and remaining tempeh. Serve with parsley sauce.
VARIATION
Pan-Seared Tempeh Steaks with Chermoula Sauce
Omit oregano. Substitute lemon juice for red wine vinegar, ¼ teaspoon cayenne pepper for red pepper flakes, and cilantro for parsley. Add ½ teaspoon ground cumin and ½ teaspoon paprika to tempeh marinade. Add ½ teaspoon ground cumin and ½ teaspoon paprika to sauce.
Serves 4 to 6
Why This Recipe Works With its deep, intense flavors, Indian curry powder makes an excellent pairing for sturdy tempeh. To create truly complex curry flavor, we started by toasting curry powder and garam masala in a dry skillet. A serrano chile delivered the right combination of flavor and spice. Blooming glutamate-rich tomato paste with our seasonings added a savory umami element to our curry. Canned diced tomatoes pulsed in a food processor formed the base of the sauce. Simmering the tempeh in the curry for 15 minutes helped to infuse it with the curry’s flavor. To round out our curry with vegetables, we added cauliflower, simmering it in the sauce until tender, and convenient frozen peas. Finishing our tempeh curry with a dash of coconut milk imparted a little extra richness. To make this sauce spicier, use the higher amount of chiles and/or add the seeds from the chile. We prefer our homemade Garam Masala (this page), but you may use store-bought. Serve over rice.
2 tablespoons curry powder
1½ teaspoons garam masala
1 (14.5-ounce) can diced tomatoes
¼ cup vegetable oil, divided
2 onions, chopped fine
3 garlic cloves, minced
1 tablespoon grated fresh ginger
1–1½ serrano chiles, stemmed, seeded, and minced
1 tablespoon tomato paste
½ head cauliflower (1 pound), cored and cut into 1-inch florets
8 ounces tempeh, cut into 1-inch pieces
1¼ cups water
1 teaspoon table salt
1 cup frozen peas
¼ cup canned coconut milk
2 tablespoons minced fresh cilantro
1. Toast curry powder and garam masala in 10-inch skillet over medium-high heat, stirring constantly, until spices darken slightly and become fragrant, about 1 minute. Transfer to bowl. Pulse tomatoes and their juice in food processor until coarsely chopped, 3 to 4 pulses.
2. Heat 3 tablespoons oil in Dutch oven over medium-high heat until shimmering. Add onions and cook, stirring occasionally, until caramelized, about 10 minutes.
3. Reduce heat to medium. Clear center of pot and add remaining 1 tablespoon oil, garlic, ginger, serrano, toasted spices, and tomato paste. Cook, mashing mixture into pot, until fragrant, about 1 minute. Add cauliflower and tempeh and cook, stirring constantly, until well coated with spices.
4. Stir in processed tomatoes, water, and salt, scraping up any browned bits. Increase heat to medium-high and bring to simmer. Cover, reduce heat to medium, and cook, stirring occasionally, until vegetables are tender, 10 to 15 minutes. Stir in peas and coconut milk and cook until heated through, about 2 minutes. Off heat, season with salt to taste and sprinkle with cilantro. Serve.
Serves 4 to 6
Why This Recipe Works Crispy tofu fingers tossed with a bold sweet-and-spicy chili glaze can be served alongside your choice of rice or with vegetables ranging from steamed broccoli to Stir-Fried Asparagus with Shiitake Mushrooms (this page). We wanted the coating for our tofu to be light, crisp, and nicely browned; to achieve this, we found that a combination of ¾ cup cornstarch and ¼ cup cornmeal was just right. Cutting our tofu into fingers gave us a greater coating-to-tofu ratio, which provided the right balance of crispy crust to creamy interior along with plenty of surface area for the clingy glaze to adhere to. Soft tofu gave us a lovely textural contrast between the crisp outside and the silky interior. To keep the light coating from getting greasy, we swapped the traditional skillet for nonstick so we could use less oil. Firm or extra-firm tofu will also work, but the finished dish will taste drier. To make the dish spicier, use the higher amount of Asian chili-garlic sauce.
Tofu
28 ounces soft tofu, cut into 3-inch-long by ½-inch-thick fingers
½ teaspoon table salt
¼ teaspoon pepper
¾ cup cornstarch
¼ cup cornmeal
¼ cup vegetable oil, divided
Glaze
½ cup water
½ cup rice vinegar
⅓ cup sugar
4 garlic cloves, minced
2–3 teaspoons Asian chili-garlic sauce
2 teaspoons cornstarch
¼ cup minced fresh cilantro
1. For the tofu Spread tofu over paper towel–lined baking sheet, let drain for 20 minutes, then gently press dry with paper towels and sprinkle with salt and pepper.
2. Adjust oven rack to middle position, place paper towel–lined plate on rack, and heat oven to 200 degrees. Combine cornstarch and cornmeal in shallow dish. Working with several tofu pieces at a time, coat thoroughly with cornstarch mixture, pressing gently to adhere; transfer to wire rack set in baking sheet.
3. Heat 2 tablespoons oil in 12-inch nonstick skillet over medium-high heat until shimmering. Cook half of tofu until crisp and lightly golden on all sides, 10 to 12 minutes. Lift tofu from oil, letting excess oil drip back into skillet, then transfer to plate in oven. Repeat with remaining 2 tablespoons oil and remaining tofu.
4. For the glaze Whisk water, vinegar, sugar, garlic, chili-garlic sauce, and cornstarch together in bowl. Wipe out now-empty skillet with paper towels, add glaze, and simmer over medium heat until syrupy and reduced to 1¼ cups, 2 to 3 minutes.
5. Off heat, stir in cilantro. Add tofu and turn to coat with glaze. Season with salt to taste, and serve.

Spread tofu pieces evenly over rimmed baking sheet lined with paper towels, and let sit for 20 minutes to drain. Gently press tofu dry with paper towels.
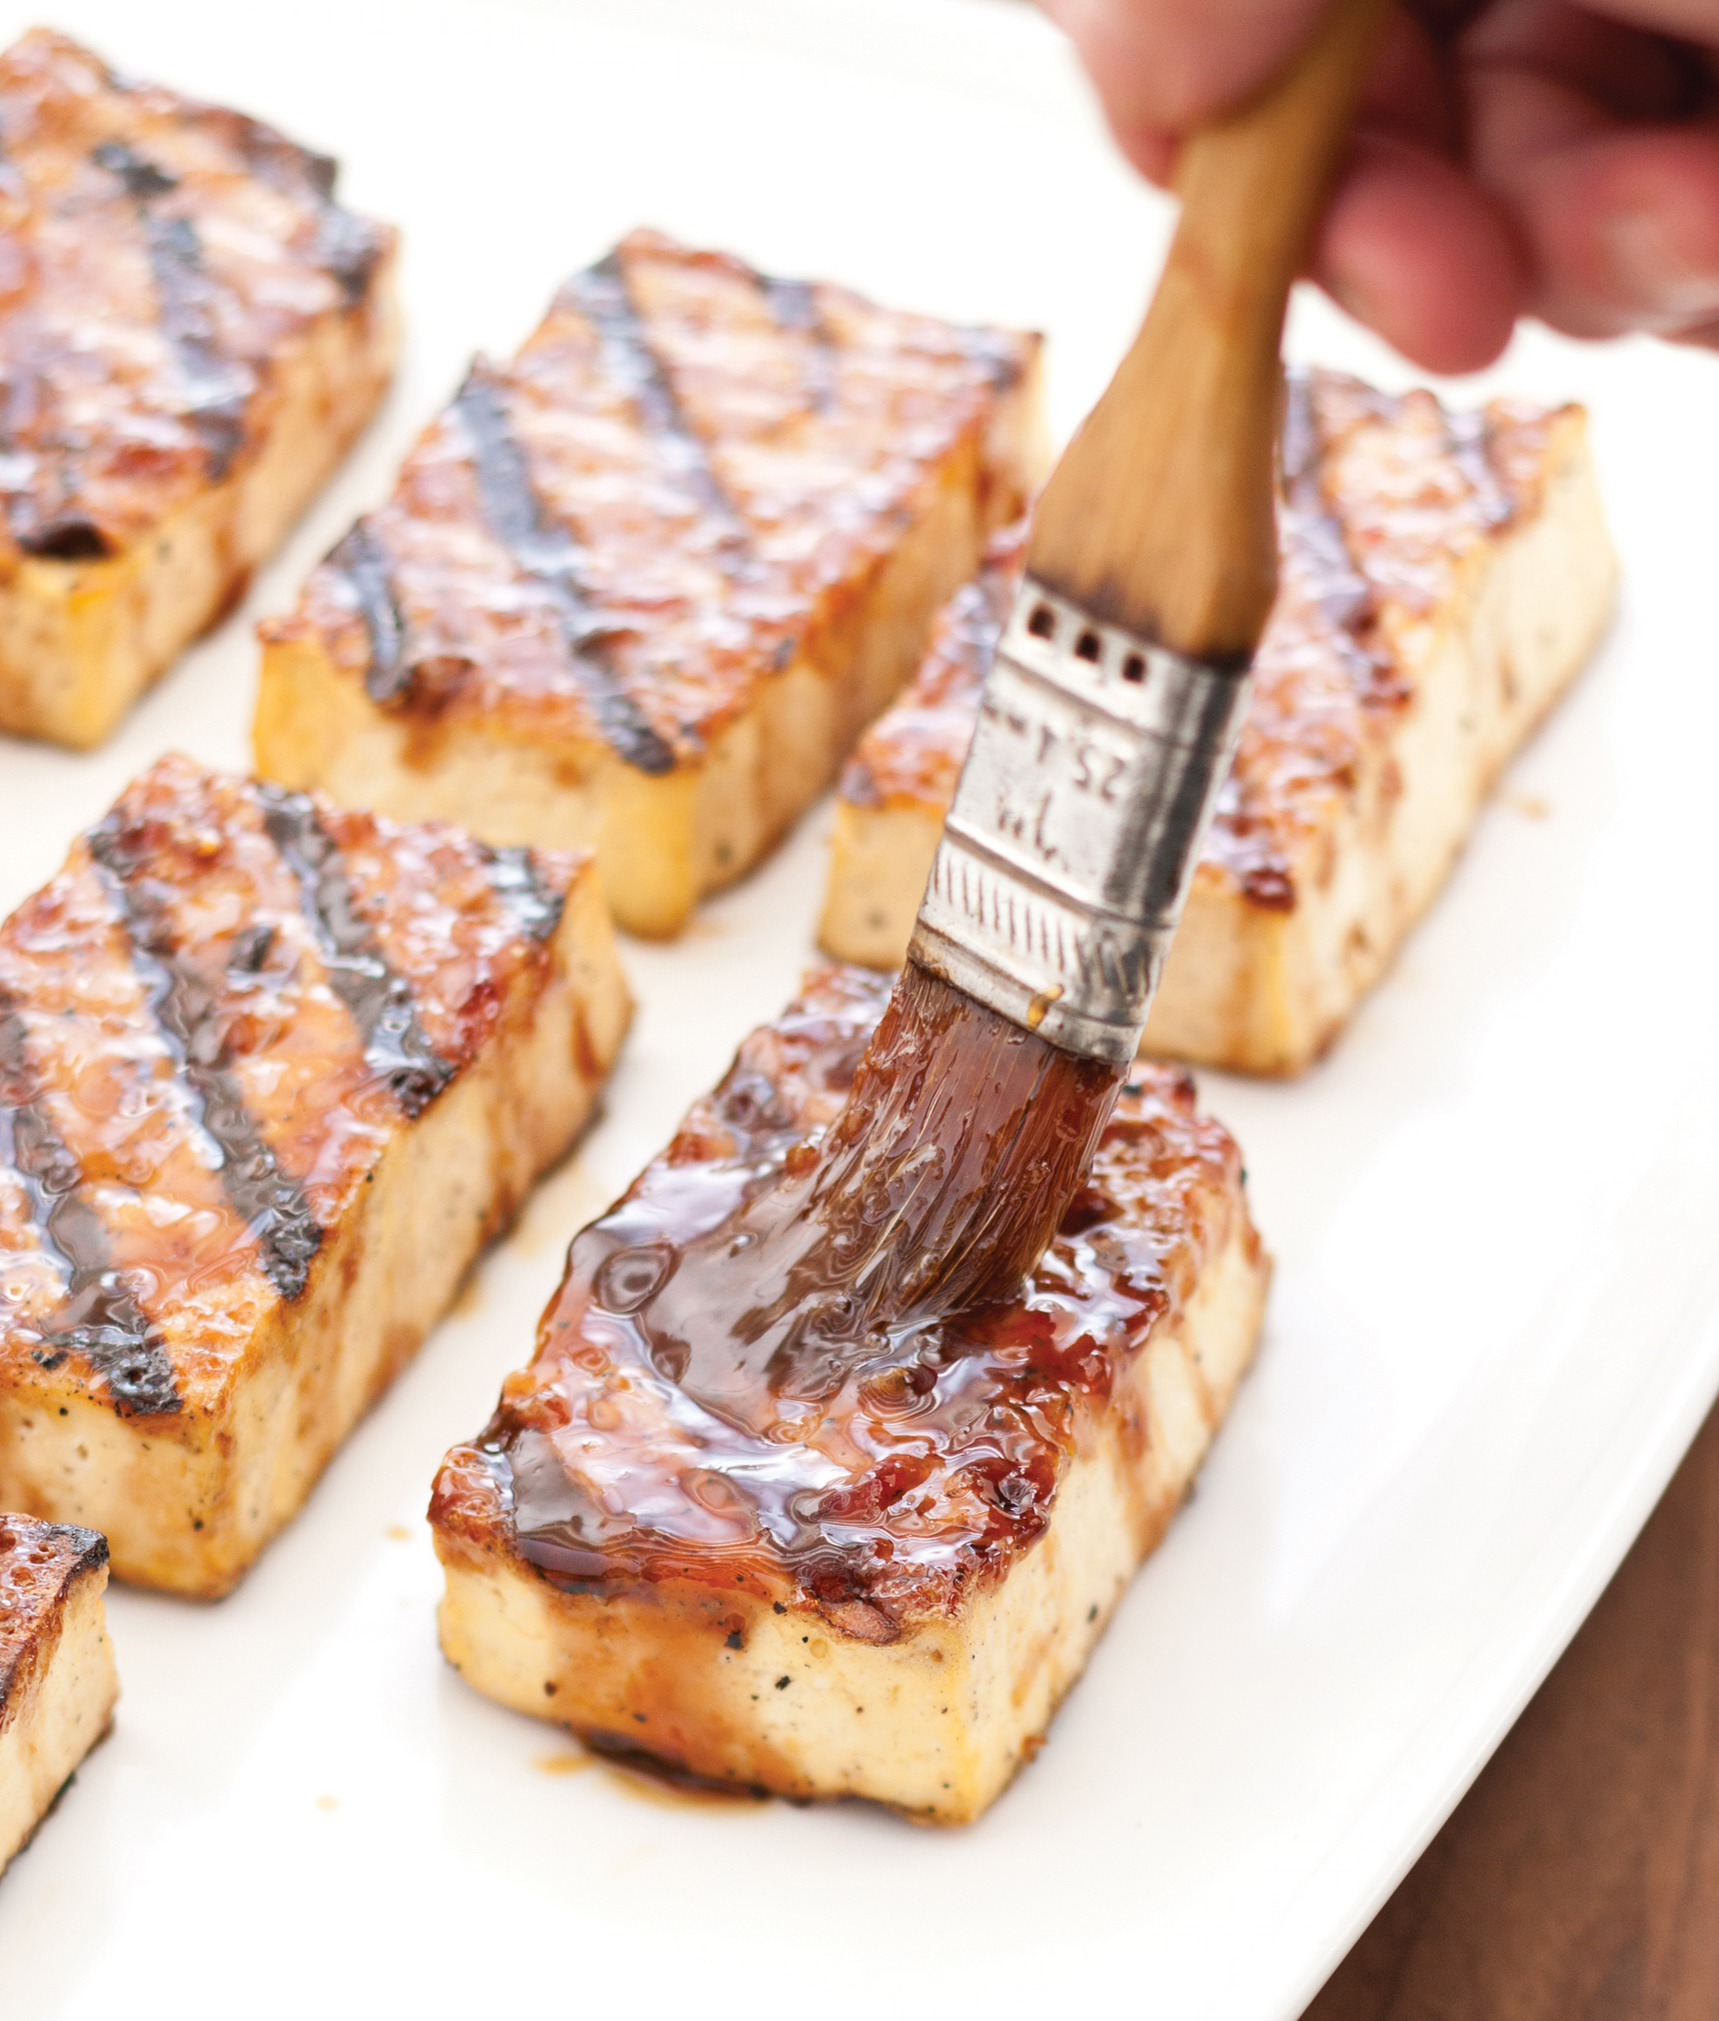
Serves 4 to 6
Why This Recipe Works Tofu has a delicate, silky texture that contrasts beautifully with the crisp, browned crust that results from a quick stint on the grill, and its mild flavor gets a boost from the gingery, garlicky flavors of this glaze. First we made the glaze by simmering soy sauce, sugar, mirin, fresh ginger, garlic, and chili-garlic sauce. Some cornstarch helped to thicken the sauce so it would cling to the tofu. We found that the keys to successfully grilled tofu were cutting it to the right shape and handling it carefully on the grill. We tried grilling tofu that had been cut into planks, strips, and cubes, and found that tofu cut lengthwise into 1-inch-thick planks fared best. This shape maximized surface contact, and the larger pieces were easier to turn. Using two spatulas provided the best leverage for flipping the delicate tofu. You can use either firm or extra-firm tofu in this recipe. Dry sherry or white wine can be substituted for the mirin. Be sure to handle the tofu gently on the grill to prevent it from breaking apart.
Glaze
⅓ cup soy sauce
⅓ cup water
⅓ cup sugar
¼ cup mirin
1 tablespoon grated fresh ginger
2 garlic cloves, minced
2 teaspoons cornstarch
1 teaspoon Asian chili-garlic sauce
Tofu
28 ounces firm tofu, sliced lengthwise into 1-inch-thick planks
2 tablespoons vegetable oil
½ teaspoon table salt
¼ teaspoon pepper
¼ cup minced fresh cilantro
1. For the glaze Simmer soy sauce, water, sugar, mirin, ginger, garlic, cornstarch, and chili-garlic sauce in small saucepan over medium-high heat until thickened and reduced to ¾ cup, 5 to 7 minutes; transfer to bowl.
2. For the tofu Spread tofu over paper towel–lined baking sheet, let drain for 20 minutes, then gently press dry with paper towels. Brush tofu with oil and sprinkle with salt and pepper.
3A. For a charcoal grill Open bottom vent completely. Light large chimney starter filled with charcoal briquettes (6 quarts). When top coals are partially covered with ash, pour two-thirds evenly over half of grill, then pour remaining coals over other half of grill. Set cooking grate in place, cover, and open lid vent completely. Heat grill until hot, about 5 minutes.
3B. For a gas grill Turn all burners to high, cover, and heat grill until hot, about 15 minutes. Leave all burners on high.
4. Clean and oil cooking grate. Gently place tofu on grill, perpendicular to grate bars (on hotter part of grill if using charcoal). Cook (covered if using gas) until lightly browned on both sides, 6 to 10 minutes, gently flipping tofu halfway through cooking using 2 spatulas.
5. Turn all burners to medium if using gas, or slide tofu to cooler part of grill if using charcoal. Brush tofu with ¼ cup glaze and cook until well browned, 1 to 2 minutes. Flip tofu, brush with ¼ cup glaze, and cook until well browned, 1 to 2 minutes. Transfer tofu to platter, brush with remaining ¼ cup glaze, and sprinkle with cilantro. Serve.

To cut into planks: Slice block of tofu crosswise into planks of desired width.

To cut into fingers: Cut tofu crosswise into planks, then slice each plank into fingers of desired size.

To cut into cubes: Cut tofu into fingers, then cut each finger into cubes of desired size.
Serves 4
Why This Recipe Works This satisfying, surprisingly savory Vietnamese recipe will have even the most reluctant tofu skeptic coming back for more. We tossed cubes of tofu with cornstarch, lightly pan-fried them, and served them with a traditional salty-sweet caramel sauce. To achieve the tricky balance of sweet and savory in our sauce, we kept the caramel base simple with water and sugar and then added a healthy dose of garlic, fish sauce substitute, and pepper. To give the sauce more depth, we added a thinly sliced onion to caramelize and soften in the sauce. Tossing the tofu with cornstarch and pan-frying it gave it an appealingly crisp, browned exterior; we then drizzled it with the caramel sauce and topped it all with some chopped peanuts for textural contrast and a sprinkling of cilantro and scallions for a fresh finish. You can use either firm or extra-firm tofu in this recipe. The caramel can go from amber-colored to burnt quickly after the garlic is added, so it’s important to have the measured water at the ready to stop the caramelization. Serve over rice.
21 ounces firm tofu, cut into ¾-inch cubes
1¼ teaspoons pepper, divided
½ teaspoon table salt
1¾ cups water, divided
⅓ cup sugar
6 tablespoons vegetable oil, divided
5 garlic cloves, minced
1 onion, halved and sliced thin
3 tablespoons Fish Sauce Substitute (this page)
2 teaspoons plus ½ cup cornstarch, divided
½ cup fresh cilantro leaves
¼ cup dry-roasted peanuts, chopped
3 scallions, green parts only, sliced thin on bias
1. Spread tofu over paper towel–lined baking sheet, let drain for 20 minutes, then gently press dry with paper towels and sprinkle with ¼ teaspoon pepper and salt.
2. Meanwhile, pour ¼ cup water into medium saucepan, then sprinkle sugar evenly over top. Cook over medium heat, gently swirling pan occasionally (do not stir), until sugar melts and mixture turns color of maple syrup, 7 to 10 minutes.
3. Stir in 3 tablespoons oil and garlic and cook until fragrant, about 30 seconds. Off heat, slowly whisk in remaining 1½ cups water (sauce will sizzle). Stir in onion, fish sauce substitute, 2 teaspoons cornstarch, and remaining 1 teaspoon pepper. Return pan to medium-low heat and simmer vigorously until onion is softened and sauce has thickened, 10 to 15 minutes. Remove from heat and cover to keep warm.
4. Spread remaining ½ cup cornstarch in shallow dish. Working with several tofu pieces at a time, coat thoroughly with cornstarch, pressing gently to adhere; transfer to plate.
5. Heat remaining 3 tablespoons oil in 12-inch nonstick skillet over high heat until just smoking. Add tofu and cook, turning as needed, until all sides are crisp and well browned, 10 to 15 minutes; transfer to paper towel–lined plate to drain. Transfer tofu to platter, drizzle with sauce, and sprinkle with cilantro, peanuts, and scallions. Serve.
NOTES FROM THE TEST KITCHEN
CHOOSING THE RIGHT TOFU
Tofu is available in a variety of textures: extra-firm, firm, medium, soft, and silken. Reaching for the right variety will be key to the success of any given recipe. In general, firmer varieties hold their shape when cooking, while softer varieties do not, so it follows that each type of tofu is best when used in specific ways. Regardless of type, tofu is highly perishable and is best when it is fresh. To store an opened package, cover the tofu with water and refrigerate in a covered container, changing the water daily. Any hint of sourness means the tofu is past its prime.
Extra-Firm and Firm Tofu We prefer extra-firm or firm tofu for stir-fries and noodle dishes, as they hold their shape in high-heat cooking applications and when tossed with pasta. These two varieties of tofu are also great marinated (they absorb marinade better compared with softer varieties) or tossed raw into salads.
Medium and Soft Tofu Medium and soft tofu boast a creamy, custardy texture; we love to pan-fry these kinds of tofu, often coated with cornstarch, to achieve a crisp exterior, which makes a nice textural contrast to the silky interior. Soft tofu is also great scrambled like eggs.
Silken Tofu Silken tofu has a very soft, ultracreamy texture and is often used as a base for smoothies and dips, in desserts such as puddings, or as an egg replacement in vegan baked goods.
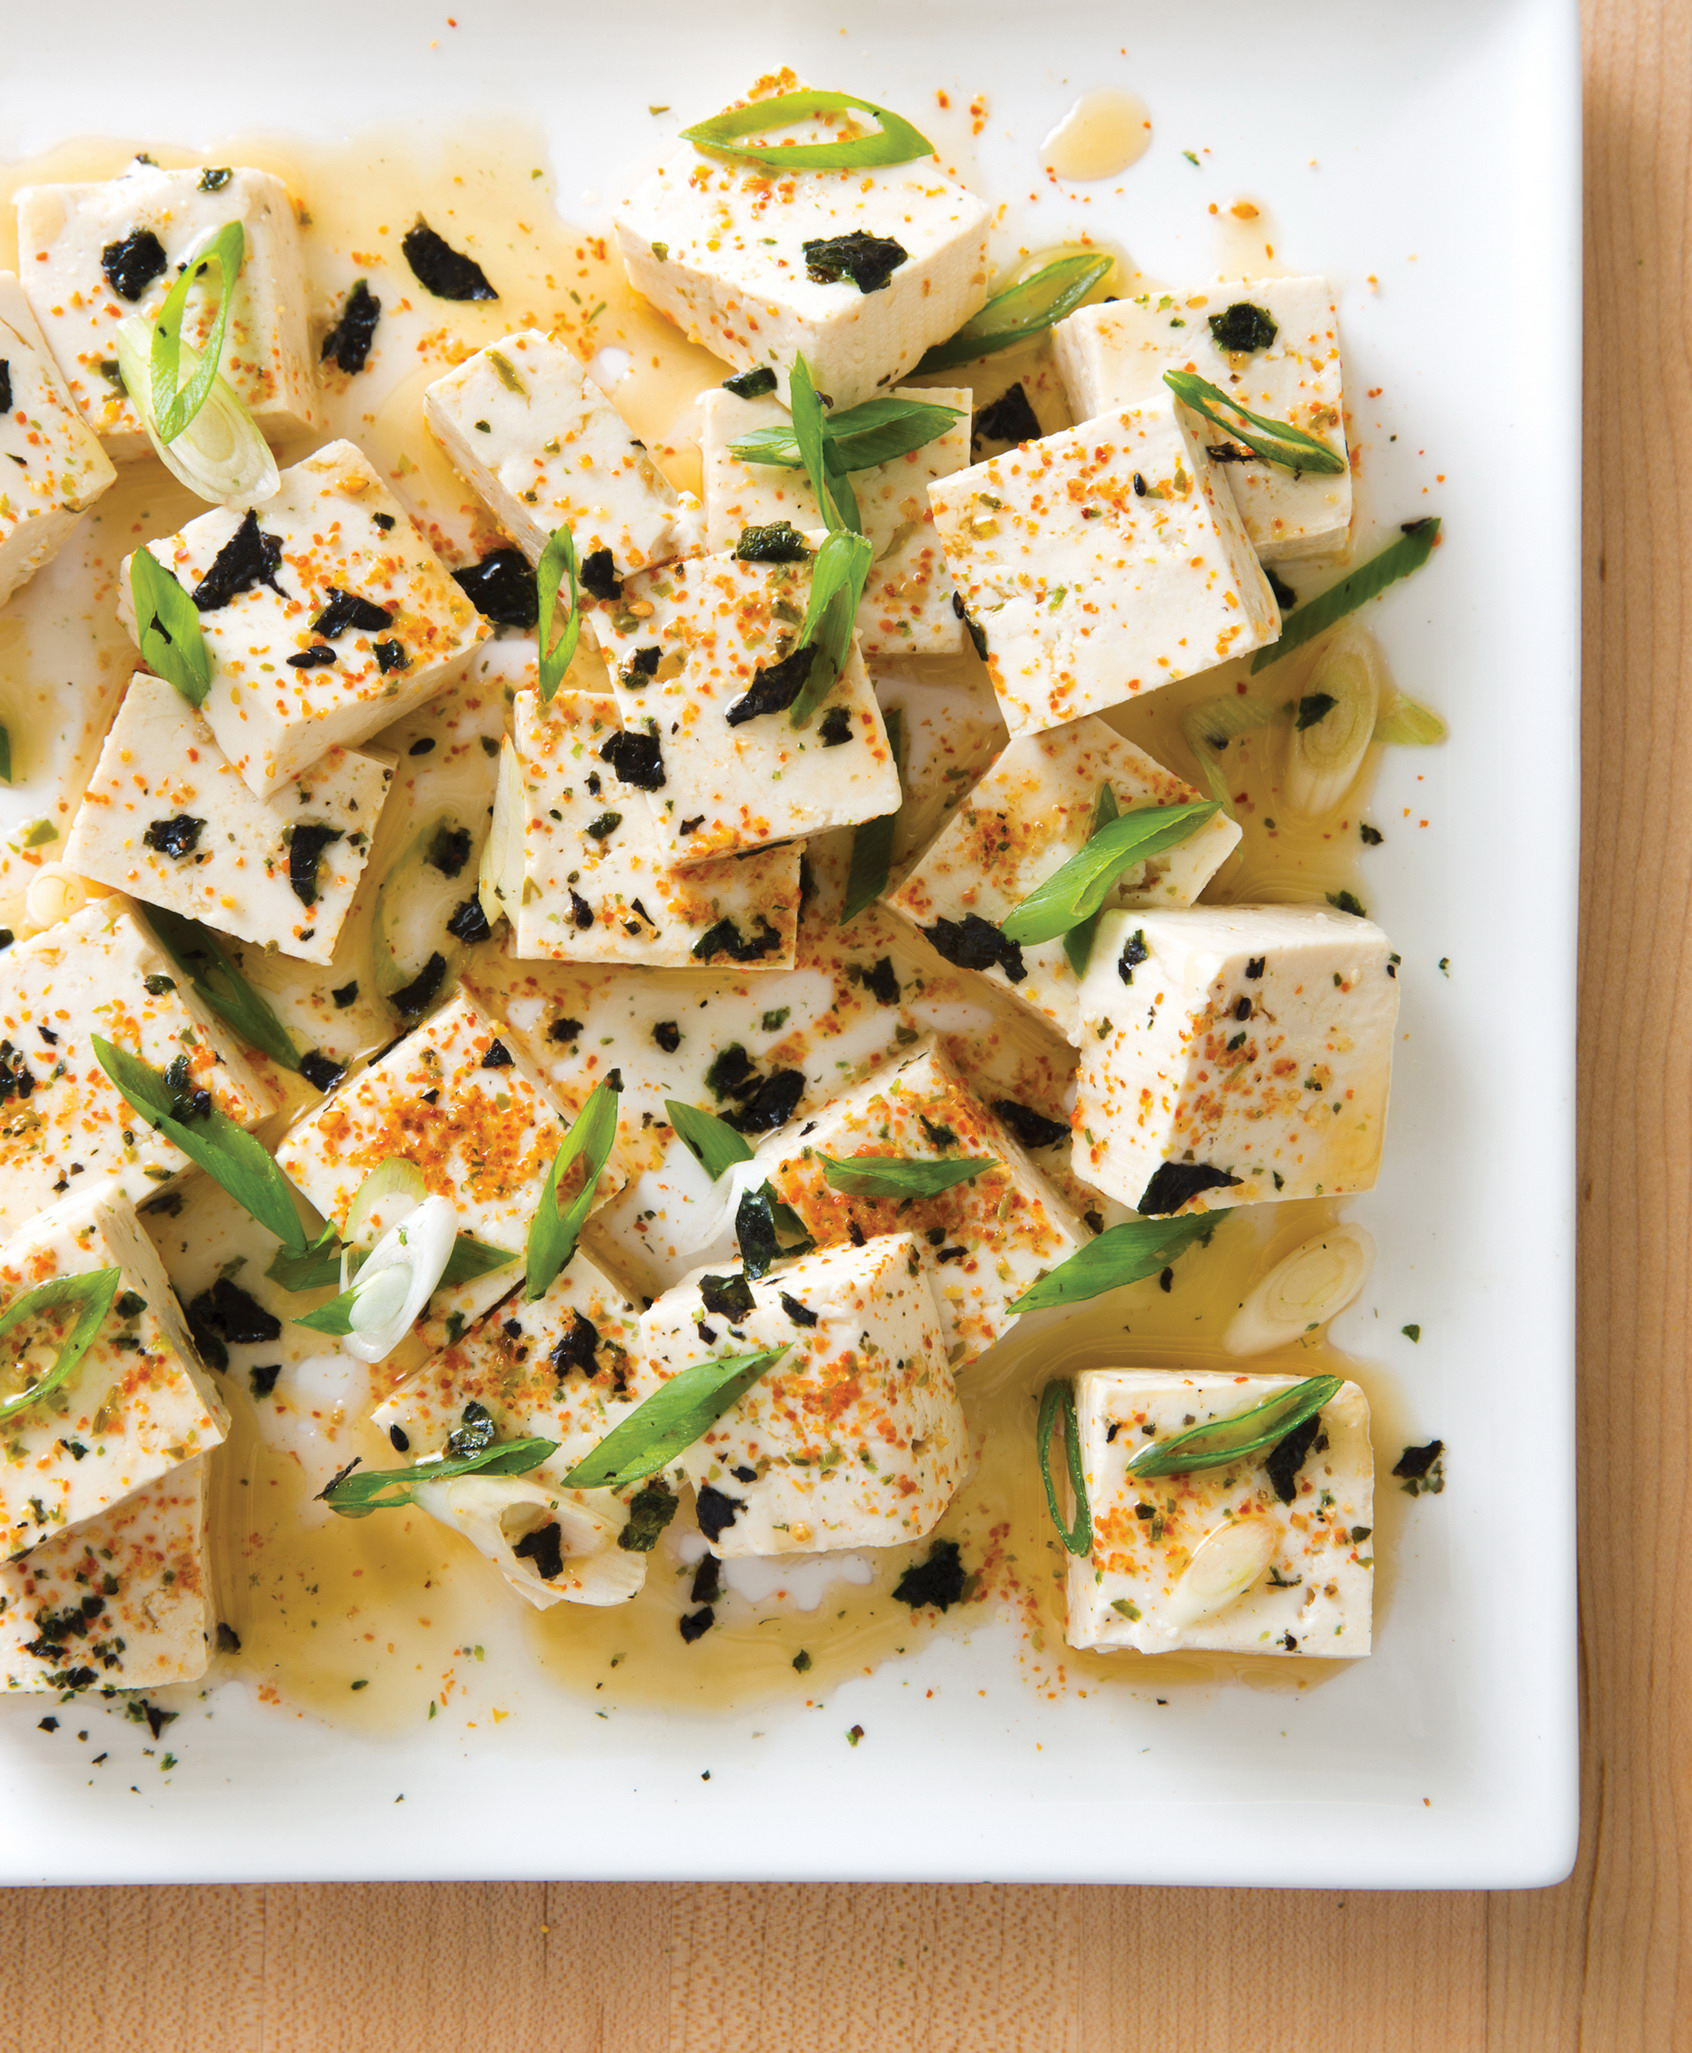
Serves 4 to 6
Why This Recipe Works Marinated raw tofu is served throughout Japan during the hot summer months as a cool and refreshing appetizer or simply as a snack. In the best renditions, a flavorful marinade and a few choice garnishes amplify the tofu’s delicate flavor. The marinade for this dish is typically a soy sauce–enhanced dashi, the ubiquitous Japanese broth prepared from kombu seaweed and bonito (skipjack tuna) flakes. We replaced the bonito with a glutamate-rich combination of wakame seaweed, fish sauce substitute, mirin, and sugar. This mixture produced a well-rounded marinade: sweet, salty, and robust—almost fishy in its intensity. A splash of rice wine vinegar, added off the heat after the broth had steeped, provided a bit of balance. To garnish our chilled tofu, we liked a sprinkle of crumbled nori, sliced scallions, and a drizzle of toasted sesame oil. A sprinkling of shichimi togarashi (a common Japanese spice mix) also tastes great here. For an accurate measurement of boiling water, bring a full kettle of water to a boil and then measure out the desired amount.
14 ounces firm tofu, halved lengthwise, then cut into ½-inch-thick squares
¼ teaspoon table salt
⅛ teaspoon pepper
2 cups boiling water
¼ cup Fish Sauce Substitute (this page)
¼ cup mirin
4 teaspoons sugar
¼ ounce wakame seaweed
¼ ounce kombu seaweed
4 teaspoons rice vinegar
2 sheets toasted nori seaweed, crumbled
2 scallions, sliced thin on bias
Toasted sesame oil
Shichimi Togarashi (recipe follows)
1. Spread tofu over paper towel–lined baking sheet, let drain for 20 minutes, then gently press dry with paper towels and sprinkle with salt and pepper.
2. Meanwhile, combine boiling water, fish sauce substitute, mirin, sugar, wakame, and kombu in bowl. Cover and let sit for 15 minutes. Strain liquid through fine-mesh strainer, discarding solids, then return broth to now-empty bowl.
3. Add tofu and vinegar, cover, and refrigerate until cool, at least 2 hours or up to 2 days. To serve, use slotted spoon to transfer tofu to platter, top with nori and scallions, and drizzle with sesame oil and sprinkle with shichimi togarashi to taste.
Makes about ¼ cup
This intriguing spice is savory from sesame seeds, spicy from cayenne, and aromatic from ginger and garlic. We microwaved the fragrant orange zest to dry it out before adding it to the blend.
1½ teaspoons grated orange zest
4 teaspoons sesame seeds, toasted
1 tablespoon paprika
2 teaspoons pepper
½ teaspoon garlic powder
½ teaspoon ground ginger
¼ teaspoon cayenne pepper
Microwave orange zest in small bowl, stirring occasionally, until dry and no longer clumping together, about 2 minutes. Stir in sesame seeds, paprika, pepper, garlic powder, ginger, and cayenne. (Shichimi togarashi can be stored in airtight container for up to 1 week.)
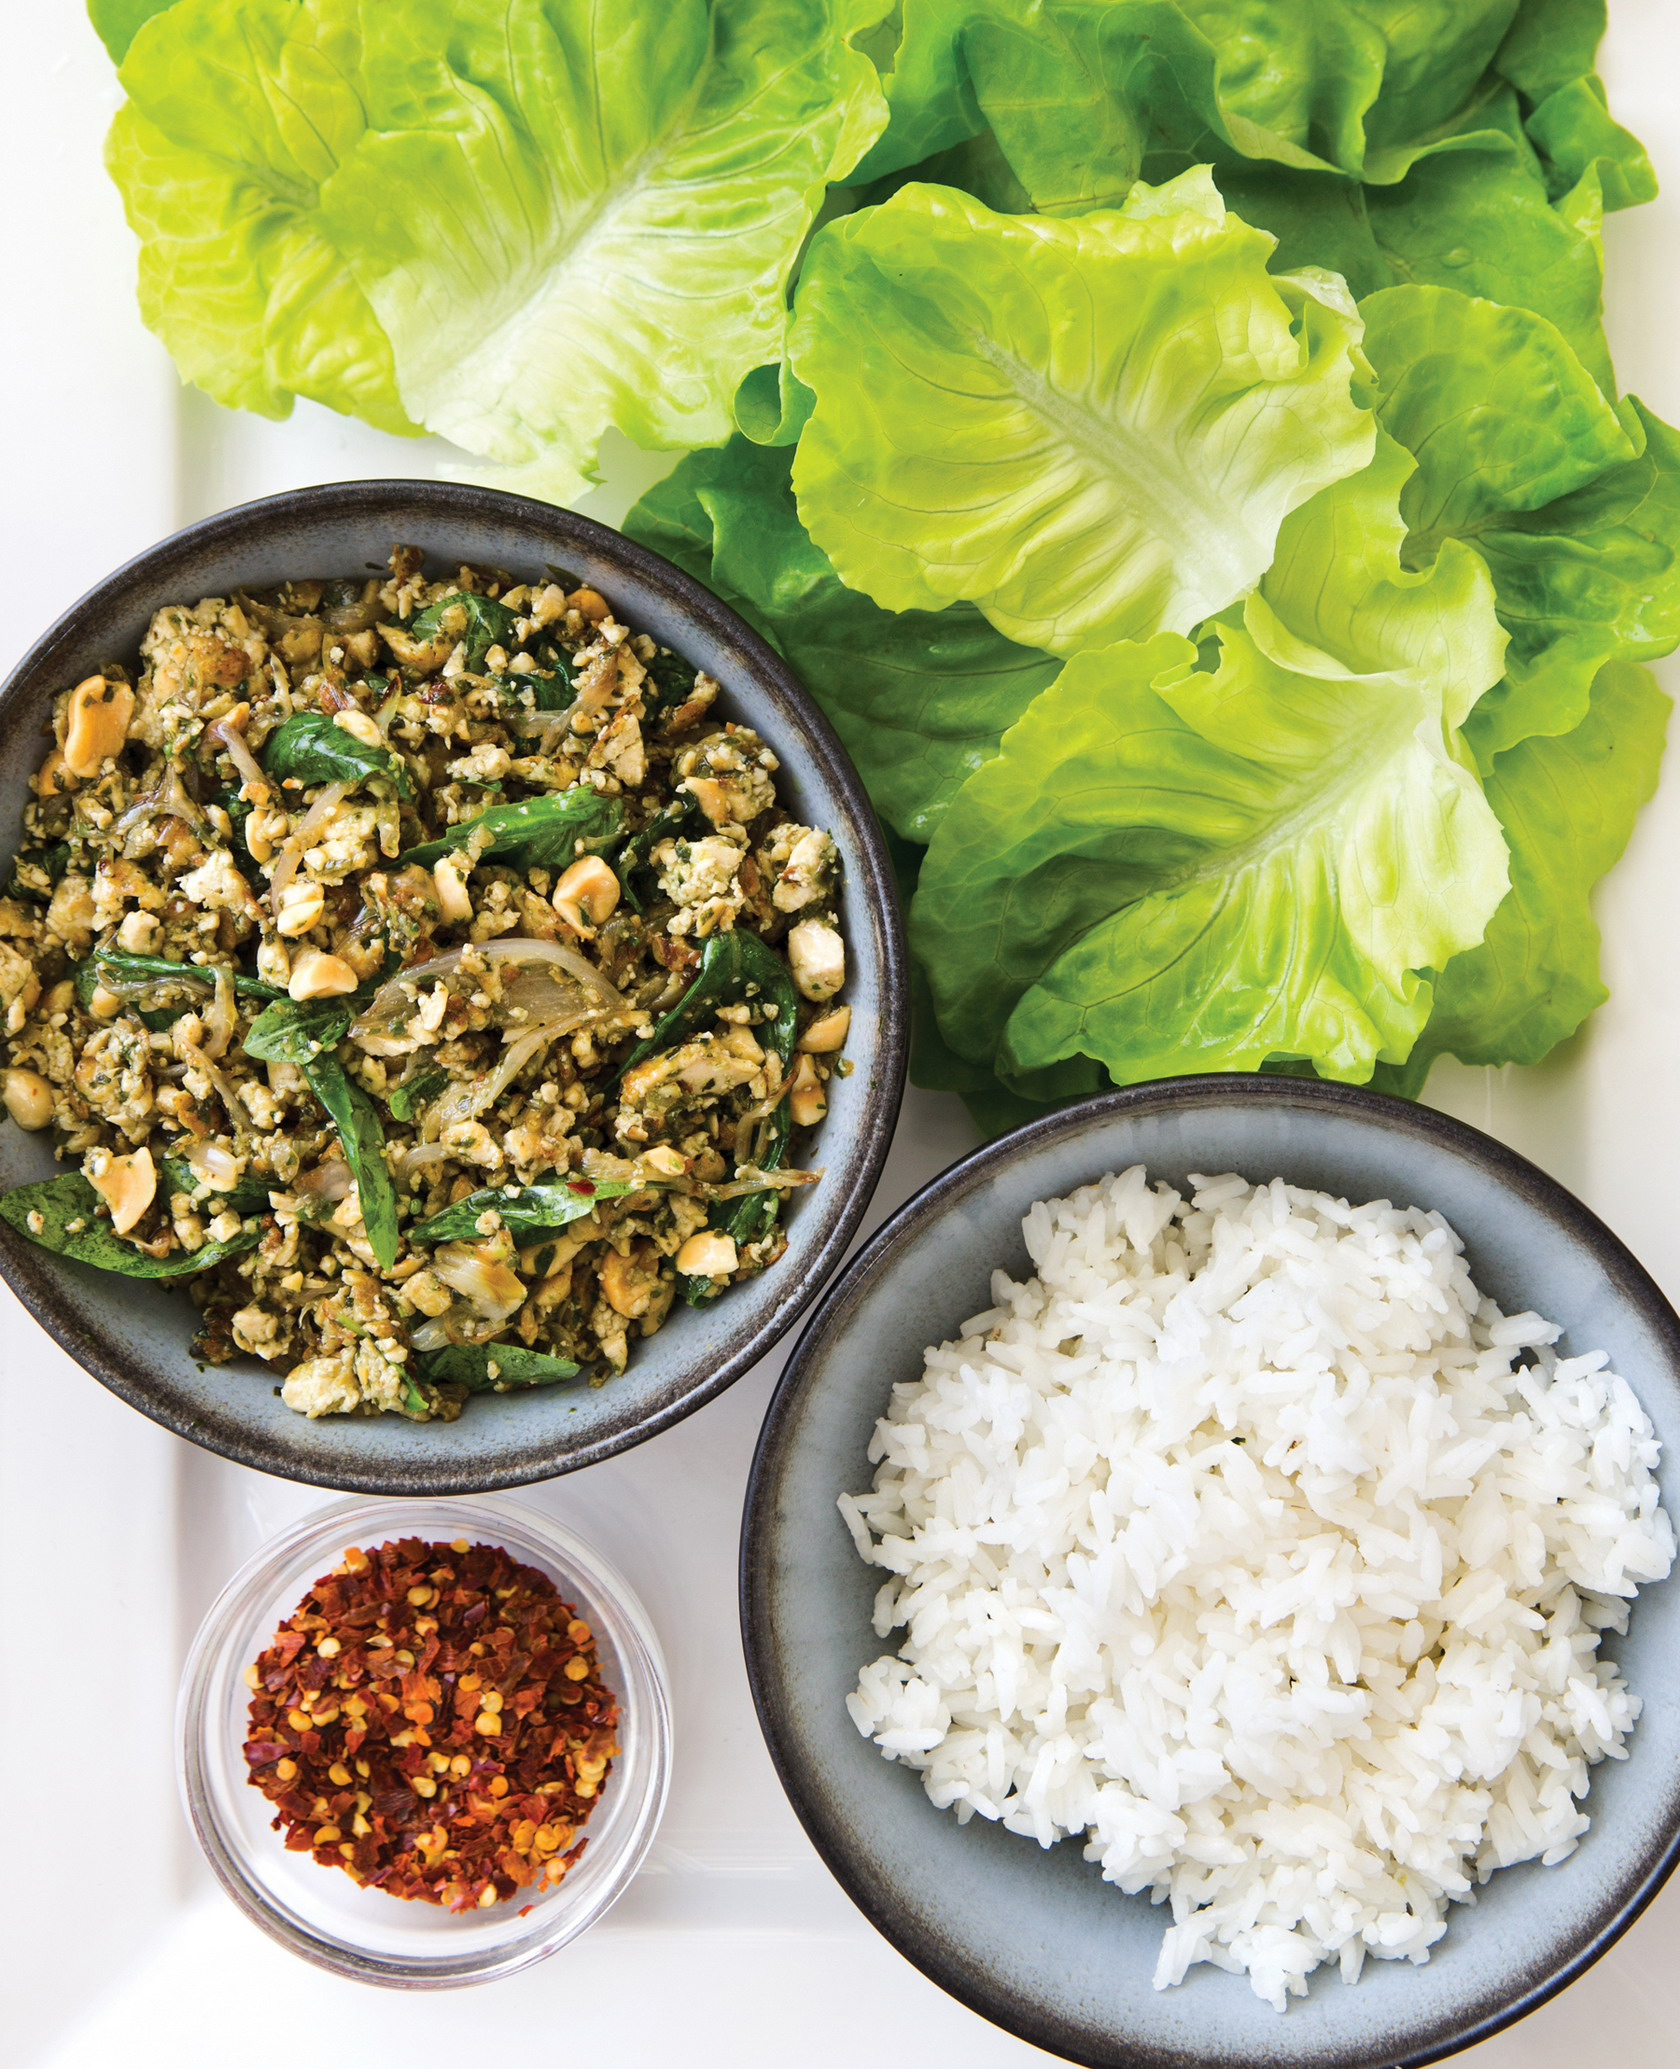
Serves 4
Why This Recipe Works We drew inspiration from the sweet, savory, and spicy flavors of Thai cuisine to develop a stir-fried tofu filling to serve in crisp, cool lettuce cups. The Thai method of stir-frying involves sautéing aromatics slowly over moderate heat. The aromatics infuse the oil as they cook, which gives the finished dish layers of complexity, so we thought this technique would be perfect for packing mild tofu with flavor. To give the tofu lots of surface area and to make it a cohesive filling, we pulsed it in a food processor to give it a texture akin to ground meat. We then combined garlic, basil, and Thai chiles, reserving a portion and adding to it fish sauce substitute, vegan oyster sauce, sugar, and vinegar to make a savory stir-fry sauce. Next, we added oil along with the remaining aromatics, sliced shallot, and tofu to a cold skillet and cooked everything until the tofu and shallots turned golden brown. At the end, we stirred in the sauce and more basil leaves until wilted and then added some crunchy peanuts. You can use either firm or extra-firm tofu. If fresh Thai chiles are unavailable, substitute two serranos or one jalapeño. For a milder dish, remove the seeds and ribs from the chiles.
14 ounces extra-firm tofu, cut into 2-inch pieces
¼ teaspoon table salt
⅛ teaspoon pepper
2 cups fresh basil leaves, divided
3 garlic cloves, peeled
6 green or red Thai chiles, stemmed
2 tablespoons Fish Sauce Substitute (see this page), plus extra as needed
1 tablespoon mushroom oyster sauce
1 tablespoon sugar
1 teaspoon distilled white vinegar, plus extra as needed
3 shallots, halved and sliced thin
2 tablespoons vegetable oil
¼ cup dry-roasted peanuts, chopped
2 heads Bibb lettuce (1 pound), leaves separated
Red pepper flakes
1. Spread tofu over paper towel–lined baking sheet and let drain for 20 minutes. Gently press dry with paper towels and sprinkle with salt and pepper.
2. Meanwhile, process 1 cup basil, garlic, and chiles in food processor until finely chopped, 6 to 10 pulses, scraping down sides of bowl as needed. Transfer 1 tablespoon basil mixture to small bowl and stir in fish sauce substitute, mushroom oyster sauce, sugar, and vinegar. Transfer remaining basil mixture to 12-inch nonstick skillet.
3. Pulse tofu in now-empty food processor until coarsely chopped, 3 to 4 pulses. Line baking sheet with clean paper towels. Spread processed tofu over prepared baking sheet and press gently with paper towels to dry.
4. Stir dried tofu, shallots, and oil into skillet with basil mixture and cook over medium heat, stirring occasionally, until tofu and shallots are browned, 10 to 15 minutes. (Mixture should start to sizzle after about 1½ minutes; adjust heat as needed.)
5. Add reserved basil mixture and continue to cook, stirring constantly, until well coated, about 1 minute. Stir in remaining 1 cup basil and cook, stirring constantly, until wilted, 30 to 60 seconds. Off heat, stir in peanuts. Transfer mixture to platter and serve with lettuce leaves, pepper flakes, extra fish sauce substitute, and extra vinegar.
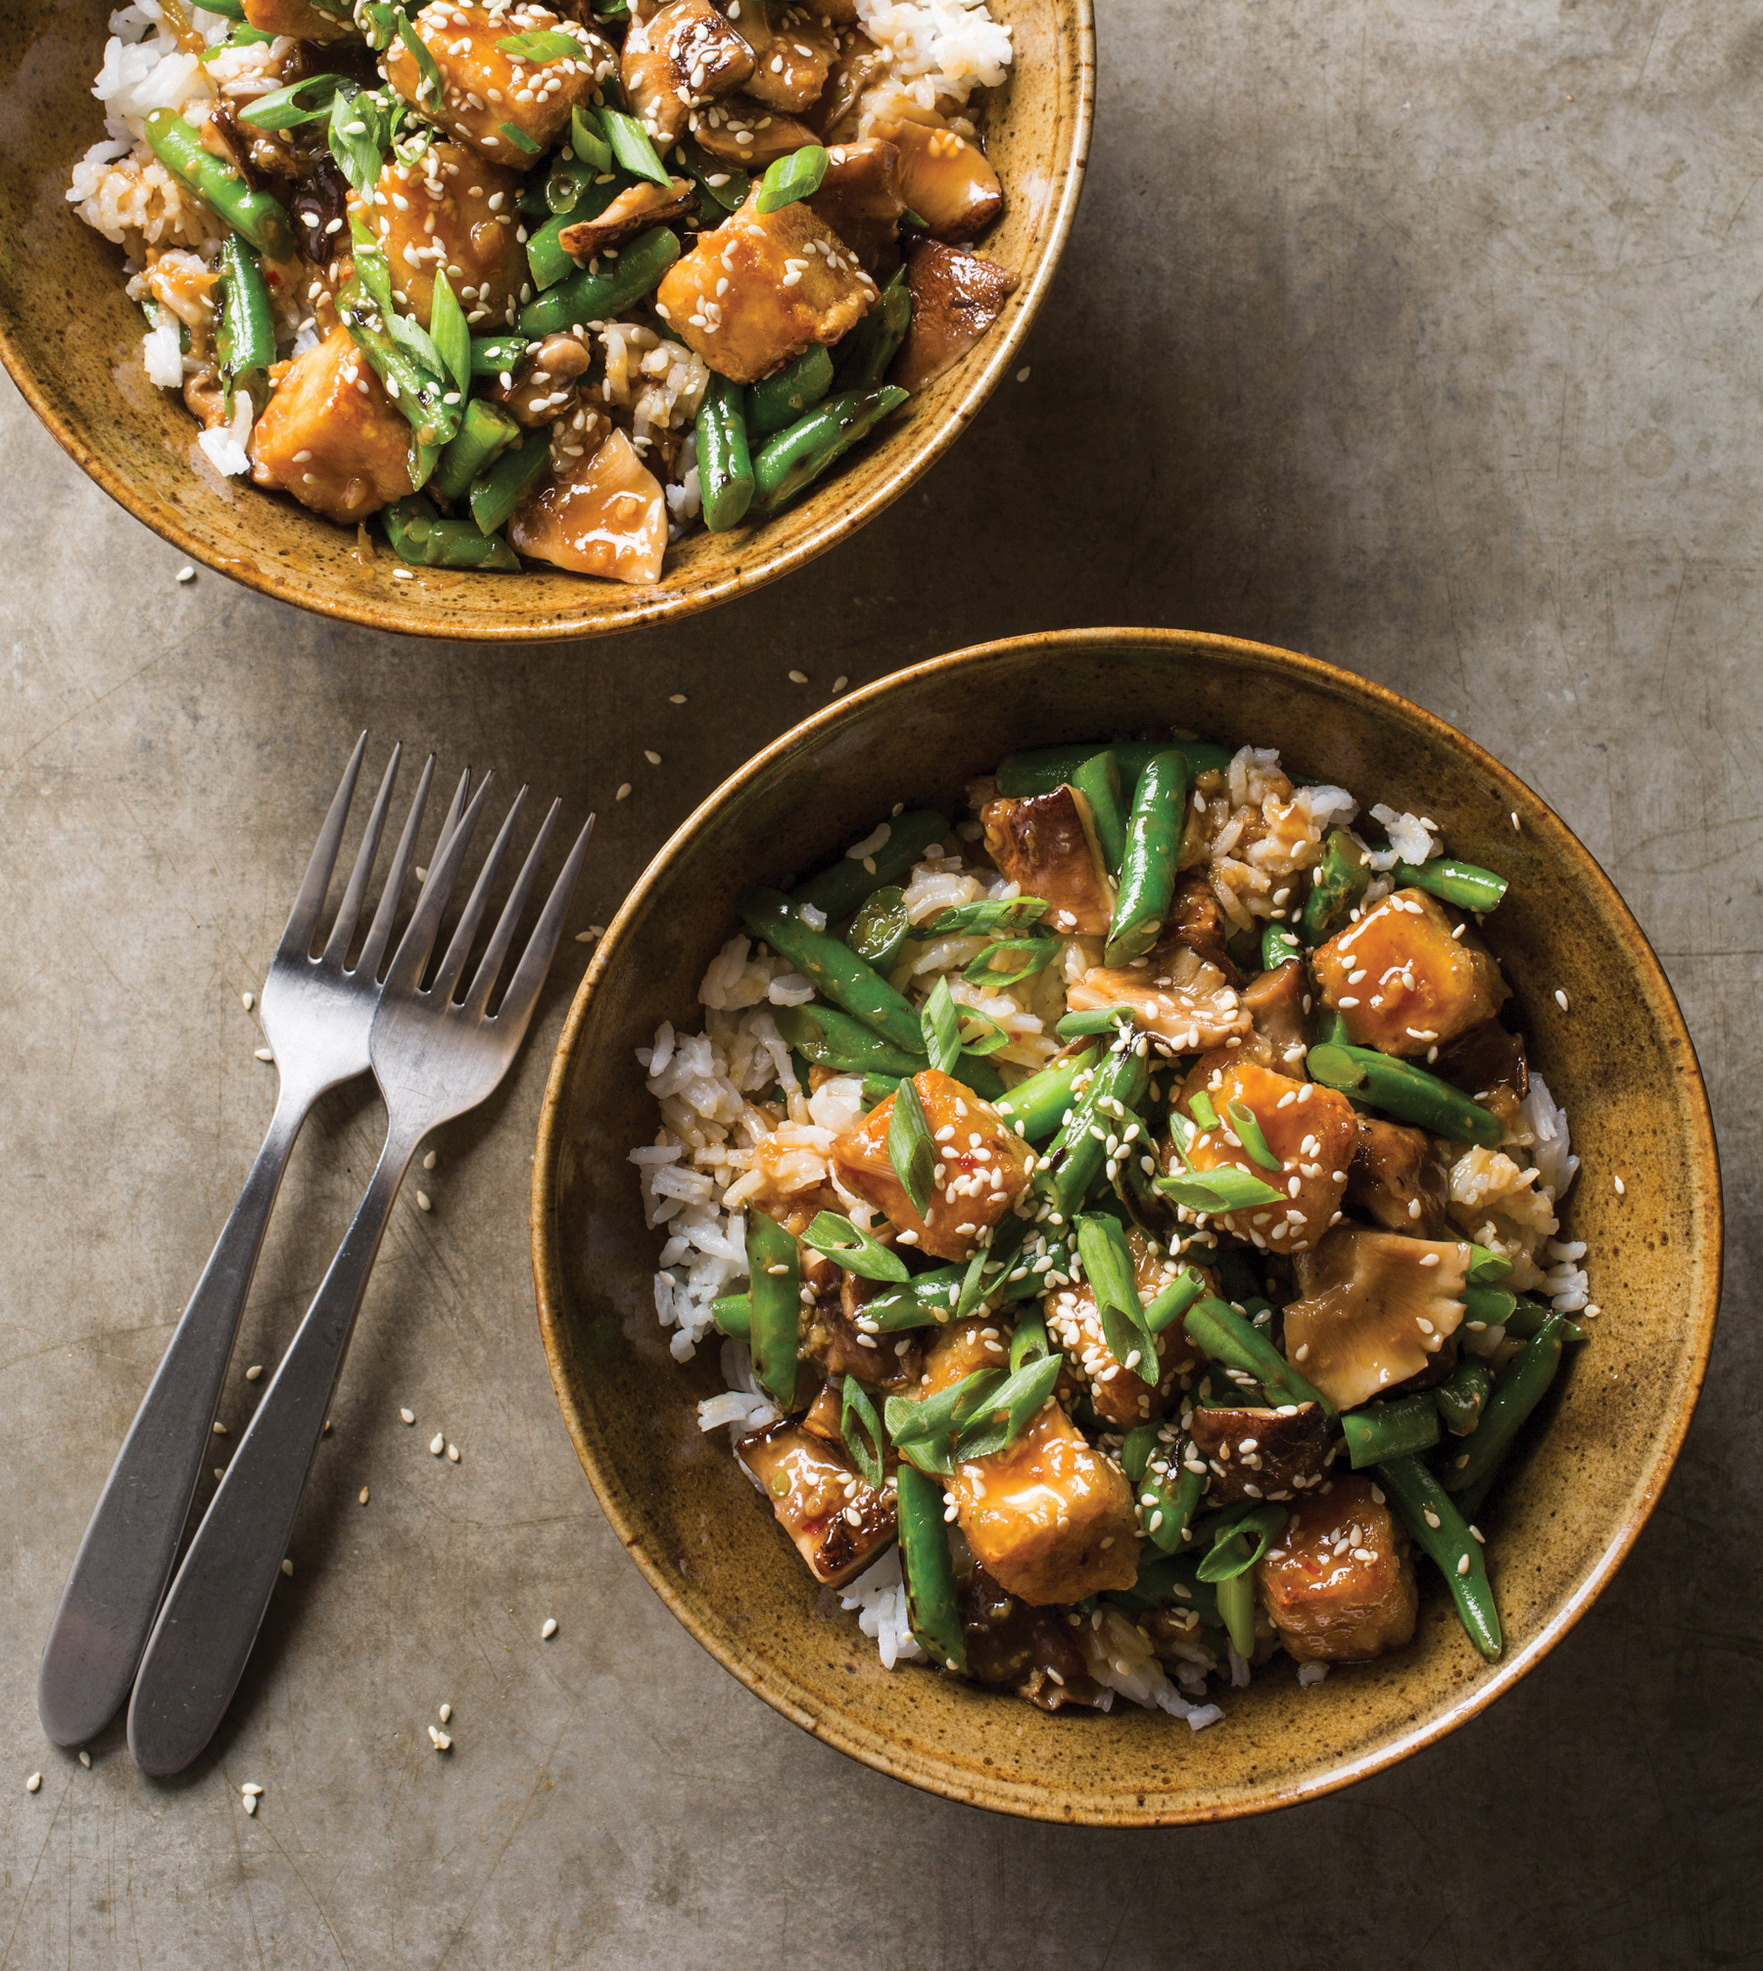
Serves 4
Why This Recipe Works This dish is a great way to get started with stir-frying tofu because of its ease of preparation and its crowd-pleasing Chinese flavors. We sliced and drained extra-firm tofu and then coated it simply with cornstarch, which developed a slightly crunchy outer sheath as it browned in the skillet. After transferring the tofu to a bowl, we added sturdy green beans and meaty shiitake mushrooms to the skillet, covering them until they softened and then uncovering them to brown them. Don’t overstir the tofu or vegetables while they’re browning, or else you won’t get that desired sear. Although we often stir-fry vegetables in batches, here we were able to stir-fry them at the same time; the moisture released from the mushrooms nicely steamed the green beans. For a classic brown sauce, we combined soy sauce, sesame oil, rice vinegar, and a touch of sugar and pepper flakes, and we thickened it with cornstarch. Serve over rice.
Sauce
¾ cup vegetable broth
3 tablespoons soy sauce
2 tablespoons rice vinegar
1 tablespoon packed brown sugar
2 teaspoons cornstarch
1 teaspoon toasted sesame oil
⅛ teaspoon red pepper flakes
Stir-Fry
14 ounces extra-firm tofu, cut into ¾-inch pieces
⅓ cup cornstarch
3 tablespoons vegetable oil, divided
2 scallions, white and green parts separated and sliced thin on bias
3 garlic cloves, minced
1 tablespoon grated fresh ginger
12 ounces green beans, trimmed and cut on bias into 1-inch lengths
12 ounces shiitake mushrooms, stemmed and quartered
1 tablespoon toasted sesame seeds (optional)
1. For the sauce Whisk all ingredients together in bowl.
2. For the stir-fry Spread tofu on paper towel–lined baking sheet and let drain for 20 minutes. Gently pat dry with paper towels. Toss drained tofu with cornstarch in bowl, then transfer to fine-mesh strainer and shake gently to remove excess cornstarch.
3. Combine 1 teaspoon oil, scallion whites, garlic, and ginger in bowl. Heat 2 tablespoons oil in 12-inch nonstick skillet over high heat until shimmering. Add tofu and cook, turning as needed, until crisp and well browned on all sides, 12 to 15 minutes; transfer to paper towel–lined plate to drain.
4. Add remaining 2 teaspoons oil to now-empty skillet and heat over medium-high heat until shimmering. Add green beans and mushrooms, cover, and cook until mushrooms release their liquid and green beans are bright green and beginning to soften, 4 to 5 minutes. Uncover and continue to cook until vegetables are spotty brown, about 3 minutes.
5. Push vegetables to sides of skillet. Add garlic mixture to center and cook, mashing mixture into pan, until fragrant, about 30 seconds. Stir garlic mixture into vegetables. Add browned tofu and stir to combine. Whisk sauce to recombine, then add to skillet and cook, stirring constantly, until sauce is thickened, about 30 seconds. Transfer to platter; sprinkle with scallion greens and sesame seeds, if using; and serve.
Serves 4 to 6
Why This Recipe Works For a simplified and streamlined skillet Thai curry, we used store-bought red curry paste, sautéing it in a little oil and adding coconut milk, fish sauce substitute, and brown sugar for a deep flavor without a lot of time or effort. Browning the drained tofu pieces before adding them to the simmering base paid off in texture and flavor. Snow peas and red pepper strips provided color and flavor as well as a crispness that complemented the yielding texture of the tofu. To make the dish spicier, use the higher amount of curry paste. Serve this satisfying curry on its own or with rice.
14 ounces extra-firm tofu, cut into ¾-inch pieces
¼ teaspoon table salt
⅛ teaspoon pepper
2 tablespoons vegetable oil, divided
1-1½ tablespoons red curry paste
1 (14-ounce) can coconut milk
2 tablespoons Fish Sauce Substitute (this page)
4 teaspoons packed light brown sugar
¼ cup water
1½ pounds sweet potatoes, peeled and cut into ¾-inch pieces
1 red bell pepper, stemmed, seeded, and cut into ¼-inch-wide strips
½ pound snow peas, strings removed
½ cup coarsely chopped fresh basil leaves
1 tablespoon fresh lime juice
1. Spread tofu on paper towel–lined baking sheet and let drain for 20 minutes. Gently pat dry with paper towels and sprinkle with salt and pepper.
2. Heat 1 tablespoon oil in 12-inch nonstick skillet over medium-high heat until shimmering. Add tofu in single layer and cook until golden brown on 1 side, about 2 minutes. Gently stir tofu and cook until second side is golden brown, about 2 minutes. Transfer to plate and set aside.
3. Add remaining 1 tablespoon oil to skillet and return to medium heat until shimmering. Add curry paste and cook, stirring constantly, until fragrant, about 1 minute. Whisk in coconut milk, fish sauce substitute, sugar, and water. Add sweet potatoes and tofu; bring to simmer. Turn heat to low, cover, and cook until potatoes are tender, 15 to 20 minutes.
4. Add bell pepper and snow peas, increase heat to medium- low, and continue to cook, covered, until peas are crisp-tender, about 4 minutes. Off heat, stir in basil and lime juice. Season with salt to taste. Serve immediately.