
ELECTRIC PRESSURE-COOKER RECIPES
Creamy Carrot Soup with Warm Spices 
Wild Rice Soup with Coconut and Lime
Black Bean Chili with Fried Eggs and Queso
Green Beans with Potatoes and Basil
Beet and Watercress Salad with Orange and Dill
Braised Whole Cauliflower with Tomatoes, Olives, and Ras el Hanout
Braised Fennel with Radicchio and Pear
Mashed Butternut Squash with Sage and Toasted Hazelnuts
Spaghetti Squash with Fresh Tomato Sauce
Brown Rice with Shiitakes and Edamame
Warm Wild Rice Salad with Pecans and Cranberries
Freekeh Pilaf with Dates and Pistachios
Greek Chickpeas with Coriander and Sage
French Lentils with Swiss Chard
SLOW-COOKER RECIPES
Fire-Roasted Tomato and Fennel Soup
Creamy Cauliflower and Potato Soup
Farro and Butternut Squash Stew
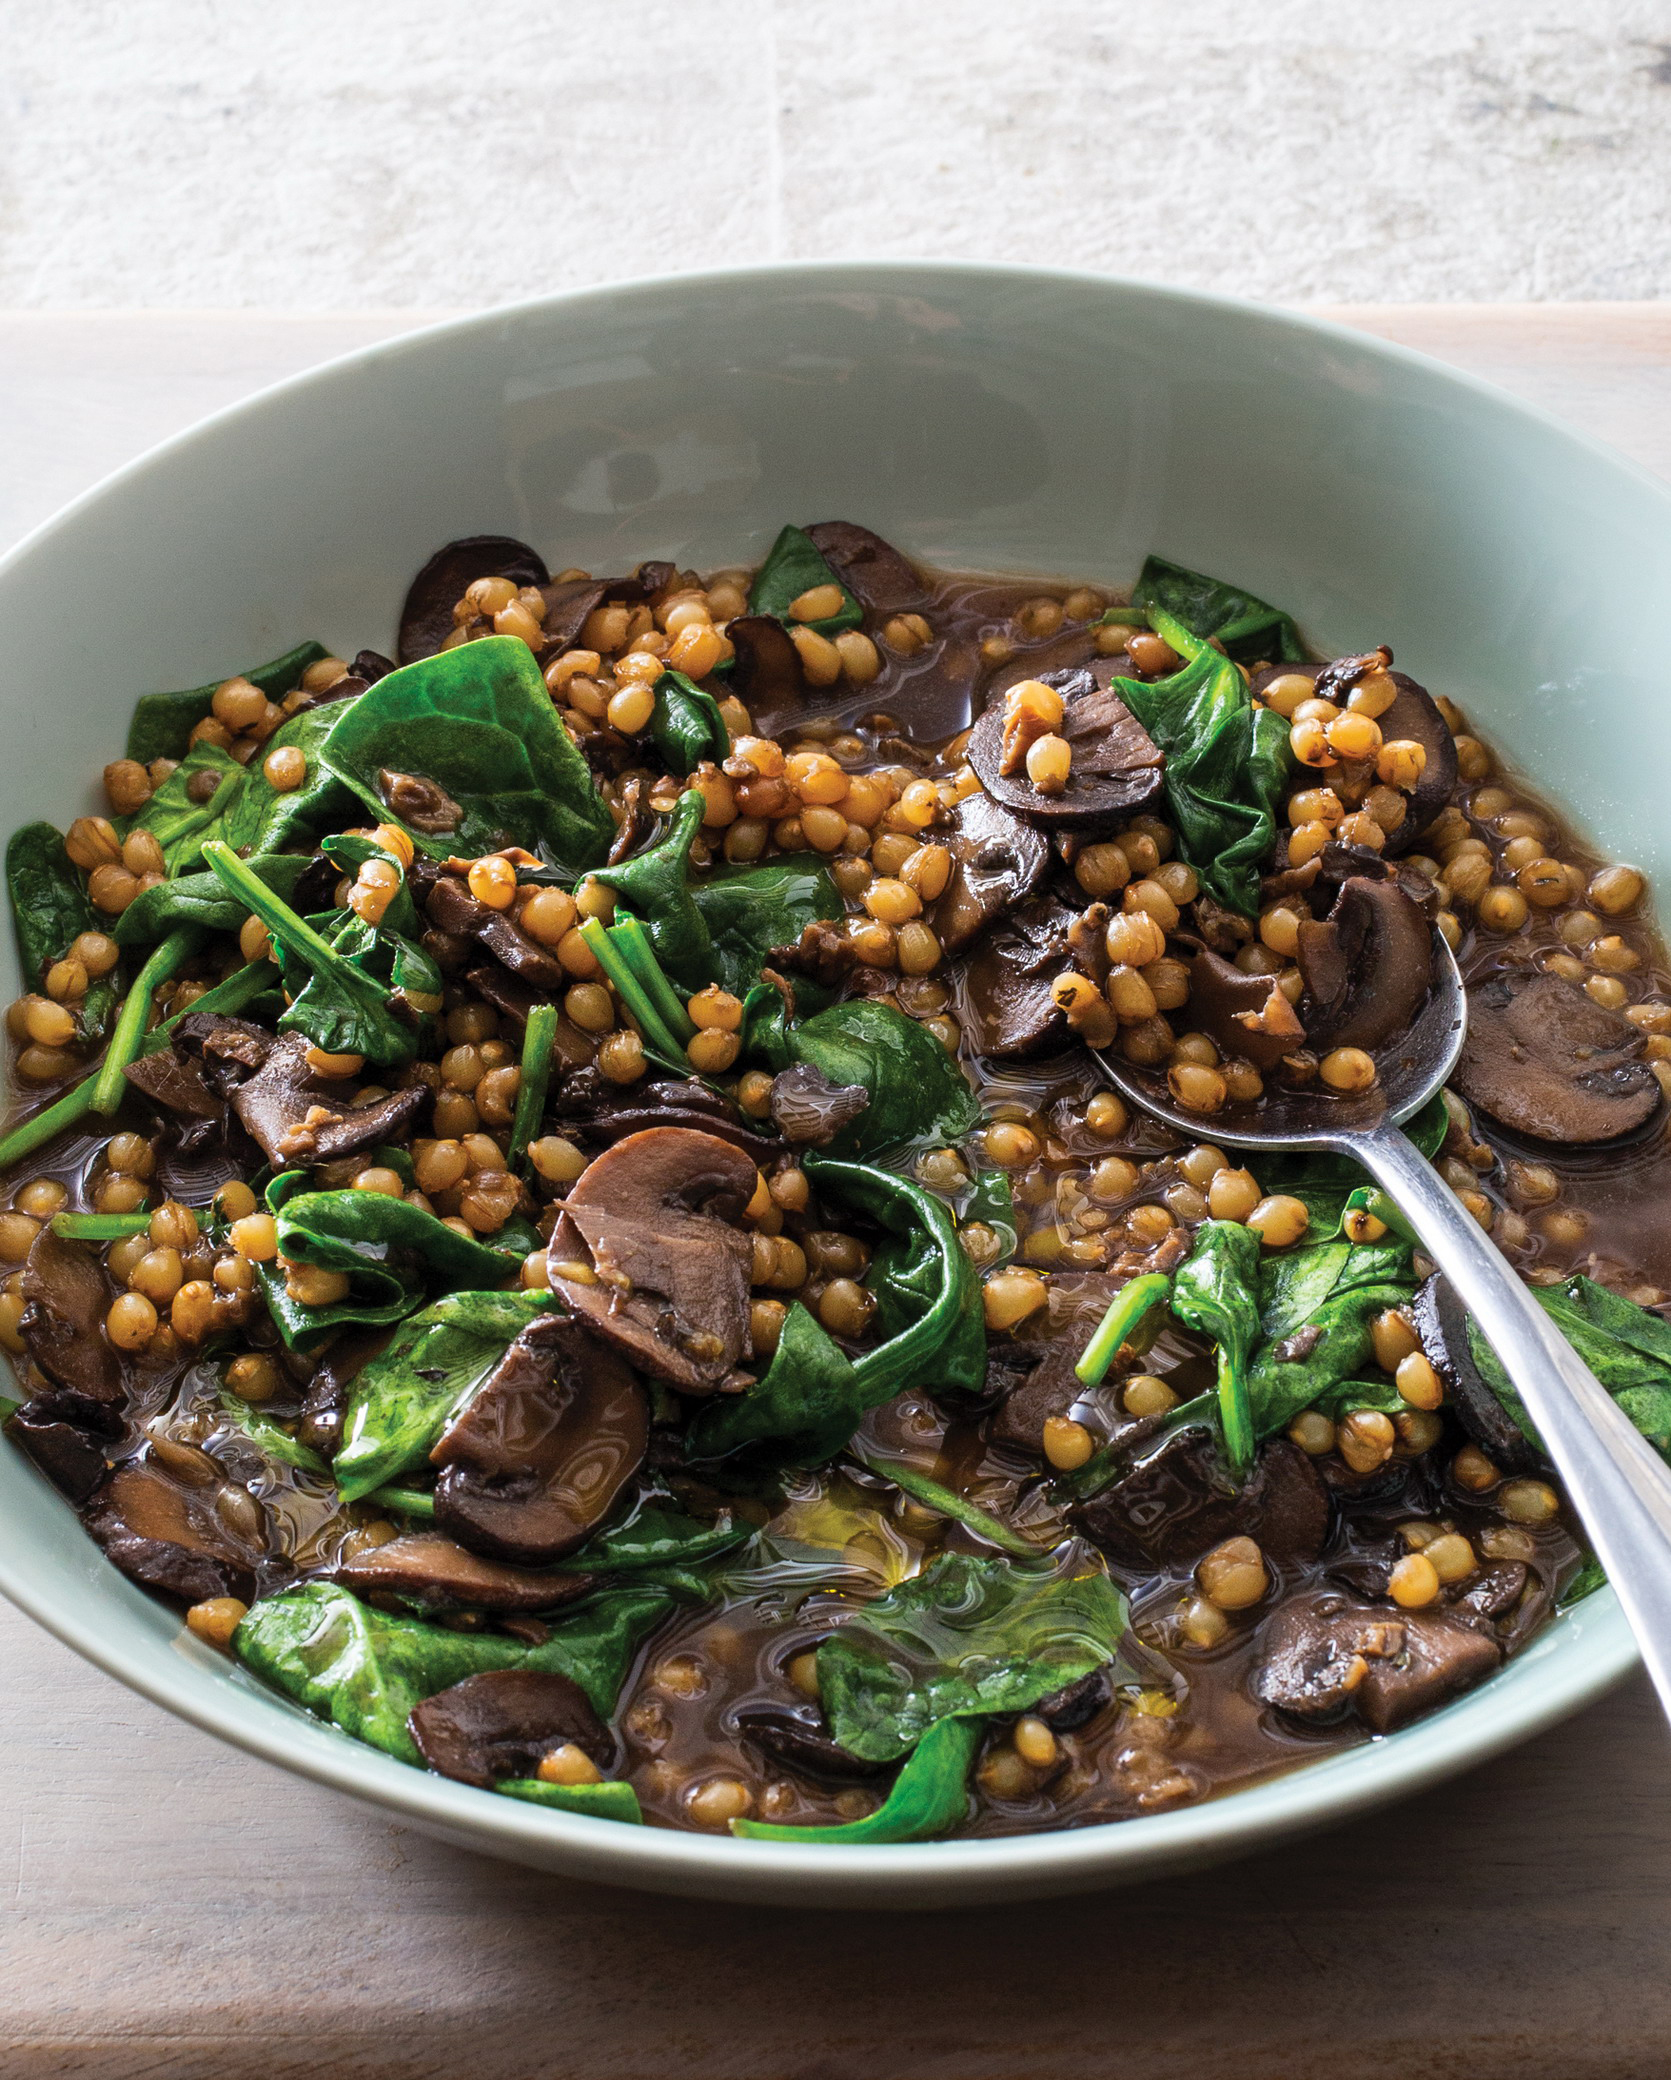
Wheat Berry and Wild Mushroom Stew
Moroccan Lentil Soup with Mustard Greens
Root Vegetable Tagine with Dried Cherries
Braised Red Cabbage with Fennel and Orange
Mustard Greens and Sweet Potato Tacos
Herbed Fingerling Potatoes with Lemon
Indian-Spiced Mashed Butternut Squash
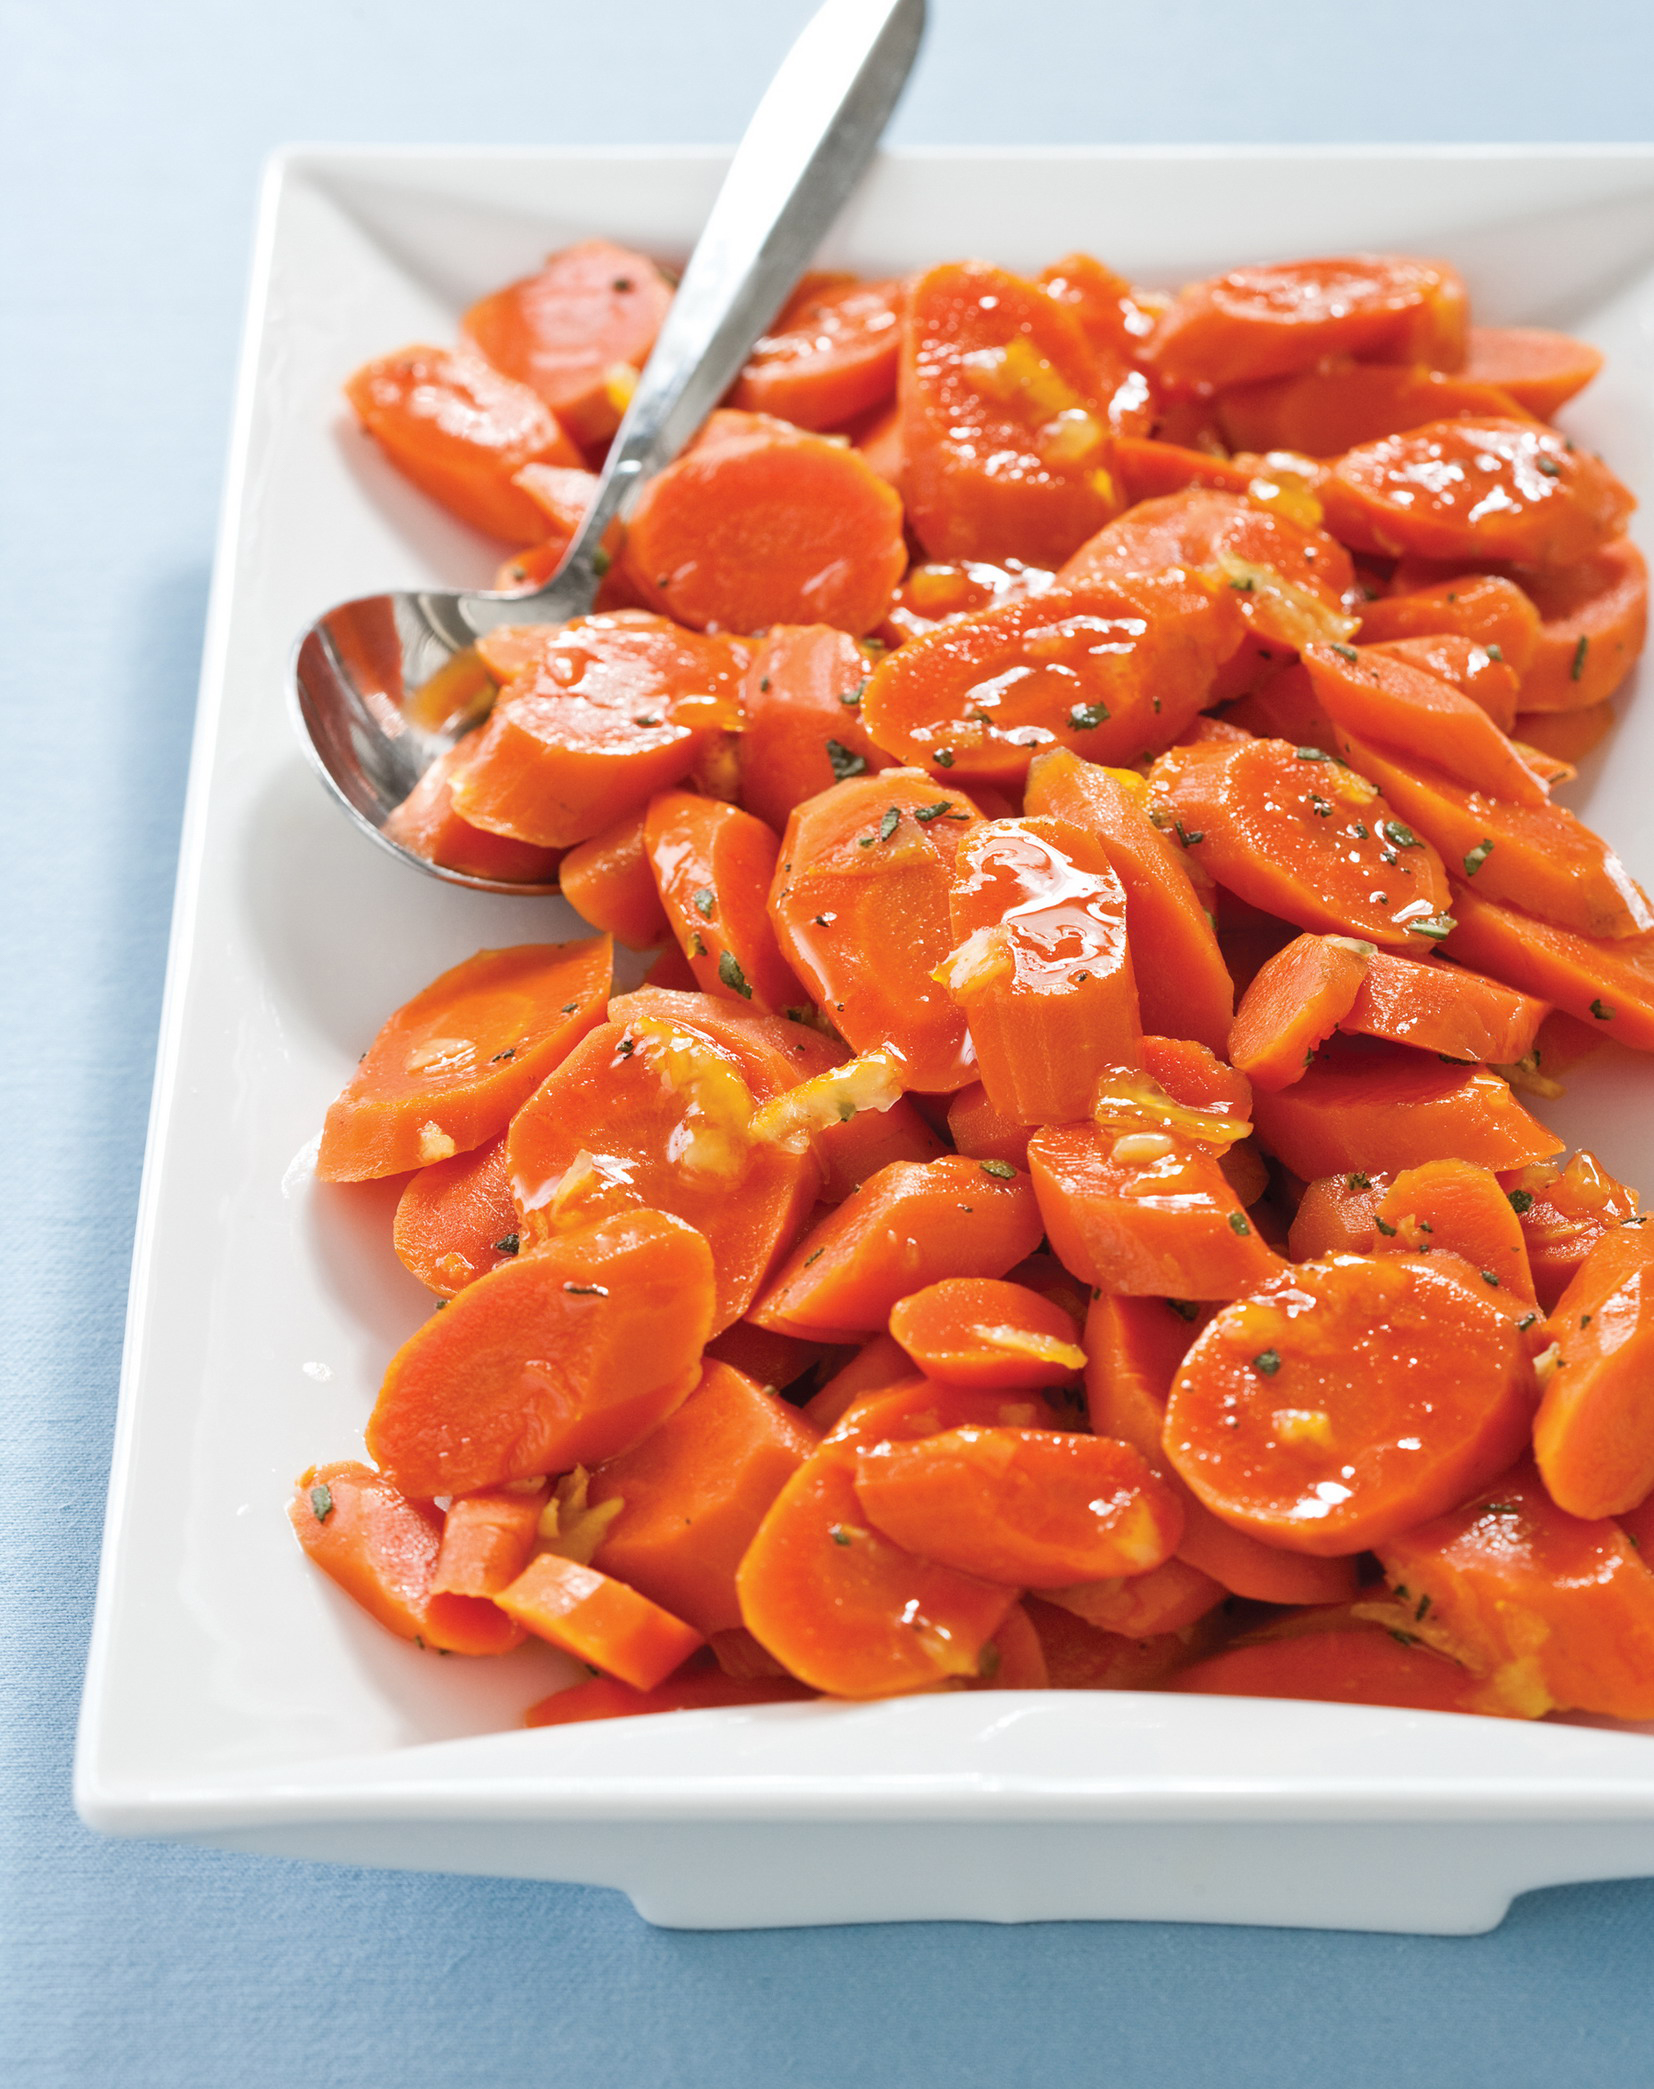
Maple-Orange Glazed Acorn Squash
Braised Sweet Potatoes with Cilantro-Lime Dressing
All-Purpose Fresh Tomato Sauce
Spiced Barley Pilaf with Dates and Parsley
Beet and Wheat Berry Salad with Arugula and Apples
Braised White Beans with Olive Oil and Sage
Warm Lentil Salad with Radishes and Mint
RECIPE EXTRAS
FAST (45 minutes or less total time)
Photos: Greek Chickpeas with Coriander and Sage; Braised Spring Vegetables; Vegetable and Chickpea Stew
Serves 6 

Why This Recipe Works Creamy, satiny-smooth vegetable soups made without cream are just as achievable in the pressure cooker as they are on the stovetop. Sturdy carrots and onions plus a few delicately balanced aromatics cooked for a mere 3 minutes under pressure to produce this luxurious yet simple soup. In many carrot soup recipes, additional vegetables are used, but tasters felt that this muted the clean brightness of the carrots, so we kept such extras to a minimum. Taking a flavor cue from the eastern Mediterranean, we added fresh ginger plus ground coriander, fennel, and cinnamon. A touch of baking soda helped break down the carrots, and after a quick spin in the blender we had a silken soup you’d never guess was cream-free. To finish, we topped individual portions with a drizzle of pomegranate molasses (to underscore the natural sweetness of the carrots), a small dollop of yogurt, toasted hazelnuts, and some fresh herbs. If you can’t find pomegranate molasses, you can make your own (this page).
2 tablespoons extra-virgin olive oil
2 onions, chopped
1 teaspoon table salt
1 tablespoon grated fresh ginger
1 tablespoon ground coriander
1 tablespoon ground fennel
1 teaspoon ground cinnamon
4 cups vegetable broth
2 cups water
2 pounds carrots, peeled and cut into 2-inch pieces
½ teaspoon baking soda
2 tablespoons pomegranate molasses
½ cup plain plant-based Greek yogurt or dairy Greek yogurt
½ cup hazelnuts, toasted, skinned, and chopped
½ cup chopped fresh cilantro or mint
1. Using highest sauté or browning function, heat oil in electric pressure cooker until shimmering. Add onions and salt and cook until onions are softened, about 5 minutes. Stir in ginger, coriander, fennel, and cinnamon and cook until fragrant, about 30 seconds. Stir in broth, water, carrots, and baking soda.
2. Lock lid in place and close pressure release valve. Select high pressure cook function and cook for 3 minutes. Turn off pressure cooker and quick-release pressure. Carefully remove lid, allowing steam to escape away from you.
3. Working in batches, process soup in blender until smooth, 1 to 2 minutes. Return processed soup to pressure cooker and bring to simmer using highest sauté or browning function. Season with salt and pepper to taste. Drizzle individual portions with pomegranate molasses and top with yogurt, hazelnuts, and cilantro before serving.
NOTES FROM THE TEST KITCHEN
The recipes in this chapter were developed to work in an electric pressure cooker—either a multicooker or a dedicated pressure cooker. They will not work with a stovetop pressure cooker. We recommend the Instant Pot Duo Evo Plus 9-in-1 Electric Pressure Cooker, 8-QT. It has a clear, intuitive digital interface, a lid that seals automatically, a pressure-release switch, and silicone pot handles. It sears and sautés evenly, and its stainless-steel pot is stovetop-friendly.

NOTES FROM THE TEST KITCHEN
The recipes in this chapter were developed to work in a traditional slow cooker; they will not work in a multicooker. Most of these recipes were designed for a 4- to 7-quart cooker. We recommend the KITCHENAID 6-Quart Slow-Cooker with Solid Glass Lid. Its control panel is simple to set and monitor. Its thick stoneware crock, insulated housing, and built-in thermal sensor are all well designed.

Serves 6 
Cooking time 6 to 8 hours on low or 4 to 6 hours on high
Why This Recipe Works Fire roasting gives tomatoes even more umami power and depth of flavor. Canned fire-roasted tomatoes are a great pantry product and give this soup smoky undertones and a subtle, appealing charred quality. We also turned to fennel for its fresh, subtle anise flavor. Microwaving the fennel before adding it to the slow cooker ensured that it came out perfectly cooked. To reinforce the soup’s smokiness, we added a little smoked paprika for an extra kick. Pureeing only a portion of the soup helped to thicken the base but left the finished soup appealingly chunky and rustic. Adding brown sugar at the end of cooking helped balance the acidity of the tomatoes, and tarragon brightened the soup with fresh herbal notes. A small drizzle of olive oil before serving added richness. You will need a 4- to 7-quart slow cooker for this recipe.
2 fennel bulbs, stalks discarded, bulbs halved, cored, and cut into ½-inch pieces
2 tablespoons plus 1 teaspoon extra-virgin olive oil, divided
4 garlic cloves
1 tablespoon tomato paste
2 teaspoons smoked paprika
2 (28-ounce) cans diced fire-roasted tomatoes
2 cups vegetable broth
¼ teaspoon table salt
2 tablespoons minced fresh tarragon
2 tablespoons packed brown sugar
1. Microwave fennel, 1 teaspoon oil, garlic, tomato paste, and paprika in bowl, stirring occasionally, until fennel is softened, about 5 minutes; transfer to slow cooker. Stir in tomatoes and their juice, broth, and salt. Cover and cook until fennel is tender, 6 to 8 hours on low or 4 to 6 hours on high.
2. Process 4 cups soup in blender until smooth, about 1 minute; return to slow cooker. Stir in tarragon and sugar and season with salt and pepper to taste. Drizzle each portion with 1 teaspoon oil before serving.

Serves 6
Cooking time 6 to 8 hours on low or 4 to 6 hours on high
Why This Recipe Works Both cauliflower and potatoes break down as they cook for a long time to bring creamy qualities to soup, so we thought a slow cooker soup using both vegetables would be ultracreamy—and we were right. The long slow-cooking time coaxed out the sweet, nutty flavor and creamy texture of the cauliflower, and the Yukon Gold potatoes delivered a buttery taste and helped thicken the soup when pureed along with the cauliflower. Some plant-based creamer provided even more richness while still letting the pure vegetable flavors shine through. A pinch of nutmeg added depth and a pinch of cayenne lent warmth. Finally, for a hearty and flavorful finishing touch, we sautéed some reserved cauliflower florets until tender and browned. You will need a 4- to 7-quart slow cooker for this recipe.
1 onion, chopped fine
2 garlic cloves, minced
1 teaspoon vegetable oil
Pinch ground nutmeg
Pinch cayenne pepper
6 cups vegetable broth, plus extra as needed
1 large head cauliflower (3 pounds), cored and cut into 1-inch florets, divided
1 pound Yukon Gold potatoes, peeled and cut into ½-inch pieces
½ teaspoon table salt
2 tablespoons refined coconut oil or unsalted butter
½ teaspoon sherry vinegar
½ cup plant-based creamer or dairy half-and-half
2 tablespoons minced fresh chives
1. Microwave onion, garlic, oil, nutmeg, and cayenne in bowl, stirring occasionally, until onion is softened, about 5 minutes; transfer to slow cooker. Stir in broth, all but 2 cups cauliflower, potatoes, and salt. Cover and cook until vegetables are tender, 6 to 8 hours on low or 4 to 6 hours on high.
2. Meanwhile, melt oil in 12-inch skillet over medium heat. Add remaining 2 cups cauliflower and cook, stirring frequently, until florets are golden brown and tender, 8 to 10 minutes. Off heat, stir in vinegar and season with salt and pepper to taste.
3. Working in batches, process soup in blender until smooth, 1 to 2 minutes. Return soup to slow cooker, stir in creamer, and let sit until heated through, about 5 minutes. (Adjust soup consistency with extra hot broth as needed.) Season with salt and pepper to taste. Top individual portions with browned cauliflower mixture and sprinkle with chives before serving.

Serves 6
Why This Recipe Works Wild rice can be tricky and time-consuming to cook, even in a soup, so we took advantage of the pressure cooker to make it foolproof. Our Thai-inspired soup features tender wild rice and mushrooms in a vegetable broth enriched with coconut milk and brightened with lemongrass and cilantro. Initially we tried putting all of the broth ingredients in the pressure cooker along with the rice, but the flavor of the dish was dull. To make sure our soup turned out bright, we reserved half of the coconut milk to stir in after releasing the pressure, along with red curry paste and lime juice. We stirred the mushrooms in along with the reserved coconut milk mixture, so that their flavor stayed distinct and didn’t turn muddy. We preferred a combination of mushrooms, but 12 ounces of any one type will work. Do not use quick-cooking or presteamed wild rice in this recipe. Not all Thai curry pastes are vegan, so read the labels carefully.
2 tablespoons vegetable oil
2 onions, chopped fine
6 garlic cloves, minced
2 tablespoons grated fresh ginger
4 cups vegetable broth
2 (14-ounce) cans coconut milk, divided
1 cup wild rice, picked over and rinsed
2 lemongrass stalks, trimmed to bottom 6 inches and smashed with back of knife
3 tablespoons Fish Sauce Substitute (this page), divided, plus extra for seasoning
4 sprigs fresh cilantro, plus leaves for serving
3 tablespoons lime juice (2 limes), plus lime wedges for serving
1 tablespoon sugar
1 tablespoon Thai red curry paste
12 ounces cremini, shiitake, or white mushrooms, trimmed and sliced thin
Salt and pepper
2 scallions, sliced thin
1. Using highest sauté or browning function, heat oil in electric pressure cooker until shimmering. Add onions and cook until softened, 3 to 5 minutes. Stir in garlic and ginger and cook until fragrant, about 30 seconds. Stir in broth, 1 can coconut milk, rice, lemongrass, 1 tablespoon fish sauce substitute, and cilantro sprigs.
2. Lock lid in place and close pressure release valve. Select high pressure cook function and cook for 23 minutes. Turn off pressure cooker and quick-release pressure. Carefully remove lid, allowing steam to escape away from you.
3. Discard lemongrass and cilantro sprigs. Whisk remaining 1 can coconut milk, remaining 2 tablespoons fish sauce substitute, lime juice, sugar, and curry paste together in bowl. Stir coconut milk mixture and mushrooms into soup and cook using highest sauté or browning function until mushrooms are just tender, 3 to 5 minutes. Turn off pressure cooker. Season with extra fish sauce substitute and salt and pepper to taste. Top individual portions with cilantro leaves and scallions and serve, passing lime wedges separately.

Trim stalk to bottom 6 inches and remove dry outer layers.

Serves 6
Cooking time 10 to 12 hours on low or 7 to 9 hours on high
Why This Recipe Works Nutty-sweet farro is a great source of plant-based protein in this hearty whole-grain vegetable stew, which also includes mushrooms for umami depth and butternut squash for satisfying substance. We cooked the squash in a foil packet right on top of the rest of the stew to make sure it would retain its sweet taste and bright color. Microwaving the mushrooms and aromatics with a little oil caused the mushrooms to soften, release some of their moisture, and become flavored by the aromatics. To give the vegetable broth a flavor boost, we stirred in white wine for complexity and brightness. At the end of cooking, we stirred the squash into the stew and added handfuls of peppery arugula. The arugula may seem like a lot at first, but it wilts down substantially. We prefer the flavor and texture of whole farro; pearled farro can be used, but the texture may be softer. Do not use quick-cooking or presteamed farro (the ingredient list on the package will specify the type) in this recipe. You will need a 4- to 7-quart slow cooker for this recipe.
1½ pounds cremini mushrooms, trimmed and quartered
1 onion, chopped fine
2 tablespoons tomato paste
3 garlic cloves, minced
1 tablespoon extra-virgin olive oil, plus extra for serving
1 teaspoon table salt, divided
6 cups vegetable broth, plus extra as needed
1 cup whole farro
¼ cup dry white wine
2 bay leaves
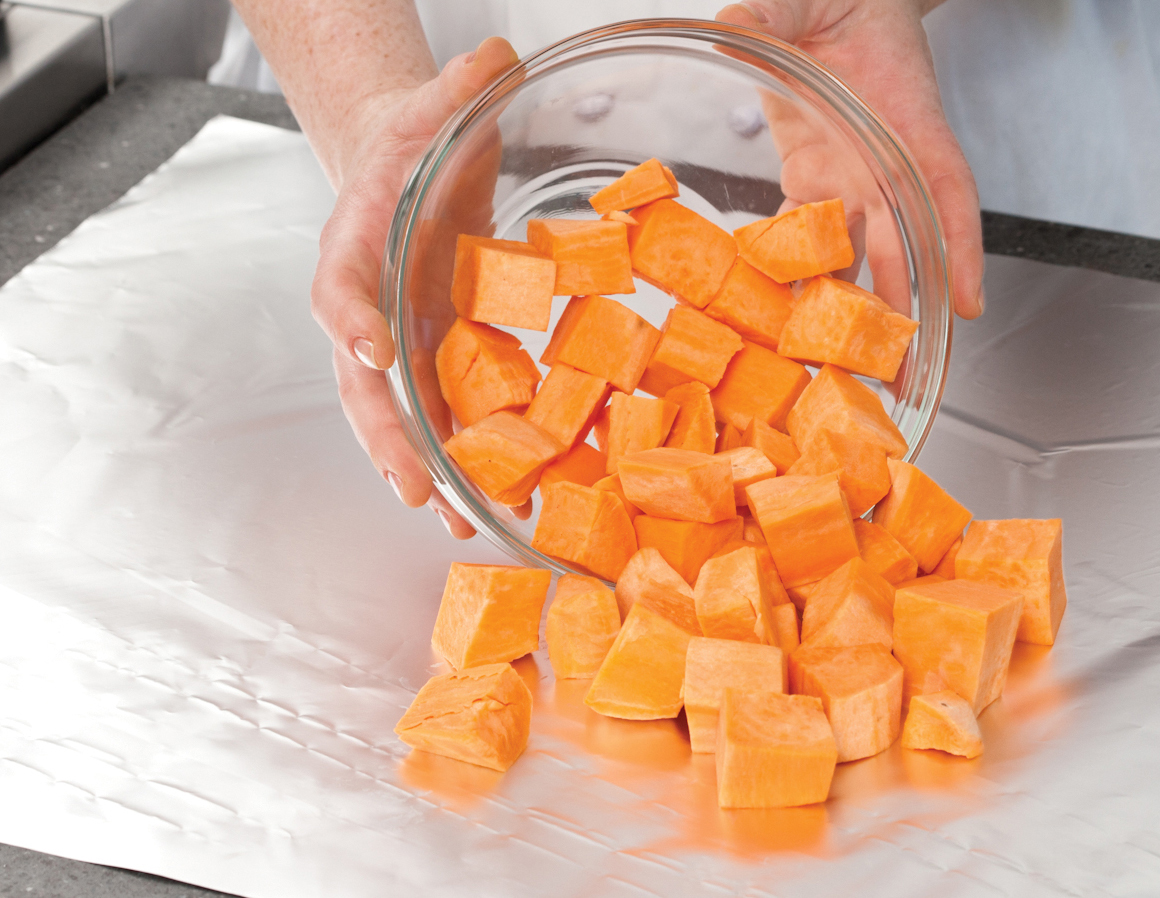
1½ pounds butternut squash, peeled, seeded, and cut into ½-inch pieces (4 cups)
¼ teaspoon pepper
5 ounces (5 cups) baby arugula
Vegan Parmesan Substitute (this page) or grated dairy Parmesan (optional)
1. Microwave mushrooms, onion, tomato paste, garlic, oil, and ½ teaspoon salt in bowl, stirring occasionally, until vegetables are softened, 8 to 10 minutes; transfer to slow cooker.
2. Stir broth, farro, wine, and bay leaves into slow cooker. Sprinkle squash with pepper and remaining ½ teaspoon salt, wrap in aluminum foil packet, and place on top of stew. Cover and cook until farro is tender, 10 to 12 hours on low or 7 to 9 hours on high.
3. Carefully open foil packet and stir squash, along with any accumulated juices, into stew. Discard bay leaves. Stir in arugula, 1 handful at a time, and let sit until wilted, about 5 minutes. Adjust consistency with extra hot broth as needed. Season with salt and pepper to taste. Serve, passing vegan Parmesan substitute, if using, and extra oil separately.
Serves 6
Cooking time 8 to 9 hours on low or 5 to 6 hours on high
Why This Recipe Works Wheat berries, like farro, are naturally high in plant-based protein and are sturdy enough to maintain their satisfyingly chewy texture in this hearty slow-cooked stew. Including both fresh cremini mushrooms and dried porcini mushrooms ensured that our stew had tender bites of mushroom and intense, earthy flavor. To reinforce the woodsy notes of the mushrooms, we added dried thyme. We also stirred in some Madeira, adding an extra splash of the fortified wine at the end of cooking for brightness. Baby spinach provided color and freshness. The spinach may seem like a lot at first, but it wilts down substantially. If using quick-cooking or presteamed wheat berries (the ingredient list on the package specifies the type), you will need to decrease the cooking time in step 1. The wheat berries will retain a chewy texture once fully cooked. You can substitute dry sherry for the Madeira if desired. You will need a 4- to 7-quart slow cooker for this recipe.
2 pounds cremini mushrooms, trimmed and sliced thin
½ ounce dried porcini mushrooms, rinsed and minced
3 garlic cloves, minced
3 tablespoons extra-virgin olive oil, divided, plus extra for drizzling
2 teaspoons minced fresh thyme or ½ teaspoon dried
½ teaspoon table salt
6 cups vegetable broth, plus extra broth as needed
1½ cups wheat berries
½ cup dry Madeira, divided
6 ounces (6 cups) baby spinach
Vegan Parmesan Substitute (this page) or grated dairy Parmesan (optional)
1. Microwave cremini mushrooms, porcini mushrooms, garlic, 1 tablespoon oil, thyme, and salt in bowl, stirring occasionally, until mushrooms are softened, about 5 minutes; transfer to slow cooker. Stir in broth, wheat berries, and 6 tablespoons Madeira. Cover and cook until wheat berries are tender, 8 to 9 hours on low or 5 to 6 hours on high.
2. Stir in spinach, 1 handful at a time, and let sit until wilted, about 5 minutes. Adjust consistency with extra hot broth as needed. Stir in remaining 2 tablespoons oil and remaining 2 tablespoons Madeira and season with salt and pepper to taste. Serve, drizzling individual portions with extra oil and sprinkling with vegan Parmesan substitute, if using.
Serves 6
Cooking time 7 to 9 hours on low or 4 to 6 hours on high
Why This Recipe Works Even though lentils are more delicate and quicker-cooking than other beans, they still hold up well in the slow cooker. We found that French green or brown lentils did an especially good job of retaining their texture, shape, and flavor through the long simmer. We started our slow-cooker lentil soup by microwaving aromatics (garlic and onion) with Moroccan spices—coriander, garam masala, and cayenne—for a deep, round flavor. To finish, we wanted a new and interesting flavor that worked with our North African flavor spin. Dates are a common Moroccan ingredient, and we discovered that they imparted a rich sweetness to the broth. Mustard greens, also added at the end, offered the perfect peppery balance to all the warm spices. For a little tang, we topped the soup with a mixture of yogurt, parsley, and lemon juice. We prefer French green lentils, or lentilles du Puy, for this recipe, but it will work with any type of lentil except red or yellow. If you can’t find mustard greens, you can substitute kale. You will need a 4- to 7-quart slow cooker for this recipe.
1 onion, chopped fine
2 garlic cloves, minced
1 teaspoon vegetable oil
1 teaspoon garam masala
¾ teaspoon ground coriander
⅛ teaspoon cayenne pepper
8 cups vegetable broth
1 cup French green lentils, picked over and rinsed
¼ teaspoon table salt
12 ounces mustard greens, stemmed and sliced ½ inch thick
4 ounces pitted dates, chopped (¾ cup)
½ cup plain plant-based Greek yogurt or dairy Greek yogurt
¼ cup chopped fresh parsley
1 tablespoon lemon juice
⅛ teaspoon pepper
1. Microwave onion, garlic, oil, garam masala, coriander, and cayenne in bowl, stirring occasionally, until onion is softened, about 5 minutes; transfer to slow cooker. Stir in broth, lentils, and salt. Cover and cook until lentils are tender, 7 to 9 hours on low or 4 to 6 hours on high.
2. Stir mustard greens and dates into soup, cover, and cook on high until greens are tender, 20 to 30 minutes. Season with salt and pepper to taste.
3. Combine yogurt, parsley, lemon juice, and pepper in bowl. Season with salt and pepper to taste. Top individual portions of soup with yogurt mixture before serving.

Serves 6
Why This Recipe Works Bold spices are an exciting contrast to the bounty of vegetables in this Lebanese-inspired stew. We wanted to streamline the lengthy list of spices included in many Lebanese recipes, so we turned to baharat, a potent Middle Eastern spice blend. Using the sauté or browning function of the pressure cooker, we started by browning the bell peppers and onion to develop depth of flavor. The baharat went in next, followed by a little garlic and tomato paste. After adding tomatoes and potatoes and cooking it all under pressure, we released the pressure and briefly simmered the delicate zucchini in the stew to ensure that it cooked through while remaining green and tender, adding convenient canned chickpeas to warm through at the same time. A little olive oil drizzled on at the end provided richness, while chopped mint added freshness. If you can’t find baharat, you can substitute 1½ teaspoons ground nutmeg, 1½ teaspoons paprika, ½ teaspoon ground coriander, ½ teaspoon ground cinnamon, and ½ teaspoon ground cumin.
¼ cup extra-virgin olive oil, plus extra for drizzling
2 red bell peppers, stemmed, seeded, and cut into 1-inch pieces
1 onion, chopped fine
½ teaspoon table salt
½ teaspoon pepper
1½ tablespoons baharat
4 garlic cloves, minced
1 tablespoon tomato paste
4 cups vegetable broth
1 (28-ounce) can whole peeled tomatoes, drained with juice reserved, chopped
1 pound Yukon Gold potatoes, peeled and cut into ½-inch pieces
2 zucchini, quartered lengthwise and sliced 1 inch thick
1 (15-ounce) can chickpeas, rinsed
⅓ cup chopped fresh mint
1. Using highest sauté or browning function, heat oil in electric pressure cooker until shimmering. Add bell peppers, onion, salt, and pepper and cook until vegetables are softened and lightly browned, 5 to 7 minutes. Stir in baharat, garlic, and tomato paste and cook until fragrant, about 1 minute. Stirin broth and tomatoes and reserved juice, scraping up any browned bits, then stir in potatoes.
2. Lock lid in place and close pressure release valve. Select high pressure cook function and cook for 9 minutes. Turn off pressure cooker and quick-release pressure. Carefully remove lid, allowing steam to escape away from you.
3. Stir zucchini and chickpeas into stew and cook, using highest sauté or browning function, until zucchini is tender, 10 to 15 minutes. Turn off pressure cooker. Season with salt and pepper to taste. Drizzle individual portions with extra oil, and sprinkle with mint before serving.
Serves 4 to 6
Why This Recipe Works Chili becomes a cinch to make in the pressure cooker using dried beans. We chose black beans because of their robust flavor and dense, sturdy texture, and brined the dried beans in salted water before cooking to help them hold their shape and cook evenly. Naturally we wanted tocreate a hearty bean chili as deeply savory and satisfying as any meat version. Creating big flavor in chili without using meat can be tricky, but browning a hefty amount of aromatics and blooming spices in the cooker gave our chili depth. For bigvegetable flavor, we also added white mushrooms and bell peppers. A cup of vegetable broth and a can of crushed tomatoes provided enough liquid for our beans to cook evenlywhile still resulting in a thick, hearty finished dish. See this page for more information on brining beans. Serve with your favorite chili garnishes.
3 tablespoons table salt, for brining
1 pound (2½ cups) dried black beans, picked over and rinsed
3 tablespoons vegetable oil
1 onion, chopped fine
9 garlic cloves, minced
2 tablespoons ground cumin
1½ tablespoons chili powder
1 teaspoon minced canned chipotle chile in adobo sauce
1 (28-ounce) can crushed tomatoes
1 cup vegetable broth, plus extra as needed
1 pound white mushrooms, trimmed and halved if small or quartered if large
2 red bell peppers, stemmed, seeded, and cut into ½-inch pieces
2 bay leaves
½ cup minced fresh cilantro
Lime wedges
Plant-based sour cream or dairy sour cream
1. Dissolve 3 tablespoons salt in 4 quarts cold water in large container. Add beans and soak at room temperature for at least 8 hours or up to 24 hours. Drain and rinse well.
2. Using highest sauté or browning function, heat oil in electric pressure cooker until shimmering. Add onion and cook until softened, 3 to 5 minutes. Stir in garlic, cumin, chili powder, and chipotle and cook until fragrant, about 1 minute. Stir in tomatoes and broth, scraping up any browned bits, then stir in beans, mushrooms, bell peppers, and bay leaves.
3. Lock lid in place and close pressure release valve. Select high pressure cook function and cook for 40 minutes. Turn off pressure cooker and quick-release pressure. Carefully remove lid, allowing steam to escape away from you.
4. Discard bay leaves. Adjust consistency with extra hot broth as needed. Stir in cilantro and season with salt and pepper to taste. Serve with lime wedges and sour cream.
VARIATION
Black Bean Chili with Fried Eggs and Queso
2 teaspoons vegetable oil
4–6 large eggs
2–3 pinches table salt
2–3 pinches pepper
Queso fresco
1. Heat oil in 12-inch nonstick skillet over low heat for 5 minutes. Meanwhile, crack 2 eggs into small bowl and sprinkle with pinch of salt and pinch of pepper. Repeat with remaining 2 eggs and second small bowl (if using 6 eggs, repeat with remaining 2 eggs and third small bowl).
2. Increase heat to medium-high and heat until oil is shimmering. Working quickly, pour 1 bowl of eggs in 1 side of pan and second bowl of eggs in other side. Cover and cook for 1 minute. Remove skillet from burner and let stand, covered, 15 to 45 seconds for runny yolks (white around edge of yolk will be barely opaque), 45 to 60 seconds for soft but set yolks, and about 2 minutes for medium-set yolks. Top each serving of chili with a fried egg and some queso fresco.
Serves 6
Cooking time 2 to 4 hours on low
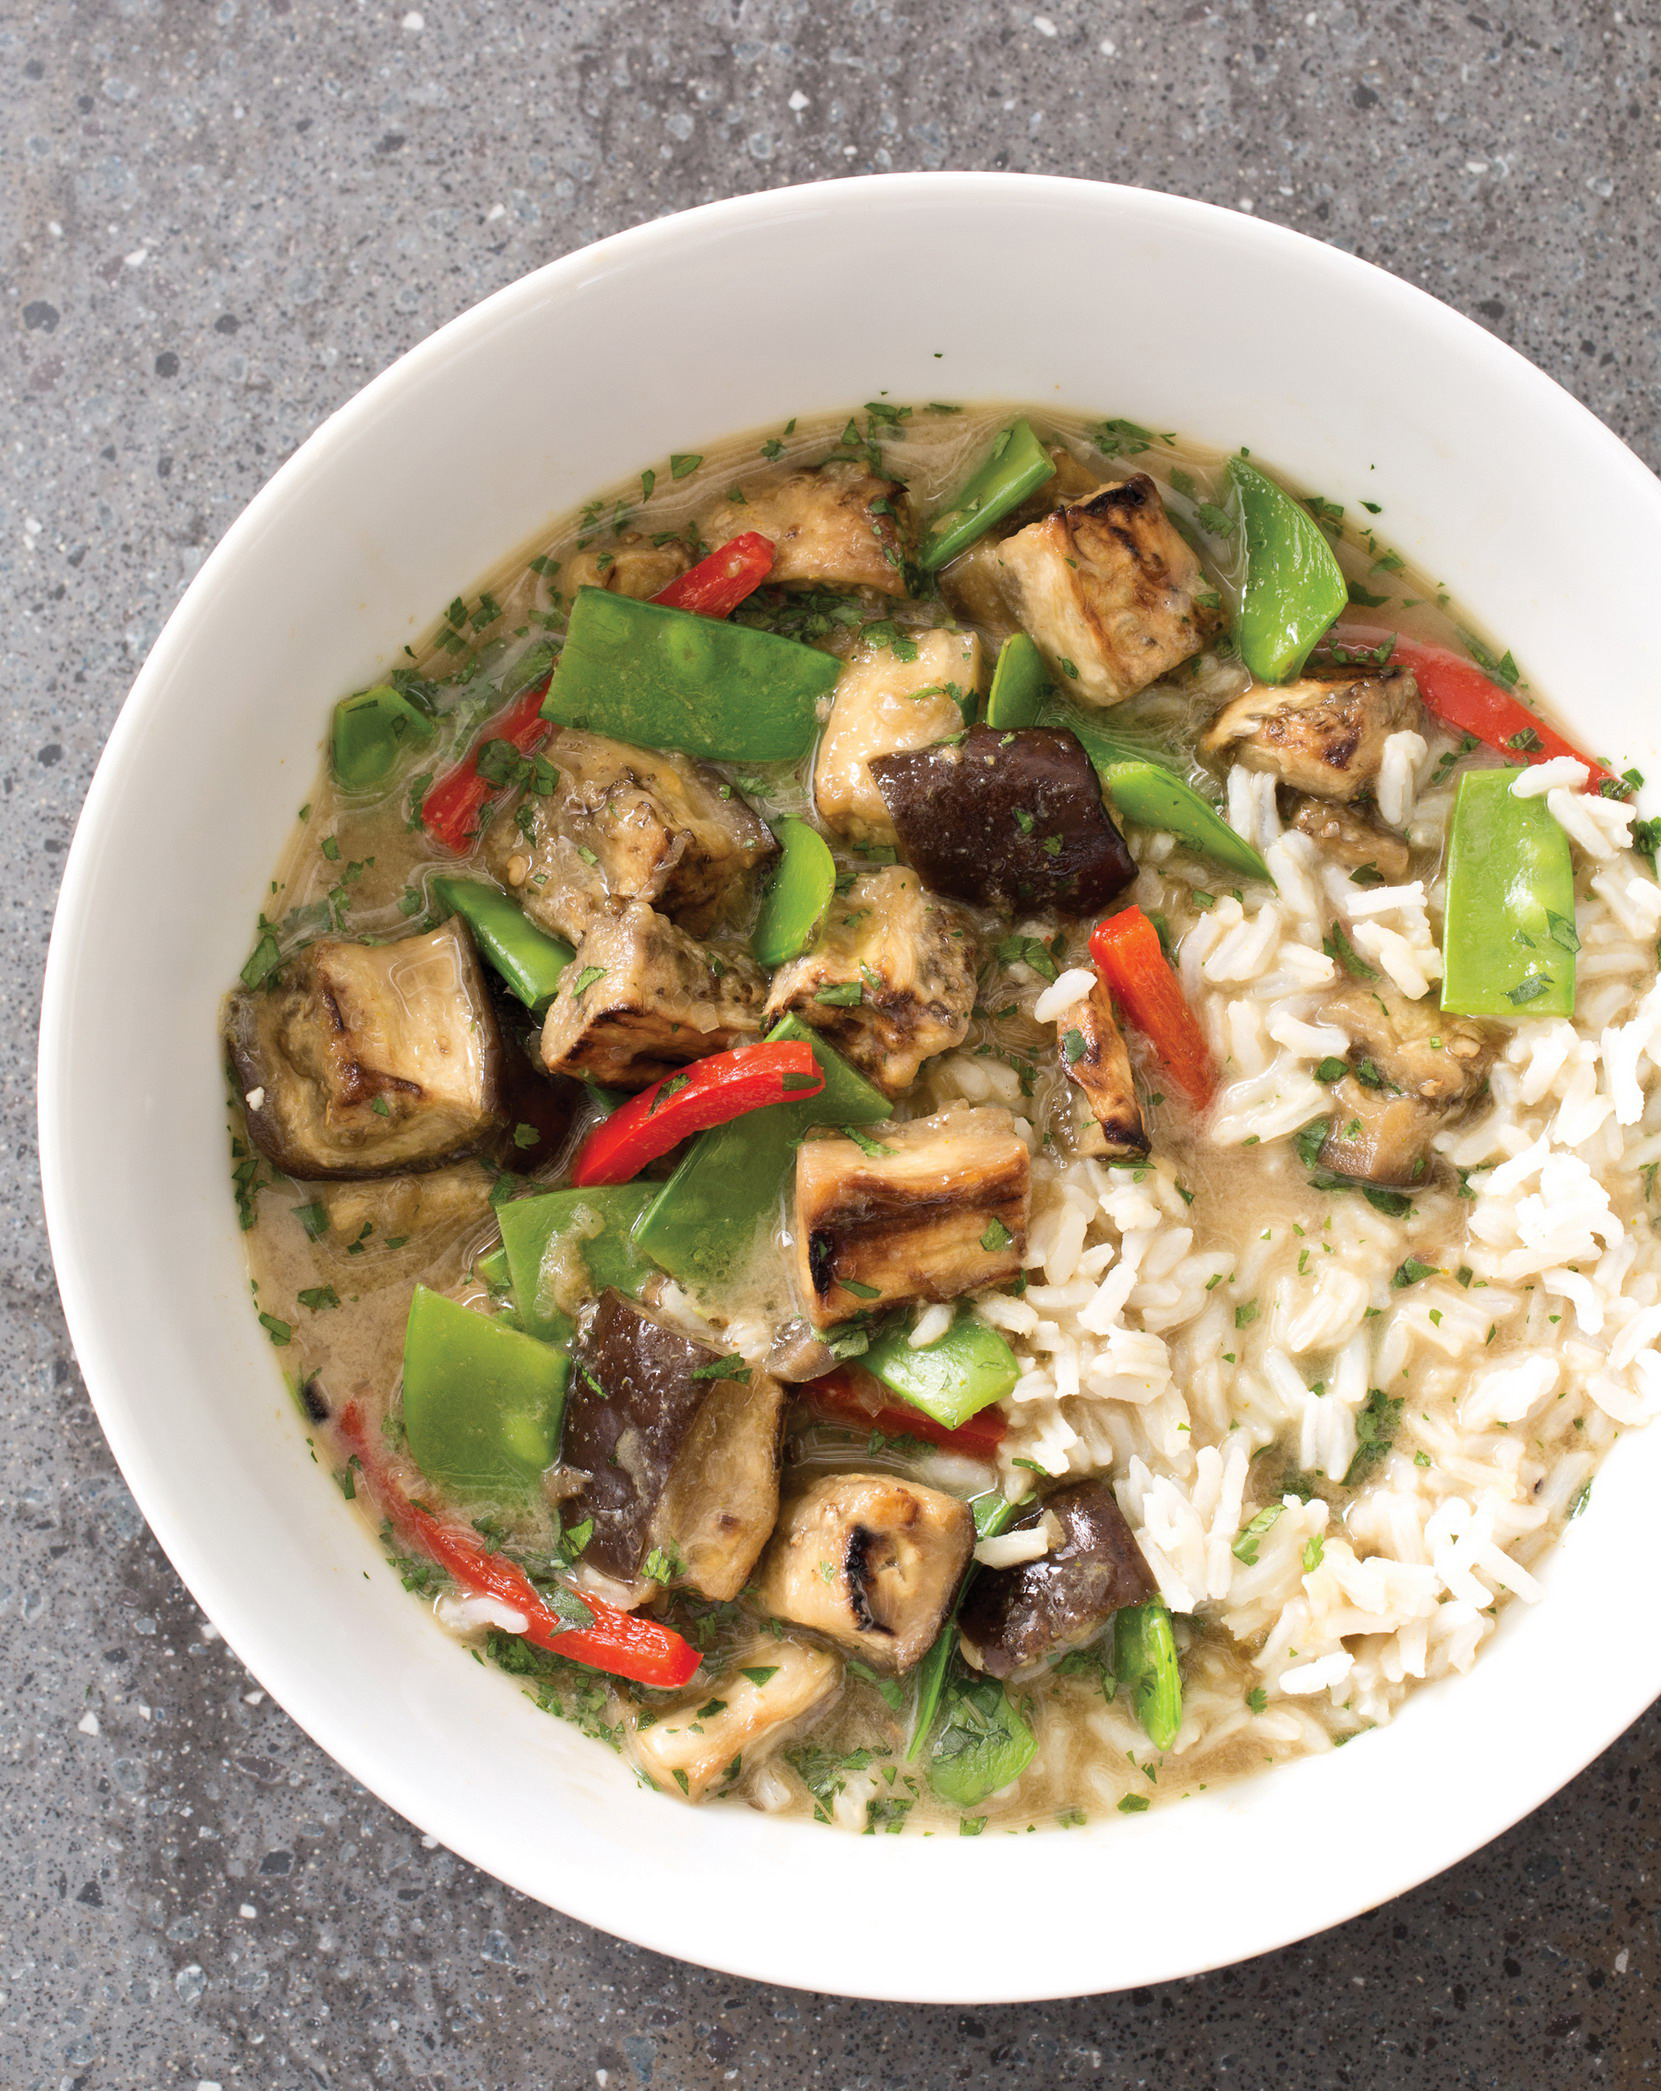
Why This Recipe Works Meaty-textured eggplant is the star of this vegetable-packed curry. Though we liked the hands-off element of using the slow cooker, our first attempts resulted in bland mush. To drive off excess moisture from the eggplant before adding it to the moist heat environment of the cooker, we gave it a quick spin under the broiler, deepening the eggplant’s flavor in the process. For complex curry flavor without the need for gathering up a laundry list of ingredients, we turned to convenient store-bought green curry paste, which contained all the ingredients of classic Thai curries we wanted to incorporate. A combination of vegetable broth and coconut milk (added at the end) gave us a rich, creamy base, with instant tapioca helping to thicken it. Snow peas and red bell pepper were the perfect accents to the eggplant, and to ensure that they were perfectly crisp-tender, we simply microwaved them with a little water, then added them to the finished curry. Serve with Hands-Off Baked Coconut Rice (this page). You will need a 4- to 7-quart slow cooker for this recipe.
Vegetable oil spray
2 pounds eggplant, cut into 1-inch pieces
4 shallots, minced
3 tablespoons Thai green curry paste
1 tablespoon sugar
4 cups vegetable broth
2 tablespoons Fish Sauce Substitute (this page), plus extra for seasoning
2 tablespoons instant tapioca
¼ teaspoon table salt
1 pound snow peas, strings removed, cut into 1-inch pieces
1 red bell pepper, stemmed, seeded, and cut into 2-inch-long matchsticks
1 (14-ounce) can coconut milk
¼ cup chopped fresh cilantro
1 tablespoon lime juice, plus extra for seasoning
1. Adjust oven rack 6 inches from broiler element and heat broiler. Line rimmed baking sheet with aluminum foil and spray with oil spray. Toss eggplant, shallots, curry paste, and sugar together in bowl. Spread eggplant mixture evenly in prepared sheet and lightly spray with oil spray. Broil vegetables until softened and beginning to brown, 10 to 12 minutes, rotating sheet halfway through broiling; transfer to slow cooker. Stir in broth, fish sauce substitute, tapioca, and salt. Cover and cook until flavors meld and eggplant is tender, 2 to 4 hours on low.
2. Microwave snow peas, bell pepper, and 1 tablespoon water in covered bowl, stirring occasionally, until crisp-tender, 4 to 6 minutes. Drain vegetables, then stir into curry. Microwave coconut milk in bowl until hot, about 2 minutes. Stir into curry and let sit until heated through, about 5 minutes. Stir in cilantro and lime juice. Season with salt, pepper, extra fish sauce substitute, and extra lime juice to taste. Serve.
Serves 6
Cooking time 8 to 10 hours on low or 5 to 7 hours on high
Why This Recipe Works Tagine refers to both the conical cooking vessel and the stew-like dish (typically containing meat or poultry) that is prepared in this vessel throughout North Africa. For our plant-based take on tagine transplanted to the slow cooker, we chose root vegetables as the starting point, since we knew they would be able to stand up to a long, slow cooking time. Carrots were a must for their sweet, earthy flavor, as were parsnips. To round out the mix, we turned to an undersung hero of the vegetable world: the nutritional powerhouse rutabaga. Its flavor (similar to a mild turnip) helped offset the sweetness of the other root vegetables. To create just the right flavorful broth with warm spices, we microwaved an aromatic mixture of onions, garlic, and garam masala with fresh ginger. We then added dried cherries and fresh cilantro at the end of cooking to bring freshness and vibrancy to the dish. Topping individual portions with yogurt and toasted almonds tamed the spices of the stew and added contrast and crunch. Serve with rice or couscous. You will need a 4- to 7-quart slow cooker for this recipe.
2 onions, chopped fine
4 garlic cloves, minced
1½ tablespoons garam masala
2 teaspoons vegetable oil
2 teaspoons paprika
1½ teaspoons grated fresh ginger
Pinch cayenne
1½ pounds carrots, peeled, halved lengthwise, and sliced 1 inch thick
1 pound parsnips, peeled, halved lengthwise, and sliced 1 inch thick
1 pound rutabaga, peeled and cut into ½-inch pieces
4 cups vegetable broth
2 (2-inch) strips orange zest
2 tablespoons instant tapioca
½ teaspoon table salt
½ cup dried cherries, chopped
2 tablespoons minced fresh cilantro
½ cup plain plant-based Greek yogurt or dairy Greek yogurt
⅓ cup slivered almonds, toasted
1. Microwave onions, garlic, garam masala, oil, paprika, ginger, and cayenne in bowl, stirring occasionally, until onions are softened, about 5 minutes; transfer to slow cooker. Stir carrots, parsnips, rutabaga, broth, orange zest, tapioca, and salt into slow cooker. Cover and cook until vegetables are tender, 8 to 10 hours on low or 5 to 7 hours on high.
2. Discard orange zest. Stir cherries and cilantro into tagine and season with salt and pepper to taste. Top individual portions with yogurt and almonds before serving.

Serves 6 to 8
Cooking time 8 to 10 hours on high
Why This Recipe Works Meatless chilis frequently rely on a mixture of beans and vegetables for heartiness, but for this chili we wanted something even heartier and more savory. We started our chili with dried navy beans, which turned tender and creamy with the long slow-cooker simmer. After some experimentation with grains, it turned out that bulgur provided the satisfying textural dimension we sought, adding a meat-like texture but a deliciously different flavor all its own. After a quick rinse and a few minutes in the microwave, the grain needed just 5 to 10 minutes in the slow cooker to fully soften and absorb the other flavors. Finally, we ramped up the umami intensity of our chili with soy sauce, dried shiitake mushrooms, and tomato paste. When shopping, don’t confuse bulgur with cracked wheat, which has a much longer cooking time and will not work in this recipe. Bulgur is made from cracked wheat that has been parboiled or steamed, whereas cracked wheat has had no processing other than milling. Serve with your favorite chili garnishes. You will need a 4- to 7-quart slow cooker for this recipe.
2 onions, chopped fine
3 tablespoons chili powder
¼ cup tomato paste
2 tablespoons vegetable oil
4 teaspoons dried oregano
1 tablespoon ground cumin
1¼ teaspoons table salt, divided
1 pound (2½ cups) dried navy beans, picked over and rinsed
3 tablespoons soy sauce
½ ounce dried shiitake mushrooms, rinsed and minced
⅔ cup medium-grind bulgur, rinsed
1. Microwave onions, chili powder, tomato paste, oil, oregano, cumin, and 1 teaspoon salt in bowl, stirring occasionally, until onions are softened, about 5 minutes; transfer to slow cooker. Stir in beans, 9 cups water, soy sauce, and mushrooms. Cover and cook until beans are tender, 8 to 10 hours on high.
2. Microwave bulgur, 2 cups water, and remaining ¼ teaspoon salt in covered bowl until bulgur is softened, about 5 minutes; drain bulgur and stir into chili. Cover and cook on high until bulgur is tender, 5 to 10 minutes. Adjust consistency with extra hot water as needed. Season with salt and pepper to taste. Serve.
Serves 4 to 6
Why This Recipe Works This vibrant dish of quickly braised artichokes, asparagus, and peas captures springtime with fresh seasonal vegetables, varying vegetable textures, and verdant colors. As lovely and tasty as they are when combined, however, these vegetables don’t cook at anywhere near the same rate. The pressure cooker came to the rescue, helping us to cook each to perfection and in just one pot. First, we pressure-cooked halved baby artichokes (in garlicky vegetable broth to infuse them with flavor). They came out tender and evenly cooked from leaf to stem. After releasing the pressure, we then added asparagus and shelled fresh peas, and simmered them until just crisp-tender. Shredded basil and mint and lemon zest gave the dish an extra bright, springy taste. If you can’t find fresh peas, you can substitute 1 cup frozen.
1 lemon, grated to yield 2 teaspoons zest and halved
8 baby artichokes (4 ounces each)
1 tablespoon extra-virgin olive oil, plus extra for serving
3 garlic cloves, minced
¾ cup vegetable broth
½ teaspoon table salt
1 pound asparagus, trimmed and cut on bias into 2-inch lengths
1 pound fresh peas, shelled (1¼ cups)
2 tablespoons shredded fresh basil
1 tablespoon shredded fresh mint
1. Squeeze zested lemon halves into container filled with 4 cups water, then add spent halves. Working with 1 artichoke at a time, trim stem to about ¾ inch and cut off top quarter of artichoke. Break off bottom 3 or 4 rows of tough outer leaves by pulling them downward. Using paring knife, trim outer layer of stem and base, removing any dark green parts. Cut artichoke in half and submerge in lemon water.
2. Using highest sauté or browning function, cook oil and garlic in electric pressure cooker until fragrant, about 1 minute. Remove artichokes from lemon water, shaking off excess liquid, and add to pressure cooker along with broth and salt.
3. Lock lid in place and close pressure release valve. Select high pressure cook function and cook for 4 minutes. Turn off pressure cooker and quick-release pressure. (If using Instant Pot, quick-release pressure immediately after multicooker reaches pressure.) Carefully remove lid, allowing steam to escape away from you.
4. Add asparagus and peas and cook using highest sauté or browning function, stirring occasionally, until crisp-tender, 4 to 6 minutes. Turn off pressure cooker. Stir in basil, mint, and lemon zest and season with salt and pepper to taste. Transfer vegetables to serving platter and drizzle with extra oil. Serve.
Serves 4
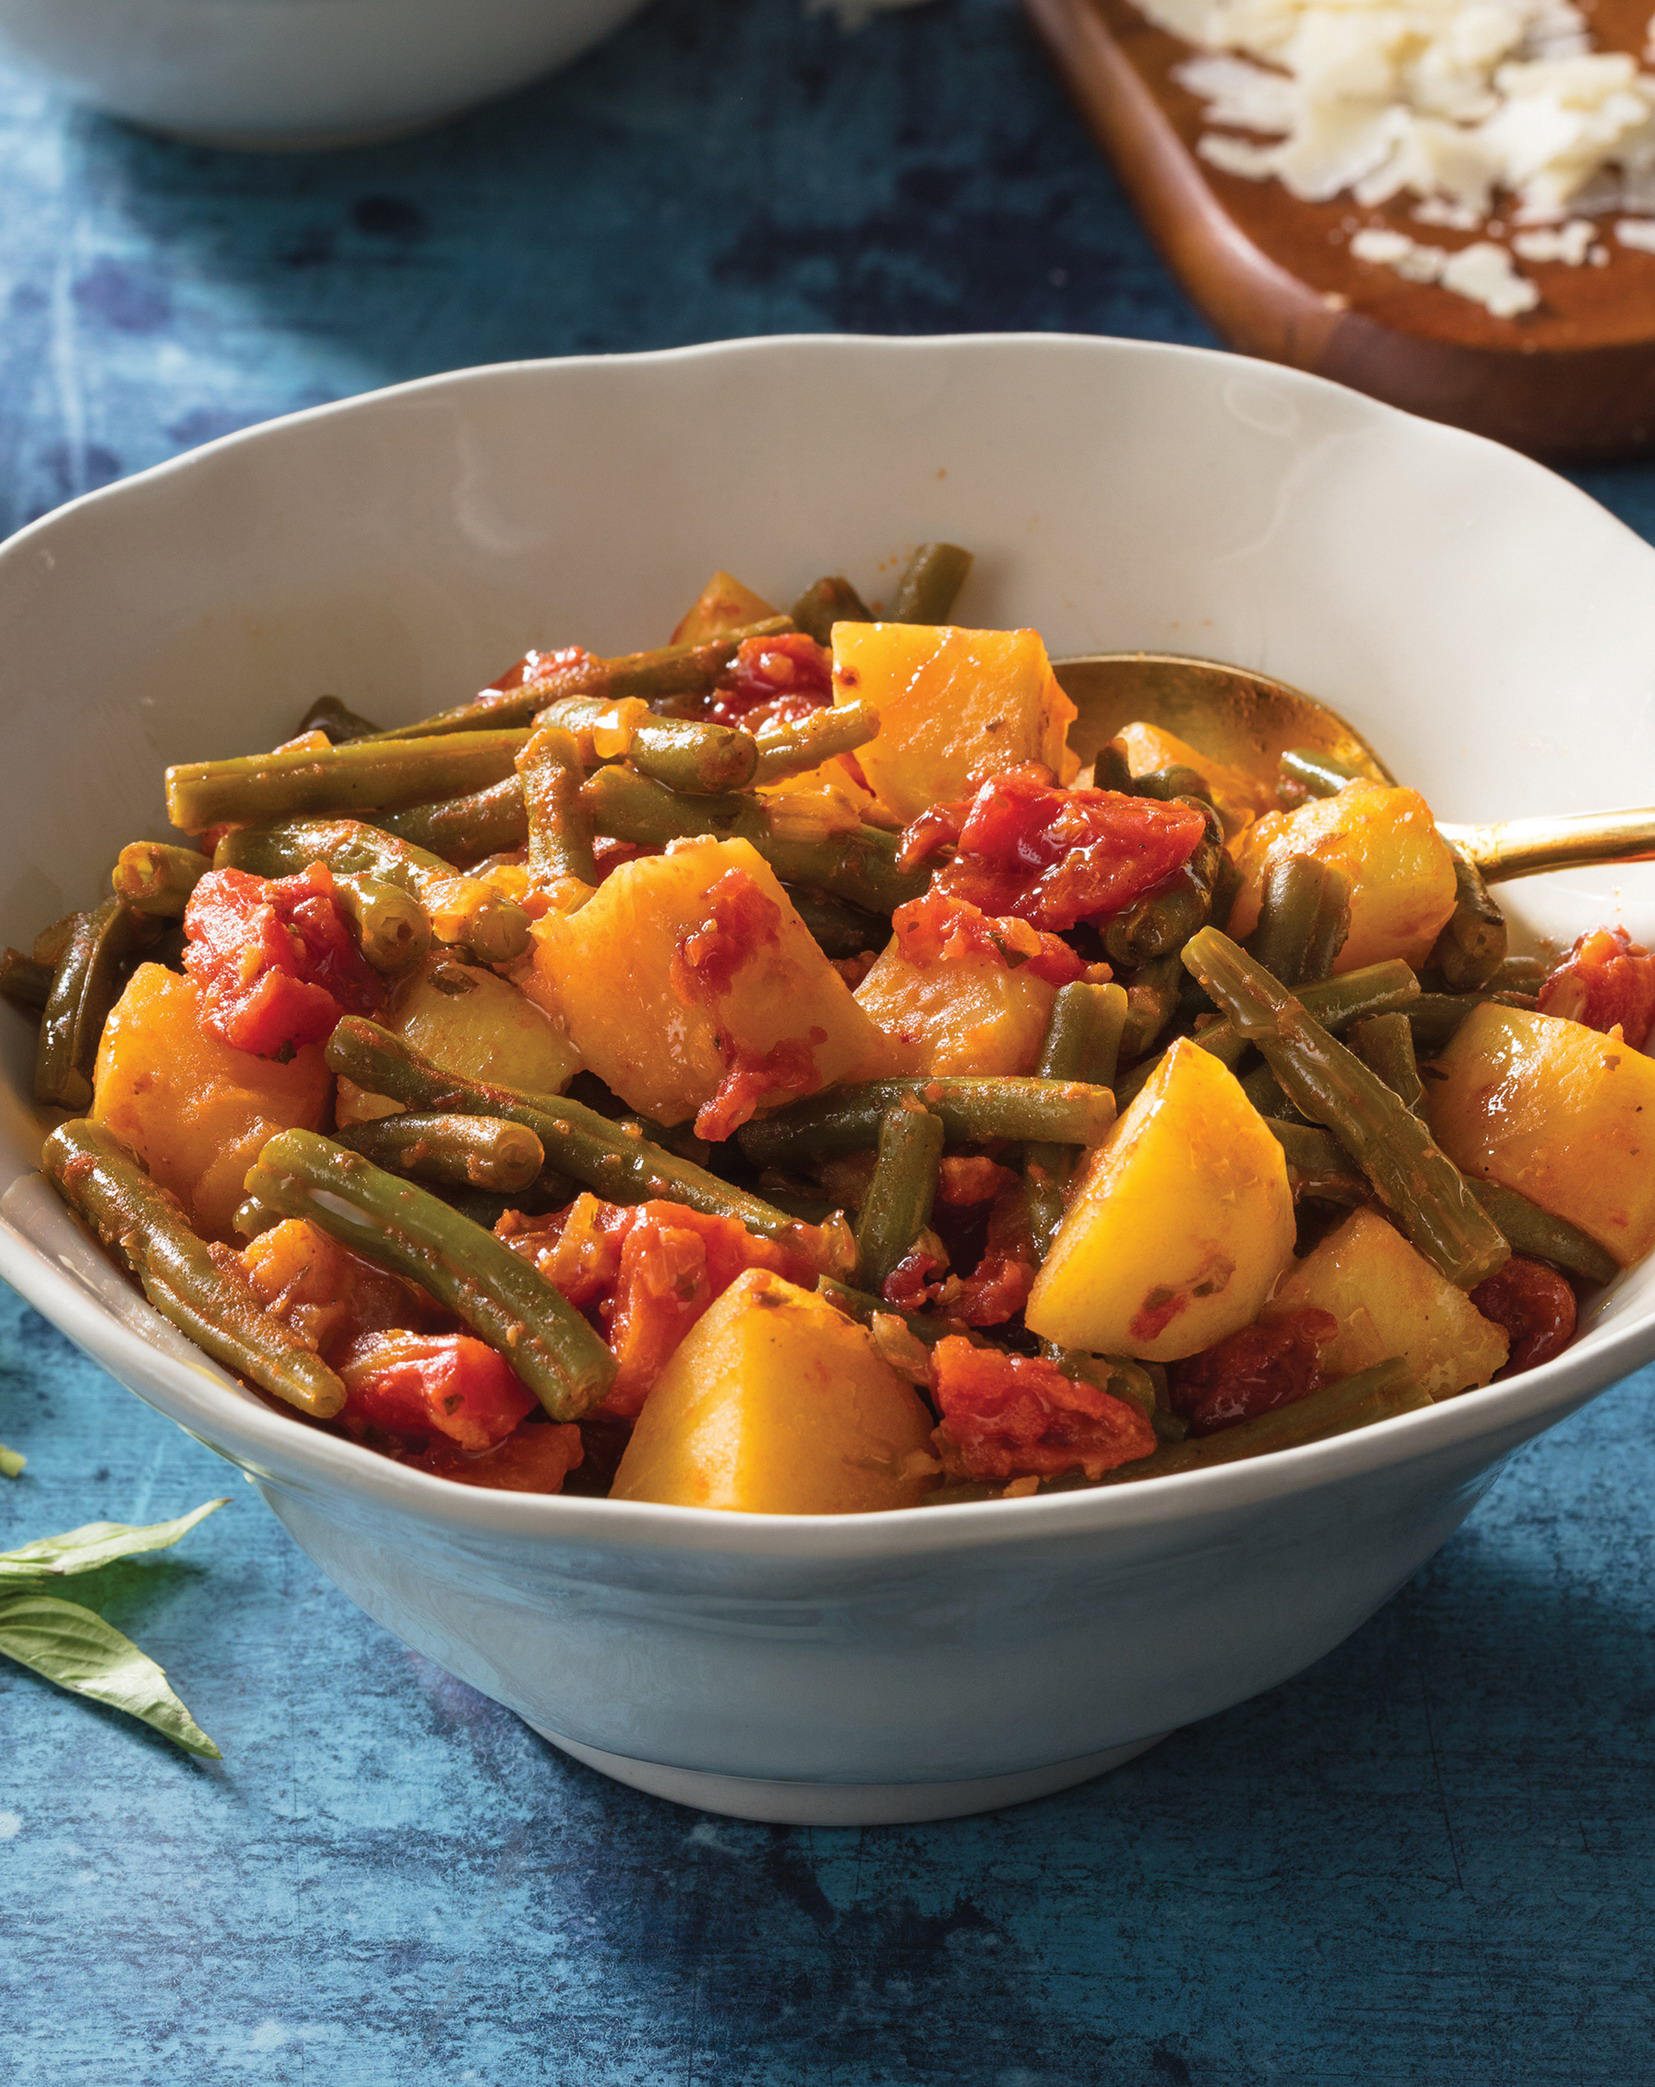
Why This Recipe Works Unlike crisp-tender green beans that have been steamed or sautéed, Greece’s traditional braised green beans boast a unique texture that’s meltingly soft without ever being mushy. Unfortunately, achieving this can require 2 hours of simmering. To get ultratender braised green beans in a fraction of the time, we loved the quick-cooking, even heat of the pressure cooker. To turn this into a substantial plant-based meal, we added chunks of buttery Yukon Gold potatoes, which turned tender in the same amount of time as the green beans. Canned tomatoes supplied sweetness, while their juice along with a little water provided just enough braising liquid for the beans and potatoes. A final drizzle of fruity extra-virgin olive oil and a sprinkling of toasted pine nuts added richness and textural contrast.
2 tablespoons extra-virgin olive oil, plus extra for drizzling
1 onion, chopped fine
2 tablespoons minced fresh oregano or 2 teaspoons dried
2 tablespoons tomato paste
4 garlic cloves, minced
1 (14.5-ounce) can whole peeled tomatoes, drained with juice reserved, chopped
1 cup water
1 teaspoon table salt
¼ teaspoon pepper
1½ pounds green beans, trimmed and cut into 2-inch lengths
1 pound Yukon Gold potatoes, peeled and cut into 1-inch pieces
3 tablespoons chopped fresh basil or parsley
2 tablespoons toasted pine nuts
Vegan Parmesan Substitute (this page) or shaved Parmesan (optional)
1. Using highest sauté or browning function, heat oil in electric pressure cooker until shimmering. Add onion and cook until softened, about 5 minutes. Stir in oregano, tomato paste, and garlic and cook until fragrant, about 30 seconds. Stir in tomatoes and their juice, water, salt, and pepper, then stir in green beans and potatoes. Lock lid in place and close pressure release valve. Select high pressure cook function and cook for 5 minutes.
2. Turn off pressure cooker and quick-release pressure. Carefully remove lid, allowing steam to escape away from you. Season with salt and pepper to taste. Sprinkle individual portions with basil, pine nuts, and vegan Parmesan substitute and drizzle with extra oil. Serve.
Serves 4
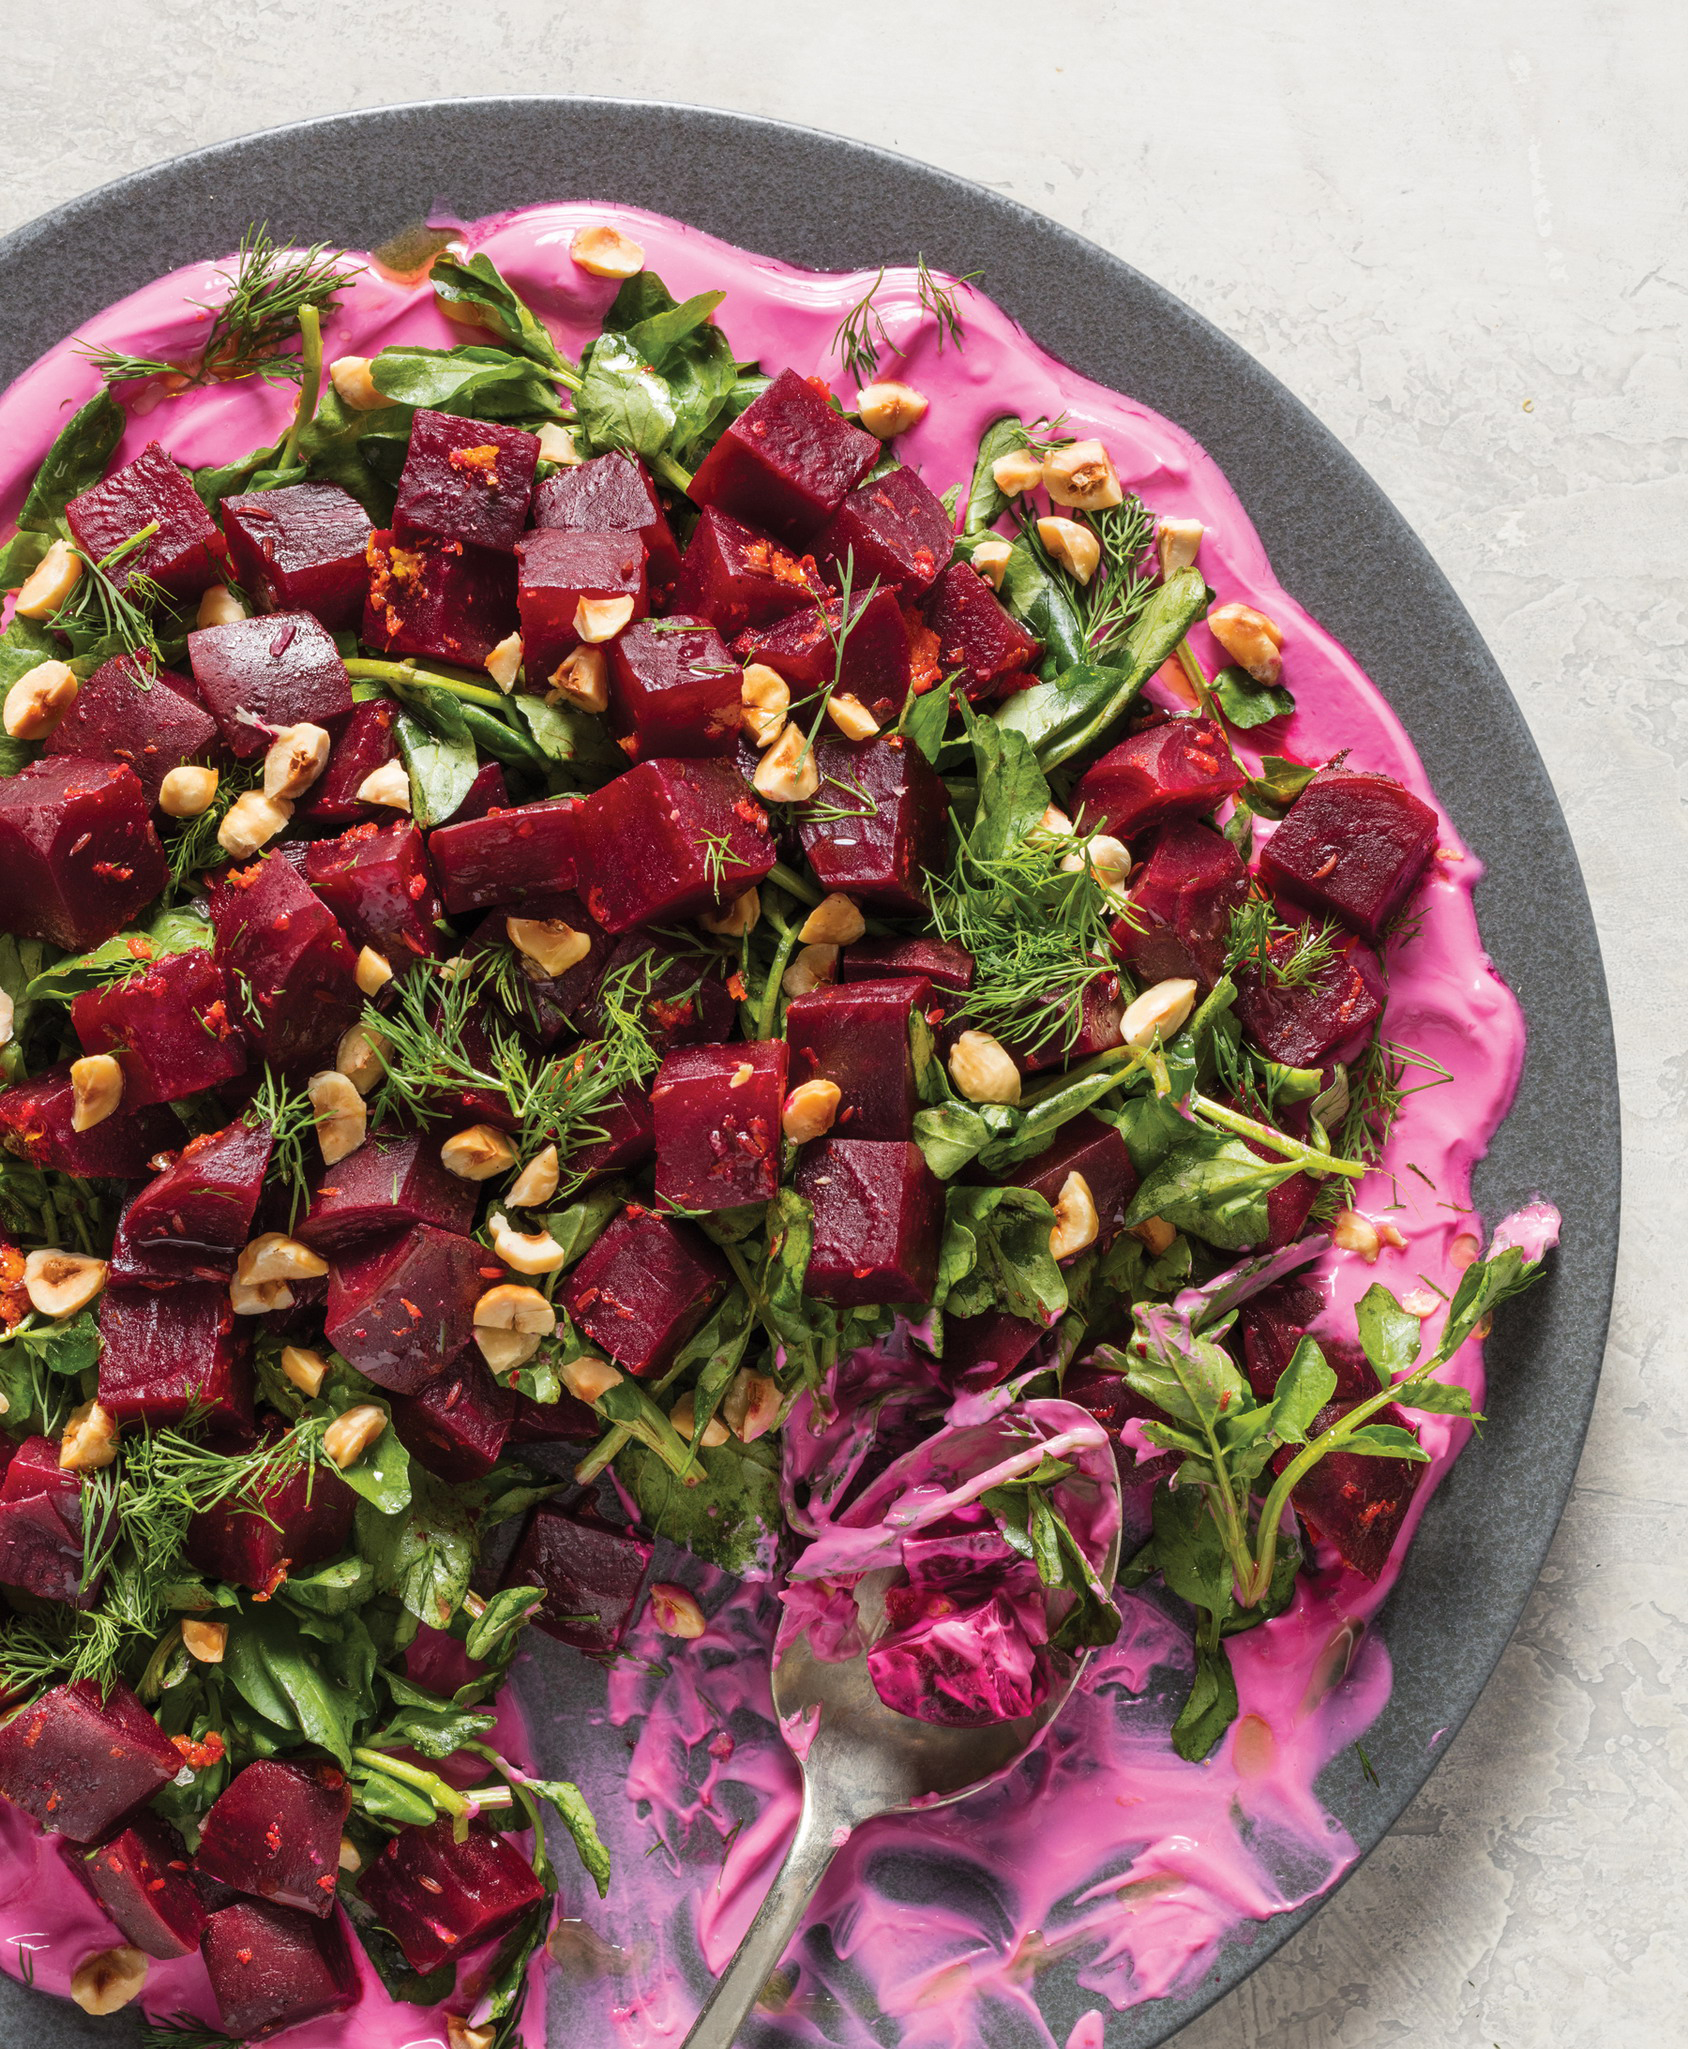
Why This Recipe Works Sweet, slightly earthy beets do double duty in this pretty magenta-and-green salad bursting with an unexpected combination of ingredients. After quickly cooking the unpeeled beets under pressure with caraway seeds and water (there was no need to peel the beets, since the intense heat of the pressure cooker made the skins undetectable in the finished dish), we stirred their potent and vibrantly colored cooking liquid into some Greek yogurt, turning it a spectacular shade of pink, perfect as a base for some peppery green watercress. Orange zest brightened up the beets, which we arranged on top of the greens. A sprinkling of fresh dill brought out the anise notes of the caraway seeds, and hazelnuts and coarse sea salt added a rich finishing crunch. Look for small or medium-size beets; large beets can be woody.
2 pounds beets, scrubbed, trimmed, and cut into ¾-inch pieces
½ cup water
1 teaspoon caraway seeds
½ teaspoon table salt
1 cup plain plant-based Greek yogurt or dairy Greek yogurt
1 small garlic clove, minced to paste
5 ounces (5 cups) watercress, torn into bite-size pieces
1 tablespoon extra-virgin olive oil, divided, plus extra for drizzling
1 tablespoon white wine vinegar, divided
1 teaspoon grated orange zest plus 2 tablespoons juice
¼ cup hazelnuts, toasted, skinned, and chopped
¼ cup coarsely chopped fresh dill
Coarse sea salt
1. Combine beets, water, caraway seeds, and table salt in electric pressure cooker. Lock lid in place and close pressure release valve. Select high pressure cook function and cook for 8 minutes. Turn off pressure cooker and quick-release pressure. Carefully remove lid, allowing steam to escape away from you.
2. Using slotted spoon, transfer beets to plate; set aside to cool slightly. Combine yogurt, garlic, and 3 tablespoons beet cooking liquid in bowl; discard remaining cooking liquid. In large bowl toss watercress with 2 teaspoons oil and 1 teaspoon vinegar. Season with table salt and pepper to taste.
3. Spread yogurt mixture over surface of serving platter. Arrange watercress on top of yogurt mixture, leaving 1-inch border of yogurt mixture. Add beets to now-empty large bowl and toss with orange zest and juice, remaining 2 teaspoons vinegar, and remaining 1 teaspoon oil. Season with table salt and pepper to taste. Arrange beets on top of watercress mixture. Drizzle with extra oil and sprinkle with hazelnuts, dill, and sea salt. Serve.
Serves 6
Cooking time 5 to 6 hours on low or 3 to 4 hours on high
Why This Recipe Works Braised red cabbage is a favorite German side dish. It typically includes apples and warm spices—and plenty of lard or other animal fat. For an updated, plant-based spin and a dish worthy of being served on its own, we turned toward the Mediterranean, adding fresh fennel and using a minimal amount of fat in the form of vegetable oil. With its enclosed heat environment, the slow cooker was perfect for braising the cabbage while trapping the enticing aromas of the fennel. Adding the vegetables directly to the slow cooker left them too crunchy for our liking, so to get the texture just right, we precooked the cabbage and fennel in the microwave to soften them slightly. For a bright braising liquid that would add another flavor dimension, we chose sweet-tangy orange juice, enhancing it with fennel seeds, bay leaves, and thyme. A bit of sugar rounded out the sweetness, and vinegar perked up the flavors and added balance. You will need a 5- to 7-quart slow cooker for this recipe.
1 head red cabbage (2 pounds), cored and shredded
2 fennel bulbs, 2 tablespoons fronds minced, stalks discarded, bulbs halved, cored, and sliced ½ inch thick
1 onion, chopped fine
2 teaspoons vegetable oil
½ teaspoon table salt
1 cup orange juice (2 oranges)
2 tablespoons packed light brown sugar, divided, plus extra as needed
2 sprigs fresh thyme
½ teaspoon fennel seeds
3 bay leaves
2 tablespoons white wine vinegar, plus extra as needed
1. Microwave cabbage, fennel slices, onion, oil, and salt in covered bowl, stirring occasionally, until vegetables are softened, 15 to 20 minutes. Drain cabbage mixture and transfer to slow cooker. Stir in orange juice, 1 tablespoon sugar, thyme sprigs, fennel seeds, and bay leaves. Cover and cook until cabbage is tender, 5 to 6 hours on low or 3 to 4 hours on high.
2. Discard thyme sprigs and bay leaves. Stir in vinegar and remaining 1 tablespoon sugar. Season with salt, pepper, extra sugar, and extra vinegar to taste. (Cabbage can be held on warm or low setting for up to 2 hours.) Sprinkle with fennel fronds before serving.
Serves 6 to 8
Cooking time 5 to 6 hours on low or 3 to 4 hours on high
Why This Recipe Works Glazed carrots are a reliable side dish that we often turn to when hosting a crowd. Doing them on the stovetop involves some last-minute fussing that makes them less simple than we’d like, however. Using the slow cooker eliminated all the last-minute fuss involved and freed up a burner. Initially we tried cooking the carrots in vegetable broth, but tasters felt the broth was a distraction from the carrots’ delicate sweetness. In the end, water seasoned with a little sugar and salt turned out to be the right choice for gently simmering these carrots. Once they were tender, we simply drained them and tossed them with coconut oil and tart orange marmalade. The marmalade and coconut oil (or butter) melted to form a ready-to-use glaze that conveniently did not need to be reduced on the stovetop. Simple, sweet, and delicious—this is a plant-based side at its easiest. The variation makes it just a little fancier with parsnips, rutabaga, and celery root. You will need a 4- to 7-quart slow cooker for this recipe.
3 pounds carrots, peeled and sliced ¼ inch thick on bias
1 tablespoon sugar
¼ teaspoon table salt
½ cup orange marmalade
2 tablespoons refined coconut oil or unsalted butter, softened
1. Combine carrots, ¾ cup water, sugar, and salt in slow cooker. Cover and cook until carrots are tender, 5 to 6 hours on low or 3 to 4 hours on high.
2. Drain carrots and return to now-empty slow cooker. Stir in marmalade and oil. Season with salt and pepper to taste. Serve. (Carrots can be held on warm or low setting for up to 2 hours; loosen glaze with hot water as needed.)
VARIATION
Cooking time 5 to 6 hours on low or 3 to 4 hours on high
1 pound parsnips, peeled and cut into 1-inch pieces
1 pound rutabaga, peeled and cut into 1-inch pieces
1 celery root (14 ounces), peeled and cut into 1-inch pieces
½ teaspoon table salt
3 tablespoons orange marmalade
1 tablespoon refined coconut oil or unsalted butter, softened
2 teaspoons minced fresh parsley
2 teaspoons lemon juice
1. Combine parsnips, rutabaga, celery root, ¾ cup water, and salt in slow cooker. Press 16 by 12-inch sheet of parchment paper firmly onto vegetables, folding down edges as needed. Cover and cook until vegetables are tender, 5 to 6 hours on low or 3 to 4 hours on high.
2. Discard parchment. Drain vegetables and return to now-empty slow cooker. Stir in marmalade, oil, parsley, and lemon juice. Season with salt and pepper to taste. Serve. (Vegetables can be held on warm or low setting for up to 2 hours; loosen glaze with hot water as needed.)

Braised Whole Cauliflower with Tomatoes, Olives, and Ras el Hanout
Serves 2 as a main dish or 4 as a side dish
Why This Recipe Works A whole head of cauliflower is a showstopping sight to behold no matter how you prepare it. When done in the pressure cooker, it’s also a super-speedy way to a vegetable-focused entrée. We started by making an intensely savory cooking liquid of garlic, our anchovy substitute, ras el hanout, and tomatoes. When the large cauliflower’s fibrous core didn’t always cook through during initial testing, we made deep cuts in the stem to allow the liquid and heat to reach the center, which rendered the whole head perfectly tender. After releasing the pressure, we removed the cauliflower, stirred in the sweet-savory, flavor-intense combo of golden raisins and green olives, and thickened the sauce using the sauté or browning function of the cooker before spooning it over the beautiful vegetable and finishing with cilantro and pine nuts. We prefer our homemade Ras el Hanout (this page), but you may use store-bought; just be aware that different brands can vary in intensity.
2 tablespoons extra-virgin olive oil
6 garlic cloves, minced
1 tablespoon Anchovy Substitute (this page) (optional)
2 teaspoons ras el hanout
⅛ teaspoon red pepper flakes
1 (28-ounce) can whole peeled tomatoes, drained with juice reserved, chopped coarse
1 large head cauliflower (3 pounds)
½ cup pitted brine-cured green olives, chopped coarse
¼ cup golden raisins
¼ cup fresh cilantro leaves
¼ cup pine nuts, toasted
1. Using highest sauté or browning function, cook oil, garlic, anchovy substitute, ras el hanout, and pepper flakes in electric pressure cooker until fragrant, about 3 minutes. Turn off pressure cooker, then stir in tomatoes and reserved juice.
2. Trim outer leaves of cauliflower and cut stem flush with bottom florets. Using paring knife, cut 4-inch-deep cross in stem. Nestle cauliflower, stem side down, into pot and spoon some of sauce over top. Lock lid in place and close pressure release valve. Select high pressure cook function and cook for 3 minutes.
3. Turn off pressure cooker and quick-release pressure. Carefully remove lid, allowing steam to escape away from you. Using tongs and slotted spoon, transfer cauliflower to serving platter and tent with aluminum foil. Stir olives and raisins into sauce and cook, using highest sauté or browning function, until sauce has thickened slightly, about 5 minutes. Season with salt and pepper to taste. Cut cauliflower into wedges and spoon some of sauce over top. Sprinkle with cilantro and pine nuts. Serve, passing remaining sauce separately.

Serves 4 to 6
Cooking time 3 to 4 hours on low or 2 to 3 hours on high
Why This Recipe Works Eggplant is often prepared with meat in Turkish cuisine. This versatile vegetable is also plenty satisfying and hearty on its own, paired with traditional Turkish spices (paprika, cumin, cayenne pepper, and cinnamon). For this plant-focused casserole, we included bulgur, which cooks perfectly in the steamy environment. Broiling the eggplant before adding it to the cooker drove off extra moisture and kept the slices firm. An herb-yogurt sauce added a welcome richness and tang to this well-spiced dish. When shopping, don’t confuse bulgur with cracked wheat, which has a much longer cooking time and will not work here. You will need a 5- to 7-quart oval slow cooker for this recipe.
Sauce
1 cup plain plant-based yogurt or dairy yogurt
¼ cup chopped fresh parsley
2 tablespoons chopped fresh mint
1 garlic clove, minced
Bulgur
2 teaspoons paprika
1½ teaspoons ground cumin
1½ teaspoons table salt, divided
⅛ teaspoon cayenne pepper
⅛ teaspoon ground cinnamon
1½ pounds eggplant, sliced into ½-inch-thick rounds
¼ cup extra-virgin olive oil, divided
1 onion, chopped fine
4 garlic cloves, minced
1 tablespoon tomato paste
1 cup medium-grind bulgur, rinsed
1 cup vegetable broth
4 tomatoes, cored and sliced ½ inch thick
1. For the sauce Combine all ingredients in bowl and season with salt and pepper to taste. Refrigerate until ready to serve.
2. For the bulgur Adjust oven rack 6 inches from broiler element and heat broiler. Combine paprika, cumin, ¾ teaspoon salt, cayenne, and cinnamon in bowl. Arrange eggplant in single layer on aluminum foil–lined rimmed baking sheet, brush both sides with 3 tablespoons oil, and sprinkle with spice mixture. Broil eggplant until softened and beginning to brown, 10 to 12 minutes, flipping eggplant halfway through broiling.
3. Lightly coat slow cooker with vegetable oil spray. Microwave onion, garlic, tomato paste, remaining ¾ teaspoon salt, and remaining 1 tablespoon oil in bowl, stirring occasionally, until onion is softened, about 5 minutes; transfer to prepared slow cooker. Stir in bulgur and broth. Shingle alternating slices of eggplant and tomato into 3 tightly fitting rows on top of bulgur mixture. Cover and cook until eggplant and bulgur are tender and all broth is absorbed, 3 to 4 hours on low or 2 to 3 hours on high. Serve, passing sauce separately.
Serves 4
Why This Recipe Works Assertive greens and sweet pear make perfect companions to braised fennel in this brunch-worthy salad. When fennel is cooked quickly under pressure, it gently softens and its vegetal flavor mellows into something sweeter and almost caramelized. We started by cutting the fennel into wedges and browning them in the pressure cooker before cooking them under pressure for a mere 2 minutes. We whisked together a lemony dressing, assembled the salad, and topped it off with toasty, crunchy almonds. The optional Pecorino offered an additional salty, nutty note. Don’t core the fennel before cutting it into wedges; the core helps hold the wedges together during cooking.
6 tablespoons extra-virgin olive oil, divided
2 fennel bulbs (12 ounces each), 2 tablespoons fronds chopped, stalks discarded, bulbs halved, each half cut into 1-inch-thick wedges
¾ teaspoon table salt, divided
½ teaspoon grated lemon zest plus 4 teaspoons juice
5 ounces (5 cups) baby arugula
1 small head radicchio (6 ounces), shredded
1 Bosc or Bartlett pear, quartered, cored, and sliced thin
¼ cup whole almonds, toasted and chopped
Shaved Pecorino Romano cheese (optional)
1. Using highest sauté or browning function, heat 2 tablespoons oil in electric pressure cooker until just smoking, about 5 minutes. Brown half of fennel, about 3 minutes per side; transfer to plate. Repeat with 1 tablespoon oil and remaining fennel; do not remove from pot.
2. Return first batch of fennel to pot along with ½ cup water and ½ teaspoon salt. Lock lid in place and close pressure release valve. Select high pressure cook function and cook for 2 minutes. Turn off pressure cooker and quick-release pressure. Carefully remove lid, allowing steam to escape away from you. Using slotted spoon, transfer fennel to plate; discard cooking liquid.
3. Whisk lemon zest and juice, remaining 3 tablespoons oil, and remaining ¼ teaspoon salt together in large bowl. Add arugula, radicchio, and pear and toss to coat. Transfer arugula mixture to serving platter and arrange fennel wedges on top. Sprinkle with almonds; fennel fronds; and Pecorino, if using. Serve.
Serves 4
Cooking time 3 to 4 hours on low or 2 to 3 hours on high
Why This Recipe Works Tacos in the slow cooker means you can set this out for a crowd and it will stay perfectly warm and juicy as people come back for more. And they will: Corn tortillas stuffed with seasoned mustard greens and sweet potatoes made even the most carnivorous among us in the test kitchen excited to eat meatless tacos. In order for the sweet potatoes to be a manageable size for folding into a taco and eating without having them fall out, we cut them into ½-inch pieces. But we discovered that these small pieces cooked quickly and lost their shape, so we wrapped the starchy tubers in foil to help tame the heat of the slow cooker and keep them from falling apart. We arranged the foil-wrapped potatoes right on top of the greens in the slow cooker, and then unwrapped them and stirred them into the greens at the end. The tender vegetables needed a crunchy counterpoint, so we put together some quickly pickled radishes. If you would like to include cheese, we recommend queso fresco. You can substitute an equal amount of Swiss chard for the mustard greens, if desired. You will need a 4- to 7-quart slow cooker for this recipe.
1 onion, chopped fine
2 tablespoons minced fresh oregano or 2 teaspoons dried
2 tablespoons extra-virgin olive oil, divided
4 garlic cloves, minced
1 teaspoon ground cumin
1 teaspoon ground coriander
¾ teaspoon table salt
1½ pounds mustard greens, stemmed and cut into 1-inch pieces
1 pound sweet potatoes, peeled and cut into ½-inch pieces
12 (6-inch) corn tortillas, warmed
1 recipe Spicy Pickled Radishes (recipe follows)
4 ounces queso fresco, crumbled (1 cup) (optional)
1. Lightly coat slow cooker with vegetable oil spray. Microwave onion, oregano, 1 tablespoon oil, garlic, cumin, coriander, and salt in bowl, stirring occasionally, until onion is softened, about 5 minutes; transfer to prepared slow cooker. Stir in mustard greens and ½ cup water. Season sweet potatoes with salt and pepper, wrap in aluminum foil packet, and place on top of greens. Cover and cook until greens and potatoes are tender, 3 to 4 hours on low or 2 to 3 hours on high.
2. Transfer foil packet to plate. Drain greens mixture and return to now-empty slow cooker. Carefully open foil packet and gently fold potatoes, along with any accumulated juices, into greens. Stir in remaining 1 tablespoon oil and season with salt and pepper to taste. Serve with tortillas; pickled radishes; and queso fresco, if using.
Makes about 1¾ cups
10 radishes, trimmed and sliced thin
½ cup lime juice (4 limes)
½ jalapeño chile, stemmed and sliced thin
1 teaspoon sugar
¼ teaspoon table salt
Combine all ingredients in bowl, cover, and let stand at room temperature for 30 minutes. (Mixture can be refrigerated for up to 24 hours.)
MAKING FOIL PACKETS
1. Place vegetables on 1 side of large sheet of aluminum foil. Fold foil over vegetables and crimp 3 open edges to seal.
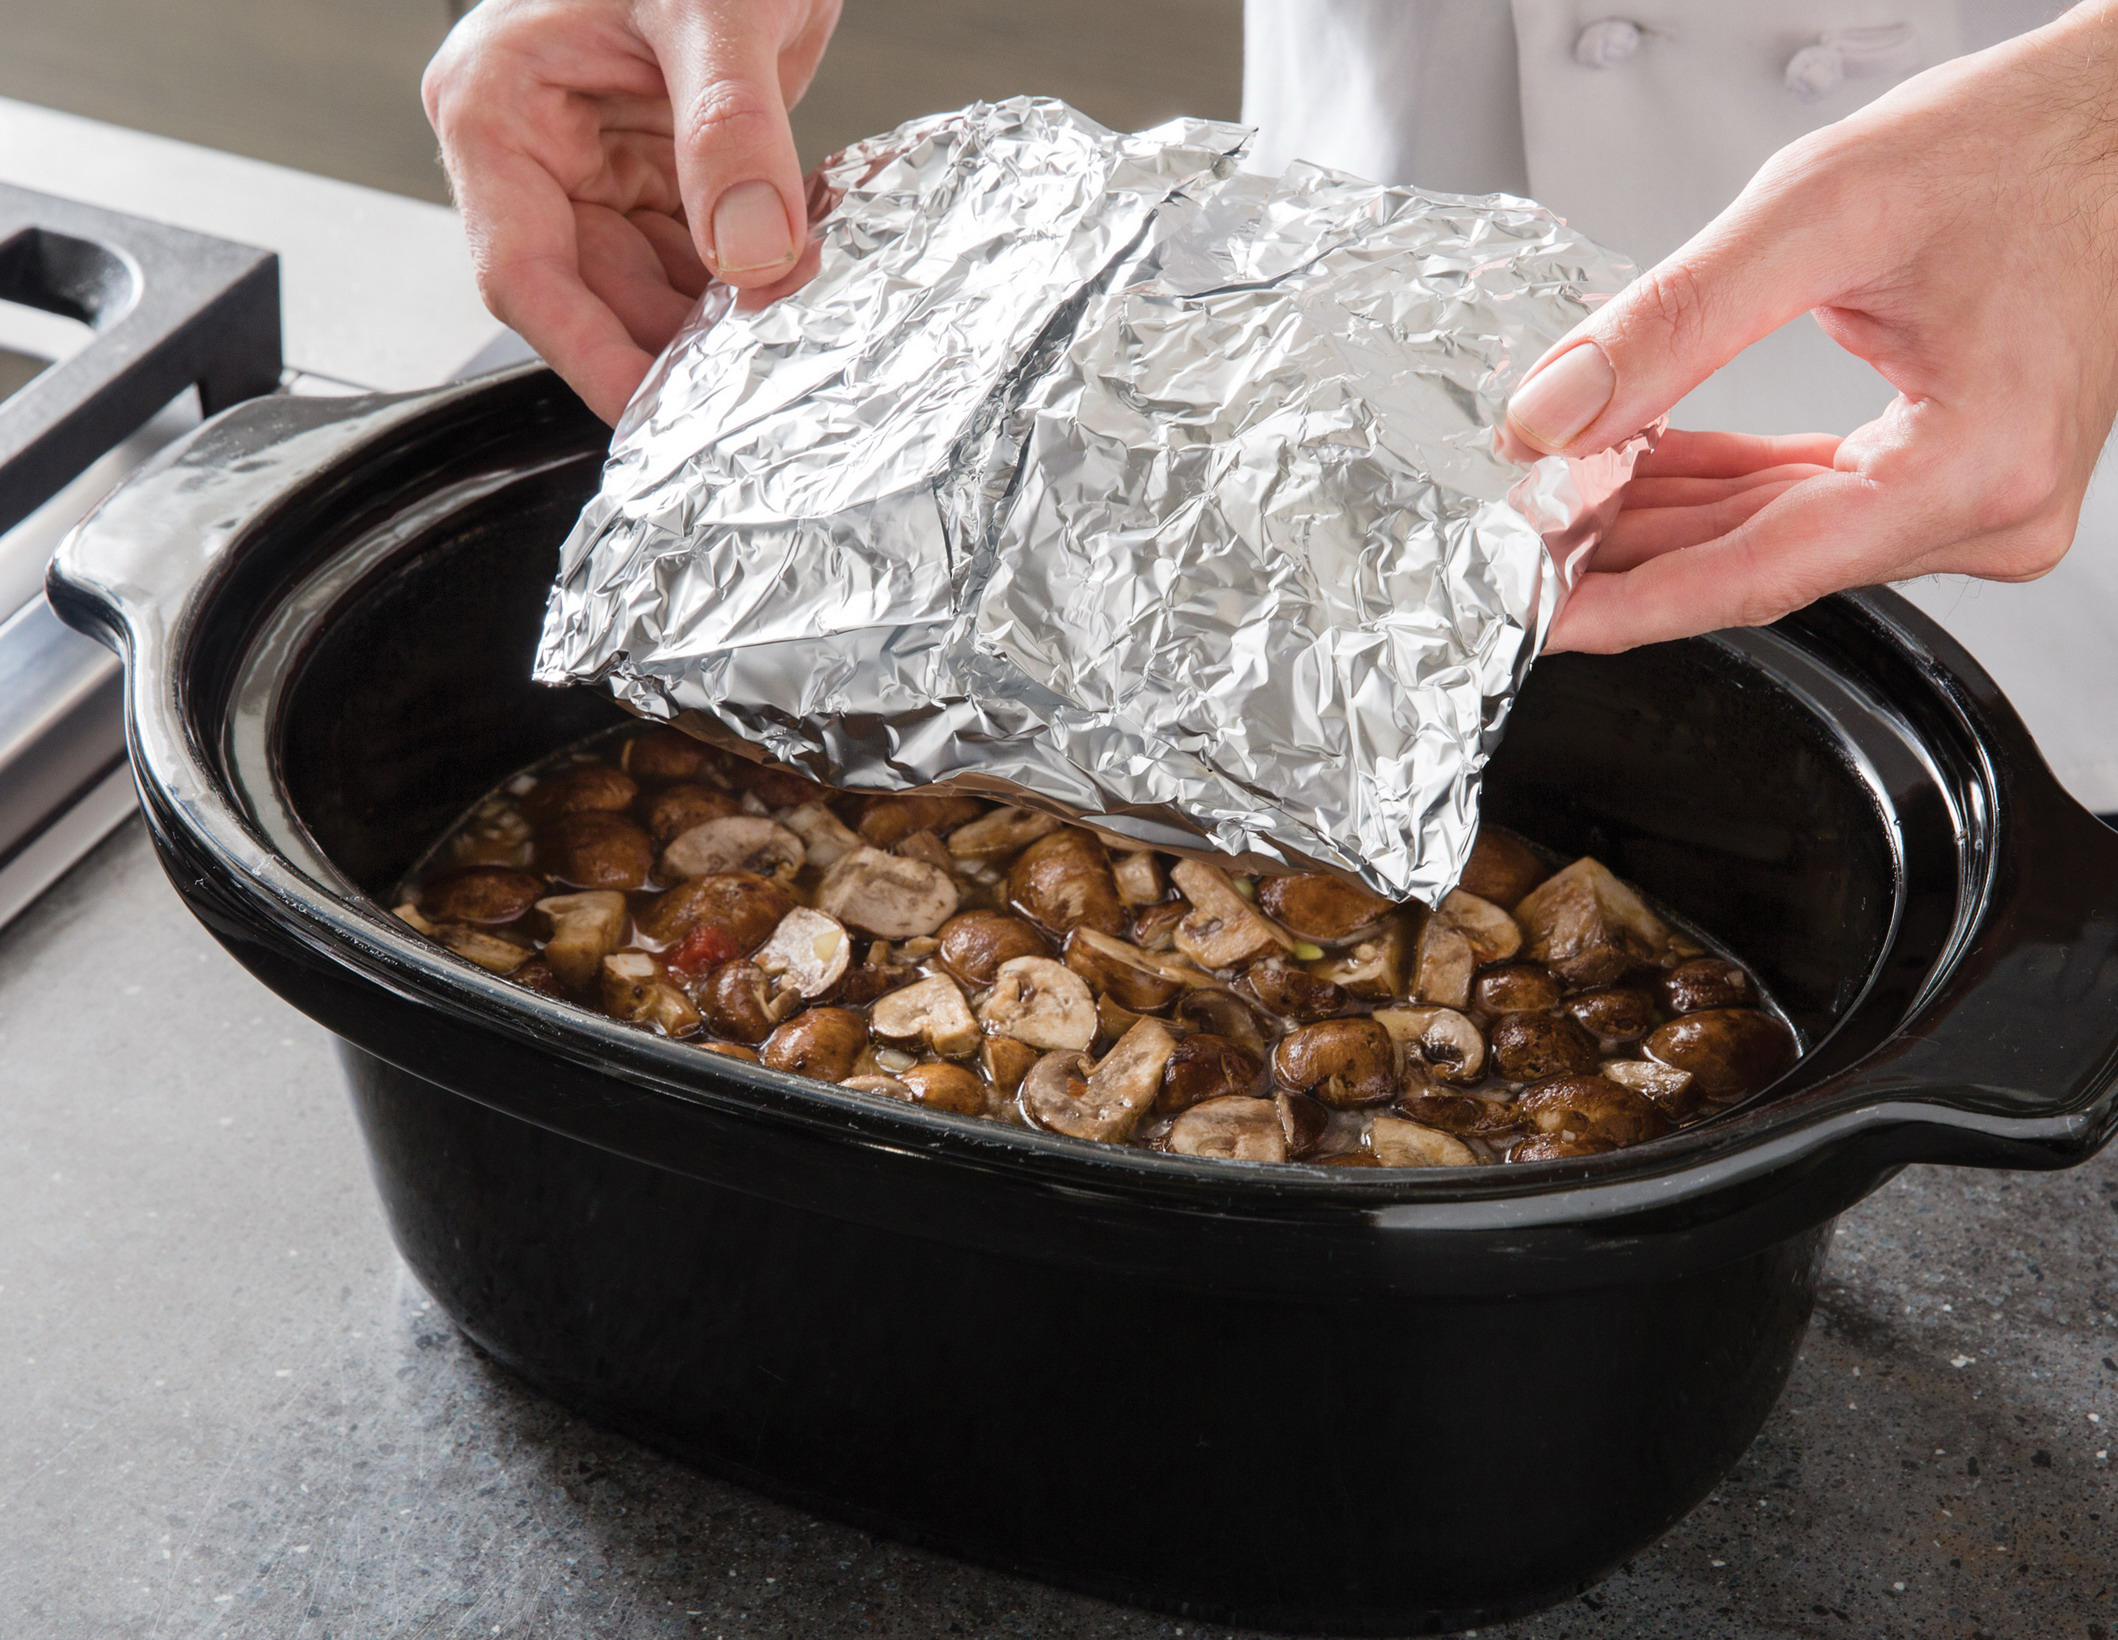
2. Place packet on top of ingredients in slow cooker, pressing it gently to fit.
Serves 6
Cooking time 5 to 6 hours on low or 3 to 4 hours on high
Why This Recipe Works “Traditional” mashed potatoes are undeniably delicious, but they require loads of butter and dairy to achieve the expected flavor and texture. But cooking sliced russet potatoes in the moist environment of the slow cooker, using a sheet of parchment paper laid on top of them to trap steam and ensure even cooking, meant we didn’t need to use either butter or cream to achieve mashed-potato nirvana. Cooking garlic alongside the potatoes in the cooker added a noticeable but mellow garlic flavor to our mash. And switching from butter to olive oil gave our slow-cooker mashed potatoes a luxuriously smooth texture and a deep, subtle peppery flavor all their own. You will need a 4- to 7-quart slow cooker for this recipe.
2 pounds russet potatoes, peeled and sliced ¼ inch thick
1 cup water, plus extra as needed
3 garlic cloves, lightly crushed and peeled
1 teaspoon table salt
Vegetable oil spray
3 tablespoons extra-virgin olive oil
2 teaspoons lemon juice
1. Combine potatoes, water, garlic, and salt in slow cooker. Spray top layer of potatoes with oil spray. Press 16 by 12-inch sheet of parchment paper firmly onto potatoes, folding down edges as needed. Cover and cook until potatoes are tender, 5 to 6 hours on low or 3 to 4 hours on high.
2. Discard parchment. Mash potatoes with potato masher until smooth. Fold in oil and lemon juice and season with salt and pepper to taste. Serve. (Mashed potatoes can be held on warm or low setting for up to 2 hours; loosen with hot water as needed before serving.)
CREATING A PARCHMENT SHIELD
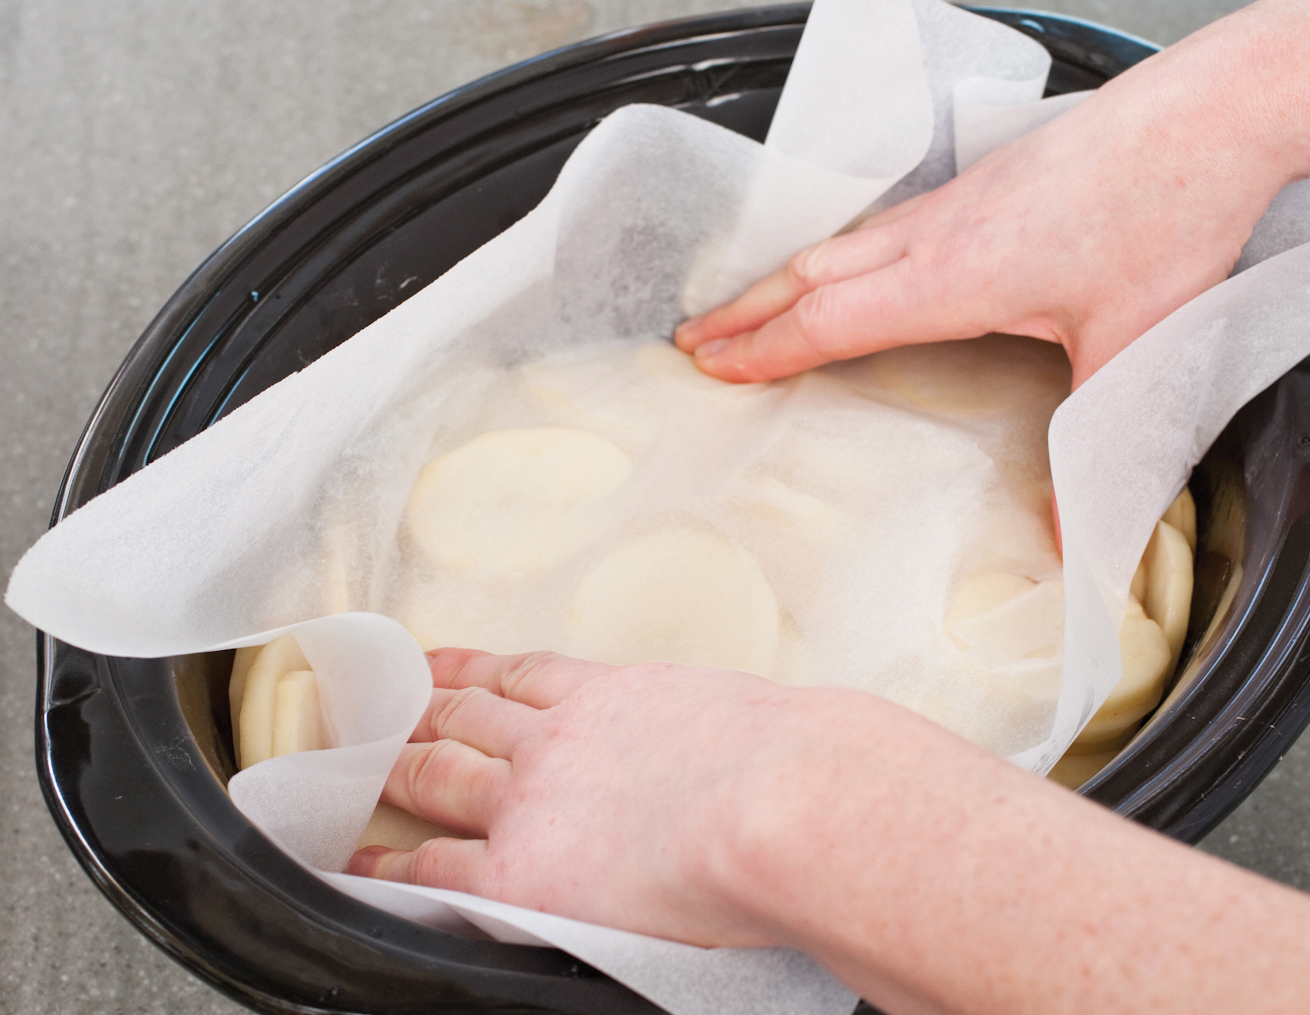
Press 16 by 12-inch sheet of parchment paper firmly onto vegetables, folding down edges as needed.

Serves 6
Cooking time 5 to 6 hours on low or 3 to 4 hours on high
Why This Recipe Works Fingerling potatoes are creamy and dense and feel somehow special because of their small, narrow shape, making them an attractive alternative to standard white or red potatoes. So for a supereasy, company-worthy side dish, we turned to fingerlings, which require no prep work and turn perfectly tender in the slow cooker. They are traditionally roasted because boiling them dilutes their delicate flavor and turns them mushy, but we found that adding them to the slow cooker without any liquid whatsoever—just some olive oil, garlic, and scallions for flavor—allowed them to retain their earthy sweetness and cook through without a hint of mushiness. Before serving, we simply added chopped fresh parsley and lemon zest and juice for bright color and flavor. Use fingerling potatoes measuring approximately 3 inches long and 1 inch in diameter. You will need a 4- to 7-quart slow cooker for this recipe.
2 pounds fingerling potatoes
4 teaspoons extra-virgin olive oil, divided
2 scallions, white parts minced, green parts sliced thin, divided
3 garlic cloves, minced
1 teaspoon table salt
¼ teaspoon pepper
1 tablespoon chopped fresh parsley
1 teaspoon lemon zest plus 1 tablespoon juice
1. Combine potatoes, 1 teaspoon oil, scallion whites, garlic, salt, and pepper in slow cooker. Cover and cook until potatoes are tender, 5 to 6 hours on low or 3 to 4 hours on high.
2. Stir in parsley, lemon zest and juice, scallion greens, and remaining 1 tablespoon oil; season with salt and pepper to taste. Serve. (Potatoes can be held on warm or low setting for up to 2 hours.)
Serves 4
Cooking time 5 to 6 hours on low or 3 to 4 hours on high
Why This Recipe Works Garam masala, golden raisins, and toasted cashews transform hearty and comforting but mild-tasting butternut squash into a flavor-packed dish. We simply slow-cooked seasoned sliced squash until tender, then mashed the squash right in the cooker using a potato masher. For luxurious creaminess and rich flavor and texture, we folded in plant-based creamer and coconut oil along with the raisins and nuts. We like our homemade Garam Masala (recipe follows) in this recipe, but you can use store-bought. You will need a 4- to 7-quart slow cooker for this recipe.
2 pounds butternut squash, peeled, halved lengthwise, seeded, and sliced ¼ inch thick
½ cup water, plus extra as needed
2 teaspoons packed brown sugar
¾ teaspoon table salt
½ teaspoon garam masala
Vegetable oil spray
6 tablespoons plant-based creamer or dairy half-and-half, warmed
¼ cup golden raisins
¼ cup roasted cashews, chopped
1 tablespoon refined coconut oil or unsalted butter, melted
1. Combine squash, water, sugar, salt, and garam masala in slow cooker. Spray top layer of squash with oil spray. Press 16 by 12-inch sheet of parchment paper firmly onto squash, folding down edges as needed. Cover and cook until squash is tender, 5 to 6 hours on low or 3 to 4 hours on high.
2. Discard parchment. Mash squash with potato masher until smooth. Fold in plant-based creamer, raisins, cashews, and melted oil. Season with salt and pepper to taste. Serve. (Mashed squash can be held on warm or low setting for up to 2 hours; loosen with hot water as needed before serving.)
Makes about ½ cup
For the best results, grind your own peppercorns.
1½ tablespoons black peppercorns
2 teaspoons cardamom pods
1½ teaspoons coriander seeds
1¼ teaspoons cumin seeds
¾ of 1 (3-inch) cinnamon stick
Process all ingredients in spice grinder until finely ground, about 30 seconds. Mixture can be stored at room temperature in airtight container for up to 1 year.
Serves 4
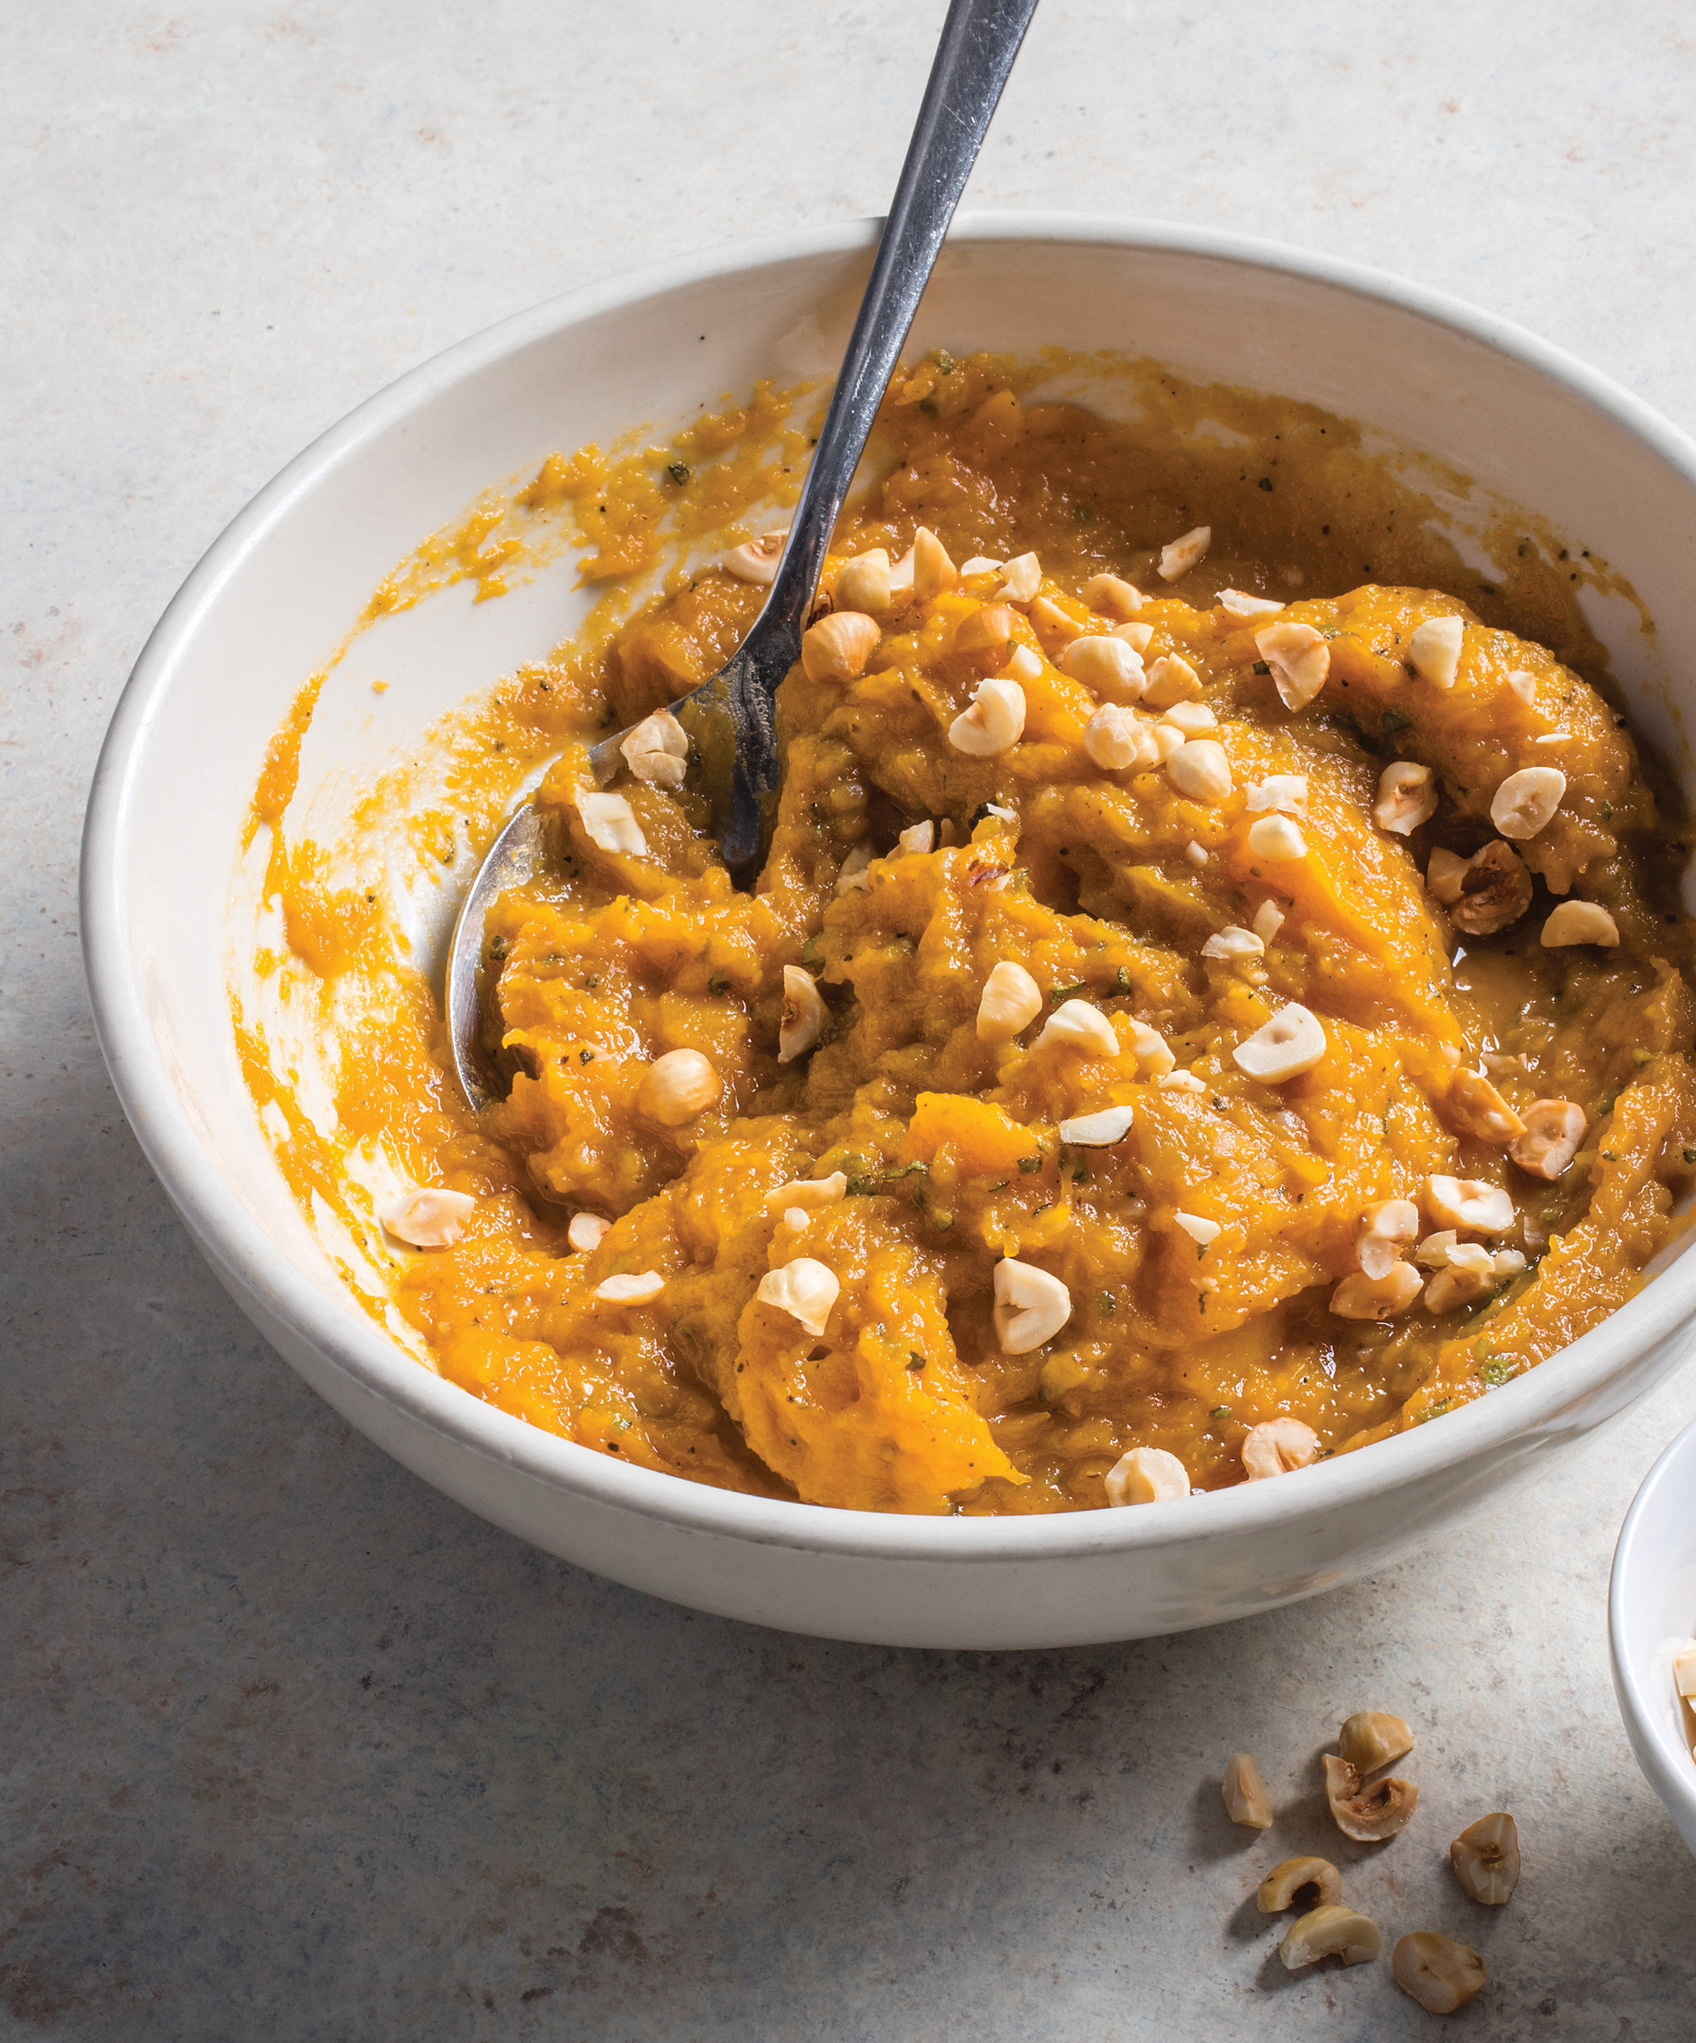
Why This Recipe Works The pressure cooker makes achieving this comforting autumnal mash fast and simple. Blooming garlic, onion, and cinnamon in coconut oil gave the dish a warm richness. We then stirred in cut-up squash and a chopped Granny Smith apple, which accented the sweetness of the squash with some brightness. A small amount of broth steamed the squash and apple to tenderness and boosted flavor, and then, after releasing the pressure, we simply switched to the sauté or browning function to quickly cook off any excess liquid, concentrating the flavors with minimal effort. Mashing the squash and apple with a potato masher gave the dish a pleasingly rustic texture. Maple syrup stirred in at the end enhanced sweetness, minced sage brought an herbal touch, and hazelnuts added a crunchy, toasty finish.
2 tablespoons refined coconut oil or unsalted butter
½ onion, chopped fine
1 teaspoon table salt
½ teaspoon pepper
1 garlic clove, minced
⅛ teaspoon ground cinnamon
2 pounds butternut squash, peeled, seeded, and cut into 1-inch pieces (5 cups)
1 Granny Smith apple, peeled, cored, and cut into 1-inch pieces
½ cup vegetable broth
2 tablespoons maple syrup
2 teaspoons minced fresh sage
¼ cup hazelnuts, toasted, skinned, and chopped coarse
1. Using highest sauté or browning function, melt oil in electric pressure cooker. Add onion, salt, and pepper and cook until onion is softened, 3 to 5 minutes. Stir in garlic and cinnamon and cook until fragrant, about 30 seconds. Stir in squash, apple, and broth.
2. Lock lid in place and close pressure release valve. Select high pressure cook function and cook for 6 minutes. Turn off pressure cooker and quick-release pressure. Carefully remove lid, allowing steam to escape away from you.
3. Using highest sauté or browning function, continue to cook squash mixture, stirring occasionally, until liquid is almost completely evaporated, 3 to 5 minutes. Turn off pressure cooker. Using potato masher, mash squash mixture until mostly smooth. Stir in maple syrup and sage and season with salt and pepper to taste. Transfer to serving bowl and sprinkle with hazelnuts. Serve.
Serves 4
Cooking time 3 to 4 hours on low or 2 to 3 hours on high
Why This Recipe Works Another quintessential fall and winter squash, acorn squash takes seemingly forever to roast in the oven and can sometimes emerge dry and a bit grainy when cooked that way. In the slow cooker, however, it turns tender easily without ever overcooking or drying out. Here we created a simple cooking base made up of water, orange juice, cloves, and cinnamon and placed the squash wedges cut side down in this flavorful mixture. And since we think a glaze greatly enhances both the look and flavor of acorn squash, we made a quick one in the microwave by combining maple syrup with coriander, cayenne pepper, and orange zest. This lively glaze elevated the humble squash, toasted hazelnuts provided flavorful crunch, and a sprinkling of fresh parsley added a bright herbal finish. You will need a 5- to 7-quart oval slow cooker for this recipe.
2 teaspoons grated orange zest plus ½ cup juice
5 cloves
1 cinnamon stick
2 (1-pound) acorn squashes, quartered pole to pole and seeded
¼ teaspoon table salt
⅛ teaspoon pepper
¼ cup maple syrup
⅛ teaspoon ground coriander
Pinch cayenne pepper
¼ cup hazelnuts, toasted, skinned, and chopped coarse
1 tablespoon chopped fresh parsley
1. Combine 1 cup water, orange juice, cloves, and cinnamon in slow cooker. Sprinkle squash with salt and pepper and shingle, cut side down, in slow cooker. Cover and cook until squash is tender, 3 to 4 hours on low or 2 to 3 hours on high.
2. Using tongs, transfer squash to serving platter. Brush away any cloves that stick to squash and discard cooking liquid and cinnamon stick. Microwave maple syrup, coriander, cayenne, and orange zest in bowl, stirring occasionally, until heated through, about 1 minute; season with salt and pepper to taste. Drizzle glaze over squash and sprinkle with hazelnuts and parsley. Serve.
Serves 2 as a main dish or 4 as a side dish
Why This Recipe Works Spaghetti squash strands are a fun vegetable stand-in for pasta, and using a pressure cooker allowed us to cook a large spaghetti squash and make a simple fresh tomato sauce all together in one pot. First, we bloomed aromatic garlic, oregano, and pepper flakes with tomato paste to create an umami-rich base. We opted for plum tomatoes and chose not to peel them, and because they contain proportionally less juice than larger tomatoes, we didn’t need to worry about seeding. Finally, we added the squash, halved and seeded, to the pressure cooker and cooked it until it was tender. The liquid from the tomatoes was enough to steam our squash to perfection. To rid the final dish of excess moisture, we drained the shredded squash in a strainer and reduced and concentrated the tomato sauce using the sauté or browning function. Fresh basil and Parmesan (vegan or dairy) completed our plant-based plate.
3 tablespoons extra-virgin olive oil
3 garlic cloves, minced
1 tablespoon tomato paste
1 teaspoon minced fresh oregano or ½ teaspoon dried
½ teaspoon table salt
Pinch red pepper flakes
2 pounds plum tomatoes, cored and cut into 1-inch pieces
1 (4-pound) spaghetti squash, halved lengthwise and seeded
2 tablespoons chopped fresh basil
Vegan Parmesan Substitute (this page) or shaved dairy Parmesan
1. Using highest sauté or browning function, heat oil in electric pressure cooker until shimmering. Add garlic, tomato paste, oregano, salt, and pepper flakes and cook, stirring frequently, until fragrant, about 30 seconds. Stir in tomatoes. Season squash halves with salt and pepper and nestle cut side down into pressure cooker.
2. Lock lid in place and close pressure release valve. Select high pressure cook function and cook for 10 minutes. Turn off pressure cooker and quick-release pressure. Carefully remove lid, allowing steam to escape away from you.
3. Transfer squash to cutting board, let cool slightly, then shred flesh into strands using 2 forks; discard skins. Transfer squash to fine-mesh strainer and let drain while finishing sauce.
4. Cook sauce using highest sauté or browning function until tomatoes are completely broken down and sauce is thickened, 15 to 20 minutes. Transfer squash to serving platter, spoon sauce over top, and sprinkle with basil and vegan Parmesan substitute. Serve.
Serves 4
Cooking time 3 to 4 hours on low or 2 to 3 hours on high
Why This Recipe Works Highly nutritious, hearty, and versatile, sweet potatoes should be a mainstay in any diet, plant-based or otherwise. Though they can be prepared many different ways, they take beautifully to slow cooking since they are dense and take a while to cook through, even when sliced, as they are here. We chose to braise the sweet potatoes in an Asian-inspired liquid infused with lemongrass, star anise, and ginger, which gave this superfood super flavor. After the sweet potatoes were tender, we tossed the aromatic potato slices with a fresh cilantro and lime vinaigrette, which provided a bright and spicy contrast and herbaceous note to the sweet potatoes. You will need a 5- to 7-quart oval slow cooker for this recipe.
1 lemongrass stalk, trimmed to bottom 6 inches and bruised with back of knife
2 star anise pods
1 tablespoon grated fresh ginger, divided
½ teaspoon table salt
2 pounds sweet potatoes, peeled and sliced ½ inch thick
1 tablespoon chopped fresh cilantro
1 tablespoon packed brown sugar
1 tablespoon toasted sesame oil
1 teaspoon grated lime zest plus 4 teaspoons juice
¼ teaspoon Fish Sauce Substitute (this page)
Pinch cayenne
1. Combine 1 cup water, lemongrass, star anise, 2 teaspoons ginger, and salt in slow cooker. Nestle potatoes into slow cooker, cover, and cook until potatoes are tender, 3 to 4 hours on low or 2 to 3 hours on high.
2. Using slotted spoon, transfer potatoes to serving platter. Brush away any lemongrass or star anise that sticks to potatoes and discard cooking liquid. Whisk cilantro, sugar, oil, lime zest and juice, fish sauce substitute, cayenne, and remaining 1 teaspoon ginger together in bowl; season with salt and pepper to taste. Drizzle dressing over potatoes and serve.
Serves 4
Why This Recipe Works Sturdy Swiss chard takes well to braising, which turns it meltingly tender and tempers its assertive flavor. So using a pressure cooker to prepare an abundant amount of Swiss chard in a flash was a no-brainer. We decided on simple flavorings to keep the chard in the spotlight: A healthy dose of garlic and a pinch of red pepper flakes made for a punchy base. We made sure to use the chard stems as well as the leaves to add textural contrast (and minimize waste). Using vegetable broth to braise the greens infused them with extra savory flavor, and the garlicky chard turned out tender with just the right amount of chew. A splash of lemon juice at the end lightened the finished dish. Make this a meal by serving it over the cooked grains of your choice.
¼ cup extra-virgin olive oil, divided
5 garlic cloves, sliced thin
⅛ teaspoon red pepper flakes
½ cup vegetable broth
¼ teaspoon table salt
2 pounds Swiss chard, stems cut into 2-inch lengths, leaves sliced into 2-inch-wide strips
1 tablespoon lemon juice, plus extra for seasoning
1. Using highest sauté or browning function, cook 2 tablespoons oil, garlic, and pepper flakes in electric pressure cooker until fragrant, about 1 minute. Stir in broth and salt, then stir in chard stems and leaves, 1 handful at a time.
2. Lock lid in place and close pressure release valve. Select high pressure cook function and cook for 5 minutes. Turn off pressure cooker and quick-release pressure. Carefully remove lid, allowing steam to escape away from you.
3. Stir in lemon juice and remaining 2 tablespoons oil. Season with salt, pepper, and extra lemon juice to taste. Serve.
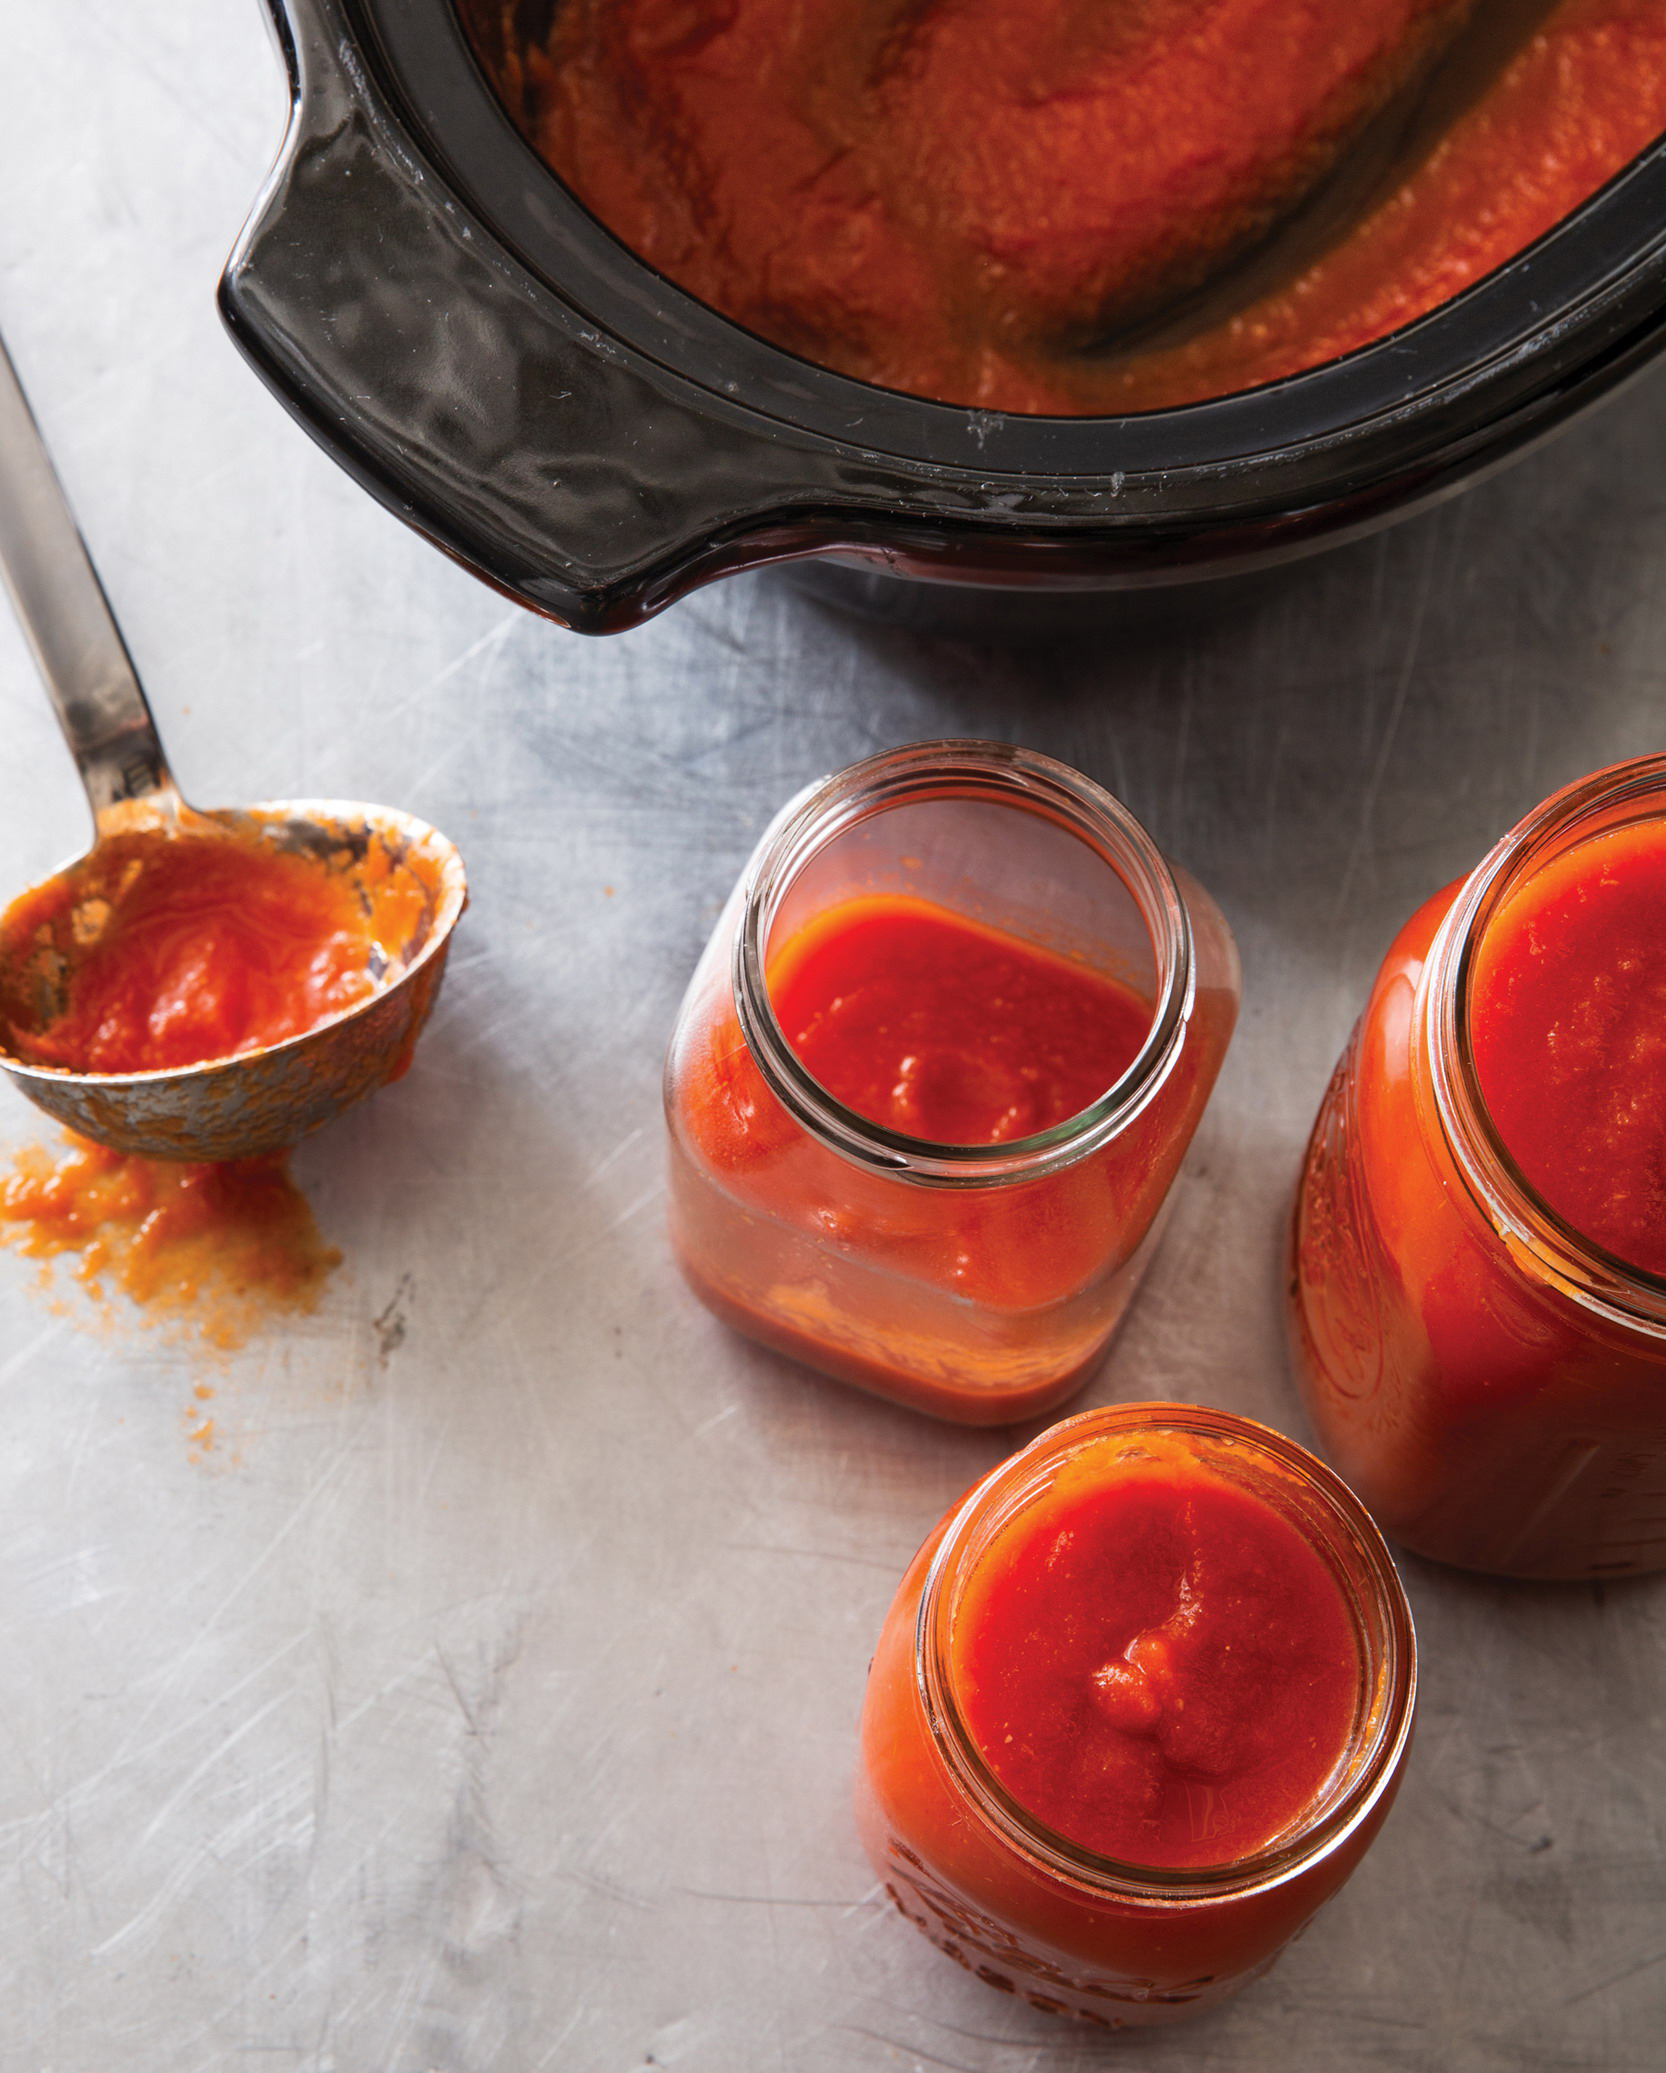
Makes about 8 cups; enough for 2 pounds pasta
Cooking time 8 to 10 hours on low or 5 to 7 hours on high
Why This Recipe Works The beauty of this recipe is that you can put a bounty of fresh tomatoes into a slow cooker along with a little salt, walk away for up to 10 hours, and end up with a brightly flavored, endlessly versatile tomato sauce. This is the recipe to turn to when your local farmers’ markets are overflowing with their late summer crops of field-grown tomatoes (and aromatic stalks of freshly picked basil). It makes enough to serve a crowd—or plenty to freeze for later use, when summer is long gone and you need a reminder of what a fresh tomato tastes like. This is a lighter-bodied sauce, so if serving with pasta, don’t dilute the sauce with pasta-cooking water as you normally might. Be sure to leave the lid slightly ajar—about ½ inch—to allow steam to escape and help concentrate the intense tomato flavor. You will need a 4- to 7-quart slow cooker for this recipe.
8 pounds plum tomatoes, cored and halved crosswise
1½ teaspoons table salt
¼ cup extra-virgin olive oil
¼ cup chopped fresh basil
1. Working over bowl, squeeze each tomato half to expel seeds and excess juice. Discard seeds and juice. Combine tomatoes and salt in slow cooker. Cover, leaving lid about ½ inch ajar, and cook until tomatoes are very soft, 8 to 10 hours on low or 5 to 7 hours on high.
2. Transfer tomatoes to colander and let excess liquid drain (do not press on tomatoes). Working in batches, process tomatoes in blender until smooth, about 1 minute; return to now-empty slow cooker. Stir oil into sauce and season with salt and pepper to taste. Before serving, stir in basil. (Sauce can be refrigerated for 1 week or frozen for up to 3 months.)
Makes about 10 cups; enough for 2 pounds pasta
Cooking time 8 to 10 hours on low or 5 to 7 hours on high
Why This Recipe Works The long simmering time that comes from using a slow cooker renders classic marinara sauce rich and flavorful. Our biggest hurdle in creating a marinara that was neither watery nor too thick was choosing the right tomato products. Our solution was a combination of three different tomato products (paste, crushed, and puree). The concentrated products (paste and puree) added complex, umami-rich flavor to the canned crushed tomatoes without unwanted dilution, so there was no need to evaporate excess liquid. We microwaved onions, garlic, and oregano along with the tomato paste to create a flavor-packed sauce base with a classic marinara taste profile. Fresh basil added at the end provided an aromatic finishing touch. In addition to serving this with pasta, we like to use it as a dipping sauce for fried vegetables or spoon it onto Italian sandwiches. You will need a 4- to 7-quart slow cooker for this recipe.
2 onions, chopped fine
6 garlic cloves, minced
2 tablespoons tomato paste
2 tablespoons extra-virgin olive oil
2 tablespoons minced fresh oregano or 2 teaspoons dried
1 teaspoon table salt
2 (28-ounce) cans crushed tomatoes
1 (28-ounce) can tomato puree
½ cup dry red wine
2 teaspoons sugar, plus extra for seasoning
¼ cup chopped fresh basil
1. Microwave onions, garlic, tomato paste, oil, oregano, and salt in bowl, stirring occasionally, until onions are softened, about 5 minutes; transfer to slow cooker. Stir in tomatoes, tomato puree, and wine. Cover and cook until sauce is deeply flavored, 8 to 10 hours on low or 5 to 7 hours on high.
2. Stir sugar into sauce. Season with salt, pepper, and extra sugar to taste. Before serving, stir in basil. (Sauce can be refrigerated for 1 week or frozen for up to 3 months.)
Serves 4 to 6
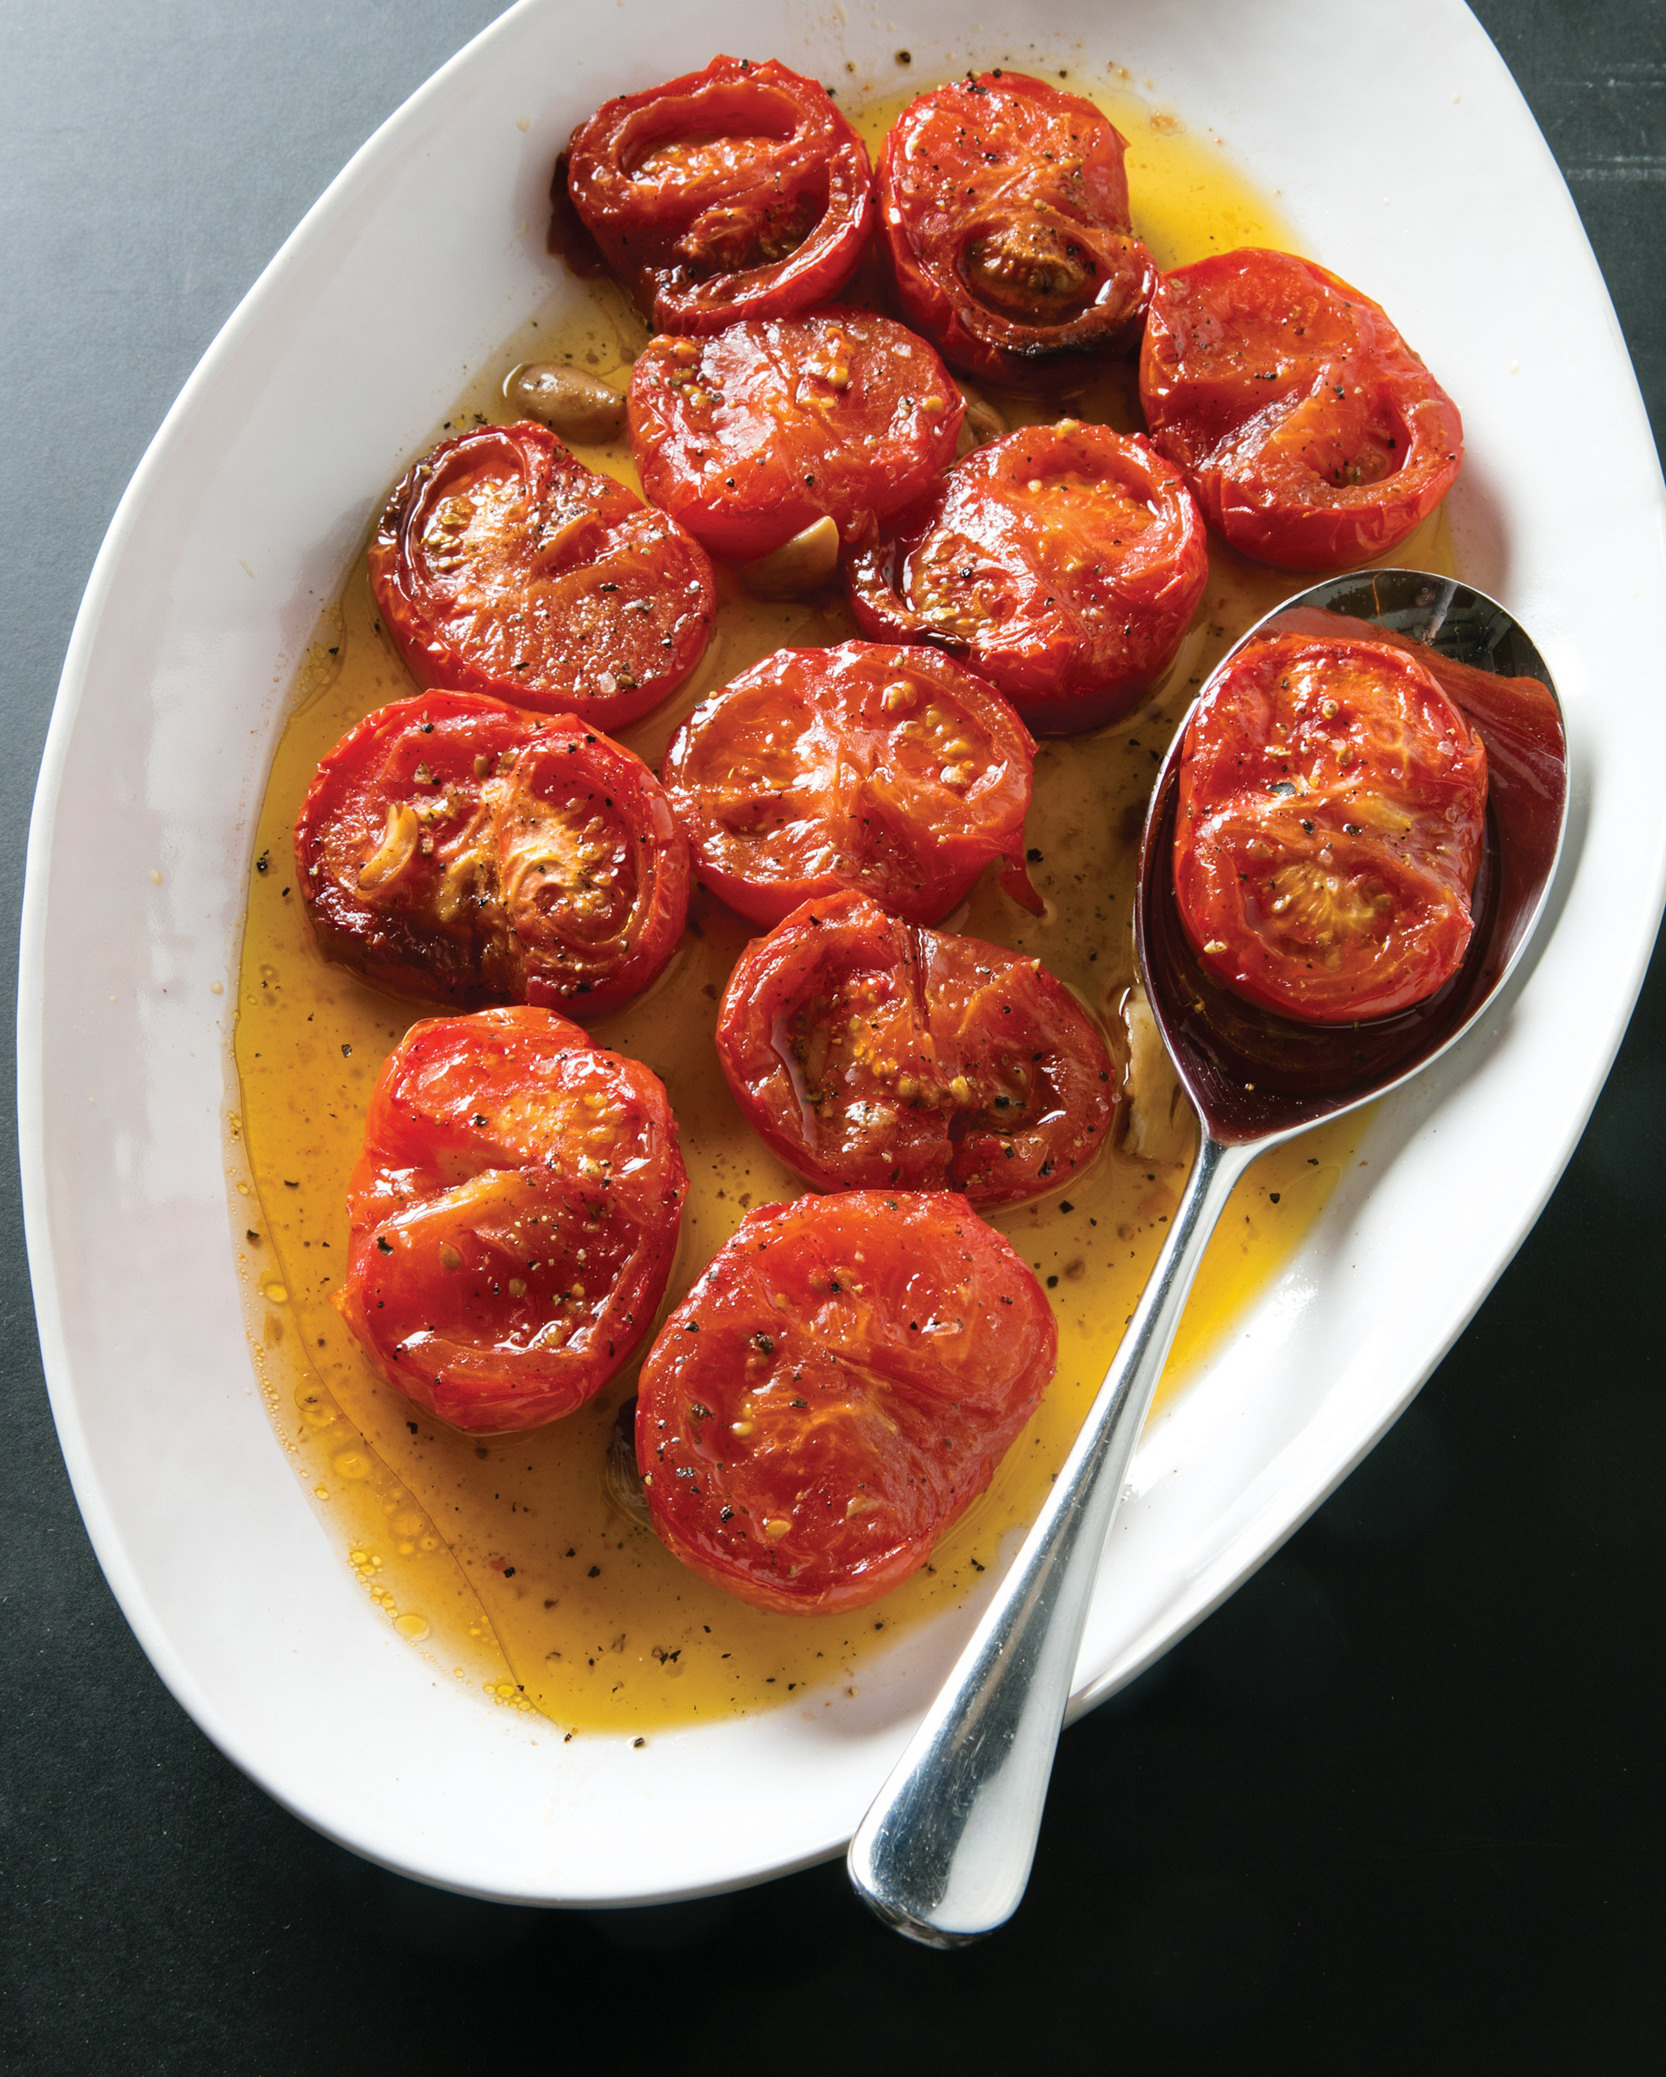
Cooking time 5 to 6 hours on low or 3 to 4 hours on high
Why This Recipe Works Whether you have an overabundance of just-picked August tomatoes or you are just looking for a way to improve average supermarket tomatoes, slow roasting is a beautiful way to go. We were after a foolproof slow-cooker “roasting” method that would deliver a sweet, intense flavor and melt-in-your-mouth texture. We gently tossed halved tomatoes with just enough olive oil to infuse them with flavor as they released their juices into the slow cooker, creating a flavorful cooking liquid. The addition of smashed garlic cloves, which mellowed and softened during the cooking time, lent a rich, nutty flavor to the oil. Aside from a little thyme, salt, and pepper, no other seasoning was needed. We recommend serving these tomatoes alongside plenty of crusty bread for dipping into the extra cooking liquid. You can also use this seriously flavorful cooking liquid to make a salad dressing. These tomatoes are great on sandwiches, or spread whole-grain toast with ricotta or goat cheese and top with the roasted tomatoes. You will need a 5- to 7-quart slow cooker for this recipe.
6 ripe tomatoes, cored and halved lengthwise
½ cup extra-virgin olive oil
6 garlic cloves, peeled and smashed
2 teaspoons minced fresh thyme or ¾ teaspoon dried
¾ teaspoon table salt
¼ teaspoon pepper
1. Combine all ingredients in slow cooker. Cover and cook until tomatoes are tender and slightly shriveled around edges, 5 to 6 hours on low or 3 to 4 hours on high.
2. Let tomatoes cool in oil for at least 15 minutes or up to 4 hours. Season with salt and pepper to taste. Serve.
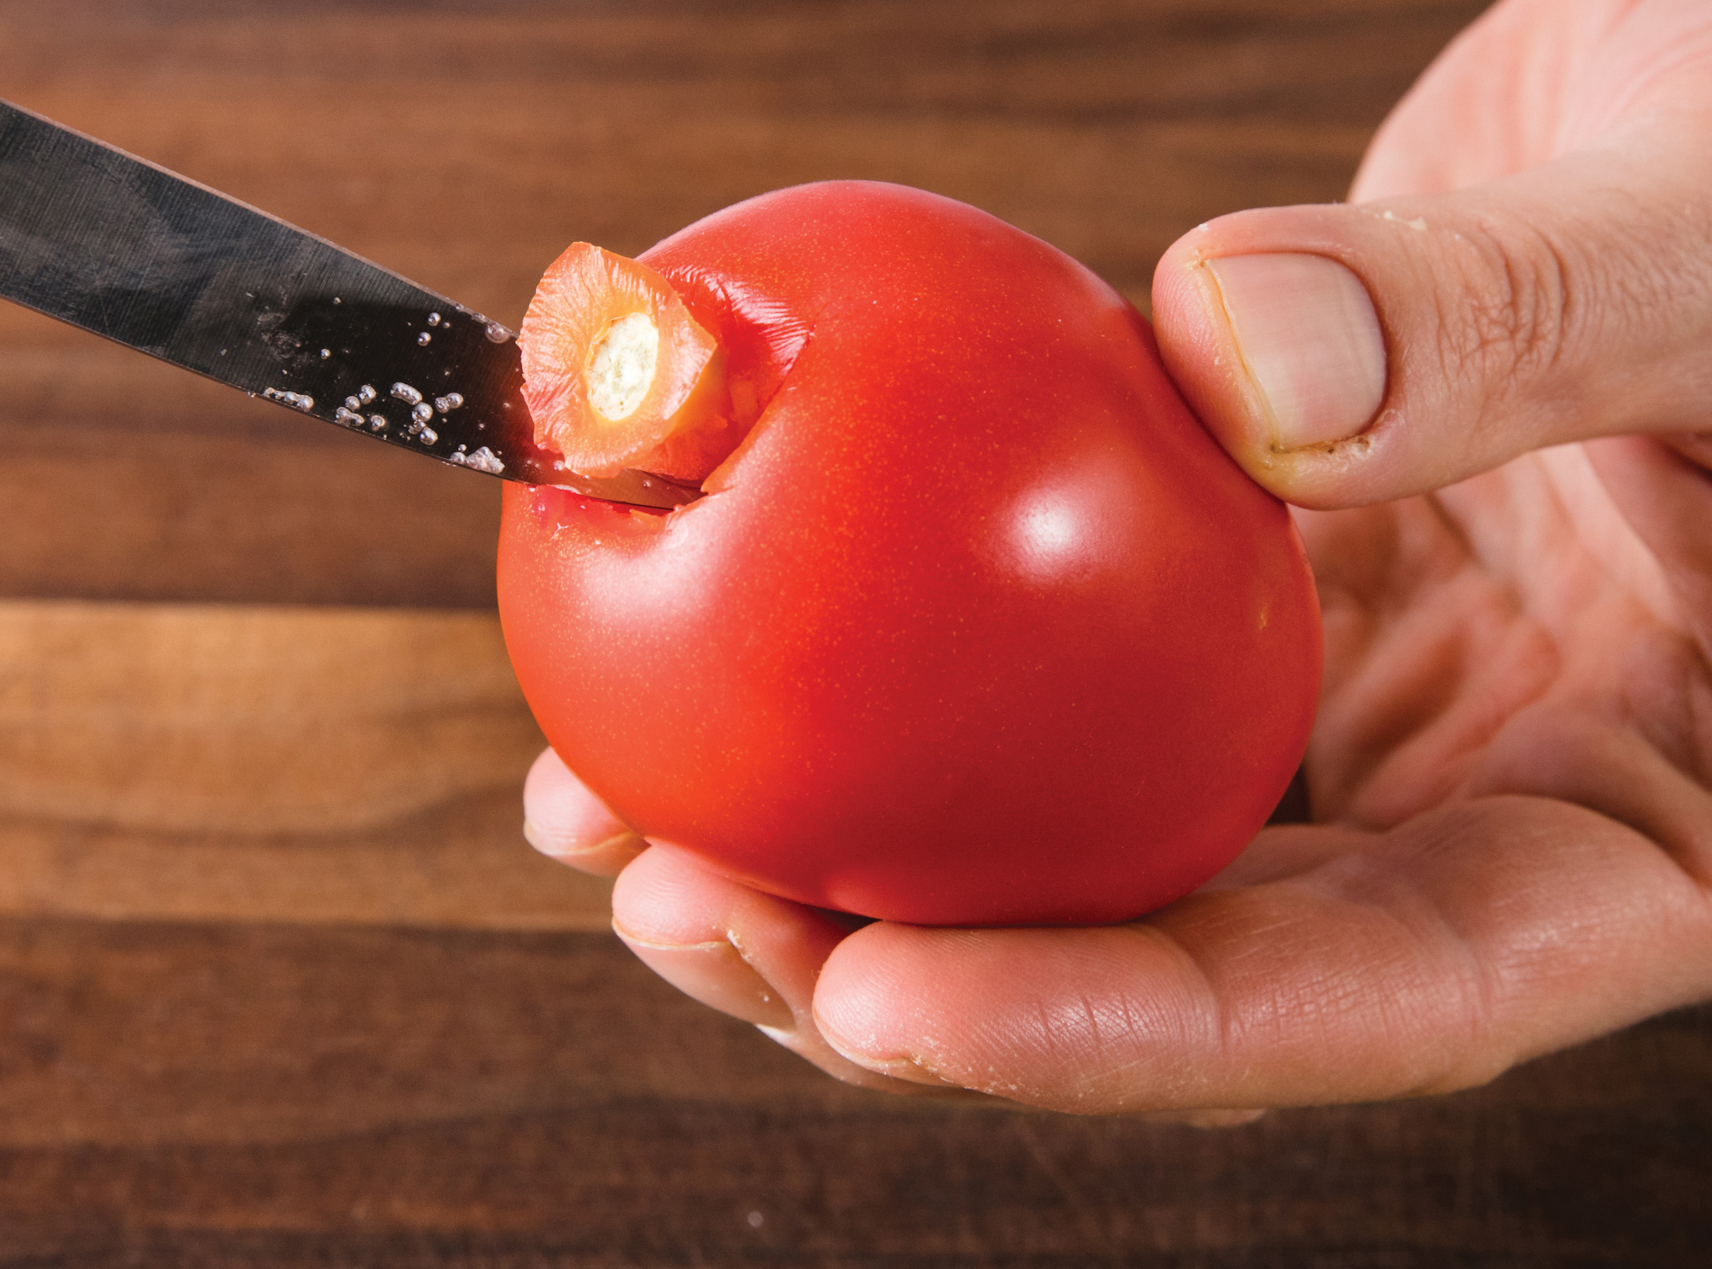
Remove core of tomato using paring knife.
Serves 4
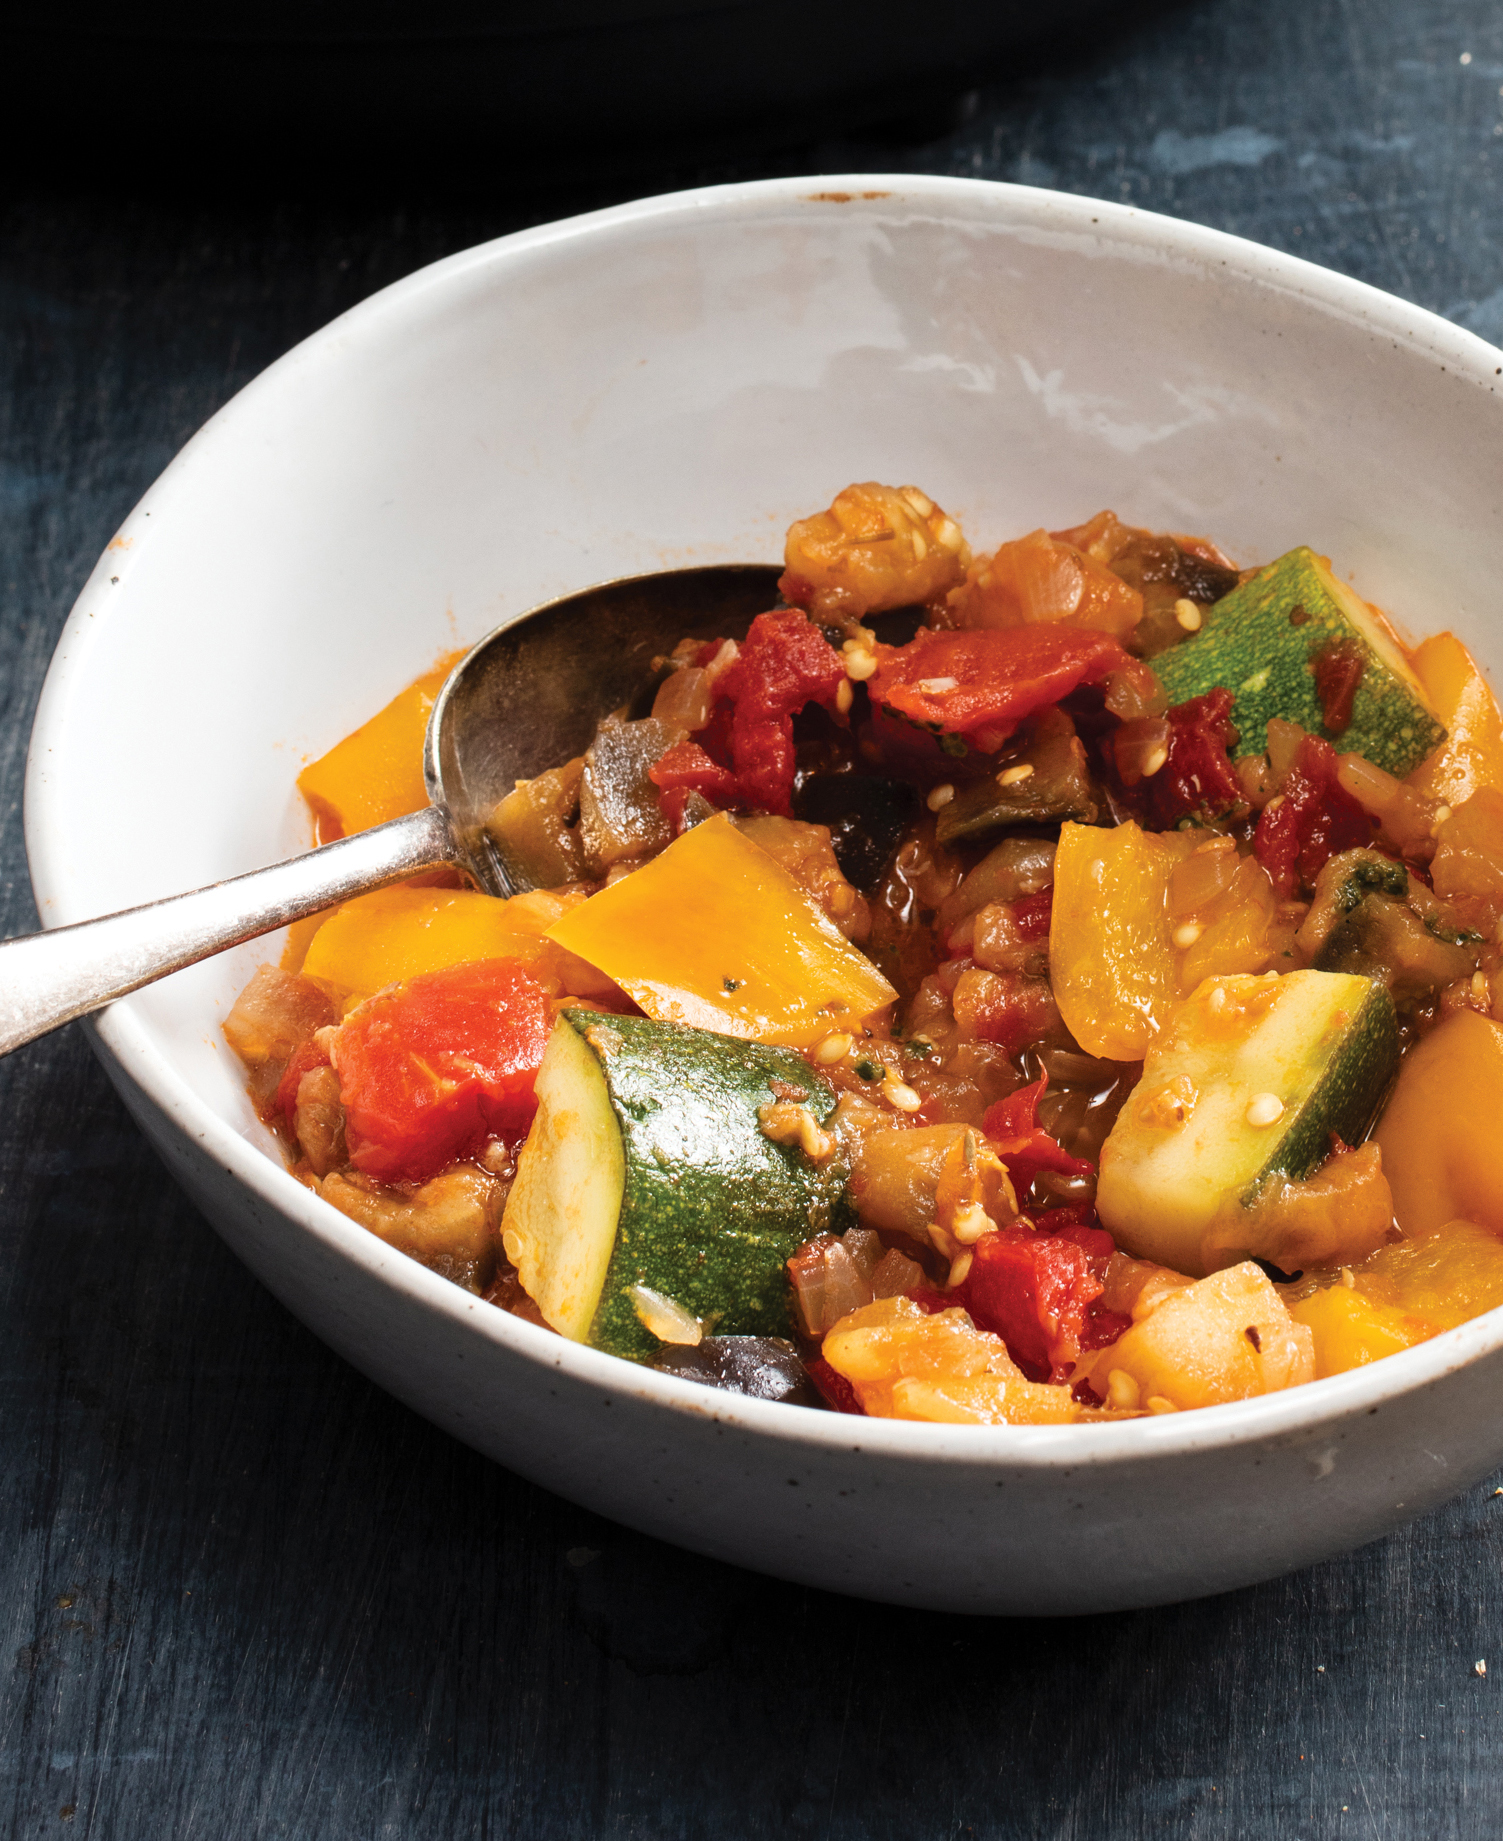
Why This Recipe Works The pressure cooker is tailor-made for traditionally long-cooked stews, but it doesn’t allow for any evaporation—and this Provençal classic is chock-full of watery vegetables. Cooking off some of their moisture before and after pressure-cooking did the trick. Sautéing the peppers also concentrated their flavor. We found that pretreating the eggplant with salt wasn’t necessary—cutting it small ensured it would break down and help create a thicker sauce (it also helped shorten the cooking time). Canned whole tomatoes and zucchini rounded out the vegetable medley. Garlic, pepper flakes, and herbes de Provence added a zesty spice backbone characteristic of this dish, and a splash of sherry vinegar to finish woke up the flavors of the sweet vegetables. We prefer to make our Vegan Pesto, but a store-bought variety (vegan or dairy) will work.
2 tablespoons extra-virgin olive oil
2 red or yellow bell peppers, stemmed, seeded, and cut into 1-inch pieces
1 onion, chopped fine
1 teaspoon table salt
4 garlic cloves, minced
1 teaspoon herbes de Provence
¼ teaspoon red pepper flakes
1 (28-ounce) can whole peeled tomatoes, drained with juice reserved, chopped
1 pound eggplant, cut into ½-inch pieces
1 pound zucchini, quartered lengthwise and sliced 1 inch thick
1 tablespoon sherry vinegar
¼ cup basil Vegan Pesto (this page), plus extra for serving
1. Using highest sauté or browning function, heat oil in electric pressure cooker until shimmering. Add bell peppers, onion, and salt and cook until vegetables are softened, about 5 minutes. Stir in garlic, herbes de Provence, and pepper flakes and cook until fragrant, about 30 seconds. Stir in tomatoes and reserved juice, eggplant, and zucchini. Lock lid in place and close pressure release valve. Select high pressure cook function and cook for 1 minute.
2. Turn off pressure cooker and quick-release pressure. Carefully remove lid, allowing steam to escape away from you. Using highest sauté function, continue to cook vegetable mixture until zucchini is tender and sauce has thickened slightly, 3 to 5 minutes. Stir in vinegar and season with salt and pepper to taste. Dollop individual portions with pesto and serve, passing extra pesto separately.
Serves 4
Why This Recipe Works Using a pressure cooker makes perfect brown rice completely foolproof. (If you’re using a multicooker, although many multicookers now have preset “rice” buttons, we discovered that we got more consistent results by manually setting the pressure-cook time ourselves.) While stovetop rice is usually cooked using the absorption method (in which the rice soaks up all the liquid it’s cooked in), we cooked ours in plenty of liquid (similar to pasta) and then drained away the extra after cooking. This resulted in more evenly cooked rice, since all of the grains were completely submerged in liquid for the entire cooking time. To turn our brown rice into a satisfying main dish, we sautéed meaty shiitake mushrooms, fragrant scallions, and grated fresh ginger in the cooker after the rice was done, then stirred in edamame for satisfying protein and rice vinegar and mirin for brightness.
1½ cups short-grain brown rice, rinsed
¼ teaspoon table salt, plus salt for cooking rice
1 tablespoon vegetable oil
4 ounces shiitake mushrooms, stemmed and sliced thin
4 scallions, white parts minced, green parts sliced thin on bias
2 teaspoons grated fresh ginger
1 cup frozen edamame, thawed
4 teaspoons rice vinegar, plus extra for seasoning
1 tablespoon mirin, plus extra for seasoning
1 teaspoon toasted sesame oil
1. Combine 12 cups water, rice, and 2 teaspoons salt in electric pressure cooker.
2. Lock lid in place and close pressure release valve. Select high pressure cook function and cook for 8 minutes. Turn off pressure cooker and let pressure release naturally for 15 minutes. Quick-release any remaining pressure, then carefully remove lid, allowing steam to escape away from you.
3. Drain rice and transfer to large bowl. Wipe out pressure cooker with paper towels. Using highest sauté or browning function, heat vegetable oil in now-empty pressure cooker until shimmering. Add mushrooms, scallion whites, ginger, and salt and cook until mushrooms are softened, 5 to 7 minutes. Transfer to bowl with rice, then add edamame, vinegar, mirin, sesame oil, and scallion greens and gently toss to combine. Season with extra vinegar and mirin to taste. Serve.

Serves 6
Why This Recipe Works Using a pressure cooker to cook wild rice turned this healthy grain, which can take up to an hour on the stovetop, into a hands-off, any-night possibility. When prepared well, wild rice has a pleasantly chewy outer husk and a nutty, savory flavor; we found that the pressure cooker produced perfect wild rice every time as long as we cooked it pasta-style: that is, in enough water to keep it submerged. The pressure cooker’s ability to moderate the temperature of the cooking liquid meant that every grain turned out tender and intact. A handful of thyme sprigs and a couple of bay leaves added to the water infused the rice with flavor. To transform the nutty rice into a finished dish with contrasting flavors and textures, we added sweet-tart dried cranberries, crunchy pecans, fresh parsley, and bright apple cider vinegar. Do not use quick-cooking or presteamed wild rice in this recipe (read the ingredient list on the package to determine this).
2 cups wild rice, picked over and rinsed
8 sprigs fresh thyme
2 bay leaves
½ teaspoon table salt, plus salt for cooking rice
1 cup fresh parsley leaves
¾ cup dried cranberries
¾ cup pecans, toasted and chopped coarse
3 tablespoons refined coconut oil or unsalted butter, melted
1 shallot, minced
2 teaspoons apple cider vinegar
1. Combine 12 cups water, rice, thyme sprigs, bay leaves, and 1 tablespoon salt in electric pressure cooker.
2. Lock lid in place and close pressure release valve. Select high pressure cook function and cook for 18 minutes. Turn off pressure cooker and quick-release pressure. Carefully remove lid, allowing steam to escape away from you.
3. Discard thyme sprigs and bay leaves. Drain rice and transfer to large bowl. Add parsley, cranberries, pecans, melted oil, shallot, vinegar, and salt and gently toss to combine. Season with salt and pepper to taste. Serve.
Serves 6
Cooking time 3 to 4 hours on low or 2 to 3 hours on high
Why This Recipe Works Barley’s high protein content and appealingly nutty flavor make it a boon to the plant-based pantry. This distinctive barley pilaf features a potent blend of Indian-inspired spices—ginger, cinnamon, and cardamom—plus dates for sweetness and texture. To cook it properly in the slow cooker, we needed to find the right liquid-to-barley ratio. After a few tests, we found that 3½ cups broth to 1½ cups barley produced barley that was cooked through once all the broth had been absorbed, though the texture was on the soft side. Reducing the amount of liquid wasn’t an option because it resulted in unevenly cooked barley. To maintain a bit of the grains’ structure and ensure even cooking, we briefly toasted the barley in the microwave before adding it to the slow cooker—which also created deeper flavor. Do not substitute hulled, hull-less, quick-cooking, or presteamed barley (read the ingredient list on the package to determine this) in this recipe. You will need a 4- to 7-quart slow cooker for this recipe.
1 onion, chopped fine
1½ cups pearl barley, rinsed
2 tablespoons extra-virgin olive oil, divided
2 teaspoons grated fresh ginger
½ teaspoon table salt
⅛ teaspoon ground cinnamon
⅛ teaspoon ground cardamom
3½ cups vegetable broth
3 ounces pitted dates, chopped (½ cup)
⅓ cup chopped fresh parsley
2 teaspoons lemon juice
1. Lightly coat slow cooker with vegetable oil spray. Microwave onion, barley, 1 tablespoon oil, ginger, salt, cinnamon, and cardamom in bowl, stirring occasionally, until onion is softened and barley is lightly toasted, about 5 minutes; transfer to prepared slow cooker. Stir in broth, cover, and cook until barley is tender and all broth is absorbed, 3 to 4 hours on low or 2 to 3 hours on high.
2. Fluff barley with fork, then gently fold in dates, parsley, lemon juice, and remaining 1 tablespoon oil. Season with salt and pepper to taste. Serve.
Serves 4
Cooking time 6 to 8 hours on low or 4 to 5 hours on high
Why This Recipe Works Nutty wheat berries, earthy beets, crisp apples, and peppery arugula combine forces in this hearty salad. The wheat berries simmered in the slow cooker right alongside the beets, which we wrapped in foil to keep the cooking even and the deep color from bleeding. Minced garlic and thyme provided an aromatic backbone. Once the wheat berries were tender, we drained and dressed them with a lively vinaigrette. Tasters felt that a creamy counterpoint was desirable to balance the flavors, so we added a dollop of cashew ricotta before serving (crumbled goat cheese also worked well). To ensure even cooking, we recommend using beets that are roughly 3 inches in diameter. If using quick-cooking or presteamed wheat berries (the ingredient list on the package specifies the type), you will need to decrease the cooking time. The wheat berries will retain a chewy texture once fully cooked. You will need a 4- to 7-quart slow cooker for this recipe.
1 cup wheat berries
2 garlic cloves, minced
2 teaspoons minced fresh thyme or ½ teaspoon dried
1 teaspoon table salt, divided
1 pound beets, trimmed
1 Granny Smith apple, peeled, cored, halved, and sliced ¼ inch thick
4 ounces (4 cups) baby arugula
3 tablespoons extra-virgin olive oil
3 tablespoons red wine vinegar
Pinch pepper
Pinch sugar
½ cup Cashew Ricotta (this page) or 4 ounces goat cheese, crumbled (1 cup)
1. Combine 5 cups water, wheat berries, garlic, thyme, and ½ teaspoon salt in slow cooker. Wrap beets individually in aluminum foil and place in slow cooker. Cover and cook until wheat berries and beets are tender, 6 to 8 hours on low or 4 to 5 hours on high.
2. Transfer beets to cutting board, open foil, and let sit until cool enough to handle. Rub off beet skins with paper towels and cut beets into ½-inch-thick wedges.
3. Drain wheat berries, transfer to large serving bowl, and let cool slightly. Add beets, apple, arugula, oil, vinegar, remaining ½ teaspoon salt, pepper, and sugar and toss to combine. Season with salt and pepper to taste. Dollop with cashew ricotta and serve.

Serves 4 to 6
Why This Recipe Works Freekeh, a protein-packed grain often used in eastern Mediterranean and North African cooking, is made from durum wheat that’s been harvested while the grains are still young and green; the grains are roasted and then sold whole or cracked. For a pilaf that accentuates freekeh’s smoky earthiness, we cooked it with warm spices including coriander, cumin, pepper. A quick sauté in the pressure cooker softened a shallot and bloomed the spices, and then we just had to add the freekeh and water and cook under pressure. Studded with sweet dates and toasted pistachios and topped with aromatic fresh mint and a drizzle of olive oil, our pilaf was hearty and healthful. You can find freekeh in the grain aisle or natural foods section of most well-stocked supermarkets. Whole freekeh requires a different cooking method and will not work in this recipe.
2 tablespoons extra-virgin olive oil, plus extra for drizzling
1 shallot, minced
1½ teaspoons grated fresh ginger
½ teaspoon table salt
¼ teaspoon ground coriander
¼ teaspoon ground cumin
¼ teaspoon pepper
1¾ cups water
1½ cups cracked freekeh, rinsed
3 ounces pitted dates, chopped (½ cup)
¼ cup shelled pistachios, toasted and chopped coarse
1½ tablespoons lemon juice
¼ cup chopped fresh mint
1. Using highest sauté or browning function, heat oil in electric pressure cooker until shimmering. Add shallot, ginger, salt, coriander, cumin, and pepper and cook until shallot is softened, about 2 minutes. Stir in water and freekeh.
2. Lock lid in place and close pressure release valve. Select high pressure cook function and cook for 4 minutes. Turn off pressure cooker and quick-release pressure. Carefully remove lid, allowing steam to escape away from you.
3. Add dates, pistachios, and lemon juice and gently fluff freekeh with fork to combine. Season with salt and pepper to taste. Transfer to serving platter, sprinkle with mint, and drizzle with extra oil. Serve.
Serves 6
Why This Recipe Works Chickpeas capture the spotlight in this satisfying dish inspired by a traditional Greek preparation of slow-baked chickpeas. The dish is little more than chickpeas, caramelized onions, and some carefully chosen herbs and spices in a superflavorful broth, but it adds up to far more than the sum of its parts. The chickpeas paired beautifully with some lemony coriander seeds that kept their distinctive character but softened into little bursting pockets of flavor. Sage leaves, mellowed by low-pressure cooking, transformed into tender, mild greens that lent subtle floral notes to the dish. See this page for more information on brining beans. To crack coriander, place the seeds on a cutting board and rock the bottom edge of a skillet over them until they crack. For a spicier dish, use the higher amount of pepper flakes. Serve these chickpeas with rice or pita bread.
1½ tablespoons table salt, for brining
1 pound (2½ cups) dried chickpeas, rinsed
2 tablespoons extra-virgin olive oil, plus extra for drizzling
2 onions, halved and sliced thin
¼ teaspoon table salt
1 tablespoon coriander seeds, cracked
¼–½ teaspoon red pepper flakes
2½ cups vegetable broth
¼ cup fresh sage leaves
2 bay leaves
1½ teaspoons grated lemon zest plus 2 teaspoons juice
2 tablespoons minced fresh parsley
1. Dissolve 1½ tablespoons salt in 2 quarts cold water in large container. Add chickpeas and soak at room temperature for at least 8 hours or up to 24 hours. Drain and rinse well.
2. Using highest sauté or browning function, heat oil in electric pressure cooker until shimmering. Add onions and ¼ teaspoon salt and cook until onions are softened and well browned, 10 to 12 minutes. Stir in coriander and pepper flakes and cook until fragrant, about 30 seconds. Stir in broth, scraping up any browned bits, then stir in chickpeas, sage, and bay leaves.
3. Lock lid in place and close pressure release valve. Select low pressure cook function and cook for 10 minutes. Turn off pressure cooker and let pressure release naturally for 15 minutes. Quick-release any remaining pressure, then carefully remove lid, allowing steam to escape away from you.
4. Discard bay leaves. Stir lemon zest and juice into chickpeas and season with salt and pepper to taste. Sprinkle with parsley. Serve, drizzling individual portions with extra oil.
Serves 6
Cooking time 9 to 11 hours on low or 6 to 8 hours on high
Why This Recipe Works Chickpeas are prized for their high fiber content as well as for being an excellent source of plant-based protein. But they also have a great buttery texture and an adaptable flavor, so they easily soak up the flavors of other ingredients they’re cooked with, making them ideal for slow cooking in a flavor-packed broth. We infused vegetable broth with distinctive smoked paprika and a sliced red onion for flavor and texture. Once our chickpeas were perfectly tender and creamy, we drained away all but a cup of the cooking liquid, using what we reserved to create a simple, smoky sauce. Mashing a portion of the beans enhanced the creamy consistency of the dish without adding any extra fat, and citrusy cilantro added brightness and color. The Garlicky Yogurt Sauce adds a pungent yet creamy finishing touch. You will need a 4- to 7-quart slow cooker for this recipe.
1 red onion, halved and sliced thin
1 tablespoon extra-virgin olive oil, divided
1 tablespoon sweet or hot smoked paprika
3 cups vegetable broth
3 cups water
1 pound (2½ cups) dried chickpeas, picked over and rinsed
1 teaspoon table salt
¼ cup chopped fresh cilantro
Garlicky Yogurt Sauce (recipe follows) (optional)
1. Microwave onion, 1 teaspoon oil, and paprika in bowl, stirring occasionally, until onion is softened, about 5 minutes; transfer to slow cooker. Stir in broth, water, chickpeas, and salt. Cover and cook until chickpeas are tender, 9 to 11 hours on low or 6 to 8 hours on high.
2. Drain chickpeas, reserving 1 cup cooking liquid. Return one-third of chickpeas to now-empty slow cooker and mash with potato masher until smooth. Stir in reserved cooking liquid, cilantro, remaining chickpeas, and remaining 2 teaspoons oil. Season with salt and pepper to taste. Serve with yogurt sauce, if using.
Makes about 1 cup
1 cup plain plant-based yogurt or dairy yogurt
2 tablespoons chopped fresh mint
1 garlic clove, minced
Combine plant-based yogurt, mint, and garlic in bowl; cover and refrigerate until ready to serve.
INGREDIENT SPOTLIGHT
Smoked paprika is the Spanish cousin to the more widely used Hungarian paprika. Smoked paprika can be either sweet or hot, and it is made from a different variety of red pepper than regular paprika is made from. The peppers are dried over oak embers and then ground, and the resulting spice has a woodsy smokiness. Sprinkle smoked paprika over hummus, mashed potatoes, or Blistered Shishito Peppers (this page).
Serves 6
Cooking time 9 to 11 hours on low or 6 to 8 hours on high
Why This Recipe Works These slow-cooked beans deliver rich flavor and creamy, tender texture. We found that dried small white beans worked well here, and they required no prep other than being picked over and rinsed. To ensure that the beans took on robust flavor during their long stint in the slow cooker, we simmered them with onion, a hefty amount of garlic, and a little sage. Once the beans were perfectly cooked, we drained the mixture and reserved a cup of the flavorful cooking liquid to stir back into the beans. We then mashed a portion of the beans to thicken the sauce and enhance the creamy consistency of the dish. To serve, we dressed them up with some good-quality olive oil. Extra fresh sage stirred in at the end enhanced the herbaceous flavors. You will need a 4- to 7-quart slow cooker for this recipe. Serve these over whole grains or with crusty bread.
1 onion, chopped fine
5 garlic cloves, minced
2 tablespoons extra-virgin olive oil, divided
2 teaspoons minced fresh sage, divided
3 cups vegetable broth
3 cups water
1 pound (2½ cups) dried small white beans, picked over and rinsed
1 teaspoon table salt
1. Microwave onion, garlic, 1 teaspoon oil, and 1 teaspoon sage in bowl, stirring occasionally, until onion is softened, about 5 minutes; transfer to slow cooker. Stir in broth, water, beans, and salt. Cover and cook until beans are tender, 9 to 11 hours on low or 6 to 8 hours on high.
2. Drain beans, reserving 1 cup cooking liquid. Return one-third of beans to now-empty slow cooker and mash with potato masher until smooth. Stir in reserved cooking liquid, remaining beans, remaining 5 teaspoons oil, and remaining 1 teaspoon sage. Season with salt and pepper to taste. Serve.

Serves 6
Why This Recipe Works Versions of beans and greens are found all over the world, and we think you can’t have too many plant-based versions of this dish in your cooking arsenal. This sophisticated, Mediterranean-inspired rendition of beans and greens comes together quickly and easily in the pressure cooker. The quick, even cooking of the pressure cooker ensured that the lentils kept their shape and firm-tender texture after cooking in a garlic-and-thyme-bolstered liquid. After releasing the pressure, we stirred in Swiss chard leaves until just wilted, letting them maintain their fresh bite. A bit of mustard stirred in off the heat added a tangy kick, while almonds added richness and parsley countered with freshness. We prefer French green lentils, or lentilles du Puy, for this recipe, but it will work with any type of lentil except red or yellow.
2 tablespoons extra-virgin olive oil, plus extra for drizzling
12 ounces Swiss chard, stems chopped fine, leaves sliced into ½-inch-wide strips
1 onion, chopped fine
½ teaspoon table salt
2 garlic cloves, minced
1 teaspoon minced fresh thyme or ¼ teaspoon dried
2½ cups water
1 cup lentilles du Puy (French green lentils), picked over and rinsed
3 tablespoons whole-grain mustard
½ teaspoon grated lemon zest plus 1 teaspoon juice
3 tablespoons sliced almonds, toasted
2 tablespoons chopped fresh parsley
1. Using highest sauté or browning function, heat oil in electric pressure cooker until shimmering. Add chard stems, onion, and salt and cook until vegetables are softened, about 5 minutes. Stir in garlic and thyme and cook until fragrant, about 30 seconds. Stir in water and lentils.
2. Lock lid in place and close pressure release valve. Select high pressure cook function and cook for 11 minutes. Turn off pressure cooker and let pressure release naturally for 15 minutes. Quick-release any remaining pressure, then carefully remove lid, allowing steam to escape away from you.
3. Stir chard leaves into lentils, 1 handful at a time, and let cook in residual heat until wilted, about 5 minutes. Stir in mustard and lemon zest and juice. Season with salt and pepper to taste. Transfer to serving platter, drizzle with extra oil, and sprinkle with almonds and parsley. Serve.
Serves 4
Cooking time 4 to 5 hours on low or 3 to 4 hours on high
Why This Recipe Works We chose tiny green lentils for this tasty warm salad, for their earthy, complex flavor and tender-firm texture. With a ratio of 2½ cups vegetable broth to 1 cup lentils, we were able to produce perfectly cooked legumes. We flavored them with garlic, thyme, and paprika and stirred in sliced radishes and chopped mint to bring crunch and bright freshness to our warm salad. We prefer French green lentils, or lentilles du Puy, for this recipe, but it will work with any type of lentil except red or yellow. For a heartier salad, serve this over mixed greens. If you would like to add cheese, we suggest feta. You will need a 4- to 7-quart slow cooker for this recipe.
1 tablespoon extra-virgin olive oil, divided
2 garlic cloves, minced
1½ teaspoons minced fresh thyme or ¼ teaspoon dried
1 teaspoon paprika
2½ cups vegetable broth
1 cup lentilles du Puy (French green lentils), picked over and rinsed
2½ tablespoons red wine vinegar, divided
¼ teaspoon table salt
6 radishes, trimmed, halved, and sliced thin
¼ cup chopped fresh mint
1 shallot, halved and sliced thin
1 ounce feta cheese, crumbled (¼ cup) (optional)
1. Microwave 1 teaspoon oil, garlic, thyme, and paprika in bowl, stirring occasionally, until fragrant, about 30 seconds; transfer to slow cooker. Stir in broth, lentils, 1 tablespoon vinegar, and salt. Cover and cook until lentils are tender, 4 to 5 hours on low or 3 to 4 hours on high.
2. Stir in radishes; mint; shallot; feta, if using; remaining 2 teaspoons oil; and remaining 1½ tablespoons vinegar. Season with salt and pepper to taste. Serve.