Chapter Three
Little Tops & Dresses
Dad & Me Necktie Shirts
Designed by Dana Bincer, Yarnovations.com
It’s baby’s Business Casual Friday every day with T-shirts embellished with crocheted neckties. The ties are worked in two pieces and joined, then sewn to a T-shirt and Onesie.
Sizes and Finished Measurements
- To fit baby (dad): 21⁄2 (4)"/6.5 (10) cm wide and 7 (18)"/18 (45.5) cm long
Yarn
- Bernat Handcrafter Crochet Thread 5, 100% acrylic, 371 yds (339 m)/3 oz (85 g), Color 31116 Loyal Blue

Crochet Hooks
- US size 6 steel (1.8 mm) for baby tie, US size 00 steel (3.5 mm) for dad tie or sizes needed to obtain correct gauge
Gauge
- 32 stitches and 28 rows = 4"/10 cm in pattern stitch with smaller hook and single strand of yarn
- 27 stitches and 23 rows = 4"/10 cm in pattern stitch with larger hook and yarn doubled
Other Supplies
- Yarn needle, sewing needle and coordinating thread, T-shirt, Onesie
Pattern Essentials
Pattern Stitch (worked over an odd number of stitches)
Row 1: Ch 1, (sc in next dc, dc in next sc) across to last st, sc in last st, turn.
Row 2: Ch 1, (dc in next sc, sc in next dc) across to last st, dc in last st, turn.
Repeat Rows 1 and 2 for pattern.
Crocheting the Ties
Note: Yarn is used single throughout for baby tie, doubled for dad’s.
- Chain 3.
- Row 1: (Dc, sc, dc) in 3rd ch from hook, turn. You now have 3 sts.
- Row 2 (increase row): Ch 1, (dc, sc) in first st, dc in next st, (sc, dc) in last st, turn. You now have 5 sts.
- Row 3 (increase row): Ch 1, (dc, sc) in first st, dc in next st, sc in next st, dc in next st, (sc, dc) in last st, turn. You now have 7 sts.
- Continue in pattern, increasing 1 st at each end of every row until you have 19 (25) sts.
- Row 10 (13) (decrease row): Ch 1, dc2tog, (sc in next st, dc in next st) to last 3 sts, sc in next st, dc2tog, turn. You now have 17 (23) sts.
- [Work even in pattern for 6 (10) rows, decrease 1 st at each end of next row] four (seven) times. You now have 9 sts. Work even in pattern for 6 more rows.
- Fasten off, leaving a long sewing length.
The Knot
- Chain 10.
- Row 1 (RS): Sc in 2nd ch from hook, (dc in next st, sc in next st) three times, dc in next st, slip st in next st, turn. You now have 9 sts.
- Row 2: Ch 1, skip slip st, slip st in next st, (dc in next st, sc in next st) three times, dc in next st, turn. You now have 8 sts.
- Row 3: Ch 1, (sc in next st, dc in next st) three times, slip st in next st, skip remaining st, turn. You now have 7 sts.
- Row 4: Ch 1, skip slip st, (sc in next st, dc in next st) three times, turn. You now have 6 sts.
- Row 5: Ch 1, (sc in next st, dc in next st) three times, turn.
- Rows 6–8: Repeat Row 5 three times.
- Row 9: Ch 1, (sc in next st, dc in next st) twice, sc in next st, (dc, sc) in last st, turn. You now have 7 sts.
- Row 10: Ch 1, (dc in next st, sc in next st) three times, dc in next st, turn.
- Row 11: Ch 1, (sc in next st, dc in next st) three times (sc, dc) in last st, turn. You now have 8 sts. Do not fasten off.
Assembling
- Center last row of necktie to flat sides of Rows 1–11 (the concave side is the top to be sewn closest to tee’s collar). Using yarn needle and tail from tie, sew together with whipstitch across. Weave in end.
- Picking up dropped loop at end of knot piece, slip st around the tie, working 1 slip st at the end of each row and 1 slip st in each sc or dc; join with slip st to first st. Fasten off. Weave in ends.
- Block and sew to Onesie or T-shirt.
The Back’s Where It’s At Bolero
Designed by Sylvie Damey
This baby bolero jacket is worked from the top down in front loop double crochet. An open square is left in the center back to hold a motif that’s worked separately and sewn in.
Size and Finished Measurements
- To fit 0–3 months: 16"/40.5 cm chest circumference
Yarn
- Brown Sheep Company Cotton Fleece, 80% cotton/20% merino wool, 215 yds (197 m)/3.5 oz (100 g), Color CW900 Perry’s Primrose

Crochet Hook
- US H/8 (5 mm) or size needed to obtain correct gauge
Gauge
- 18 stitches and 9 rows = 4"/10 cm in front loop double crochet
Other Supplies
- Straight pins, yarn needle
Crocheting the Back Motif
- Ch 4, join with slip st to form a ring.
- Rnd 1: Ch 3 (counts as dc throughout), 11 dc in ring, join with slip st to top of ch-2. You now have 12 dc.
- Rnd 2: Ch 4 (counts as dc and ch 1), *dc in next st, ch 1; repeat from * around, join with slip st to 3rd ch of ch-4. You now have 24 sts.
- Rnd 3: Ch 3, 2 dc in next space, *dc in next dc, 2 dc in next space; repeat from * around, join with slip st to top of ch-3. You now have 36 dc.
- Rnd 4: Ch 3, (tr, ch 2, tr, dc) in same st, *ch 3, skip 3 dc, sc in next 2 dc, ch 3, skip 3 dc**, (dc, tr, ch 2, tr, dc) in next st; repeat from * around, ending last repeat at **; join with slip st to top of ch-3.
- Rnd 5: Ch 1, sc in same st and next tr, *4 sc in next space, (sc in next 2 sts, 3 sc in next space) twice**, sc in next 2 sts; repeat from * around, ending last repeat at **, join with slip st to first sc. Fasten off, leaving a long tail for sewing.
Crocheting the Jacket
- Chain 62.
- Row 1 (RS): Dc in 4th ch from hook, *2 dc in next ch, dc in next 2 ch; repeat from * to last ch, 2 dc in last ch, turn. You now have 80 sts.
- Row 2: Ch 3 (counts as dc throughout), FLdc in each st across, turn.
- Row 3: Repeat Row 2.
- Row 4 (increase row): Ch 3, *2 FLdc in next st, FLdc in next 3 sts; repeat from *, ending with 2 FLdc in next st, FLdc in each of last 2 sts, turn. You now have 100 sts.
- Rows 5 and 6: Ch 3, FLdc in each st across, turn.
The Back Opening
You’ll work on one side only to leave an open gap in the center of back for motif insert.
- Row 7 (increase row, RS): Working only over the first 42 sts, ch 3, (FLdc in next 2 sts, 2 FLdc in next st) 13 times, FLdc in last 2 sts. You now have 55 sts.
- Row 8: Ch 3, FLdc in next 54 sts, turn.
- Row 9: Ch 3, FLdc in next 18 sts, skip 25 sts for sleeve opening, FLdc in next 11 sts, turn. You now have 30 sts for body.
- Rows 10–12: Ch 3, FLdc in next 29 sts, turn.
- Fasten off.
The Second Section
- With RS facing, skip 16 sts after first crocheted section, join yarn in next st and work over last 42 sts of back as follows.
- Row 7 (increase row, RS): Ch 3, (FLdc in next 2 sts, 2 FLdc in next st) 13 times, FLdc in last 2 sts. You now have 55 sts.
- Row 8: Ch 3, FLdc in next 54 sts, turn.
- Row 9: Ch 3, FLdc in next 10 sts, skip 25 sts for sleeve opening, FLdc in next 19 sts, turn. You now have 30 sts for body.
- Rows 10–12: Ch 3, FLdc in next 29 sts, turn.
- Fasten off.
The Lower Body
- With RS facing, join yarn to outside edge of first crocheted section.
- Row 13: Ch 3, FLdc in next 29 sts, ch 14, FLdc in next 30 sts, turn. You now have 60 sts and 1 ch-space.
- Row 14: Ch 3, FLdc in next 29 sts, work 16 dc in the ch-14 space, FLdc in next 30 sts, turn. You now have 76 sts.
- Rows 15–17: Ch 3, FLdc in each st across, turn.
The Edging
- With RS facing, join yarn to bottom corner of right front, ch 1, work 1 rnd in reverse sc around all edges of body, working 1 st in each st, 2 sts along each end of FLdc rows, and 2 sts in each corner, join with slip st to first st. Fasten off.
Crocheting the Sleeves
- With RS facing, join yarn between 2 FLdc sts at center of underarm.
- Rnd 1: Ch 3, 2 dc around post of first underarm dc, FLdc in next 25 sleeve sts, 2 dc around post of last underarm dc, join with slip st to top of ch-3, turn. You now have 30 sts.
- Rnds 2–9: Ch 3, FLdc in next 29 sts, join with slip st to top of ch-3, turn. Do not turn at end of last rnd.
- With RS facing, ch 1, reverse sc in each st around, join with slip st to first st. Fasten off.
- Repeat sleeve in other armhole opening.
Making the Ties (make 4)
- Using the photo as a guide, mark the location of each tie along top edge of cardigan, placing first pair of ties low enough to be comfortable around baby’s neck. For each tie, cut 2 lengths of yarn 12"/30.5 cm long. Hold both pieces together and thread them through edge of cardigan (just in from the reverse sc edging), using hook if necessary to pull them through. Twist the lengths together, accentuating initial twist of yarn. Fold in half and tie an overhand knot to join the ends. Trim ends.
Finishing
- Working on RS of cardigan, place motif inside back opening, with RS of motif facing out. Pin in place. Using tail from motif, sew motif to cardigan, inserting needle only in top loop of each st around motif for an invisible join.
- Weave in ends. Block if desired.
Tiny Tango Vest
Designed by Kristen Stoltzfus
It only takes one to tango in this adorable ruffled vest. With five layers of ruffles, the vest front is open to make tummy-time comfy.
Sizes and Finished Measurements
- To fit 0–3 (6 months): 15 (18)"/38 (45.5) cm chest circumference
- Note: The fronts don’t meet. There is a 2"/5 cm gap in front.
Yarn
- Red Heart Anne Geddes Baby DK weight, 80% acrylic/20% nylon, 340 yds (310 m)/3.5oz (100g), Color #764 Taffy
Crochet Hook
- US H/8 (5 mm) or size needed to obtain correct gauge
Gauge
- 18 stitches and 12 rows = 4"/10 cm in body pattern
- 18 stitches and 10 rows = 4"/10 cm in double crochet
Other Supplies
Crocheting the Back
- Chain 35 (43).
- Row 1: Dc in 3rd ch from hook and in each ch across, turn. You now have 33 (41) dc.
- Row 2: Ch 1, sc in first dc, *ch 1, skip 1 dc, sc in next dc; repeat from * across, turn. You now have 16 (20) ch-spaces.
- Row 3: Ch 2 (does not count as st here and throughout), dc in first sc and in next space, 2 dc in each space across, dc in last sc, turn. You now have 33 (41) dc.
- Rows 4–17 (21): Repeat Rows 2 and 3 seven (nine) times.
The Ruffle Base Section
- Row 1 (WS): Ch 2, dc in first 2 dc, (BPdc in next dc, dc in next 3 dc) seven (nine) times, BPdc in next dc, dc in each of last 2 dc, turn. You now have 8 (10) BPdc, 23 (31) dc.
- Row 2: Ch 1, work 1 FPdc in each BPdc and 1 dc in each dc across, turn.
- Row 3: Ch 2, work 1 BPdc in each FPdc and 1 dc in each dc across, turn.
- Rows 4 and 5 (4–9): Repeat Rows 2 and 3 one (three) times. Fasten off.
Crocheting the Right Front
- With RS facing, working in opposite loops of foundation ch, join yarn with slip st in first ch.
- Row 1: Ch 2, dc in first 11 (15) ch sts, turn, leaving remaining sts unworked. You now have 11 (15) dc.
- Rows 2–17 (21): Repeat Rows 2–17 (21) of back.
The Ruffle Base Section
- Row 1 (WS): Ch 2, dc in first dc, (BPdc in next dc, dc in next 3 dc) two (three) times, BPdc in next dc, dc in last dc, turn. You now have 3 (4) BPdc, 8 (11) dc.
- Rows 2–5 (9): Repeat Rows 2–5 (9) of back Ruffle Base Section. Fasten off.
Crocheting the Left Front
- With right front at right and working on opposite side of foundation ch, skip next 11 ch sts and join yarn with slip st to next ch.
- Row 1: Ch 2, dc in same ch, dc in each ch across, turn. You now have 11 (15) dc.
- Rows 2–17 (21): Repeat Rows 2–17 (21) of back.
The Ruffle Base Section
- Rows 1–5 (9): Repeat Rows 1–5 (9) of right front. Fasten off.
- Sew side seams, leaving 31⁄2 (4)"/9 (10) cm unjoined at top for armhole.
Crocheting the Ruffles
- Row 1: Working on surface of sts, with RS facing and hem away from you, join yarn with slip st in first post st of ruffle base Row 1; [(ch 5, slip st) in next post st of Row 1] across right front, back, and left front, turn. You now have 13 (17) ch-5 loops.
- Row 2: Ch 1, [(dc, tr) five times, dc] in each loop across, ch 1, slip st in last slip st. Fasten off.
Size 0–3 months only
- Repeat Rows 1 and 2 of ruffle on post sts of Rows 3 and 5 for three ruffle rows total.
Size 6 months only
- Repeat Rows 1 and 2 of ruffle on post sts of Rows 3, 5, 7, and 9 for five ruffle rows total.
Crocheting the Edgings
- Join yarn with slip st in underarm seam, ch 1, sc evenly around armhole, join with slip st to first sc. Fasten off. Repeat for other side.
- With RS of front facing, join yarn in side of dc at right-hand corner, ch 1, (hdc, dc) in side of dc; working in sides of rows, work 1 dc in each sc and 2 dc in each dc to shoulder “seam”; (sc in opposite side of foundation ch) 11 times; working in sides of rows, work 1 dc in each sc and 2 dc in each dc to side of last dc, (dc, hdc, slip st) in side of last dc. Fasten off.
- Weave in ends. Block.
Summer Kisses Cardigan
Designed by Thomasina Cummings, Thomasina Cummings Designs
This cardigan with cap sleeves in newborn size is worked from the top down without seams, so it’s a really quick project to work. The short sleeves are ideal for summer, but they could just as easily be worn over a long-sleeved top in cooler weather. The finished item can be left plain or trimmed with lace, ribbon, or your choice of embellishment, making it an ideal unisex baby shower gift.
Size and Finished Measurements
- To fit newborn: 14"/35.5 cm chest circumference
Yarn
- Cascade Ultra Pima, 100% pima cotton, 220 yds (201 m)/3.5 oz (100 g), Color 3720 Sage
Crochet Hook
- US G/6 (4 mm) or size needed to obtain correct gauge
Gauge
- 16 stitches and 12 rows = 4"/10 cm in double crochet
Other Supplies
- Yarn needle, three 5⁄8"/16 mm buttons, sewing needle and coordinating thread, decorative trim (optional)
Pattern Essentials
X-st (X-stitch) Worked over 2 sts or spaces and counts as 2 sts. Skip next st or space, dc in next st or space; working in front of previous dc, dc in skipped st or space.
Crocheting the Cardigan
The Yoke
Note: Except where noted, yoke sts and the first row of the body are worked between the sts of the previous row. When instructed to work in “spaces,” begin in the space between sts that immediately follows the post st, and then work into subsequent spaces between sts.
The Body
Finishing
The Bottom Edging
- Row 1 (RS): Ch 1, sc in each st across, turn. You now have 65 sts.
- Row 2: Ch 1, sc in each sc across. Fasten off.
The Sleeve Edging
- Join yarn to inside edge of sleeve opening.
- Rnd 1 (RS): Ch 1, sc in each st around, join with slip st to first sc, turn. You now have 27 sts.
- Rnd 2: Repeat Rnd 1.
- Fasten off. Repeat for second sleeve.
- Weave in ends.
- Buttons should be sized to fit snugly through spaces between double crochet on front. Sew buttons securely to the yoke, evenly spaced and aligned with double crochet openings.
Reversible Sweater
Designed by René E. Wells, Granny an Me Designs
Baby will look smart and keep warm in this wool-blend cardigan. It is worked from the top down in double crochet — sometime in the front loop, sometimes in the back, and sometimes both — and the front bands are worked in single crochet. You could also add buttons, using between-stitch spaces for buttonholes.
Size and Finished Measurements
- To fit newborn–6 months: 19"/48.5 cm chest circumference
Yarn
- Opal Dancing Sock 6-fach, 75% virgin wool/25% nylon, 459 yds (420 m)/5.3 oz (150 g), Color 7366
Crochet Hook
- US F/5 (3.75 mm) or size needed to obtain correct gauge
Gauge
- 23 stitches and 11 rows = 4"/10 cm in double crochet
Other Supplies
Pattern Essentials
Make corner (2 dc, ch 2, 2 dc) in 1 stitch.
Crocheting the Yoke
The Lower Body
- Fold sweater along shoulders so fronts are on top of back with sleeves outward.
- Join fronts to back and separate sleeves as follows.
- Row 9: Ch 3, BLdc in each st to corner, 2 dc in corner space, skip next 44 dc, 2 dc in next corner space on back (front is joined to back), BLdc in each st along back, 2 dc in back corner space, skip next 44 dc, 2 dc in next front corner space, BLdc in each st to end, turn. You now have 110 dc.
- Row 10: Ch 3: FLdc in each st across, turn.
- Row 11: Ch 3, BLdc in each st across, turn.
- Rows 12–23: Continue in established pattern. Fasten off.
Crocheting the Sleeves
- Join yarn with slip st at underarm at back side corner.
- Row 1: Ch 3, BLdc in each st across, turn. You now have 42 sts.
- Row 2: Ch 3, working in front loop only, dc2tog, work in pattern to last 2 sts, dc2tog, turn. You now have 40 sts.
- Rows 3–12: Repeat Rows 1 and 2. You now have 30 sts.
- Fasten off, leaving a long tail for sewing.
Crocheting the Front Bands (make 2)
- Row 1: Join yarn with slip st at lower front edge, sc evenly up edge to neck, turn.
- Rows 2–4: Ch 1, sc in each sc across, turn.
- Fasten off.
Finishing
- Weave in ends invisibly so sweater can be worn with either side as the right side.
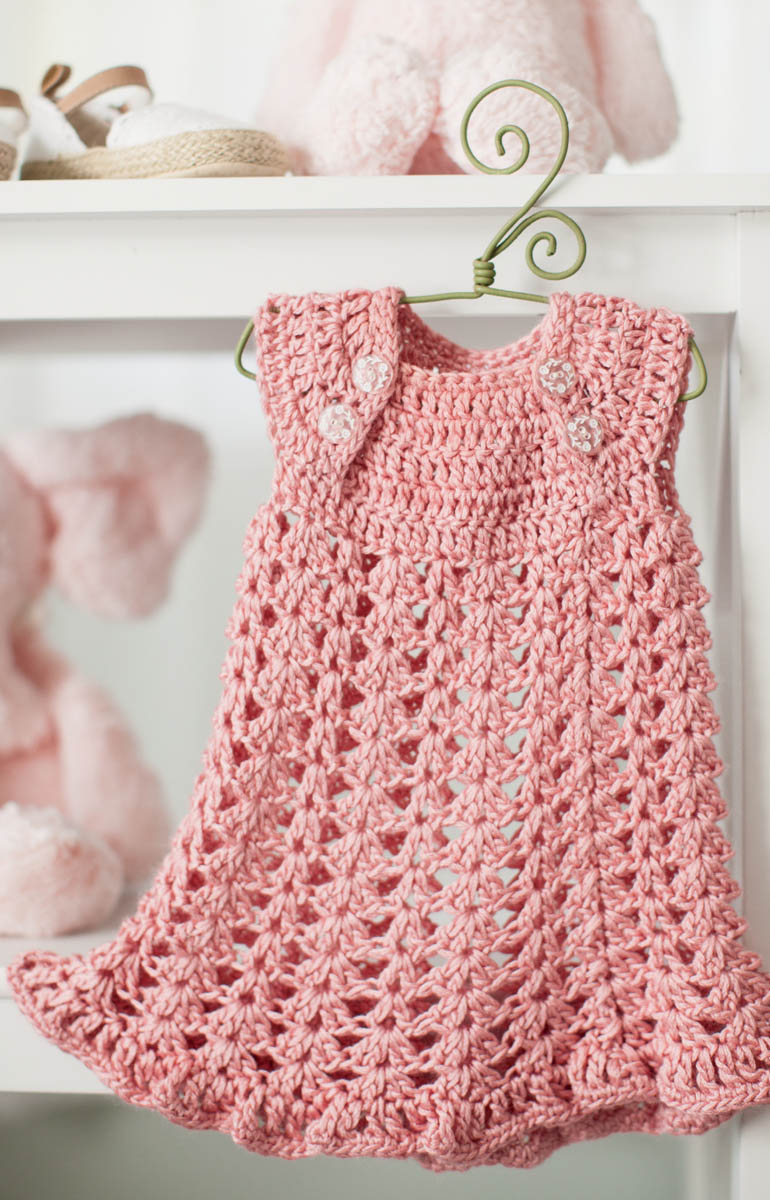
Pretty in Pink
Designed by Anastasia Popova
This lovely little dress is worked from the top down. The buttoned front piece makes dressing easier, and the buttons add charm. The hem is finished with a ruffled edging.
Sizes and Finished Measurements
- To fit newborn (3 months): 15 (18)"/38 (45.5) cm chest circumference and 11 (111⁄2)"/28 (29) cm length
Yarn
- Martha Stewart Crafts Extra Soft Wool Blend, 65% acrylic/35% wool, 164 yds (150 m)/3.5 oz (100 g), Color 503 Gerbera Daisy

Crochet Hook
- US 7 (4.5mm) or size needed to obtain correct gauge
Gauge
- 15 stitches and 8 rows = 4"/10 cm in double crochet
- 2 pattern repeats and 7 rows = 4"/10 cm in skirt pattern
Other Supplies
- Yarn needle, four 1⁄2"/13 mm buttons, sewing needle and coordinating thread
Pattern Essentials
Shell (2 dc, ch 1, 2 dc) in 1 stitch or space.
V-st (Dc, ch 1, dc) in 1 stitch or space.
Crocheting the Front Yoke
- Chain 14 (18).
- Row 1: 2 dc in 4th ch from hook, dc in each ch to last 2 ch, 2 dc in next ch, dc in next ch, turn. You now have 14 (18) dc.
- Row 2: Ch 2 (counts as dc here and throughout), 2 dc in next dc, dc in each st across to last 2 dc, 2 dc in next dc, dc in top of turning ch, turn. You now have 16 (20) sts.
- Rows 3 and 4 (3–5): Repeat Row 2. You now have 20 (26) sts.
- Next Row: Work 1 row of sc evenly across both sides and top of the front piece, placing approximately 2 sc in each row end. Fasten off.
Crocheting the Main Yoke
- Chain 23 (27).
- Row 1: 2 dc in 4th ch from hook, 2 dc in next ch, dc in next 1 (2) ch, 2 dc in next 3 ch, dc in next 7 (9) ch, 2 dc in next 3 ch, dc in next 1 (2) ch, 2 dc in next 2 ch, dc in next ch, turn. You now have 31 (35) sts.
- Row 2: Ch 2 (counts as dc here and throughout), 2 dc in next 2 dc, dc in next 4 (5) dc, 2 dc in next 3 dc, dc in next 11 (13) dc, 2 dc in next 3 dc, dc in next 4 (5) dc, 2 dc in next 2 dc, dc in top of turning chain, turn. You now have 41 (45) sts.
- Row 3: Ch 2, 2 dc in next 2 dc, dc in next 7 (8) dc, 2 dc in next 3 dc, dc in next 15 (17) dc, 2 dc in next 3 dc, dc in next 7 (8) dc, 2 dc in next 2 dc, dc in last st, turn. You now have 51 (55) sts.
- Row 4: Ch 2, 2 dc in next 2 dc, dc in next 10 (11) dc, 2 dc in next 3 dc, dc in next 19 (21) dc, 2 dc in next 3 dc, dc in next 10 (11) dc, 2 dc in next 2 dc, dc in last st, turn. You now have 61 (65) sts.
3-month size only
- Row 5: Ch 2, 2 dc in next 2 dc, dc in next 14 dc, 2 dc in next 3 dc, dc in next 25 dc, 2 dc in next 3 dc, dc in next 14 dc, 2 dc in next 2 dc, dc in last st. Do not turn. You now have 75 sts.
The Edging
Newborn size only
- Row 1: Working in row-end sts across side, ch 1, (2 sc in next row-end st, ch 2, skip next row) twice; working across opposite side of foundation ch, sc in next 21 ch; working in row-end sts across side, (ch 2, skip next row, 2 sc in next row-end st) twice, turn. You now have 29 sc and 4 ch-2 buttonholes.
3-month size only
- Row 1: Working in row-end sts across side, ch 1, (2 sc in next row-end st, ch 2, skip next row) twice, 2 sc in next row-end st; working across opposite side of foundation ch, sc in next 25 ch; working in row-end sts across side, ch 1, 2 sc in next row-end st, (ch 2, skip next row, 2 sc in next row-end st) twice, turn. You now have 37 sc and 4 ch-2 buttonholes.
Both sizes
- Row 2: Ch 1, sc in each st across. Do not fasten off.
Connect the Yoke
- With WS of front yoke and main yoke facing, overlap sides of main yoke over 2 sts on each side of front yoke, leaving the center 16 (22) sts of the front yoke uncovered. Pin in place.
- Rnd 1: Ch 2, working through double thickness of main yoke and front yoke, 2 dc in same st of main yoke and in first st of front, dc in same st of main yoke and in next st of front; working through single thickness of main yoke, dc in next 2 dc, ch 3, skip next 14 (18) sts of main yoke, dc in next 27 (33) sts, ch 3, skip next 14 (18) sts of yoke, dc in next 2 sts of yoke; working through double thickness of main yoke and front yoke together, 2 dc in next st of main yoke and next st of front yoke, dc in same st of main yoke and in next st of front yoke, dc in next 16 (22) sts of front yoke, join with slip st to top of beginning ch-2. You now have 60 (72) sts.
Sewing Buttons
We highly recommend sewing buttons onto baby clothes with a sewing needle and thread. Repeat the thread path many times to be sure the button will not come off, even if baby uses it for teething. If your buttons have large holes, you can sew first with thread, then cover the thread with yarn.
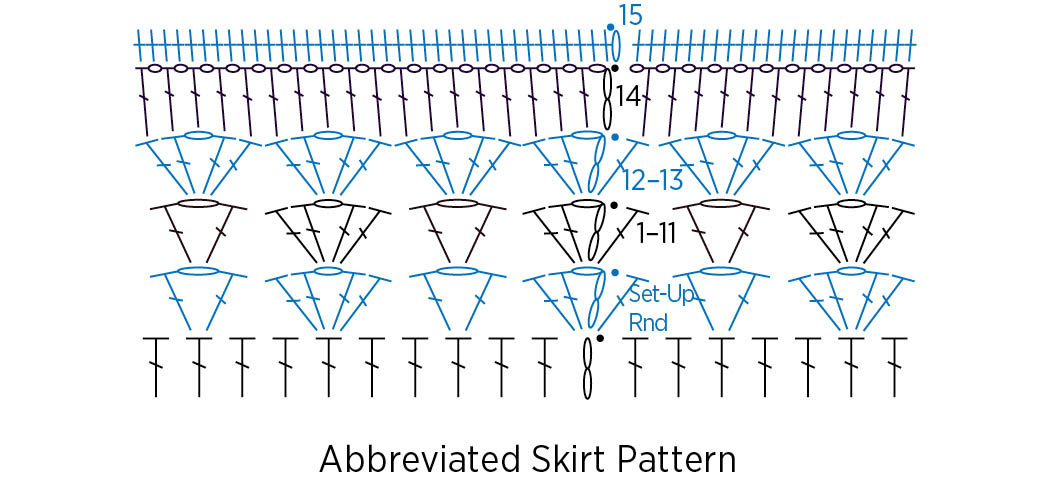
Crocheting the Skirt
- Set-Up Rnd: Ch 3 (counts as dc, ch 1 here and throughout), 2 dc in same st, skip next 2 sts, V-st in next st, (skip next 2 sts, shell in next st, skip next 2 sts, V-st in next st) to last 2 sts, skip next 2 sts, dc in base of ch-3, join with slip st in ch-3 space (first shell completed). You now have 10 (12) shells and 10 (12) V-sts.
- Rnds 1–11: Ch 3, 2 dc in first space, V-st in next space, (shell in next space, V-st in next space) around, dc in first space (first shell completed), join with slip st in ch-3 space.
- Rnds 12 and 13: Ch 3, 2 dc in first sp, shell in each space around, ending dc in first space (first shell completed), join with slip st in ch-3 space. You now have 20 (24) shells.
- Rnd 14: Ch 3, (dc in next st or space, ch 1) around, join with slip st in ch-3 space. You now have 200 (240) sts.
- Rnd 15: Ch 1, sc in each st and ch-1 space around, join with slip st to first sc.
- Fasten off.
Finishing
- Weave in ends. Block. Sew buttons on front yoke opposite buttonholes.
In the Woods Vest
Designed by Justyna Kacprzak, Cute and Kaboodle
This warm little side-to-side vest can be boyish, girlish, or neutral, depending on the color. Shopping for buttons will be fun.
Size and Finished Measurements
- To fit 0–3 months: 16"/40.5 cm chest circumference
Yarn
- Himalaya El Örgü Íplikleri Everyday, 100% acrylic, 273 yds (250 m)/3.5 oz (100 g), Color 70022 Brown
Crochet Hook
- US 7 (4.5 mm) or size needed to obtain correct gauge
Gauge
- 18 stitches and 12 rows = 4"/10 cm in back loop half double crochet
Other Supplies
- Yarn needle, eight 5⁄8"/16 mm buttons, sewing needle and coordinating thread
Pattern Essentials
X-st (X-stitch) Worked over 2 sts or spaces and counts as 2 sts. Skip 1 st, hdc in next st, hdc in skipped st.
Crocheting the Vest
- Chain 41.
- Row 1 (WS): Hdc in 2nd ch from hook, (X-st over next 2 sts) seven times, hdc in next 25 ch, turn. You now have 40 sts.
- Row 2: Ch 1 (does not count as st throughout), BLhdc in next 25 hdc, (X-st over next 2 sts) seven times, hdc in last st, turn.
- Row 3: Ch 1, hdc in first st, (X-st over next 2 sts) seven times, hdc in next 25 hdc, turn.
- Rows 4 and 5: Repeat Rows 2 and 3.
- Row 6: Ch 1, BLhdc in next 25 hdc, (X-st over next 2 sts) three times, hdc in next st, turn. You now have 32 sts.
- Row 7: Ch 1, hdc in first st, (X-st over next 2 sts) three times, hdc in next 25 hdc, turn.
- Rows 8–15: Repeat Rows 6 and 7 four times.
- Row 16: Ch 1, BLhdc in next 25 sts, (X-st over next 2 sts) three times, hdc in next st, ch 9, turn.
- Row 17: Hdc in 2nd ch from hook, (X-st over next 2 sts) seven times, hdc in next 25 sts, turn. You now have 40 sts.
- Rows 18–21: Repeat Rows 6 and 7 twice.
- Row 22: Ch 1, hdc in first st, (X-st over next 2 sts) 12 times, hdc in next st, turn. You now have 26 sts.
- Row 23: Ch 1, sc in next 26 sts, turn.
- Rows 24 and 25: Repeat Rows 22 and 23.
- Row 26: Ch 1, hdc in first st, (X-st over next 2 sts) 12 times, hdc in next st, ch 19, turn.
- Row 27: Hdc in 2nd ch from hook, (X-st over next 2 sts) nine times, hdc in next 25 sts, turn. You now have 44 sts.
- Row 28: Ch 1, BLhdc in next 25 hdc, (X-st over next 2 sts) eight times, hdc in next st, skip 1 st, hdc in next st, turn.
- Row 29: Ch 1, hdc in first st, (X-st over next 2 sts) nine times, hdc in next 25 hdc, turn.
- Row 30: Ch 1, BLhdc in next 25 hdc, 8 X-sts in next 16 sts, hdc in next st, skip 1 st, hdc in next st, turn.
- Row 31: Ch 1, hdc in first st, (X-st over next 2 sts) nine times, hdc in next 25 hdc, turn.
- Row 32: Ch 1, BLhdc in next 25 hdc, (X-st over next 2 sts) six times, hdc in next st, turn. You now have 38 sts.
- Row 33: Ch 1, hdc in first st, (X-st over next 2 sts) six times, hdc in next 25 sts, turn.
- Rows 34–41: Repeat Rows 32 and 33 four times.
- Row 42: Ch 1, BLhdc in next 25 hdc, (X-st over next 2 sts) six times, hdc in next st, ch 7, turn.
- Row 43: Hdc in 2nd ch from hook, (X-st over next 2 sts) nine times, hdc in next 25 hdc. You now have 44 sts.
- Row 44: Ch 1, BLhdc in next 25 hdc, (X-st over next 2 sts) eight times, hdc in next st, skip 1 st, hdc in next st, turn.
- Row 45: Ch 1, hdc in next st, (X-st over next 2 sts) nine times, hdc in next 25 sts, turn.
- Row 46: Ch 1, BLhdc in next 25 hdc, (X-st over next 2 sts) eight times, hdc in next st, skip 1 st, hdc in next st, turn.
- Row 47: Ch 1, BLhdc in next st, (X-st over next 2 sts) nine times, hdc in next 25 hdc, turn.
- Row 48: Ch 1, BLsc in next 25 sts, turn.
The Lower Edging
- Row 1 (RS): Ch 1, hdc in next 25 sts, turn.
- Row 2: Ch 1, hdc in next 24 sts, 3 hdc in last sc; working along the bottom edge, work 71 sc evenly spaced across to next corner, 3 sc in corner; working on the opposite side of the foundation ch, sc in each of the next 24 ch, turn. You now have 125 sts.
- Row 3: Ch 1, hdc in next st, FPhdc in next st, BPhdc in next st, *ch 1, skip 1 st, (BPhdc in next st, FPhdc in next st) twice, BPhdc in next st, repeat from * three more times, FPhdc in next st, BPhdc in next st, (hdc, FPhdc, hdc) in next hdc, (BPhdc in next st, FPhdc in next st) 36 times, BPhdc in next st, (hdc, FPhdc, hdc) in next hdc, (BPhdc in next st, FPhdc in next st) 12 times, hdc in next st, turn. You now have 129 sts.
- Row 4: Ch 1, sc in first st, (BPsc in next st, FPsc in next st) to last st of Row 3, sc in the last st of Row 3; do not turn. Do not fasten off.
The Upper Edging
- Work evenly in sc across top edge of vest as follows: work 6 sc across side edge of button band and buttonhole band, 16 sts along each vertical armhole/strap edge, 6 sc along each vertical neck edge, 7 sc on tops of each front strap, 15 sc along front and back necks, 6 sc at underarm.
- Fasten off. Weave in ends. Sew buttons opposite buttonholes: two buttons on each front shoulder strap and four buttons on button band.
Handsome Boy’s Vest
Designed by Annalee Rose
This simple but sophisticated vest has a band of half double crochet at the bottom and decorative vertical stripes of front-post double crochet. It is worked in two pieces and seamed.
Size and Finished Measurements
- To fit 3–6 months: 18"/45.5 cm chest circumference
Yarn
- Berroco Ultra Alpaca Fine, 50% Peruvian wool/30% nylon/20% superfine alpaca, 433 yds (400 m)/3.5 oz (100 g), Color 1281 Redwood Mix
Crochet Hooks
- US D/3 (3.25 mm) and US E/4 (3.5 mm) or size needed to obtain correct gauge
Gauge
- 21 stitches and 20 rows = 4"/10 cm in half double crochet with larger hook
Other Supplies
- Yarn needle, stitch marker
Crocheting the Front
- With smaller hook, ch 49.
- Row 1: Sc in 2nd ch from hook and in each ch across, turn. You now have 48 sts. Mark this as a RS row.
- Row 2 (WS): Ch 1, sc in each sc across, turn.
- Rows 3–7: Repeat Row 2 five times, ending with a RS row.
- Switch to larger hook.
- Row 8 (WS): Ch 2 (does not count as st throughout), hdc in each sc across, turn.
- Row 9: Ch 2, hdc in next 10 hdc, FPdc in next 3 sts 2 rows below, hdc in next 22 hdc, FPdc in next 3 sts 2 rows below, hdc in next 10 hdc, turn.
- Row 10: Ch 2, hdc in each st across, turn.
- Repeat Rows 9 and 10 until piece measures 7"/18 cm from beginning, ending on a WS row.
The Armhole Shaping
- Next Row (RS): Slip st in first 4 sts, ch 2, hdc in first 6 hdc, FPdc in next 3 sts 2 rows below, hdc in next 22 hdc, FPdc in next 3 sts 2 rows below, hdc in next 6 hdc, turn, leaving remaining sts unworked. You now have 40 sts.
- Repeat Rows 2 and 3 until piece measures 11⁄2"/4 cm from beginning of armhole shaping, ending with a WS row. Do not fasten off.
The Left Shoulder
- Continue working in pattern over the first 11 sts until piece measures 11"/28 cm from the bottom edge, ending on a RS row. Fasten off.
The Right Shoulder
- With RS facing, skip 18 sts from left shoulder, join yarn with slip st in next st, ch 2, hdc in same st; work in pattern across remaining 10 sts. You now have 11 sts. Continue in pattern until piece measures the same as left shoulder, ending with a RS row. Fasten off.
Crocheting the Back
- Work same as front through armhole shaping.
- Work even until piece measures 111⁄2"/29 cm, or 3 rows less than front.
- Last Row: Ch 2, hdc in next 11 hdc, slip st in next 18 sts, ch 2, hdc in last 11 hdc. Fasten off.
- With RS together, sew front to back at shoulder and side seams, leaving neck and armholes open.
Finishing
Armhole Edgings
- With RS facing and smaller hook, attach yarn at underarm seam.
- Rnd 1: Ch 1, sc evenly around armhole, do not join. Pm in the first st of the rnd and move it up as you work the rnds.
- Rnd 2: Sc in each sc around, placing sc2tog at each of the two underarm corners.
- Rnd 3: Repeat Rnd 2, slip st to next sc. Fasten off.
- Repeat for other armhole.
Neckband
- With RS facing and smaller hook, attach yarn to center of back neck, ch 1, sc evenly around neckline, placing sc2tog at each of the four inside corners, join with slip st to first sc. Fasten off.
- Weave in ends. Block.
Kimono Shell Sweater
Designed by Laura Hontz
With or without the shell edging, this darling kimono will suit any baby — boy or girl. Snaps are used for closures.
Size and Finished Measurements
- To fit 3–6 months, 181⁄2"/47 cm chest circumference
Yarn
- Sirdar Crofter DK, 60% acrylic/25% cotton/15% wool, 184 yds (170 m)/1.75 oz (50 g), Color 0033 Hepburn
Crochet Hook
- US G/6 (4 mm) or size needed to obtain correct gauge
Gauge
- 16 stitches and 12 rows = 4"/10 cm in half double crochet
Other Supplies
- Yarn needle, sewing needle and coordinating thread, two snaps
Pattern Essentials
Fhdc (foundation half double crochet) *Yo, insert hook into ch at base of previous st, yo and pull up loop, yo and draw through 1 loop (chain made), yo and pull through 3 loops (half double crochet made). Repeat from * for desired length. Note: This method is for adding stitches onto existing crochet work.
Crocheting the sweater
The Back
- Chain 39.
- Set-Up Row (WS): Hdc in 3rd ch from hook, hdc in each ch across, turn. You now have 37 hdc.
- Rows 1–10: Ch 2 (does not count as hdc here and throughout), hdc in each hdc across, turn.
- Row 11 (RS): Ch 2, hdc in each hdc across; ch 25, turn.
The Sleeves
- Row 12 (WS): Hdc in 3rd ch from hook and in next 22 ch, hdc in each hdc across back, fhdc 23 at end of row, turn. You now have 83 hdc.
- Rows 13–20: Ch 2, hdc in each hdc across, turn.
The Right Front
- Row 1 (RS): Ch 2, hdc in next 35 sts, turn, leaving remaining sts unworked. You now have 35 hdc.
- Row 2: Ch 2, hdc in each hdc across, turn.
- Row 3: Ch 2, hdc in each st to last st, 2 hdc in last st, turn. You now have 36 hdc.
- Rows 4–7: Repeat Rows 2 and 3 twice. You now have 38 hdc.
- Row 8: Ch 2, hdc in next 16 hdc, turn, leaving remaining sleeve sts unworked. You now have 16 hdc.
- Row 9: Repeat Row 3. You now have 17 hdc.
- Rows 10–19: Repeat Rows 2 and 3 five times. You now have 22 hdc.
- Row 20: Repeat Row 2.
- Fasten off.
The Left Front
- With RS facing, skip 13 back neck sts, join yarn with slip st in next st.
- Rows 1 and 2: Ch 2, hdc in each hdc across, turn. You now have 35 hdc.
- Row 3 (RS): Ch 2, 2 hdc in first st, hdc in each st across, turn. You now have 36 hdc.
- Row 4: Ch 2, hdc in each hdc across, turn.
- Rows 5 and 6: Repeat Rows 3 and 4. You now have 37 hdc.
- Row 7: Repeat Row 3. You now have 38 hdc. Fasten off.
- Row 8: Skip first 23 sts, join yarn in next st, ch 2, hdc in same st, hdc in each st across, turn. You now have 15 hdc.
- Row 9: Ch 2, 2 hdc in first st, hdc in each st across, turn. You now have 16 hdc.
- Row 10: Ch 2, hdc in each hdc across, turn.
- Row 11: Ch 2, 2 hdc in first dc, hdc in each hdc across, turn. You now have 17 hdc.
- Rows 12–19: Repeat Rows 10 and 11 four times.
- Row 20: Repeat Row 10. Fasten off.
- Fold sweater in half at shoulders. Sew sleeve and side seams.
Crocheting the Shell Edging
- With RS facing, join yarn to lower right front edge at right underarm seam. Ch 1, counting each row end as st, *skip next st, 5 dc in next st, skip next st, slip st in next st; repeat from * across row, up right front of sweater, around neck edge, down left side of sweater, and across bottom of left side front, slip st in last st. Fasten off.
Finishing
- Fold right front over left front. With sewing needle and thread, sew one snap near lower edge of sweater and another at bottom of the V.
Prism Pinafore
Designed by Edie Eckman
Colorful variegated yarn creates cheerful stripes in this seamless baby dress. The skirt is worked first in side-to-side rows, then joined. Work the bodice from the skirt up to the neck, and add three cute buttons to finish it off.
Size and Finished Measurements
- To fit 3–6 months: 17"/43 cm chest circumference and 12"/30.5 cm length
Yarn
- Wisdom Yarns Poems Socks, 75% superwash wool, 25% nylon, 459 yds (420 m)/3.5 oz (100 g), Color 960 Cotton Candy
Crochet Hooks
- US H/8 (5 mm) and US 7 (4.5 mm) or size needed to obtain correct gauge
Gauge
- 18 stitches and 10 rows = 4"/10 cm in back loop double crochet with smaller hook
Other Supplies
- Stitch markers, yarn needle, sewing needle and coordinating thread, three 1⁄2"/13 mm buttons
Pattern Essentials
Button loop (Sc, ch 3, slip st) in same st.
Crocheting the Skirt
- With larger hook, ch 38.
- Row 1 (WS): With smaller hook and working in back bumps of chain (see Working in back bump of chain), dc in 3rd ch from hook and in each ch across, turn. You now have 36 dc.
- Row 2: Ch 3 (counts as dc here and throughout), BLdc in next 17 sts, BLhdc in next 14 sts, BLsc in next 5 sts, turn.
- Row 3: Ch 3, BLdc in each st across, turn.
- Repeat Rows 2 and 3 twenty-six times, then work Row 2 once more.
- Fold skirt with RS together.
- Joining Row: Ch 1 and, working through double thickness in both loops of foundation ch and both loops of last row, sc in each st across.
- You now have 56 rows (28 ridges).
Crocheting the Bodice
- Turn skirt right side out and arrange seam at center back. Place marker at center front on top edge.
- Rnd 1 (RS): Working along side edge of skirt rows/ridges, join yarn by working standing hdc at center front, hdc in side of next row, ch 1, (hdc in next 2 rows, ch 1) around, join with slip st to top of first hdc. You now have 56 hdc and 28 ch-spaces.
- Rnd 2: Ch 3, dc in each hdc and ch-1 space around, join with slip st to top of ch-3. You now have 84 sts.
The Armholes
Crocheting the Edging
- Rnd 1 (RS): Ch 1, sc in each sc across, placing 3 sc in corner of left front neck; work 11 sc evenly down left edge of front placket; working a total of 11 sc up right edge of front placket, work (2 sc, button loop) three times, work 2 sc, ending with 2 sc in same place as first sc, join with slip st to first sc.
- Rnd 2: Ch 1, sc in each sc across neck edge to top left neck. Fasten off.
- Weave in ends. Sew buttons to left front placket opposite button loops.
Vintage Bluebell Sacque
Designed by Michele DuNaier, MAD Cap Fancies
Crocheted from the top down, this jacket is worked with basic crochet stitches along with shell and fan combinations. The ribbons are both decorative and utile — they keep the jacket closed in a baby-safe fashion.
Size and Finished Measurements
- To fit 6–12 months: 21"/53.5 cm chest circumference
Yarn
- Lion Brand Baby Soft, 60% acrylic/40% nylon, 459 yds (420 m)/5 oz (142 g), Color 106 Pastel Blue
Crochet Hooks
- US I/9 (5.5 mm) or size needed to obtain correct gauge and US H/8 (5 mm)
Gauge
- 16 stitches = 4"/10 cm in double crochet with larger hook
- 3 shells and 7 rows = 3"/7.5 cm in body pattern
Other Supplies
- Stitch markers, yarn needle, 21⁄2 yds/2.3 m of 1⁄4"/6 mm satin ribbon, two purchased satin flowers (optional), sewing needle and coordinating thread for attaching the optional flowers
Pattern Essentials
Fan [(Dc, ch 1) four times, dc] in 1 stitch or space.
Shell (Hdc, dc, ch 1, dc, hdc) in 1 stitch or space.
Crocheting the sacque
The Yoke
- Using larger hook, ch 56.
- Row 1 (WS): Sc in 2nd ch from hook, *2 sc in next ch, sc in next 2 ch; repeat from * across, turn. You now have 73 sc.
- Row 2: Ch 3 (counts as dc here and throughout), pm to indicate RS; dc in each sc across, turn.
- Row 3: Ch 1, *sc in next 3 dc, 2 sc in next dc; repeat from * to last st, sc in turning ch, turn. You now have 91 sc.
- Row 4: Repeat Row 2.
- Row 5: Ch 1, sc in first dc, *2 sc in next sc, sc in next 4 dc; repeat from * across, turn. You now have 109 sc.
- Row 6: Ch 4, skip first 3 sc, slip st in next sc, (ch 4, skip 2 sc, slip st in next sc) 35 times, turn. You now have 36 ch-spaces.
- Row 7: Ch 4, slip st in first ch-space, (ch 4, slip st in next ch-space) to last ch-space, (ch 4, slip st) twice in last ch-space, turn. You now have 37 ch-spaces.
- Row 8: Ch 1, slip st in first ch-space, (ch 2, dc, ch 1, dc, hdc) in first ch-space (counts as first shell), shell in each ch-space across, turn. You now have 37 shells.
- Pm in shells 6, 14, 24, and 32; leave markers in place through sleeve section.
- Row 9: Ch 2, shell in each of next 5 ch-1 spaces, shell in ch-1 space of first marked shell, ch 7, skip 7 shells for armhole, shell in ch-1 space of 2nd marked shell, shell in each of next 9 ch-1 spaces, shell in ch-1 space of 3rd marked shell, ch 7, skip 7 shells for armhole, shell in ch-1 space of 4th marked shell, shell in each of next 5 ch-1 spaces, hdc in turning ch, turn. You now have 23 shells and 2 ch-7 spaces.
the Body
- Expand shells by adding a ch-space between them as follows.
- Row 1: Ch 3, (shell, ch 1) in each ch-1 space to next ch-7 space, *skip first ch, (shell in next ch, ch 1, skip 1 ch) three times**, (shell, ch 1) in each ch-1 space to next ch-7 space, repeat from * to ** once, (shell, ch 1) in each of next 5 ch-1 spaces, shell in ch-1 space of last shell, dc in turning ch, turn. You now have 29 shells.
- Row 2: Ch 3, (shell in ch-1 space of shell, ch 1, skip next ch-1 space) across to last shell, shell in ch-1 space of last shell, dc in turning ch, turn.
- Rows 3–12: Repeat Row 2. You now have 14 rows of shells, counting the 2 rows done in yoke section.
- Row 13: Ch 1, fan in ch-1 space of first shell, (slip st in ch-1 space between shells, fan in ch-1 space of next shell) across row, ch 1, slip st in turning chain, turn. You now have 29 fans. Do not fasten off.
The Body Edging
- Change to smaller hook.
- Row 1: With yarn still attached at lower right-hand corner, pivot to work in the sides of rows up right side of front; work 30 sc evenly spaced up right side of front, (sc, ch 2, 2 dc) in right corner of neck; working in unused loops of starting chain, (ch 1, dc2tog over 2 ch) 27 times around neck, ch 1, (2 dc, ch 2, sc) in left corner of neck; work 30 sc evenly spaced down left side of front, ending in left corner at end of body Row 12, turn.
- Row 2: Ch 4, skip 1 sc, slip st in next sc, (ch 4, skip 1 sc, slip st in next sc) up left front to left neck corner, ch 4, skip 1 dc, slip st in next dc, (skip next ch-space, slip st in next dc, ch 4) across neck to right neck corner, slip st in neck corner, ch 4 around corner, skip 1 sc, slip st in next sc, (ch 4, skip 1 sc, slip st in next sc) down right front, ending at start of body edging Row 1. Fasten off.
Crocheting the Sleeves (make 2)
You should still have two markers under each armhole.
- Row 1 (WS): With larger hook, join yarn with slip st under armhole at center ch of the ch-7, ch 3, skip 1 ch, dc in next ch, shell in ch-1 space of next marked shell, (shell in ch-1 space of next 7 shells around armhole, shell in ch-1 space of other marked shell, skip next ch, dc in next ch, dc in same ch as beginning slip st, ch 1, join with slip st to 3rd ch of beginning ch-3, turn. You now have 9 shells and 4 dc.
- Row 2: Ch 1, (Slip st, ch 3, hdc) in first ch-1 space (half shell made), shell in ch-1 space of next 9 shells around armhole, (hdc, dc) in same place as beginning half shell, ch 1, join with a slip st to top of beginning ch-3 to complete the shell, turn. You now have 10 shells.
- Row 3–13: Repeat Row 2.
The Sleeve Edging
- Change to smaller hook.
- Row 1 (RS): Ch 3, dc in next ch-1 space, (dc in next dc, skip 2 hdc, dc in next dc, dc in next ch-space) around, ending dc in next dc, skip 2 hdc, join with slip st to top of ch-3, turn. You now have 30 dc.
- Row 2: (Ch 4, skip 1 dc, slip st in next dc) around to last 2 sts, ch 4, skip 1 dc, slip st in first slip st. You now have 15 ch-spaces.
- Fasten off.
Finishing
- Remove markers. Weave in ends. Block.
- Weave ribbon through body edging Row 1 (at neck only), Row 6 of the yoke, and Row 1 of the sleeve edging (on both sleeves), and tie into a bow.
- With sewing needle and thread, tack ribbon down in several places to prevent baby from pulling it out.
- Sew rosettes on yoke as pictured, if desired.
Pinwheel Vest
Designed by Lorna Miser, Lorna Miser Designs
This clever design uses a full circle motif for the back and two half circles for the front. Tied with a simple ribbon bow, this vest will become a favorite.
Size and Finished Measurements
- To fit 6–18 months: 20"/51 cm chest circumference and 10"/25.5 cm length
Yarn
- Cascade Yarns Pinwheel, 100% acrylic, 440 yds (400 m)/7 oz (200 g), Color 16 Grapes
Crochet Hook
- US I/9 (5.5 mm) or size needed to obtain correct gauge
Gauge
- First 3 rounds of back = 31⁄2"/9 cm in diameter
Other Supplies
- Stitch markers, yarn needle, 1 yd (1 m) of 3⁄8"/9.5 mm satin ribbon
Crocheting the Vest
The Back
- Ch 4, join with slip st to form a ring.
- Rnd 1: Ch 3 (counts as dc here and throughout), 12 dc in ring, join with slip st to top of ch-3. You now have 13 sts.
- Rnd 2: Ch 4 (counts as dc and ch 1), *dc in next st, ch 1; repeat from * around, join with slip st to 3rd ch of beginning ch-4.
- Rnd 3: Ch 6 (counts as dc and ch 3), *dc in next st, ch 3; repeat from * around, join with slip st to 3rd ch of beginning ch-6.
- Rnd 4: Slip st in next ch-1 space, ch 3, 2 dc in same space, ch 2, *3 dc in next space, ch 2; repeat from * around, join with slip st to top of beginning ch-3.
- Rnd 5: Slip st in next dc, ch 6, dc in next space, ch 3, *skip 1 dc, dc in next dc, ch 3, dc in next space, ch 3; repeat from * around, join with slip st to 3rd ch of beginning ch-6. You now have 26 sts and 26 spaces.
- Rnd 6: Ch 3, 2 dc in next space, *dc in next st, 2 dc in next space; repeat from * around, join with slip st to top of beginning ch-3. You now have 78 sts.
- Rnd 7: Ch 5 (counts as dc and ch 2), skip 1 dc, *dc in next dc, skip 1 dc, ch 2; repeat from * around, join with slip st to 3rd ch of beginning ch-5.
- Rnd 8: Slip st in next space, ch 3, dc in same space, ch 1, (2 dc, ch 1) in each space around, join with slip st to top of beginning ch-3.
- Rnd 9: Slip st in next space, ch 3, 2 dc in same space, 3 dc in each space around, join with slip st to top of beginning ch-3. You now have 117 sts.
- Rnd 10 (squaring rnd): Ch 1, sc in first 3 sts, *hdc in next 3 sts, dc in next 3 sts, tr in next 3 sts, dtr in next 3 sts, ch 5, dtr in next 3 sts, ch 5, dtr in next 3 sts, tr in next 3 sts, dc in next 3 sts, hdc in next 3 sts**, sc in next 6 sts; repeat from * around, ending last repeat at **. (This final side becomes the neck edge of the back.)
- Rnd 11: Ch 3, dc in each st around, working (3 dc, ch 3, 3 dc) in each ch-5 corner space, join with slip st to top of beginning ch-3. Pm in 11th dc to right of top left-hand corner and to left of top-right-hand corner spaces.
The Right Front
- Ch 4, join with slip st to form a ring.
- Row 1 (RS): Ch 3 (counts as dc here and throughout), 6 dc in ring, turn. You now have 7 sts.
- Row 2: Ch 4 (counts as dc and ch 1), *dc in next st, ch 1; repeat from * to last st, dc in top of turning chain, turn. You now have 6 ch-1 spaces.
- Row 3: Ch 6 (counts as dc and ch 3), *dc in next st, ch 3; repeat from * to last st, dc in 3rd ch of turning ch, turn. You now have 6 ch-3 spaces.
- Row 4: Ch 5 (counts as dc and ch 2), *3 dc in next space, ch 2; repeat from * to last st, dc in 3rd ch of turning ch, turn. You now have 20 dc and 7 ch-2 spaces.
- Row 5: Ch 3, dc in next space, *ch 3, skip 1 dc, dc in next dc, ch 3, dc in next space; repeat from * to last st, dc in top of turning ch, turn. You now have 12 ch-3 spaces.
- Row 6: Ch 3, dc in next dc, *2 dc in next space, dc in next dc; repeat from * across, ending with last dc in top of turning ch, turn. You now have 39 sts.
- Row 7: Ch 5 (counts as dc and ch 2), skip 1 dc, *dc in next dc, skip 1 dc, ch 2; repeat from * to last st, dc in top of turning ch, turn. You now have 20 dc and 19 ch-2 spaces.
- Row 8: Ch 4 (counts as dc and ch 1), (2 dc, ch 1) in each space across to last st, dc in top of turning ch, turn. You now have 40 dc and 20 ch-1 spaces.
- Row 9: Ch 3, skip first space, 3 dc in each space to across last space, skip last space, dc in 3rd ch of turning ch, turn. You now have 56 sts.
- Row 10 (squaring for shoulder): Ch 1, *sc in next 3 sts, hdc in next 3 sts, dc in next 3 sts, tr in next 3 sts, ch 1, 3 sc around the post of last tr made, sc in each st across, turn.
- Row 11: Ch 3, dc in next 43 sts, skip next sc, slip st in next sc worked in side of tr, slip st in next sc. Do not fasten off.
Join the Shoulder
- Holding right front and back with RS together and working through both layers, starting in row-end sc on right front and marked dc in top edge of back, slip st shoulder sts together. Do not fasten off.
Join the Right Side Edge
- With RS facing, work 40 slip sts evenly spaced across left side edge of right front.
- With RS of right front and back together and working through double thickness, slip st in each of next 20 sts. Do not fasten off.
Shape the Right Armhole
- Turn body RS out.
- Ch 3, dc in each st around armhole, join with slip st to top of beginning ch-3. You now have 40 sts. Fasten off.
The Left Front
- Work same as right front through Row 9.
- Row 10 (squaring for shoulder, WS): Ch 1, sc in each st across to last 11 sts, ch 3 (counts as tr), tr in next 2 sts, dc in next 3 sts, hdc in next 3 sts, sc in next 3 sts, turn.
Join the Shoulder
- Row 11: Holding left front and back with RS together and working through both layers, ch 1, slip st in each of next 12 sts to marker on back left shoulder; working through single layer of left front only, sc in next ch-3 space, dc in each st across to beginning of Row 10 (bottom corner). Do not fasten off.
Join the Left Side Edge
- Work 40 slip sts evenly spaced across right side edge of left front. Fasten off.
- With RS of left front and back together, join yarn with slip st at bottom edge and working through double thickness, slip st in each of next 19 sts. Do not fasten off.
Shape the Left Armhole
- Work as for right armhole.
Finishing
- Weave in ends. Cut ribbon in half and tie one end of each half to each side at the center front.
Boy’s Cardigan
Designed by Annelies Baes
This trendy little cardigan is worked in separate pieces and seamed. The entire cardigan is worked in a crocheted version of Moss Stitch. Make a girl’s version with a simple change of color and buttons.
Size and Finished Measurements
- To fit 6–12 months: 22"/56 cm chest circumference
Yarn
- Schoppel-Wolle Admiral Stärke 6, 75% virgin wool/25% nylon, 437 yds (400 m)/5.3 oz (150 g), Color 6601 Marsgrün

Crochet Hook
- US E/4 (3.5 mm) or size needed to obtain correct gauge
Gauge
- 18 stitches and 17 rows = 4"/10 cm in Moss Stitch
Other Supplies
- Stitch markers or contrasting thread, yarn needle, four 7⁄8"/22 mm buttons, sewing needle and coordinating thread
Pattern Essentials
Moss Stitch (worked over an even number of sts)
Row 1: Sc in 3rd ch from hook (beginning ch-2 counts as dc), *dc in next ch, sc in next ch; repeat from * across, turn.
Row 2: Ch 2 (counts as dc throughout), sc in next dc, *dc in next sc, sc in next dc; repeat from * across, turn.
Repeat Row 2 for pattern, working 1 sc in each dc and 1 dc in each sc.
Crocheting the Cardigan
The Back
- Chain 51.
- Row 1 (RS): Work Row 1 of Moss Stitch. You now have 50 sts.
- Rows 2–28: Work Row 2 of Moss Stitch.
- Fasten off.
Shape the Armhole
- Row 29 (RS): Skip 6 sts, slip st to join yarn in next st, ch 2, work in pattern across to last 6 sts, turn, leaving remaining sts unworked. You now have 38 sts.
- Rows 30–47: Work Row 2 of Moss Stitch.
- Fasten off.
The Left Front
- Chain 27.
- Row 1 (RS): Work Row 1 of Moss Stitch. You now have 26 sts.
- Rows 2–28: Work Row 2 of Moss Stitch.
- Fasten off.
Shape the Armhole and Neck
- Row 29 (RS): Skip 6 sts, slip st in next st, ch 2, work in pattern across to last st, turn, leaving last st unworked. You now have 19 sts.
- Row 30: Ch 1, work in pattern across, turn.
- Row 31: Ch 2, work in pattern to last st, turn, leaving last st unworked. You now have 18 sts.
- Row 32: Ch 2, work in pattern to end of row, turn.
- Row 33: Ch 2, work in pattern to last 2 sts, sc in next sc, turn, leaving last st unworked. You now have 17 sts.
- Rows 34–45: Repeat Rows 30–33 three times. You will have 11 sts at the end of Row 45.
- Rows 46 and 47: Repeat Rows 30 and 31. You will have 10 sts at the end of Row 47. Fasten off.
The Right Front
- Rows 1–27: Work as for left front. Do not fasten off at end of last row.
Shape the Armhole and Neck
- Row 28 (WS): Ch 2, work in pattern to last 2 sts, sc in next sc, turn, leaving last st unworked. You now have 25 sts.
- Row 29: Ch 1, work in pattern to last 6 sts, turn, leaving last 6 sts unworked. You now have 19 sts.
- Rows 30-44: Work as for left front Rows 31–45. You now have 11 sts.
- Row 45: Ch 1, work in pattern to end of row, turn.
- Row 46: Ch 2, work in pattern to last st, skip last st, turn. You now have 10 sts.
- Row 47: Ch 1, work in pattern to end of row, turn.
The Sleeves (Make 2)
- Ch 36, join with slip st to first ch to form a ring.
- Rnd 1: Ch 1, sc in first ch, dc in next ch, *sc in next ch, dc in next ch; repeat from * around, join with slip st to first sc, turn. You now have 36 sts.
- Rnd 2: Ch 2 (counts as dc here and throughout), sc in next dc, *dc in next sc, sc in next dc; repeat from * around, join with slip st to top of ch-2, turn.
- Rnd 3: Ch 1, sc in first st, dc in next sc, *sc in next dc, dc in next sc; repeat from * around, join with slip st to first sc, turn.
- Rnd 4: Repeat Rnd 2.
- Rnd 5 (increase rnd): Ch 2, sc in first dc, *dc in next sc, sc in next dc; repeat from * to last st, (dc, sc) in last sc, join with slip st to top of ch-2, turn. You now have 38 sts.
- Rnd 6: Repeat Rnd 3.
- Rnds 7 and 8: Repeat Rnds 2 and 3.
- Rnd 9 (increase rnd): Ch 1, (sc, dc) in first st, *sc in next dc, dc in next sc; repeat from * to last st, (sc, dc) in last dc, join with slip st to first sc, turn. You now have 40 sts.
- Rnd 10: Ch 2, *sc in next dc, dc in next sc; repeat from * to end of rnd, join with slip st to top of ch-2, turn.
- Rnd 11 (increase rnd): Repeat Rnd 5. You now have 42 sts.
Begin working back and forth in rows.
- Row 12: Ch 2 (counts as 1 dc), sc in same st, *dc in next sc, sc in next dc; repeat from * to last st, (dc, sc) in last st, do not join, turn. You now have 44 sts.
- Row 13: Ch 2, sc in next dc, *dc in next sc, sc in next dc; repeat from * across, turn.
- Rnd 14: Repeat Rnd 13. Fasten off, leaving a 24"/61 cm tail for sewing.
Assembling the Pieces
- Place left front and back together with RS together. Join side and shoulder seams with slip st. Repeat for right front.
- Mark center of sleeves with stitch marker or colored thread. Place one sleeve into armhole with RS together, aligning unjoined rnds of sleeve with body underarm shaping (6 skipped sts on front and back) and sleeve center with shoulder seam; join seams with slip st. Repeat for second sleeve.
- Working across foundation ch edge of sleeve, work 1 rnd of slip st, join with slip st. Fasten off.
Crocheting the Front Bands
If you are making this cardigan for a boy, make the buttonholes on the left front, if you are making this cardigan for a girl, make them on the right front; instructions written below are for a boy’s cardigan.
- Row 4 (buttonhole row): Ch 1, BLsc in first sc, FLsc in next sc, *ch 2, skip 2 sc, (BLsc in next sc, FLsc in next sc) three times; repeat from * three more times; work remainder of row in pattern: (BLsc, FLsc) across, turn.
- Row 5: Repeat Row 2, working pattern sts in buttonhole ch-spaces. At the end of the row, turn work 90° to work along bottom edge.
- Last Row: Ch 1, slip st in each st along lower edge. Fasten off.
Finishing
- Weave in ends. Block cardigan and allow to dry. Sew on buttons opposite buttonholes.
Rosetta Cardigan
Designed by Annelies Baes
Rosetta Cardigan is presented in three sizes so you can keep your little girl in fashion from six months to two years of age. Raglan sleeves and eyelet-and-lace trimmings make it fancy enough for solid yarn, too. It is worked without seams, from the top down.
Sizes and Finished Measurements
- To fit 0–6 (6–12, 12–24) months: 20 (221⁄2, 261⁄2)"/51 (57, 67.5) cm chest circumference. Sample shown is size 6–12 months.
Yarn
- Schoppel Wolle Zauberball Stärke 6, 75% virgin wool/25% nylon, 437 yds (400 m)/5.3 oz (150 g), Color 2079 By the Flower
Crochet Hook
- US E/4 (3.5 mm) or size needed to obtain correct gauge
Gauge
- 20 stitches and 16 rows = 4"/10 cm in half double crochets
Other Supplies
- Yarn needle, stitch markers, four 5⁄8"/16 mm buttons, sewing needle and coordinating thread
Pattern Essentials
HdcV-st (half double crochet V-stitch) (Hdc, ch 1, hdc) in 1 stitch or space.
Crocheting the Cardigan
The Yoke
- Chain 44 (48, 50).
- Row 1 (RS): HdcV-st in 3rd ch from hook, hdc in next 7 (8, 8) ch, hdcV-st in next ch, hdc in next 24 (26, 28) ch, hdcV-st in next ch, hdc in next 7 (8, 8) ch, hdcV-st in last ch, turn. You now have 46 (50, 52) hdc and 4 ch-spaces.
- Row 2: Ch 2 (does not count as st here and throughout), 2 hdc in first hdc, hdcV-st in next ch-space, hdc in next 9 (10, 10) hdc, hdcV-st in next ch-space, hdc in next 26 (28, 30) hdc, hdcV-st in next ch-space, hdc in next 9 (10, 10) hdc, hdcV-st in next ch-space, 2 hdc in last hdc, turn. You now have 56 (60, 62) hdc and 4 ch-spaces.
Note: From now on, work hdcV-st in every ch-space and 1 hdc in every hdc unless otherwise indicated.
- Rows 3–13 (15, 18): Ch 2, 2 hdc in first hdc, *hdc in each hdc across to next ch space, hdcV-st in next space; repeat from * three times, hdc in each hdc across to last hdc, 2 hdc in last hdc, turn. You now have 166 (190, 222) hdc and 4 ch-spaces.
Separate the Sleeves
Note: Discontinue increasing sts at the beginning and end of rows for the V-neck. Sleeves will be separated, and you will continue working on the both fronts and back.
Size 0–6 months only
- Row 14 (WS): Ch 2, hdc in next 25 hdc for right front, *yo, insert hook into next ch-space and pull up a loop, skip next 33 sleeve sts, yo, insert hook into next ch-space and pull up a loop, yo and pull through all 5 loops on hook (hdc2tog made)**; hdc2tog, hdc in next 46 hdc, hdc2tog; repeat from * to ** once, hdc in last 25 hdc for left front, turn. You now have 100 hdc.
- Row 15: Ch 2, hdc in each hdc across, turn.
- Rows 16–29: Repeat Row 15. At end of Row 29, do not fasten off; do not turn.
Size 6–12 months only
- Row 16 (WS): Ch 2, hdc in next 29 hdc for right front, *yo, insert hook in next ch-space and pull up a loop, skip next 38 sleeve sts, yo, insert hook in next ch-space and pull up a loop, yo and pull through all 5 loops on hook (hdc2tog made)**; hdc2tog, hdc in next 52 hdc, hdc2tog; repeat from * to ** once; hdc in last 29 hdc for left front, turn. You now have 114 hdc.
- Row 17: Ch 2, hdc in each hdc across, turn.
- Rows 18–33: Repeat Row 17. At end of Row 33, do not fasten off; do not turn.
Size 12–24 months only
- Row 19 (RS): Ch 2, hdc in next 35 hdc for left front, *yo, insert hook in next ch-space and pull up a loop, skip 44 next sleeve sts, yo, insert hook in next ch-space and pull up a loop, yo and pull through all 5 loops on hook**; hdc2tog, hdc in next 60 hdc, hdc2tog; repeat from * to ** once, hdc in last 35 hdc for right front, turn. You now have 134 hdc.
- Row 20: Ch 2, hdc in each hdc across, turn.
- Rows 21–41: Repeat Row 20. At end of Row 41, do not fasten off; do not turn.
Crocheting the Edgings
The Front and Neck Edging
All sizes
- With RS facing, turn 90° to work across right front edging.
- Row 1 (WS): Ch 2, 2 hdc in front edging just made; along bottom edge work (2 hdc in next hdc) 98 times, hdc in last 2 hdc; 2 hdc in front edging, turn. You now have 201 hdc.
- Row 2 (eyelet row, WS): Ch 2, hdc in first st, ch 2, skip next st, *hdc in next st, ch 2, skip 1 hdc; repeat from * across right front edge, back neck edge, and down left front edge, ending hdc in last st. Do not fasten off; do not turn.
The Bottom Edging
- Turn garment to work across bottom edge.
Size 0–6 months only
- Row 1 (WS): Ch 2, 2 hdc in front edging just made; along bottom edge work (2 hdc in next hdc) 98 times, hdc in last 2 hdc; 2 hdc in front edging, turn. You now have 201 hdc.
Size 6–12 months only
- Row 1 (WS): Ch 2, hdc in front edging just made; along bottom edge hdc in next 5 sts, (2 hdc in next hdc) 104 times, hdc in last 5 sts; 2 hdc in front edging, turn. You now have 221 hdc.
Size 12–24 months only
- Row 1 (WS): Ch 2, hdc in front edging just made; along bottom edge work (2 hdc in next hdc) 134 times; 2 hdc in front edging, turn. You now have 271 hdc.
All sizes
- Row 2: Ch 2, (dc, ch 1, dc) in first hdc, *dc in next 3 sts, dc2tog over next 3 sts (skipping center st), dc in next 3 sts, (dc, ch 1, dc) in next st; repeat from * to end of row, turn.
- Row 3: Ch 2, (dc, ch 1, dc) in first ch-space, *ch 1, skip 1 dc, dc in next dc, ch 1, skip 1 dc, dc2tog over next 3 sts (skipping center st), ch 1, skip 1 dc, dc in next dc, ch 1, skip 1 dc, (dc, ch 1, dc) in next ch-space; repeat from * across, turn.
- Row 4: Ch 2, (dc, ch 1, dc) in first ch-space, *dc in next (dc, ch-space, dc), dc2tog over next 3 sts (skipping center st), dc in next (dc, ch-space, dc), (dc, ch 1, dc) in next ch-space; repeat from * across, turn.
- Row 5: Repeat Row 3.
- Row 6: Ch 1, sc in first dc, (sc, ch 2, sc) in first ch-space, *sc in next (dc, ch-space, dc), skip 1 ch, sc in next st, skip 1 ch, sc in next (dc, ch-space, dc), (sc, ch 2, sc) in next ch-space; repeat from * across, sc in last dc; turn 90° to work final edging row across fronts and neck.
- Last Row: Sc evenly across right front edge, back neck edge, and left front edge, working in each hdc and each ch st, join with slip st to first sc of row 6. Fasten off.
Crocheting the Sleeves
Size 0–6 months only
- Rnd 1: With WS facing, join yarn with slip st at underarm, ch 2, hdc in first st, 3 hdc around the leg of hdc2tog, hdc in next 33 hdc, 3 hdc around the leg of hdc2tog, join with slip st to first hdc, turn. You now have 40 hdc.
Size 6–12 months only
- Rnd 1: With WS facing, join yarn with slip st at underarm, ch 2, hdc around the leg of hdc2tog, hdc in next 38 hdc, hdc around the leg of hdc2tog, join with slip st to first hdc, turn. You now have 40 hdc.
Size 12–24 months only
- Rnd 1: With RS facing, join yarn with slip st at underarm, ch 2, hdc in first st, 3 hdc around the leg of hdc2tog, hdc in next 45 hdc, 2 hdc around the leg of hdc2tog, join with slip st to first hdc, turn. You now have 50 hdc.
All sizes
- Rnd 2: Ch 2, hdc in each hdc around, join with slip st to first hdc, turn. You now have 40 (40, 50) hdc.
- Rnd(s) 3 (3 and 4, 3–8): Repeat Rnd 2.
- Rnd 4 (5, 9): Ch 3 (counts as dc), *dc in next 3 sts, dc2tog over next 3 sts, dc in next 3 sts**, (dc, ch 1, dc) in next st; repeat from * three (three, four) times; ending last repeat at **, (dc, ch 1) in first st; join with slip st to top of ch-3, turn.
- Rnd 5 (6, 10): Slip st in next ch-1 space, ch 3, *ch 1, skip 1 dc, dc in next dc, ch 1, skip 1 dc, dc2tog over next 3 sts, ch 1, skip 1 dc, dc in next dc, ch 1, skip 1 dc, **(dc, ch 1, dc) in next ch-space; repeat from * around, ending last repeat at **, dc in next beginning ch-1 space, ch 1, join with slip st to top of ch-3, turn. Do not fasten off.
Size 0–6 months only: Proceed to sleeve Edging Rnd.
Sizes 6–12 (12–24) months only
- Rnd 7 (11): Ch 1, slip st in ch-space, ch 3, *dc in next (dc, space, dc), dc2tog over next 3 sts, dc in next (dc, space, dc)**, (dc, ch 1, dc) in next space; repeat from * around, ending last repeat at **, (dc, ch 1) in beginning ch-1 space, join with slip st to top of ch-3, turn.
- Rnd 8 (12): Slip st in next ch-1 space, ch 3, *ch 1, skip 1 dc, dc in next dc, ch 1, skip 1 dc, dc2tog over next 3 sts, ch 1, skip 1 dc, dc in next dc, ch 1, skip 1 dc, **(dc, ch 1, dc) in next ch-space; repeat from * around, ending last repeat at **, dc in next beginning ch-1 space, ch 1, join with slip st to top of ch-3, turn. Do not fasten off.
All sizes
- Edging Rnd: Ch 1, *(sc, ch 2, sc) in next space, sc in next (dc, space, dc), skip 1 ch, sc in next st, skip 1 ch, sc in next (dc, space, dc); rep from * around, join with slip st to first sc. Fasten off.
- Repeat for second sleeve.
Finishing
- Weave in ends. On right front edge, pm at bottom of V-neck and at bottom of body section, then place two markers evenly spaced between them. Sew one button at each marker. Use eyelet row openings as buttonholes.
- Block cardigan and allow to dry.
Unforgettable Vest
Designed by Nirmal Kaur Khalsa, Nirmal’s Designs
Changing hook sizes creates a subtle and clever rib shaping at the bottom of this vest. Crocheted in one piece with only a single short seam makes finishing easy. You won’t forget how much fun this was to make!
Size and Finished Measurements
- To fit 6–12 months: 21"/53.5 cm chest circumference and 91⁄2"/24 cm length
Yarn
- Red Heart Boutique Unforgettable, 100% acrylic, 280 yds (256 m)/3.5 oz (100 g), Color 3955 Winery
Crochet Hooks
- US I/9 (5.5 mm) or size needed to obtain correct gauge and US H/8 (5 mm)
Gauge
- 18 stitches and 19 rows = 4"/10 cm in Seed Stitch with larger hook
Other Supplies
Pattern Essentials
Seed Stitch (for gauge swatch only) (multiple of 2+1, add 1 for loose chain)
Chain a multiple of 2 sts.
Row 1: Sc in 2nd ch from hook, (ch 1, skip 1 ch, sc in next ch) across, turn.
Row 2: Ch 1, sc in first sc, (sc, ch 1) in each ch-1 space across to last ch-1 space, sc in last ch-1 space, sc in last sc, turn.
Row 3: Ch 1, sc in first sc, (ch 1, sc) in each ch-1 space across to last 2 sts, ch 1, sc in last sc, turn.
Repeat Rows 2 and 3 for pattern.
Crocheting the Vest
- With larger hook, ch 41, slip st in first ch to form armhole opening, ch 23 for side of vest.
- Row 1 (RS): With smaller hook, sc in 2nd ch from hook and in next 6 ch sts; with larger hook, (ch 1, skip 1 ch, sc in next ch) across side, around armhole opening and across other side of foundation ch to last 7 sts; with smaller hook, sc in last 7 sts, turn. You now have 87 sts.
- Row 2: With smaller hook, ch 1, sc in first sc, BLsc in next 6 sc; with larger hook, sc in next ch-space, (ch 1, sc) in each ch-1 space across to last 7 sts; with smaller hook, BLsc in last 7 sts, turn.
- Row 3: With smaller hook, ch 1, sc in first sc, BLsc in next 6 sts; with larger hook, (ch 1, sc) in each ch-1 space to last 8 sts, ch 1, skip 1 sc; with smaller hook, BLsc in last 7 sts, turn.
- Rows 4–24: Repeat Rows 2 and 3, ending with Row 3 of pattern.
Divide for Neck Opening
- Row 1: Work in pattern Row 3 for 20 sts, ch 35, skip 35 sts for neck opening; being careful not to twist ch, sc in next ch-space, continue in pattern across remaining sts, turn.
- Row 2: Work in pattern Row 2 across, working in back bump of each ch across neck opening chain, continue in pattern Row 2 across remaining sts, turn.
- Rows 3–24: Work even in established pattern.
- Next Row (connecting row): With WS of front and back together, fold vest in half vertically, bringing other ribbed edge behind next sts to be worked; working through double thickness of both pieces, sc through back loop of front sc and both loops of back sc for first 7 sts. Fasten off, leaving an 18"/45.5 cm sewing length.
Finishing
- With yarn needle and length of yarn, and working through back loops, seam the next 16 sts of sides together. Weave in ends.
Six-Button Vest
Designed by Brenda K. B. Anderson
This unusual vest is made flat, in sideways-turned rows, in one piece. It is perfect for squirmy babies, since you just pop it on over the head and then button the sides. The only sewing required is attaching the buttons.
Size and Finished Measurements
- To fit 6 months: 20"/51 cm chest circumference and 91⁄2"/24 cm length
Yarn
- Berroco Vintage DK, 50% acrylic/40% wool/10% nylon, 288 yds (263 m)/3.5 oz (100 g), Color 2194 Breezeway
Crochet Hook
- US G/6 (4 mm) or size needed to obtain correct gauge
Gauge
- 201⁄2 stitches and 20 rows = 4"/10 cm in stitch pattern
Other Supplies
- Stitch markers, yarn needle, six 7⁄8"/22 mm buttons, sewing needle and coordinating thread
Pattern Essentials
Scfl (single crochet in the frontmost loop) Insert hook from bottom to top under the horizontal bar lying just below the top 2 loops of the hdc, yo and pull up a loop, yo and pull through 2 loops.
Stitch Pattern (any multiple, add 1 for turning chain)
Row 1: Hdc in 2nd ch from hook and in each ch across, turn.
Row 2: Ch 1, scfl in each st across, turn.
Row 3: Ch 1, hdc in each st across, turn.
Repeat Rows 2 and 3 for pattern.
Crocheting the Vest
Section 1 (Left Underarm)
Note: Vest begins at wearer’s left side (see diagram below).
- Chain 31.
- Row 1 (WS): Sc in back bump (see Working in back bump of chain) of 2nd ch from hook and in each ch across, turn. You now have 30 sc.
- Row 2 (RS): Ch 1 (does not count as st here and throughout), BLsc in next 8 sts, hdc in next 22 sts, turn.
- Row 3: Ch 1, scfl in next 22 sts, BLsc in next 8 sts, turn.
- Rows 4–11: Repeat Rows 2 and 3 four more times.
- Row 12: Ch 1, BLsc in next 8 sts, hdc in next 21 sts, 2 hdc in the last st, turn. You now have 31 sts.
- Row 13: Ch 1, scfl in next 23 sts, BLsc in next 8 sts, turn.
- Row 14: Ch 1, BLsc in next 8 sts, hdc in next 22 sts, 2 hdc in the last st, turn. You now have 32 sts.
- Row 15: Ch 1, scfl in next 24 sts, BLsc in next 8 sts, turn.
- Row 16: Ch 1, BLsc in next 8 sts, hdc in next 23 sts, 2 hdc in the last st, ch 60 (to create the left shoulder and left front), turn. Do not fasten off.
Section 2 (Left Front and Back)
- Row 17: Sc in 2nd ch from hook and in next 58 chs, scfl in next 25 sts, BLsc in next 8 sts, turn. You now have 92 sts.
- Row 18: Ch 1, BLsc in next 8 sts, hdc in next 76 sts, BLsc in next 8 sts, turn.
- Row 19: Ch 1, BLsc in next 8 sts, scfl in next 76 sts, BLsc in next 8 sts, turn.
- Row 20: Ch 1, BLsc in next 8 sts, hdc in next 37 sts, 2 hdc in next 2 sts (to help shape top of shoulder), hdc in next 18 sts, ch 2, skip next 2 sts (for buttonhole), hdc in next 8 sts, ch 2, skip next 2 sts (for buttonhole), hdc in next 7 sts, sc in both loops of next st, ch 2, skip next 2 sts (for buttonhole), sc in both loops of next st, BLsc in last 4 sts, turn. You now have 94 sts and three buttonholes made.
- Row 21: Ch 1, BLsc in next 5 sts, 2 sc in ch-2 space, BLsc in next st, scfl in next 7 sts, 2 sc in next ch-2 space, scfl in next 8 sts, 2 sc in next ch-2 space, scfl in next 60 sts, BLsc in next 8 sts, turn.
- Row 22: Ch 1, BLsc in next 8 sts, hdc in next 78 sts, BLsc in next 8 sts, turn.
- Row 23: Ch 1, BLsc in next 8 sts, scfl in next 78 sts, BLsc in next 8 sts, turn.
- Row 24: Ch 1, BLsc in next 8 sts, hdc in next 38 sts, 2 hdc in next st, pm in 2nd of these hdc sts (place marker A — see diagram), 2 hdc in next st, hdc in next 7 sts, pm in the last st made, hdc in next 31 sts, BLsc in next 8 sts, turn. You now have 96 sts. Do not fasten off.
Section 3 (Front)
- Row 25: Ch 1, BLsc in next 8 sts, scfl in next 32 sts (ending with marked st; remove marker), turn, leaving remaining back sts unworked. You now have 40 sts.
- Row 26: Ch 1, BL slip st in next 3 sts, hdc in next 29 sts, BLsc in next 8 sts, turn.
- Row 27: Ch 1, BLsc in next 8 sts, scfl in next 27 sts, turn, leaving remaining sts unworked. You now have 35 sts.
- Row 28: Ch 1, BL slip st in next 3 sts, hdc in next 24 sts, BLsc in next 8 sts, turn.
- Row 29: Ch 1, BLsc in next 8 sts, scfl in next 24 sts, turn, leaving remaining sts unworked. You now have 32 sts.
- Row 30: Ch 1, hdc in next 24 sts, BLsc in next 8 sts, turn.
- Rows 31–40: Repeat Rows 29 and 30 five more times.
- Row 41: Ch 1, BLsc in next 8 sts, scfl in next 24 sts, ch 4, turn.
- Row 42: Hdc in 2nd ch from hook and in next 2 chs, hdc in next 24 sts, BLsc in next 8 sts, turn. You now have 35 sts.
- Row 43: Ch 1, BLsc in next 8 sts, scfl in next 26 sts, ch 7, turn.
- Row 44: Hdc in 2nd ch from hook and in next 5 ch-sts, hdc in next 26 sts, BLsc in next 8 sts, turn. You now have 40 sts.
- Fasten off. Place stitch marker in the last stitch made (place marker B — see diagram).
Section 4 (Back)
- Row 1: With WS facing, join yarn in marked st (marker A), ch 1, scfl in same st and in next 39 sts, BLsc in next 8 sts, turn. You now have 48 sts.
- Row 2 (RS): Ch 1, BLsc in next 8 sts, hdc in next 40 sts, turn.
- Row 3: Ch 1, scfl in next 40 sts, BLsc in next 8 sts, turn.
- Rows 4–19: Repeat Rows 2 and 3 eight more times.
- Row 20: Repeat Row 2.
- Fasten off. Place marker C in last st made (see diagram).
Section 5 (Right Front and Back)
- Row 1: With WS facing, join yarn in back loop of marked st at bottom front (marker B), ch 1, BLsc in same st and in next 7 sts, scfl in next 32 sts, ch 8, beginning with marked st at back shoulder (marker C), scfl in next 40 sts, BLsc in next 8 sts, turn. You now have 96 sts.
- Row 2: Ch 1, BLsc in next 8 sts, hdc in next 38 sts, hdc2tog across next 2 sts, hdc2tog across the following 2 ch-sts, hdc in next 6 chs, hdc in next 32 sts, BLsc in next 8 sts, turn. You now have 94 sts.
- Row 3: Ch 1, BLsc in next 8 sts, scfl in next 78 sts, BLsc in next 8 sts, turn.
- Row 4: Ch 1, BLsc in next 8 sts, hdc in next 78 sts, BLsc in next 8 sts, turn.
- Row 5: Repeat Row 3.
- Row 6: Ch 1, BLsc in next 8 sts, hdc in next 37 sts, hdc2tog twice, hdc in next 37 sts, BLsc in next 8 sts, turn. You now have 92 sts.
- Row 7: Ch 1, BLsc in next 4 sts, sc in both loops of next st, ch 2, skip next 2 sts (for buttonhole), sc in both loops of next st, scfl in next 7 sts, ch 2, skip next 2 sts (for buttonhole), scfl in next 8 sts, ch 2, skip next 2 sts (for buttonhole), scfl in next 57 sts, BLsc in next 8 sts, turn. You now have 92 sts and three buttonholes made.
- Row 8: Ch 1, BLsc in next 8 sts, hdc in next 57 sts, 2 hdc in next ch-2 space, hdc in next 8 sts, 2 hdc in next ch-2 space, hdc in next 7 sts, BLsc in next st, 2 sc in next ch-2 space, BLsc in next 5 sts, turn.
- Row 9: Ch 1, BLsc in next 8 sts, scfl in next 76 sts, BLsc in next 8 sts, turn. You now have 92 sts.
- Row 10: Ch 1, BLsc in next 8 sts, hdc in next 25 sts, pm in last of these 25 sts (place marker D — see diagram), hdc in next 51 sts, BLsc in next 8 sts.
- Fasten off.
Note: There is 1 extra row across the right shoulder compared to the left shoulder. This is to make the front edges of the vest near the buttonholes look the same from one side to the other. The small difference in width of the shoulders can be evened out in blocking and will not be noticeable.
Section 6 (Right Underarm)
- Row 1: With WS facing, beginning with marked st at back right side (marker D), pull up loop from back bar of marked st, ch 1, scfl in same st and in next 24 sts, BLsc in next 8 sts, turn. You now have 33 sts.
- Row 2: Ch 1, BLsc in next 8 sts, hdc in next 23 sts, hdc2tog, turn. You now have 32 sts.
- Row 3: Ch 1, scfl in next 24 sts, BLsc in next 8 sts, turn.
- Row 4: Ch 1, BLsc in next 8 sts, hdc in next 22 sts, hdc2tog, turn. You now have 31 sts.
- Row 5: Ch 1, scfl in next 23 sts, BLsc in next 8 sts, turn.
- Row 6: Ch 1, BLsc in next 8 sts, hdc in next 21 sts, hdc2tog, turn. You now have 30 sts.
- Row 7: Ch 1, scfl in next 22 sts, BLsc in next 8 sts, turn.
- Row 8: Ch 1, BLsc in next 8 sts, hdc in next 22 sts, turn.
- Rows 9–16: Repeat Rows 7 and 8 four more times. Do not fasten off.
Crocheting the Edgings
- Rotate piece 90°; work 14 sc evenly spaced along row ends of underarm to marker D, slip st in each st along front edge, ending at bottom of right front. Fasten off.
- Beginning at bottom corner of left front, with RS facing, join yarn by pulling up a loop, ch 1, slip st in each st along left front edge ending at underarm edge; work 14 sc evenly spaced across row-end sts along underarm edge. Fasten off.
The Neck Edging
Note: Make sure that the neck edging does not constrict the neck opening too much. The neck should be able to stretch to accommodate at least a 17"/43 cm head (or the size of the recipient’s head, if you know the measurement). Check this as you work. If the neck is getting too tight, use a larger hook or add more stitches in the first round.
- Rnd 1: With RS facing, join yarn by pulling up a loop at right-hand corner of back neck (or left-hand corner, if you crochet left-handed), ch 1, work 20 sc evenly spaced across back neck, 16 sc along side of neck, 10 sc across front neck, 16 sc along other side edge of neck; do not join. Pm in the first st of the rnd and move it up as you work the rnds. You now have 62 sc.
- Rnds 2–4: BLsc in each sc around; do not join. At the end of Rnd 4, join with slip st to next st. Fasten off.
Finishing
- Weave in ends. Block to dimensions. Because of the shoulder shaping, you may find it easier to block this vest while it is folded at the shoulders.
- Sew buttons to the underarm sections to correspond with buttonholes, placing buttons on the last hdc ridge from either edge.
Floral Lace Cardigan
Designed by Vicky Chan
This sweet-looking cardigan is worked seamlessly from the top down. Juxtaposing the simple stripes of the body, the lovely floral lace lends beautiful details to the yoke and hem.
Size and Finished Measurements
- To fit 18–24 months: 22"/56 cm chest circumference and 12"/30.5 cm length
Yarn
- King Cole Bamboo Cotton 4 ply, 52% cotton/48% bamboo, 405 yds (371 m)/3.5 oz (100 g), Color 1019 Cream
Crochet Hooks
- US C/2 (2.75 mm) and US D/3 (3.25 mm) or size needed to obtain correct gauge
Gauge
- 22 stitches and 12 rows = 4"/10 cm in double crochet with larger hook, blocked
Other Supplies
- Stitch markers, yarn needle, three 14 mm buttons, sewing needle, coordinating thread
Crocheting the Cardigan
The Yoke
See chart below.
- Chain 74.
- Row 1 (WS): Sc in 2nd ch from hook, *ch 1, skip 1 ch, sc in next ch; repeat from * across, turn. You now have 37 sc and 36 ch-1 spaces.
- Row 2 (RS): Ch 3 (counts as dc here and throughout), dc in first sc, 3 dc in each sc across to last sc, 2 dc in last sc, turn. You now have 109 dc.
- Row 3: Ch 3, dc in next dc, *ch 1, skip next dc, dc in next dc; repeat from * to last st, dc in last st, turn. You now have 53 ch-1 spaces.
Note: Rows 4–6 together form a band of 18 flowers.
- Row 4: Ch 1, sc in first dc, *ch 3, skip next dc, 3-dc cluster in next dc, ch 3, skip next ch-1 space, sc in next ch-1 space; repeat from * across, placing final sc in last dc, turn. You now have 18 clusters.
- Row 5: Ch 1, sc in first sc, *(slip st, ch 3, sc) in next ch-3 sp, ch 2, (sc, ch 3, slip st) in next ch-3 space; repeat from * to last st, sc in last st, turn.
- Row 6: Ch 4 (counts as dc, ch 1 here and throughout), (2-dc cluster, ch 3, 2-dc cluster) in next ch-2 space, *ch 3, (2-dc cluster, ch 3, 2-dc cluster) in next ch-2 space; repeat from * across, ending ch 1, dc in last sc, turn. You now have 35 ch-3 spaces.
- Row 7: Ch 4, *dc in next cluster, ch 1, dc in next ch-3 space, ch 1; repeat from * to last 2-dc cluster, dc in next cluster, ch 1, skip next ch, dc in top of ch-3 turning ch; turn. You now have 73 dc and 72 ch-1 spaces.
- Row 8: Ch 3, dc in each ch-1 space and dc across, turn. You now have 145 dc.
- Row 9: Ch 4, skip next dc, dc in next dc, *ch 1, skip 1 dc, dc in next dc; repeat from * across, turn. You now have 73 dc and 72 ch-1 spaces.
- Row 10: Ch 3, 2 dc in next ch-1 space, dc in next dc and ch-1 space, 2 dc in next dc, *dc in next 7 sts, 2 dc in next dc; repeat from * across until 2 spaces remain; dc in next ch-1 space, dc in next dc, 2 dc in last ch-1 space, dc in 3rd ch of ch-4 turning ch, turn. You now have 165 dc.
- Rows 11–14: Ch 3, dc in each dc across, turn.
- Row 15: Ch 4, skip next dc, dc in next dc, (ch 1, skip 1 dc, dc in next dc) 10 times, ch 1, dc in same dc, ch 11 for right underarm, skip next 37 dc for right armhole, dc in next dc, ch 1, dc in same dc, (ch 1, skip 1 dc, dc in next dc) 22 times, ch 1, dc in same dc, ch 11 for left underarm, skip next 37 dc for left armhole, dc in next dc, ch 1, dc in same dc, (ch 1, skip 1 dc, dc in next dc) 10 times, ch 1, dc in top of ch-3 at end of row, turn. You now have 25 sts for each front, 37 sts for each armhole, and 49 sts for back.
The Body
- Row 16: Ch 3, dc in each ch-1 space and dc across left front; dc in first 6 ch of left underarm, pm in dc just made, dc in next 5 ch; dc in each dc and ch-1 space across back; dc in first 6 ch of right underarm, pm in dc just made, dc in next 5 ch; dc in each dc and ch-1 space across right front, ending 2 dc in space formed by ch-4, turn. You now have 121 dc.
Note: On the following rows, move markers up to corresponding st in each row to keep track of side increases.
- Row 17: Repeat Row 9. You now have 61 dc and 60 ch-1 spaces.
- Row 18 (increase row): Ch 3, (dc in each dc and ch-1 space to 1 st before marker, 2 dc in next st, dc in marked st, 2 dc in next st) twice, dc in each dc and ch-1 space, ending 2 dc in space formed by ch-4, turn. You now have 125 dc.
- Row 19: Ch 3, dc in each dc across, turn.
- Row 20 (increase row): Ch 3, (dc in each dc to 1 st before marker, 2 dc in next st, dc in marked st, 2 dc in next st) twice, dc in each dc across, turn. You now have 129 dc.
- Rows 21 and 22: Repeat Rows 19 and 20. You now have 133 dc.
- Row 23: Repeat Row 9.
- Row 24: Repeat Row 18. You now have 137 dc.
- Rows 25 and 26: Repeat Rows 23 and 24. You now have 141 dc.
- Rows 27 and 28: Repeat Rows 19 and 20. You now have 145 dc.
- Rows 29 and 30: Ch 3, dc in each dc across, turn.
- Row 31–34: Repeat Rows 3–6. You now have 24 flowers.
- Row 35: Ch 3, dc in same st, (dc, ch 1, dc) in each ch-3 space across, 2 dc in top of ch-3, turn. You now have 145 sts.
- Row 36: Ch 3, dc in each ch-1 space and dc across. Fasten off.
Finishing
The Button Band
- With RS facing and smaller hook, join yarn with slip st to left front at neck edge.
- Row 1 (RS): Ch 1, work 2 sc in each dc and ch-3 sp, and 1 sc in each sc across right front edge, turn. You now have 67 sc.
- Rows 2–4: Ch 1, sc in each sc across, turn.
- Fasten off.
The Buttonhole Band
- With RS facing and smaller hook, join yarn with slip st to right front at lower edge.
- Rows 1 and 2: Repeat Rows 1 and 2 of button band.
- Row 3 (RS): Ch 1, sc in next 43 sc, (ch 2, skip 2 sc, sc in next 8 sc) twice, ch 2, skip 2 sc, sc in last 2 sc, turn.
- Row 4: Ch 1, sc in each sc and 2 sc in each ch-2 space across, turn.
The Edging
- Ch 1, sc in each sc up along right buttonhole band, 3 sc in corner sc, sc in each st across neck edge, 3 sc in corner sc, sc in each sc down along left button band. Fasten off.
The Sleeve Edgings
- With RS facing and smaller hook, join yarn to armhole at center of underarm with slip st in space between 2 dc, ch 1, sc in each space between 2 dc along left half of underarm edge, sc in next dc space up sleeve edge, ch 1, dc in next dc of sleeve edge, (ch 1, skip next dc, dc in next dc) across sleeve edge, ch 1, sc in next dc space down sleeve edge, sc in each space between 2 dc along remaining half of underarm edge, join with slip st to first sc. Fasten off.
- Repeat sleeve edging on other sleeve.
- Weave in ends. Sew buttons to right front opposite buttonholes.
April Showers Cape
Designed by Christy Hagan
With fairy gardens and imagination play increasing in popularity, this cape is an ideal addition to any toddler’s wardrobe. And it’s a great project for beginning crocheters — basic stitches, no shaping, stunning results.
Size and Finished Measurements
- To fit toddler: 14"/35.5 cm center back to neck length
Yarn
- Red Heart Boutique Unforgettable, 100% acrylic, 280 yds (256 m)/3.5 oz (100 g), Color 3935 Tidal
Crochet Hook
- US K/101⁄2 (6.5 mm) or size needed to obtain correct gauge
Gauge
- 13 stitches and 12 rows = 4"/10 cm in half double crochet/single crochet rows
Other Supplies
- Straight pins, yarn needle, 1"/2.5 cm closure
Crocheting the Body
First Panel
- Chain 31.
- Row 1 (WS): Working into back bump of each ch, sc in 2nd ch from hook and each ch across, turn. You now have 30 sc.
- Row 2: Ch 1 (does not count as st), hdc in each st across, turn.
- Row 3: Ch 1, sc into each st across, turn.
- Rows 4–53: Repeat Rows 2 and 3.
- Row 54: Repeat Row 2; do not turn, but rotate to work along edge.
Second Panel
- Set-Up Row (RS): Working along side of rows and placing 1 st in each row end, ch 1, 30 hdc along edge, turn, leaving remainder of edge unworked. You now have 30 hdc.
- Row 1: Ch 1, sc in each st across, turn.
- Rows 2–23: Repeat Rows 2 and 3 of first panel.
- Rnd 24: Ch 1, sc in each st and row end around all edges of body, placing 3 sc in each exterior corner st, join with slip st to first sc. Fasten off.
Crocheting the Hood
- Chain 40.
- Row 1: Working into back bump of each ch, sc in 2nd ch from hook and each ch across, turn. You now have 39 sc.
- Row 2: Ch 1, hdc in each st across, turn.
- Row 3: Ch 1, sc in each st across; turn.
- Rows 4–21: Repeat Rows 2 and 3.
- Fold hood in half with RS together, and working through double thickness of previous row and foundation ch, slip st in each st across to seam top of hood.
- Fasten off.
The Edging
- Row 1: With RS facing, join yarn with slip st to corner of hood, ch 1, working along row ends, work 42 sc evenly spaced across, turn. You now have 42 sc.
- Row 2: Ch 1, sc in first st, skip 1 sc, *(dc, ch 1, dc, ch 1, dc) in next st, skip 1 sc, sc in next st; repeat from * to last st, sc in last st. You now have 10 shells.
- Fasten off.
Finishing
- Pin hood to body, placing center back of hood on inside corner of body. Whipstitch hood to body. Weave in ends. Sew closure to front corners of body. (See Sewing Buttons.)
Jumper Top
Designed by Julie Blagojevich
Lovely merino, cashmere, and silk yarn will keep your young one cozily comfy. The skirt uses a feather and fan pattern, and the piece is worked in the round with doubled laceweight yarn.
Size and Finished Measurements
- To fit 12 months: 17"/43 cm chest circumference and 131⁄2"/34.5 cm length
Yarn
- Shalimar Yarns Breathless Single Ply Lace, 75% superwash merino wool/15% cashmere/10% silk, 850 yds (777 m)/3.5 oz (100 g), Color Oyster

Crochet Hook
- US 7 (4.5 mm) or size needed to obtain correct gauge
Gauge
- 19 stitches and 10 rows = 4"/10 cm in skirt pattern with yarn doubled
- 18 stitches and 20 rows = 4"/10 cm in bodice pattern with yarn doubled
Other Supplies
- Straight pins, yarn needle
Pattern Essentials
Yarn is used doubled throughout. Prepare the yarn by winding two equal balls and crocheting with one strand from each ball, or wind a center-pull ball and pull from both the inside and the outside of the ball.
Crocheting the Jumper
The Skirt
- Fsc 76, join with slip st to form a ring, being careful not to twist the sts.
- Rnd 1: Ch 1, sc in each st around, join with slip st to first sc.
- Rnd 2: Ch 1, 2 sc each st around, join with slip st to first sc. You now have 152 sts.
- Rnd 3: Ch 3 (counts as dc here and throughout), 4 dc in same st, *dc in next sc, (skip 1 sc, dc in next sc) eight times, (5 dc in next sc) twice; repeat from * six times, dc in next st, (skip 1 sc, dc in next sc) eight times, 5 dc in last st, join with slip st to top of ch-3.
- Rnd 4: Ch 1, sc in each st around, join with slip st to first sc.
- Rnds 5–16: Repeat Rnds 3 and 4 six times.
- Rnd 17: Ch 1, sc in each st around, join with slip st to first sc.
- Rnd 18: Ch 1, slip st in first st, *ch 1, slip st in next sc; repeat from * around, ending last repeat ch 1, join with slip st to first sc. Fasten off.
The Bodice
- Attach yarn to chain side of foundation rnd at the join.
- Rnd 1: Ch 1, sc in same st, sc in each st around, join with slip st to first sc. You now have 76 sts.
- Rnds 2–6: Ch 1, sc in each st around, join with slip st to first sc.
- Rnds 7 and 8: Ch 1, sc in first st, dc in next st, *sc in next st, dc in next st; repeat from * around, join with slip st to first sc.
- Rnds 9–15: Repeat Rnds 2–8.
- Rnds 16–20: Repeat Rnds 2–6.
- Rnd 21: Ch 1, slip st in first st, *ch 1, slip st in next st; repeat from * around, ending last repeat with ch 1, join with slip st to first sc. Fasten off.
The Shoulder Straps (Make 2)
Note: Shoulder straps are worked in rounds to form tubes, giving them double strength and the ability to maintain shape.
- Fsc 14, join with slip st to form a ring, being careful not to twist the sts.
- Rnds 1–34: Ch 1, sc in first st and each remaining st around, join with slip st to first sc.
- Fasten off.
Assembling the Jumper
- Pin straps to front and back of bodice, making sure the join lines of the straps run along the center of the undersides. Sew to bodice with doubled yarn. Weave in ends. Block.
Pistachio Gelato Jacket
Designed by Michele DuNaier, MAD Cap Fancies
This chic and easy-to-slip-on jacket is worked from the neck edge down. There’s no end to the fun you can have searching for the perfect buttons.
Size and Finished Measurements
- To fit 12–24 months: 21"/53.5 cm chest circumference
Yarn
- Lion Brand Baby Soft, 60% acrylic/40% nylon, 459 yds (420 m)/5 oz (141 g), Color 170 Pistachio
Crochet Hook
- US J/10 (6 mm) or size needed to obtain correct gauge
Gauge
- 15 stitches and 11 rows = 4"/10 cm in double crochet
Other Supplies
- Eight locking stitch markers, yarn needle, four 5⁄8"/16 mm buttons, sewing needle and coordinating thread
Pattern Essentials
Inc Working into ch-spaces of next large shell, sc in first ch-space, shell in next ch-space, sc in last ch-space.
Large Shell [(Dc, ch 1) three times, dc] in 1 st.
Shell [(Dc, ch 1) twice, dc] in 1 st.
V-st (or half shell) (Dc, ch 1, dc) in 1 st or space.
Pattern Stitch
Row 1: Ch 4 (counts as dc, ch 1 throughout), dc in same st (counts as V-st), sc in center dc of next shell, (shell in next sc, sc in center dc of next shell) across to last shell, V-st in last sc, turn.
Row 2: Ch 1, sc in first st, (shell in next sc, sc in center dc of next shell) across, ending with last sc in 3rd ch of turning ch, turn.
Repeat Rows 1 and 2 for pattern.
Crocheting the Jacket
The Collar and Yoke
- Chain 50.
- Row 1: Sc in 2nd ch from hook and in each ch across, turn. You now have 49 sc.
- Row 2 (large shell row): Ch 4 (counts as dc and ch 1 here and throughout), dc in same st, skip 1 sc, sc in next sc, skip 1 sc, (shell in next sc, skip 1 sc, sc in next sc, skip 1 sc, large shell in next sc, skip 1 sc, sc in next sc, skip 1 sc) twice, (shell in next sc, skip 1 sc, sc in next sc, skip 1 sc) three times, (large shell in next sc, skip 1 sc, sc in next sc, skip 1 sc, shell in next sc, skip 1 sc, sc in next sc, skip 1 sc) twice, V-st in last st, turn. You now have 4 large shells, 7 shells, and 2 half shells.
- Place a marker in center of each of the 4 large shells; after each row of the yoke, move markers up to center st that was worked in marked st.
- Row 3 (increase row): *Work in pattern st Row 2 to marked large shell, inc in large shell; repeat from * across ending last pattern repeat shell in last sc, sc in 3rd ch of beginning ch-4, turn. You now have 16 shells.
- Row 4: Work in pattern st Row 1. You now have 15 shells and 2 half shells.
- Row 5 (large shell row): *Work in pattern st Row 2 to next marked sc, large shell in marked sc; repeat from * across to last marker, work in pattern st Row 2 to end, turn. You now have 4 large shells and 12 shells.
- Row 6 (increase row): *Work in pattern st Row 1 to marked large shell, inc in large shell; repeat from * to last marker, work in pattern st Row 2 to end, turn. You now have 19 shells and 2 half shells.
- Row 7: Work in pattern st Row 2. You now have 20 shells.
- Row 8 (large shell row): Work in pattern st Row 1 to marked sc, large shell in marked sc; repeat from * to last marker, work in pattern st Row 1 to end. You now have 4 large shells, 15 shells, and 2 half shells.
- Row 9 (increase row): *Work in pattern st Row 2 to marked large shell, inc in large shell; repeat from * to last marker, work in pattern st Row 2 to end, turn. You now have 24 shells.
- Row 10: Work in pattern stitch Row 1. You now have 23 shells and 2 half shells.
- Row 11 (large shell row): Repeat Row 5. You now have 4 large shells and 20 shells.
- Row 12 (increase row): Repeat Row 6. You now have 27 shells and 2 half shells. Ignoring the half shells at row ends, markers should be at center dc of shells 4, 10, 18, and 24.
Divide for Sleeves
Do not remove markers after next row; they will be used later in the sleeve section.
- Dividing Row: Ch 1, sc in first dc, (shell in next sc, sc in next shell) across front, ending with sc in first marked shell, ch 5 for underarm, skip 5 shells, sc in next marked shell, (shell in next sc, sc in next shell) across back, ending with sc in next marked shell, ch 5 for underarm, skip 5 shells, sc in next marked shell, shell in next sc, (sc in next shell, shell in sc) across front, ending with sc in 3rd ch of turning ch, turn. You now have 16 shells.
The Body
- Row 1: Work in pattern st Row 1 to marked sc, shell in marked sc, skip 2 ch of ch-5 space, sc in next ch, skip 2 ch, shell in next marked sc, work in pattern st Row 1 across to next marked sc, shell in next marked sc, skip 2 ch of ch-5 space, sc in next ch, skip 2 ch, shell in next marked sc, work in pattern st Row 1 to end, turn. You now have 17 shells and 2 half shells.
- Rows 2–12: Starting with pattern st Row 2, work even in pattern, ending with Row 2. You now have 18 shells on even-numbered rows, 17 shells and 2 half shells on odd-numbered rows.
The Body Edging
Note: As you work 3 sc in each corner on the following row, place a marker in the center sc.
- Row 1: Ch 1, sc in each dc and in each sc across row (skipping ch-spaces); 3 sc in corner; working along right front edge, work 34 sc evenly spaced up edge to corner, 3 sc in corner, work 48 sc evenly spaced along neck edge, 3 sc in corner; working along left front edge, work 34 sc evenly spaced down edge to corner, 3 sc in corner, join with slip st to first sc, turn. You now have 201 sts.
- Row 2: Ch 3, dc in next sc and in each sc around, placing 3 dc in each of the 4 marked corner sts, join with slip st to 3rd ch of ch-3, turn. You now have 209 sts.
- Row 3: Ch 1, sc in first dc and in each dc around, placing 3 sc in each of the 4 marked corner sts, join with a slip st to first sc. You now have 217 sts.
- Fasten off.
The Sleeves
Note: There should still be two markers on each end of the armholes.
- Rnd 1: With RS facing, join yarn with slip st in center ch st of underarm chain; (ch 4, dc) in same ch, sc in center dc of marked shell, shell in next sc, (sc in next shell, shell in next sc) around top of armhole, sc in center dc of other marked shell, (dc, ch 1) in center ch where yarn was joined (completes first shell), join with slip st to 3rd ch of ch-4, turn. You now have 7 shells.
- Rnd 2: Ch 1, sc in turning ch of previous row, shell in next sc, (sc in next shell, shell in next sc) around armhole, join with slip st to first sc, turn.
- Rnd 3: Ch 4, dc in first sc, sc in next shell, (shell in next sc, sc in next shell) around, (dc, ch 1) in same st as ch-4 to complete shell, join with a slip st to 3rd ch of ch-4, turn.
- Rnds 4–6: Repeat Rows 2 and 3 once, then repeat Row 2 once more.
- Rnd 7 (decrease row): Ch 3, sc in next shell, (shell in next sc, sc in next shell) around, join with slip st to top of ch-3, turn. You now have 6 shells and 1 dc.
- Rnd 8 (decrease row): Ch 1, sc in first st, V-st in next sc, sc in next shell, (shell in next sc, sc in next shell) around, ending V-st in last sc, join with slip st to first sc, turn. You now have 5 shells and 2 V-sts.
- Rnd 9: Ch 1, sc in first sc, sc in ch-space of next V-st, shell in next sc, (sc in next shell, shell in next sc) around, ending sc in ch-space of next V-st, join with slip st to first sc, turn. You now have 6 shells.
- Rnd 10: Ch 4, dc in first sc, skip next sc, sc in next shell, (shell in next sc, sc in next shell) around, skip last sc, (dc, ch 1) in same sc as beginning ch-4, join with slip st to 3rd ch of ch-4, turn. You now have 6 shells.
- Rnd 11: Ch 1, sc in first st, shell in next sc, (sc in next shell, shell in next sc) around, join with slip st to first sc, turn. You now have 6 shells.
- Rnd 12: Ch 4, dc in first sc, sc in next shell, (shell in next sc, sc in next shell) around, (dc, ch 1) in last st, join with slip st to 3rd ch of ch-4, turn.
- Rnds 13 and 14: Repeat Rows 11 and 12.
The Sleeve Edging
- Row 1: Ch 1, sc in each sc and dc around, skipping all ch-spaces, join with slip st to first sc, turn. You now have 24 sc.
- Row 2: Ch 3, dc in next sc and in each sc around, join with slip st to top of ch-3, turn. You now have 24 dc.
- Row 3: Ch 1, sc in each dc around, join with slip st to first sc. Fasten off.
- Repeat for other sleeve.
Finishing
- Remove all markers. Weave in ends. Fold lapels down. Sew buttons evenly spaced from collar to bottom edging, on one side of body. Use gap between dc on other side of body edging as buttonhole. (See Sewing Buttons.)
Justin’s Jacket
Designed by Edie Eckman
Worked side to side with minimal shaping, this is a perfect project for beginning crocheters. Let your toddler help you “make” the sweater by picking out cute buttons.
Size and Finished Measurements
- To fit 2–4 years: 26"/66 cm chest circumference, buttoned
Yarn
- Plymouth Yarn Worsted Merino Superwash Kettle Dyed, 100% superwash fine merino wool, 436 yds (398 m)/7 oz (200 g), Color 1003 Kettle Wisteria
Crochet Hook
- US I/9 (5.5 mm) or size needed to obtain correct gauge
Gauge
- 13 stitches and 11 rows = 4"/10 cm in half double crochet
Other Supplies
- Yarn needle, five 7⁄8"/22 mm buttons, sewing needle and coordinating thread
Crocheting the jacket
The First Sleeve
- Chain 31.
- Row 1 (RS): Working into the back bump of each ch (see Working in back bump of chain), hdc in 3rd ch from hook and in each ch across, turn. You now have 29 hdc. Mark this side as RS.
- Rows 2–4: Ch 2 (does not count as hdc here and throughout), hdc in each hdc across, turn.
- Row 5 (increase row): Ch 2, 2 hdc in first st, hdc in each hdc to last st, 2 hdc in last st, turn. You now have 31 hdc.
- Rows 6–9: Repeat Row 2 four times.
- Row 10: Repeat Row 5. You now have 33 sts.
- Rows 11–18: Repeat Row 2 eight times.
- Row 19: Ch 2, hdc in each hdc across, ch 22, turn.
The Body
- Row 1: Hdc in 3rd ch from hook and in each ch across, hdc in each st across sleeve, fhdc 20, starting first hdc in base of previous hdc, turn. You now have 73 sts.
- Rows 2–10: Ch 2, hdc in each hdc across, turn.
Divide for Back Neck
- Row 1 (WS): Ch 2, hdc in next 34 sts, turn, leaving remaining sts unworked. You now have 34 hdc.
- Rows 2–15: Ch 2, hdc in each hdc across, turn.
- Fasten off.
The First Front
- Row 1 (WS): With back just worked held to the right, skip 7 sts, join yarn with standing hdc in next st, hdc in each st to end, turn. You now have 32 hdc.
- Rows 2–8: Ch 2, hdc in each hdc across, turn.
- Fasten off. Set aside.
The Second Front
- Loosely chain 34.
- Row 1 (RS): Working into the back bump of each ch, hdc in 3rd ch from hook and in each ch across, turn. You now have 32 hdc.
- Rows 2–8: Ch 2, hdc in each hdc across, turn.
- Row 9 (joining row): Ch 2, hdc in each hdc across; fhdc 7; beginning at back neck edge with RS facing, hdc in each hdc across back, turn. You now have 73 hdc.
- Rows 10–18: Ch 2, hdc in each hdc across, turn.
- Fasten off.
The Second Sleeve
- Row 1 (RS): Skip 20 sts, join yarn with standing hdc in next st, hdc in next 32 sts, turn, leaving remaining 20 sts unworked. You now have 33 hdc.
- Rows 2–11: Ch 2, hdc in each hdc across, turn.
- Row 12: Ch 2, hdc2tog, hdc to last 2 sts, hdc2tog, turn. You now have 31 hdc.
- Rows 13–16: Repeat Row 2 four times.
- Row 17: Repeat Row 11. You now have 29 hdc.
- Rows 18–20: Repeat Row 2 three times.
- Fasten off.
Finishing
- Fold sweater in half at shoulders with WS together. Working through both layers from lower left underarm to left cuff, join yarn at bottom edge, ch 1, sc across side to sleeve, sc across bottom of sleeve. Fasten off. Repeat for other side, working from right cuff to lower right underarm; do not fasten off.
- Place markers for five buttons spaced as desired along left front (or right front) edge.
- Sweater Edging: With RS facing and continuing with yarn at right underarm, ch 1, sc evenly around bottom, fronts, and neck edges, working 3 sc in each exterior corner and working sc2tog over each interior corner, and working buttonholes at each marker as follows: (ch 2, skip 2 sts, sc in each st to next marker); join with slip st to first sc. Fasten off.
- Weave in ends. Sew buttons opposite buttonholes. (See Sewing Buttons.)