Chapter Six
Little
Toys
Benjamin Bear
Designed by Ida Herter, Herter Crochet Designs
This wonderfully huggable teddy bear is made in classic amigurumi style — single crochet worked in continuous rounds. The super-bulky yarn is easy to work with and amazingly soft.
Finished Measurements
Yarn
- Bernat Blanket, 100% polyester, 258 yds (236 m)/10.5 oz (300 g), Color 10006 Vintage White (MC)

Crochet Hooks
- US J/10 (6 mm) or size needed to obtain correct gauge and F/5 (3.75 mm)
Gauge
- Head rounds 1–5 = 4"/10 cm on larger hook
Other Supplies
- Stitch marker, polyester fiberfill, small amount of worsted weight yarn for bow tie (A, optional), yarn needle, scraps of black worsted weight yarn for features (B), two 15 mm safety eyes
Crocheting the Head
- With MC and larger hook, ch 2.
- Rnd 1: 8 sc in 2nd ch from hook; do not join. You now have 8 sc. Pm in the first st of the rnd and move it up as you work the rnds.
- Rnd 2: 2 sc in each sc around. You now have 16 sc.
- Rnd 3: *Sc in next sc, 2 sc in next sc; repeat from * around. You now have 24 sc.
- Rnd 4: *Sc in next 2 sc, 2 sc in next sc; repeat from * around. You now have 32 sc.
- Rnd 5: *Sc in next 3 sc, 2 sc in next sc; repeat from * around. You now have 40 sc.
- Rnd 6: *Sc in next 4 sc, 2 sc in next sc; repeat from * around. You now have 48 sc.
- Rnds 7–14: Sc in each sc around.
- Rnd 15: *Sc in next 4 sc, sc2tog; repeat from * around. You now have 40 sc.
- Rnd 16: *Sc in next 3 sc, sc2tog; repeat from * around. You now have 32 sc.
- Rnd 17: *Sc in next 2 sc, sc2tog; repeat from * around, join with slip st to first sc. You now have 24 sc.
- Fasten off, leaving a long sewing length.
Crocheting the Body
- With MC and larger hook, ch 2.
- Rnds 1–6: Repeat Rnds 1–6 of head. You now have 48 sc.
- Rnds 7–11: Sc in each sc around.
- Rnd 12: *Sc in next 6 sc, sc2tog; repeat from * around. You now have 42 sc.
- Rnds 13–15: Sc in each sc around.
- Rnd 16: *Sc in next 5 sc, sc2tog; repeat from * around. You now have 36 sc.
- Rnds 17 and 18: Sc in each sc around.
- Rnd 19: *Sc in next 4 sc, sc2tog; repeat from * around. You now have 30 sc.
- Rnd 20: *Sc in next 3 sc, sc2tog; repeat from * around, join with slip st to first sc. You now have 24 sc.
- Fasten off. Fill firmly with fiberfill.
Crocheting the Snout
- With MC and larger hook, ch 2.
- Rnd 1: 6 sc in 2nd ch from hook; do not join. You now have 6 sc. Pm in the first st of the rnd and move it up as you work the rnds.
- Rnd 2: 2 sc in each sc around. You now have 12 sc.
- Rnd 3: *Sc in next sc, 2 sc in next sc; repeat from * around. You now have 18 sc.
- Rnd 4: Sc in each sc around, join with slip st to first sc.
- Fasten off, leaving a long sewing length.
Crocheting the Arms (make 2)
- With MC and larger hook, ch 2.
- Rnds 1 and 2: Repeat Rnds 1 and 2 of snout. You now have 12 sc.
- Rnd 3: *Sc in next 3 sc, 2 sc in next sc; repeat from * around. You now have 15 sc.
- Rnds 4–11: Sc in each sc around.
- Fill arm with fiberfill, stuffing bottom of arm firmly and gradually decreasing the amount of fiberfill toward the top of the arm.
- Rnd 12: *Sc in next 3 sc, sc2tog; repeat from * around. You now have 12 sc.
- Rnd 13: *Sc in next 2 sc, sc2tog; repeat from * around. You now have 9 sc.
- Fasten off, leaving a long sewing length.
Crocheting the Feet and Legs (make 2)
- With MC and larger hook, ch 5.
The Sole
- Rnd 1: 2 sc in 2nd ch from hook, sc in next 2 ch, 4 sc in last ch; working on opposite side of foundation ch, sc in next 2 ch, 2 sc in last ch; do not join. You now have 12 sc. Pm in the first st of the rnd and move it up as you work the rnds.
- Rnd 2: (2 sc in next sc, sc in next 4 sc, 2 sc in next sc) twice. You now have 16 sc.
- Rnd 3: Sc in first sc, 2 sc in next sc, sc in next 3 sc, 2 sc in next 6 sc, sc in next 3 sc, 2 sc in next sc, sc in last sc. You now have 24 sc.
- Rnd 4: (2 sc in next sc, sc in next sc) twice, sc in next 2 sc, (2 sc in next sc, sc in next sc) twice, 2 sc in next sc, sc in next 2 sc, 2 sc in next sc, (sc in next sc, 2 sc in next sc) twice, sc in next 2 sc, (sc in next sc, 2 sc in next sc) twice. You now have 34 sc.
The Foot
- Rnds 5 and 6: Sc in each sc around. You now have 34 sc.
- Rnd 7: Sc in next 8 sc, (sc2tog, sc in next sc) twice, sc2tog, sc in next 2 sc, (sc2tog, sc in next sc) twice, sc2tog, sc in last 8 sc. You now have 28 sc.
- Rnd 8: Sc in next 8 sc, (sc2tog) 6 times, sc in last 8 sc. You now have 22 sc.
- Rnd 9: Sc in each sc around.
- Rnd 10: Sc in next 8 sc, (sc3tog) twice, sc in last 8 sc. You now have 18 sc.
The Leg
- Rnds 11–16: Sc in each sc around.
- Rnd 17: *Sc in next 7 sc, sc2tog; repeat from * around, join with a slip st to first sc of rnd. You now have 16 sc.
- Fasten off, leaving a long tail of yarn for sewing. Stuff foot portion firmly and gradually decrease the amount of fiberfill as leg is filled.
Crocheting the Ears (make 2)
- With MC and larger hook, ch 2.
- Rnds 1–3: Work as for snout. You now have 18 sc.
- Rnds 4 and 5: Sc in each sc around, join last rnd with slip st to first sc.
- Fasten off, leaving a long tail of yarn for sewing.
Crocheting the Bow Tie (optional)
- With A and smaller hook, ch 31 (or until desired length is reached).
- Row 1: Sc in 2nd ch from hook and in each ch across, turn. You now have 30 sc.
- Row 2: Ch 1, sc in each sc across, turn.
- Rows 3–5: Repeat Row 2; do not turn.
- Fasten off, leaving a 24"/61 cm tail. Weave in the beginning tail.
- Seam the sides of the fabric together to create a loop. Center the seam on the back of the loop and flatten the fabric. Wrap the 24"/61 cm yarn tail tightly around the middle of the loop several times to create the center of the bow. Secure the end and leave the remaining tail of yarn for assembly.
Finishing
- Using yarn needle and B, embroider the nose by making a V with satin stitches on the snout. Fill in the V with straight satin stitches. Make a small straight stitch from the bottom center of the nose down. Embroider the mouth by making one long stitch to the left of the snout. Gently pull the curve downward and stitch over the center of the curve to secure it in place. Repeat this step on the opposite side of the snout.
- Following manufacturers’ instructions, place safety eyes on Rnd 10 of the head, approximately 5 sts apart.
- Using the long tail of yarn attached to the snout, sew the snout to the face. There should be 1 rnd of sts between the eyes and the top of the snout.
- Fill the head with fiberfill and sew bottom of head to top of body.
- Flatten the last rnd of the arms and whipstitch them to the body using the sewing lengths. Arms should be attached between Rnds 18 and 19 on the body. Flatten the last rnd of the legs and, with feet facing forward, whipstitch them to Rnd 7 of the body. Make sure all limbs are centered.
- Flatten the ears and curve them slightly. Whipstitch the ears to the side of the head.
- Using the long tail of yarn attached to the back of the bow tie, sew the bow under the bear’s neck, centering the bow with the bear’s nose.
- Weave in ends.
Toy Safety
Toys are made to be held, and babies will put anything they can hold into their mouths. Here are some things to keep in mind.
- We strongly recommend using safety eyes or embroidery techniques to add eyes and other features to baby toys.
- Don’t use novelty yarn with sequins or bits of fiber that can easily be separated from the main yarn.
- Stuff toys with fiberfill rather than poly-pellets, which can come out through the knitted stitches.
- Secure all ribbons and ties with a few stitches to prevent baby from pulling them out.
Lil’ Miss Lilly
Designed by Anastasia Popova
This adorable little piggy will make a wonderful friend for any baby, and may just stick around through the toddling years and beyond. She is crocheted in the traditional amigurumi style of single crochet in spirals.
Finished Measurements
- Approximately 31⁄2"/9 cm long
Yarn
- Lily Sugar ’n Cream, 100% cotton, 120 yds (109 m)/2.5 oz (71 g), Color 0046 Rose Pink

Crochet Hook
- US G/6 (4 mm) or size needed to obtain correct gauge
Gauge
- 16 stitches and 16 rounds = 4"/10 cm in single crochet
Other Supplies
- Stitch marker, polyester fiberfill, yarn needle, scraps of black and white yarn
Crocheting the Body
- Make an adjustable ring.
- Rnd 1: Ch 1, 5 sc in ring, pull on beginning yarn tail to tighten loop. You now have 5 sts. Do not join. Pm in the first st of the rnd and move it up as you work the rnds.
- Rnd 2: 2 sc in each st around. You now have 10 sts.
- Rnds 3 and 4: Sc in each st around.
- Rnd 5: (Sc in next st, 2 sc in next st) around. You now have 15 sts.
- Rnd 6: (Sc in next 2 sts, 2 sc in next st) around. You now have 20 sts.
- Rnd 7: (Sc in next 3 sts, 2 sc in next st) around. You now have 25 sts.
- Rnds 8–13: Sc in each st around.
- Rnd 14: (Sc in next 3 sts, sc2tog) around. You now have 20 sts.
- Rnd 15: (Sc in next 2 sts, sc2tog) around. You now have 15 sts.
- Rnd 16: (Sc in next st, sc2tog) around. You now have 10 sts.
- Stuff the body with fiberfill.
- Rnd 17: Sc2tog around. You now have 5 sts.
- Fasten off, leaving a 10"/25.5 cm tail. Using yarn needle, weave the tail through the remaining 5 sts and pull tight to close the opening. Using hook, form a loop with yarn tail and ch 6 to create a tail. Fasten off. Trim yarn tail to 1⁄4"/6 mm.
Crocheting the Ears (make 2)
- Chain 3.
- Row 1: Sc in 2nd ch from hook and next ch, turn. You now have 2 sts.
- Row 2: Ch 1, sc in same st, 2 sc in next st, turn. You now have 3 sts.
- Row 3: Ch 1, sc in each st across.
- Fasten off, leaving 10"/25.5 cm sewing length.
Crocheting the Feet (make 4)
- Make an adjustable ring.
- Rnd 1: Ch 1, 5 sc in ring, pull on beginning yarn tail to tighten loop. You now have 5 sts.
- Rnd 2: 2 sc in each st around. You now have 10 sts.
- Rnds 3 and 4: Sc in each st around.
- Fasten off, leaving a 10"/25.5 cm sewing length.
Finishing
- Using yarn needle and yarn tails, sew ears in place. Stuff feet with fiberfill and sew into place. Weave in ends. Using photograph as a guide, embroider the eyes with black yarn and the snout with white yarn.
Kitty Kat Lovey
Designed by Aurelia Mae Delaney
This adorable stuffed animal and security blanket combo features a classic granny square blankie and a single crochet kitty. Very cute, don’t you agree?
Finished Measurements
- 13"/33 cm by 13"/33 cm square; kitty 21⁄4"/5.5 cm tall
Yarn
- Freia Fine Handpaints Ombré Sport, 100% wool, 217 yds (198 m)/2.5 oz (75 g), South Beach

Crochet Hook
- US G/6 (4 mm) or size needed to obtain correct gauge
Gauge
- 16 stitches = 4"/10 cm in single crochet
- 20 sts and 10 rows = 4"/10 cm in granny pattern
Other Supplies
- Stitch markers, polyester fiberfill, yarn needle, scraps of yarn for face
Crocheting the Kitty
The Ears (Make 2)
- Chain 6.
- Row 1: Sc in 2nd ch from hook and in each ch across, turn. You now have 5 sc.
- Row 2: Ch 1, sc2tog, sc in next st, sc2tog, turn. You now have 3 sts.
- Row 3: Ch 1, sc in each st across, turn.
- Row 4: Ch 1, sc2tog over first and last st (skipping middle st), turn. You now have 1 st.
- Row 5: Ch 1, sc in first st. Fasten off.
The Head
- Make an adjustable ring.
- Rnd 1: Ch 2, 6 sc into ring, do not join. You now have 6 sc. Pm in the first st of the rnd and move it up as you work the rnds.
- Rnd 2: 2 sc in each st around. You now have 12 sc.
- Rnd 3: *Sc in next sc, 2 sc in next sc; repeat from * around. You now have 18 sc.
- Rnd 4: *Sc in next 2 sc, 2 sc in next sc; repeat from * around. You now have 24 sc.
- Rnd 5: *Sc in next 3 sc, 2 sc in next sc; repeat from * around. You now have 30 sc.
- Rnds 6–10: Sc in each sc around.
- Rnd 11: *Sc in next 3 sc, sc2tog; repeat from * around. You now have 24 sc.
- Rnd 12: *Sc in next 2 sc, sc2tog; repeat from * around. You now have 18 sc.
- Stuff the head with fiberfill.
- Rnd 13: *Sc in next sc, sc2tog; repeat from * around. You now have 12 sc.
- Rnd 14: Sc2tog around. You now have 6 sc.
- Cut yarn, but do not fasten off. Set head aside.
The Arms (Make 2)
- Make an adjustable ring.
- Rnd 1: Ch 2, 6 sc into ring, do not join. You now have 6 sc. Pm in the first st of the rnd and move it up as you work the rnds.
- Rnd 2: *Sc in next sc, 2 sc in next sc; repeat from * two more times. You now have 9 sc.
- Rnd 3: Sc in each sc around.
- Rnd 4: 2 sc in next 3 sts, sc in next 6 sts. You now have 12 sc.
- Rnd 5: Sc in each sc around.
- Rnd 6: (Sc2tog) three times, sc in next 6 sts. You now have 9 sc.
- Rnds 7–16: Sc in each sc around.
- Fasten off, leaving a 12"/30.5 cm tail. Stuff lightly and sew hole closed.
Crocheting the Blanket
- Place dropped loop from head onto hook. Continue on head sts.
- Rnd 1: 2 sc in each sc around. You now have 12 sc.
- Rnd 2: *Sc in next st, 2 sc in next sc; repeat from * around. You now have 18 sc.
- Rnd 3: *Hdc in next 2 sts, 2 hdc in next st; repeat from * around. You now have 24 hdc.
The Granny Square
- Rnd 1: Ch 3 (counts as dc throughout), (2 dc, ch 3, 3 dc) in same st, ch 1, skip 2 sts, 3 dc in next st, ch 1, skip 2 sts, *(3 dc, ch 3, 3 dc) in next st, ch 1, skip 2 sts, 3 dc in next st, ch 1, skip 2 sts; repeat from * around, join with a slip st to top of ch-3.
- Rnd 2: Slip st to next ch-3 space, ch 3, (2 dc, ch 3, 3 dc) in same space, ch 1, (3 dc, ch 1) in next 2 ch-1 spaces, *(3 dc, ch 3, 3 dc) in next ch-3 space, ch 1, (3 dc, ch 1) in next 2 ch-1 spaces; repeat from * around, join with slip st to top of ch-3.
- Rnd 3: Slip st to next ch-3 space, ch 3, (2 dc, ch 3, 3 dc) in same space, ch 1, (3 dc, ch 1) in each ch-1 space across to next corner ch-3 space, *(3 dc, ch 3, 3 dc) in next ch-3 space, ch 1, (3 dc, ch 1) in each ch-1 space across to next corner ch-3 space; repeat from * around, join with a slip st to top of ch-3.
- Repeat Rnd 3 of granny square pattern until your yarn runs out, ending with a complete rnd. Fasten off.
Finishing
- Using the photograph as a guide, sew the ears onto the head, and the arms onto the sides of the neck. Weave in ends. Sew hole closed at base of head (under blanket). Use separate colored yarn scraps to embroider the face.
Owl Puppet
Designed by Bronislava Slagle
This little puppet is sure to elicit many giggles. The body is worked in puff stitch, and the other body parts are worked in double crochet.
Finished Measurements
- 10"/25.5 cm circumference and 8"/20.5 cm tall
Yarn
- Loops & Threads Impeccable, Ombré 100% acrylic, 192 yds (175 m)/3.5 oz (100 g), Color 02015 Adobe
Crochet Hook
- US G/6 (4 mm) or size needed to obtain correct gauge
Gauge
- 7 stitches and 61⁄2 rows = 4"/10 cm in puff stitch
Other Supplies
- Yarn needle, two purchased 3"/7.5 cm flowers, two 7⁄8"/22 mm buttons, sewing needle and coordinating thread
Pattern Essentials
Exch (extended chain) Chain st pulled longer than usual, up to the height of the first st of the row or rnd.
Puff st Yo, insert hook into st or space indicated and pull up a loop (yo, insert hook into same st or space and pull up a loop) three times, yo and pull through 8 loops on hook, yo and pull through 2 loops on hook.
Crocheting the owl
- Chain 32. Join with a slip st in first ch, being careful not to twist ch.
- Rnd 1: Ch 1, sc in each ch around, join with slip st to first sc. You now have 32 sc.
- Rnd 2: Exch, puff st in first st, ch 1, skip 1 st, *puff st in next st, ch 1, skip 1 st; repeat from * around, join with slip st to top of first puff st. You now have 16 puff sts and 16 ch-1 spaces.
- Rnds 3–5: Slip st in next ch-1 space, exch, puff st in first space, ch 1, *puff st in next space, ch 1; repeat from * around, join with slip st to top of first puff st.
- Rnd 6: Slip st in next ch-1 space, exch, (puff st, ch 1, puff st) in first space, ch 1, (puff st in next space, ch 1) seven times, (puff st, ch 1) twice in next space, (puff st in next space, ch 1) seven times, join with slip st to top of first puff st. You now have 18 puff sts and 18 ch-1 spaces.
- Rnds 7 and 8: Repeat Rnd 3.
- Rnd 9: Ch 3 (counts as dc here and throughout), dc in next st, ch 5, skip 5 sts for wing opening, dc in next 13 sts, ch 5, skip 5 sts for wing opening, dc in next 11 sts, join with slip st to top of ch-3. You now have 26 dc and 2 ch-5 spaces.
- Rnd 10: Ch 3, dc2tog over next dc and ch, dc in next 4 ch and in next 2 dc, (dc2tog, dc in next 7 sts) three times, join with slip st to top of ch-3. You now have 32 sts.
- Rnd 11: Ch 3, skip next st, dc2tog, dc in next 16 dc, dc2tog, skip next st, dc in next dc, turn, leaving remaining sts unworked. You now have 20 sts.
- Row 12 (WS): Ch 3, skip 1 st, dc2tog, dc in next 12 dc, dc2tog, skip next st, dc in next dc, turn. You now have 16 sts.
- Row 13: Ch 3, dc in next 15 dc, turn.
- Row 14: Ch 3, dc in same st, dc in next 14 dc, 2 dc in last st, turn. You now have 18 sts.
- Row 15: Ch 3, dc in same st, dc in next 16 dc, 2 dc in last st, turn. You now have 20 sts.
- Fasten off.
the Eyes (make 2)
- Ch 5, join with slip st to form a ring.
- Row 1: Ch 3, 13 dc in ring, join with slip st to top of ch-3. You now have 14 dc.
- Row 2: Ch 3, dc in same st, 2 dc in each dc around. You now have 28 sts. Fasten off, leaving a 12"/30.5 cm tail for sewing.
- Place the circles on top of each other with WS together and line up the sts. Referring to the assembly diagram, sew both circles (eyes) together under both loops of 6 sts, allowing top Vs of sts to fold outward. Place circles with RS facing up. Line up the seam with the center of the top of head/body and sew them to the head/body, leaving 3 sts on the bottom of each eye and 2 sts on the body unsewn for the owl’s beak.
The Beak
- Rnd 1: With RS facing, join yarn with slip st in first free st of right eye, ch 1, sc in each of first 3 free sts on right eye; on left eye, dc in next 3 free sts; on body, sc in next 2 free sts, join with slip st to first sc. You now have 8 sts.
- Rnd 2: Ch 1, sc in first 6 sc, sc2tog, join with slip st to first st. You now have 7 sts.
- Rnd 3: Ch 1, sc in first st, (sc2tog) three times, join with slip st to first st. You now have 4 sts.
- Fasten off. Use yarn tail to close opening at tip of beak. Weave in ends.
The Wings (Make 2)
- Leaving a long tail for sewing, ch 15, join with slip st to form a circle.
- Rnd 1: Ch 3, dc in next 14 dc, join with slip st to top of ch-3. You now have 15 dc.
- Rnd 2: Ch 3, dc2tog, dc in next 10 dc, dc2tog, join with slip st to top of ch-3. You now have 13 dc.
- Rnd 3: Ch 3, dc2tog, dc in next 8 dc, dc2tog, join with slip st to top of ch-3. You now have 11 dc.
- Rnd 4: Ch 3, dc2tog, dc in next 6 dc, dc2tog, join with slip st to top of ch-3. You now have 9 dc.
- Rnd 5: Ch 3, dc2tog, dc in next 4 dc, dc2tog, join with slip st to top of ch-3. You now have 7 dc.
- Rnd 6: Ch 3, dc2tog around, join with slip st to top of ch-3. You now have 4 dc. Fasten off.
The Ears (Make 2)
- Cut twelve 7"/18 cm pieces of yarn. Holding six strands together, pull strands through one top corner of head; fold strands in half and make a tight overhand knot. Trim ends about 1"/2.5 cm from knot.
Finishing
- Using photo as a guide, with yarn length and yarn needle sew the wings onto the body. Remove pistils from center of purchased flowers. Layer one button over each flower head and use sewing needle and thread to sew to center of eye circles. See Sewing Buttons
- Weave in ends.
Ellie Bear
Designed by Laura Biondi, Black Sheep Crochet
Make a whole family of bears by varying your yarn and gauge — anything goes! Just be sure your tension is tight enough that the fiberfill stays inside, where it belongs.
Finished Measurements
- Approximately 13"/33 cm tall
Yarn
- Lion Brand Homespun Thick & Quick, 98% acrylic/2% polyester, 185 yds (169 m)/6 oz (170 g), Wild Fire

Crochet Hook
- US K/101⁄2 (6.5 mm) and US G/6 (4 mm) or size needed to obtain correct gauge
Gauge
- 12 stitches and 12 rounds = 4"/10 cm in single crochet on larger hook
Other Supplies
- Stitch markers, polyester fiberfill, yarn needle, small amount of black yarn for features
Crocheting the Bear
The Body
- With larger hook, ch 3, join with slip st to form a ring.
- Rnd 1: Ch 1, 6 sc in ring. You now have 6 sc. Do not join. Pm in the first st of the rnd and move it up as you work the rnds.
- Rnd 2: 2 sc in each sc around. You now have 12 sc.
- Rnd 3: *Sc in next sc, 2 sc in next sc; repeat from * around. You now have 18 sts.
- Rnd 4: *Sc in next 2 sc, 2 sc in next sc; repeat from * around. You now have 24 sts.
- Rnd 5: *Sc in next 3 sc, 2 sc in next sc; repeat from * around. You now have 30 sts.
- Rnd 6: *Sc in next 4 sc, 2 sc in next sc; repeat from * around. You now have 36 sts.
- Rnd 7: *Sc in next 5 sc, 2 sc in next sc; repeat from * around. You now have 42 sts.
- Rnds 8–10: Sc in each sc around.
- Rnd 11: *Sc in next 5 sc, sc2tog; repeat from * around. You now have 36 sc.
- Rnds 12 and 13: Sc in each sc around.
- Rnd 14: *Sc in next 4 sc, sc2tog; repeat from * around. You now have 30 sc.
- Rnds 15 and 16: Sc in each sc around.
- Rnd 17: *Sc in next 3 sc, sc2tog; repeat from * around. You now have 24 sc.
- Rnds 18 and 19: Sc in each sc around.
- Rnd 20: *Sc in next 2 sc, sc2tog; repeat from * around. You now have 18 sc.
- Rnd 21: *Sc in next sc, sc2tog; repeat from * around. You now have 12 sc.
- Fasten off.
The Arms and Legs (Make 4)
- Ch 3, join with slip st to form a ring.
- Rnds 1 and 2: Work as for body. You now have 12 sc.
- Rnds 3–13: Sc in each sc around.
- Fasten off, leaving a long tail for sewing.
The Head
- Ch 3, join with slip st to form a ring.
- Rnds 1–6: Work as for body. You now have 36 sc.
- Rnds 7–11: Sc in each sc around.
- Rnd 12: *Sc in next 4 sc, sc2tog; repeat from * around. You now have 30 sc.
- Rnd 13: *Sc in next 3 sc, sc2tog; repeat from * around. You now have 24 sc.
- Rnd 14: *Sc in next 2 sc, sc2tog; repeat from * around. You now have 18 sc.
- Rnd 15: *Sc in next sc, sc2tog; repeat from * around. You now have 12 sc.
- Fasten off, leaving a long tail for sewing.
The Ears (Make 2)
- Ch 3, join with slip st to form a ring.
- Rnds 1–3: Work as for body. You now have 18 sc.
- Rnds 4–6: Sc in each sc around.
- Fasten off, leaving a long tail for sewing.
The Muzzle
- Ch 3, join with slip st to form a ring.
- Rnds 1–3: Work as for body. You now have 18 sc.
- Rnd 4: Sc in each sc around.
- Fasten off, leaving a long tail for sewing.
The Eyes (Make 2)
- With smaller hook and black yarn, ch 3, join with slip st to form a ring.
- Place a st marker in the first st and move it up as you begin each rnd.
- Rnds 1 and 2: Work as for body. You now have 12 sc.
- Fasten off, leaving a long tail for sewing.
Finishing
- Stuff head and body somewhat firmly. Attach head to body using yarn needle, matching stitches evenly around. Attach ears to top of head, about 3 rnds from the top, bending them into a crescent shape. Sew the muzzle onto the lower front half of the face, stuffing lightly before completing seam. Sew eyes to face on either side of and slightly above muzzle.
- Stuff arms and legs lightly, concentrating stuffing at the bottom of each limb. Sew top of arms closed and attach arms to body 2 rnds down from neck. Sew top of legs closed and attach legs in a straight line about 2 rnds up from the center of the bottom of the body.
- With black yarn and using photo as a guide, embroider nose with satin stitch.
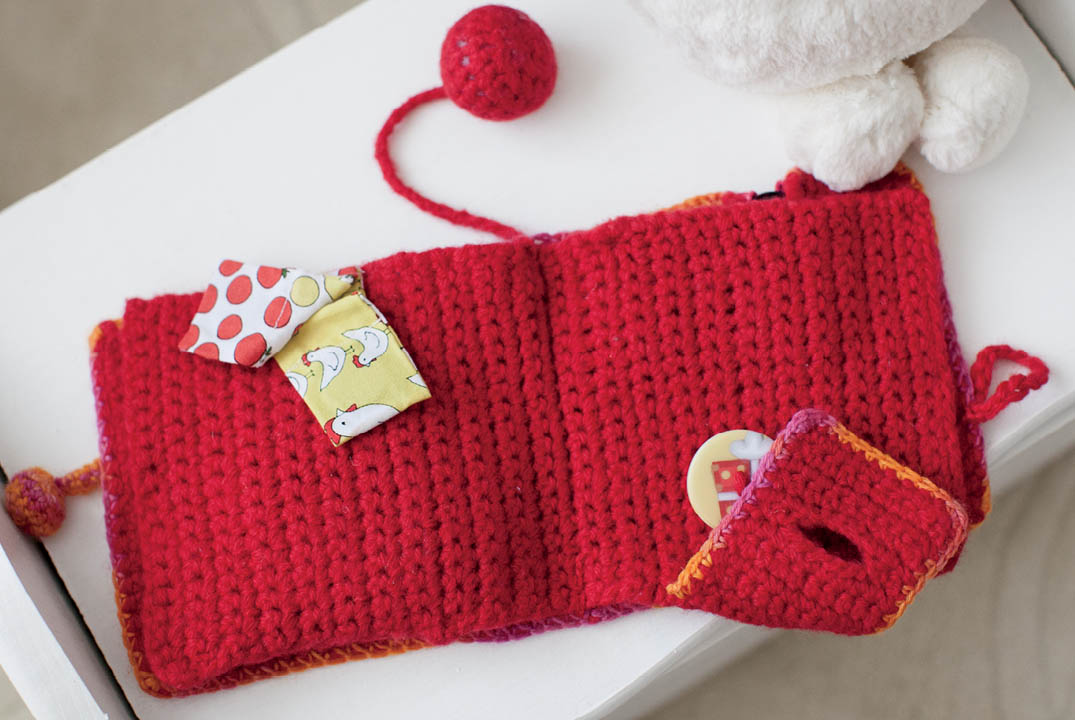
Zip, Snap, and Button It!
Designed by Gwen Steege
This activity book will provide you and your toddler hours of fun discovering not only zippers, buttons, and snaps, but a pocket, magnets, hooks, and even a hidden picture. Because it’s all worked in single crochet, beginning crocheters who also like to sew a little can easily make this fun toy.
Finished Measurements
- 51⁄2"/14 cm by 5"/12.5 cm, after gentle felting, folded
Yarn
- Cascade 220, 100% Peruvian Highland wool, 220 yds (200 m)/3.5 oz (100 g), Color 8895 Christmas Red
Crochet Hook
- US H/8 (5 mm) or size needed to obtain correct gauge
Gauge
- 16 stitches and 18 rows = 4"/10 cm in single crochet, after light felting
Other Supplies
- Stitch markers, yarn needle, polyester fiberfill, multicolor sock yarn for trim (optional), one 7"/18 cm patterned zipper, sewing needle and coordinating thread, two 13⁄8"/35 mm buttons, one extra-large hook-and-eye closure, one 30 mm sew-on snap, small amount of patterned fabric (for appliqué), one 11⁄8"/29 mm sew-on magnetic snap
Pattern Essentials
Pages are reversible, but are marked as “right side” (RS) and “wrong side” (WS) for clarity.
Crocheting the Pages
The Inside Pages
- Fsc 20. Pm to mark this as RS.
- Row 1: Ch 1 (counts as sc here and throughout), sc in next sc and in each sc across, turn. You now have 20 sc.
- Repeat Row 1, working last sc of each row in the top of beginning ch, until piece measures 11"/28 cm.
- Fasten off. Weave in ends.
The Outside Pages
- Work as for inside pages until piece measures 2"/5 cm, ending with a WS row.
- Next Row (zipper opening, RS): Ch 1, sc in next 6 sc, ch 14, turn.
- Next Row (WS): Sc in 2nd ch from hook, sc in next 12 ch, sc in next 6 sc, turn. You now have 20 sc.
- Work even in sc until piece measures about 7"/18 cm from beginning, ending with a RS row.
- Next Row (top edge of pocket opening, WS): Ch 1, sc in next 7 sc, turn. You now have 8 sc.
- Work even in sc on these 8 sc only until piece measures 91⁄2"/24 cm from beginning, ending with a WS row. Fasten off.
- Next Row (bottom edge of pocket opening, WS): With WS facing, join yarn in same st as last st of previous section, ch 1, sc in next 12 sc, turn. You now have 13 sc.
- Work even on these 13 sc only until bottom of opening measures same as top of opening, ending with a WS row, turn.
- Joining Row (RS): Ch 1, sc in next 11 sc, insert hook into next st and into first st on other side of opening and sc these 2 sts together, sc in next 7 sc, turn. You now have 20 sc.
- Work even until piece measures 111⁄2"/29 cm from beginning, or the same as the inside pages. Fasten off.
The Pocket
- Row 1: Hold outside pages with WS facing and zipper opening at left; attach yarn at the corner of the pocket opening and, working along the top edge of the pocket opening, ch 1, work 8 sc evenly spaced across, turn. You now have 9 sc.
- Row 2: Ch 1, sc in each sc across, turn.
- Work even until back of pocket measures 23⁄4"/7 cm.
- Next Row (turning row): Ch 1, FLsc in each sc across, turn.
- Repeat Row 2 until front of pocket measures same as back of pocket. Fold pocket to align with lower edge of pocket opening, and working through double thickness of pocket and lower edge of pocket opening, sc in each st across to attach front of pocket to remaining edge of pocket opening.
- Whipstitch sides of the pocket closed. Take an extra stitch on each side to tack corners closed.
Crocheting the Doodads on inside pages
The Hook-and-Eye Tab
Note: All tabs are attached to the inside pages of the book. The tabs will fold over to the other side (RS/WS) once completed.
- Row 1: With RS facing and short edge at the top, join yarn with slip st on right edge 4"/10 cm from top edge, ch 1, work 8 sc evenly spaced along edge to 13⁄4"/4.5 cm from top edge, turn. You now have 9 sc.
- Row 2: Ch 1, sc in each sc across, turn.
- Work even in sc until tab measures 31⁄2"/9 cm. Fasten off.
The Snap Flap
- Row 1: With RS facing and short edge at the top, join yarn with slip st on left edge 4"/10 cm from lower edge, ch 1, work 11 sc evenly spaced along edge to 11⁄4"/3.2 cm from lower edge, turn. You now have 12 sc.
- Row 2: Ch 1, sc in each sc across, turn.
- Work even in sc until tab measures 2"/5 cm. Fasten off.
The Button Flap
- Row 1: With WS facing, working on same end of page as snap flap, join yarn with slip st 4"/10 cm from lower edge. (This is at the opposite end from, but the same edge as, the hook-and-eye flap.) Ch 1, work 11 sc evenly spaced along edge to 11⁄4"/3.2 cm from lower edge, turn. You now have 12 sc.
- Rows 2–8: Ch 1, sc in each sc across, turn.
- Row 9: Ch 1, sc in next sc, ch 5, skip 5 sc, sc in last 2 sts, turn.
- Row 10: Ch 1, sc in each sc and ch across, turn.
- Rows 11–14: Repeat Row 2. Fasten off.
The Large Ball
- Begin with an adjustable ring.
- Rnd 1: Ch 1, 5 sc in ring, join with slip st to beginning ch. You now have 6 sc.
- Rnd 2: Ch 1, sc in same st, 2 sc in each st around, join with slip st to beginning ch. You now have 12 sc.
- Rnd 3: Ch 1, sc in same st, sc in next sc, *2 sc in next sc, sc in next sc; repeat from * around, join with slip st to beginning ch. You now have 18 sc.
- Rnds 4 and 5: Ch 1, sc in each sc around, join with slip st to beginning ch.
- Rnd 6: Ch 1, *sc2tog, sc in next sc; repeat from * to last 2 sc, sc2tog, join with slip st to beginning ch. You now have 12 sc.
- Stuff the ball with a small amount of polyester fiberfill before proceeding.
- Rnd 7: Ch 1, sc2tog five times, skip last st, join with slip st to beginning ch. You now have 6 sc.
- Fasten off, leaving a 36"/91 cm tail. Thread the tail through a yarn needle, and run the yarn through the remaining sts to close the hole. Fasten off.
- Use the tail to work a 7"/18 cm chain. Leave tail to attach to book.
The Small Ball
- Using the sock yarn, work same as large ball through Rnd 2. Then work Rnd 7. Fasten off, leaving a 20"/51 cm tail. Use this tail to work a 3"/7.5 cm chain, and then work a row of sc on each side of the chain. Fasten off. Attach this piece to top right-hand of the pocket. Weave in ends.
Finishing
Note: The sock yarn sc trim is optional, but it does make the project “pop.” Felting the completed pages gives them a bit of body and density that will make them stand up to play.
- Edging: If desired, using the sock yarn, work an edging of sc around all edges of the outside pages, as well as around each of the tabs, the top of the pocket, and around the pocket edges on the inside of the front page.
- Felting and blocking: Felt all pieces gently (see Other Techniques). Do not allow pieces to become stiff, but felt them only until slightly fulled. When pages have reached their desired fullness, pin them out flat so that you can even up the edges and square the corners. Allow to dry thoroughly.
- Joining pages: Place outside pages with RS down and pocket on left. Place inside pages on top of outside pages with RS down and hook-and-eye tab on left. With project yarn and yarn needle, sew through center line of both layers together to create book “spine.”
- Zipper: With matching sewing thread, machine- or hand-stitch zipper into zipper opening on outside pages.
- Fasteners: Fold tabs inward and use yarn or matching sewing thread to attach the buttons, hook-and-eye, and snap to pages and tabs as pictured.
- Hidden picture: Cut a small piece of fabric no larger than 2"/5 cm square. If possible, use fabric with a picture, such as an animal, boat, or flower, that a child will recognize and enjoy. Press under a small seam allowance and use thread to sew to WS of outside pages under pocket flap.
- Magnetic snap: Cut two strips of fabric each 6"/15 cm long by 2"/5 cm wide. With WS facing, fold each strip in half to be 2" by 3" (5 × 7.5 cm). Machine- or hand-stitch the long edges, making 1⁄4"/6 mm seams. Place one half of the magnetic snap into each tab. Fold the raw edges at the top of each tab to the inside. Align the tabs with folded edges together, taking care that the magnets are facing in the correct direction to snap closed. Machine- or hand-stitch the tabs to the top edge of the inside page where the hook-and-eye is attached on the other side.
- Button flap button: Sew one large button to page to align with button flap.
- Closing button: Using photo as a guide, sew one large button to front cover of book.
- Closing loop: Join yarn with slip st on outer edge of back cover of book, opposite the button; chain a length long enough to go around button, slip st in same st. Fasten off. Weave in ends.
- Large ball: With tail and yarn needle, attach large ball to top edge of spine.
Effie Effalump
Designed by Melissa Morgan-Oakes
Effie’s ring handle is perfect for little hands, and her trunk is just right for little teething mouths. A cute face and a subtle jingling noise provide extra interest.
Finished Measurements
- Approximately 61⁄2"/16.5 cm from tip of trunk to end of ring
Yarn
- Cascade Yarns Sateen, 100% acrylic, 300 yds (274 m)/3.5 oz (100 g), Color 405 Mist (MC)

Crochet Hook
- US B/1 (2.25 mm) or size needed to obtain correct gauge
Gauge
- 22 stitches = 4"/10 cm in single crochet
Other Supplies
- Locking stitch marker, Mylar coffee bag cut to 61⁄2"/16.5 cm long by 2"/5 cm wide, polyester fiberfill, yarn needle, small black safety eyes or embroidery floss and embroidery needle, jingle bell, small amount of tan yarn (CC) for ruffle (optional)
Crocheting the Handle
- With MC, ch 12, join with slip st to form a ring.
- Rnd 1: Ch 1, sc in each ch around; do not join. Pm in the first st of the rnd and move it up as you work the rnds.
- Continuing in a spiral, sc in each sc around until tube measures 7"/18 cm long. Roll Mylar lengthwise into a tight tube and insert into crocheted tube; allow Mylar to expand to diameter of crocheted tube. Fill loosely with fiberfill. Bring ends of tube together and stitch all layers closed.
Crocheting the Trunk and Head
- With MC, chain 2.
- Rnd 1: 9 sc in 2nd ch from hook, join with slip st to first sc. You now have 9 sts. Pm in the first st of the rnd and move it up as you work the rnds.
- Rnds 2–6: Sc in each sc around, do not join.
The Trunk
- Rnd 1: Sc in first sc, sc2tog, sc in next sc, sc2tog, 2 sc in next 2 sc, sc in next sc. You now have 9 sts.
- Rnd 2: Sc in each st around.
- Repeat Rnds 1 and 2 two more times.
The Head
- Rnd 1: *Sc in first sc, 2 sc in next sc; repeat from * around. You now have 12 sts.
- Rnd 2: Sc in each sc around.
- Rnd 3: *Sc in next 2 sc, 2 sc in next sc; repeat from * around. You now have 16 sts.
- Rnd 4: Sc in each sc around.
- Rnd 5: 2 sc in each sc around. You now have 32 sts.
- Rnds 6 and 7: Sc in each sc around.
- Rnd 8: Sc2tog, sc in each st to last 2 sts, sc2tog. You now have 30 sts.
- Rnds 9–11: Repeat Rnd 8. You now have 24 sts.
- Rnd 12: Sc in each sc around.
- Clip a locking ring stitch marker in the loop of your live stitch. This will allow you to do some prefinishing without losing your place. Stuff trunk loosely with fiberfill, and attach or embroider eyes where desired. Firmly attach the jingle bell inside the head by tying it to the yarn used to attach or embroider the eyes.
- Place the live stitch back on the hook and proceed. When working the final head shaping below, pause occasionally to stuff the head as you go, tucking fiberfill between the bell and front of face. Do not overstuff.
- Rnd 13: *Sc in next 4 sc, sc2tog; repeat from * around. You now have 20 sts.
- Rnd 14: *Sc in next 3 sc, sc2tog; repeat from * around. You now have 16 sts.
- Rnd 15: *Sc in next 2 sc, sc2tog; repeat from * around. You now have 12 sts.
- Rnd 16: *Sc in next sc, sc2tog; repeat from * around. You now have 8 sts.
- Rnd 17: *Sc2tog; repeat from * around. You now have 4 sts.
- Fasten off, leaving a sewing length. Thread tail on yarn needle and use to close the back of the head.
Crocheting the Ears (make 2)
- With MC, chain 3.
- Row 1: 2 sc in 2nd ch from hook and in next ch, turn. You now have 4 sts.
- Row 2: Ch 1, 2 sc in each sc across, turn. You now have 8 sts.
- Row 3: Ch 1, 2 sc in each sc across, turn. You now have 16 sts.
- Rows 4–6: Ch 1, sc in each sc across.
- Fasten off. Using photo as a guide, attach ears to sides of head, bending the top of the ear over a bit to give it a little depth.
Crocheting the Ruffle
- With CC, ch 16.
- Row 1: 3 dc in 4th ch from hook, 4 dc in each ch across, turn. You now have 52 sts.
- Row 2: Ch 3 (counts as dc), dc in same st, 2 dc in each dc across, turn. You now have 104 sts. Cut CC and join MC.
- Row 3: Slip st in each dc across.
- Fasten off, leaving a sewing length.
Finishing
- Sew head to handle. Place ruffle around Effie’s neck and stitch ends of rows together. Weave in ends.
Granny Bunny Buddy
Designed by Dana Bincer, Yarnovations.com
Young ones will love to poke their little fingers through the holes in this playmate, so-named for its granny square body. The ears and arms are the perfect size for little hands to grab and hold onto.
Finished Measurements
Yarn
- Red Heart Soft Baby Steps, 100% acrylic, 256 yds (234m)/4 oz (113 g), Color 9600 White
Crochet Hook
- US G/6 (4 mm) or size needed to obtain correct gauge
Gauge
- 18 stitches and 20 rows = 4"/10 cm in single crochet
Other Supplies
- Stitch marker, polyester fiberfill, yarn needle, scrap of pink yarn for mouth, two 3⁄8"/10 mm buttons for eyes, sewing needle and coordinating thread, 12"/30.5 cm of 1⁄4"/6 mm ribbon for bow at neck
Crocheting the Bunny
The Head
- Chain 2.
- Rnd 1: 6 sc in 2nd ch from hook. You now have 6 sts. Do not join. Pm in the first st of the rnd and move it up as you work the rnds.
- Rnd 2: 2 sc in each sc around. You now have 12 sts.
- Rnd 3: *Sc in next sc, 2 sc in next sc**, sc in next 2 sc, 2 sc in next sc; repeat from * around, ending last repeat at **. You now have 17 sts.
- Rnd 4: Sc in next sc, 2 sc in next sc, (sc in next 3 sc, 2 sc in next sc, sc in next 2 sc, 2 sc in next sc) twice, sc in last sc. You now have 22 sts.
- Rnd 5: Sc in next 3 sc, 2 sc in next sc, sc in next 7 sc, 2 sc in next sc, sc in next 6 sc, 2 sc in next sc, sc in next 3 sc. You now have 25 sts.
- Rnd 6: Sc in next 7 sc, 2 sc in next sc, sc in next 8 sc, 2 sc in next sc, sc in next 7 sc, 2 sc in next sc. You now have 28 sts.
- Rnd 7: Sc in next 14 sc, 2 sc in next sc, sc in next 13 sc. You now have 29 sts.
- Rnd 8: Sc in each sc around.
- Rnd 9: Sc in next 13 st, sc2tog, sc in next 14 sc. You now have 28 sts.
- Rnd 10: Sc2tog, sc in next 7 sc, sc2tog, sc in next 8 sc, sc2tog, sc in next 7 sc. You now have 25 sts.
- Rnd 11: Sc in next 3 sc, sc2tog, sc in next 6 sc, sc2tog, sc in next 7 sc, sc2tog, sc in next 3 sc. You now have 22 sts.
- Rnd 12: Sc, sc2tog, (sc in next 2 sc, sc2tog, sc in next 3 sc, sc2tog) twice, sc in last sc. You now have 17 sts.
- Rnd 13: Sc2tog, (sc in next sc, sc2tog, sc in next 2 sc, sc2tog) twice, sc in last sc. You now have 12 sts.
- Stuff the head with fiberfill.
- Rnd 14: Sc2tog around. You now have 6 sts. Fasten off, leaving a long tail for sewing. Weave end through each stitch around and cinch closed. Secure with knot, leaving a long tail for sewing.
The Ears (Make 2)
- Chain 2.
- Rnd 1: 8 sc in 2nd ch from hook. You now have 8 sts. Do not join. Pm in the first st of the rnd and move it up as you work the rnds.
- Rnd 2: 2 sc in each sc around. You now have 16 sts.
- Rnds 3–5: Sc in each sc around.
- Rnd 6: (Sc in next 6 sc, sc2tog) twice. You now have 14 sts.
- Rnd 7: Sc in each sc around.
- Rnd 8: (Sc in next 5 sc, sc2tog) twice. You now have 12 sts.
- Rnd 9: Sc in each sc around.
- Rnd 10: (Sc in next 4 sc, sc2tog) twice. You now have 10 sts.
- Rnd 11: (Sc in next 3 sc, sc2tog) twice. You now have 8 sts.
- Rnds 12–20: Sc in each sc around.
- Row 21: Flatten ear to create two sets of parallel stitches. Holding WS together and working through both thicknesses, sc in next 4 sts to close ear, turn. You now have 4 sts.
- Row 22: (Sc2tog) twice, turn. You now have 2 sts.
- Row 23: Sc across.
- Fasten off, leaving a long tail for sewing.
The Arms (Make 2)
- Chain 2.
- Rnd 1: 6 sc in 2nd ch from hook. You now have 6 sc. Do not join. Pm in the first st of the rnd and move it up as you work the rnds.
- Rnd 2: 2 sc in each sc around. You now have 12 sts.
- Rnds 3 and 4: Sc in each sc around.
- Rnd 5: (Sc2tog, sc in next 4 sc) twice. You now have 10 sts.
- Rnd 6: (Sc2tog, sc in next 3 sc) twice. You now have 8 sts.
- Rnd 7: (Sc2tog, sc in next 2 sc) twice. You now have 6 sts.
- Rnds 8–15: Sc in each sc around.
- Fasten off, leaving a long tail for sewing.
- Stuff lightly.
Crocheting the Granny Body
- Ch 4, join with slip st to form a ring.
- Rnd 1: Ch 3 (counts as dc), 3 dc in ring, ch 2, (4 dc, ch 2) three times in ring, join with slip st to top of ch-4. You now have 16 dc and 4 ch-2 spaces.
- Rnd 2: Ch 5 (counts as dc and ch 2 here and throughout), (4 dc, ch 2) twice in next 3 spaces, (4 dc, ch 2, 3 dc) in next space, join with slip st to 3rd ch of ch-5.
- Rnd 3: Ch 3 (counts as dc here and throughout), 3 dc in next space, *ch 2, (4 dc, ch 2, 4 dc) in corner space, ch 2**, 4 dc in next space; repeat from * around, ending last repeat at **, join with slip st to top of ch-3.
- Rnd 4: Ch 5, *(4 dc, ch 2) in each space to corner, (4 dc, ch 2) twice in corner space; repeat from * around, ending with 3 dc in last space, join with slip st to 3rd ch of ch-5.
- Rnd 5: Ch 3, 3 dc in next space, ch 2, *(4 dc, ch 2) in each space to corner, (4 dc, ch 2) twice in corner space; repeat from * around, ending (4 dc, ch 2) in each space to beginning of rnd, join with slip st to top of ch-3.
- Rnds 6–9: Repeat Rnds 4 and 5 twice.
- Rnd 10: Ch 1, *sc in next 2 dc, picot, sc in next 2 dc, (2 sc, picot, sc) in next space; repeat from * around, join with slip st to first sc.
- Fasten off. Weave in ends.
Finishing
- Using photo as a guide, sew ears to top of head. With pink yarn, embroider mouth. With sewing needle and thread, sew on button eyes securely. Sew arms to center of blanket, then sew head assembly to top of arms at blanket center. Weave in ends. Tie ribbon in a bow around bunny’s neck and tack in place with sewing thread.
The Owl and the Pussycat
Designed by Lorna Miser, Lorna Miser Designs
This quirky toy is worked in the round — the owl is on one side, the pussycat is on the other. Further entertain your child by reciting the quirky poem by Edward Lear, about “the land where the Bong-Tree grows.”
Finished Measurements
- Approximately 8"/20.5 cm tall
Yarn
- Universal Yarns Poems, 100% wool, 109 yds (100 m)/3.5 oz (100 g), Color 588 La Lavande
Crochet Hook
- US G/6 (4 mm) or size needed to obtain correct gauge
Gauge
- 14 stitches and 10 rows = 4"/10 cm in half double crochet
Other Supplies
- Stitch marker, yarn needle, polyester fiberfill, small amounts of different colored felt, sewing needle and thread, scraps of white and black yarn for features
Crocheting the Base
- Chain 10.
- Row 1: Dc in 4th ch from hook and in each ch across, turn. You now have 8 dc.
- Row 2: Ch 3 (counts as dc here and throughout), dc in each dc across, turn.
- Repeat Row 2 until base measures 5"/12.5 cm from beginning. Fasten off and set aside.
Crocheting the Body
- Ch 50, join with slip st to first ch, being careful not to twist.
- Rnd 1: Sc in first ch, hdc in each ch around; do not join. Pm in the first st of the rnd and move it up as you work the rnds.
- Continue to hdc in each st around until piece measures 41⁄2"/11.5 cm from beginning. Do not fasten off.
The First Ear
- Rnd 1: Skip next 24 sts, hdc in next st. Pm in the first st of the rnd and move it up as you work the rnds.
- Rnd 2: Hdc in each hdc around. You now have 25 sts.
- Rnd 3: Repeat Rnd 2.
- Rnd 4: *Hdc in next 3 sts, hdc2tog; repeat from * around. You now have 20 sts.
- Rnd 5: Repeat Rnd 2.
- Rnd 6: *Hdc in next 2 sts, hdc2tog; repeat from * around. You now have 15 sts.
- Rnd 7: Repeat Rnd 2.
- Rnd 8: *Hdc in next st, hdc2tog; repeat from * around. You now have 10 sts.
- Rnd 9: Repeat Rnd 2.
- Rnd 10: Hdc2tog around. You now have 5 sts.
- Fasten off, leaving a sewing length. Sew tip of ear closed. Weave in ends.
The Second Ear
- With RS facing, join yarn with standing hdc in first skipped st, hdc in next 24 sts. You now have 25 sts.
- Work Rnds 2–10 as for first ear.
Finishing
- Stuff the body with fiberfill. With RS facing, slip st base to bottom of body. Weave in ends.
- Using templates for eyes and noses, cut out two eyes and one nose for each face from felt. Using photo as a guide, sew features to each side with needle and thread. Embroider whiskers for cat with white yarn. Embroider pupils for all four eyes with black yarn.
Little Pegasus
Designed by Kate Wood
This Pegasus is glittery white, but since it’s a mythological creature, you can stitch it in whatever color you like. The pattern is worked continuously in the round, except where indicated.
Finished Measurements
- Approximately 7"/18 cm long from nose to tail
Yarn
- Red Heart Shimmer, 97% acrylic/3% metallic, 280 yds (256 m)/3.5 oz (100 g), Color 1010 Snow
Crochet Hook
- US E/4 (3.5 mm) or size needed to obtain correct gauge
Gauge
- 20 stitches and 20 rounds = 4"/10 cm in single crochet
Other Supplies
- Stitch marker, two safety eyes or small amount of black yarn, yarn needle, polyester fiberfill
Pattern Essentials
Beg 5-dc cluster (beginning 5-dc cluster) Ch 2, yo, insert hook into first st and pull up a loop, yo and pull through 2 loops on hook, (yo, insert hook into same st and pull up a loop, yo and pull through 2 loops on hook) three times, yo and pull through 5 loops on hook.
Crocheting the Head
- Make an adjustable ring.
- Rnd 1: Work 6 sc in ring. Do not join. You now have 6 sc. Pm in the first st of the rnd and move it up as you work the rnds.
- Rnd 2: 2 sc in each st around. You now have 12 sc.
- Rnd 3: (Sc in next 3 sc, 2 sc in next sc) around. You now have 15 sts.
- Rnd 4: Sc in each sc around.
- Rnd 5: (Sc in next 3 sc, sc2tog) around. You now have 12 sts.
- Rnd 6: Sc in each sc around.
- Rnd 7: (Sc in next 3 sc, 2 sc in next sc) around. You now have 15 sts.
- Rnd 8: (Sc in next 4 sc, 2 sc in next sc) around. You now have 18 sts.
- Rnd 9: (Sc in next 2 sc, 2 sc in next sc) four times, (hdc in next 2 sc, 2 hdc in next sc) twice. You now have 24 sts.
- Rnd 10: (Sc in next 3 sc, 2 sc in next st) four times, (hdc in next 3 sts, 2 hdc in next st) twice. You now have 30 sts.
- Rnd 11: (Sc in next 4 sts, 2 sc in next st) four times, (hdc in next 4 sts, 2 hdc in next st) twice. You now have 36 sts.
- Rnds 12–16: Sc in each st around.
- Embroider or affix eyes at ends of the hdc made in Rnd 10.
- Rnd 17: (Sc in next 4 sc, sc2tog) around. You now have 30 sts.
- Rnd 18: (Sc in next 3 sc, sc2tog) around. You now have 24 sts.
- Rnd 19: (Sc in next 2 sc, sc2tog) around. You now have 18 sts.
- Stuff head with fiberfill.
- Rnd 20: (Sc in next sc, sc2tog) around. You now have 12 sts.
- Rnd 21: Sc2tog around. You now have 6 sts.
- Fasten off, leaving a long sewing length. Finish stuffing head. Use yarn needle and tail to sew open end firmly closed.
The Ears (Make 2)
- Leaving a long sewing length, ch 3.
- Row 1: 2 sc in 2nd ch from hook and in next ch, turn. You now have 4 sc.
- Row 2: Ch 1, sc2tog twice, turn. You now have 2 sts.
- Row 3: Ch 1, sc2tog. You now have 1 st.
- Fasten off.
- Using yarn needle and beginning yarn tail, sew ears to head, just behind Rnd 13. Weave in ends.
The Neck
- Leaving a long sewing length, ch 18.
- Rnd 1: Being careful not to twist chain, sc in first ch to form a circle, then sc in each ch around; do not join. Pm in the first st of the rnd and move it up as you work the rnds. You now have 18 sc.
- Rnd 2: Sc in next 16 sc, sc2tog. You now have 17 sc.
- Rnd 3: Sc in next 15 sc, sc2tog. You now have 16 sc.
- Rnd 4: Sc in next 14 sc, sc2tog. You now have 15 sc.
- Rnd 5: Sc in next 13 sc, sc2tog. You now have 14 sc.
- Rnd 6: Sc in next 12 sc, sc2tog. You now have 13 sc.
- Rnd 7: Sc in next 11 sc, sc2tog. You now have 12 sc.
- Fasten off.
Crocheting the Body
- Make an adjustable ring.
- Rnd 1: Work 6 sc in ring. Do not join. You now have 6 sc. Pm in the first st of the rnd and move it up as you work the rnds.
- Rnd 2: 2 sc in each st around. You now have 12 sc.
- Rnd 3: (Sc in next sc, 2 sc in next sc) around. You now have 18 sts.
- Rnd 4: (Sc in next 2 sc, 2 sc in next sc) around. You now have 24 sts.
- Rnd 5: (Sc in next 3 sc, 2 sc in next sc) around. You now have 30 sts.
- Rnd 6: (Sc in next 4 sc, 2 sc in next sc) around. You now have 36 sts.
- Rnds 7–11: Sc in each sc around.
- Rnd 12: (Sc in next 10 sc, sc2tog) around. You now have 33 sts.
- Rnd 13: (Sc in next 9 sc, sc2tog) around. You now have 30 sts.
- Rnds 14 and 15: Sc in each around.
- Rnd 16: (Sc in next 9 sc, 2 sc in next st) around. You now have 33 sts.
- Rnd 17: (Sc in next 10 sc, 2 sc in next st) around. You now have 36 sts.
- Rnds 18–22: Sc in each sc around.
- Stuff body with fiberfill.
- Rnd 23: (Sc in next 4 sc, sc2tog) around. You now have 30 sts.
- Rnd 24: (Sc in next 3 sc, sc2tog) around. You now have 24 sts.
- Rnd 25: (Sc in next 2 sc, sc2tog) around. You now have 18 sts.
- Rnd 26: (Sc in next sc, sc2tog) around. You now have 12 sts.
- Rnd 27: Sc2tog around. You now have 6 sts.
- Fasten off, leaving a long sewing length. Finish stuffing body. Use yarn needle and tail to sew open end firmly closed.
The Hind Legs (Make 2)
- Make an adjustable ring.
- Rnd 1: Work 6 sc in ring. Do not join. You now have 6 sc. Pm in the first st of the rnd and move it up as you work the rnds.
- Rnd 2: 2 sc in each st around. You now have 12 sc.
- Rnd 3: (Sc in next 3 sc, 2 sc in next sc) around. You now have 15 sts.
- Rnd 4: BLsc in each sc around.
- Rnd 5: Sc in next 3 sc, (sc2tog) three times, sc in next 3 sc, 2 sc in next 3 sc. You now have 15 sts.
- Rnds 6 and 7: Sc in each sc around.
- Rnd 8: Sc in next 3 sc, sc2tog, sc in next 10 sc. You now have 14 sts.
- Rnd 9: Sc in next 4 sc, sc2tog, sc in next 8 sc. You now have 13 sts.
- Rnd 10: Sc in next 3 sc, sc2tog, sc in next 8 sc. You now have 12 sts.
- Rnds 11–14: Sc in each sc around.
- Rnds 15 and 16: Sc in next 3 sc, slip st in next 3 sts, sc in next 3 sc, hdc in next 3 sts.
- Rnds 17–20: Sc in each st around.
- Rnd 21: Sc in next 6 sc, 2 sc in next sc, sc in next 5 sc. You now have 13 sts.
- Rnd 22: Sc in next 6 sc, 2 sc in next sc, sc in next 6 sc. You now have 14 sts.
- Rnd 23: Sc in next 8 sc, 2 sc in next sc, sc in next 5 sc. You now have 15 sts.
- Rnd 24: Sc in next 8 sc, 2 sc in next st, sc in next 6 sc. You now have 16 sts.
- Rnd 25: Sc in each sc around.
- Rnd 26 (first leg only): Hdc in next 8 sc, slip st in next 8 sc.
- Rnd 26 (second leg only): Slip st in next 8 sc, hdc in next 8 sc.
- Fasten off, leaving a long tail for sewing.
The Front Legs (Make 2)
- Work same as hind legs through Rnd 10.
- Rnds 11–20: Sc in each st around.
- Rnds 21–26: Work Rnds 21–26 of hind legs.
- Fasten off, leaving a long sewing length.
The Wings (Make 2)
- Leaving a long sewing length, ch 1.
- Row 1: (Beg 5-dc cluster, ch 2, 5-dc cluster) in starting ch, turn.
- Row 2: Ch 1, sc in first cluster, ch 1, sc in ch-2 space, ch 1, sc in cluster, turn.
- Row 3: Beg 5-dc cluster in first sc, *ch 2, 5-dc cluster in next sc; repeat from * once more, turn.
- Row 4: Ch 1, sc in first cluster, (ch 1, sc in next ch-2 space, ch 1, sc in next cluster) twice, turn.
- Row 5: Beg 5-dc cluster in first sc, ch 3, slip st in next ch-1 space, beg 5-dc cluster in next sc, ch 3, slip st in next ch-1 space, slip st in next sc, beg 5-dc cluster in next sc, ch 3, slip st in next ch-1 space, beg 5-dc cluster in next sc, ch 3, slip st in same sc.
- Fasten off.
Finishing
- Firmly stuff legs and sew to body, placing the hdc side of each leg to the outside of body and the slip st side on the inside of body, creating a smooth transition from legs to body.
- Sew wider edge (first row) of neck to body. Stuff the neck, then sew the narrow end of the neck (last row) to the head.
- Sew the wings to the back.
- For mane, cut pieces of yarn 4"/10 cm long. Fold each in half, and use hook to pull through stitching on the head/neck, creating a loop. Yarnover with both loose ends, pulling them through the loop to attach. Trim to desired length.
- For tail, cut 13 pieces of yarn 9"/23 cm long or desired length. Lay 12 yarn pieces parallel and tie them together at the center with the 13th strand of yarn to create a tassel. Sew tassel to body; trim to desired length.
Cuddly Snuggly Elephant
Designed by Kate Wood
The merino-and-angora blend used for this pachyderm makes him extra soft and cuddly. He’s worked in continuous rounds of single crochet and has eyes made from scrap yarn.
Finished Measurements
- Approximately 7"/18 cm long, including trunk
Yarn
- Lana Gatto Class, 80% extrafine merino wool/20% angora, 136 yds (124 m)/1.75 oz (50 g), Color 5234 Light Grey
Crochet Hook
- US F/5 (3.75 mm) or size needed to obtain correct gauge
Gauge
- 20 stitches and 20 rounds = 4"/10 cm in single crochet, unstuffed
Other Supplies
- Stitch marker, yarn needle, polyester fiberfill, scrap of yarn for eyes
Crocheting the Head
- Make an adjustable ring.
- Rnd 1: Ch 1, 6 sc in ring. You now have 6 sts. Do not join. Pm in the first st of the rnd and move it up as you work the rnds.
- Rnd 2: 2 sc in each st around. You now have 12 sts.
- Rnd 3: *Sc in next sc, 2 sc in next sc; repeat from * around. You now have 18 sts.
- Rnd 4: *Sc in next 2 sc, 2 sc in next sc; repeat from * around. You now have 24 sts.
- Rnd 5: *Sc in next 3 sc, 2 sc in next sc; repeat from * around. You now have 30 sts.
- Rnds 6–12: Sc in each sc around.
- Fasten off, leaving a long sewing length.
The Ears (Make 2)
- Make an adjustable ring.
- Rnd 1: Ch 1, 6 sc in ring. You now have 6 sts. Do not join. Pm in the first st of the rnd and move it up as you work the rnds.
- Rnd 2: *Sc in next sc, 2 sc in next sc; repeat from * around. You now have 9 sts.
- Rnd 3: *Sc in next 2 sc, 2 sc in next sc; repeat from * around. You now have 12 sts.
- Rnd 4: *Sc in next 3 sc, 2 sc in next sc; repeat from * around. You now have 15 sts.
- Rnd 5: *Sc in next 4 sc, 2 sc in next sc; repeat from * around. You now have 18 sts.
- Rnd 6: *Sc in next 5 sc, 2 sc in next sc; repeat from * around. You now have 21 sts.
- Rnd 7: *Sc in next 6 sc, 2 sc in next sc; repeat from * around. You now have 24 sts.
- Rnds 8–10: Sc in each sc around.
- Rnd 11: (Sc2tog) six times, sc in next 4 sc, (sc2tog) four times. You now have 14 sts.
- Fasten off, leaving a long sewing length. Flatten the ear; the decreases worked in Rnd 11 will give it a curved shape. Sew the open end closed, leaving a sewing length.
The Trunk
- Make an adjustable ring.
- Rnd 1: Ch 1, 6 sc in ring. You now have 6 sts. Do not join. Pm in the first st of the rnd and move it up as you work the rnds. Pull excess yarn through to the right side of work (this yarn tail will be used to curl up the trunk).
- Rnds 2–10: Sc in each sc around.
- Rnd 11: Sc in next 5 sc, 2 sc in last sc. You now have 7 sts.
- Rnd 12: Sc in next 3 sc, 2 sc in next sc, sc in next 3 sc. You now have 8 sts.
- Rnd 13: Sc in next 7 sc, 2 sc in last sc. You now have 9 sts.
- Rnd 14: Sc in next 4 sc, 2 sc in next st, sc in last 4 sc. You now have 10 sts.
- Rnd 15: Sc in next 9 sc, 2 sc in last sc. You now have 11 sts.
- Rnd 16: Sc in next 5 sc, 2 sc in next sc, sc in last 5 sc. You now have 12 sts.
- Rnd 17: (Sc in next 3 sc, 2 sc in next sc) three times. You now have 15 sts.
- Rnd 18: (Sc in next 4 sc, 2 sc in next sc) three times. You now have 18 sts.
The shaping in the next rnd will help the trunk attach more cleanly to the head.
- Rnd 19: Hdc in next 8 sc, sc in next st, slip st in next 9 sts. You now have 18 sts. Slip st to first hdc to join. Fasten off, leaving a long sewing length.
Crocheting the Tail
- Chain 4. Fasten off, leaving a long sewing length to sew to body. Trim other yarn tail to 1⁄4"/6 mm.
Crocheting the Body
- Make an adjustable ring.
- Rnds 1–5: Work as for head. You now have 30 sts.
- Rnd 6: *Sc in next 4 sc, 2 sc in next sc; repeat from * around. You now have 36 sts.
- Rnd 7: *Sc in next 5 sc, 2 sc in next sc; repeat from * around. You now have 42 sts.
- To attach the tail, use hook to pull yarn tail through between Rnds 6 and 7. Using yarn needle, sew yarn tail securely to WS of body. Trim excess.
- Rnds 8–19: Sc in each sc around.
- Rnd 20: *Sc in next 5 sc, sc2tog; repeat from * around. You now have 36 sts.
- Rnd 21: *Sc in next 4 sc, sc2tog; repeat from * around. You now have 30 sts.
- Rnd 22: *Sc in next 3 sc, sc2tog; repeat from * around. You now have 24 sts.
- Stuff body with fiberfill.
- Rnd 23: *Sc in next 2 sc, sc2tog; repeat from * around. You now have 18 sts.
- Rnd 24: *Sc in next sc, sc2tog; repeat from * around. You now have 12 sts.
- Rnd 25: Sc2tog around. You now have 6 sts.
- Finish stuffing body. Use yarn needle and tail to sew open end closed.
The Legs (Make 4)
- Make an adjustable ring.
- Rnds 1–3: Work as for head. You now have 18 sts.
- Rnd 4: BLsc in each sc around. (This makes the transition from hoof to leg.)
- Rnd 5: *Sc next 4 sts, sc2tog; repeat from * around. You now have 15 sts.
- Rnds 6–10: Sc in each sc around.
- Row 11: Hdc in next 6 sc, sc next st, slip st in next st, leaving remaining sts unworked.
- Fasten off, leaving a long sewing length.
Finishing
- Follow diagram for help with assembling the elephant.
- Stuff each leg. Rotate each leg so that the hdc are facing outward, allowing the leg to meet the curve of the body. Sew the elephant’s tail at the back and top of the body.
- Flatten the end of the elephant’s trunk, and curl it under (toward the slip st). Use the yarn tail that was pulled through to sew the curl in place. Stuff the remainder of trunk. Using yarn tail at open end, sew the trunk to the head. The hdc edge of the trunk should just meet Rnd 2 of the head.
- With scrap yarn, satin stitch two eyes on front of head between Rnds 5 and 6, using the trunk to guide placement.
- Sew the ears to the head, then firmly stuff head. Using yarn needle and tail, sew head to front of body. Weave in ends.
Goldie the Bouncing Fish
Designed by Melissa Dallke, The Crochet Experience
This fish gets its bounce by being crocheted over a tennis ball. Crocheted with wool using single and double crochet, this unique amigurumi is sure to delight.
Finished Measurements
- 9"/23 cm circumference with 3"/7.5 cm tail
Yarn
- Berlini Merino Xtra, 100% extrafine merino wool, 154 yds (141 m)/1.75 oz (50 g), Color 10 Mandarin Orange
Crochet Hook
- US D/3 (3.25 mm) or size needed to obtain correct gauge
Gauge
- 28 stitches and 28 rounds = 4"/10 cm in single crochet
Other Supplies
- Stitch marker, tennis ball, yarn needle, scraps of white and black worsted yarn for eyes
Crocheting the Body
- Make an adjustable ring.
- Rnd 1: Work 6 sc into ring. Do not join. Pm in the first st of the rnd and move it up as you work the rnds.
- Rnd 2: 2 sc in each st around. You now have 12 sts.
- Rnd 3: (Sc in next st, 2 sc in next st) around. You now have 18 sts.
- Rnd 4: (Sc in next 2 sts, 2 sc in next st) around. You now have 24 sts.
- Rnd 5: (Sc in next 3 sts, 2 sc in next st) around. You now have 30 sts.
- Rnd 6: (Sc in next 4 sts, 2 sc in next st) around. You now have 36 sts.
- Rnd 7: (Sc in next 5 sts, 2 sc in next st) around. You now have 42 sts.
- Rnd 8: (Sc in next 6 sts, 2 sc in next st) around. You now have 48 sts.
- Rnd 9: (Sc in next 7 sts, 2 sc in next st) around. You now have 54 sts.
- Rnds 10–19: Sc in each st around.
- Rnd 20: (Sc in next 7 sts, sc2tog) around. You now have 48 sts.
- Rnd 21: (Sc in next 6 sts, sc2tog) around. You now have 42 sts.
- Insert tennis ball and continue working around ball.
- Rnd 22: (Sc in next 5 sts, sc2tog) around. You now have 36 sts.
- Rnd 23: (Sc in next 4 sts, sc2tog) around. You now have 30 sts.
- Rnd 24: (Sc in next 3 sts, sc2tog) around. You now have 24 sts.
- Rnd 25: (Sc in next 2 sts, sc2tog) around. You now have 18 sts.
- Rnd 26: (Sc in next st, sc2tog) around. You now have 12 sts.
- Rnd 27: Sc2tog around. You now have 6 sts. Remove marker; do not fasten off.
The Tail
- Ch 22; 3 dc in 2nd ch from hook, 3 dc in each ch across, slip st into body next to beginning ch; repeat from * two more times.
- Fasten off. Weave in ends.
Crocheting the Side Fins
Note: Use photo as a guide when making fins.
- With tail facing away, join yarn to side of fish by inserting hook between 2 sc and making a slip st.
- Row 1: Working up the side of the ball (insert hook between next 2 sc, pull up loop and make 1 sc) four times, turn. You now have 5 sts.
- Row 2: Ch 3 (counts as dc), dc in same st, (2 dc in next st) four times, turn. You now have 10 sts.
- Row 3: Ch 1, 2 sc in each st across. You now have 20 sts.
- Fasten off. Weave in ends.
- Repeat to make a fin on opposite side of ball.
Crocheting the Top Fin
- With the tail on the right, slip st between 2 sc (about 1⁄2"/13 mm from top of ball) as for side fins.
- Row 1: Work 6 sc in a line toward face, turn.
- Row 2: Ch 3, dc in next st, hdc in next 2 sts, sc in next 2 sts, slip st into body.
- Fasten off. Weave in ends.
Crocheting the Eyes (make 2)
- With white yarn, make adjustable ring.
- Rnd 1: Work 6 sc into ring. Do not join. Pm in the first st of the rnd.
- Rnd 2: 2 sc in each st around. You now have 12 sts. Slip st into marked st.
- Thread a needle with a 24"/61 cm piece of black yarn and tie a knot in one end. Pull needle through center of white circle from WS to RS. Embroider a five-point star by working five evenly spaced straight sts from center, each 1⁄4"/6 mm long, around toward outer edge. Starting in the center of the star, weave yarn in an outward spiral, *working over one ray, then under next ray; repeat from * until you reach the points of the star. Pull yarn to WS. Cut yarn and weave in ends.
- Place eyes close together, 1⁄2"/13 mm below top fin and whipstitch to head with white tails. Weave in ends.
Crocheting the Mouth
- Beginning 1"/2.5 cm below center of one eye, slip st between 2 sc; sc between next 2 sts four times, slip st into body. Cut yarn and weave in ends.
- Steam block, pinning fins back.
Pocket Dolly
Designed by Gwen Steege
This soft little dolly, with her flapper hat and flouncy skirt, is likely to become a take-along favorite, tucked into a pocket or wrapped in its own cozy blanket. Crocheted with superwash merino wool, it is carefree for parents, as well. You can make three dolls with one skein of this yarn.
Finished Measurements
Yarn
- Madelinetosh Tosh Merino Light, 100% superwash merino wool, 420 yds (384 m)/3.5 oz (100 g), Dachshund

Crochet Hook
- US E/4 (3.5 mm) crochet hook or size needed to obtain correct gauge
Gauge
- 24 stitches and 24 rounds = 4"/10 cm in single crochet
Other Supplies
- Stitch markers, yarn needle, polyester fiberfill, about 4 yds/3.5 m, 5/2 pearl cotton (sample uses Halcyon Yarn’s Dark Gold), 1⁄2 yd/45.5 cm of 3⁄8"/1 cm ribbon, sewing needle and coordinating thread
Crocheting the Doll
The Head
- Begin with an adjustable ring.
- Rnd 1: Ch 1, work 6 sc in ring, join with slip st to first sc. You now have 6 sts.
- Rnd 2: Ch 1, 2 sc in same st, 2 sc in each st around, join with slip st to first sc. You now have 12 sc.
- Rnd 3: Ch 1, 2 sc in same st, sc in next sc, *2 sc in next sc, sc in next sc; repeat from * around, join with slip st to first sc. You now have 18 sc.
- Rnd 4: Ch 1, 2 sc in same st, sc in next 2 sc, *2 sc in next sc, sc in next 2 sc; repeat from * around, join with slip st to first sc. You now have 24 sc.
- Rnd 5: Ch 1, 2 sc in same st, sc in next 3 sc, *2 sc in next st, sc in next 3 sc; repeat from * around, join with slip st to first sc. You now have 30 sc.
- Pm in the first st of the rnd and move it up as you work the rnds. Continuing in rnds without joining, sc in each sc around until piece measures 11⁄2"/4 cm from center ring.
- Decrease Rnd 1: *Sc in next 3 sts, sc2tog; repeat from * around. You now have 24 sc.
- Decrease Rnd 2: *Sc in next 2 sts, sc2tog; repeat from * around. You now have 18 sc.
- Decrease Rnd 3: *Sc in next st, sc2tog; repeat from* around, join with slip st to first sc. You now have 12 sc.
The Upper Body
- Continue in joined rnds.
- Rnd 1: Ch 1, 2 sc in same st, sc in next sc, *2 sc in next sc, sc in next sc; repeat from * around, join with slip st to first sc. You now have 18 sc.
- Rnd 2: Ch 1, 2 sc in same st, sc in next 2 sc, *2 sc in next st, sc in next 2 sc; repeat from * around, join with slip st to first sc. You now have 24 sc.
- Rnd 3: Ch 1, 2 sc in same st, sc in next 3 sc, *2 sc in next st, sc in next 3 sc; repeat from * around, join with slip st to first sc. You now have 30 sc.
- Rnd 4: Ch 1, 2 sc in same st, sc in next 4 sc, *2 sc in next st, sc in next 4 sc; repeat from * around, join with slip st to first sc. You now have 36 sc.
- Rnds 5–13: Ch 1, sc in each sc around, join with slip st to first ch.
The Skirt
- Rnd 1: Ch 2 (counts as hdc), FLhdc in each sc around, join with slip st to top of ch-2.
- Rnd 2: Ch 1, 2 sc in same st, sc in next 3 sc, *2 sc in next sc, sc in next 3 hdc; repeat from * around, join with slip st to first sc. You now have 45 sc.
- Rnd 3: Ch 1, 2 sc in same st, sc in next 4 sc, *2 sc in next sc, sc in next 4 sc; repeat from * around, join with slip st to first sc. You now have 54 sc.
- Rnd 5: Ch 1, sc in first st, ch 2, skip 2 sc, *sc in next sc, ch 2, skip 2 sts; repeat from * around, join with slip st to first sc.
- Rnd 6: Ch 1, sc in each sc and 2 sc in each ch-2 space around; with pearl cotton, join with slip st to first sc.
- With pearl cotton, ch 1, sc in each sc around, join with slip st to first sc. Fasten off.
Crocheting the Lower Body
- Fold skirt toward head.
- Rnd 1: Join yarn with slip st in back loop of any st in last upper body rnd, ch 1 (counts as sc), BLsc in each sc around. You now have 36 sc. Do not join. Pm in the first st of the rnd and move it up as you work the rnds.
- Sc in each sc around until lower body measures about 1"/2.5 cm from waist (top of skirt). Lightly stuff the head and upper body with fiberfill.
The Right Leg
- Rnd 1: Sc in next 18 sc, leaving remaining sts unworked. You now have 18 sc.
Continue in rnds without joining.
- Rnd 2: Skip next 18 sts, sc in each sc around. You now have 18 sc.
- Repeat Rnd 2 until leg measures about 1⁄2"/13 mm from crotch.
- Next Rnd: FLsc in each sc around.
- Next Rnd: BLsc in each sc around.
- Lightly stuff the leg with fiberfill.
- Decrease Rnd 1: *Sc in next st, sc2tog; repeat from* around. You now have 12 sc.
- Next Rnd: (Sc2tog) around. You now have 6 sc. Fasten off, leaving a 6"/15 cm tail. With yarn needle, weave the tail through remaining 6 sts and pull tight to close. Weave in ends.
The Left Leg
- Rnd 1: With RS facing, standing sc in first sc at crotch opening, sc in each sc around remaining body sts. You now have 18 sc.
- Complete as for right leg.
Crocheting the Arms
- Mark sides of doll. Beginning just below the neck and working downward toward the waist, join yarn and work 6 sc evenly spaced along center side line, turn, work 6 sc evenly spaced up side toward neck. You now have 12 sc. Do not join. Pm in the first st of the rnd and move it up as you work the rnds.
- Continuing in rnds without joining, sc in each sc around until arm measures 3⁄4"/2 cm from the body.
- Lightly stuff the arm with fiberfill.
- Decrease Rnds: Sc2tog around until 3 sts remain. Fasten off, leaving a 6"/15 cm tail. With yarn needle, thread the tail through the remaining 6 sts and pull tight to close. Weave in ends.
- On opposite side of doll, repeat the above rnds for the second arm.
Crocheting the Hat
- Locate the middle round of the head.
- Rnd 1: Beginning at center back head with doll’s feet toward you and head facing away, standing sc in first sc, sc in each sc around, join with slip st to first sc. You now have 30 sc.
- Rnds 2 and 3: Ch 1, sc in each sc around, join with slip st to first ch.
- Fasten off.
Crocheting The Flower (make 2)
- With pearl cotton, make an adjustable ring.
- Rnd 1: Ch 1, work 6 sc in ring, join with slip st to first sc. You now have 6 sts.
- Rnd 2: Ch 1, 2 sc in each st around, join with slip st to first ch. You now have 12 sc. Fasten off, leaving a 6"/15 cm tail.
Finishing
- Use the beginning and ending tails to attach the flowers securely to the head just above the rim of the hat. Weave in ends. Tie the ribbon around the doll’s neck and tack in place with needle and thread.