Finding and Organizing Messages with Search Folders 288
Finding Messages with Windows Search 291
Flagging and Monitoring Messages and Contacts 293
Grouping Messages by Customizing the Folder View 298
Filtering a View Using Categories 299
Managing Email Effectively 299
WITHOUT some means of organizing and filtering email, most people would be inundated with messages, many of which are absolutely useless. Fortunately, the Microsoft Outlook 2010 junk email filters can take care of most of, if not all, the useless messages. For the rest, you can use several Outlook 2010 features to help you organize messages, locate specific messages, and otherwise get control of your Inbox and other folders.
This chapter shows you how to customize your message folder views, which will help you organize your messages. You’ll also learn about the Outlook 2010 search folders, which give you a great way to locate messages based on conditions that you specify and to organize messages without adding other folders to your mailbox. This chapter also explains how to use categories and custom views to organize your messages.
Outlook 2010 adds some new features for working with message threads, also called conversations. A message conversation comprises the original message and all of the replies that result from the original message. Outlook 2010 offers a new Conversation view that organizes all the messages in a conversation into an expandable/collapsible branch (see Figure 10-1).
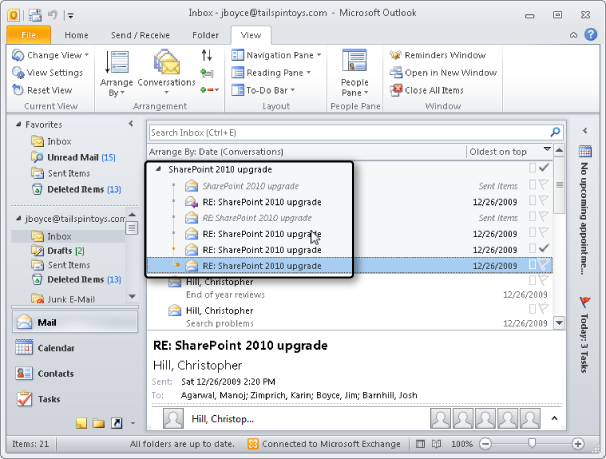
The messages in a conversation need not be in the same folder. In fact, the Conversation view works much like a search folder (discussed later in this chapter) in that it locates and displays the related messages regardless of where they are located. So, for example, it shows your replies from the Sent Items folder, any replies in your Inbox, and any replies that you have filed in other folders.
If you are using a different view and want to switch to Conversation view, click the View tab on the Ribbon and click Date (Conversations) in the Arrangement group. You’ll also find a handful of options under the Conversations group on the View ribbon that control the view. The first is a check box; the rest appear when you click Conversation Settings. These include:
Show Message In Conversations Select this option to turn on or off Conversation view.
Show Messages From Other Folders Select this option to have Outlook include related messages from other folders (such as Sent Items) in addition to those in the current folder.
Show Senders Above The Subjects List all senders for the conversation above the subject line.
Always Expand Conversations Select this option if you want Outlook to always expand conversations so you can see all the messages in them without having to expand them yourself.
Use Classic Indented View Select this option if you want the messages in the conversation to be indented to visually show the order in which you received them.
Tip
The Conversation view displays a dotted line that shows the relationship between messages in the conversation (which message replies to which other message). Click a message in the conversation to see its relationship.
Another benefit of the new conversation features of Outlook 2010 is the capability to delete messages with duplicated content automatically. For example, assume that you send a message to someone, who sends a reply. You reply to that message, and then receive another reply. So far, that’s four messages. Each time there was a reply, the content of the original message and all the replies were duplicated. So, in reality, the last message contains not only the original message but all the replies. If all you need is the conversation and not the individual messages, why not just delete those first three messages and keep the fourth?
That’s a simple scenario, but assume that you sent the message to 10 people, most replied to all at least once, and some messages bounced back and forth between people several times. At the end of the day, you have 30 messages on the same conversation, most of which are essentially duplicates of the others, but some have a little added content that the others don’t have.
This is where the conversation cleanup in Outlook 2010 comes into play. It searches through the messages, finds the ones with duplicate content, and deletes them. The ones with unique content, it keeps. The result is that you have all the content from the conversation but have reduced the message count by a potentially significant amount, perhaps 50 percent or more. By default, when you run a cleanup, Outlook puts the duplicate messages in the Deleted Items folder of the account in which the messages are stored.
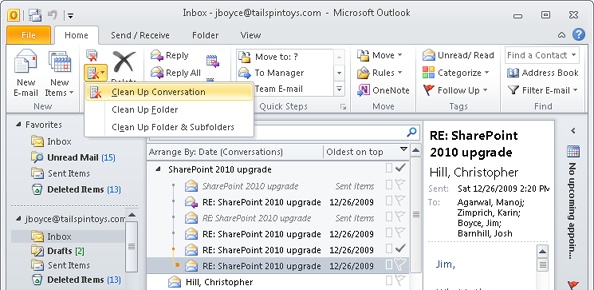
You have three different levels at which you can run a cleanup: selected conversation, all conversations in the folder, and all conversations in the folder and all subfolders. To clean up a single item, click the conversation and then, on the Home tab of the Ribbon, click the Clean Up button and choose Clean Up Conversation (see Figure 10-2). If you want to clean up the whole folder, choose Clean Up Folder or Clean Up Folders and Subfolders, depending on whether you want to get the subfolders, too.
As you might have guessed, you have a handful of options that control how conversation cleanup works. To set these options, click File, Options, Mail, and scroll down to the Conversation Clean Up group (see Figure 10-3).
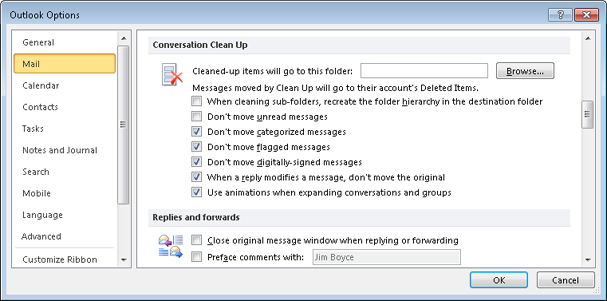
The options are generally self-explanatory. You can choose the folder in which to put the cleaned-up messages (by default, the Deleted Items folder), and also specify whether Outlook will move unread, categorized, flagged, or digitally signed messages. You can also direct Outlook not to move the original message if a reply to that message modifies the original.
Tip
Until you remove the messages permanently from the Deleted Items folder, you can recover just as you would any other deleted item. On a Microsoft Exchange Server mailbox, you can recover them up until the point at which the retention period defined by the Exchange Server administrator causes the messages to be purged from your mailbox.
No doubt you’ve received messages that you didn’t really need to be copied on, or that you simply don’t care about. Or, maybe you’ve received one of those messages where some hapless soul has sent a message to 1,000 users. Some of those people reply to all, and pretty soon there are people replying to all telling everyone not to reply to all! Don’t you wish you could ignore those messages? Well, you can in Outlook 2010.
Click a conversation to select it and then click Ignore Conversation in the Delete group on the Home tab of the Ribbon. After prompting you to confirm the action, Outlook moves all the current messages in the conversation to the Deleted Items folder (or other folder that you have designated in Outlook Options), and also automatically moves all future messages in that conversation there, as well.
I confess that I am an email pack rat. I have every message from my Exchange Server mailbox for the past five years, the length of time I’ve been with my current employer. What isn’t in my mailbox on the server is in one or more .pst files on my hard drive. Conversation cleanup is the middle ground between keeping all those messages or keeping none. You can keep the gist of all your email conversations without keeping every single message. That means potentially keeping your mailbox a more manageable size or having to archive less frequently. In either case, cleaning up the redundant messages reduces storage requirements on your server, your local computer, or both by reducing the sheer number of messages in your mail store.
If you have Exchange Server in your organization, you might already have an archiving solution in place like those from Mimosa Systems, EMC, or others. Generally, these solutions archive all messages that come into your mailbox, eliminating the need for you to archive items to a .pst on your local computer (and thereby avoiding the security risks associated with local .pst files). With an archiving solution in place, conversation cleanup makes even more sense, because all the messages in the conversation will be in your archive if you need them. Clean away!
The Outlook 2010 search folders are an extremely useful feature for finding and organizing messages. A search folder isn’t really a folder but rather a special view that functions much like a separate folder. In effect, a search folder is a saved search. You specify conditions for the folder, such as all messages from a specific sender or all messages received in the last day, and Outlook 2010 displays in that search folder view those messages that meet the specified conditions.
In a way, a search folder is like a rule that moves messages to a special folder. However, although the messages seem to exist in the search folder, they continue to reside in their respective folders. For example, a search folder might show all messages in the Inbox and Sent Items folders that were sent by Jim Boyce. Even though these messages appear in the Jim Boyce search folder (for example), they are actually still located in the Inbox and Sent Items folders.
It isn’t difficult at all to use a search folder. The Folder List includes a Search Folders branch, as shown in Figure 10-4, that lists all the search folder contents. Simply click a search folder in the Folder List to view the headers for the messages it contains.

A new installation of Outlook 2010 includes four search folders by default, which you can use as is or customize to suit your needs:
Categorized Mail This search folder shows all messages that have categories assigned to them.
Fax If you are connected to an Exchange Server mailbox with unified messaging enabled, this search folder will enable you to see all received faxes in your mailbox.
Unread Mail This search folder shows all messages that are unread.
Voice Mail If you are connected to an Exchange Server mailbox with unified messaging enabled, this search folder shows all received voice-mail messages.
To customize an existing search folder, open the Folder List, right-click the folder, and then choose Customize This Search Folder to open the Customize dialog box, similar to the one shown in Figure 10-5.
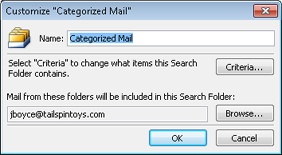
Figure 10-5. Set the criteria or folders to include for a search folder in the Customize dialog box.
You can change the name of the search folder in the Name box in the Customize dialog box. To change the criteria for the search folder, click the Criteria button to display a dialog box that enables you to change your selection. The dialog box that appears depends on the criteria that you used when you created the folder. For example, if you are modifying a search folder that locates messages from a specific sender, Outlook 2010 displays the Select Names dialog box so that you can specify a different person (or additional people).
To change which folders are included in the search folder, click Browse in the Customize dialog box to open the Select Folder(s) dialog box. Select each folder that you want to include, or select the Personal Folders or Mailbox branch to include all folders in the mail store in the search. Select the Search Subfolders option to include all subfolders for a selected folder in the search. When you have finished selecting folders, click OK, and then click OK again to close the Customize dialog box.
If the default search folders don’t suit your needs, you can create your own search folder with the criteria and included subfolders that locate the messages you want. To create a search folder, right-click the Search Folders branch, and then choose New Search Folder to open the New Search Folder dialog box, shown in Figure 10-6.

The New Search Folder dialog box provides several predefined search folders, and you can create a custom search folder easily by choosing one from the list. If the search folder you select requires specifying additional criteria, click the Choose button to open a dialog box in which you specify the criteria. Then, in the New Search Folder dialog box, select an account in the Search Mail In drop-down list to search that account.
Note
The Choose button appears in the New Search Folder dialog box only if the selected search folder requires additional configuration, such as the sender’s name.
If the predefined search folders won’t do the trick, scroll to the bottom of the Select A Search Folder list, select Create A Custom Search Folder, and then click Choose to open the Custom Search Folder dialog box to specify a custom criterion for the search folder, a search folder name, and subfolders to include.
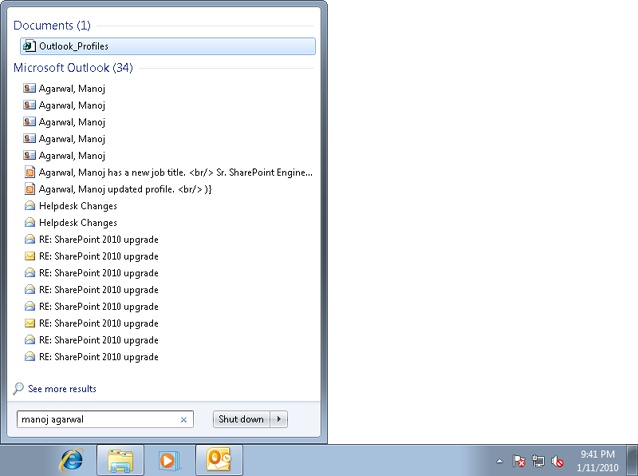
If you are running Outlook 2010 on Windows 7 (or other version of Windows with Windows Search installed), you have some additional ways to search for messages outside of Outlook that can be very handy. To search for any item in Windows, whether in Outlook or not, click Start and start typing in the Search Programs And Files text box. As you type (assuming that indexing is enabled and has finished indexing the content on your computer), results appear above the text box that match your search. For example, Figure 10-7 shows a quick search for items related to Manoj Agarwal. In this example, Windows 7 found an Outlook profile, contacts, Really Simple Syndication (RSS) messages, and email.
You can refine a search in Windows further by using keywords. For example, to find messages with “SharePoint” in the subject, type the following in the Search Programs And Files text box:
Subject:SharePoint
That will return results for messages containing SharePoint in the subject, but will also return other items, such as documents with SharePoint in the title. You can restrict your searches to Outlook items using a handful of keywords. Table 10-1 lists some useful, Outlook-related Windows search keywords to help you refine a search.
Table 10-1. Outlook-Related Windows Search Keywords
Description | Keyword | Example |
|---|---|---|
Email sender | from | from:Manoj Agarwal |
Has an attachment | attachment | has:attachment |
Is an attachment | attachment | is:attachment |
Size of an item | size | size:>2MB |
Date of an item | date | date:>2/15/10<=3/15/10 |
Is an email | kind | kind:email |
Is a contact | kind | kind:contact |
Is a meeting | kind | kind:meetings |
Restrict search to Outlook | store | store:mapi |
Search by subject | subject | subject:sharepoint |
Sent to someone | to | to:Manoj Agarwal |
Copied to someone | cc | cc:Manoj Agarwal |
Has a specified category | category | category:Toy Show |
From a specified person | from | from:manoj agarwal |
Received on a certain date | received | received:yesterday |
Sent on a certain date | sent | sent:today |
Sent to a specific address | toaddress, to | toaddress:magarwal@tailspintoys.com |
The item has been read | isread | isread:false |
Tip
Table 10-1 contains just some of the Outlook-related search terms that you can use to locate items. There are many others that are specific to the Outlook data types, including contacts, email messages, and calendar items. You’ll find a complete description at http://www.microsoft.com/windows/products/winfamily/desktopsearch/technicalresources/advquery.mspx.
Keep in mind that you can limit your search to Outlook by using store:mapi in the search string. Also, you can use multiple search criteria to refine a search. For example, assume that you want to search only Outlook for email messages from Manoj Agarwal that have an attachment larger than 2 MB and were sent yesterday. Here’s the search syntax to use:
store:mapi kind:email from:manoj agarwal hasattachment:true size:>2MB sent:yesterday
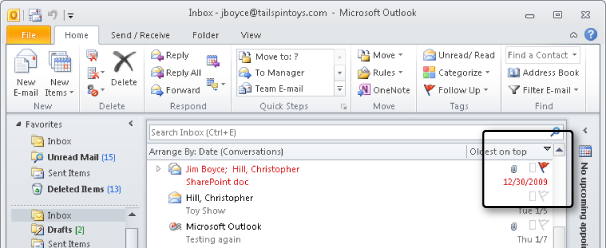
Outlook 2010 allows you to flag a message to draw your attention to the message and display an optional reminder when the follow-up action is due. The flag appears in the message header, as shown in Figure 10-8.
Outlook 2003 offered six flag types, compared with just one in earlier versions. In Outlook 2010, as in Outlook 2007, colored flags are replaced by color categories, reducing follow-up flag colors to red and a few shades of pink. You can choose from one of five predefined flags or choose a custom flag. The predefined flags have date specifications of Today, Tomorrow, This Week, Next Week, and No Date. If you choose the custom flag option, you can specify any date you want. The predefined dates therefore give you a quick and easy way to assign a general follow-up date, while the custom option lets you specify a specific date.
Note
See Chapter 5, to learn more about color categories.
You can flag messages that you’ve received from others, as well as those you’ve sent. This capability gives you a way to flag and follow up messages from your end. You can flag messages in any message folder, including the Sent Items folder.
Tip
INSIDE OUT Add notes to received messages
You can use flags to add notes to messages you receive from others, giving yourself a quick reminder of pending tasks or other pertinent information. Outlook 2010 can generate a reminder for you concerning the flagged item. To set up Outlook 2010 to do so, right-click the message, choose Follow Up, Add Reminder, and then set a due date and time.
Follow these steps to flag a message you have received (or a message that resides in the Sent Items folder):
Locate the message that you want to flag.
Right-click the message, choose Follow Up, and then select a follow-up period from the cascading menu (Today, Tomorrow, and so on), or to specify a custom date, choose Custom.
If you chose Custom, enter the follow-up action text in the Flag To field or select an existing action from the drop-down list, and then specify a start date and an end date.
Click OK.
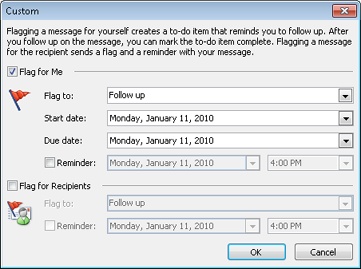
With Outlook 2010, you can flag outgoing messages for follow-up for yourself, the recipient, or both. So, the capability to flag an outgoing message lets you set a reminder on the message to follow up on the message yourself. For example, you might send an email message to a coworker asking for information about a project. The follow-up flag could remind you in a week to follow up if you haven’t had a response. You can also flag a message to generate a reminder on the recipient’s computer.
Use the following steps to flag a message you send:
With the message form open prior to sending the message, on the Message tab on the Ribbon, in the Tags group, click Follow Up, and then click Add Reminder to open the Custom dialog box, shown in Figure 10-9.
In the Flag To drop-down list, select the text you want to include with the flag, or type your own text in this box.
If you want to include a due date and a subsequent reminder, select the date in the Due Date drop-down list, which opens a calendar that you can use to select a date. Alternatively, you can enter a date, day, time, or other information as text in the Due Date box.
Click OK, and then send the message as you normally would.
Follow these steps to flag a message for follow-up on the recipient’s computer:
Open a new message form, and then click Follow Up in the Options group on the Message tab.
Choose Add Reminder to open the Custom dialog box.
Select the Flag For Recipients option, and then select the follow-up action in the Flag To drop-down list.
Specify a reminder, and then click OK.
Complete the message, and then send it.
A flag icon appears next to the message header for flagged messages in the message folder. If you have configured Outlook 2010 to display the Reading pane, the flag text appears in the InfoBar. The flag icons also help you to identify flagged messages regardless of whether the Reading pane is displayed. You can sort the view in the folder using the Flag column, listing all flagged messages together to make them easier to locate. To view the flag text when the Reading pane is turned off, simply open the message. The flag text appears in the message form’s InfoBar.
Outlook 2010 has no special mechanism for processing flagged messages other than the reminders previously discussed. You simply call, email, or otherwise respond based on the flag message. To change the flag status, simply click the flag, or right-click a flagged message and then choose Mark Complete. To remove the flag from the message, right-click a flagged message, and then choose Clear Flag.
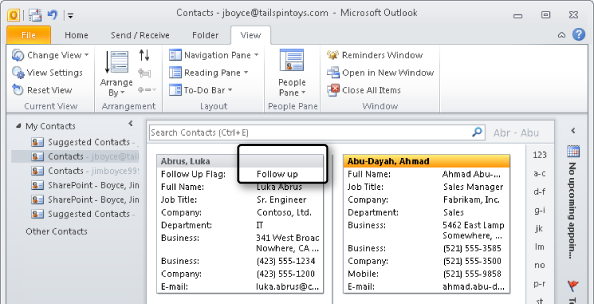
You can flag contact items as well as messages, marking them for follow-up or adding other notations to an item. For example, you might flag a contact item to remind yourself to call the person by a certain time or date or to send documents to the contact. A flag you add to a contact item isn’t always readily apparent because the flag shows up as text, as shown in Figure 10-10. As you can for messages, you can use one of the Outlook 2010 predefined flags to mark a contact item, or you can specify your own flag text. Figure 10-11 shows that you can organize items by flag status.
Note
The flag field does not appear in Business Card view. In some of the other views, you can use the Field Chooser to add the Follow Up Flag field to the view.

Flagging a contact is easy—just right-click the contact, choose Follow Up, and then select a follow-up date. To assign a custom flag to a contact item, follow these steps:
Outlook 2010 does not use icons to represent flag status for contact items. You cannot format the Follow Up Flag column to display as anything other than text. To change the flag status for a contact item, right-click the item and then choose Mark Complete or Clear Flag.
To help you organize information, Outlook 2010 allows you to customize various message folder views. By default, Outlook 2010 displays only a small selection of columns for messages, including the From, Subject, Received, Size, Flag, Attachment, and Importance columns.
Note
For details on how to add and remove columns from a folder view to show more or less information about your messages, see the section Working with the Standard Outlook Views, on page 72.
You can sort messages easily using any of the column headers as your sort criterion. To view messages sorted alphabetically by sender, for example, click the column header of the From column (simple list views only). To sort messages by date received, click the column header of the Received column. Click the Attachment column header to view all messages with attachments.
In addition to managing your message view by controlling columns and sorting, you can group messages based on columns. Whereas sorting allows you to arrange messages in order using a single column as the sort criterion, grouping allows you to display the messages in groups based on one or more columns. For example, you might group messages based on sender, and then on date received, and finally on whether they have attachments. This method helps you locate messages more quickly than if you had to search through a message list sorted only by sender.
Grouping messages in a message folder is a relatively simple process:
As explained in Chapter 5, color categories in Outlook 2010 make it very easy to identify specific messages or types of messages. For example, you might categorize messages you receive from specific people so that you can see at a glance that a message is from a particular person without grouping on the From field.
In some situations, you might want to customize a view so that you see only messages that fall into certain categories. For example, assume that you have categorized messages for two projects, each with a unique category. Now you want to view all messages from both projects. The easiest way to do that is to filter the view so that it shows only messages with those two categories assigned to them. You can do that using a custom view or a search folder. Both of these methods are explained in the section Viewing Selected Categories Only, on page 127.
Before we offer tips on effective email management, let’s ask the question, “Why bother?” If you receive a large number of messages, the answer is probably staring you in the face—a chaotic Inbox full of messages. With a little bit of planning and effort, you can turn that Inbox into … well … an empty Inbox! When you leave the office at the end of the day with an empty Inbox, you’ll be amazed at the sense of accomplishment you’ll feel.
Here are some tips to help you get control of your mailbox:
Use Conversation view Take advantage of the new conversation features in Outlook 2010 to help you quickly organize messages by topic, clean up your Inbox, and ignore those inevitable message threads that are just not applicable or of interest to you.
Categorize, categorize, categorize Categorizing your messages offers several benefits. First, with color categories in Outlook 2010, assigning categories to messages will help you quickly identify specific types of messages. Second, you’ll be able to search for messages by category with filtered views, search folders, and the search features built into Outlook 2010. You can assign categories manually or assign them automatically with rules. Whatever the case, the more diligent you are in assigning categories, the more useful they will be for finding messages and organizing your mailbox.
Organize with folders Although you could simply leave all messages in the Inbox, moving messages into other folders will unclutter your Inbox and help you locate messages when you need them. There is no right or wrong way to structure your message folders—use whatever structure and number of folders suits the way you work. What is important is that you organize in a way that suits you.
Organize with rules Use rules to move messages into other folders, assign categories, and otherwise process messages when they arrive in your Inbox. Rules enable you to organize your messages automatically, potentially saving you an enormous amount of time.
Let search folders organize for you Search folders are an extremely useful feature in Outlook 2010. With a search folder, you can organize messages based on almost any criteria without actually moving the messages from their current locations. Search folders take very little effort to set up and offer you the benefit of being able to search your entire mailbox for messages that fit the search criteria. You can bring together in one virtual folder all messages in your mail store that fit the search criteria.