Using the Quick Access Toolbar 70
Understanding the Outlook Folders 70
Working with the Standard Outlook Views 72
Using Other Outlook Features 100
Configuring Outlook Options 107
IF you’ve used earlier versions of Microsoft Outlook, you’ll find that the interface in Outlook 2010 has both changed and stayed the same. Many elements are the same or similar to previous versions, but there are some big changes, such as the presence of the ribbon throughout the program. If you have worked with Office 2007 or with other Office 2010 applications, you’re no doubt familiar with the ribbon and can make the transition in Outlook without too much trouble. If you’re new to Outlook 2010 entirely, you need to become familiar with its interface, which is the main focus of this chapter.
Outlook 2010 presents your data using different views, and this chapter shows you how to customize the way those views look. This chapter also examines other standard elements of the interface, including the ribbon, toolbars, the Navigation pane, the Folder list, and the Reading pane. You’ll also learn how to use multiple Outlook 2010 windows and views and navigate your way through the Outlook 2010 interface.
This chapter looks at the various ways you can configure Outlook 2010, explaining settings that control a broad range of options, from email and spelling to security. In addition, you’ll learn about settings in your operating system that affect how Outlook 2010 functions. Where appropriate, the text refers you to other chapters where configuration information is discussed in detail in the context of a particular feature or function.
This chapter also examines web integration in Outlook 2010. You’ll learn about browsing the web with Outlook 2010 and about accessing your Microsoft Exchange Server email through a web browser. Later in the chapter, you’ll find a discussion of add-ins, which can enhance Outlook 2010 functionality.
Before diving into Outlook folders and how to use them, let’s take a look at the most obvious interface change in Outlook 2010, the ribbon. Unlike previous versions of Outlook that used a combination of menus and toolbars, Outlook implements the full Office ribbon interface to give you access to commands, options, and tools in Outlook 2010. The ribbon is shown in Figure 4-1.

The ribbon is something of a paradigm shift. Rather than provide a linear, menu-based list of commands, the ribbon places features onto individual tabs, each of which comprises tools with related functions. For example, all the tools that relate to inserting items into a new message are located together on the Insert tab of the new message form.
Each ribbon tab is divided into groups, and each group organizes the features for a specific function. On the Message tab of the new message form, for example, the Basic Text group organizes the tools you use to format text in the message.
The ribbon operates in the context of the currently selected folder. For example, when you have the Inbox open, the tabs and commands in the ribbon apply primarily to the Inbox. For example, when the Inbox is open, the New group on the Home tab shows a New E-mail button that, when clicked, starts a new email message. Likewise, when the Calendar folder is open, the buttons offered are New Appointment and New Meeting. Other tabs and commands change as well, such as the commands on the View menu, which show view choices for the selected folder.
You’ll see at least four tabs in the ribbon regardless of which folder is open, and the Search tab appears when you click in the Search box. These tabs include:
Home This tab is the place to go to create new items and access the most common commands for items in the selected folder. For the Inbox, for example, the Home tab contains commands for replying to messages, creating and using Quick Steps, moving messages, and other common email tasks.
Send/Receive Use this tab to synchronize folders (send/receive email, for example), show send/receive status, and set connection and download preferences.
Folder Use this tab to access folder-specific tasks such as setting permission for a folder, cleaning up the folder, recovering deleted items, and so on.
View Use the View tab to access various views for the current folder, create and manage views, and set options for the various interface panes (such as the Navigation pane).
Search This tab appears only when you click in the Search box, and it offers options that you can use to define your search criteria and access search options and other tools.
In addition to these tabs, Outlook will show other tabs as appropriate. For example, when you click an appointment in the Calendar, Outlook displays the Calendar Tools/Appointment tab, which includes commands that are specific to the appointment. If you click a meeting, Outlook shows the Calendar Tools/Meeting tab. The important point is that these tabs are context-sensitive and apply to the selected item.
As described briefly in Chapter 1, like the other Office applications, Outlook uses the Backstage view (see Figure 4-2) to give you access to commands and options formerly found on the File menu, and it also integrates many of the commands from the former Tools menu. For example, you can access account settings, open files, print, set up Out of Office replies, clean up the mailbox, and access rules and alerts from the Backstage view.
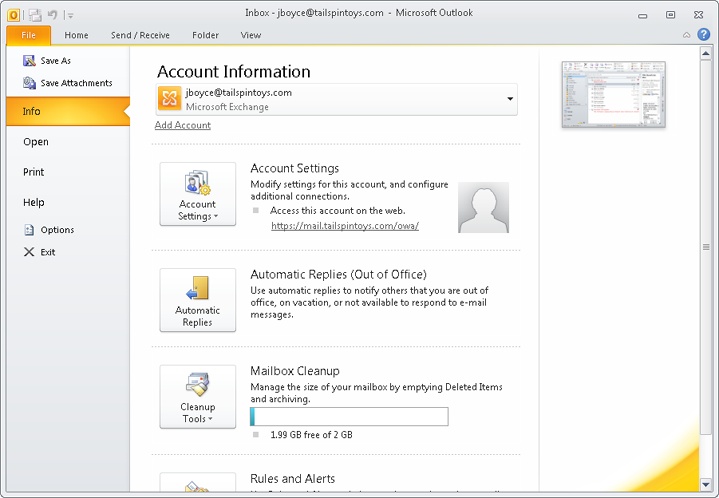
Figure 4-2. Use the Backstage view to access account settings and other general Outlook options and commands.
The Backstage view is fairly self-explanatory. Individual items are covered where applicable throughout this book. To return to your Outlook folders, just click one of the other ribbon tabs.
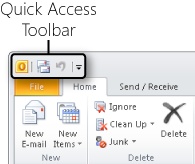
Outlook, like the other Office applications, provides a Quick Access toolbar that, as its name implies, gives you quick access to commonly used commands and options (see Figure 4-3). By default, the Quick Access toolbar contains only two commands: Send/Receive All Folders and Undo. To use one of these commands, just click its button. If you want to move the toolbar below the ribbon instead of above it, click the small arrow button at the right of the toolbar and choose Show Below the Ribbon. Click the button again and choose Show Above the Ribbon to move it back to its default location.
Tip
As you might expect, you can customize the ribbon to suit your liking. See Chapter 25, for details on customizing the ribbon and the Quick Access toolbar.
Outlook 2010 uses a standard set of folders to organize your data. Once you’re comfortable working with these standard folders, you’ll be able to change their location, customize their appearance, or even create additional folders, as you’ll learn throughout this book.
The following list describes the default Outlook 2010 folders:
Calendar This folder contains your schedule, including appointments, meetings, and events.
Contacts This folder stores information about people, such as name, address, phone number, and a wealth of other data.
Deleted Items This folder stores deleted Outlook 2010 items of various types (contacts, messages, and tasks, for example). You can recover items from the Deleted Items folder, giving you a way to “undelete” an item if you’ve made a mistake or changed your mind. If you delete an item from this folder, however, the item is deleted permanently.
Drafts Use this folder to store unfinished drafts of messages and other items. For example, you can use the Drafts folder to store a lengthy email message that you haven’t had a chance to finish yet. Or you might start a message, have second thoughts about sending it, and place it in the Drafts folder until you decide whether to send it.
Inbox Outlook 2010 delivers your email to this folder. Keep in mind that, depending on the types of email accounts in your profile, you might have more than one Inbox in locations other than your default information store. For example, if you have a Hotmail account and an Exchange Server account, you’ll have an Inbox folder for each.
Journal This folder stores your journal items, allowing you to keep track of phone calls, time spent on a project, important email messages, and other events and tasks.
Junk E-Mail This folder contains items that have been placed there by the Outlook Junk E-Mail Filter. This filter is designed to divert the most obvious spam, and you can customize it to suit your needs.
News Feed This folder stores news feed items delivered through the Outlook Social Connector.
Notes This folder stores and organizes notes. You can move or copy notes to other folders in Outlook 2010, as well as to folders on disk. You can also create shortcuts to notes.
Outbox The Outbox stores outgoing messages until they are delivered to their destination servers. You can configure Outlook 2010 to deliver messages immediately after you send them or have the messages wait in your Outbox until you process them (by synchronizing with the computer running Exchange Server or by performing a send/receive operation through your POP3 account, for example).
RSS Feeds This folder stores Really Simple Syndication (RSS) content. RSS is a way for content publishers to make news, blogs, and other content available to subscribers.
Search Folders Search folders are special virtual folders that you can use to search for and display messages in a familiar folder structure. The folders look like regular Outlook folders, but the messages that appear in them can actually be located in multiple places.
Sent Items This folder stores copies of the messages you have sent. You can configure Outlook 2010 to store a copy of each sent item in this folder automatically.
Suggested Contacts This folder shows the email addresses for people who have emailed you or who you have emailed that are not already in your Contacts folder.
Sync Issues This folder contains synchronization status messages (essentially a log of mailbox synchronization errors).
Tasks This folder lists tasks that have been assigned to you or that you have assigned to either yourself or others.
Before you can become proficient at using Outlook 2010, you need to be familiar with its standard views and other elements of its interface. This section introduces you to the Outlook 2010 standard views and includes information about how to work with these views and customize them to meet your needs.
Outlook 2010 provides default views of its standard folders as well as one additional view that is a summary of your schedule, tasks, and email for the current day—Outlook Today. To switch to Outlook Today view if you are working in another folder, click the root of your default mail store in the Navigation pane, which is identified in the Folder pane by your email address (in other words, click your email address in the Navigation pane). Figure 4-4 shows a typical Outlook Today view. In the Calendar area on the left, Outlook 2010 summarizes your schedule for the current day, showing each appointment with time and title. You can view the details of a particular appointment easily by clicking the appointment time or title to open it.
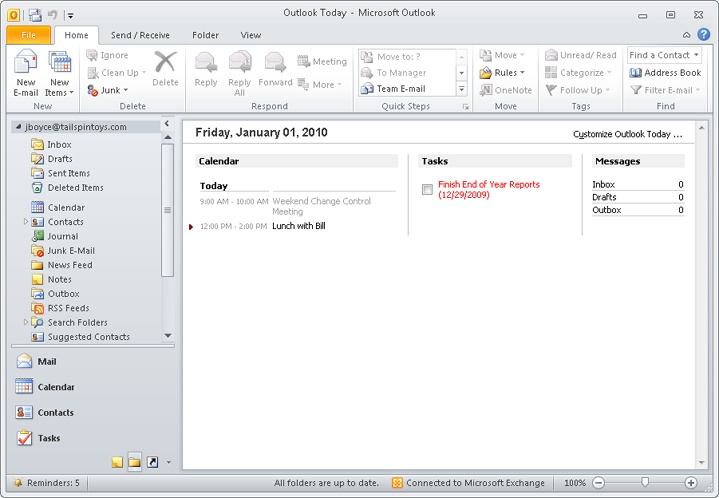
In the Tasks area, Outlook Today lists your tasks for the current day, including overlapping tasks with a duration of more than one day. The list includes a title and completion date for each task, along with a check box. You can mark the task as completed by selecting the check box; doing so crosses out the task on the list. If the check box is cleared, the task is incomplete.
In the Messages area, Outlook Today lists the number of unread messages in your Inbox and number of messages in the Drafts and Outbox folders.
Note
For details on customizing the Outlook Today view to display additional information, including the use of Hypertext Markup Language (HTML) code in such customization, see Chapter 25.
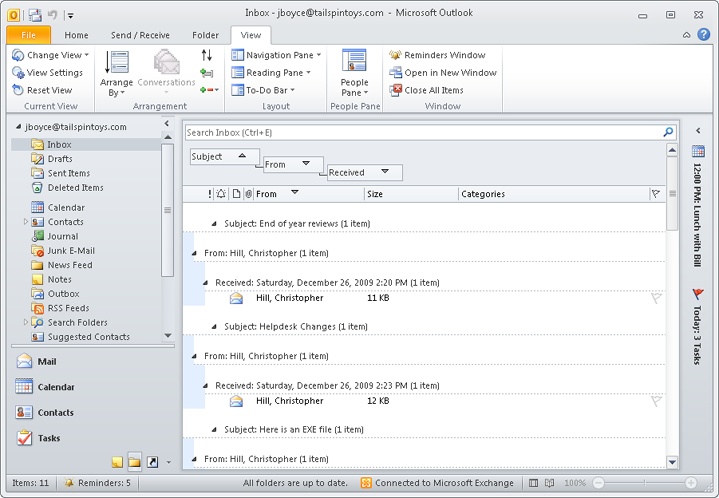
The Inbox displays your default message store, as shown in Figure 4-5. For example, if you use an Exchange Server account, the Inbox view shows the Inbox folder in your Exchange Server mailbox. If you are using a mail account that stores data in a local .pst file, the Inbox view shows the contents of the Inbox folder in that store.

As you can see, the Inbox view shows the message header for each message, including such information as sender, subject, and date and time received in various columns. These columns are not always visible, however, because the default configuration includes the Reading pane on the right in the Outlook 2010 window, which hides many of the columns on a typical display. If you turn off the Reading pane or move it to the bottom of the window, you can view the message header columns.
You can sort messages easily by clicking the column header for the column you want to use as the sort criterion. For example, to locate messages from a specific sender quickly, you can click the From column header to sort the list alphabetically by sender. To switch between ascending and descending sort, simply click the column header again. An up arrow next to the column name indicates an ascending sort (such as A to Z), and a down arrow indicates a descending sort (such as Z to A).
Note
To learn how to add and remove columns and change their appearance and order, see the section Customizing the Inbox View, on page 78.
By default, Outlook 2010 shows the following columns in the Inbox view when the Reading pane is either off, displayed at the bottom of the window, or taking a minimal amount of space on the right in the window:
Importance This column indicates the level of importance, or priority, that the sender has assigned to a message—Low, Normal, or High. A high-priority message is accompanied by an exclamation point, whereas a down arrow marks a low-priority message. No symbol is displayed for a message of normal importance.
Reminder This column indicates whether messages have a reminder associated with them (a bell icon indicates a reminder).
Icon This column indicates the type of message and its status. For example, unopened messages are accompanied by a closed envelope icon, and opened messages are accompanied by an open envelope icon.
Attachment This column displays a paper clip icon if the message includes one or more attachments. Right-click a message and choose View Attachments to view the attachments, or simply double-click an attachment in the Reading pane.
Caution
Although Outlook 2010 provides protection against viruses and worms by preventing you from opening certain types of attachments and opening Office file types in Protected View, this is no guarantee against infection. Your network administrator might have modified the blocked attachment lists, or you might have modified your blocked attachment list locally to allow a specific attachment type that may be susceptible to infection to come through. So you should still exercise caution when viewing attachments, particularly from unknown sources. It’s a good practice to save attachments to disk and run a virus scan on them before opening them.
From This column shows the name or address of the sender.
Subject This column shows the subject, if any, assigned by the sender to the message.
Received This column indicates the date and time that Outlook 2010 received the message.
Size This column indicates the overall size of the message, including attachments.
Categories This column shows the color indicators for color categories assigned to the message.
Flag Status In this column, you can flag messages for follow-up action. For example, you can flag a message that requires you to place a call, to forward the message, or to respond at a particular time. You specify the action, date, and time for follow-up.
Note
For detailed information about flagging messages for follow-up and other ways to manage and process messages, see the section Flagging and Monitoring Messages and Contacts, on page 293.
Tip
The date and time displayed in the Inbox’s Received column can be a little deceiving. This data reflects the time the message was placed in your message store (received by the server). If you’re working online with an Exchange Server account, for example, Outlook 2010 shows the time the message was placed in the Inbox folder for your mailbox on the computer running Exchange Server. If the time on your computer isn’t coordinated with the time on the server, the time you actually receive the message could be different from the time reflected in the message header. For sent messages (in the Sent Items folder), the time indicated is the time the message was placed in your Outbox. If you’re working offline, that time could differ from the time the message is actually sent.
Another part of the Inbox view is the Reading pane, which appears on the right in the Inbox view. You can use the Reading pane to preview messages without opening them in a separate window, as well as preview attachments without opening them. The scroll bar on the right of the Reading pane lets you scroll through the message or attachment. The top of the Reading pane presents information about the message, such as sender, recipient, subject, and attachments.
You can double-click most of the items in the Reading pane header to see detailed information about the items. For example, you can double-click the name of the sender to display information about the sender, as shown in Figure 4-6. Use this method to view quickly other information about the contact, such as phone number. You can also double-click attachments to open them. Right-clicking an item opens its shortcut menu, on which you can choose a variety of actions to perform on the item—for instance, you can right-click an attachment and choose Save As to save the attachment to disk. Experiment by right-clicking items in the Reading pane to see which actions you can take for specific items.
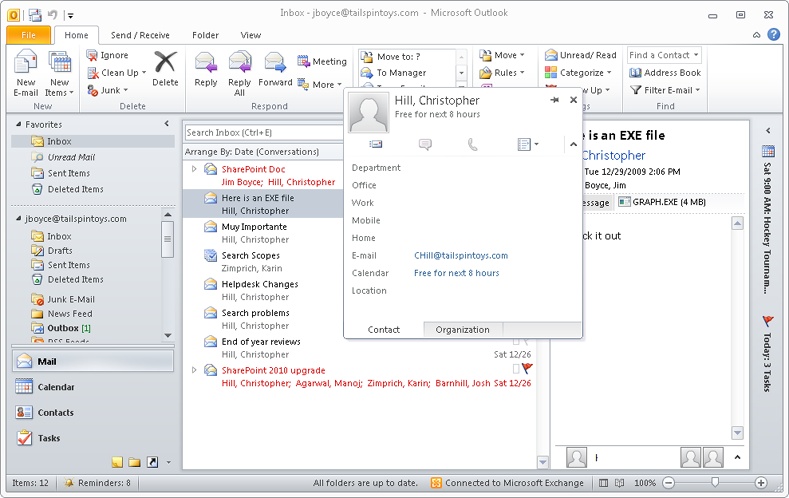
Figure 4-6. After you double-click a sender’s address in the Reading pane, Outlook displays information about the sender.
Note
The information that Outlook 2010 displays when you double-click the name of the sender of an email message in the Reading pane depends on whether the sender is in your Contacts folder, in the Global Address List (GAL; Exchange Server accounts), or not in either.
Note
If a message has been flagged for follow-up, information about the follow-up (the specific action, the date due, and so on) also appears in the Reading pane header.
Note
To turn the Reading pane on or off, click the View tab, click Reading Pane, and then choose Right, Bottom, or Off. To change the location of the Reading pane, click the View tab, click Reading Pane, and then choose Right or Bottom.
Note
For detailed information about using and customizing the Reading pane in various folders, see the section Using the Reading Pane, on page 104.
On the View tab of the ribbon, you’ll find a Change View button in the Current View group. Clicking Change View displays the following three options:
Compact This view shows the From, Subject, Received, Quick Click Category, and Flag Status columns in two lines for each message. This is the same as the two-line view option in previous versions of Outlook.
Single This view shows the default columns described previously in this chapter using a single line for each message.
Preview This view turns off the Reading pane and shows a single-line view of your message headers with the first few lines of the message text displayed below the header. This is essentially the same as the AutoPreview view in previous Outlook versions.
Outlook 2010 offers a wealth of settings that you can use to control messaging. In addition, you also have quite a bit of control over the appearance of the Inbox and other message folders. For example, you can change the column headings included in the Inbox or add and remove columns. The following sections explore specific ways to customize the Inbox (which apply to other message folders as well).
Note
For detailed information about configuring messaging and other options, see the section Configuring Outlook Options, on page 107.
By default, Outlook 2010 displays only a small subset of the available fields for messages. You can add columns for other fields, such as CC or Sensitivity, to show additional information. However, the Inbox behaves differently depending on the location and size of the Reading pane. Essentially, the view adjusts to accommodate the Reading pane; as you make the Reading pane larger, making less room available to show message headers, Outlook 2010 switches to Compact view.
When displaying Compact view, Outlook 2010 also provides two column headers above these message columns that you can use to change views or change the sort order. For example, the default view is Arranged By: Date. You can click this header to choose a different property by which to group the view.
The other column header sorts by ascending or descending order and changes the name depending on the Arrange By criteria. For example, it might say either Newest On Top or Oldest On Top, depending on whether the folder is sorted in ascending or descending order by date. Or, if you are arranging by Subject, for example, the column reads A On Top or Z On Top. Whatever the case, you can click this column to switch between the two sort options.
The number of columns in the message pane depends on the amount of space available in the window. The more space that is available, the more columns Outlook 2010 displays. For example, continue to drag the left edge of the Reading pane to the right, and Outlook 2010 eventually shows additional columns. You have to experiment with the size of the Reading pane to find a layout that suits you because the amount of available space depends on your system’s display resolution. Alternatively, simply position the Reading pane at the bottom of the window to maximize the amount of space available for message pane columns.
To add and remove columns, follow these steps:
Open the folder that you want to modify in either Single or Preview view, right-click the column header bar, and choose Field Chooser to display the Field Chooser dialog box, shown in Figure 4-7.
Locate the name of the field you want to add, and then drag the field from the Field Chooser dialog box to the desired location on the column header bar. Outlook 2010 displays a red arrow at the top of the column header bar to indicate where the column will be inserted.
To remove a field, drag the field from the column header bar.
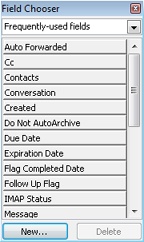
You can choose other types of fields by selecting a type from the drop-down list at the top of the Field Chooser dialog box. You can also use this dialog box to create custom fields.
Outlook 2010 also provides another method for adding and removing columns in message folders. Perform the following steps:
Click View Settings on the View tab, and then click Columns to display the Show Columns dialog box, as shown in Figure 4-8.
To add a column, select the column in the Available Columns list, and then click Add.
To remove a column from the folder view, select the field in the Show These Columns In This Order list, and then click Remove.
Click OK to have your changes take effect.
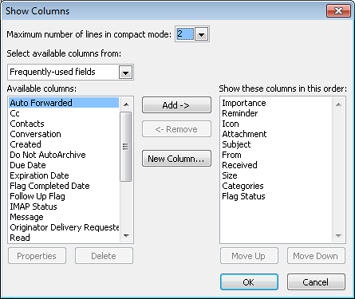
In a message folder, Outlook 2010 displays columns in a specific order by default, but you can change the order easily. The simplest way is to drag a column header to the desired location. You also can right-click the column header bar, choose View Settings, click Columns to display the Show Columns dialog box (shown in Figure 4-5), and then use the Move Up and Move Down buttons to change the column order.
Outlook 2010 uses a default set of names for the columns that it displays in message folders. However, you can change those column names—for example, you might want to rename the From column to Sender.
To change a column name, follow these steps:
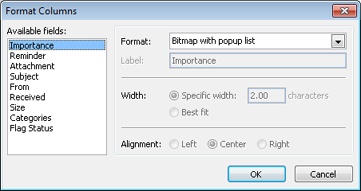
Click View Settings in the View tab of the ribbon and then click Format Columns to display the Format Columns dialog box, shown in Figure 4-9.
In the Available Fields list, select the field for which you want to change the column header.
In the Label box, type the label you want displayed in the column header for the selected field.
Repeat steps 2 and 3 for the other fields you want to change.
Click OK to apply the changes.
Click OK to close the Advanced View Settings dialog box.
Note
Four columns will not allow you to change the label: Importance, Reminder, Flag Status, and Attachment. However, you can switch between using a symbol or text in the Importance and Flag Status columns. You can change the Attachment column to display either a paper clip icon or the text True/False, On/Off, or Yes/No, depending on whether the message has an attachment.
If a column isn’t wide enough to show all the information for the field or if you need to make room for more columns, you might want to change the column width. The easiest way to change the width of a column is to drag the edge of the column header in the column header bar to resize it. Alternatively, you can right-click the column header bar, choose View Settings, Format Columns, and specify a column width in the Format Columns dialog box (shown in Figure 4-6).
By default, all the columns are left-aligned in message folders, including the Inbox. You can, however, configure the alignment to display the columns as left-justified, right-justified, or centered. For example, you might want to change the format for the Size column to show only numbers and then display the column right-justified. Simply click View Settings in the View tab on the ribbon and then click Format Columns. In the Format Columns dialog box (shown in Figure 4-6), select the column to change, and then, under the Alignment option, select Left, Center, or Right, depending on the type of justification you want.
Each default column in a message folder displays its data using a particular format. For example, the From column shows only the sender, not the recipient. Although in most cases, the specified recipient is you, that isn’t the case when the message you’ve received is a carbon copy. You might then want to change the data format of the From column to also display the person specified in the To field of the message. Other columns also offer different formats. For example, you can change the data format used by time and date fields such as Received or Sent to show only the date rather than date and time.
To change the data format used for a particular column, right-click the column header bar and choose View Settings, or click View Settings in the View tab on the ribbon, and then click Format Columns. In the Format Columns dialog box (shown in Figure 4-6), select the column for which you want to change the format, and then select the format in the Format drop-down list. The available formats vary according to the field selected.
Outlook 2010 offers many ways to organize and display your data. A good example of this flexibility is the option of grouping messages based on a hierarchy of criteria. For example, you might want to group messages in your Inbox first by subject, then by sender, and then by date received, as shown in Figure 4-10.
To organize your messages based on a particular column, you can simply right-click the column and choose Group By This Field. If the folder is showing the Arranged By column (Compact view), click this column header, and then choose the field by which you want to group the messages.
For more complex groupings, follow these steps:
Right-click the column header bar, and then choose Group By Box to display the Group By box above the column header bar.
To set up a grouping, drag a column header from the column header bar to the Group By box.
To set up an additional level of grouping, drag another column header to the Group By box. Repeat this process until you have as many levels of grouping as you need.
To remove a grouping, drag the column header from the Group By box to the desired location on the column header bar.
To hide or show the Group By box, right-click the column header bar, and then choose Group By Box again. To expand or collapse your view of a group of messages, click the triangle button next to the group or message.
Note
For a detailed explanation of grouping and sorting, along with several other topics that will help you organize your data, see the section Grouping Messages by Customizing the Folder View on page 298.
Let’s say you’ve just spent an hour fine-tuning your default Inbox view and have discovered that the customization doesn’t apply to the subfolders in your Inbox. Or, you want to apply the same settings to the Inbox folder for your other mail accounts, Microsoft SharePoint lists, and so on. Fortunately, you don’t have to go through the customization process again for each one.
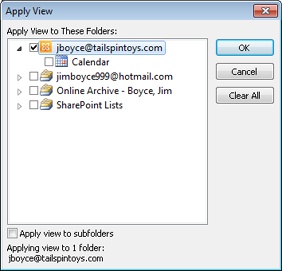
In the customized view, click Change View on the View tab in the ribbon, then choose Apply Current View to Other Mail Folders to open the Apply View dialog box (see Figure 4-11). Place a check beside the folders where you want the view applied, and make sure to choose the Apply View To Subfolders check box to have the view settings applied to subfolders. Then, click OK to apply the view settings.
In the Calendar folder, you can look at your schedule in several different ways. By default, the Calendar view shows the current day’s schedule as well as the Date Navigator (a monthly calendar) in the upper-left corner of the Navigation pane. The To-Do Bar, which displays tasks that overlap or fall on the current day, is shown in Figure 4-12. With the To-Do Bar turned on, the Date Navigator moves to the upper-right corner of the To-Do Bar. You can configure the To-Do Bar to show other tasks as well. In addition, the Task List can appear at the bottom of the window in Day and Week views.
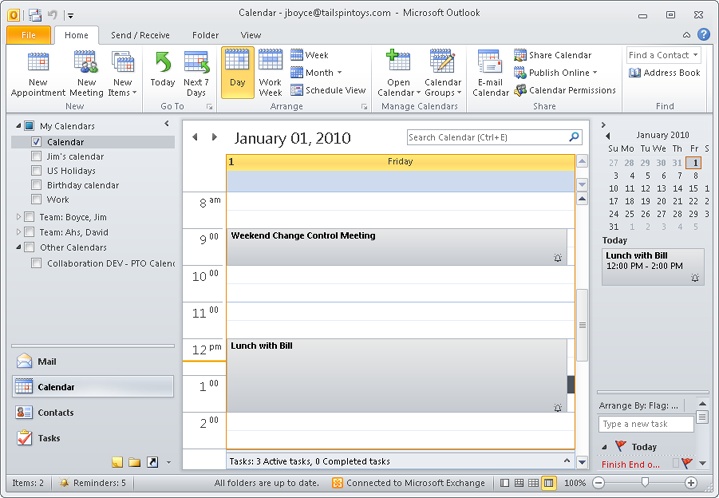
Figure 4-12. The default Calendar view shows your schedule and the Date Navigator, but you can also view tasks.
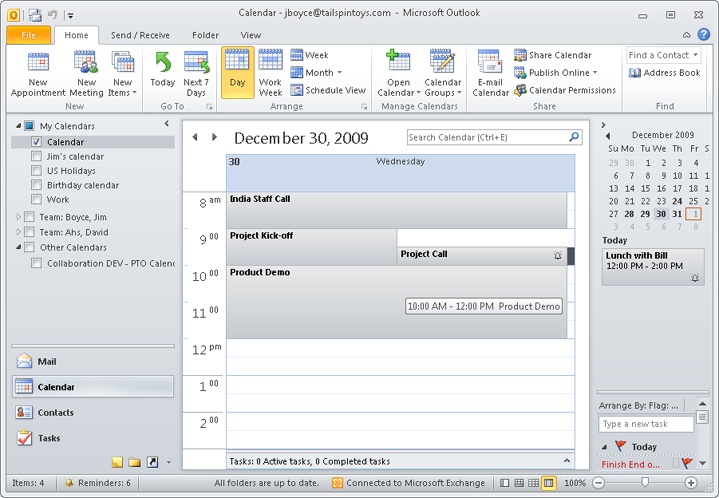
Your schedule shows the subject for each scheduled item—a brief description of a meeting or an appointment, for example—next to its time slot, blocking out the time assigned to the item. Items that overlap in the schedule are displayed side by side, as shown in Figure 4-13.
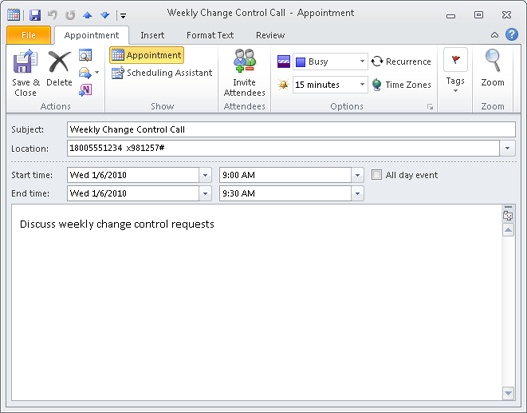
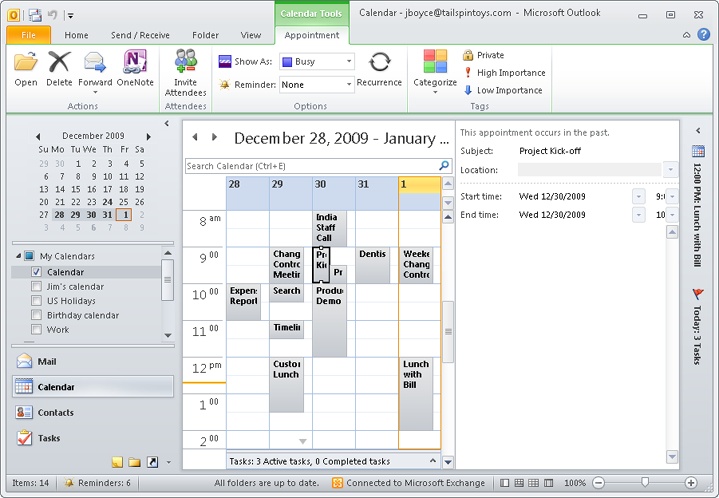
By default, the Calendar view shows only the subject for each item scheduled in the period displayed. You can open the item to modify it or view details about it by double-clicking the item, which opens its form, as shown in Figure 4-14.
You can add an item to your schedule using one of these methods:
Double-click the time slot of the start time that you want to assign to the item.
Right-click a time slot, and then choose the type of item to create (an appointment, a meeting, or an event).
Select a time slot, and then click an item type in the New group on the Home tab of the ribbon.
Click New Items on the Home tab of the ribbon, and then select the item type.
The first method opens an appointment form. The form opened by the other three methods depends on the type of item you select.
It is also easy to change the start or end time for an item in the schedule. To move an item to a different time without changing its duration, simply drag the item to the new time slot. To change the start or end time only, position the mouse pointer on the top or bottom edge of the item, and then drag it to the desired time.
Like the Inbox and other message views, Calendar view has a Reading pane that lets you preview appointments and other items in your schedule without opening them. To turn the Reading pane on or off, click the View tab on the ribbon, click Reading Pane, and then choose either Right, Bottom, or Off. Click the item to display it in the Reading pane, as shown in Figure 4-15. To display more or less information in the pane, drag the edge of the Reading pane to resize it. You can also make other changes to the displayed item—such as subject and times—through the Reading pane.
The Task List displays a list of your tasks on the To-Do Bar. You can turn the Task List on or off on the To-Do Bar. If the To-Do Bar is not shown, click the View tab, click To-Do Bar, and then click Normal or Minimized. By default, the Task List shows the tasks for the current day. As you can in the Inbox and other views, you can change the options and the items displayed on the To-Do Bar: right-click the To-Do Bar column header bar, and then choose the items you want to include, or choose Options to customize how these items are displayed.
Note
For more information about the To-Do Bar and the features Outlook 2010 provides for working with and assigning tasks, see Chapter 21.
The monthly calendars in the upper-right area of the To-Do Bar are collectively called the Date Navigator. When the To-Do Bar is hidden, the Date Navigator appears at the top of the Navigation pane.
The Date Navigator is useful not only as a calendar but also as a way to provide a fast glance at which days include appointments. Days with a scheduled item appear in bold, and those without scheduled items appear in a normal font. You can view a particular day by clicking it. Click the arrow at the left or right of the Date Navigator to change which months are displayed. You can also click and hold on the month name to choose from a shortcut menu which month to view.
Tip
INSIDE OUT Specify the font of the Date Navigator
You can configure the Date Navigator to display all dates in normal text rather than using bold for days that contain items. To do this, click View Settings on the View tab of the ribbon, and then click Other Settings in the Advanced View Settings dialog box. Clear the Bolded Dates In Date Navigator Represent Days Containing Items check box, and then click OK. Click OK to close the dialog box.
You can change the number of months displayed by the Date Navigator by resizing the Reading pane, resizing the Calendar pane, changing the width of the Navigation pane or the To-Do Bar, or changing the font used by the Date Navigator. Assign a smaller font to show more months.
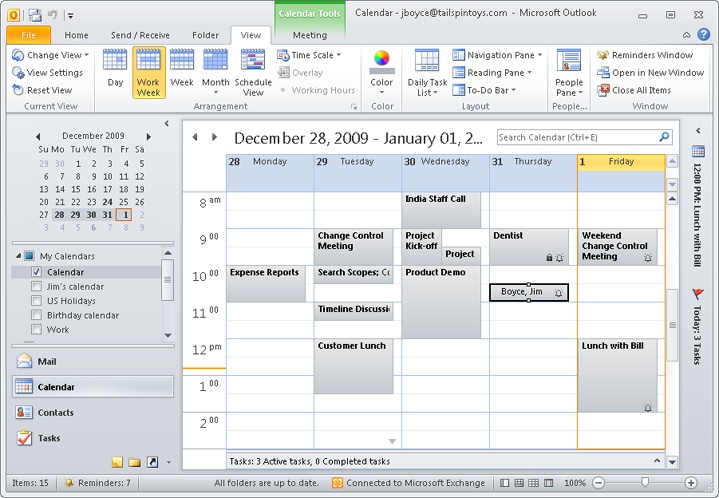
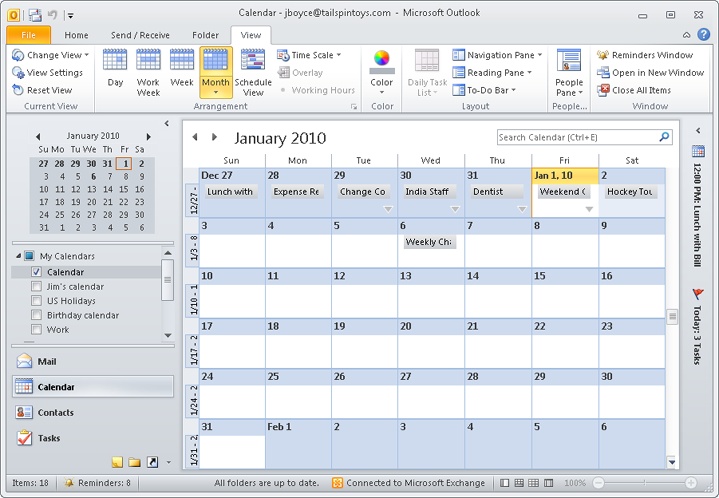
Although the default Calendar view shows only the subject for a scheduled item, you can configure the view to show additional detail—or you can change the view completely. For example, you can switch from a daily view to one that shows the work week, the calendar week, or the month. You can see examples of the Work Week view in Figure 4-16, the Week view in Figure 4-17, and the Month view in Figure 4-18. To select a particular view, click the Day, Work Week, Week, or Month button on the Home or View tab of the ribbon.

You have additional options for viewing your schedule in the Calendar folder. Click Change View on the View tab of the ribbon, and then choose one of the following to change the view:
Calendar Show the items in a calendar format with the Reading pane turned off.
Preview Show the items in a calendar format with the Reading pane turned on.
List Show items in a list rather than Calendar view.
Active Project Related-Related Appointments Show only items that occur in the future and that are related to projects.
Active Non-Project-Related Appointments Show only items that occur in the future and are not related to projects.
Note
For additional information about customizing the way Outlook 2010 displays information in the various calendar views, see Chapter 19.
As you can with mail folder views, you can apply customized view settings from one calendar folder to other calendar folders. After you are satisfied with the custom view settings, click the View tab in the ribbon, click Change View, and then choose Apply Current View to Other Calendar Folders. Outlook displays an Apply View dialog box similar to the one shown previously in Figure 4-8. Place a check by the folders where you want the view applied and click OK.
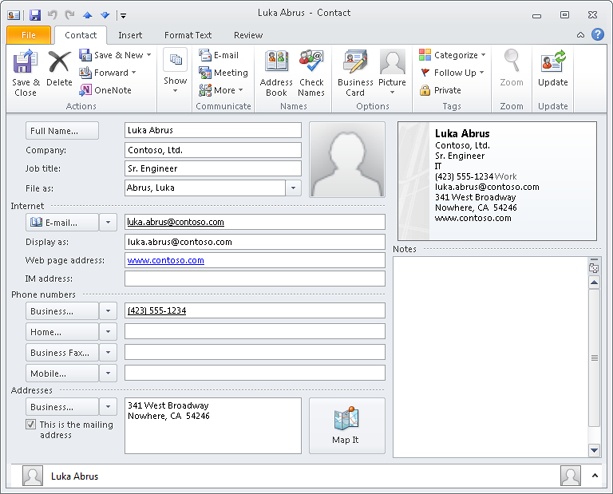
The Contacts folder stores all your contact information. By default, the Contacts folder displays the Business Cards view, shown in Figure 4-19, which shows the name for each contact along with other selected fields (address and phone number, for example). You can view the details for a contact by double-clicking the contact’s business card, which opens the contact form, shown in Figure 4-20. Using this form, you can view or make changes to the contact’s data or perform other tasks, such as calling the contact, generating a meeting request, or viewing a map of the contact’s address. If you have a large number of contact entries stored in the Contacts folder, you can click the buttons at the right edge of the view to select which portion of the contacts list to show.

Note
For a detailed discussion of working with contacts, including the actions you can take with the contact form, see Chapter 18.
Outlook 2010 offers several other ways to view the contents of your Contacts folder. Choose View, Current View, and then choose one of the following commands to change the view:
In addition to these views, Outlook also offers some options in the Arrangement group on the View tab. You can choose between Categories, Company, and Location to group the contacts by those fields when a list view is displayed.
Adding contact entries to your Contacts folder is easy: Click New on the Home tab when the Contacts folder is open, or click New Items and choose Contact. Either action opens the contact form, in which you enter the contact’s data.
Like other views in other folders, the view in the Contacts folder can be customized to suit your needs and preferences. For example, you can adjust the view to display additional fields of information or to remove fields you don’t need. You can sort the view based on specific contact criteria or group similar items together based on multiple criteria. For details about customizing the Contacts view, see Chapter 18.
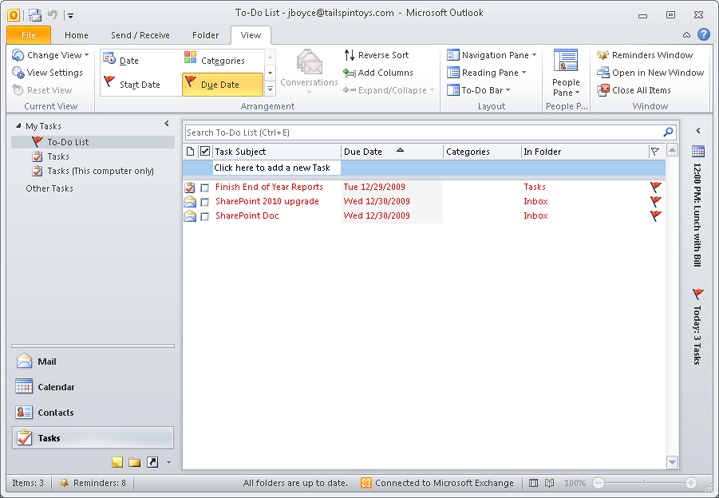
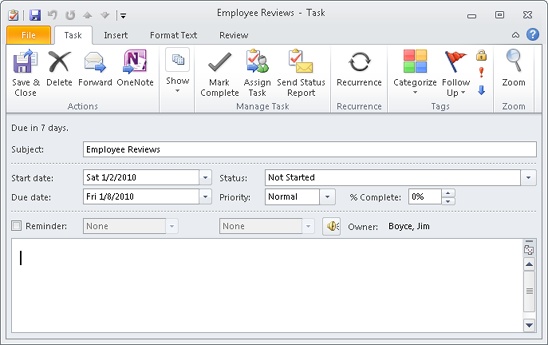
The Tasks folder contains your task list. The default Tasks view, shown in Figure 4-21, lists each task in a simple list with subject, due date, and status. Double-click an existing task to open the task form, which displays detailed information about the task, including due date, start date, status, notes, and so on, as shown in Figure 4-22. To add a new task to the list, double-click a blank list entry to open a new task form, where you can enter all the details about the task.
The task list shows tasks that you have assigned to others as well as those tasks assigned to you (by yourself or by others). These assignments can be one-time or recurring, and the list shows both in-progress and completed tasks. Additionally, any messages that you have flagged for follow-up appear in your task list.
Like other Outlook 2010 views, Tasks view provides a Reading pane that you can use to view details for a task without opening the task item. To display the Reading pane, Click the View tab, click Reading Pane, and then specify the location (either Right or Bottom).
You can customize the view in the Tasks folder in a variety of ways—adding and removing columns, changing column names, and organizing tasks by category or other properties, to list a few. To customize the columns, click View Settings on the View tab, and then click Format Columns in the Advanced View Settings dialog box. The resulting dialog box allows you to select the format for each column, change the name, apply alignment, and so on. To change the order of columns in the view, simply drag the column headers into the desired positions, resizing as needed.
You can also organize your task list in various ways. You can click column headers to sort the columns in ascending or descending order, and you can group the columns based on a particular field or group of fields, just as you can in the Inbox and other Outlook 2010 folders.
You can also click View, Change View, and then choose one of the following commands to change the Tasks view:
Simple List Shows whether the task has been completed, the task name, the folder location of the task, categories, and the due date
Detailed Shows status, percent complete, dates modified or completed, and categories in addition to the information displayed in the Simple List view
Next Seven Days Displays tasks scheduled for the next seven days
Overdue Displays incomplete tasks with due dates that have passed
Completed Shows only completed tasks
Server Tasks With Exchange Server accounts, helps you view assigned tasks
To-Do List Displays tasks in the To-Do List with a Reading pane
In addition to selecting these views, you can use the options in the Arrangement group on the View tab to organize tasks.
Note
For more information about customizing the view in the Tasks folder, see the section Working with Tasks in the Tasks Folder, on page 537.
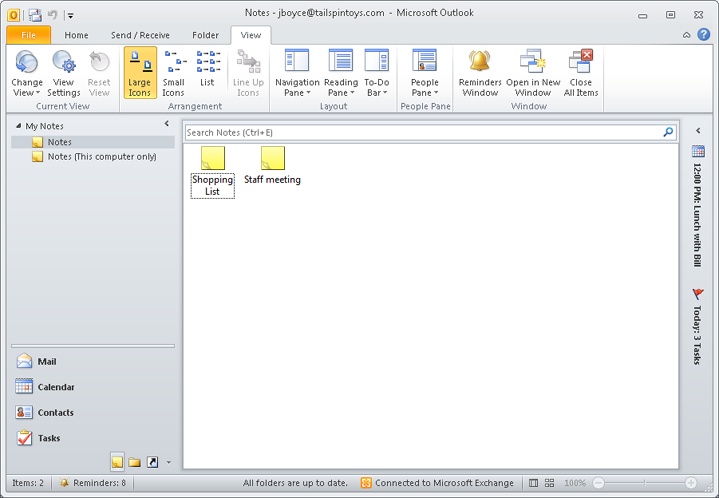
With its Notes feature, Outlook 2010 helps you organize your thoughts and tasks. Each note can function as a stand-alone window, allowing you to view notes on your desktop outside Outlook 2010. The Notes pane provides a look into your Notes folder, where your notes are initially stored. From there, you can copy or move your notes to other locations (such as the desktop) or create shortcuts to them. By default, the initial Notes pane displays the notes as icons, with the first line of the note serving as the title under the note’s icon, as shown in Figure 4-23.
As it does for other options, Outlook 2010 offers several other ways to view notes. You can click Change View on the View tab, and then choose one of the following:
Icon Displays an icon for each note, with the first line of the note serving as the icon’s description (the default view)
Notes List Displays the notes as a line-by-line list
Last Seven Days Resembles the Notes List view but restricts the display to only the past seven days and is based on the current date
You can also use the options in the Arrangement group of the View tab to display the notes using different sizes of icons.
You can show the Reading pane in the Notes folder, displaying the text of a note when you click it in the list. To choose a view, click Change View on the View tab of the ribbon and choose the desired view.
You can customize the views in the Notes folder the same way that you can in other folders. You can, for example, drag columns to rearrange them, resize columns, change column names and other properties, add other fields, and group notes based on various criteria.
Note
For a detailed explanation of how to work with the Notes folder, see Chapter 23.
As explained in Chapter 2, the Notes feature in Outlook can be useful, but for most people, it is probably only marginally so. OneNote offers a far wider breadth of features for taking notes, and if you haven’t already done so, you should try OneNote to see what it can do. See Chapter 23 for more details on OneNote and its integration with Outlook.
The Deleted Items folder contains Outlook 2010 items that you have deleted, and it can include all the Outlook 2010 item types (such as messages, contacts, and appointments). The Deleted Items folder offers a way for you to recover items you’ve deleted, because the items remain in the folder until you manually delete them from that location or allow Outlook 2010 to clean out the folder. When you delete an item from the Deleted Items folder, that item is deleted permanently.
You can configure Outlook 2010 to delete all items from the Deleted Items folder automatically when you exit Outlook 2010. To do so, click File, Options, and then click Advanced in the left pane. Select the Empty Deleted Items Folder When Exiting Outlook check box, and then click OK.
You might want to change the default Outlook 2010 view based on your type of work and the Outlook 2010 folders that you use most. Or you might want to use a particular view as the initial view because it presents the information you need right away each morning to start your workday.
You can designate any of the Outlook 2010 folders as your startup view. To do so, follow these steps:
In Outlook 2010, click File, Options.
Click Advanced in the left pane.
In the Outlook Start And Exit group, next to the Start Outlook In This Folder text box, click Browse, and then select the folder that you want to see by default when Outlook 2010 starts. Click the root branch (labeled with your email address) if you want to specify Outlook Today as the default view.
Click OK, and then click OK again to close the Outlook Options dialog box.
In addition to the various folders and views described in this chapter, Outlook 2010 incorporates several other standard components in its interface. The following sections explain these features and how to use them effectively.
Note
This book assumes that you’re familiar with your operating system and comfortable using menus. Therefore, neither the Outlook 2010 ribbon nor its individual tabs are discussed in this book, except for specific tabs and commands where applicable.
The Navigation pane appears on the left in the Outlook 2010 window and contains shortcuts to the standard Outlook 2010 folders as well as shortcuts to folders you’ve created and other important data folders, as shown in Figure 4-24. Just click an icon in the Navigation pane to open that folder or item. The Navigation pane gives you quick access not only to Outlook 2010 folders but also to all your data.

Figure 4-24. The Navigation pane provides quick access to all Outlook 2010 data and other frequently used resources and folders.
Note
For a detailed discussion of the Navigation pane, including how to create your own groups and shortcuts, see the section Customizing the Navigation Pane, on page 631.
Tip
You can create new shortcuts in any of the existing Shortcuts groups in the Navigation pane, and you can also create your own groups.
Depending on your monitor’s resolution and the number of shortcuts in each group, you might not be able to see all the icons in a group. If that’s the case, you can use the scroll bar on the right edge of the Navigation pane to scroll through the icons in the selected group.
Most of the time, you’ll probably just click an icon in the Navigation pane to open its associated folder. However, you can also right-click a view button and use the resulting shortcut menu to perform various tasks with the selected object. For example, you might right-click the Calendar icon and then choose Open In New Window to open a second window showing the calendar’s contents. To view a different folder, simply click the folder’s button in the Navigation pane. The content of the upper portion of the Navigation pane changes according to the folder that you select. For example, the Navigation pane shows the Folder List if you click the Folder List button.
Outlook 2010 shows a selection of view buttons for standard folders in the Navigation pane. If you don’t use certain folders very often, however, you might prefer to remove them from the Navigation pane to make room for other view buttons. For example, if you never use the Journal or Notes folder, you can remove those view buttons from the Navigation pane and use the Folder List to access those folders when needed.
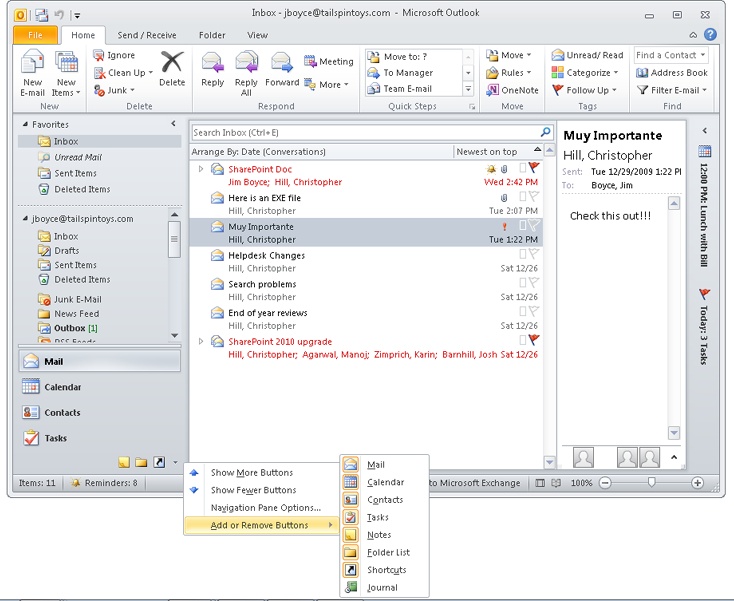
To change the view buttons displayed in the Navigation pane, click Configure Buttons in the lower-right section of the Navigation pane (it’s a small arrow button), and then choose Add Or Remove Buttons to open the shortcut menu shown in Figure 4-25. Click a folder in the list to either add it to or remove it from the Navigation pane. Those folders that are selected in the list appear in the pane.
If you need to add or remove more than one folder, click Configure Buttons, and then choose Navigation Pane Options to open the Navigation Pane Options dialog box. Select each folder that you want included in the Navigation pane, and then click OK.
Note
Use the Move Up and Move Down buttons in the Navigation Pane Options dialog box to control the order of buttons in the Navigation pane.
If you seldom use the Navigation pane, you can close it or minimize it to make room on the screen for the Folder List or other data. Simply click the View tab, click Navigation Pane, and then choose Off or Minimize to alter the display.
Although Outlook 2010 opens in a single window, it supports the use of multiple windows, which can be extremely useful. For example, you might want to keep your Inbox open while you browse through your schedule. Or perhaps you want to copy items from one folder to another by dragging them. Whatever the case, it’s easy to use multiple windows in Outlook 2010.
When you right-click a folder in the Navigation pane, the shortcut menu for that folder contains the Open In New Window command. Choose this command to open the selected folder in a new window, keeping the existing folder open in the current window. You also can open a folder from the Folder List (discussed next) in a new window. Simply right-click a folder, and then choose Open In New Window to open that folder in a new window.
When you need to switch between folders, you’ll probably use the Navigation pane most of the time. But the Navigation pane doesn’t include shortcuts to all your folders by default, and adding those shortcuts can clutter the pane, especially if you have multiple data stores. Fortunately, Outlook 2010 provides another quick way to navigate your folders: the Folder List.
Click the Folder List button in the Navigation pane to display the Folder List, as shown in Figure 4-26. In the list, click the folder that you want to open.

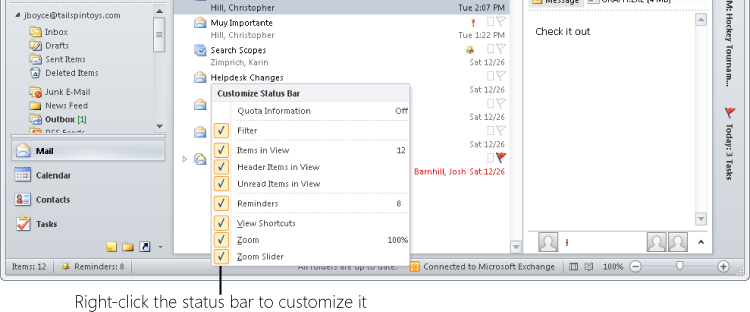
The status bar appears at the bottom of the Outlook 2010 window, as shown in Figure 4-27, and presents information about the current folder and selected items, such as the number of items in the folder. It can also include other status information, such as the progress of folder synchronization and connection status for Exchange Server.

Figure 4-27. The status bar provides useful information, such as the number of items in the selected folder or current connection status to the server.
You can customize the status bar to control what information appears in it. To do so, just right-click the status bar to display a pop-up menu with available items. Items that have a check by them appear on the status bar, and those without a check do not. Just put a check by the ones you want displayed (see Figure 4-28).
In earlier sections of this chapter, you learned about the Reading pane, which allows you to preview Outlook 2010 items without opening them. For example, you can preview an email message in the Reading pane simply by clicking the message header. To turn the Reading pane on or off, click the View tab, click Reading Pane, and then choose Right, Bottom, or Off.
To some degree, the way that the Reading pane functions depends on how you configure it. For example, you can set up the Reading pane to mark messages as read after they’ve been previewed for a specified length of time. To configure the Reading pane, click File, Options, click Mail in the left pane of the Outlook Options dialog box, and then click Reading Pane. Select options based on the following list:
Mark Items As Read When Viewed In The Reading Pane Select this option to have messages marked as read when they’ve been previewed for the time specified by the following option.
Wait n Seconds Before Marking Item As Read Specify the number of seconds that a message must be displayed in the Reading pane before it is marked as read.
Mark Item As Read When Selection Changes Select this option to have the message in the Reading pane marked as read when you select another message.
Single Key Reading Using Spacebar Selecting this option allows you to use the Spacebar to move through your list of messages to preview them. Press Shift+Spacebar to move up the list. You also can use the Up Arrow and Down Arrow keys to move up and down the message list.
The Reading pane in Outlook 2010 offers some additional functionalities, which include the following:
In a message, you can double-click an address in the Reading pane to view details for the address.
The Reading pane header displays the message’s attachments. You can double-click an attachment to open it, or right-click the attachment and choose other tasks on the shortcut menu (such as saving the attachment).
The Reading pane displays Accept and Decline buttons so that you can accept or decline a meeting request in the Reading pane without opening the request.
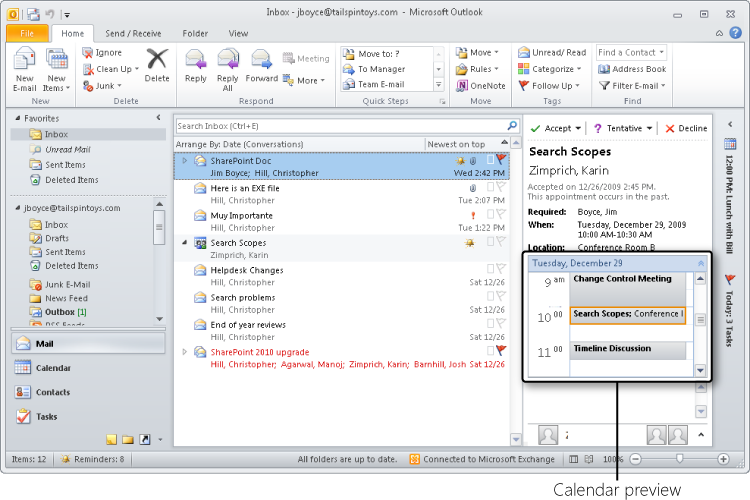
When a meeting invitation is selected, the Reading pane shows a snippet of your calendar with the proposed meeting and the adjacent items to help you determine if you can make the meeting or not (see Figure 4-29).
The InfoBar is the banner near the top of an open email message, appointment, contact, or task. It tells you whether a message has been replied to or forwarded, along with the online status of a contact who is using instant messaging, and so on. The InfoBar in a message form, for example, displays the From, To, Cc, and other fields. In Outlook 2010, the InfoBar resides in the Reading pane, as shown in Figure 4-30.
Some of the fields in the InfoBar simply display information, but others lead to more details. For example, you can double-click a name in the InfoBar to view the associated address and other contact information, or you can double-click attachments to open them. If the InfoBar displays a message that you replied to or that you forwarded, click that message and choose Find Related Messages to search for messages in the same conversation as the selected message.
Because Outlook 2010 is a complex application with a broad range of capabilities, you have many options for controlling the way that it looks and functions. This portion of the chapter is designed to help you configure Outlook 2010 to perform as you require.
The following list describes the different pages in the Outlook Options dialog box, providing an overview of the features listed on that page and pointing out key new Outlook 2010 features. Because many of the options in this dialog box are best understood in the context of the feature they control, you’ll find more detail about individual options in chapters that focus on a particular Outlook 2010 feature (messaging or scheduling, for example); be sure to consult the cross-references to the applicable chapters for more information.
To open the Options dialog box described here, start Outlook 2010, and then click File and choose Options. You’ll find these pages on the dialog box (Figure 4-31 shows the General page):
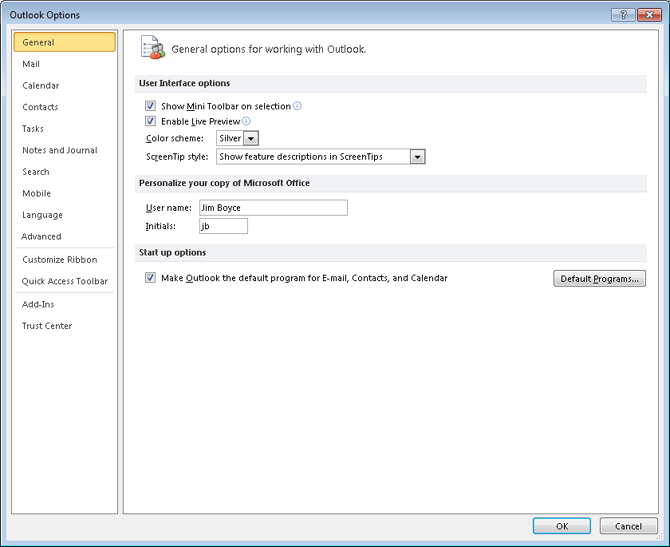
General Use this page to turn on or off the Mini Toolbar (which shows formatting options when you select text), enable Live Preview (which shows how a document will change when you place the mouse over a feature that would apply a change), set the color scheme for Outlook, and specify how ScreenTips behave. You can also personalize your copy of Office and set Outlook as the default program for email, contacts, and calendaring.
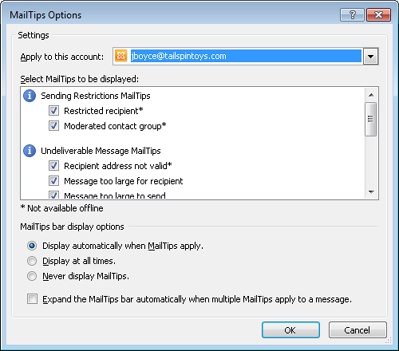
Mail This page contains options that control the default message format, editing options such as AutoCorrect, proofing (such as spell-checking), notifications when new emails arrive, conversation clean-up options, how Outlook handles replies and forwards, receipt tracking, and other mail-specific options. A new Outlook 2010 feature controlled from this page is the MailTips feature, which warns you about potential problems such as sending a message to too many people, sending a message that is too large for the recipients, and so on. To access these options, click MailTips Options to open the MailTips dialog box (see Figure 4-32).
Calendar Use these options to set the start and end times for your workday, set the start of the workweek, and set other general calendar options such as default reminder time and meeting invitation format. You can also add holidays, change free/busy options, set the color used on the calendar, set the default time zone, and set up an additional time zone. You can also configure Scheduling Assistant options and manage resource scheduling from this page.
Contacts On this page, change how contacts are saved and displayed, and set whether to display photos if available. Here’s another new Outlook 2010 feature: The option Automatically Create Outlook Contacts For Recipients That Do Not Belong To An Outlook Address Book, if selected, causes new contacts to be added to the Suggested Contacts folder when you receive a message from or send a message to an address that does not exist in your Outlook Address Book. You’ll see the Suggested Contacts folder listed in the Navigation pane when you open the folder list or open the Contacts folder.
Tasks Use the options on this page to set a default reminder time for tasks, set task colors, set the Quick Click flag option, number of working hours per day and per week, and other general task options.
Notes And Journal The options on this page control the default note size, color, and font, and enable you to access the Journal options, which control the items that are journaled automatically in Outlook.
Search Use this page to specify how Outlook searches and displays search results, such as the highlight color. You can also access the Windows Search indexing options by clicking the Indexing Options button. This is the same as opening the Indexing Options item from the Control Panel.
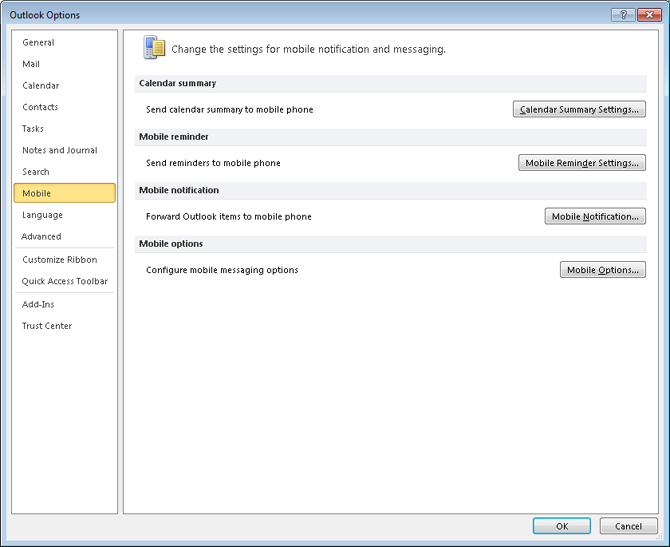
Mobile Use this page (see Figure 4-33) to set up calendar summaries and mobile reminders that are sent to your mobile device. You can also configure Outlook to forward items to your mobile phone when those items meet certain criteria, and set options for text messaging.
Language This page offers options that control which languages are used for proofing, grammar checking, sorting, and other language-specific tasks. You can also choose the display and Help languages from this page.
Advanced Use this page to set a variety of advanced options for Outlook that include the startup folder, whether to empty the Deleted Items folder when you exit Outlook, and settings that control when and how Outlook automatically archives your data. You can also control reminder options and how Outlook handles RSS feeds, set up send/receive groups, configure custom forms options, set dial-up connection settings, and configure international options.
One Outlook 2010–specific feature on this page to note in the Other group on this page is the Allow Analysis Of Sent E-mails To Identify People You Commonly E-mail And Subjects You Commonly Discuss, And Upload This Information To The Default SharePoint Server. This option relates to the SharePoint Server Colleague Add-In. If this option is enabled, Outlook scans your sent email folder to look for names and keywords and periodically uploads that data to SharePoint. You can then use the Add Colleagues page on your SharePoint My Site to add colleagues and keywords based on those scans. The registry setting HKEY_CURRENT_USER\Software\Microsoft\Office\14.0\Common\Portal\ColleagueImport\Enabled also determines whether this feature is enabled. A DWORD value of 0 turns it off and a value of 1 turns it on.
Customize Ribbon Use this page to customize the ribbon, adding commands you use frequently, removing those you seldom use, or turning off items altogether. For details on customizing the ribbon, see Chapter 26.
Quick Access Toolbar On this page, you can configure the Quick Access toolbar, which by default sits above the ribbon. See Chapter 26 for more details on customizing the Quick Access toolbar.
Add-Ins This page shows the add-ins installed for Outlook and organizes them by active, inactive, and disabled status. You can turn add-ins on or off by selecting an add-in category from the Manage drop-down list and clicking Go.
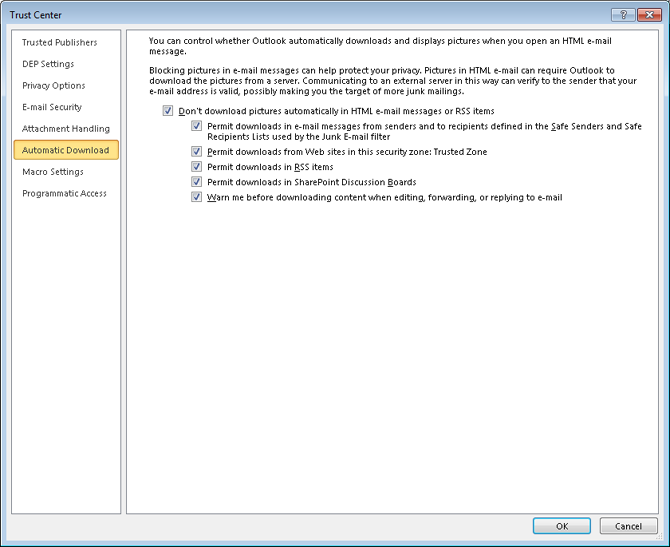
Trust Center The Trust Center Settings button on the Trust Center page opens the Trust Center dialog box, shown in Figure 4-34. This dialog box lets you configure a broad range of security-related settings for Outlook and is organized into the following pages:
Trusted Publishers Use this page to view certificates for trusted publishers. Certificates are used to sign add-ins digitally and allow Outlook to trust their execution.
DEP Settings Turn Data Execution Prevention (DEP) on or off with this page. DEP, when turned on, prevents applications from using protected memory. Many viruses and other security threats attack Windows through protected memory areas, so turning on DEP can help secure your computer against these threats.
Privacy Options Use this page to configure a handful of privacy-related options, such as allowing Office to download troubleshooting data automatically for detecting and fixing potential problems. You can also configure translation and research options from this page.
E-mail Security These options control encrypted email settings, certificates, enable you to read all mail as plain text, and control scripting.
Attachment Handling Use these options to turn on Reply With Changes for attachments (which adds additional properties to Office file attachments when you send them), turn on or off Attachment Preview (which enables you to preview attachments in the Reading pane in Outlook), and turn on or off individual file preview applications.
Automatic Downloads Use these options to control how Outlook handles pictures in HTML email or RSS items. Preventing image download can prevent spammers from validating your email address when you open a message containing an image.
Macro Settings Use these settings to specify which types of macros Outlook will allow to run.
Programmatic Access These options let you receive notifications when programs attempt to access your address book or send email automatically through Outlook. These options are disabled if you have a valid antivirus program.
Other chapters in this book include sections that offer best-practice advice on using specific features, such as the calendar. This section of this chapter offers some best-practice advice overall on using Outlook 2010 effectively:
Integrate and take advantage of Outlook 2010 If you have been using Outlook Express, Windows Mail, or another email client instead of Outlook 2010, switch to Outlook 2010. Outlook 2010 integrates many of the contact-management and tracking features with email, making it an extremely useful productivity tool. In addition, Outlook 2010 offers some exceptional features for gathering and organizing email (such as search folders), making it an excellent choice for handling all your email needs.
Get organized Make extensive use of folders and categories to organize your messages, contacts, appointments, and other Outlook 2010 data. The better you organize your data, the easier it will be to find and work with it, making you that much more efficient. Don’t just throw stuff into your Outlook 2010 folders—take the time to manage your data effectively. In particular, make use of categories and search folders to help you manage your email, and use automatic formatting and color categories to organize your calendar.
Keep your Inbox cleared out Near the end of yourbes workday, allocate a certain amount of time to work through your Inbox and respond to each message. Reply to those you can and move them into appropriate folders for archiving. Those you can’t respond to because they require follow-up should be flagged for follow-up. The fewer messages you have in your Inbox at the end of the day, the greater your sense of accomplishment when you leave the office.
Take advantage of the Navigation pane, Reading pane, and To-Do Bar These Outlook 2010 features can help you quickly navigate Outlook 2010 to find the information you need. In Outlook 2010, the capability to minimize the Navigation pane and To-Do Bar will give you a lot more window space in your Outlook 2010 folders.