Working with Tasks in the Tasks Folder 537
Viewing and Customizing the Tasks Folder 556
Working with Tasks in Other Ways 562
Managing Tasks Effectively 565
Microsoft Outlook 2010 offers a broad selection of tools to help you manage your workday, including techniques for handling email; a way to manage appointments, meetings, and events; a handy method of creating quick notes; and a journal for tracking projects, calls, and other items. All these tools are often related to creating and completing tasks. For example, writing this book was a long string of tasks to be completed: drawing up the outline, writing each chapter, and reviewing edits, for starters.
In your job, your tasks during the average day are no doubt different. Perhaps they include completing contracts, making sales calls, writing or reviewing documents, completing reports, developing websites, or developing program code. Some tasks take only a little time to complete, whereas others can take days, weeks, or even months.
Outlook 2010 provides the means not only to track your own tasks but also to manage those tasks you need to assign to others. This feature is a much more efficient and effective way to manage tasks than using a notebook, sticky notes, or just your memory. You can set reminders and sort tasks according to category, priority, or status to help you view and manage them.
This chapter examines the Tasks folder and its related features. In addition to learning how to manage your own tasks, you’ll also learn to assign tasks to and manage tasks assigned to others.
Outlook 2010 provides several ways for you to create and manage tasks. You can create one-time tasks or recurring tasks, set up reminders for tasks, and assign tasks to others. In this section, you’ll see how to create tasks for yourself and how to use Outlook 2010 to manage those tasks effectively.
The default view in the Tasks folder is the To-Do List, shown in Figure 21-1, which organizes the tasks by Due Date. Depending on the amount of space available in the view, Outlook 2010 shows additional columns in the To-Do List view, such as Start Date, Reminder Time, Due Date, the folder in which the tasks are located, and Categories.
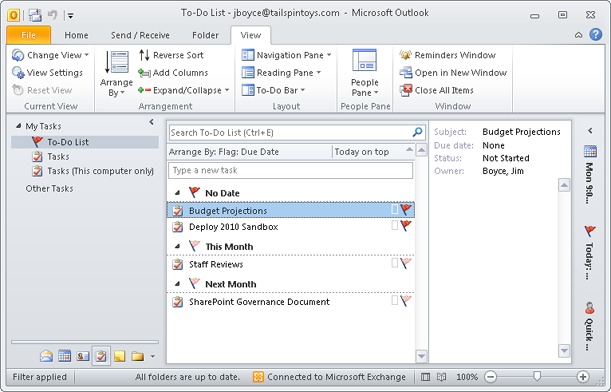
The columns in the To-Do List include:
Icon The Icon column indicates the type of task. For example, it can indicate either that the task is yours or that it’s assigned to another person. The clipboard icon with a check mark indicates that the task is your own. An arrow pointing to a small person symbol indicates that the task is assigned to someone else. In addition, the icon can also be an envelope, indicating a message item for follow-up.
Task Subject You can enter any text in the Subject column, but generally, this text should describe the task to be performed. You can also add notes to each task to identify further the purpose or goal of the task.
Start Date This column indicates the start date for the task.
Reminder Time This column shows the reminder for the task.
Due Date This column indicates the due date for the task and by default shows the day and date. You can specify different date formats if you want.
In Folder This column shows the folder in which the task is located.
Categories This column shows the categories, if any, assigned to the task.
Flag Status This column shows the task’s current flag status, and you can use the column to mark the task as complete or right-click to choose other options.
Note
For details on customizing the Tasks folder view, see the section Viewing and Customizing the Tasks Folder, on page 556. For additional information about features in Outlook 2010 that can help you use and manage views, see the section Using Other Outlook Features, on page 100.
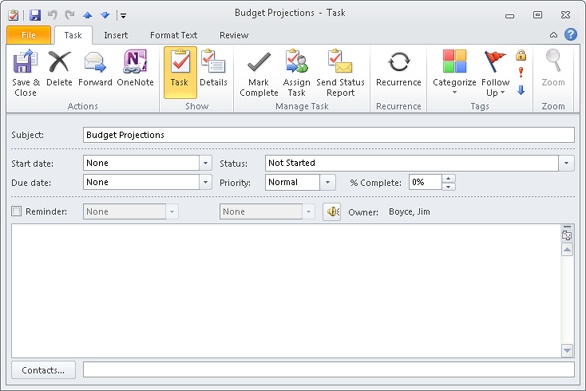
Most details appear in the Reading pane. You can also view all the details of a task by double-clicking the task item. Doing so opens the task form, the format of which varies depending on whether the task is yours or is assigned to someone else. Figure 21-2 shows the form for a task that belongs to you. Figure 21-3 shows the Task page of a form for a task assigned to someone else.
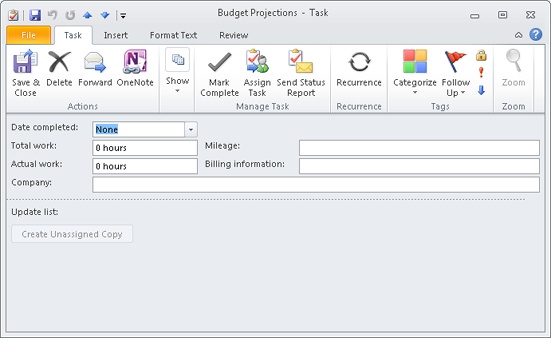
The Details page of the task form, shown in Figure 21-4, shows additional information about the task, such as date completed, total work required, actual work performed, and related background information.
Tip
Press Ctrl+Tab to switch between pages in any multi-paged dialog box or form, including the task form.
Creating a task is mechanically much the same as creating any item in Outlook 2010. Use any of the following methods to create a new task:
Between the column header bar and the first task in the list is a new task entry line labeled Click Here To Add A New Task. In the To-Do Bar, the box is labeled Type A New Task. Click the line and start typing if you want to specify only the subject for the task, without initially adding details or selecting options. You can open the task at any time afterward to add other information.
Double-click in an empty area of the task list.
Right-click in an empty area of the task list, and then choose New Task.
With the Tasks folder open, click New Task on the Home tab on the ribbon.
With any Outlook 2010 folder open, click New Items, and then choose Task. This allows you to create a new task when another folder, such as the Inbox or the Calendar folder, is displayed.
The options on the task form are straightforward. Simply select the options that you want and set the task properties (such as start date and due date). Opening the Due Date or Start Date drop-down list displays a calendar that you can use to specify the month and date for the task. If no specific date is required for the task, you can leave the default value None selected. If you currently have a date selected and want to set the date to None, select None from the drop-down list.
Tip
INSIDE OUT Specify total work and actual work
As you’ll learn a little later in this section, you can specify values for Total Work and Actual Work on the Details page of the task form. Total Work indicates the total number of hours (days, weeks, and so on) required for the task; Actual Work lets you record the amount of work performed to date on the task. Unfortunately, the % Complete value on the Task page is not tied to either of these numbers. Thus, if Total Work is set to 40 hours and Actual Work is set to 20 hours, the % Complete box doesn’t show 50 percent complete. Instead, you must specify the value for % Complete manually.
Note
The % Complete value is tied to the Status field on the Task page. If you set % Complete to 100, Outlook 2010 sets the status to Completed. If you set % Complete to 0, Outlook 2010 sets the status to Not Started. Any value between 0 and 100 results in a status of In Progress. Selecting a value in the Status drop-down list has a similar effect on % Complete. Select Not Started, for example, and Outlook 2010 sets the % Complete value to 0.
In addition to entering information such as the percentage of work that’s completed, the priority, and the status, you can also set a reminder for the task. As it does for other Outlook 2010 items, such as appointments, Outlook 2010 can display a reminder window and play a sound as a reminder to start or complete the task. You can set only one reminder per task, so it’s up to you to decide when you want Outlook 2010 to remind you about the task. Click the speaker button on the task form to select the audio file that you want Outlook 2010 to use for the reminder.
One key task setting is the Owner setting. When you create a task, you own that task initially. Only the owner can modify a task. Task ownership is relevant only to assigned tasks—that is, tasks that you assign to others to perform.
Note
For details about task ownership, see the section Assigning Tasks to Others, on page 547.
Other information that you can specify on the Task tab of the task form’s ribbon includes categories and the private or nonprivate status of the task. The ability to assign categories to tasks can help you organize your tasks. You can assign multiple categories to each task as needed and view the Tasks folder sorted by category. For example, you might assign project categories to tasks to help you sort the tasks according to project, allowing you to focus on the tasks for a specific project.
Note
For details on working with categories, see the section Assigning Categories to Outlook Items, on page 120.
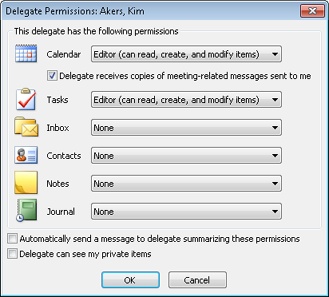
The private or nonprivate status of a task allows you to control whether others who have delegate access to your folders can see a specific task. Tasks marked as private aren’t visible unless you explicitly grant permission to the delegate to view private items. To control the visibility of private items, click File, Account Settings, and then Delegate Access. Double-click a delegate, and in the Delegate Permissions dialog box, shown in Figure 21-5, select or clear the Delegate Can See My Private Items check box. Repeat the process for any other delegates as needed.
The Details page of the task form (shown in Figure 21-4) allows you to specify additional information about the task. To view the Details page, click Details in the Show group of the ribbon. The options on the Details page include the following:
Date Completed Use this calendar to record the date that the task is completed. This is the actual completion date, not the projected completion date.
Total Work Specify the total amount of work required for the task. You can enter a value in minutes, hours, days, or weeks by entering a value followed by the unit, such as 3 days.
Actual Work Record the total amount of work performed on the task to date. You can enter the data using the same units as in the Total Work box.
Company List any companies associated with the task, such as suppliers, customers, or clients.
Mileage Record mileage associated with the task if mileage is reimbursable or a tax-deductible expense.
Billing Information Record information related to billing for the task, such as rate, person to bill, and billing address.
Update List This option applies to tasks assigned to others. It shows the person who originally sent the task request and the names of all others who received the task request, reassigned the task to someone else, or elected to keep an updated copy of the task on their task list. When you send a task status message, Outlook 2010 adds these people as recipients of the status message.
Create Unassigned Copy Use this button to create a copy of an assigned task that you can send to another person.
Note
For details on working with the update list, assigned tasks, and unassigned copies, see the section Assigning Tasks to Others, on page 547.
TROUBLESHOOTING
For others to see your tasks, you must share your Tasks folder. If you’re using Exchange Server as your mail server, you can also allow others to see your tasks by granting them delegate access to your Tasks folder. The two methods are similar, with one major difference: Granting delegate access to others allows them to send messages on your behalf. Sharing a folder simply gives others access to it without granting send-on-behalf-of permission.
To share your Tasks folder without granting send-on-behalf-of permission, right-click the Tasks folder icon in the Folder List in the Navigation pane, and then choose Properties. Click the Permissions tab, and then add or remove users and permissions as needed.
Note
For additional details on sharing folders and setting permissions, see the section Granting Access to Folders, on page 842. To learn how to set up delegate access to your folders, see Chapter 34.
Earlier in this chapter, you learned several ways to create a task that occurs once. You can also use Outlook 2010 to create recurring tasks. For example, you might create a recurring task for reports that you have to submit on a weekly, monthly, or quarterly basis. Perhaps you perform backup operations once a week and want Outlook 2010 to remind you to do this.
You create a recurring task much the same way you create a single-instance task, except that when the task form is open, you click the Recurrence button on the Task tab of the ribbon to display the Task Recurrence dialog box, shown in Figure 21-6.
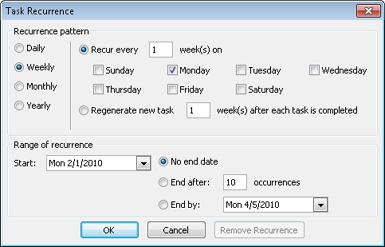
You can select daily, weekly, monthly, or yearly recurrence. Selecting one of these four options in the dialog box changes the options available in the dialog box, allowing you to select the recurrence pattern. For example, select Weekly, and then select the days of the week on which you want the task to occur.
When you create a recurring task, one of the decisions you must make is whether you want the task to recur at a specified period regardless of the task’s completion status. You can also choose to regenerate a new task after the existing task is completed. For example, you can create a task that recurs every Friday. The task will recur whether or not you marked the previous instance as completed. If you need to complete the previous task before the next task is generated, however, you should configure the recurrence so that the new task is created only after the previous one is completed. For example, perhaps you run a series of reports, but each relies on the previous report being completed. In this situation, you would probably want to set up the task to regenerate only after the preceding one was completed.
The Regenerate New Task option in the Task Recurrence dialog box allows you to configure the recurrence so that the new task is generated a specified period of time after the previous task is completed. Select the Regenerate New Task option, and then specify the period of time that should pass after completion of the task before the task is regenerated.
Other options for a recurring task are the same as those for a one-time task. Specify subject, details, contacts, categories, and other information as needed. Remember to set up a reminder for the task if you want Outlook 2010 to remind you before the task’s assigned completion time.
You can add a reminder to a task when you create the task or after you create it. As with reminders for appointments, you specify the date and time for the reminder as well as an optional sound that Outlook 2010 can play along with the reminder.
To add a reminder, follow these steps:
Open the task, and then select Reminder on the Task page.
Use the calendar in the drop-down list next to the Reminder check box to select the date, and then select a time for the reminder. You can select a time in half-hour increments in the drop-down list or specify your own value by typing it in the box.
Click the speaker button to open the Reminder Sound dialog box, in which you select a WAV file to assign to the reminder.
Click OK, and then close the task form.
When you create a task, you might also want to estimate the time that it will take to complete the task. You can enter this estimate in the Total Work box on the Details page of the task form. As the task progresses, you can change the Total Work value to reflect your changing estimate or leave it at the original value to track time overruns and underruns for the task. For example, assume that you propose a 40-hour task to a client. As you work through the task, you continue to update the Actual Work box to reflect the number of hours you’ve worked on the task. You reach 40 hours of work on the task and haven’t completed it. You then have to make a decision: Do you update the Total Work value to show a new estimate for completion and bill the client accordingly, or do you leave it as is and absorb the cost overrun?
Unfortunately, the Total Work and Actual Work fields are simple, nonreactive data fields. Outlook 2010 provides no interaction between the two to determine an actual % Complete value for the task. For that reason—and because Outlook 2010 can’t calculate job costs based on charge rates and the amount of work completed—Outlook 2010 by itself generally isn’t a complete job tracking or billing application. You should investigate third-party applications to perform that task or develop your own applications using the Microsoft Office 2010 system as a development platform.
Logically, the goal for most tasks is completion. At some point, therefore, you’ll want to mark tasks as completed. When you mark a task as completed, Outlook 2010 strikes through the task in the task list to provide a visual cue that the task has been finished. The easiest way to mark a task as completed is to place a check in the Complete column, which by default is the first column from the left in the Detailed view. Alternatively, click the Mark Complete button on the ribbon. You can also mark a task as completed on the Task page, simply by selecting Completed in the Status drop-down list or setting the % Complete box to 100.
Outlook 2010 by default sorts the task list by completion status. If you’ve changed the list to sort based on a different column, simply click that column header. For example, clicking the Complete column header sorts the task list by completion status. If you want to view only completed tasks, click Change View on the View tab on the ribbon and choose Completed. Viewing only incomplete tasks is just as easy: click Change View and choose Active.
Note
For additional details on customizing the Tasks folder view, see the section Viewing and Customizing the Tasks Folder, on page 556.
In addition to creating tasks for yourself in Outlook 2010, you can assign tasks to others. For example, you might manage a staff of several people and frequently need to assign them projects or certain tasks in a project. The main benefit of using Outlook 2010 to assign those tasks is that you can receive status reports on assigned tasks and view these status reports in your Tasks folder. Outlook 2010 automates the process of sending task requests and processing responses to those requests. You’ll learn more about assigning tasks in the sections that follow. First, however, you need to understand task ownership.
When you create a task, you initially own that task. Only a task’s owner can make changes to the task. This means that you can modify the properties (the percent complete, the status, the start date, and so on) of all tasks that you create and own. When you assign a task to someone else and that person accepts the task, the assignee becomes the owner of the task. You can then view the task’s properties, but you can no longer change them. Similarly, you become the owner of tasks assigned to you when you accept them, and you can then make changes to those tasks.
A task’s Owner property is a read-only value, which appears in the Owner box on the Task page. You can click the value, but you can’t change it directly. The only way to change owners is to assign the task and have the assignee accept it.
Assigning a task to someone else is a simple process. In general, you create the task, add details, and specify options for the task. Then you tell Outlook 2010 to whom you want to assign the task, and Outlook 2010 takes care of generating the task request and sending it to the assignee.
Follow these steps to assign a task to someone else:
In Outlook 2010, open the Tasks folder, and create a new task.
Add information and set options for the task such as start date, due date, status, and priority.
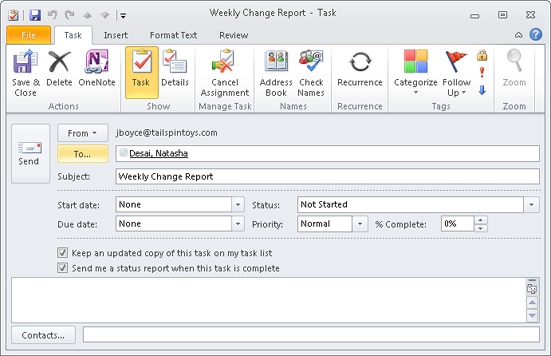
On the Task tab, in the Manage Task group, click Assign Task. Outlook 2010 changes the form to include additional options, as shown in Figure 21-7.
In the To box, enter the address of the person to whom you’re assigning the task, or click To to browse the Address Book for the person’s address.
Outlook 2010 automatically selects the following two check boxes. Set them as you want, and then click Send to send the task request to the assignee.
Keep An Updated Copy Of This Task On My Task List Select this check box if you want to keep a copy of the task in your own task list. You’ll receive updates when the assignee makes changes to the task, such as a change in the % Complete status. If you clear this check box, you won’t receive updates, nor will the task appear in your task list.
Send Me A Status Report When This Task Is Complete Select this check box if you want to receive a status report on completion. The status report comes in the form of an email message that Outlook 2010 generates automatically on the assignee’s system when the assignee marks the task as completed.
Note
For information about task updates and status reports, see the section Tracking the Progress of a Task, on page 554.
Note
Click Cancel Assignment on the ribbon to cancel an assignment and restore the original task form.
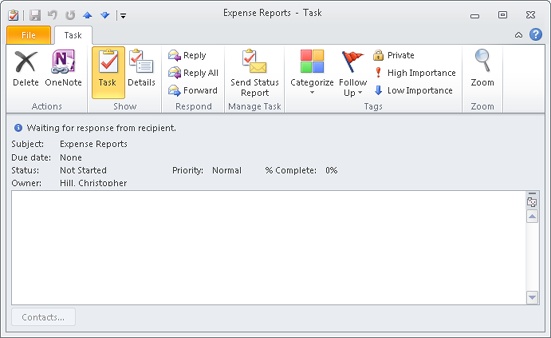
When you click Send, Outlook 2010 creates a task request message and sends it to the assignee. If you open the task, you’ll see a status message indicating that Outlook 2010 is waiting for a response from the assignee, as shown in Figure 21-8. This message changes after you receive a response and indicates whether the assignee accepted the task.
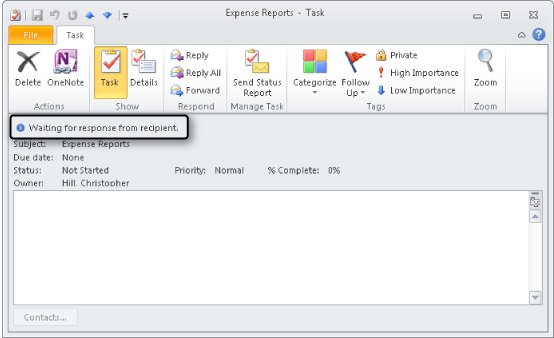
Figure 21-8. Outlook 2010 indicates that it is waiting for a response to a task request for a selected task.
When you receive a task request from someone who wants to assign a task to you, the message includes buttons that allow you to accept or decline the task. Figure 21-9 shows the buttons on the InfoBar when the Reading pane is displayed.
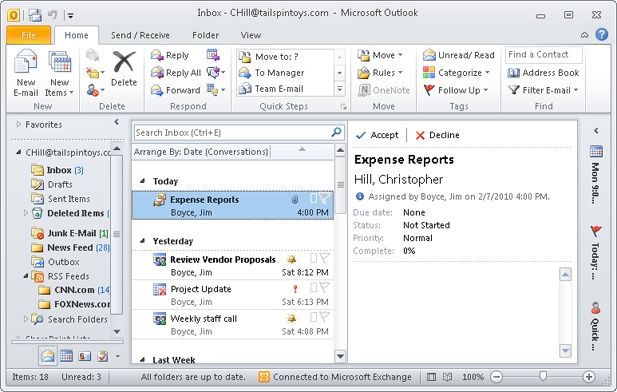
Figure 21-9. You can accept or decline a task request easily by clicking the Accept or Decline button on the InfoBar in the Reading pane.
You can click either Accept or Decline to respond to the request. If the Reading pane isn’t visible, you can open the message and then click Accept or Decline in the Respond group on the message form’s ribbon. When you do so, Outlook 2010 displays either an Accepting Task or a Declining Task dialog box, giving you the option of sending the accept or decline message as is or editing it. For example, you might want to add a note to the message that you’ll have to change the due date for the task or that you need additional information about the task. Select Edit The Response Before Sending in the dialog box if you want to add your own comments; select Send The Response Now if you don’t want to add comments. Then click OK to generate the message. The next time that you synchronize your Outbox with the server, the message will be sent.
You have one more option in addition to accepting or declining a task request that’s waiting for your response—you can assign the task to someone else. For example, assume that you manage a small group of people. Your supervisor assigns a task to you, and you want to assign it to one of the people under you. When you receive the task request, open it, click Assign Task, and then select the person to whom you want to assign the task. Outlook 2010 creates a task request and sends it to the assignee. When the assignee accepts the task, his or her copy of Outlook 2010 sends an acceptance notice to you and adds both the originator’s address and your address to the update list on the Details page of the task form. This means that changes to the task by the assignee are updated to your copy of the task and to the originator’s copy.
TROUBLESHOOTING
Task requests keep disappearing
After you accept or decline a task, Outlook 2010 automatically deletes the task request from your Inbox. Unlike meeting requests, task requests are always deleted—Outlook 2010 doesn’t provide an option that allows you to control this behavior. Outlook 2010 does, however, keep a copy of the task request in the Sent Items folder. Outlook 2010 also deletes task update messages after you read them. These messages are generated automatically when someone modifies an assigned task. Outlook 2010 sends the task update message to the people listed in the update list on the Details page of the task form. Although you can move these update messages out of the Deleted Items folder manually, Outlook 2010 provides no way to prevent them from being deleted.
When a response to a task assignment reaches you, Outlook 2010 doesn’t act automatically on the response. For example, if someone accepts a task that you assigned, Outlook 2010 doesn’t consider the task accepted until you open the response. Until that point, the InfoBar in the Reading pane still indicates that Outlook 2010 is waiting for a response. When you open the response, the InfoBar in the message form indicates whether the task has been accepted or declined, depending on the assignee’s action. Outlook 2010 deletes the response when you close the message. You have no options for controlling this behavior—Outlook 2010 always deletes the response.
If an assignee declines your task request, you can assign the task to someone else (or reassign it to the same individual) easily. Open the response, and click Assign Task on the form’s toolbar just as you would when assigning a new task.
Your tasks won’t always be accepted—you’re bound to receive a rejection now and then. When you do, you have two choices: assign the task to someone else, or reclaim ownership so that you can modify or complete the task yourself. To reclaim a task, open the message containing the declined task request, and then click Return To Task List on the Task tab of the ribbon.
In some situations, you’ll no doubt want to assign a task to more than one person. As a department manager, for example, you might need to assign a project to all the people in your department, or at least to a small group. Outlook 2010 is somewhat limited in task management: It can’t track task status when you assign a task to more than one person. You can certainly assign the task, but you won’t receive status reports.
What’s the solution? You must change the way that you assign tasks, if only slightly. Rather than assigning the whole project as a single task, for example, break the project into separate tasks and assign each one individually, or break a specific task into multiple tasks. Use a similar name for each task to help you recognize that each one is really part of the same task. For example, you might use the names Quarterly Report: Joe and Quarterly Report: Jane to assign the preparation of a quarterly report to both Joe and Jane.
Tip
INSIDE OUT Working around limitations
Although the Outlook 2010 task management features are certainly useful, a more comprehensive set of tools for distributing and managing tasks within a project would be a great addition to the program. For example, the ability to subdivide a task automatically would be helpful, as would the ability to assign a task to multiple people and still receive updates without having to subdivide the task. You can, however, work around this by adjusting the way that you assign and manage tasks.
When you assign a task, you can choose to keep an updated copy of the task in your task list. This copy allows you to track the status of the task. As the assignee adds or changes task information—such as changing the Total Work value—that assignee’s copy of Outlook 2010 generates an update and sends it to the addresses listed in the task’s update list (on the Details page of the task form). Typically, the update list includes only one name—the name of the person who assigned the task. If the task was delegated (passed from one person to another), the update list shows all persons in the assignment chain.
Note
If you assign a task to multiple people, Outlook 2010 can no longer track task status. This limitation is one reason to subdivide a task, as explained in the preceding section.
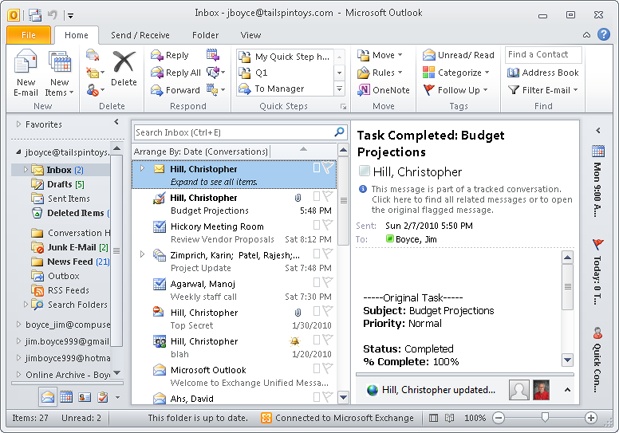
As mentioned, Outlook 2010 sends task status messages to the update list addresses when an assignee makes changes to a task. When you receive a status message, Outlook 2010 updates your copy of the task when you read the status message. Outlook 2010 then deletes the status message, with one exception: When the assignee marks the task as completed, Outlook 2010 sends a Task Completed message to the update list addresses. When you receive and read the message, Outlook 2010 marks your copy of the task as completed but does not delete the Task Completed message. Figure 21-10 shows a Task Completed message.
As you work on an assigned task, you’ll probably want to send status updates to the person who assigned the task to you. Sending task status reports is more than easy—it’s automatic. Outlook 2010 generates the updates each time you modify the task, such as when you change the % Complete value.
You can also send an update manually, which is useful when you want to send an update without actually modifying the task. To send an update, open the task and then click the Send Status Report button in the Manage Task group of the Task tab. Outlook opens a new email message with the properties for the task in the body of the message, including Status, % Complete, and Actual Work. You can add your own notes and then click Send to send the message.
Outlook 2010 allows you to create an unassigned copy of a task that you have assigned to someone else. This unassigned copy goes into your task list with you as the owner. You can then work on the task yourself or assign it to someone else. For example, suppose that you assigned a task to someone but you want to work on it too. You can create a copy and then work on the copy, changing its dates, completion status, and other information as you go.
Creating an unassigned copy has one drawback, however: You will no longer receive updates for the assigned task. This makes it more difficult to track the other person’s progress on the assigned task.
Follow these steps to create an unassigned copy of a task:
In Outlook 2010, open the Tasks folder, and then click the assigned task.
Click the Tasks tab on the ribbon, click Details, and then click Create Unassigned Copy.
Outlook 2010 displays a warning that creating the copy will prevent you from receiving updates to the assigned task. Click OK to create the copy or Cancel to cancel the process.
Outlook 2010 replaces the existing task with a new one. The new task has the same name except that the word copy is appended to the name in the Subject box. Make changes as needed to the task, and then choose Save & Close to save the changes.
As mentioned at the beginning of this chapter, Outlook 2010 uses the To-Do List view as the default Tasks folder view. Several other predefined views are also available, including those described in the following list. To use any of these views, click the View tab, click Change View, and then select the view you want.
Simple List Shows the task subject, the due date, categories, folder, and whether the task is completed
Detailed Shows the same information as a simple list, along with status, date completed, and modified date
Overdue Shows incomplete tasks with due dates that have passed
Server Tasks Shows tasks stored on a server running Microsoft SharePoint
Outlook 2010 provides several ways to customize the view of the Tasks folder. These methods are the same as those for other Outlook 2010 folders. For details on sorting, grouping by various columns, adding and removing columns, and customizing the folder view in other ways, see the section Inbox, on page 73.
Note
For information about using filters to locate and display specific tasks, such as those with certain text, dates, or other properties, see the section Using Advanced Find, on page 799.
In addition to using the customizing methods described in Chapter 4, you might also want to change the way Outlook 2010 displays certain items in the Tasks folder. For example, you could change the font or character size for the column names or change the color that Outlook 2010 uses to display overdue tasks (red by default). The following sections explain how to make these types of changes in the Tasks folder.
Outlook 2010 by default uses an 8-point Segoe UI font for column headings, rows, and AutoPreview text. You can select a different font or different font characteristics (point size, italic, color, and so on). You also can change the style and color for the gridlines in list views and specify whether to show the Reading pane.
Follow these steps to customize your view settings:
Click View Settings on the View tab on the ribbon, or right-click the column header bar and then choose View Settings.
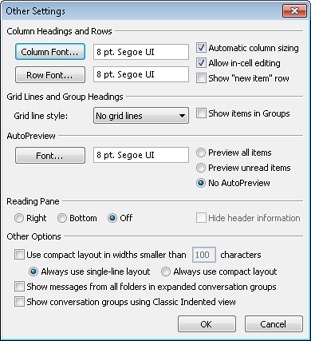
In the Advanced View Settings dialog box, click Other Settings to display the Other Settings dialog box, shown in Figure 21-11.
Click Column Font or Row Font in the Column Headings And Rows area of the dialog box, or click Font in the AutoPreview area to open a standard Font dialog box that you can use to configure font, size, and other settings for the specified text.
Use the options in the Grid Lines And Group Headings area to specify the line type and color that you want Outlook 2010 to use for list views.
Set the other options, using the following list as a guide:
Automatic Column Sizing Sizes columns automatically and fits them to the display’s width. Clear this check box to specify your own column width (by dragging each column’s header), and use a scroll bar to view columns that don’t fit the display.
Allow In-Cell Editing Allows you to click in a cell and modify the contents. If this check box is cleared, you must open the task to make changes.
Show “New Item” Row Displays a row at the top of the list for adding new tasks. The New Item row appears only if the Allow In-Cell Editing option is selected.
Show Items in Groups Group items together (such as by date).
Preview All Items Turns on AutoPreview and causes Outlook 2010 to display the first three lines of the contents of all items.
Preview Unread Items Turns on AutoPreview and causes Outlook 2010 to display the first three lines of the contents of unread items only.
No AutoPreview Displays only the headings for items and does not display AutoPreview text.
Reading Pane The options in this area control the location of the Reading pane. Click Off to hide the Reading pane. You also can choose View, Reading Pane to select the location or turn the Reading pane on or off.
Hide Header Information Choose this option to not show header information in the Reading pane.
Other Options These options control a handful of settings that determine view layout.
Click OK to close the Other Settings dialog box, and then click OK to close the Customize View dialog box.
Outlook 2010 can perform conditional text formatting in the Tasks folder just as it can for other folders. For example, Outlook 2010 displays overdue tasks in red and uses gray strikethroughs for completed and read tasks. Outlook 2010 has five predefined conditional formatting rules, and you can create additional rules if you want to set up additional conditional formatting. For example, you might create a rule to show in red all tasks that haven’t been started and are due within the next seven days.
To create conditional formatting rules, click View Settings, Conditional Formatting to display the Conditional Formatting dialog box, shown in Figure 21-12.
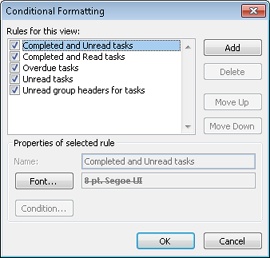
Figure 21-12. Modify or create custom automatic formatting rules in the Conditional Formatting dialog box.
Follow these steps to create a new rule:
In the Conditional Formatting dialog box, click Add. This creates a new rule named Untitled.
Type a title for the rule, and then click Font. Use the resulting Font dialog box to specify the font characteristics that you want Outlook 2010 to use for tasks that meet the rule’s conditions. Click OK to close the Font dialog box.
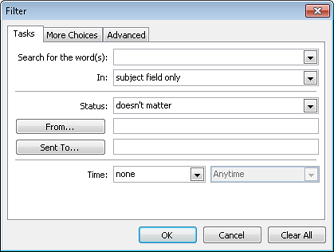
Click Condition to open the Filter dialog box, shown in Figure 21-13. Specify the criteria for the condition. For example, select Due in the Time drop-down list, and then select In The Next 7 Days. This specifies that you want Outlook 2010 to use the font selections from step 2 to format any tasks that are due within the next seven days.
Use the More Choices and Advanced tabs to set other conditions as needed, and then click OK.
Add other rules as needed. Click OK to close the Conditional Formatting dialog box, and then click OK to close the Advanced View Settings dialog box.
You can create fairly complex rules using the Filter dialog box, which can help you organize and identify specific types of tasks. Also note that you can change the order of the rules in the Automatic Formatting dialog box by using the Move Up and Move Down buttons. Outlook 2010 applies the rules in order from top to bottom, so it’s possible for one rule to override another.
Outlook 2010 provides a few options that control the appearance of items in the Tasks folder, reminders, and other task-related elements. To set these options, click File, Options, and Tasks. On the Tasks page of the Options dialog box, you’ll find the following options:
Default Reminder Time Specifies the default reminder time for tasks. This option is set to 8:00 A.M. by default, but you can change the time if you want—perhaps you’d prefer to see reminders at 10:00 A.M. instead. Keep in mind that this setting is the default that Outlook 2010 uses for task reminders when you create a task, but you can change the reminder time for individual tasks as needed.
Overdue Task Color Select the color that you want Outlook 2010 to use to display overdue tasks.
Completed Task Color Select the color that you want Outlook 2010 to use to display completed tasks.
Keep My Task List Updated With Copies Of Tasks I Assign To Other People Select this option to have Outlook 2010 keep a copy of assigned tasks in your Tasks folder and update their status when assignees make changes to the tasks.
Send Status Reports When I Complete An Assigned Task Select this option to have Outlook 2010 send status reports to you when you complete a task that was assigned to you.
Set Reminders On Tasks With Due Dates Select this option to have Outlook 2010 set a reminder on tasks with due dates. Outlook 2010 bases the timer on the task’s due date and the reminder time specified in the Options dialog box.
Task Working Hours Per Day Use this option to set the number of hours in your workday.
Task Working Hours Per Week Use this option to set the number of hours in the workweek.
Outlook 2010 provides a few other ways to work with tasks in addition to the Tasks folder. The following sections explain how to set up and track tasks in the task list area of the To-Do Bar, in the Daily Task List, and in Outlook Today view.
The To-Do Bar is an interface feature that you can show or hide in Outlook 2010, and the task list is a component of the To-Do Bar. Figure 21-14 shows the To-Do Bar with the task list at the bottom.
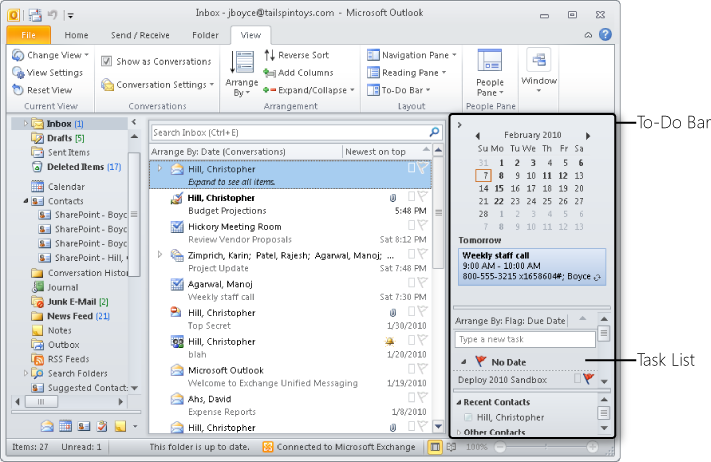
By default, Outlook 2010 shows only subject, category color indicator, a reminder bell (if the task has a reminder set), and flag status for each task in the task list, but as you expand the width of the To-Do Bar, other columns appear. You can add and remove columns as needed. To do so, right-click the column header bar above the task list, and then choose View Settings. In the Advanced View Settings dialog box, click Columns to open the Show Columns dialog box, where you can specify the columns to include in the view and their order.
You can modify tasks directly in the task list just as you can in the Tasks folder, depending on the view settings that you’ve specified. For example, if you’ve turned on in-cell editing, you can make changes to a task simply by clicking it and typing the needed changes. You can mark a task as completed, change the Actual Work value, change the due date, and so on. The task list is, in this respect, no different from the Tasks folder. The primary benefit of the task list is that it allows you to work with your tasks in a single window along with the other tools in the view.
Tip
INSIDE OUT Show and hide the task list
To show or hide the task list in the To-Do Bar, choose To-Do Bar from the Layout group of the View tab, and then choose Task List from the menu.
You can use the same methods that you use to create tasks in the Tasks folder to create a new task in the task list. Right-click in the empty area of the task list, and then choose New Task or New Task Request, depending on whether you’re creating the task for yourself or assigning it to someone else. If both the Show New Item Row option and in-cell editing are enabled, you can click the Type A New Task row between the first task in the list and the column header to create a new task. Alternatively, you can click the arrow next to the New button on the Standard toolbar and then choose Task to create a new task.
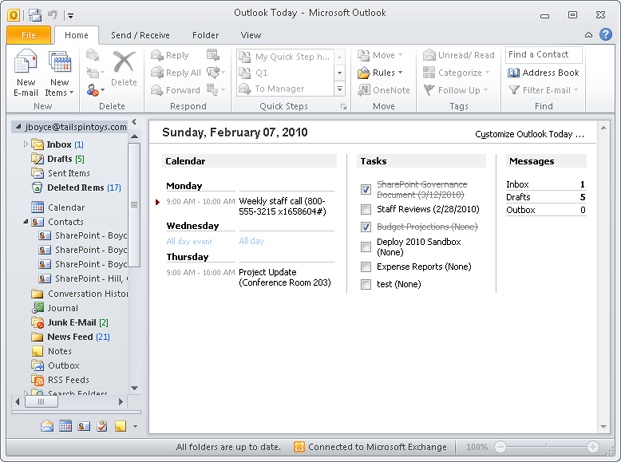
Chapter 4 explains how Outlook Today gives you quick access to a useful selection of data. Outlook Today view is shown in Figure 21-15. The Calendar area displays meetings and events scheduled for the current day (and for subsequent days, if space allows). The Messages area indicates the number of unread messages in your Inbox, messages in the Drafts folder, and unsent messages in the Outbox. The Tasks area lists your tasks.
Note
For more information about using Outlook Today, see the section Working with the Standard Outlook Views, on page 72.
You can’t create a task by clicking in the Tasks area of Outlook Today, but you can click the New Items button on the Home tab on the ribbon and then choose Task to create a new task. To modify a task, click the task’s name in the list to open the task form. Mark a task as completed by selecting the check box next to its name.
Outlook 2010 adds a new way to manage tasks through the Daily Task List, which optionally appears at the bottom of the calendar, as shown in Figure 21-16. The Daily Task List shows the list of tasks that are due on the selected day. You can work with the tasks in the Daily Task List much as you can with the tasks in the To-Do Bar.

When the Daily Task List is displayed, you can click the Minimize button at the far-right edge of the Daily Task List column bar to minimize it. Likewise, when the Daily Task List is minimized, click the Restore button to display it.
Tasks are one of the Outlook 2010 features that many people overlook, spending their time instead primarily in the Inbox, Contacts, and Calendar folders. Nevertheless, tasks can be extremely useful and a powerful productivity and workflow tool. If you haven’t used tasks before, spend the time to become familiar with them. When you are comfortable using tasks, the following tips will help you make the most of them:
Really use them Tasks won’t do you much good if you just put a few on your task list and then don’t really use them. Instead, use tasks in Outlook 2010 for all of your daily, weekly, and monthly tasks. Make sure to set progress status as you go along and mark tasks as complete when you complete them.
Use task assignment Outlook 2010 tasks can be a great tool for helping you organize your day and get your job done. Task assignment extends that benefit across your team or workgroup. Get your group in the habit of using tasks, and then start using task assignment across the group to manage tasks.
Use realistic due dates Setting realistic due dates for your tasks and working on the tasks accordingly will help you integrate tasks into your daily work schedule. The keys to being successful using Outlook 2010 tasks are to be diligent about how you use them and to integrate them into your workday and workflow.
Use reminders By assigning reminders to your tasks, you’ll be able to keep track of when the tasks are coming due. Assign a reminder period that is sufficiently long to enable you to complete the task by its due date.
Keep the tasks at hand Use the task list in the To-Do Bar and the Daily Task List in the Calendar folder to keep your tasks visible at all times so that you can work with them easily and see their status.