Organizing Data 803
Organizing Your Outlook Items Effectively 805
ALTHOUGH some people use Microsoft Outlook 2010 only for email, the majority of people use all the personal information manager (PIM) features the program has to offer. Because a PIM is only as good as its ability to help you search for and organize data, Outlook 2010 offers a solid selection of features to help you do just that.
This chapter shows you how to perform simple and advanced searches to locate data. You’ll learn how to search using Instant Search as well as the Find A Contact feature and Advanced Find. This chapter also explores various ways you can organize your Outlook 2010 data—for example, by creating additional folders for storing specific types of messages.
The Instant Search feature of the Microsoft Office system provides a simple, unified search interface that is the same across all the Outlook 2010 folders. Instant Search relies on the search subsystem built into Windows, which indexes Outlook 2010 mail folders to deliver search results faster.
Searching in Outlook 2010 is as simple as typing your search terms in the Instant Search box at the top of the Inbox. Outlook 2010 displays results as you type, automatically filtering out older results when there are a large number of items. To focus searches, Outlook 2010 searches only the folder that you have open, although you can easily choose to search all your folders instead.
When you start a search, you first determine the scope of your search. Outlook 2010 sets the search scope as the folder that is selected in the Navigation pane. To change the search scope, you click a different folder in the Navigation pane.
As you type text in the Instant Search box, the search results are displayed in the pane below the Instant Search box. To refine your search and get fewer results, type more text. To widen your search, delete some text. You can also build custom queries based on a wide range of criteria.
Note
If you prefer to use the tools provided in earlier versions of Outlook, you still can. Advanced Find and the Find A Contact feature remain available as options for those who prefer a familiar interface.
Note
Instant Search requires Windows Search, which is part of Microsoft Windows Vista and Windows 7, and is available as a download for Windows XP. For more information about Windows Search, you can visit the Windows Search site at www.microsoft.com/windows/products/winfamily/desktopsearch/.
While the default configuration of Instant Search should work in most circumstances, you might need to fine-tune things just a bit to optimize Instant Search for how you use Outlook 2010. Using Instant Search might require configuring a few different options, most of which are found in Outlook 2010, although a few options are set with Indexing Options in the Control Panel.
You turn Instant Search on and off differently depending on whether you are using Windows 7, Windows Vista, or Windows XP.
Enabling Instant Search on a Computer Running Windows Vista or Windows 7 Instant Search is enabled by default on computers running Windows Vista and Windows 7. If you have turned Instant Search off for Outlook, you can enable it again. Open the Indexing Options item from the Control Panel or by clicking in the Instant Search box, and then, on the Search tab, clicking Search Tools, Search Options, and Indexing Options. In the Indexing Options dialog box, click Modify, and then select the content that you want Instant Search to index and search, one of which is Microsoft Outlook. You must exit and restart Outlook 2010 for this change to take effect.
Enabling Instant Search on a Computer Running Windows XP On computers running Windows XP, you are prompted to download the Windows Desktop Search software the first time that you start Outlook 2010. Once the software is downloaded and installed, you must restart Outlook 2010 to complete the installation process and use Instant Search.
If you have chosen not to install Windows Search and enable Instant Search, you can always change your mind. To turn on Instant Search, click the Click Here To Enable Instant Search option under the Instant Search box.
Note
Microsoft must validate your copy of Windows XP before you are allowed to download Windows Desktop Search. If you have not yet installed the validation ActiveX control, you will be prompted to install it. Right-click the information bar, and then choose Install. A security warning dialog box will appear; click Install again. Once the ActiveX control is installed, you will be returned to the download screen.
Note
If your computer is running Windows XP and you have not downloaded the Windows Desktop Search software, you are prompted repeatedly to install it. If you don’t want to see these prompts, you can disable them. To do so, on the Tools menu, choose Options. Choose Other, and then click Advanced Options. In the Advanced Options dialog box, clear the Show Prompts To Download Windows Desktop Search check box, and then click OK.
Disabling Instant Search Open the Indexing Options dialog box as described previously in this section. Click Modify, and then clear the Microsoft Outlook option. You must exit and restart Outlook 2010 for this change to take effect.
You can determine the initial scope of searches, as well as how Outlook 2010 handles results, in the Search Options dialog box.
To configure Instant Search, click File, Options, and then click Search in the left pane to display the Search page of the Outlook Options dialog box, show in Figure 32-1. The following list explains the options available:
To have Outlook 2010 show you search results as you type, select When Possible, Display Results As The Query Is Typed. If this option is cleared, Outlook 2010 does not start searching until you click Search or press Enter.
When your search has a large number of results, Outlook 2010 by default limits the number of items it displays by filtering for the most recent. To view all results of your searches, no matter the number, clear the Improve Search Speed By Limiting The Number Of Results Shown check box.
To have Outlook 2010 highlight your search terms where they appear in the results, select Highlight Search Terms In The Results. You can also set the highlight color.
If you want Outlook 2010 to search mail items that have been moved to the Deleted Items folder but not yet actually deleted, select Include Messages From The Deleted Items Folder In Each Data File When Searching In All Items.
To set the default scope of Instant Search, under Include Results Only From, choose either Current Folder or All Folders.
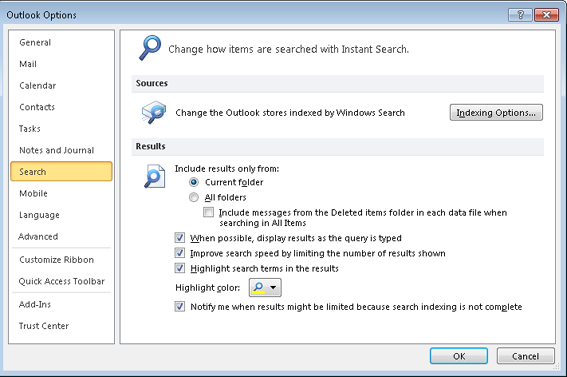
Figure 32-1. You can configure Instant Search using the Search page of the Outlook Options dialog box.
You can also specify which of your Outlook data files (if you have more than one) are indexed by Windows Search, as explained in the next section.
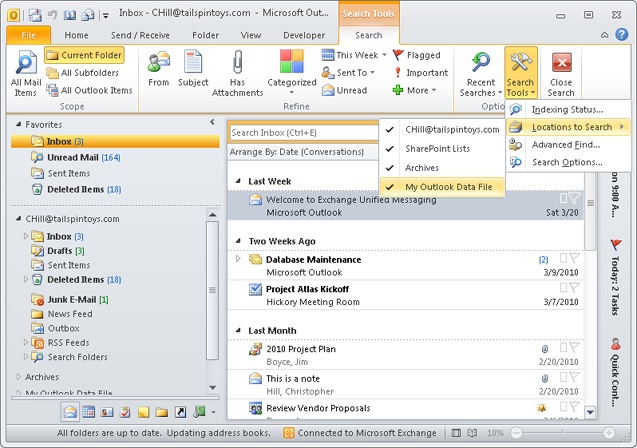
If you have multiple Outlook 2010 data files, you can tell Outlook 2010 to include only specific data files in an Instant Search without removing them from the list of files that are indexed. This allows you to stop a file from being searched without having to re-create the index for the file when you want it included again—a much faster option. You might use this technique to segregate project or client files, or perhaps to exclude a large archive file from searches most of the time, yet be able to easily include the file when you need to.
To change which data files Outlook 2010 searches, follow these steps:
Click in the Instant Search box to open the Search tab, as shown in Figure 32-2.
Click Search Tools on the Search tab and choose Locations to Search.
Select the Outlook 2010 data files that you want included in searches by default. At least one data file must be selected, but you can choose additional files to search as well.
You can also specify whether your Outlook 2010 files are indexed in the Indexing Options item in the Control Panel. For information about using Indexing Options, see the section Configuring Indexing Options, on page 796.
Instant Search looks at most fields of Outlook 2010 items when performing searches, making it easy for you to find what you are looking for. This means that you can type almost anything that you think might be in the item you’re looking for, even if the item is in an attachment. To search for a message or other Outlook 2010 item, follow these steps:
Click in the Instant Search box (or press Ctrl+E), and then type your search text.
Outlook 2010 will display the search results as you type, with the search terms highlighted. To narrow the search results, type more text. To widen the results, delete some text.
If you do not see the items you want, you can broaden your search scope by clicking the link Try Searching Again In All Mail Items (this link changes to reflect the current folder type) in the results pane.
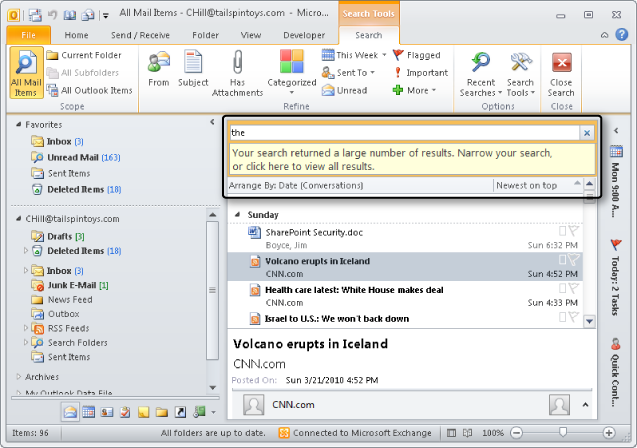
If your search returns a large number of results, Outlook 2010 might display only the most recent results. If you see a message in the InfoBar similar to the one shown in Figure 32-3, click it to show all results, including the older items.
To clear the search and start over, click the X to the right of the Instant Search box.
To repeat a search that you have performed recently, click in the Instant Search box to display the Search tab, and then choose Recent Searches. Select the search that you want to repeat from the list.
Note
You might find that the results of some of your searches include an item that really doesn’t seem to belong there, and in which you can’t find the words you searched for. This might be because the item has an attachment that contains the search term.
TROUBLESHOOTING
You don’t get any search results
If you repeatedly get fewer results than you expect, or you get no results at all, you should try disabling Instant Search and repeating the search. If you do get results with Instant Search disabled, you might be having problems with Windows Desktop Search indexing.
Check your indexing status by clicking Search Tools on the Search tab and selecting Indexing Status. If a message appears stating that Outlook 2010 is currently indexing your files, note the number of items remaining to be indexed. Check back in a while to see whether the numbers are different. If the numbers are unchanged, you should rebuild the index. For information about rebuilding the index, see the section Configuring Indexing Options, on page 796.
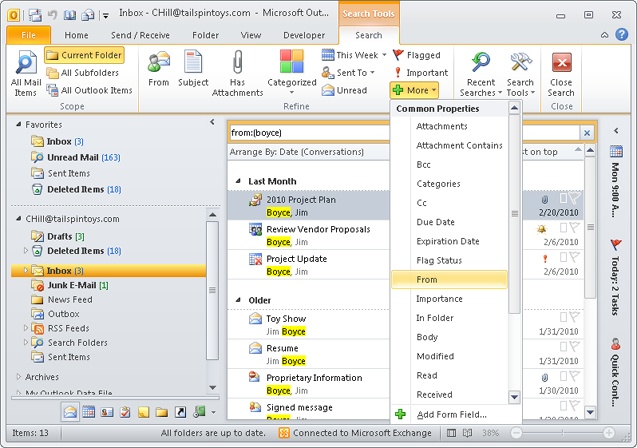
The Refine group on the Search tab shows you a number of extra fields that you can search within to refine your search results. Each type of folder (Mail, Contacts, and so on) displays the most commonly used fields for that type of folder, so each one shows a different list of fields by default. You can also add fields, even those in custom forms, to support searches for exactly the data you want.
To display the Search tab, click the Instant Search box.
Click an item in the Refine group, as shown in Figure 32-4, to add that field to the Instant Search box. Then type the criteria required by the added field, such as a name, word, etc.
To add other fields, click More to display the list shown in Figure 32-4.
Tip
Adding fields from the Refine group is a good way to learn about the search syntax that Windows Search uses. After you’re familiar with the syntax, you can just type the search keywords yourself, rather than pick them from the list. What’s more, you can use the keywords outside Outlook to search for Outlook items. Just click Start and start typing your search criteria. Windows Search will return results in the Start menu based on those criteria.
To add a custom form to the Query Builder list, follow these steps:
Click in the Instant Search box.
Click More in the Refine group on the Search tab and choose Add Form Field.
In the Select Enterprise Forms For This Folder dialog box, choose the type of forms you want to select from.
In the list in the left pane, select the form you want to add, and then click Add. Repeat this for each form you want to add. (To display form groups by category, select Show Categories.)
Click Close.
While indexing is generally self-maintaining, you can control some settings using the Indexing Options item in the Control Panel. You can also display Indexing Options from Outlook. Click File, Options, and Search, and then click Indexing Options.
To verify that your Outlook 2010 files are being indexed, follow these steps:
Click File, Options, and Search.
Click Indexing Options. In the Indexing Options dialog box, shown in Figure 32-5, verify that your Outlook 2010 files are listed in the Included Locations list.
If your Outlook 2010 files are not listed, click Modify to display the Indexed Locations dialog box. Under Change Selected Locations, select the Microsoft Outlook check box to include the files in the locations that should be indexed. (Outlook 2010 files belonging to other users are also shown, but Outlook will return to you only results from your own data files.) Click OK.
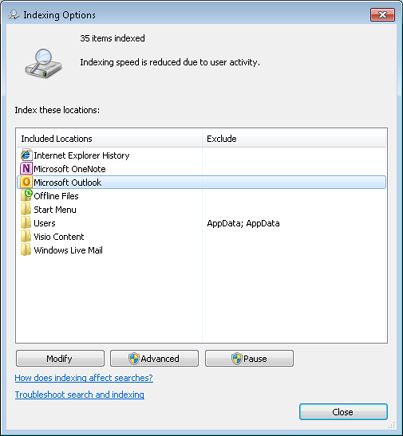
Figure 32-5. You can see the status of indexing across the entire system in the Indexing Options dialog box.
TROUBLESHOOTING
Troubleshooting indexing problems
You might need to rebuild the index due to problems such as empty search results when you know that there are items that match your search. Rebuilding an index takes a while, perhaps even several hours, and is significantly slower if you are also using the computer at the same time. Because of this, you will want to rebuild the index only when you are experiencing ongoing problems with Instant Search, and preferably when you will be away from the computer for a while.
You can rebuild the search index by opening the Indexing Options item in Control Panel and then clicking Advanced. Under Troubleshooting, click Rebuild. Once the index is rebuilt, restart Outlook 2010 to have it use the new index.
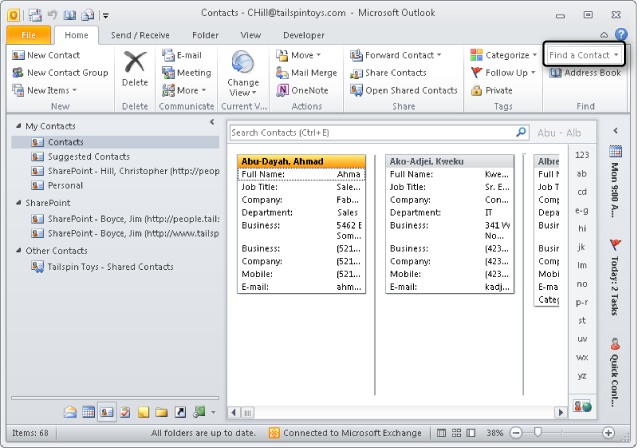
If you’re like most Outlook 2010 users, your Contacts folder will grow to contain a lot of contact entries—typically, too many to allow you to browse through the folder when you need to find a particular contact quickly. You’re also likely to encounter situations in which, for example, you need to locate contact information but can’t remember the person’s last name. Fortunately, Outlook 2010 makes it easy to locate contact data, providing two convenient ways to search contacts: Instant Search and the Find a Contact box in the Find group on the Home tab on the ribbon.
Instant Search works the same way across all the Outlook 2010 folders, so to locate a contact, begin typing the contact’s name in the Search Contacts box. You can use the buttons in the Refine group on the Search tab to add search criteria. If you want to add more fields, you can click More and then select the fields in the list.
You can also use the Find A Contact box on the Home tab on the ribbon, shown in Figure 32-6, to search for contacts. Type the search criterion (such as a first name, last name, or company), and then press Enter.
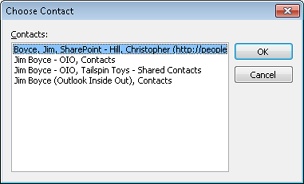
If Outlook 2010 finds only one contact that matches the search criteria, it opens the contact entry for that person. Otherwise, Outlook 2010 displays the Choose Contact dialog box, shown in Figure 32-7, in which you can select the contact entry to open.
In addition to Instant Search, Outlook 2010 still provides the Advanced Find feature for performing advanced searches that require specifying multiple search conditions.
To open the Advanced Find dialog box, shown in Figure 32-8, click in the Instant Search box, and then click Search Tools, Advanced Find or simply press Ctrl+Shift+F. You can use this dialog box to search for any type of Outlook 2010 item using multiple search conditions.
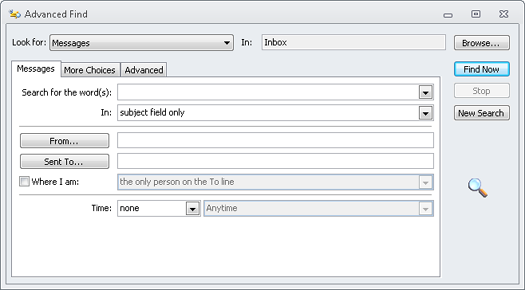
The options provided in the Advanced Find dialog box change depending on the type of item that you select in the Look For drop-down list. If you select Contacts, for example, the options change to provide specialized search criteria for contacts, such as restricting the search to a name, a company, or an address. Selecting Messages in the drop-down list changes the options so that you can search the subject field of messages, search the subject and message body, or specify other search criteria specific to messages.
Note
When you select a different item type in the Look For drop-down list, Outlook 2010 clears the current search and starts a new one. Outlook 2010 does, however, prompt you to confirm that you want to clear the current search.
On the first tab in the Advanced Find dialog box (the title of which changes based on the type of items being searched, for example, Messages in Figure 32-8), you specify the primary search criteria. The following list summarizes all the available options (although not all options appear at all times):
Search For The Word(s) Specify the word, words, or phrase for which you want to search. You can type words individually, or include quotation marks around a phrase to search for the entire phrase. You also can select from a previous set of search words using the drop-down list.
In Specify the location in the Outlook 2010 item where you want to search, such as only the subject of a message. The options available in this list vary according to the type of item that you select in the Look For drop-down list.
From Specify the name of the person who sent you the message. Type the name, or click From to browse the address book for the name.
Sent To For messages, specify the recipients to whom the message was sent.
Attendees Specify the people scheduled to attend a meeting.
Organized By Specify the person who generated the meeting request.
E-Mail Browse the address book to search for contacts by their email addresses.
Named Specify the file name of the item for which you’re searching. You can specify a single file name or use wildcard characters to match multiple items. The Named box appears if you select Files or Files (Outlook/Exchange) in the Look For drop-down list.
Of Type Choose the type of file for which to search when using the Files or Files (Outlook/Exchange) options.
Journal Entry Types Specify the journal entry type when searching the journal for items.
Contact Browse for a contact associated with an item for which you’re searching.
Where I Am When searching for messages, specify that you are the only person on the To line, on the To line with others, or on the Cc line with others.
Status Search for tasks based on their status. You can select Doesn’t Matter, Not Started, In Progress, or Completed.
Time Specify the creation or modification time, the start or end time, or other time properties specific to the type of item for which you are searching.
You use the More Choices tab in the Advanced Find dialog box, shown in Figure 32-9, to specify additional search conditions to refine the search.
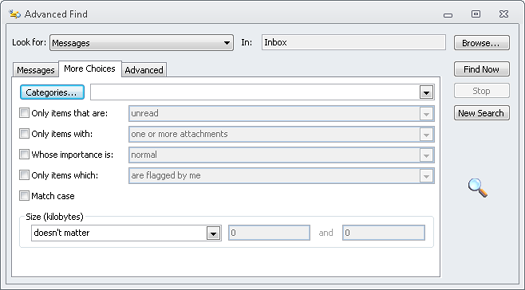
The following options are available on the More Choices tab:
Categories Specify the category or categories associated with the items for which you are searching. You can type the categories separated by commas, or you can click Categories to open the Categories dialog box and then select categories.
Only Items That Are Search for items by their read status (read or unread).
Only Items With Search for items by their attachment status (one or more attachments, or no attachments).
Whose Importance Is Specify the importance (High, Normal, or Low) of the items for which you are searching.
Only Items Which Specify the flag status of the items for which you are searching.
Match Case Direct Outlook 2010 to match the case of the text you entered as the search criterion. Clear this check box to make the search case-insensitive.
Size Specify the size criterion for the items in your search. You can select one of several options to define the size range in which the item must fall to match the search.
The More Choices tab is the same for all Outlook 2010 items except the Files search item. With Files selected in the Look For drop-down list, the Only Items With option is not available.
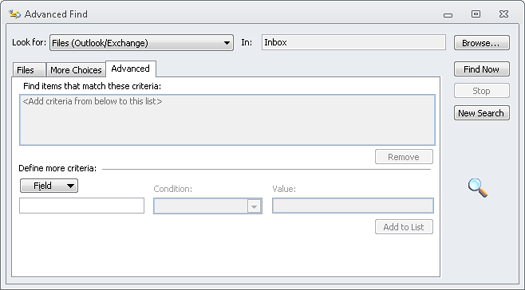
You can use the Advanced tab in the Advanced Find dialog box, shown in Figure 32-10, to create more complex searches. On this tab, select the fields to include in the search, as well as the search conditions for each field. You can build a list of multiple fields.
Searching for data and organizing data usually go hand in hand. One of the main motivations for organizing your data is that you want to be able to find it easily. Even with perfect organization, however, you’ll still need to perform searches now and then because of the sheer amount of data that might be involved. Outlook 2010 provides several ways to organize your data. Whereas other chapters in this book focus on specific ways to organize your Outlook 2010 items, this section provides an overview of ways that you can organize certain types of items and points you to the appropriate chapters for additional information.
Email messages probably make up the bulk of your Outlook 2010 data. For that reason, organizing your messages can be a challenge. Outlook 2010 offers several features that will help you organize your messages so that you can find and work with them effectively and efficiently.
Search folders are the best means in Outlook 2010 to organize messages quickly without moving them around to different folders. A search folder looks and acts like a folder, but it’s really a special type of view that displays in a virtual folder view all messages that fit the search condition for the search folder. Search folders offer two main benefits: They can search multiple folders, and they organize messages without requiring that the messages be moved from their current folder.
Note
See the section Chapter 32, on page 288, to learn more about search folders.
Another great way to organize your email messages is to separate them in different folders. For example, if you deal with several projects, consider willcreating a folder for each project and moving each message to its respective folder. You can create the folders as subfolders of your Inbox or place them elsewhere, depending on your preferences. You might even create a folder outside the Inbox named Projects and then create subfolders for each project under that folder.
Note
For more information about creating and managing folders, see Chapter 29.
Rules are one of the best tools you have in Outlook 2010 for organizing messages. You can apply rules to process messages selectively—moving, deleting, copying, and performing other actions on the messages based on the sender, the recipient, the account, and a host of other message properties. You can use rules in combination with folders to organize your email messages. For example, you might use rules to move messages for specific projects to their respective folders automatically. You can apply rules to messages when they arrive in the Inbox or any time you need to rearrange or organize.
Note
For a detailed discussion of rules, see Chapter 11.
Outlook 2010 uses color categories to help organize your email messages. If you create rules to apply certain color categories to specified email messages, the color can provide a visual indicator of the sender, the subject, the priority, or other properties of the message. In this way, you can see at a glance whether a particular message meets certain criteria. You can also use automatic formatting in a view to apply color categories.
Note
For more information about color categories, see Chapter 5.
Views give you another important way to organize your Outlook 2010 data. The default views organize specific folders using the most common criteria. You can customize Outlook Today view using Hypertext Markup Language (HTML) to provide different or additional levels of organization. You can also create custom views of any Outlook 2010 folder to organize your data to suit your preferences.
Note
For more information about customizing views, see the sections Customizing the Outlook Today View, on page 648, and Creating and Using Custom Views, on page 653.
As with mail folders, you can use categories to organize items in your other folders. For example, you might use categories to identify meetings for specific projects quickly. You can also use conditional formatting to display items in a certain color when those items match your conditional formatting condition. For contacts, you can use multiple folders to separate contacts, such as separating your business contacts from personal contacts.
It’s far too easy to get swamped in email, but you can make it less of a problem if you learn to use the options that Outlook 2010 offers to help you stay organized. Here are a few tips to get you started:
Clean out your Inbox every day There is a very real psychological boost when you can leave your office at the end of the day with your Inbox empty—and it’s a pretty nice way to start your morning, too. A habitually empty Inbox also means that any mail that is in the Inbox is still unread, so it’s easy to tell what you still need to read.
Handle each email message only once Many time management systems share a similar mantra: Open a message, read it, decide what you have to do about it, and then do it. Right now. For most people, a lot of their mail requires no action beyond reading it. If that’s the case, delete (or file) mail items immediately. Move any items that require action to a folder other than the Inbox, assigning a color category to make it easier to locate, or set a follow-up flag to remind you of a deadline if needed.
Turn off the Reading pane if you have a hard time emptying your Inbox While the Reading pane makes it easy to read a piece of mail quickly, the Reading pane also makes it easy to read mail without dealing with it.
Use rules to sort mail that you don’t need to read immediately into folders as it arrives You can also assign categories using rules as messages arrive, providing additional information that you can use to locate those messages later.
Use a combination of folders and categories to manage your mail Create folders to contain large groups of mail, and then categorize the messages to display a manageable subset of messages.
Use search folders to create customized views of your Outlook 2010 items Search folders automatically filter the contents of a list of folders that you specify based on the set of criteria found in the Advanced Find dialog box. This lets you see specific sets of messages by simply selecting a folder.
Create custom views of messages Custom views that filter Outlook 2010 items are another powerful tool, letting you quickly switch between various subsets of messages. Because views can be used in multiple folders, you can create a view once and reuse it in many places.
If you have lots of email, consider using multiple .pst files to separate disparate information into discrete data stores In addition to segregating data storage, this makes it easy to select specific data sets for Instant Search.