Understanding Outlook Folders 731
Working with the Folder List 732
Using and Managing Folders 734
Using Home Pages with Folders 750
Using Multiple Personal Folders 754
Managing Data 756
LIKE any system, Microsoft Outlook 2010 can become overloaded with messages, contact information, appointments, and other data. If you can’t manage all this data, you’ll be lost each time you try to find a particular item. Outlook 2010 helps you manage information by providing folders for storing your data. You also can create your own folders, move data between folders, and set folder properties.
This chapter focuses on managing your Outlook 2010 folders and their contents. You’ll learn how to create new folders to store email messages, contact information, and other files. You’ll also learn how to set up Outlook 2010 folders to use web views so that you can display web pages inside folders. In addition, you’ll find out what it takes to archive your data when you want to archive data on the spot.
Outlook 2010 folders are used like the folders you use in Windows Explorer. You use Outlook 2010 folders to store items that you work with, such as email messages and attachments, contact entries, journal entries, tasks, appointments, and notes. Outlook 2010 includes default folders for each type of item—for example, the Calendar, Contacts, Journal, Inbox, RSS Feeds, and Tasks folders. Along with these item-type folders are other default folders, such as Deleted Items, Drafts, Junk E-Mail, Outbox, and Sent Items.
If you are not using a Microsoft Exchange Server account, these folders are all part of your personal folders (.pst) file, so they are private. If you are running Outlook 2010 with Exchange Server, others on your network to whom you’ve assigned rights can view and manage items stored in these folders.
Note
In addition to the folders listed here, in an Exchange Server environment, your Exchange Server administrator can set up public folders that appear in your Folder List but are stored on the computer running Exchange Server. You and others who have rights to these public folders will see a Public Folders icon in your Folder List. If you have the necessary rights, you can create and delete these public folders, store and manage items in them, and see content added to them by other users.
Tip
The Folder tab on the ribbon contains commands and options that you can use to manage folders and the items in those folders. The items that appear on the Folder tab depend on the selected folder. For example, the Clean Up Folder button only shows up on the Folder tab when you are viewing a mail folder. Likewise, the Share Calendar button only shows up on the Folder tab when you are viewing a calendar folder. Take some time to experiment with the Folder tab to learn what commands and options are available from it in each folder type.
If you move between folders frequently, you might want to navigate by using a combination of the Navigation pane and the Folder List. The Navigation pane gives you quick access to the Outlook 2010 folders that the majority of people use most often. However, you might use different Outlook 2010 folders, or you might want to access certain file system folders from Outlook 2010. For example, suppose that you have an Exchange Server account but also use a set of personal folders to store personal messages and contacts or other data. Because Outlook 2010 doesn’t automatically add shortcuts in the Navigation pane for your other folders, the best way to access these folders is usually through the Folder List, as shown in Figure 29-1.
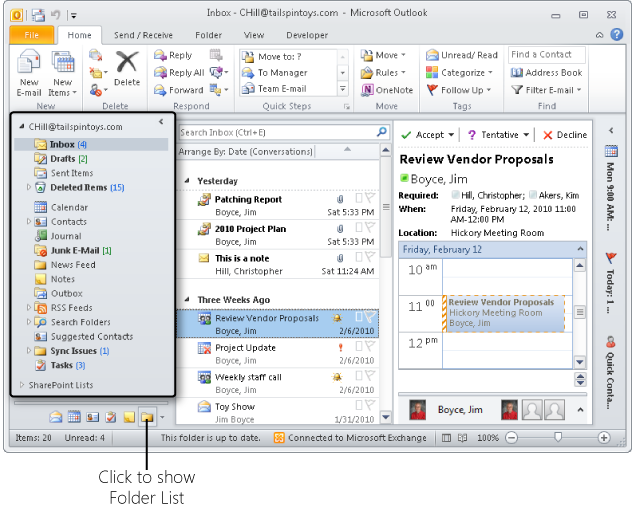
Figure 29-1. Use the Folder List to move between folders not listed in the Navigation pane, or to see which folders are included in a given store.
If the Navigation pane is not minimized, click the Folder List button at the bottom of the Navigation pane. The Navigation pane then displays the Folder List as shown in Figure 29-1. You can click folders in the list to view the contents of those folders.
If the Navigation pane is minimized, click the Configure Buttons button at the bottom of the minimized Navigation pane and choose Folder List. The Folder List will appear as a pop-up window, and after you click a folder in the list, the Folder List disappears again.
When you perform an action in Outlook 2010, you typically do so inside a folder. Outlook 2010 provides a handful of actions that you can perform with folders to change their behavior, location, appearance, and so on, as described in the following sections.
When you’re ready to work with information in Outlook 2010, you first go to the folder in which that information is stored. For example, to read a new email message downloaded to your Inbox folder, you must open the Inbox folder and then select the message to read. To open a folder, click its button in the Navigation pane or click the folder name in the Folder List.
When you open the folder, its contents are displayed in the main Outlook 2010 window. To see the contents of a particular folder item, you must open the item using one of these methods:
Double-click the item in the main Outlook 2010 window.
Right-click the item, and then choose Open.
Click the item, and then press Enter.
Click the item, and then press Ctrl+O.
Depending on the type of folder you open, the Reading pane might be available. The Reading pane displays the contents of the currently selected item without requiring you to open a separate window for the folder item. The Reading pane is handy because it provides a quick view and can help keep your desktop tidier. To display the Reading pane, click the View tab, click Reading Pane, and then select Right or Bottom.
By default, the Reading pane appears on the right in the main Outlook 2010 window, as shown in Figure 29-2. You can resize this pane by dragging the edge. To see an item in the Reading pane, simply select the item in the folder.

Note
For more information about working with the Reading pane, see the section Working with the Standard Outlook Views, on page 72.
As you know, Outlook 2010 provides a basic set of folders in which you can store certain types of data, such as the Contacts folder for storing contact information. As you use Outlook 2010 more, you’ll want to add other folders to organize your data. For example, you might add other message folders to store particular kinds of messages.
Each Outlook 2010 folder you add has a specific type based on the type of data it stores. For example, a mail folder differs from a contacts folder because the former stores messages and the latter stores contact entries. Similarly, a calendar folder stores appointments and events, and a notes folder stores notes. When you add a folder, you specify the folder type. You also specify the name of the folder and its location.
Follow these steps to create a folder:
Take one of the following actions to display the Create New Folder dialog box:
Right-click a folder in the Folder List, and then choose New Folder.
Press Ctrl+Shift+E.
Click the Folder tab on the ribbon and click New Folder.
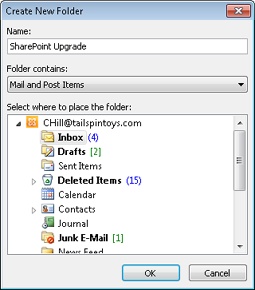
In the Name box, type a name for the folder, as shown in Figure 29-3.
From the Folder Contains drop-down list, choose the type of item you want to store in this new folder.
From the Select Where To Place The Folder list, select the location for the new folder. Selecting the Inbox, for example, places the new folder as a subfolder of the Inbox.
Click OK.
If you have a frequently used folder that isn’t listed in the Navigation pane, you can create a shortcut to the folder in the Shortcuts area of the Navigation pane. To do so, follow these steps:
At the bottom of the Navigation pane, click Shortcuts.
In the Shortcuts pane, right-click the group where you want to add the shortcut and choose New Shortcut to display the Add To Navigation Pane dialog box, shown in Figure 29-4.
Select a folder in the list, and then click OK.

You can also create your own shortcut groups. To do this, right-click an existing group and choose New Shortcut Group. Outlook 2010 creates a new shortcut and highlights the name so that you can change it. Type a new name, and then press Enter. You can move shortcuts from one group to another easily, simply by dragging them.
Note
You can drag folders, documents, and web shortcuts to a group in the Shortcuts pane to create shortcuts to those items quickly. See the section Customizing the Navigation Pane, on page 633, for more details on working with shortcuts.
When you want to remove a shortcut, right-click it, choose Delete Shortcut, and then click Yes.
TROUBLESHOOTING
A folder and contents remain when a shortcut is removed
When you remove a folder shortcut from the Navigation pane, you remove only the shortcut. You do not remove the folder from Outlook 2010, nor do you delete the folder’s contents. For information about deleting a folder and its contents, see the section Deleting a Folder, on page 746.
If you decide that a folder shortcut should be renamed, follow these steps:
Right-click the folder shortcut that you want to rename.
Choose Rename Shortcut.
Type a new name, and then press Enter.
A handy feature in Outlook 2010 is the Favorites list in the Navigation pane for your email. When you click the Mail button in the Navigation pane, Outlook 2010 displays a Favorites list at the top of the Navigation pane. By default, this list includes four of the most commonly used mail folders: the Inbox, Unread Mail, Sent Items folders, and Deleted Items, as shown in Figure 29-5.
You can add folders to and remove folders from the Favorites list easily. To add an email folder to the Favorites list, right-click the folder and then choose Show In Favorites. To remove an email folder from the Favorites list, right-click the folder in the Folder List or in the Favorites list, and then choose Remove From Favorites. (This only removes the folder from the Favorites list; it does not delete the folder itself.)

You can also change the order of favorite folders in the list. Right-click the folder in the list and choose Move Up In List or Move Down In List, or simply drag the folder to the desired location in the list.
The other default Outlook folders (Calendar, Tasks, etc.) do not offer a Favorites list like the Mail folder. However, they offer a feature that is just as useful—folder groups. When you open the Calendar folder, for example, you’ll see at least one folder group named My Calendars. If you are using an Exchange Server account, you’ll also see a Team group that shows the calendars for the people who report to you, according to the Direct Reports field in your Active Directory Domain Services (AD DS) account. Figure 29-6 shows these two calendar folder groups.
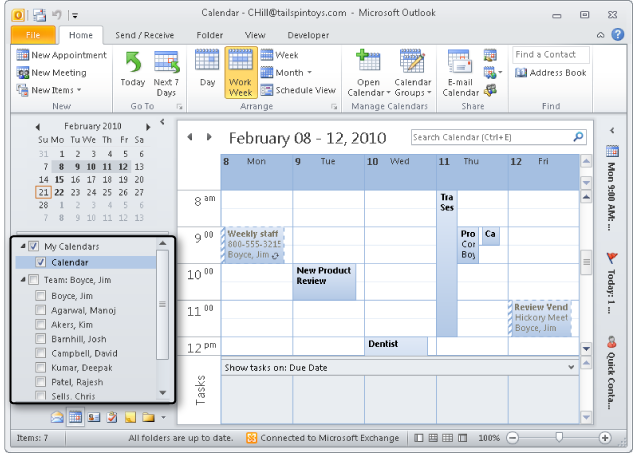
The default folder groups included in Outlook 2010 for the default folders include My Calendars, My Contacts, My Tasks, My Notes, and My Journals. Each of these groups functions in the same way. For example, you can click the arrow beside the folder group to expand or collapse the group, showing or hiding its contents.
You can create your own folder groups to help organize the folders of that type. For example, if you have multiple Contact folders, you might add a couple of folder groups to separate your work and personal contacts, or separate Microsoft SharePoint contacts from your other contacts. Alternatively, you might add folder groups to organize the calendars for people from other departments.
Creating a folder group is easy. Open the folder where you want to add the group (such as the Calendar folder), right-click an existing folder group (such as My Calendars), and choose New <Folder> Group, where <Folder> is the folder type, such as Calendar. Outlook adds a new group with the name New Group and highlights the name so you can type a new one. Type the desired name for the group and press Enter.
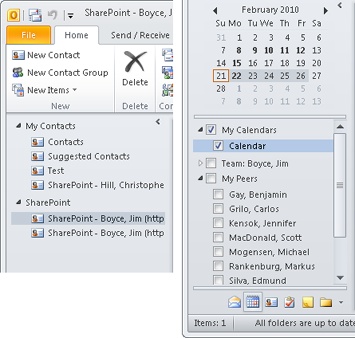
At this point, you can move folders easily from one group to another. Just click and drag a folder and place it on the group name. If the group already contains folders, you can drag the folder into the group and position it as you like. Figure 29-7 shows a couple of examples of folder groups being used to organize folders in the Navigation pane.
With one exception, Outlook folder groups let you organize the folders that are already a part of your Outlook data store. For example, you can’t create contact folders on the fly to add to a contact folder group. Instead, you create the folder and then add it to the folder group.
The exception is calendar folders. When you work with a calendar folder group, you can add calendars from the Address Book (for other Exchange Server mailbox users), a room list (also for Exchange Server), or shared calendars (from the Internet or a calendar-sharing service). This makes it possible to group together calendars from multiple sources into one calendar group.
Tip
You can’t modify the Team calendar group. It is built automatically from the Direct Reports list in AD DS.
To add a calendar to a calendar group, right-click the group to which you want to add the calendar and choose Add Calendar, followed by the location from which you want to add the calendar. For example, choose From Address Book to add one or more calendars of other Exchange Server users. Alternatively, choose Room List to add one or more calendars from the Exchange Server room list. After you add the calendar, it will show up in the group, as shown in Figure 29-7.
Sooner or later, you’ll want to remove a folder from a folder group, and this is a key difference to remember from the Favorites email folder list—when you delete a folder from a non-mail folder group, you delete the folder and its contents. For example, if you delete a contact folder, all the contacts in the folder, as well as the folder itself, are deleted. Outlook will prompt you to approve the deletion, and then it will place the items in the Deleted Items folder. You can recover them from there if necessary (until you clean out the folder, of course).
Sometimes you need to change a folder’s name, perhaps as a result of project modifications or a company name change. Unfortunately, you can’t rename the default folders created by Outlook 2010. You can, however, change the names of folders that you create. To rename a folder, begin by performing one of these actions:
Click the folder to select it, click the Folder tab on the ribbon, and click Rename Folder.
Open the Folder List, right-click the folder, and then choose Rename.
Select the folder, and then click the folder name to highlight it.
After taking one of these actions, simply type the new name and then press Enter to have the change take effect.
Another way to change a folder’s name is through its Properties dialog box, as shown in Figure 29-8, which you can display by right-clicking the folder in the Folder List and choosing Properties. On the General tab, type a new name in the top box. Click OK to save the name and to return to the Folder List.
Occasionally, you might need to move or copy a folder from one location to another. For example, suppose that you’ve created some message folders in your Inbox to organize messages, but now you want to move those folders to a folder other than the Inbox. Or maybe you want to copy the Contacts folder from your Exchange Server mailbox to a set of personal folders.
Moving or copying folders is easy. Open the Folder List, right-click the folder that you want to move or copy, and choose either Move or Copy from the shortcut menu. Outlook 2010 displays a Move Folder dialog box, as shown in Figure 29-9, or a Copy Folder dialog box. Select the folder in which you want to store the moved or copied folder and click OK, or choose New to create a new folder in which to store the moved or copied folder.
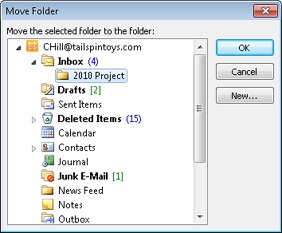
Another way to move a folder is to drag it to a new location. You can copy a folder using a similar technique—just hold down the Ctrl key while dragging.
You can move one type of folder so that it becomes a subfolder of another type of folder. For example, suppose that you receive email messages containing contact information. You can store these messages in a folder named, say, Contact Info. You then can store the Contact Info folder as a subfolder of Contacts. The type of data that you can store in the subfolder is the type you originally established for that folder. (For example, when a mail-type folder becomes a subfolder of a contacts-type folder, neither folder changes its type.)
If you want to move or copy a folder to the root of the folder store, move or copy the folder to the topmost folder in the list (indicated in the Navigation pane by the email address for your account).
You can delete an Outlook 2010 folder in the same way that you delete a folder in Windows Explorer or My Computer. When you delete an Outlook 2010 folder, it’s removed from the Folder List and placed in the Deleted Items folder. This way, if you decide you want the folder back, you can retrieve it from the Deleted Items folder.
When you delete a folder, you delete the contents of the folder as well. The contents move with the folder to the Deleted Items folder and can be retrieved along with the folder later. (The items can be retrieved only until the Deleted Items folder is emptied.) You also can retrieve individual items from the Deleted Items folder, even if those items were deleted as part of a folder deletion. For example, if you delete a message folder named Project Alpha containing three messages, you can retrieve one, two, or all three messages individually without retrieving the Project Alpha folder. To retrieve a folder from the Deleted Items folder, click Deleted Items and then select the folder to retrieve. Move that folder from the Deleted Items folder to its original location or to another location.
Although you can’t delete any of the default folders (the folders that Outlook 2010 provides), you can delete folders that you’ve added.
To do so, follow these steps:
Make sure that the folder doesn’t contain any data that you need to keep or any data that you have not archived or backed up.
Open the Folder List, right-click the folder, and then choose Delete.
Click Yes to confirm the deletion or No to cancel.
Tip
INSIDE OUT Delete items matching a specific date automatically
Outlook 2010 can remove items in a folder that match a specified date automatically. If Outlook 2010 is configured to empty the Deleted Items folder on a certain date or whenever you quit the program, however, you might lose important items that you accidentally or prematurely sent to that folder. To see the deletion date of a folder, right-click the folder, and then choose Properties. On the AutoArchive tab, if the Archive This Folder Using These Settings option is selected, look to see whether the Permanently Delete Old Items option is also selected. If it is, the time in the Clean Out Old Items Older Than option specifies how much time you have to retrieve an item from that folder. Don’t assume that the folder you deleted last year will still be around today.
Folders have several properties that control the way they appear and function, as well as others that control archiving, administration, and other activities. To view or set these properties, click the Folder tab on the ribbon and then click Folder Properties; or open the Folder List, right-click the folder, and then choose Properties to open a Properties dialog box for the folder. The following sections explain the options on each of the tabs in the Properties dialog box.
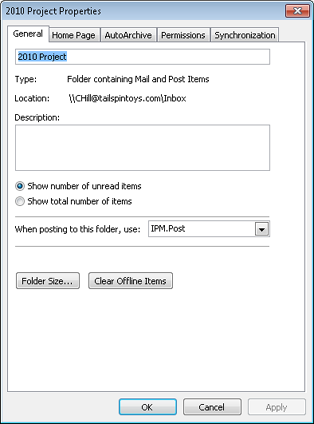
You can use the General tab, shown in Figure 29-10, to locate information about a folder, name the folder, add a descriptive comment, and set other properties.

Figure 29-10. Use the General tab of a folder’s Properties dialog box to view information about the folder and set a few general properties.
The options on the General tab are described in the following list:
Name In the top box, specify the name for the folder as you want it to appear in Outlook 2010.
Type This read-only property specifies the type of content that the folder contains.
Location This read-only property specifies the location in the folder hierarchy for the selected folder.
Description Use this box to type a description of the folder if you want. The description appears only in the folder’s Properties dialog box.
Show Number Of Unread Items Use this option with message folders to cause Outlook 2010 to display, in the Folder List and the Favorites list, the number of unread messages in the folder. Outlook 2010 displays the folder name in bold if the item contains unread messages and includes the number of unread items in parentheses to the right of the folder name.
Show Total Number Of Items Use this option with all folder types to show the total number of items in the folder. Outlook 2010 shows the folder name in bold if it contains unread items and displays the total number of items to the right of the folder name. This option can be particularly useful with search folders to show the total number of items that match the search folder’s criteria.
When Posting To This Folder, Use This drop-down list includes two selections. One is the default type of item that you can store in the folder, such as Contacts for a contacts folder. The other is Forms. If you select Forms from the list, Outlook 2010 opens the Choose Form dialog box, shown in Figure 29-11. Here, you can select the form that the folder should use for new items added to the folder. For example, you might want to use a custom appointment form for a calendar folder.
Folder Size Click this button to view information about the amount of space a folder and its subfolders use.
Clear Offline Items This button removes all items from your offline store.

TROUBLESHOOTING
Assigning a form to a folder fails
The option to select Forms in the When Posting To This Folder, Use drop-down list enables you to select a custom-designed form (of the correct type) to control entry of items into the folder. There is a constraint, however—what you select when you choose Forms and then select a form type from the Standard Forms Library or Personal Forms Library has to match the object type of the folder. If you create a new mail folder, for example, the form selected has to also be of the IPM.Post type. Likewise, if you create a calendar folder, the form selected has to be of the IPM.Appointment type. If the type doesn’t match, you get an error message stating, “You cannot create an item of this type in this folder.”
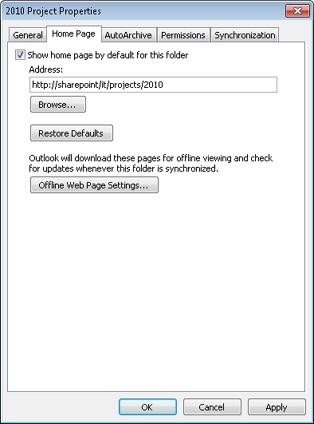
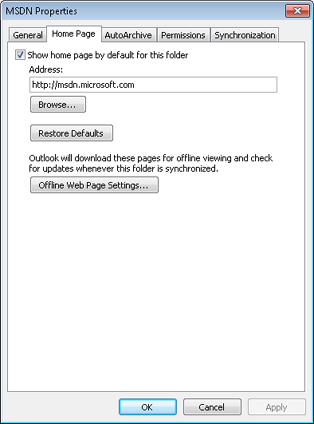
The Home Page tab lets you assign a web page as the default home page for a folder, as shown in Figure 29-12. The Restore Defaults button resets the selections on the tab to the default values. Once a web page is assigned, however, the Offline Web Page Settings button is enabled, to check for updates and download the selected pages for offline viewing.
The AutoArchive feature of Outlook automatically archives items after a specified period, which can help you avoid having folders cluttered with old messages, tasks, and so on. You configure archival properties on the AutoArchive tab of a folder’s Properties dialog box. For details, see the section Configuring Automatic Archiving, on page 767.
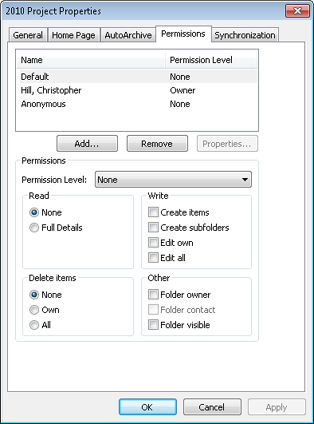
You can control access to folders in Outlook 2010 by selecting the Permissions tab and specifying the users who will be granted access and the type of access they will be granted. The default permissions provide full control to the owner of the folder, as shown in Figure 29-13, and assign no permissions to access or modify content to the Default and Anonymous groups. To add users to the Permissions list, click Add, and then select the user to include in the list. Once a user has been added, select the user, and use the drop-down list next to Permission Level to set the general permission level (Owner, Publishing Editor, Editor, Publishing Author, Author, Non-Editing Author, Reviewer, Contributor, or None). You can refine the permission level further by selecting options in the Read, Write, Delete Items, and Other areas.
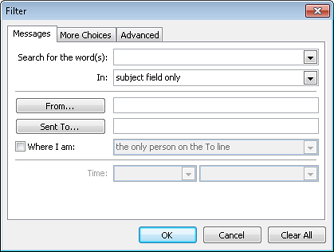
The Synchronization tab lets you filter the content that is synchronized with a folder. To establish a filter, click Filter, and in the Filter dialog box, shown in Figure 29-14, configure the criteria that you want the filter to use when downloading new items. The Filter dialog box simply sets the filter criteria; it does not perform the synchronization. To synchronize folder content, click Send/Receive All Folders on the Send/Receive tab on the ribbon.
The Contacts folder has additional properties that you can control. When configuring properties for a Contacts folder, you can set the following address book options on the Outlook Address Book tab:
Show This Folder As An E-Mail Address Book Select this option to have Outlook 2010 display contacts in a way that lets you select email addresses from the Address Book dialog box. (This is selected automatically for the default Contacts folder.)
Name Of The Address Book Specify the address book name.
There is no question that the Internet is pervasive, and you probably spend at least some portion of your day either on public websites or in your company intranet or SharePoint sites. This section describes how you can access the Internet by specifying a web page as a home page for a folder.
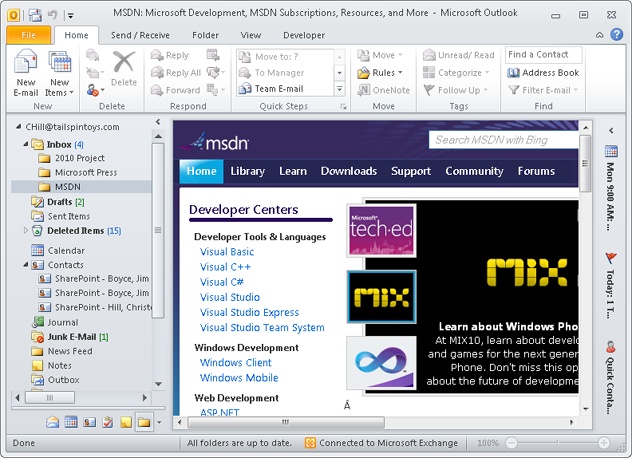
When you assign a web page as a home page for a folder, you make it convenient and easy to access intranet or Internet resources. The primary reason to use a web view in a folder is to access a website or an intranet resource without leaving Outlook 2010. As shown in Figure 29-15, you can open a folder that includes a web page as a home page and then access another page from there. You no longer have to start a separate web browser, such as Windows Internet Explorer, to open the web page.
Tip
Assigning a website to a folder isn’t the only way to view web content from inside Outlook 2010. You can also add web shortcuts to the Shortcuts list. The site shows up within Outlook in the same way as shown in Figure 29-15.
Accessing websites from within Outlook might seem like an odd thing to you at first, but it can actually be a very useful feature. For example, assume that, like many office workers, you spend 60 percent or more of your day working in Outlook, but you also spend a lot of time in one or more SharePoint sites. Rather than leave Outlook, open Internet Explorer, and browse the SharePoint site outside Outlook, you can instead integrate your most frequently used SharePoint sites in Outlook, either through shortcuts or by setting a folder path. What’s more, the capability to add websites in Outlook can help you organize the information you access on a regular basis, making it possible to access documents, shared contacts and calendars, and all your email and other Outlook items—all from a single program.
The one potential downside to viewing websites in Outlook is that you have no browser menu when viewing the site. This means that you can’t resize the site in the Outlook window if it is too small or too large to fit well. If you start out with enough desktop space, however, you’ll likely have no problems viewing sites in Outlook.
Tip
Some SharePoint lists can be integrated in Outlook in other ways. For example, you can connect shared calendars to Outlook so that they appear in your Calendar folder and can be overlaid with your other calendars (or even other SharePoint calendars). For more details on integrating SharePoint and Outlook, see Chapter 38.
You can assign a web page to any folder in your Folder List.
To assign a web page, follow these steps:
Right-click a folder in the Folder List, and then choose Properties.
Click the Home Page tab, as shown in Figure 29-16.
Set web page view properties as necessary, using the following options:
Show Home Page By Default For This Folder Select this check box if you want Outlook 2010 to display the web page rather than the existing default folder view.
Address Specify the Uniform Resource Locator (URL) of a local or remote Hypertext Markup Language (HTML) page or another Internet resource, such as a File Transfer Protocol (FTP) site. In this example, the following URL for the MSDN website is specified: http://msdn.microsoft.com.
Browse Click to browse for a URL.
Restore Defaults Click to restore the default settings (no web page).
For the folder that you want to assign a web page to, type the URL (Internet or local address) for the web page that you want to display. You also can click Browse and then select a web page in the Find Web Files dialog box. Click OK after selecting a page to return to the Home Page tab.
Click OK.
After a while, you might tire of using a web view in a folder, or the web page might become obsolete. At that point, you’ll want to get rid of it.
To remove a web page from a folder, follow these steps:
Right-click the folder in the Folder List, and then choose Properties.
Click the Home Page tab.
Clear the Show Home Page By Default For This Folder check box.
Click OK.
Each time that you open a folder with a home page view, Outlook 2010 displays the specified web page according to the Home Page options you selected. If the web page includes hyperlinks, you can click them to navigate to other pages or sites.
Tip
INSIDE OUT Create shortcuts to web pages
You can create shortcuts to web pages by clicking the Shortcuts icon at the bottom of the Navigation pane to open the Shortcut pane and then dragging a URL link (from Internet Explorer or another browser) to the Shortcut pane. An alternative to creating shortcuts is to create Outlook 2010 folders and then assign them a home page. This method has the advantage of making the pages available from the Folder List—just click the folder in the Folder List to navigate to the associated web page or FTP folder.
If you don’t use Outlook 2010 with Exchange Server, you use personal folders for storing your Outlook 2010 information and data. Your Outlook data items are stored in a local .pst file. (With Exchange Server, your messages, calendar, and other items are stored centrally on the server, although you can use .pst files in conjunction with an Exchange Server account.)
You can create multiple personal folders to help you organize your data. For example, you can store email messages associated with a project or a client in one folder and store other messages and items in a more general folder. Another useful way to set up multiple .pst files is to use one for archiving. This can help you back up your data more consistently, and Outlook 2010 can prompt you at different intervals to ensure that your archive is up to date.
Note
As Outlook 2010 copies items to the archive file, it removes them from their original location. As a result, the archiving of Outlook 2010 items is essentially a “move” process.
You can also use a .pst file to share information with other users on your network. The users must have read/write permissions to open the file.
After you create a .pst file, it appears in the Folder List automatically. You can add it to a Shortcuts group in the Navigation pane just as you can with any other folders. You then can access the .pst file simply by clicking its shortcut.
Note
For information about adding a folder shortcut, see the section Adding a Folder Shortcut to the Navigation Pane, on page 739.
A personal folder can have any name you give it. By default, the names take the form My Outlook Data File(1).pst, My Outlook Data File(2).pst, and so on. At the top of the Folder List, you can see the name of the active personal folder, which by default shows your email address as the name.
To add a personal folder, follow these steps:
Click File, Account Settings, and Account Settings, click the Data Files tab, and then click Add to open the New Outlook Data File dialog box.
Select Outlook Data File if you will not be using the .pst file with an earlier version of Outlook. Choose Outlook 97-2002 Data File if you need to use the .pst file with an earlier version of Outlook.
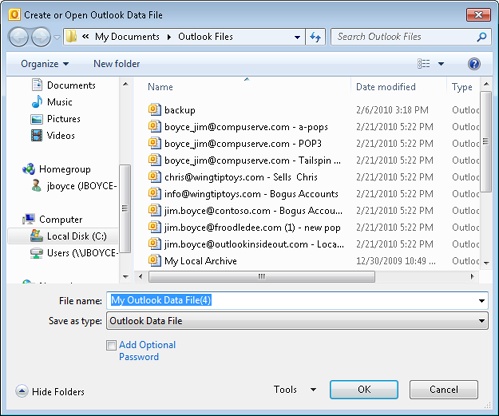
Click OK. The Create Or Open Outlook Data File dialog box appears as shown in Figure 29-17.
In the File Name box, type a name for the new personal folders file. This is the name that will appear in the Navigation pane.
If you want to protect your .pst file further, place a check in the Add Optional Password check box.
Click OK.
If you chose the option to password-protect the file, Outlook prompts for a password. Enter and confirm the password in the resulting dialog box and click OK.
The new personal folders item appears in the Data Files list. Click Close in the Account Settings dialog box, and the new personal folder (named in step 4) is accessible in the Folder List.
If you no longer need a set of personal folders (contained in a .pst file), you can remove the file from your Outlook profile. Removing a set of personal folders from your profile does not delete the .pst file—it remains intact, and you can add it back to the profile or add it to a different profile, if needed.
When you are ready to remove a .pst file, follow these steps to remove it:
In the Navigation pane, right-click the set of folders that you want to remove.
Choose Close.
As you use Outlook 2010, you’ll find that folders will become full of messages, appointments, and other items. One way to manage this data is to copy or move it to other folders so that the data is organized according to how you work. In addition, you need to make sure that your data is backed up and archived properly in case you accidentally delete data or a system failure occurs.
In this section, you’ll learn how to copy and move data to folders.
Occasionally, you might need to move or copy data from one location to another. For example, perhaps you’ve received an email message from a client connected with a project that you’re managing. Instead of keeping that message in the Inbox folder, where it might get lost with all the other messages that you receive every day, you can move it to a folder devoted to that particular project.
To move data to another folder, follow these steps:
Select the Outlook item that you want to move.
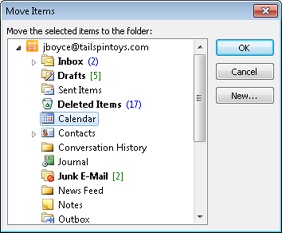
In the Home tab on the ribbon, click Move, Other Folder to open the Move Items dialog box, shown in Figure 29-18.
Select an existing folder, or click New to create a folder in which to store the moved data.
Click OK. The data is moved to the selected location.
Another way to move data is to select it in the folder and drag it to a new location. Similarly, you can copy data by holding down the Ctrl key while you drag. Alternatively, you can right-click an item, drag it to a new location, and then release the right mouse button and select either Move or Copy.
If you move an item to the root of the mail store by choosing the top branch in the Folder List (indicated by the email address of the account), Outlook 2010 dutifully moves the item to the root of your mail store. If the destination was a secondary set of personal folders, you can view the items simply by clicking the top branch in the Folder List.
However, Outlook 2010 displays the Outlook Today view when you click the top branch in the Folder List, effectively hiding any items stored there. You can perform a search to locate and display the items, but an easier method is to simply turn off the Outlook Today view temporarily (or permanently, if you never use it).
To do this, in the Navigation pane, right-click the root of your mail store and choose Data File Properties. Click the Home Page tab, clear the Show Home Page By Default For This Folder check box, and then click OK. You can now view and work with the items that are located in the root of your mail store. To restore the Outlook Today view, select the Show Home Page By Default For This Folder check box.
Note
An Outlook data file is essentially a type of database file, and as items are removed, the space that they use is not necessarily reclaimed. To reduce the file size, you must use the Compact command. To do this, click File, Account Settings, and Account Settings, click the Data Files tab, and then select your .pst file. Choose Settings, and then click Compact Now in the Outlook Data File dialog box. (Outlook also automatically compacts the file periodically.)